change time Seat Alhambra 2007 Owner's Manual
[x] Cancel search | Manufacturer: SEAT, Model Year: 2007, Model line: Alhambra, Model: Seat Alhambra 2007Pages: 291, PDF Size: 9.13 MB
Page 114 of 291
Lights and visibility
112
Switching on the turn signals
– Move the lever all the way up ⇒page 111, fig. 74 to indicate
right , and all the way down to indicate left.
Signalling a lane change
– Move the lever upwards or downwards to change lanes.
Switching main beam on and off
– Turn the light switch to position
⇒ page 108, fig. 71 .
– Press the lever forward to switch on the main beams.
– Pull the lever back towards you to switch the main beam head- lights off again.
Headlight flasher
– Pull the lever towards the steering wheel to operate the flasher.
Switching on parking lights
– Switch off the ignition and remove the key from the lock.
– Move the lever up or down to turn on the right or left-hand parking lights respectively.
WARNING
The main beam can dazzle other drivers. Risk of accident! Never use the
main beam headlights or the headlight flasher if they could dazzle other
drivers.
Note
•
The turn signals only work when the ignition is switched on. The corre-
sponding warning lamp or flashes in the combi-instrument. The warning
lamp 20) flashes when the turn signals are operated, provided a trailer is
correctly attached and connected to the vehicle. If a turn signal bulb is defec-
tive, the warning lamp flashes at double speed. If the trailer turn signal bulbs
are damaged, warning lamp does not light up. You should have the bulbs
replaced.
•
Both warning lamps will flash at the same time when the hazard warning
lights are switched on.
•
If one turn signal fails, whether that of the vehicle or of the trailer, the
warning lamp will start flashing twice as fast.
•
The main beam headlights can only be switched on if the dipped beam
headlights are already on. The warning lamp
then comes on in the combi-
instrument.
•
The headlight flasher comes on for as long as you pull the lever – even if
no other lights are switch ed on. The warning lamp
then comes on in the
combi-instrument.
•
When the parking light is switched on, the front side light and the rear
light of the corresponding side of the ve hicle stay lit. The parking lights will
only work if the key is removed from the ignition.
•
If the turn signal lever is left on after the key has been taken out of the
ignition lock, a buzzer sounds when th e driver door is opened. This is a
reminder to switch off the turn signal, unless of course you wish to leave the
parking light on.
A1
A2
A1
A2
A3
A4
20)Optional equipment
alhambra ingles.book Seite 112 Donnerstag, 19. April 2007 4:04 16
Page 159 of 291
Heating, Ventilation and Air conditioning 157
Safety First
Operating instructions
Tips and Maintenance
Te c h n i c a l D a t a
Air vents in the roof
In vehicles with a second cooling system
39) for ventilating the passenger
compartment, an air outlet is fitted in the roof above each rear seat
⇒ fig. 122 .
The air outlets in the roof can be opened and closed individually and
adjusted by moving the grid.
Each air outlet has two thumb wheels. The left thumb wheel can be used to
open and close the air outlet. The right th umb wheel can be used to direct the
air towards the head and chest.
WARNING
Never leave objects, food or medicines in front of the air outlets in the rear
seats. The hot air could damage or dest roy heat-sensitive objects, food or
medicines.
Caution
Do not use the area in front of the outl ets to store objects. This could cause
the blower to overheat and switch off. The blower could also be damaged.
Note
In the cooling mode, at least one air outlet in the roof must be open. The
cooling system could otherwise ice over.
General notesThe pollution filter
The pollution filter serves as a barrier against impurities in the outside air (
e.g.dust and pollen).
For the air conditioning system to work with maximum efficiency, the pollen
filter must be replaced at the intervals specified in the Service Schedule.
If the filter loses efficiency prematurely due to use in areas with very high
levels of air pollution, the pollen filte r must be changed more frequently than
stated in the Service Schedule.
Instructions for use
If the air conditio ning or Climatronic
40) is not switched on for a long period,
deposits on the evaporator can cause unpleasant smells. To prevent these
odours, the cooling system should be run at the highest blower setting at
least once a month when temperatures are over +5°C. Briefly open a window
at the same time.
Faults in the operation of the air conditioning
There is a fault if the all the symbols in the Climatronic flash for approx. 15
seconds when the ignition is switched on. Contact a specialist workshop.
If the air conditioning system cannot be switched on this may be caused by
the following reasons:
•
the engine is not running.
•
The blower is switched off.
•
The outside temperature is lower than +5°C.
•
the cooling system compressor has been temporarily switched off
because the engine coolant temperature is too high.
•
The air conditioner fuse is faulty.
39)Optional equipment
40)Optional equipment
alhambra ingles.book Seite 157 Donnerstag, 19. April 2007 4:04 16
Page 169 of 291
Driving167
Safety First
Operating instructions
Tips and Maintenance
Te c h n i c a l D a t a
Note
A programme will, depending on the driving resistance, be selected automat-
ically that guarantees more pulling power, thus avoiding having to shift gear
constantly.Selector lever lock
The selector lever lock in positi on P or N prevents gears from
being engaged inadvertently, which would cause the vehicle
to move.The selector lever lock is released as follows:
– Switch on the ignition.
– Press and hold the brake pedal and press the selector lever lock
on the left of the selector lever at the same time ⇒page 166,
fig. 128.The selector lever lock only works if the vehicle is stationary or driving at
speeds up to 5 km/h (approx. 3 km/h). At higher speeds the selector lever
lock is disengaged automatically in the N position.
The selector lever lock is not engaged if the selector lever is moved quickly
through position N (e.g. when shifting from R to D). This makes it possible, for
instance, to “rock” the vehicle backwards and forwards if it is stuck in snow
or mud. The selector lever lock engages automatically if the brake pedal is not
depressed and the lever is in position N for more than about 1 second.
Driving a car with an automatic gearbox
The gearbox changes the forwar d gears up and down auto-
matically.Switching on
– Start the engine with the selector lever in position P or N. Further
information ⇒page 163.
Driving
– Press and hold the brake pedal.
– Press and hold the lock button (button on the knob of the selector lever) ⇒page 166, fig. 128 , s e l e c t g e a r p o s i t i o n ( R, D or
S ).
– Release the lock button and wait for the gearbox to engage the
gear (a slight movement can be felt).
– Release the brake and press the accelerator ⇒.
Stopping briefly
– Use the foot brake to prevent the car “creeping” forwards, e.g. at traffic lights. The selector lever does not need to be put into the
positions P or N for this.
– Do not press the accelerator.
Parking the vehicle
– Press and hold the brake pedal until the vehicle comes to a standstill ⇒.
– Apply the handbrake firmly.
alhambra ingles.book Seite 167 Donnerstag, 19. April 2007 4:04 16
Page 171 of 291
Driving169
Safety First
Operating instructions
Tips and Maintenance
Te c h n i c a l D a t a
Note
The two clutch system of the direct shift gearbox* has a system to protect
against excess strain, which may occur, for example, when the vehicle is held
on a hill with the clutch and the gearbox oil overheats. When the clutch is
overloaded, the vehicle begins to jerk and the position indicator of the
selector lever begins to flash. To avoid breakdowns, the clutch breaks the
power transmission between the engine and the gearbox, as a result of which
the vehicle loses impetus. If the clutch opens automatically due to over-
loading, depress the brake pedal and wait a few seconds before
continuing.Selector lever positions
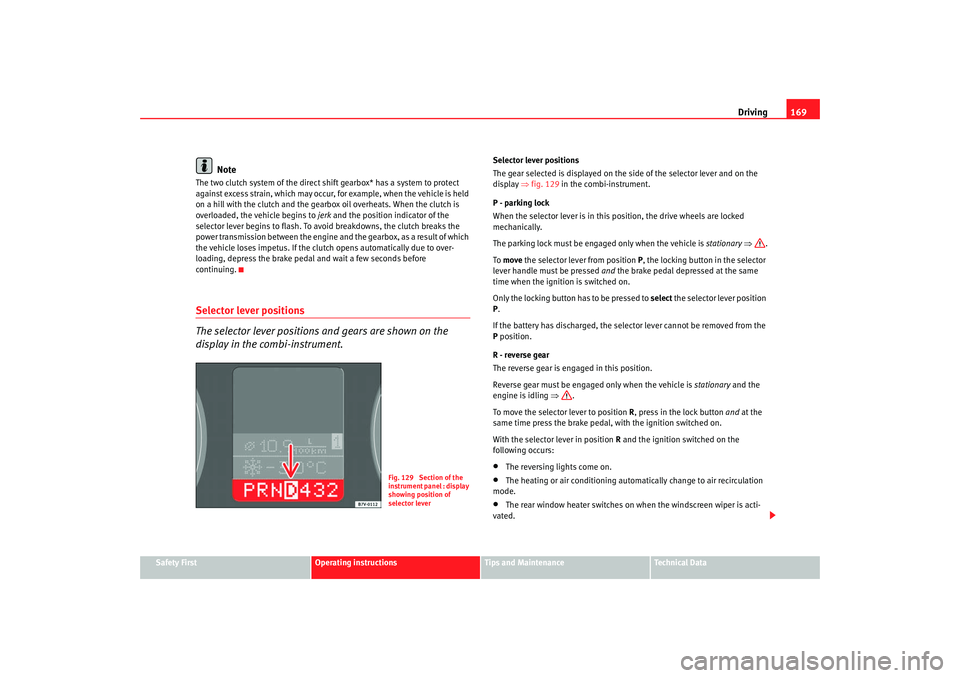
The selector lever positions and gears are shown on the
display in the combi-instrument.
Selector lever positions
The gear selected is displayed on the side of the selector lever and on the
display ⇒fig. 129 in the combi-instrument.
P - parking lock
When the selector lever is in this position, the drive wheels are locked
mechanically.
The parking lock must be engaged only when the vehicle is stationary ⇒ .
To move the selector lever from position P, the locking button in the selector
lever handle must be pressed and the brake pedal depressed at the same
time when the ignition is switched on.
Only the locking button has to be pressed to select the selector lever position
P .
If the battery has discharged, the selector lever cannot be removed from the
P position.
R - reverse gear
The reverse gear is engaged in this position.
Reverse gear must be engaged only when the vehicle is stationary and the
engine is idling ⇒.
To move the selector lever to position R, press in the lock button and at the
same time press the brake pedal, with the ignition switched on.
With the selector lever in position R and the ignition switched on the
following occurs:•
The reversing li ghts come on.
•
The heating or air conditioning automatically change to air recirculation
mode.
•
The rear window heater switches on when the windscreen wiper is acti-
vated.
Fig. 129 Section of the
instrument panel : display
showing position of
selector lever
alhambra ingles.book Seite 169 Donnerstag, 19. April 2007 4:04 16
Page 185 of 291

Intelligent technology183
Safety First
Operating instructions
Tips and Maintenance
Te c h n i c a l D a t a
You should press the button to switch the ESP back on when you no longer
need wheel spin.
When the ESP is deactivated, the TCS is switched off at the same time. This
means that this technology is not available for as long as the ESP remains
switched off.
How ESP works
ESP reduces the danger of skidding by
braking the wheels individually. The
system uses the steering wheel angle and road speed to calculate the
changes of direction desired by the driver, and constantly compares them
with the actual behaviour of the car. If the desired course is not being main-
tained accurately (for instance if the ca r is beginning to skid) the ESP compen-
sates automatically by applying the brake at the appropriate wheel.
The forces acting on the braked wheel bring the car back to a stable condi-
tion. If the car is tending to oversteer (break away at the rear) the brake appli-
cation is concentrated on the outside front wheel; if the car is understeering
(tending to follow a wider radius in a bend), the brake is mainly applied to the
inside rear wheel.
How the Traction Control System (TCS) works
TCS reduces engine power to help prev ent the driven wheels of front-wheel
drive vehicles losing traction during acceleration. The system works in the
entire speed range in conjunction with ABS. If a malfunction should occur in
the ABS, the TCS will also be out of action. TCS helps the car to start moving,
accelerate and climb a gradient in slippery conditions where this may other-
wise be difficult or even impossible.
When does the warning lamp light up or flash
?
•
The warning lamp
lights up when the ignition is switched on and
should go out again after a few seconds.
•
The warning lamp
will start flashing to indicate that the ESP and TCS
are counteracting an unstable driving condition.
•
It will light up continuously if there is a malfunction in the ESP.
•
It will light up continuously if the ESP is switched off.
•
It will also come on if a fault should occur in the ABS because the ESP
operates in conjunction with the ABS.
If the warning lamp
lights up and stays on after the engine is started, this
may mean that the control system has temporarily switched off the function.
In this case the ESP can be reactivated by switching the ignition off and then
on again. If the warning lamp goes out, this means the system is fully func-
tional
If the battery is disconnected, the warning lamp
lights after turning the
ignition on. This should turn off after a brief trip.
WARNING
Try to always adapt the speed of the vehicle to weather, road and traffic
conditions. Do not let the extra safety afforded by the system tempt you
into taking any risks when driving. Risk of accident.•
The ESP and TCS cannot defy the laws of motion. This should be kept in
mind, particularly on slippery and wet roads and when towing a trailer.
•
Always adapt your driving style to suit the condition of the roads and
the traffic situation.
•
The ESP cannot reduce the risk of accident if, for example, you are
driving with an unsuitable load or too close to the preceding vehicle.
•
Modifications to the vehicle or work carried out incorrectly (e. g. to the
engine, the brake system, running gear or any components affecting the
wheels and tyres) could affect the efficiency of the ABS, EDL, ESP and TCS
and lessen their efficiency.
•
The effectiveness of the ESP is also determined by the tyres fitted
⇒ page 225.Caution
In order to ensure that ESP and TCS func tion correctly, all four wheels must be
fitted with the same tyres. Any differences in the rolling radius of the tyres can
cause the system to reduce engine power when this is not desired.
alhambra ingles.book Seite 183 Donnerstag, 19. April 2007 4:04 16
Page 214 of 291
Checking and refilling levels
212•
Never open the bonnet if you see steam, smoke or coolant escaping
from the engine compartment.
•
Wait until no more steam, smoke or coolant is emitted from the bonnet,
then carefully open the bonnet.
•
Make sure that the support rod is inserted securely and properly in the
holder in the open bonnet.
•
When working in the engine compartment, always observe the safety
warnings ⇒ page 209
Closing the bonnetClosing the bonnet
1. To close the bonnet, pull it down to overcome the gas strut pres-
sure.
2. Make sure that the bonnet catches onto its clasp. Do not press
down ⇒ .If the bonnet does not close properly, open it again and close it properly.
WARNING
If the bonnet is not closed properly, it could open while you are driving and
completely obscure your view of the road. Risk of accident.•
After closing the bonnet, always check that it is properly secured. The
bonnet must be flush with the surrounding body panels.
•
If you notice that the bonnet latch is not secured when the vehicle is
moving, stop the vehicle immediately and close the bonnet properly. Risk
of accident.
Engine oilEngine oil specifications
The engine oil used must conform with exact specifications.Specifications
The engine comes with a special, high quality, multi grade oil that can be
used in all seasons of the year except for those regions affected by extreme
cold.
As the use of good quality oil is nec essary for the correct operation and long
service life of the engine, when it becomes necessary to replenish or change
the oil, always use an oil that complies to the VW standards.
If it is not possible to find oil conforming to the VW standards then oil
conforming to the ACEA or API standards with an appropriate viscosity at
atmospheric temperature should be used in stead. The use of this type of oil
may have some repercussions on the performance of the engine for example,
long starting time, increased consumption and a higher emission level.
If a top up is required then different oils may be mixed as long as they all
conform to the VW standards.
The specifications (VW standards) set out in the following page should
appear on the container of the service oil; the container will display together
the different standards for petrol and diesel engines, the oil can be used for
both types of engines.
WARNING (continued)
alhambra ingles.book Seite 212 Donnerstag, 19. April 2007 4:04 16
Page 222 of 291
Checking and refilling levels
220If this does not produce the desired results, the setting angle of the wind-
screen wiper arms might be incorrect. They should be checked by a qualified
workshop and corrected if necessary.
WARNING
Do not drive unless you have good visibility through all windows!•
Clean the windscreen wiper blades and all windows regularly.
•
The wiper blades should be changed once or twice a year.Caution
•
Damaged or dirty windscreen wipers could scratch the windscreen.
•
Never use fuel, nail varnish remover, paint thinner or similar products to
clean the windows. This could damage the windscreen wiper blades.
•
Never move the windscreen wiper or windscreen wiper arm manually - this
could cause damage!Note
•
On fitting the wiper blades, do not exchange the driver and passenger
side blades.
Changing the rear wiper blade
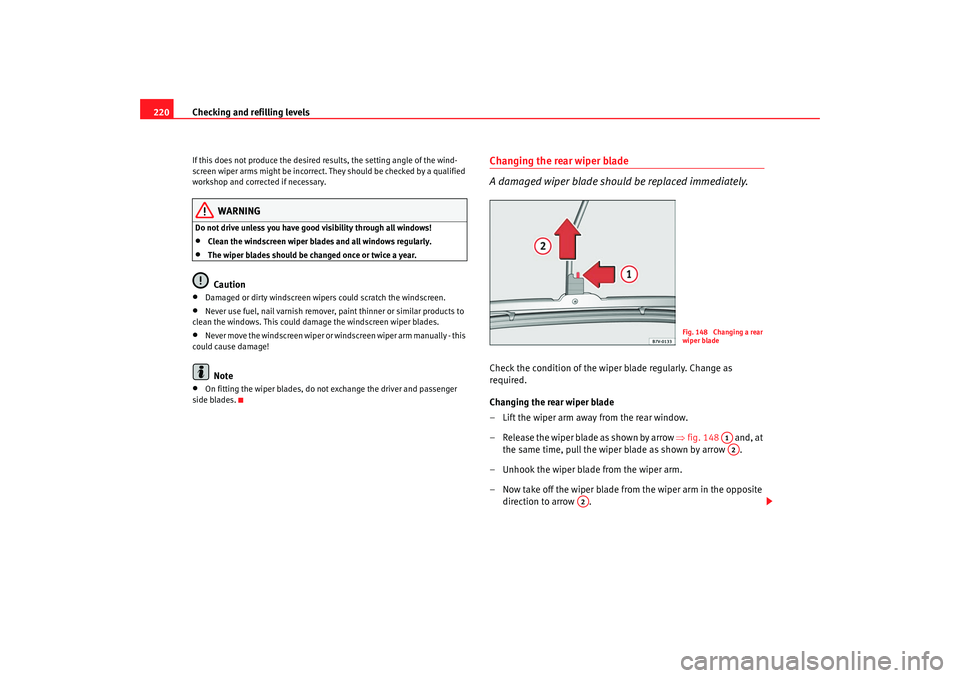
A damaged wiper blade should be replaced immediately.Check the condition of the wiper blade regularly. Change as
required.
Changing the rear wiper blade
– Lift the wiper arm away from the rear window.
– Release the wiper blade as shown by arrow ⇒fig. 148 and, at
the same time, pull the wiper blade as shown by arrow .
– Unhook the wiper blade from the wiper arm.
– Now take off the wiper blade from the wiper arm in the opposite direction to arrow .
Fig. 148 Changing a rear
wiper blade
A1A2
A2
alhambra ingles.book Seite 220 Donnerstag, 19. April 2007 4:04 16
Page 224 of 291
Checking and refilling levels
222However, if the level goes down noticeably in a short time, or drops below the
“MIN” mark, there may be a leak in the brake system. A display on the instru-
ment panel will warn you if the brake fluid level is too low ⇒page 70.
WARNING
Before opening the bonnet to check the brake fluid level, read and observe
the warnings ⇒page 209.Changing the brake fluid
The Maintenance Program indicates the brake fluid change
intervals.We recommend that you have the brake fluid changed by an Authorised
Service Centre.
Before opening the bonnet, please read and follow the warnings ⇒ in
“Safety instructions on working in the engine compartment” on page 209 in
“Working in the engine compartment”.
Brake fluid absorbs moisture. In the cour se of time, it will absorb water from
the ambient air. If the water content in the brake fluid is too high, the brake
system could corrode. This also considerably reduces the boiling point of the
brake fluid. Heavy use of the brakes may then cause a vapour lock which
could impair the braking effect.
It is important that you use only use brake fluid compliant with the US
standard FMVSS 116 DOT 4. We recommend the use of Genuine SEAT brake
fluid.
WARNING
Brake fluid is poisonous. Old brake fluid impairs the braking effect.
•
Before opening the bonnet to check the brake fluid level, read and
observe the warnings ⇒page 209.
•
Brake fluid should be stored in the closed original container in a safe
place out of reach of children. There is a toxic risk.
•
Complete the brake fluid change according to the Maintenance
Program. Heavy use of the brakes may cause a vapour lock if the brake fluid
is left in the system for too long. Th is would seriously affect the efficiency
of the brakes and the safety of the vehicle. This may cause an accident.Caution
Brake fluid could damage the paintwork. Wipe off any brake fluid from the
paintwork immediately.
For the sake of the environment
Brake fluid must be drained and disposed of in the proper manner observing
environmental regulations.
WARNING (continued)
alhambra ingles.book Seite 222 Donnerstag, 19. April 2007 4:04 16
Page 225 of 291
Checking and refilling levels223
Safety First
Operating instructions
Tips and Maintenance
Te c h n i c a l D a t a
BatteryWarnings on handling the battery
WARNING
Always be aware of the danger of injury and chemical burns as well as the
risk of accident or fire when working on the battery and the electrical
system:•
Wear eye protection. Protect your eyes , skin and clothing from acid and
particles containing lead.
•
Battery acid is very corrosive and caustic. Wear protective gloves and
eye protection. Do not tilt the batteries. This could spill acid through the
vents. Rinse battery acid from eyes immediately for several minutes with
clear water. Then seek medical care immediately. Neutralize any acid
splashes on the skin or clothing with a soapy solution, and rinse off with
plenty of water. If acid is swallowed by mistake, consult a doctor immedi-
ately.
•
Fires, sparks, naked lights and smoking are prohibited. When handling
cables and electrical equipment, avoid causing sparks and electrostatic charge. Never short the battery terminals. High-energy sparks can cause
injury.
•
A highly explosive mixture of gases is released when the battery is
under charge. The batteries should be charged in a well-ventilated room
only.
•
Keep children away from acid and batteries.
•
Before working on the electrical system, you must switch off the
engine, the ignition and all consumers. The negative cable on the battery
must be disconnected. When a light bulb is changed, you need only switch
off the light.
•
Deactivate the anti-theft alarm by unlocking the vehicle before you
disconnect the battery! The alar m will otherwise be triggered.
•
When disconnecting the battery from the vehicle electrical system,
disconnect first the negative ca ble and then the positive cable.
•
Switch off all electrical consumers before reconnecting the battery.
Reconnect first the positive cable and then the negative cable. Never
reverse the polarity of the connections. This could cause an electrical fire.
•
Never charge a frozen battery, or one which has thawed. This could
result in explosions and chemical burns. Always replace a battery that has
frozen. A flat battery can freeze at temperatures around 0
°C.
•
Ensure that the vent hose is always connected to the battery.
•
Never use a defective battery. This may be fatally explosive. Replace a
damaged battery immediately.Caution
•
Never disconnect the battery if the ignition is switched on or if the engine
is running. This could damage the electrical system or electronic compo-
nents.
•
Do not expose the battery to direct sunlight over a long period of time, as
the intense ultraviolet radiation can damage the battery housing.
Wear eye protection
Battery acid is very corrosive and caustic. Wear protec-
tive gloves and eye protection!
Fires, sparks, naked lights and smoking are prohibited!
A highly explosive mixture of gases is released when the
battery is under charge.
Keep children away from acid and batteries!
WARNING (continued)
alhambra ingles.book Seite 223 Donnerstag, 19. April 2007 4:04 16
Page 229 of 291
Checking and refilling levels227
Safety First
Operating instructions
Tips and Maintenance
Te c h n i c a l D a t a
Wear indicators
The original tyres on your vehicle have 1.6 mm high “tread wear indicators”
⇒
page 226, fig. 150 , running across the tread. Depending on the make,
there will be six to eight of them evenly spaced around the tyre. Markings on
the tyre sidewall (for instance the letters “TWI” or other symbols) indicate the
positions of the tread wear indicators. The minimum tread depth required by
law is 1.6 mm (measured in the tread grooves next to the tread wear indica-
tors). Worn tyres must be replaced. Different figures may apply in export
countries ⇒.
Tyre pressure
Incorrect tyre pressure causes premature wear and could cause tyre blow-out.
For this reason, the tyre pressure should be checked at least once per month
⇒ page 226.
Driving style
Fast cornering, heavy acceleration and hard braking all increase tyre wear.
Changing wheels around
If the front tyres are worn considerably more than the rear ones it is advisable
to change them around as shown ⇒page 226, fig. 151 . All the tyres will then
last for about the same time.
Wheel balance
The wheels on new vehicles are balanced. However, various factors encoun-
tered in normal driving can cause them to become unbalanced, which results
in steering vibration.
Unbalanced wheels should be rebalanced, as they otherwise cause excessive
wear on steering, suspension and tyres. A wheel must also be rebalanced
when a new tyre is fitted.
Incorrect wheel alignment
Incorrect wheel alignment causes excessive tyre wear, impairing the safety of
the vehicle. If tyres show excessive wear, you should have the wheel align-
ment checked by an Authorised Service Centre.
WARNING
There is a serious danger of accidents if a tyre bursts during driving!•
The tyres must be replaced at the latest when the tread is worn down to
the tread wear indicators. Failure to do so could result in an accident. Worn
tyres do not grip well at high speeds on wet roads. There is also a greater
risk of “aquaplaning”.
•
At continuously high speeds, a tyre with insufficient pressure flexes
more. This causes it to overheat. This can cause tread separation and tyre
blow-out. Risk of accident. Always observe the recommended tyre pres-
sures.
•
If tyres show excessive wear, you should have the running gear checked
by an Authorised Service Centre.
•
Keep chemicals such as oil, fuel and brake fluid away from tyres.
•
Damaged wheels and tyres must be replaced immediately!For the sake of the environment
Under-inflated tyres will increase fuel consumption.New tyres and wheels
New tyres and wheels have to be run-in.The tyres and wheel rims are an essential part of the vehicle's design. The
tyres and rims approved by SEAT are specially matched to the characteristics
of the vehicle and make a major contribution to good road holding and safe
handling ⇒.
Tyres should be replaced at least in pair s and not individually (i.e. both front
tyres or both rear tyres together). A knowledge of tyre designations makes it
alhambra ingles.book Seite 227 Donnerstag, 19. April 2007 4:04 16