wheel Seat Alhambra 2009 Workshop Manual
[x] Cancel search | Manufacturer: SEAT, Model Year: 2009, Model line: Alhambra, Model: Seat Alhambra 2009Pages: 285, PDF Size: 7.62 MB
Page 236 of 285
If and when
234
Box spanner for wheel bolts
Jack. Before you return the jack to the tool box, you must fully wind in the
claw. The crank must then be folded tight against the side of the jack.
The removable towing bracket
44), the key for unlocking the sunroof in an
emergency
44) and the anti-theft wheel bolt adaptor
44) are stored next to the
vehicle tools.
Adapter for anti-theft wheel bolts
We recommend you carry the wheel bolt adapter
44) in the vehicle tool kit at
all times.
The code number of the anti-theft wheel bolt is stamped on the front of the
adapter. You will need this number to replace the adapter if lost. Make a note
the code number of the anti-theft wheel bolt and keep it in a safe place - but
not in your vehicle.
WARNING
•
Do not use the hexagonal socket in the screwdriver handle to tighten
the wheel bolts. It is not suitable for tightening the bolts to the necessary
torque. This may cause an accident.
•
The jack supplied by the factory is only designed for changing wheels
on this model. Never attempt to use it for lifting heavier vehicles or other
loads. Risk of injury.
•
Use the jack only on firm, level ground.
•
Never start the engine when you have raised the vehicle on the jack.
Risk of accident.
•
Never place your body (e.g. arm or leg) underneath the vehicle if it is
only supported by the jack Risk of injury.
•
If you have to work underneath the vehicle, you must use suitable
stands additionally to support the vehicle - Risk of accident!.
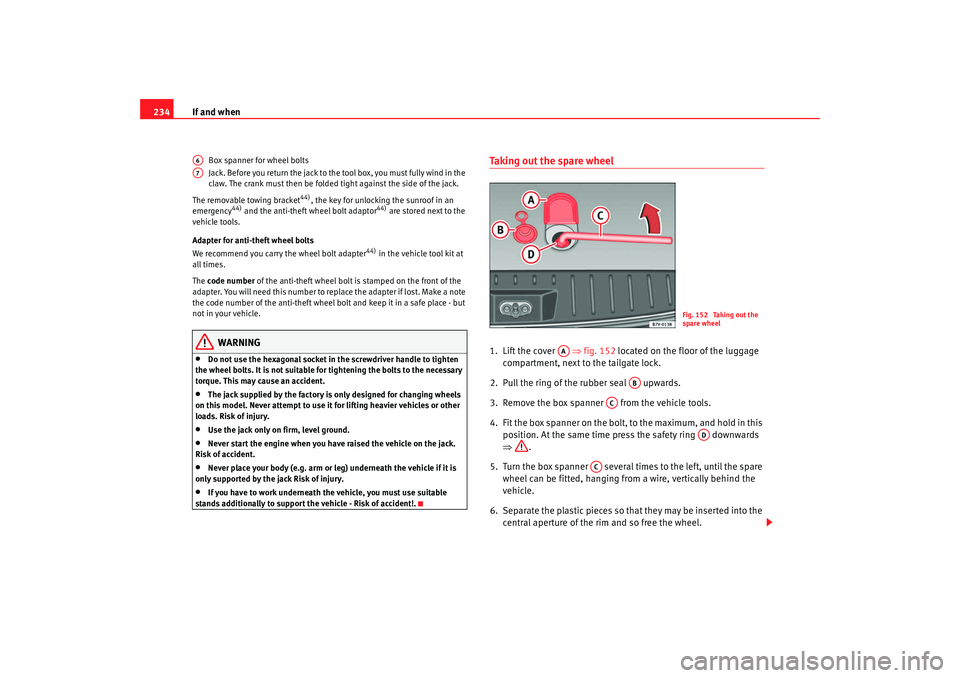
Taking out the spare wheel1. Lift the cover ⇒fig. 152 located on the floor of the luggage
compartment, next to the tailgate lock.
2. Pull the ring of the rubber seal upwards.
3. Remove the box spanner from the vehicle tools.
4. Fit the box spanner on the bolt, to the maximum, and hold in this position. At the same time press the safety ring downwards
⇒ .
5. Turn the box spanner several times to the left, until the spare wheel can be fitted, hanging from a wire, vertically behind the
vehicle.
6. Separate the plastic pieces so that they may be inserted into the central aperture of the rim and so free the wheel.
A6A7
Fig. 152 Taking out the
spare wheel
AA
AB
AC
AD
AC
alhambra_aleman.book Seite 234 Montag, 23. M‰ rz 2009 1:12 13
Page 237 of 285
If and when235
Safety First
Operating instructions
Tips and Maintenance
Te c h n i c a l D a t a
WARNING
•
If you are driving without the spare wheel, the cable should be rolled up
and the bracket fastened to the floor of the luggage compartment.
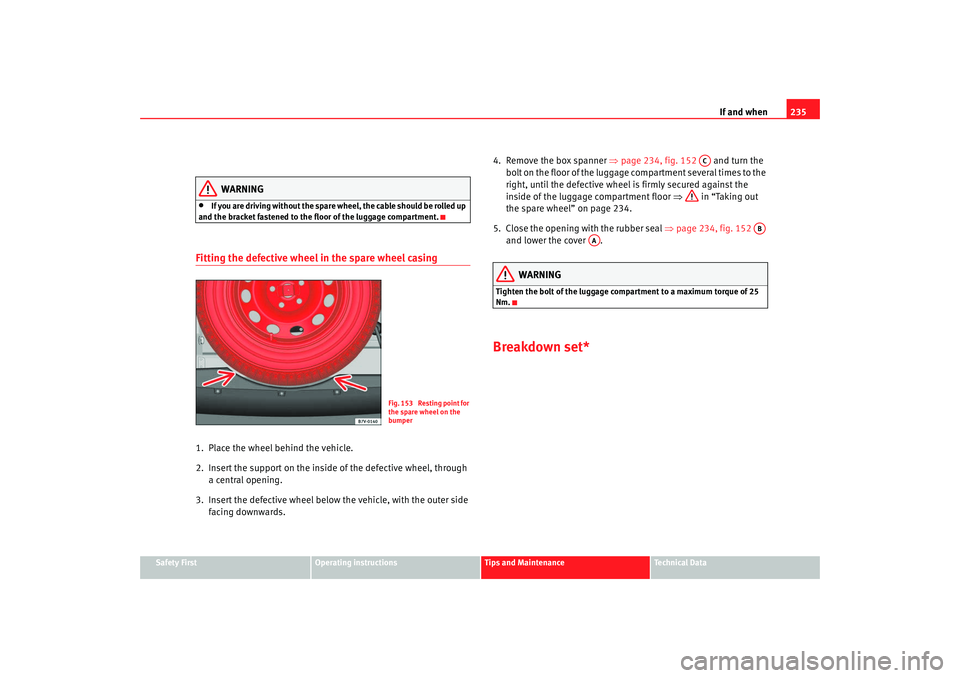
Fitting the defective wheel in the spare wheel casing1. Place the wheel behind the vehicle.
2. Insert the support on the inside of the defective wheel, through a central opening.
3. Insert the defective wheel below the vehicle, with the outer side facing downwards. 4. Remove the box spanner
⇒page 234, fig. 152 and turn the
bolt on the floor of the luggage compartment several times to the
right, until the defective wheel is firmly secured against the
inside of the luggage compartment floor ⇒ in “Taking out
the spare wheel” on page 234.
5. Close the opening with the rubber seal ⇒page 234, fig. 152
and lower the cover .
WARNING
Tighten the bolt of the luggage compartment to a maximum torque of 25
Nm.Breakdown set*
Fig. 153 Resting point for
the spare wheel on the
bumper
AC
AB
AA
alhambra_aleman.book Seite 235 Montag, 23. M‰ rz 2009 1:12 13
Page 240 of 285

If and when
238
WARNING
•
Do not allow the sealant to get onto your skin or into your eyes. Risk of
injury.
•
Keep children away from the sealant.
Changing a wheel Preparation
You must park the vehicle correctly before changing a tyre.– If you have a flat tyre or puncture, park the car as far away from the flow of traffic as possible on a flat surface.
– Switch off the engine. Switch on the hazard warning lights.
– Apply the handbrake firmly and engage a gear or put the selector in the P position.
– Chock the wheel opposite the wheel being changed with a stone or similar object.
– If you are towing a trailer, unhitch it from your vehicle.
– Remove the spare wheel and the vehicle tools from the luggage compartment.
– All passengers should leave the car. They should wait in a safe place (for instance behind the safety barrier).
WARNING
•
If you have a puncture, stop the car well away from moving traffic.
Switch on the hazard warning lights and set the emergency triangle in
position. Please observe legal requirements when doing so.
•
All passengers should leave the car.
•
Apply the handbrake firmly and engage a gear or put the gear selector
in the P position. Chock the wheel opposite the wheel being changed with
a stone or similar object.
•
If you are towing a trailer, unhitch it from your vehicle.
•
Only use jacks which have been approved for your vehicle by SEAT.
•
Never use other jacks, even if they have been approved for use on other
SEAT models. The jack could slip. Risk of injury.
•
Never start the engine when the vehicle is raised. This may cause an
accident.
•
Never place your body (e.g. arm or leg) underneath the vehicle if it is
only supported by the jack Risk of injury.
•
If you have to work underneath the vehicle, you must use suitable
stands additionally to support the vehicle - Risk of accident!.
alhambra_aleman.book Seite 238 Montag, 23. M‰ rz 2009 1:12 13
Page 241 of 285
If and when239
Safety First
Operating instructions
Tips and Maintenance
Te c h n i c a l D a t a
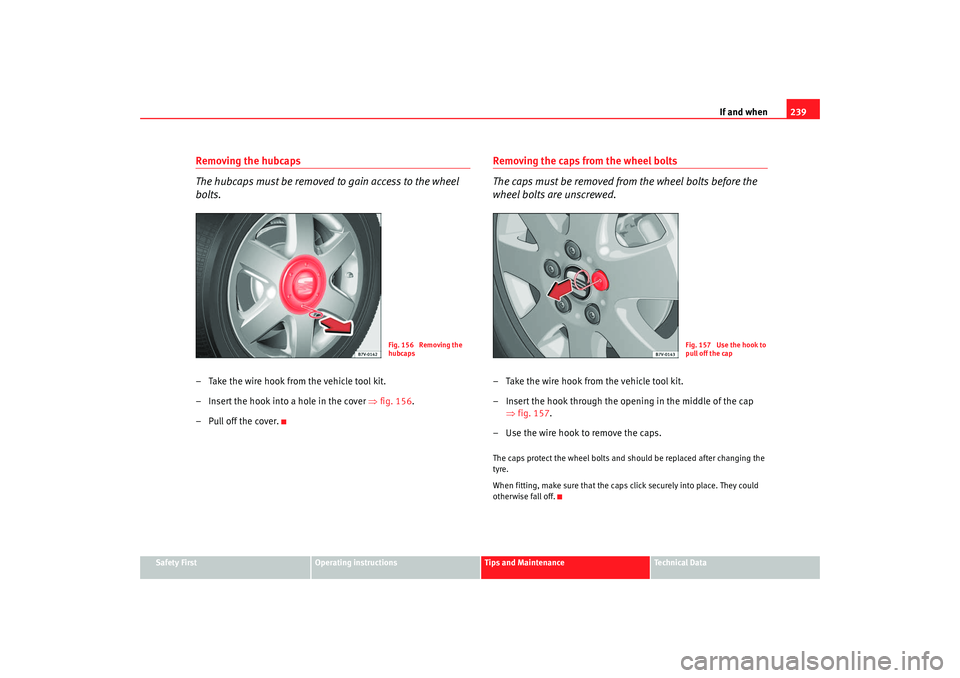
Removing the hubcaps
The hubcaps must be removed to gain access to the wheel
bolts.– Take the wire hook from the vehicle tool kit.
– Insert the hook into a hole in the cover ⇒fig. 156.
– Pull off the cover.
Removing the caps from the wheel bolts
The caps must be removed from the wheel bolts before the
wheel bolts are unscrewed.– Take the wire hook from the vehicle tool kit.
– Insert the hook through the opening in the middle of the cap ⇒fig. 157 .
– Use the wire hook to remove the caps.The caps protect the wheel bolts and should be replaced after changing the
tyre.
When fitting, make sure that the caps click securely into place. They could
otherwise fall off.
Fig. 156 Removing the
hubcaps
Fig. 157 Use the hook to
pull off the cap
alhambra_aleman.book Seite 239 Montag, 23. M‰ rz 2009 1:12 13
Page 242 of 285
If and when
240Loosening the wheel bolts
A special adapter is required to slacken the anti-theft wheel
bolts. It is contained in the vehicle tool kit.
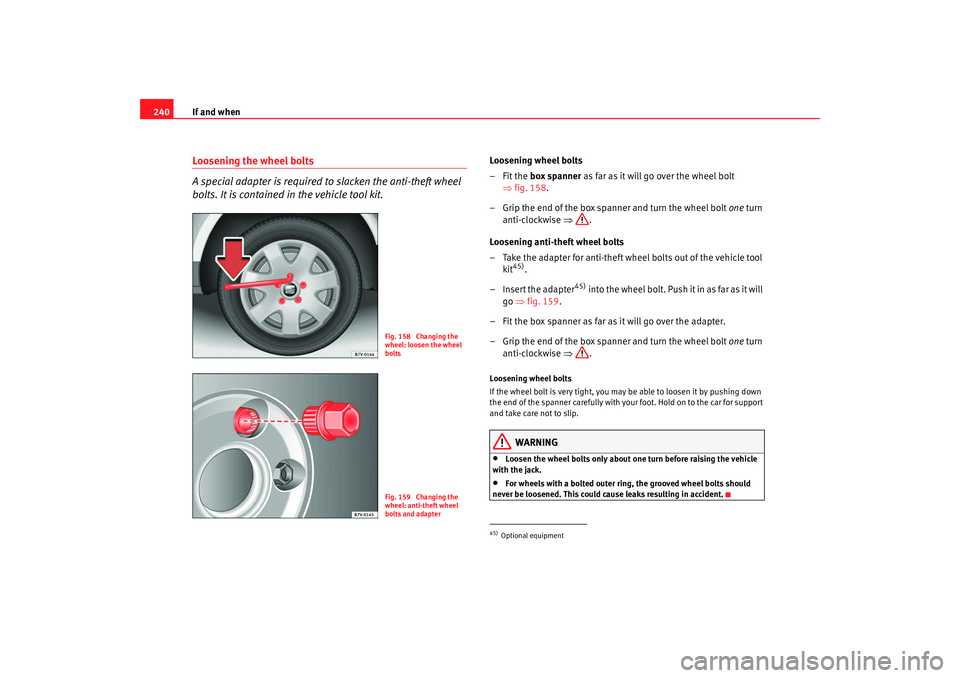
Loosening wheel bolts
–Fit the box spanner as far as it will go over the wheel bolt
⇒ fig. 158.
– Grip the end of the box spanner and turn the wheel bolt one turn
anti-clockwise ⇒.
Loosening anti-theft wheel bolts
– Take the adapter for anti-theft wheel bolts out of the vehicle tool kit
45)
.
– Insert the adapter
45)
into the wheel bolt. Push it in as far as it will
go ⇒fig. 159 .
– Fit the box spanner as far as it will go over the adapter.
– Grip the end of the box spanner and turn the wheel bolt one turn
anti-clockwise ⇒.
Loosening wheel bolts
If the wheel bolt is very tight, you may be able to loosen it by pushing down
the end of the spanner carefully with your foot. Hold on to the car for support
and take care not to slip.
WARNING
•
Loosen the wheel bolts only about one turn before raising the vehicle
with the jack.
•
For wheels with a bolted outer ring, the grooved wheel bolts should
never be loosened. This could cause leaks resulting in accident.
Fig. 158 Changing the
wheel: loosen the wheel
boltsFig. 159 Changing the
wheel: anti-theft wheel
bolts and adapter
45)Optional equipment
alhambra_aleman.book Seite 240 Montag, 23. M‰ rz 2009 1:12 13
Page 243 of 285
If and when241
Safety First
Operating instructions
Tips and Maintenance
Te c h n i c a l D a t a
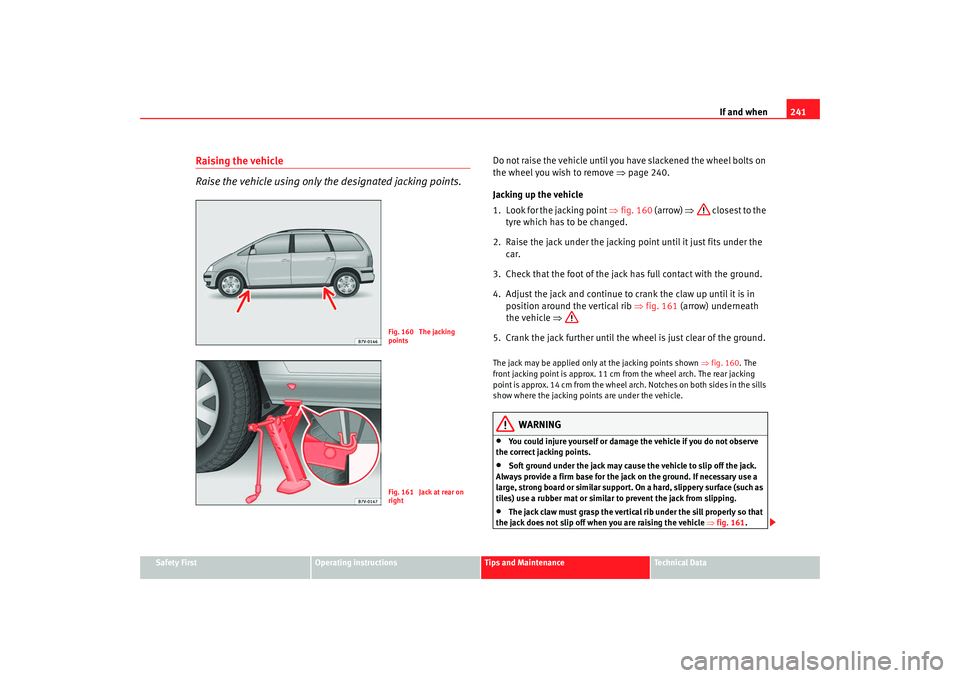
Raising the vehicle
Raise the vehicle using only the designated jacking points.
Do not raise the vehicle until you have slackened the wheel bolts on
the wheel you wish to remove ⇒page 240.
Jacking up the vehicle
1. Look for the jacking point ⇒fig. 160 (arrow) ⇒ closest to the
tyre which has to be changed.
2. Raise the jack under the jacking point until it just fits under the car.
3. Check that the foot of the jack has full contact with the ground.
4. Adjust the jack and continue to crank the claw up until it is in position around the vertical rib ⇒fig. 161 (arrow) underneath
the vehicle ⇒
5. Crank the jack further until the wheel is just clear of the ground.The jack may be applied only at the jacking points shown ⇒fig. 160 . The
front jacking point is approx. 11 cm from the wheel arch. The rear jacking
point is approx. 14 cm from the wheel arch. Notches on both sides in the sills
show where the jacking points are under the vehicle.
WARNING
•
You could injure yourself or damage the vehicle if you do not observe
the correct jacking points.
•
Soft ground under the jack may cause the vehicle to slip off the jack.
Always provide a firm base for the jack on the ground. If necessary use a
large, strong board or similar support. On a hard, slippery surface (such as
tiles) use a rubber mat or similar to prevent the jack from slipping.
•
The jack claw must grasp the vertical rib under the sill properly so that
the jack does not slip off when you are raising the vehicle ⇒ fig. 161.
Fig. 160 The jacking
pointsFig. 161 Jack at rear on
right
alhambra_aleman.book Seite 241 Montag, 23. M‰ rz 2009 1:12 13
Page 244 of 285
If and when
242
NoteThe hexagonal socket in the screwdriver handle should be used for turning
wheel bolts only. Do not use it to loosen or tighten the wheel bolts.Changing a wheel Removing the wheel
– Using the hexagonal socket in the screwdriver handle, unscrew
the slackened wheel bolts and place them on a clean surface.
– Take off the wheel.
– Store the defective wheel as described on ⇒page 235.
Fitting the spare wheel
– Put the spare wheel in place.
– Screw in the wheel bolts and tighten them lightly using the
hexagonal socket.
– Lower the vehicle on the jack.
– Tighten the wheel bolts firmly using the box spanner. Do not tighten the bolts in clockwise or anti-clockwise sequence.
Tighten them in diagonal sequence.Tyres with directional tread pattern
Tyres with directional tread pattern must be mounted so that they rotate in the
correct direction.
A directional tread pattern can be identified by arrows on the sidewall that
point in the direction of rotation. Always observe the direction of rotation indicated when mounting the wheel. This is important so that these tyres can
give maximum grip and avoid excessive noise, tread wear and aquaplaning.
If, in an emergency, you have to mount a wheel so it rotates in the wrong
direction, you must drive extremely carefully. The tyre will not give optimum
performance. This is particularly important when driving on wet roads. To
benefit from the advantages of tyres with directional tread pattern, the tyre
should be replaced as soon as possible so that it rotates in the correct direc-
tion.
Caution
•
The wheel bolts should be clean and turn easily. Do not grease or oil them.
•
The hexagonal socket in the screwdriver handle should be used for
turning wheel bolts only. Do not use it to loosen or tighten the wheel bolts.
After changing a wheel– Place the wheel with the defective tyre in the spare wheel bracket ⇒page 235.
– Have the flat tyre replaced as quickly as possible.
– Have the tightening torque of the wheel bolts checked as soon as possible with a torque wrench ⇒page 242.
– Check tyre pressure at the next opportunity.
– Avoid fast driving manoeuvres.
alhambra_aleman.book Seite 242 Montag, 23. M‰ rz 2009 1:12 13
Page 245 of 285
If and when243
Safety First
Operating instructions
Tips and Maintenance
Te c h n i c a l D a t a
WARNING
•
If the prescribed torque of the wheel bolts is too low, they could loosen
whilst the vehicle is in motion. Risk of accident! If the tightening torque is
too high, the wheel bolts and threads could be damaged.Caution
The stipulated torque for the wheel bolts on steel wheels and alloy wheels is
170 Nm with a tolerance of ±10 Nm. You should visit a specialised workshop
as soon as possible to check the torque with a torque wrench.
Note
•
The wheel bolts should be clean and turn easily. Do not grease or oil them.
•
The hexagonal socket in the screwdriver handle should be used only for
turning wheel bolts which have been slackened off. Do not use it to loosen or
tighten the wheel bolts.
•
If you notice that the wheel bolts are corroded and difficult to turn when
changing a wheel, they must be replaced before you have the tightening
torque checked.
•
If the spare tyre is not the same as the tyres that are mounted on the car -
for example with winter tyres - you should only use the spare tyre for a short
period of time and drive with extra care. Refit the normal road wheel as soon
as possible.
•
Have the flat tyre replaced as quickly as possible.
FusesChanging a fuse– Use the fuse tables, to find out where, and in which fuse box, the damaged fuse is located ⇒ page 244.
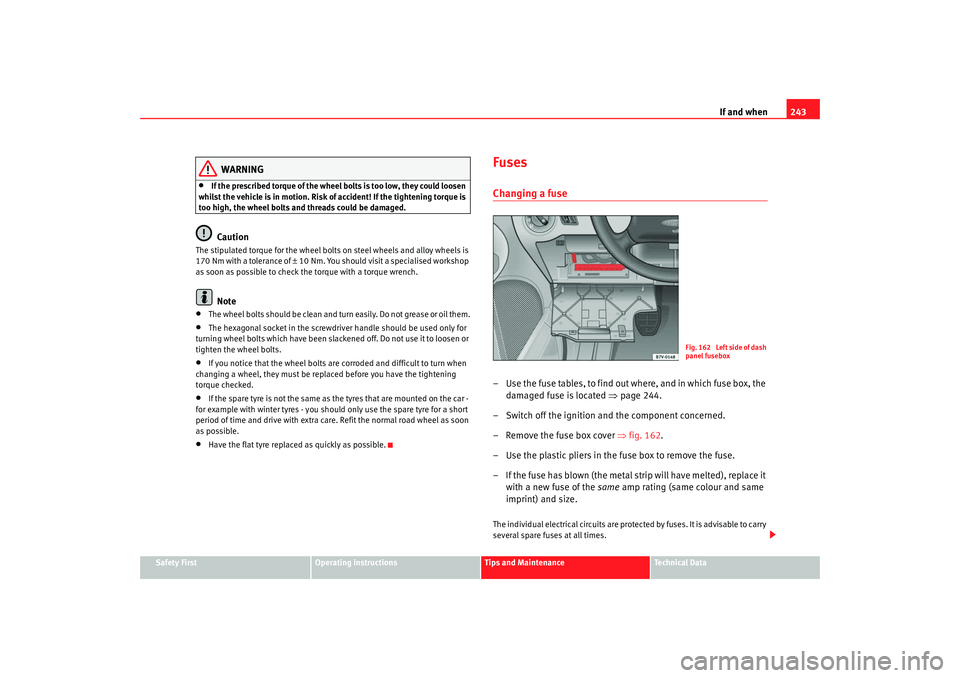
– Switch off the ignition and the component concerned.
– Remove the fuse box cover ⇒fig. 162 .
– Use the plastic pliers in the fuse box to remove the fuse.
– If the fuse has blown (the metal strip will have melted), replace it with a new fuse of the same amp rating (same colour and same
imprint) and size.The individual electrical circuits are protected by fuses. It is advisable to carry
several spare fuses at all times.
F ig . 1 6 2 Le f t si d e o f d as h
panel fusebox
alhambra_aleman.book Seite 243 Montag, 23. M‰ rz 2009 1:12 13
Page 256 of 285
If and when
254Notes for tow-starting or towingIf a cable is used for towing the vehicle, please observe the
following:
As the driver of the towing vehicle
– Switch on the hazard warning lights. However, observe any regu-
lations to the contrary.
– Drive slowly at first until the tow-rope is taut. Then accelerate gradually.
– Begin and change gears cautiously. If you are driving an auto- matic vehicle, accelerate gently.
– Remember that the brake servo and power steering are not working in the vehicle you are towing. Brake earlier than you
would normally, but with a more gentle pressure on the brake.
As the driver of the vehicle being towed
– Switch on the hazard warning lights. However, observe any regu- lations to the contrary.
– Place the gearstick in neutral or position N .
– Ensure that the tow-rope remains taut at all times.Tow-rope or tow-bar
It is easier and safer to tow a vehicle with a tow-bar. You should only use a
tow-rope if you do not have a tow-bar.
A tow-rope should be slightly elastic to reduce the loading on both vehicles.
It is advisable to use a tow-rope made of synthetic fibre or similarly elastic
material. Attach the tow-rope or the tow-bar only to the towing eyes provided or a
towing bracket.
Driving tips
Towing requires some experience, especially when using a tow-rope. Both
drivers should be familiar with the technique required for towing. Inexperi-
enced drivers should not attempt to tow-start or tow away another vehicle.
Do not pull too hard with the towing vehicle and take care to avoid jerking the
tow-rope. When towing on an unpaved road, there is always a risk of over-
loading and damaging the anchorage points.
The ignition of the vehicle being towed must be switched on to prevent the
steering wheel from locking and also to allow the use of the turn signals,
horn, windscreen wipers and washers.
If the vehicle is towed, with the hazard warning lights on and the ignition
switched on, the turn signal may be used to indicate that you are going to
change direction. Move the turn signal lever accordingly. Meanwhile, the
hazard warning lights will go off. When the turn signal lever is returned to the
rest position, the hazard warning lights will automatically reconnect.
The brake servo works only when the engine is running. In this case the pedal
has to be pressed harder.
As the power assisted steering does not work if the engine is not running, you
will need more strength to steer than you normally would.
Towing vehicles with an automatic gearbox
•
Move the selector lever to N.
•
Do not drive faster than 50 km/h when towing a vehicle.
•
Do not tow further than 50 km.
•
If a breakdown truck is used, the vehicle must be towed with the front
wheels raised.
alhambra_aleman.book Seite 254 Montag, 23. M‰ rz 2009 1:12 13
Page 257 of 285
If and when255
Safety First
Operating instructions
Tips and Maintenance
Te c h n i c a l D a t a
WARNING
The braking behaviour and capacity of a vehicle changes when being towed
or when you are trying to start the vehicle by pulling. Please observe the
following notes in order to prevent injury and accident:•
Inexperienced drivers should refrain from trying in order to avoid acci-
dent.
•
Notes for the driver of the towed vehicle
− The brake must be depressed must harder as the brake servo does
not operate. Take care not to bump into the towing vehicle.
− More strength is required at the steering wheel as the power
steering does not operate when the engine is switched off.
•
Notes for the driver of the towing vehicle
− Accelerate smoothly and avoid any sudden movement.
− Brake more in advance than usual and brake gently.Caution
When tow-starting, fuel could enter the catalytic converter and damage it
⇒ page 252.
Note
•
Observe legal requirements when towing or tow-starting.
•
For technical reasons, vehicles with an automatic gearbox must not be
tow-started.
•
If, due to a breakdown, the gearbox does not have lubricant, the vehicle
should be towed with the drive wheels suspended.
•
If it is necessary to tow a vehicle with an automatic gearbox for more than
50 km, it should be towed by qualified personnel and with the drive wheels
suspended.
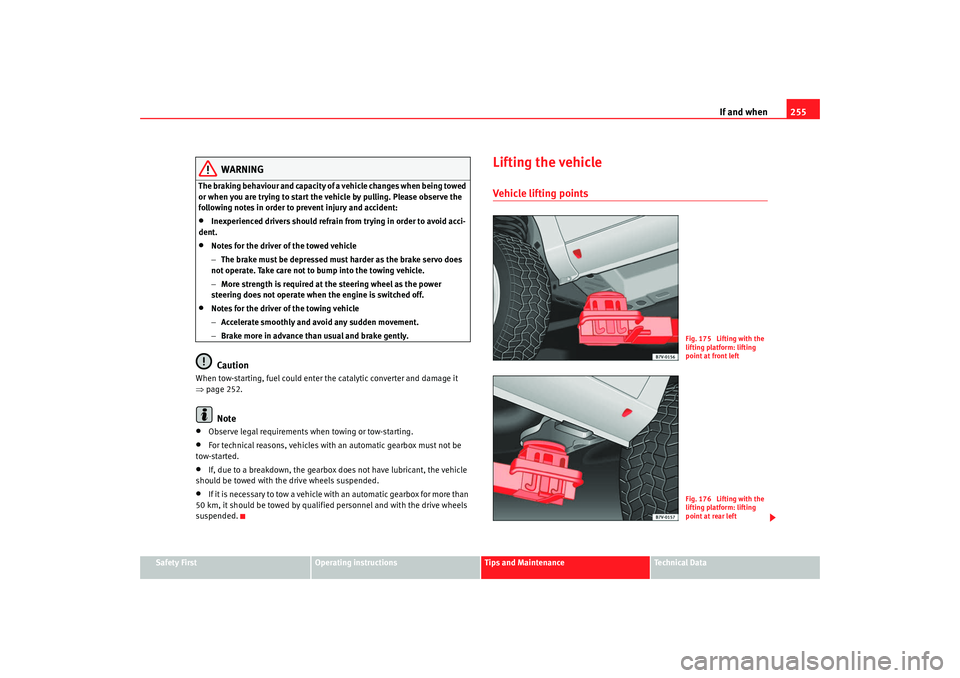
Lifting the vehicleVehicle lifting points
Fig. 175 Lifting with the
lifting platform: lifting
point at front leftFig. 176 Lifting with the
lifting platform: lifting
point at rear left
alhambra_aleman.book Seite 255 Montag, 23. M‰ rz 2009 1:12 13