height adjustment Seat Alhambra 2009 Owner's Manual
[x] Cancel search | Manufacturer: SEAT, Model Year: 2009, Model line: Alhambra, Model: Seat Alhambra 2009Pages: 285, PDF Size: 7.62 MB
Page 9 of 285
Safe Driving7
Safety First
Operating instructions
Tips and Maintenance
Te c h n i c a l D a t a
Safety FirstSafe DrivingBrief introductionDear SEAT Driver
Safety first!This chapter contains important information, tips, suggestions and
wa rn in gs tha t y ou sh ould read a n d follow in the i nterest of yo ur own
safety and the safety of your passengers.
WARNING
•
This manual contains important information concerning the driver's
and passengers' handling of the vehicle. The other booklets in the vehicle
wallet also contain further information that you should be aware of for your
own safety and for the safety of your passengers.
•
Ensure that the onboard documentation is kept in the vehicle at all
times. This is especially important when lending or selling the vehicle to
another person.
Safety equipment
The safety equipment is a part of the occupant protection
system and can reduce the risk of injury during an accident.Never “gamble” with your safety and the safety of your passengers. In the
event of an accident, the safety equipment could reduce the risk of injury. The
following list includes most of the safety equipment in your SEAT:•
optimised three-point seat belts for all seats,
•
seat belt tension devices for driver and passenger,
•
Belt height adjustment for the front seats and outer seats in the second
row,
•
frontal airbags for driver and passenger,
•
side airbags for driver and passenger,
•
curtain airbags,
•
ISOFIX anchorage for ISOFIX child seats in the outside seats in the second
and third rows,
•
Height-adjustable head restraints and
•
adjustable steering column.
The safety equipment mentioned above works together to provide you and
your passengers with the best possible protection in accident situations. But
this safety equipment cannot help you or your passengers if you or your
passengers assume an incorrect sitting position or do not properly adjust or
use this equipment.
alhambra_aleman.book Seite 7 Montag, 23. M‰ rz 2009 1:12 13
Page 28 of 285
Seat belts
26The following features are available to adjust the seat belt in the shoulder
region:•
Belt height adjustment for the front seats and the outer seats in the
second row,
•
front seat height adjustment*.
WARNING
An incorrectly worn seat belt web can cause severe injuries in the event of
an accident.•
T h e s h o u l d e r p a r t o f t h e s e a t b e l t m u st l i e o n t h e ce n t r e o f t h e s h o u l d e r ,
never across the neck. The seat belt must lie flat and fit comfortably on the
torso
•
The lap part of the seat belt must lie across the pelvis, never across the
stomach. The seat belt must lie flat and fit comfortably on the pelvis Pull
the belt tight if necessary to take up any slack.
•
Read and observe the warnings ⇒page 23.
Pregnant women must also fasten their seat belts properly
The best protection for the unborn child is for the mother to
wear the seat belt properly at all times during the pregnancy.The seat belt provides maximum protection only when the belt web
is properly positioned ⇒page 25.
– Adjust the front seat and head restraint correctly ⇒page 10.
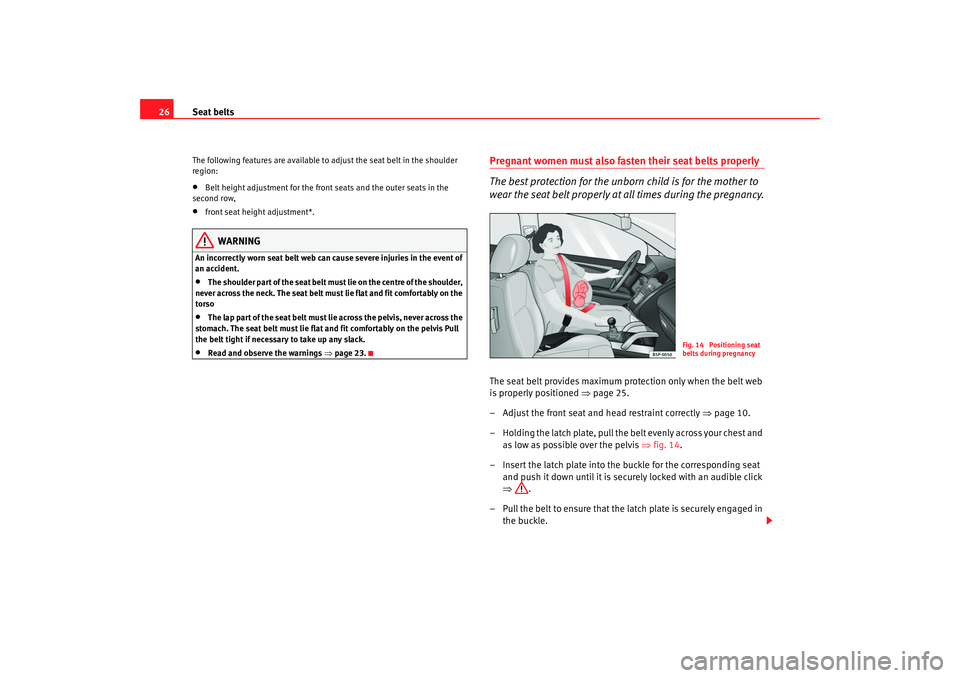
– Holding the latch plate, pull the belt evenly across your chest and as low as possible over the pelvis ⇒fig. 14 .
– Insert the latch plate into the buckle for the corresponding seat and push it down until it is securely locked with an audible click
⇒ .
– Pull the belt to ensure that the latch plate is securely engaged in the buckle.
Fig. 14 Positioning seat
belts during pregnancy
alhambra_aleman.book Seite 26 Montag, 23. M‰ rz 2009 1:12 13
Page 29 of 285
Seat belts27
Safety First
Operating instructions
Tips and Maintenance
Te c h n i c a l D a t a
WARNING
•
An incorrectly worn seat belt web can cause severe injuries in the event
of an accident.
•
For pregnant women, the lap part of the seat belt must lie as low as
possible over the pelvis, never across the stomach, and always lie flat so
that no pressure is exerted on the abdomen.
•
Read and observe the warnings ⇒page 22.
Belt height adjustment
Using the height adjusters for the front seats and the outer
seats in the second row the position of the seat belts can be
adjusted in the shoulder area according to the height of the
occupant.
The seat belt adjustment for the front seats and the outer seats in
the second row can be used to adjust the proper belt web position
at the shoulder.
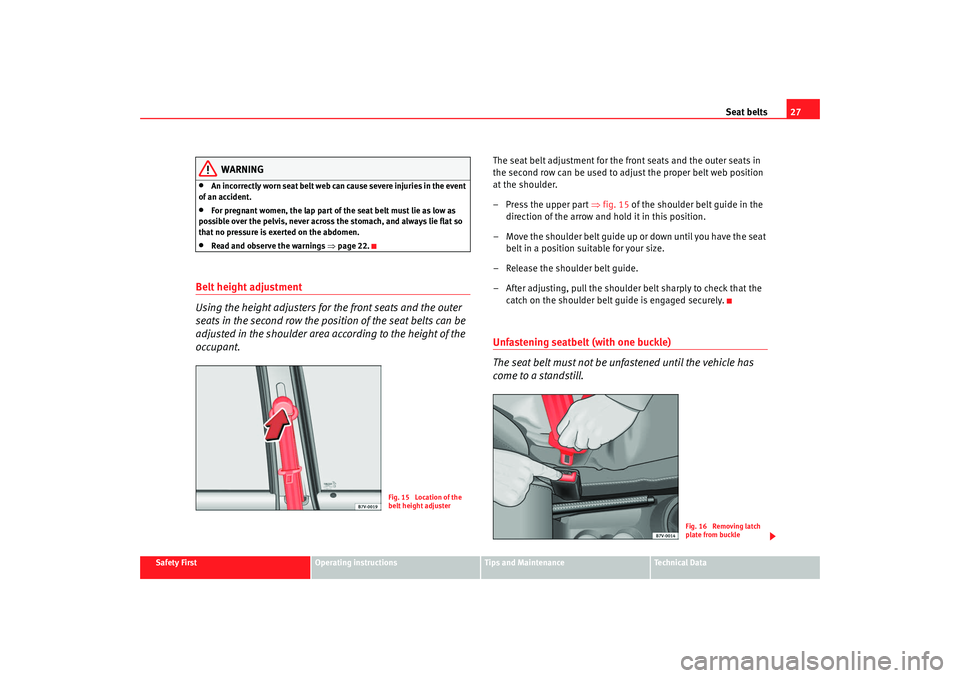
– Press the upper part ⇒fig. 15 of the shoulder belt guide in the
direction of the arrow and hold it in this position.
– Move the shoulder belt guide up or down until you have the seat belt in a position suitable for your size.
– Release the shoulder belt guide.
– After adjusting, pull the shoulder belt sharply to check that the catch on the shoulder belt guide is engaged securely.Unfastening seatbelt (with one buckle)
The seat belt must not be unfastened until the vehicle has
come to a standstill.
Fig. 15 Location of the
belt height adjuster
Fig. 16 Removing latch
plate from buckle
alhambra_aleman.book Seite 27 Montag, 23. M‰ rz 2009 1:12 13
Page 32 of 285
Seat belts
30Belt retainer*
WARNING
•
When the belt for the outer seats in the centre row is removed insert the
webbing behind the guide of the side trim ⇒fig. 20 , in order to lower the
backrest without damaging the webbing.
•
The seat belts must be removed from the holder before removing the
individual seats. This means that the belts will not be damaged.
Belt height adjustment
Seat belt height adjusters can be used to adjust the position
of the seat belt at the shoulder.The seat belt adjustment for the front seats and the outer seats in
the second row can be used to adjust the proper belt web position
at the shoulder.
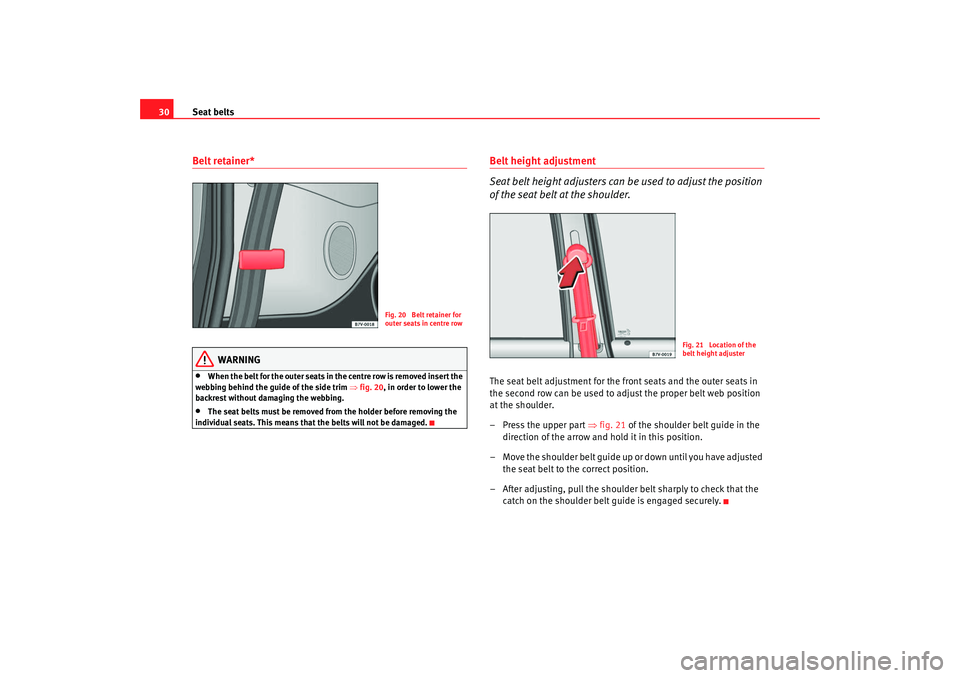
– Press the upper part ⇒ fig. 21 of the shoulder belt guide in the
direction of the arrow and hold it in this position.
– Move the shoulder belt guide up or down until you have adjusted the seat belt to the correct position.
– After adjusting, pull the shoulder belt sharply to check that the catch on the shoulder belt guide is engaged securely.
Fig. 20 Belt retainer for
outer seats in centre row
Fig. 21 Location of the
belt height adjuster
alhambra_aleman.book Seite 30 Montag, 23. M‰ rz 2009 1:12 13
Page 60 of 285

Child safety
58
– To fasten the three-point belt, take hold of the tongue and pull it slowly across the chest and lap.
– Push the tongue of the belt into the lock for that seat so that it engages audibly (pull to check! ).
– Adjust the three-point belt to suit body size ⇒.
Restoring the normal seat
– Pull the loop in the direction of the arrow and push the seat cushion down until it engages.
Removing the slumber roll
– Remove the head restraint.
– Pull the slumber roll off the head restraint.
– Reinsert the head restraint and push down until it can be heard to engage.Use the following measures to guarantee the proper routing of the shoulder
belt:•
Seatbelt height setting
•
Adjustment of the seat forwards and backwards
•
Backrest angle adjustment
WARNING
•
For safety reasons, the seat for children in Group 2 may only be fitted in
the direction of travel and in one of the outer positions (not on the centre
seat).
•
The risk of injury is increased if the belt is not correctly routed.
•
The shoulder part of the belt should be positioned roughly over the
centre of the shoulder, never across the neck, and fit closely against the
upper part of the body.
•
The lap belt part must lie across the pelvis, not across the stomach, and
always fit closely. check the fitting of the belt.
Group 3 integrated child seat
A suitable child seat and a corre ctly adjusted seat belt can
help to protect your child.Setting up the child seat
– Pull the loop to the front in the direction of the arrow ⇒fig. 41
.
A1
WARNING (continued)
Fig. 41 Using the inte-
grated child seat
A1
alhambra_aleman.book Seite 58 Montag, 23. M‰ rz 2009 1:12 13
Page 61 of 285

Child safety59
Safety First
Operating instructions
Tips and Maintenance
Te c h n i c a l D a t a
– Push the seat cushion in direction of the arrow until it
engages in position.
Fastening the three-point belt
– To fasten the three-point belt, take hold of the tongue and pull it slowly across the chest and lap.
– Push the tongue of the belt into the lock for that seat so that it engages audibly ( pull to check!)
– Adjust the three-point belt to suit body size ⇒.
Restoring the normal seat
– Pull the loop in the direction of the arrow and push the seat cushion down until it engages.Use the following measures to guarantee the proper routing of the shoulder
belt:•
Seatbelt height setting
•
Adjustment of the seat forwards and backwards
•
Backrest angle adjustment
WARNING
•
For safety reasons, the seat for children in Group 3 may only be fitted in
the direction of travel and in one of the outer positions (not on the centre
seat).
•
The risk of injury is increased if the belt is not correctly routed.
•
The shoulder part of the belt should be positioned roughly over the
centre of the shoulder, never across the neck, and fit closely against the
upper part of the body.
•
The lap belt part must lie across the pelvis, not across the stomach, and
always fit closely. check the fitting of the belt.
Cleaning the child seat– Open the zip ⇒fig. 42 fully and undo it at the end.
– Pull the cover from the Velcro fastening in area .
– Guide the belt lock and the harness belts through the cover and remove the child seat cover.The child seat cover can be washed in a washing machine at a maximum
temperature of 30°C.
A2
A1
WARNING (continued)
Fig. 42 Section of inte-
grated child seat
AA
AB
alhambra_aleman.book Seite 59 Montag, 23. M‰ rz 2009 1:12 13
Page 126 of 285
Seats and stowage
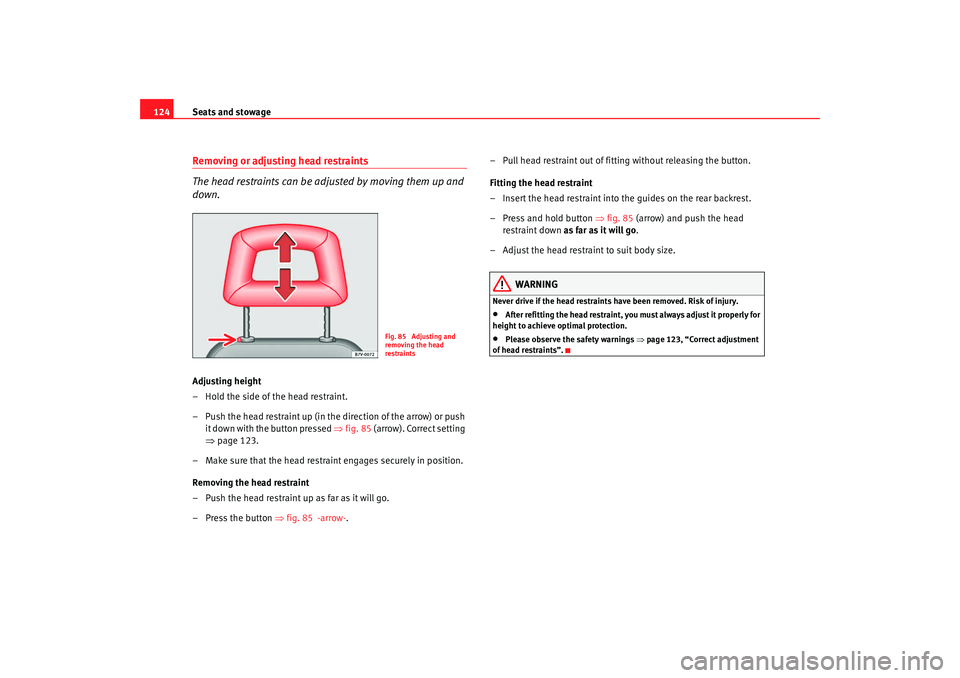
124Removing or adjusting head restraints
The head restraints can be adjusted by moving them up and
down.Adjusting height
– Hold the side of the head restraint.
– Push the head restraint up (in the direction of the arrow) or push
it down with the button pressed ⇒fig. 85 (arrow). Correct setting
⇒ page 123.
– Make sure that the head restraint engages securely in position.
Removing the head restraint
– Push the head restraint up as far as it will go.
– Press the button ⇒fig. 85 -arrow- . – Pull head restraint out of fitting without releasing the button.
Fitting the head restraint
– Insert the head restraint into the guides on the rear backrest.
– Press and hold button
⇒fig. 85 (arrow) and push the head
restraint down as far as it will go .
– Adjust the head restraint to suit body size.
WARNING
Never drive if the head restraints have been removed. Risk of injury.•
After refitting the head restraint, you must always adjust it properly for
height to achieve optimal protection.
•
Please observe the safety warnings ⇒page 123, “Correct adjustment
of head restraints”.
Fig. 85 Adjusting and
removing the head
restraints
alhambra_aleman.book Seite 124 Montag, 23. M‰ rz 2009 1:12 13
Page 163 of 285
Driving161
Safety First
Operating instructions
Tips and Maintenance
Te c h n i c a l D a t a
DrivingAddressAdjusting the steering wheel position
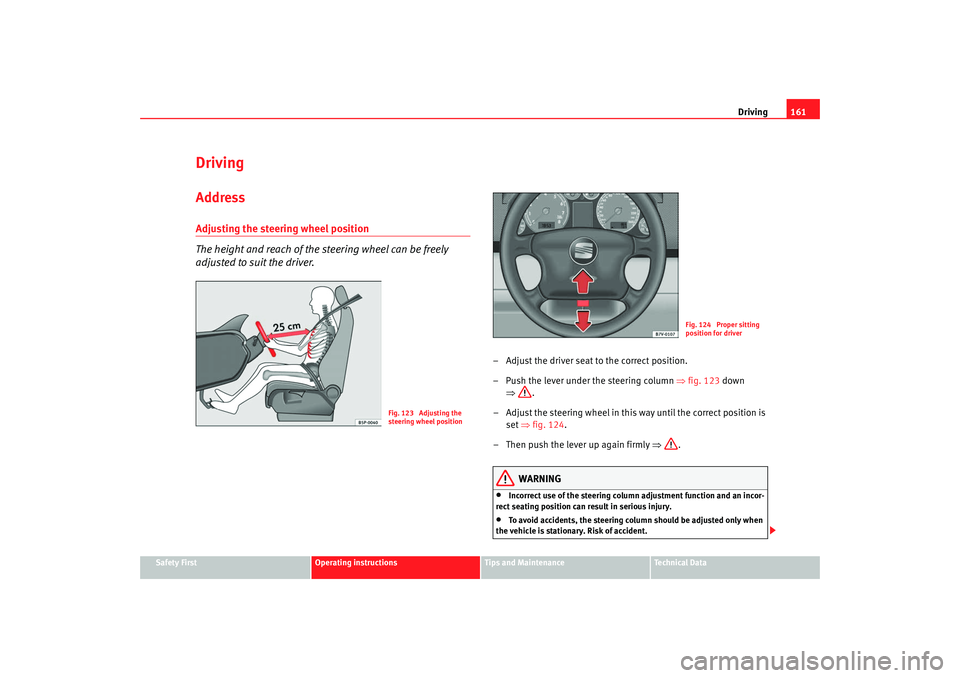
The height and reach of the steering wheel can be freely
adjusted to suit the driver.
– Adjust the driver seat to the correct position.
– Push the lever under the steering column ⇒fig. 123 down
⇒ .
– Adjust the steering wheel in this way until the correct position is set ⇒fig. 124 .
– Then push the lever up again firmly ⇒.
WARNING
•
Incorrect use of the steering column adjustment function and an incor-
rect seating position can result in serious injury.
•
To avoid accidents, the steering column should be adjusted only when
the vehicle is stationary. Risk of accident.
Fig. 123 Adjusting the
steering wheel position
Fig. 124 Proper sitting
position for driver
alhambra_aleman.book Seite 161 Montag, 23. M‰ rz 2009 1:12 13
Page 275 of 285
Index273
Index4MOTION . . . . . . . . . . . . . . . . . . . . . . . . . . . . . . 186AABS . . . . . . . . . . . . . . . . . . . . . . . . . . . . . . . . . . . 182
Warning lamp . . . . . . . . . . . . . . . . . . . . . . . . . 76
warning lamp . . . . . . . . . . . . . . . . . . . . . . . . 183
Accessories . . . . . . . . . . . . . . . . . . . . . . . . . . . . 204
Acoustic signal . . . . . . . . . . . . . . . . . . . . . . . . . . 19
Acoustic warning . . . . . . . . . . . . . . . . . . . . . . . . 163
Additional instruction manual Roof carrier . . . . . . . . . . . . . . . . . . . . . . . . . . 149
Adjust seats rear seats . . . . . . . . . . . . . . . . . . . . . . . . . . . 128
Adjusting lumbar support . . . . . . . . . . . . . . . . . 125
Air conditioning manual faults in operation . . . . . . . . . . . . . . . . . . . . 159
Air conditioning system Climatronic . . . . . . . . . . . . . . . . . . . . . . . . . . 153
General notes . . . . . . . . . . . . . . . . . . . . . . . . 159
Air recirculation mode Climatronic . . . . . . . . . . . . . . . . . . . . . . . . . . 156
Airbag cover . . . . . . . . . . . . . . . . . . . . . . . . . . . . . 39
Airbag covers . . . . . . . . . . . . . . . . . . . . . . . . . . . . 39 Airbag system . . . . . . . . . . . . . . . . . . . . . . . . . . . 33
Curtain airbags . . . . . . . . . . . . . . . . . . . . . . . 42
Front airbags . . . . . . . . . . . . . . . . . . . . . . . . . 37
Side airbags . . . . . . . . . . . . . . . . . . . . . . . . . . 40
Warning lamp . . . . . . . . . . . . . . . . . . . . . . . . . 34
Airbags Care . . . . . . . . . . . . . . . . . . . . . . . . . . . . . . . . 35
Disposal . . . . . . . . . . . . . . . . . . . . . . . . . . . . . 35
Safety notes . . . . . . . . . . . . . . . . . . . . . . . . . . 35
Alarm system . . . . . . . . . . . . . . . . . . . . . . . . . . . . 97 Switching off . . . . . . . . . . . . . . . . . . . . . . . . . 97
Alterations to the vehicle . . . . . . . . . . . . . . . . . 204
Alternator Warning lamp . . . . . . . . . . . . . . . . . . . . . . . . . 78
Anti-freeze . . . . . . . . . . . . . . . . . . . . . . . . . . . . . 218
Anti-lock brake system Warning lamp . . . . . . . . . . . . . . . . . . . . . . . . . 76
Anti-locking brake system . . . . . . . . . . . . . . . . 182 warning lamp . . . . . . . . . . . . . . . . . . . . . . . . 183
Anti-puncture kit . . . . . . . . . . . . . . . . . . . . . . . . 236 Sealing and inflating tyres . . . . . . . . . . . . . 237
Anti-theft alarm system . . . . . . . . . . . . . . . . . . . . 97 Switching off . . . . . . . . . . . . . . . . . . . . . . . . . 97
Anti-theft wheel bolts . . . . . . . . . . . . . . . . . . . . 240
Aquaplaning . . . . . . . . . . . . . . . . . . . . . . . . . . . 229
Armrest . . . . . . . . . . . . . . . . . . . . . . . . . . . . . . . . 131 Ashtrays
Front . . . . . . . . . . . . . . . . . . . . . . . . . . . . . . . 140
rear . . . . . . . . . . . . . . . . . . . . . . . . . . . . . . . . 141
Automatic belt retractor . . . . . . . . . . . . . . . . . . . 23
Automatic car washes . . . . . . . . . . . . . . . . . . . . 196
Automatic gearbox . . . . . . . . . . . . . . . . . . . . . . 168 Safety interlock for ignition key . . . . . . . . . 164
Automatic gearbox with Tiptronic . . . . . . . . . . 173
Automatic mode Climatronic . . . . . . . . . . . . . . . . . . . . . . . . . . 154
Automatic wipe Windscreen wiper and washer . . . . . . . . . . 117
automatic wipe Rear window wiper and wash . . . . . . . . . . . 118
AUX-IN Input . . . . . . . . . . . . . . . . . . . . . . . . . . . . 143
BBall coupling . . . . . . . . . . . . . . . . . . . . . . . . . . . 193
BAS . . . . . . . . . . . . . . . . . . . . . . . . . . . . . . . . . . . 182
Battery Changing . . . . . . . . . . . . . . . . . . . . . . . . . . . 226
Charging . . . . . . . . . . . . . . . . . . . . . . . . . . . . 226
Winter conditions . . . . . . . . . . . . . . . . . . . . 225
Belt height adjustment . . . . . . . . . . . . . . . . . 27, 30
Belt retainer . . . . . . . . . . . . . . . . . . . . . . . . . . . . . 30
Belt tension device Disposal . . . . . . . . . . . . . . . . . . . . . . . . . . . . . 31
alhambra_aleman.book Seite 273 Montag, 23. M‰ rz 2009 1:12 13
Page 282 of 285
Index
280Starting the engine
after the fuel tank has been run dry . . . . . . 166
With the ignition key . . . . . . . . . . . . . . . . . . 165
Steam cleaners . . . . . . . . . . . . . . . . . . . . . . . . . 197
Steering . . . . . . . . . . . . . . . . . . . . . . . . . . . . . . . 161 Steering lock . . . . . . . . . . . . . . . . . . . . . . . . 163
Steering wheel controls . . . . . . . . . . . . . . . . . . . 86
Steering wheel height adjustment . . . . . . . . . . 161
Stowage Other stowage areas . . . . . . . . . . . . . . . . . . 136
Stowage compartment Front passenger side . . . . . . . . . . . . . . . . . 134
Sun visor front . . . . . . . . . . . . . . . . . . . . . . . . . . . . . . . 115
Sunroof blind Sliding/tilting roof . . . . . . . . . . . . . . . . . . . 106
Switches Exterior mirrors . . . . . . . . . . . . . . . . . . . . . . 120
Hazard warning lights . . . . . . . . . . . . . . . . . 111
lights . . . . . . . . . . . . . . . . . . . . . . . . . . . . . . 109
Sliding/tilting roof . . . . . . . . . . . . . . . . . . . 105
Switching off the engine With the ignition key . . . . . . . . . . . . . . . . . . 166TTailgate . . . . . . . . . . . . . . . . . . . . . . . . . . . . . . . . 99Closing . . . . . . . . . . . . . . . . . . . . . . . . . . . . . 100
Convenience opening . . . . . . . . . . . . . . . . . . 99
Opening . . . . . . . . . . . . . . . . . . . . . . . . . . . . . 99
safety instructions . . . . . . . . . . . . . . . . . . . . 101 Tailgate open display*
warning light . . . . . . . . . . . . . . . . . . . . . . . . . 79
Tank Fuel level . . . . . . . . . . . . . . . . . . . . . . . . . . . . 66
Tank capacity . . . . . . . . . . . . . . . . . . . . . . . . . 66
Tank capacity . . . . . . . . . . . . . . . . . . . . . . . . . . . 208
TCS . . . . . . . . . . . . . . . . . . . . . . . . . . . . . . . . . . . 185
TCS (Traction control system) Warning lamp . . . . . . . . . . . . . . . . . . . . . . . . 76
The danger of not using the seat belt . . . . . . . . 21
Thermos box cleaning . . . . . . . . . . . . . . . . . . . . . . . . . . . . 203
Tightening torque of wheel bolts . . . . . . . . . . . 261
Tools . . . . . . . . . . . . . . . . . . . . . . . . . . . . . . . . . . 233
Towing . . . . . . . . . . . . . . . . . . . . . . . . . . . . . . . . 252
Towing a trailer . . . . . . . . . . . . . . . . . . . . . 192, 260
Towing bracket . . . . . . . . . . . . . . . . . . . . . . . . . 193 storage . . . . . . . . . . . . . . . . . . . . . . . . . . . . . 233
Towing eye . . . . . . . . . . . . . . . . . . . . . . . . . . . . . 252
Towline anchorage Rear . . . . . . . . . . . . . . . . . . . . . . . . . . . . . . . 253
Tow-starting . . . . . . . . . . . . . . . . . . . . . . . . 252, 253
Traction control system . . . . . . . . . . . . . . . . . . 185 warning lamp . . . . . . . . . . . . . . . . . . . . . . . . . 76
Trailer turn signals Indicator lamps . . . . . . . . . . . . . . . . . . . . . . . 74
Warning lamp . . . . . . . . . . . . . . . . . . . . . . . 113
Trailer weights . . . . . . . . . . . . . . . . . . . . . . . . . . 260
Trips, checklist . . . . . . . . . . . . . . . . . . . . . . . . . . . 8 Turn signals . . . . . . . . . . . . . . . . . . . . . . . . . . . . 113
Warning lamp . . . . . . . . . . . . . . . . . . . . 75, 113
Two-way radio . . . . . . . . . . . . . . . . . . . . . . . . . . 205
Type plate . . . . . . . . . . . . . . . . . . . . . . . . . . . . . 258
Tyre pressure . . . . . . . . . . . . . . . . . . . . . . . . . . . 228
Tyre pressures . . . . . . . . . . . . . . . . . . . . . . . . . . 260
Tyres and wheels Dimensions . . . . . . . . . . . . . . . . . . . . . . . . . 229
Tyres service life . . . . . . . . . . . . . . . . . . . . . . . . 228
Tyres tread depth . . . . . . . . . . . . . . . . . . . . . . . 229
Tyres with directional tread pattern . . . . . . . . . 227
UUnderbody sealant . . . . . . . . . . . . . . . . . . . . . . 200
Unfastening seat belt (with one buckle) . . . . . . . . . . . . . . . . . . . . . 27
Unfastening seat belts (with two buckles) . . . . . . . . . . . . . . . . . . . . . 28
Upper right stowage on instrument panel . . . 135VVehicle Lifting . . . . . . . . . . . . . . . . . . . . . . . . . . . . . . 255
Vehicle battery . . . . . . . . . . . . . . . . . . . . . . . . . 225
Vehicle data . . . . . . . . . . . . . . . . . . . . . . . . . . . . 258
Vehicle identification data . . . . . . . . . . . . . . . . 258
Vehicle identification number . . . . . . . . . . . . . 258
Vehicle paint Car care products . . . . . . . . . . . . . . . . . . . . 195
alhambra_aleman.book Seite 280 Montag, 23. M‰ rz 2009 1:12 13