wheel bolt torque Seat Alhambra 2011 Owner's Manual
[x] Cancel search | Manufacturer: SEAT, Model Year: 2011, Model line: Alhambra, Model: Seat Alhambra 2011Pages: 385, PDF Size: 7.92 MB
Page 298 of 385
296
Wheels and tyres
Wheel rims The design of wheel bolts is matched to the rims. If different rims are fitted,
the corr
ect
wheel bolts with the right length and correctly shaped bolt
heads must be used. This ensures that wheels are fitted securely and that
the brake system functions correctly ⇒ page 305.
For technical reasons, it is not generally possible to use the wheels from
other vehicles. In some cases, this may also be true for the same model of
wheel.
The tyres and rims approved by SEAT are specially matched to the character-
istics of the vehicle and are critical to good road holding and safe handling.
Wheel bolts
Wheel bolts must be tightened to the correct torque ⇒ page 305.
Beadlock wheel rims
Beadlock wheel rims have various components. These are joined together
by special bolts using a special procedure. This ensures good performance,
a better seal, improved safety and wheel run out. Therefore, worn rims
should always be replaced and must only be repaired in a Technical Service.
SEAT recommends visiting a Technical Service ⇒ .
Wheel rims w
ith bolted trims
Wheel rims may be fitted with interchangeable trim parts which are attach-
ed to the rim using self-locking bolts. Worn trims should only be replaced at
a Technical Service. SEAT recommends visiting a Technical Service ⇒ .
WARNING
The use of worn or damaged wheel rims could make driving more danger-
ous and r
esult in serious accidents and damage.
● Only wheel rims which have been approved for use with your vehicle
should be u
sed.
● Inspect wheel rims regularly for damage and replace as required. WARNING
If the bolted joints of wheel rims with bolted ring trims are not correctly
tightened or loo sened, thi
s could result in serious accident.
● Never loosen the bolted joints of wheel rims with bolted ring trims.
● Any work relating to wheel rims with bolted rims should be carried
out at qua
lified workshop. SEAT recommends visiting a Technical Service.
Replacement of new tyres and wheel rims New tyres
●
When tyres are new, drive with extreme caution for the first 500 km
(310 mil e
s), as all tyres need to be run-in. Tyres which have not been run-in
do not have such good grip ⇒ or braking capacity
⇒ .
● All four wheels must be fitted with radial tyres of the same type, size
(ro l
ling circumference) and the same tread pattern.
● The tread depth of new tyres may vary, according to the type and make
of tyr
e and the tread pattern.
Replacing tyres
● Where possible, always replace both wheels on an axle (both wheels on
the front ax
le or both wheels on the rear axle) ⇒ .
● Old tyres should only be replaced by SEAT approved tyres for the vehicle
in ques tion, and in ac
cordance with the maximum permitted size, diameter,
load and speed capacity.
● Never use tyres which are larger than SEAT approved tyres. If the tyres
are too b
ig, they may knock or rub against the chassis or other components,
resulting in damage.
Page 308 of 385
306
Wheels and tyres WARNING (Continued)
● Only use suitable tools that are not damaged when changing a wheel.
● A
lw
ays stop the engine, turn on the electronic parking brake and
plac
e the gear selector lever in position P, for an automatic gearbox, or
engage a gear for a manual gearbox to reduce the risk of the vehicle mov-
ing accidentally.
● Have the tightening torque of the wheel bolts checked as soon as
poss
ible with a reliable torque wrench.
Preparations for changing a wheel Check list
Bef
or
e changing a wheel, complete the following operations in the order
given ⇒ :
Park the
vehicle on an even and solid surface.
Connect the electronic parking brake ⇒ page 183.
Automatic gearbox: Move selector lever to position P ⇒ page 174.
Stop the engine and remove the key from the ignition ⇒ page 170.
Manual gearbox: Select a gear ⇒ page 174.
Have all vehicle occupants get out of the vehicle and wait in a safe
place (for example, behind the safety barrier).
Block the opposite wheel with wedges or a similar object.
When towing a trailer: unhook the trailer from the towing vehicle and
park it correctly.
If the luggage compartment is full: take the baggage out of the vehicle. Take the vehicle tool kit out of the luggage compartment.
Remove the wheel trims ⇒ page 304.
1.
2.
3.
4.
5.
6.
7.
8.
9.
10.
11. WARNING
Failure to follow the checklist prepared for your own safety could lead to
acc ident
s and severe injuries.
● Always complete the operations given in the checklist and observe
the genera
l rules of safety.
Page 309 of 385
307
Wheels and tyres
Wheel bolts Fig. 181 Changing the
wheel: Sl
ac
ken the wheel
bolts. Fig. 182 Changing the
wheel: T
y
re valve 1 and
pos ition of
anti-theft
wheel locking bolt 2 or
3 .
Only use the tool supplied with the vehicle to loosen the wheel bolts.
Loo sen the wheel
bolts only about one turn before raising the vehicle with
the jack. If the wheel bolt is very tight, you may be able to loosen it by pushing down
on the end of the wheel br
ace carefully with your foot. Hold on to the car for
support and take care not to slip.
Loosening wheel bolts
● Fit the wheel brace as far as it will go over the wheel bolt ⇒ fig. 181.
● Hold the wheel brace at the end and rotate the bolt approximately one
turn antic
lockwise ⇒ .
Loo senin
g anti-theft wheel bolts
For wheels with full hubcap, the anti-theft wheel lock must be threaded into
position ⇒ fig. 182 2 or
3 before mounting the hubcap. Otherwise it will
not be po s
sible to mount the full hubcap.
● Take the adapter for anti-theft wheel bolts out of the vehicle tool kit.
● Insert the adapter onto the wheel bolt.
● Fit the wheel brace onto the adapter as far as possible.
● Hold the wheel brace at the end and rotate the bolt approximately one
turn antic
lockwise ⇒ .
Import ant
information about wheel bolts
The wheel rims and bolts have been designed to be fitted to factory op-
tions. If different rims are fitted, the correct wheel bolts with the right length
and correctly shaped bolt heads must be used. This ensures that wheels are
fitted securely and that the brake system functions correctly.
In some circumstances, wheel bolts from the same model vehicle should
not be used.
Wheel bolt tightening torque
The prescribed tightening torque for wheel bolts for steel and alloy wheels
is 140 Nm. Have the tightening torque of the wheel bolts checked as soon
as possible with a reliable torque wrench.
If wheel bolts are rusty and it is difficult to tighten them, the threads should
be replaced and cleaned before checking the torque. Safety First Operating instructions Practical tips Technical Data
Page 310 of 385
308
Wheels and tyres
Never grease or lubricate wheel bolts or the wheel hub threads. Although
they h av
e been tightened to the prescribed torque, they could come loose
while driving. WARNING
If the wheel bolts are not fitted correctly they could be released while
drivin g l
eading to loss of vehicle control and serious damage.
● Only use wheel bolts which correspond to the wheel rims in question.
● Never use different wheel bolts.
● The bolts and threads should be clean, free of oil and grease and easy
to thre
ad. WARNING (Continued)
● To loosen and tighten the wheel bolts, always use the wheel brace
s up
plied with the vehicle.
● Loosen the wheel bolts only about one turn before raising the vehicle
with the jac
k.
● Never grease or lubricate wheel bolts or the wheel hub threads. Al-
though they hav
e been tightened to the prescribed torque, they could
come loose while driving.
● Never loosen the bolted joints of wheel rims with bolted ring trims.
● If the wheel bolts are not tightened to the correct torque, they may
come loose whi
le driving, and the bolts and rims may come out. If the
tightening torque is too high, the wheel bolts and threads can be dam-
aged.
Page 313 of 385
311
Wheels and tyres
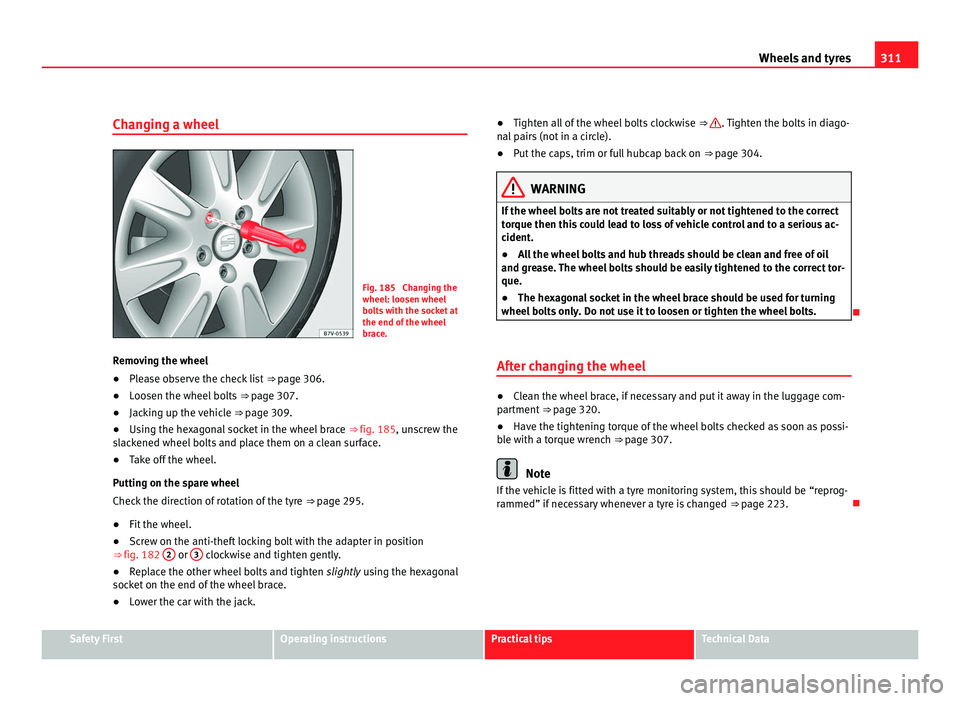
Changing a wheel Fig. 185 Changing the
wheel: loosen wheel
bo
lt
s with the socket at
the end of the wheel
brace.
Removing the wheel
● Please observe the check list ⇒ page 306.
● L
oosen the wheel bolts ⇒ page 307.
● Jac
king up the vehicle ⇒ page 309.
● U
sing the hexagonal socket in the wheel brace ⇒ fig. 185, uns
crew the
slackened wheel bolts and place them on a clean surface.
● Take off the wheel.
Putting on the s
pare wheel
Check the direction of rotation of the tyre ⇒ page 295.
● Fit the wheel.
● Screw on the anti-theft locking bolt with the adapter in position
⇒ fig. 182 2 or
3 clockwise and tighten gently.
● Replace the other wheel bolts and tighten slightl
y using the hexagonal
socket on the end of the wheel brace.
● Lower the car with the jack. ●
Tighten all of the wheel bolts clockwise ⇒ . Tighten the bolts in diago-
nal p
airs (not in a circle).
● Put the caps, trim or full hubcap back on ⇒ page 304. WARNING
If the wheel bolts are not treated suitably or not tightened to the correct
tor que then thi
s could lead to loss of vehicle control and to a serious ac-
cident.
● All the wheel bolts and hub threads should be clean and free of oil
and grea
se. The wheel bolts should be easily tightened to the correct tor-
que.
● The hexagonal socket in the wheel brace should be used for turning
wheel bolt
s only. Do not use it to loosen or tighten the wheel bolts.
After changing the wheel ●
Clean the wheel brace, if necessary and put it away in the luggage com-
par tment
⇒ page 320.
● Have the tightening torque of the wheel bolts checked as soon as possi-
ble w
ith a torque wrench ⇒ page 307. Note
If the vehicle is fitted with a tyre monitoring system, this should be “reprog-
rammed” if nec
essary whenever a tyre is changed ⇒ page 223.Safety First Operating instructions Practical tips Technical Data
Page 349 of 385
347
General notes on the technical data
Towing a trailer Tr ai
ler weights Trailer weight
The trai
l
er weights and drawbar loads approved are selected in intensive tri-
als according to precisely defined criteria. The approved trailer weights are
valid for vehicles in the EU for maximum speeds of 80 km/h (in certain cir-
cumstances up to 100 km/h). The figures may be different in other coun-
tries. All data in the official vehicle documents take precedence over these
data ⇒ .
Dra wb
ar load
The maximum permitted weight exerted by the trailer drawbar on the ball
joint of the towing bracket must not exceed 85 kg.
In the interest of road safety, we recommend that you always tow approach-
ing the maximum drawbar load. The response of the trailer on the road will
be poor if the drawbar load is too small.
If the maximum permitted drawbar load is not reached (e.g. in the case of
small single-axle trailers, light and without load, or tandem axle trailers with
a wheelbase of less than 1 m) it is compulsory for the drawbar load to be at
least 4% of the trailer's weight. WARNING
● For safety reasons, do not exceed the 80 km/h limit. This is also valid
in c ou
ntries where higher speeds are permitted.
● Never exceed the maximum trailer weights or the drawbar load. If the
permiss
ible axle load or the permissible total weight is exceeded, the
driving characteristics of the vehicle may change, leading to accidents,
injuries and damage to the vehicle. Wheels
Ty r
e pressure, snow chains, wheel bolts Tyre pressures
The stic
k
er with the tyre pressure values can be found on the inside of the
tank flap. The tyre pressure values given there are for cold tyres. The slightly
raised pressures of warm tyres must not be reduced. ⇒ Snow chains
Snow c
h
ains may be fitted only to the front wheels.
Consult the chapter “wheels” of this manual.
Wheel bolts
After the wheels have been changed, the tightening torque of the wheel
bolts should be checked as soon as possible with a torque wrench ⇒ .
The tightenin g t
orque for steel and alloy wheels is 120 Nm. WARNING
● Check the tyre pressure at least once per month. Checking tyre pres-
s ur
e value is very important. If the tyre pressure is too high or too low,
there is an increased danger of accidents, particularly at high speeds.
● If the torque of the wheel bolts is too low, they could loosen while the
vehicl
e is in motion. Risk of accident! If the tightening torque is too high,
the wheel bolts and threads can be damaged. Note
We recommend that you ask your Authorised Service Centre for information
about ap pr
opriate wheel, tyre and snow chain size. Safety First Operating instructions Practical tips Technical Data
Page 380 of 385
T
Tai l
gate . . . . . . . . . . . . . . . . . . . . . . . . . . . . . . . . 84Closing . . . . . . . . . . . . . . . . . . . . . . . . . . . . . 86
Driving with the tailgate open . . . . . . . . . . . 14
Electronic locking . . . . . . . . . . . . . . . . . . . . . 87
Electronic opening . . . . . . . . . . . . . . . . . . . . 87
Emergency locking and unlocking . . . . . . 317
Locking . . . . . . . . . . . . . . . . . . . . . . . . . . 76, 86
Opening . . . . . . . . . . . . . . . . . . . . . . . . . . . . 85
See "Tailgate" . . . . . . . . . . . . . . . . . . . . . 76, 84
Unlocking . . . . . . . . . . . . . . . . . . . . . . . . 76, 85
Warning indicator . . . . . . . . . . . . . . . . . . . . . 85
TCS see ASR . . . . . . . . . . . . . . . . . . . . . . . . . . . . 191
Technical data . . . . . . . . . . . . . . . . . . . . . . . . . 345 Axle loads . . . . . . . . . . . . . . . . . . . . . . . . . . . 15
Bottle capacity . . . . . . . . . . . . . . . . . . . . . . 109
Curb weight . . . . . . . . . . . . . . . . . . . . . . . . . 15
Engine oil specifications . . . . . . . . . . . . . . 280
Roof load . . . . . . . . . . . . . . . . . . . . . . . . . . . 140
Total weight . . . . . . . . . . . . . . . . . . . . . . . . . 15
Tyre pressures . . . . . . . . . . . . . . . . . . . . . . . 297
Weights . . . . . . . . . . . . . . . . . . . . . . . . . . . . . 15
Technical details Type of fuel . . . . . . . . . . . . . . . . . . . . . . . . . 268
Technical modifications . . . . . . . . . . . . . . . . . . 258 Labels . . . . . . . . . . . . . . . . . . . . . . . . . . . . . 255
Lifting platform . . . . . . . . . . . . . . . . . . . . . . 262
Plates . . . . . . . . . . . . . . . . . . . . . . . . . . . . . 255
Temperature display Outside temperature . . . . . . . . . . . . . . . . . . 59 Temperature gauge
Cool ant . . . . . . . . . . . . . . . . . . . . . . . . . . . . 284
Things to note Auxiliary heater . . . . . . . . . . . . . . . . . 163, 166
Diesel particulate filter . . . . . . . . . . . . . . . 270
Electric sliding doors . . . . . . . . . . . . . . . . . . 82
Fumes . . . . . . . . . . . . . . . . . . . . . . . . . . . . . 166
Increase in exhaust fumes . . . . . . . . . . . . . 269
Parking sensor system . . . . . . . . . . . . . . . . 199
Rear assist . . . . . . . . . . . . . . . . . . . . . . . . . 209
Switching Auto Hold off . . . . . . . . . . . . . . . 195
Water underneath the vehicle . . . . . . . . . . 160
Tightening torque Wheel bolts . . . . . . . . . . . . . . . . . . . . . . . . . 307
Tightening torque of wheel bolts . . . . . . . . . . 347
TIN . . . . . . . . . . . . . . . . . . . . . . . . . . . . . . . . . . . 303
Tips for driving . . . . . . . . . . . . . . . . . . . . . . . . . . . 7 Before starting out . . . . . . . . . . . . . . . . . . . . . 7
Tiptronic . . . . . . . . . . . . . . . . . . . . . . . . . . . . . . 180
Tools . . . . . . . . . . . . . . . . . . . . . . . . . . . . . . . . . 320
Total weight . . . . . . . . . . . . . . . . . . . . . . . . . . . . 15
Tow hitch Function control . . . . . . . . . . . . . . . . . . . . . 236
Installing a bicycle carrier . . . . . . . . . . . . . 235
Towing . . . . . . . . . . . . . . . . . . . . . . . . . . . . . . . . 340 Automatic gearbox . . . . . . . . . . . . . . . . . . . 341
Driving advice . . . . . . . . . . . . . . . . . . . . . . . 343
Four-wheel-drive . . . . . . . . . . . . . . . . . . . . . 341
Front tow ring . . . . . . . . . . . . . . . . . . . . . . . 342
Rear tow ring . . . . . . . . . . . . . . . . . . . . . . . . 342
Special notes . . . . . . . . . . . . . . . . . . . . . . . 341
Tow bar . . . . . . . . . . . . . . . . . . . . . . . . . . . . 341
Towing prohibited . . . . . . . . . . . . . . . . . . . 341 Towing rope . . . . . . . . . . . . . . . . . . . . . . . . 341
With a to
w hitch . . . . . . . . . . . . . . . . . . . . . 341
Towing a trailer . . . . . . . . . . . . . . . . . . . . . . . . . 347
Towing bracket Optical parking system . . . . . . . . . . . . . . . 201
Parking sensor system . . . . . . . . . . . . . . . . 199
Tow starting . . . . . . . . . . . . . . . . . . . . . . . . . . . 341
Traction . . . . . . . . . . . . . . . . . . . . . . . . . . . . . . . 303
Traction control system ASR (TCS) . . . . . . . . . . 191
Traction control when accelerating ASR (TCS) 190
Trailer Adjusting the headlights . . . . . . . . . . . . . . 237
Antitheft alarm . . . . . . . . . . . . . . . . . . . . . . 236
Connection . . . . . . . . . . . . . . . . . . . . . . . . . 235
Drawbar load . . . . . . . . . . . . . . . . . . . . . . . 231
Driving with a trailer . . . . . . . . . . . . . . 233, 237
Electrically releasing the hitch ball . . . . . . 234
Electric socket . . . . . . . . . . . . . . . . . . . . . . 236
Fitting a trailer tow hitch . . . . . . . . . . . . . . 239
Function control . . . . . . . . . . . . . . . . . . . . . 236
Hitch ball . . . . . . . . . . . . . . . . . . . . . . . . . . . 234
Hitching . . . . . . . . . . . . . . . . . . . . . . . . . . . 235
Loading . . . . . . . . . . . . . . . . . . . . . . . . . . . . 236
Rear LED lights . . . . . . . . . . . . . . . . . . 233, 236
Rear lights . . . . . . . . . . . . . . . . . . . . . . 233, 236
Stabilising the vehicle and trailer combina-tion . . . . . . . . . . . . . . . . . . . . . . . . . . . . . . 238
Trailer cable . . . . . . . . . . . . . . . . . . . . 233, 235
Trailer weight . . . . . . . . . . . . . . . . . . . . . . . 240
Wing mirrors . . . . . . . . . . . . . . . . . . . . . . . . 233
Trailer cable . . . . . . . . . . . . . . . . . . . . . . . 233, 235
Trailer hitch ball See "Trailer" . . . . . . . . . . . . . . . . . . . . . . . . 233378
Index
Page 382 of 385
Engine compartment . . . . . . . . . . . . . . . . . 249
Exterior mirr
or
s . . . . . . . . . . . . . . . . . . . . . . 245
High pressure cleaning equipment . . . . . . 244
Imitation leather . . . . . . . . . . . . . . . . . . . . . 253
Instrument panel . . . . . . . . . . . . . . . . . . . . 253
Plastic parts . . . . . . . . . . . . . . . . . . . . . . . . 253
Protection of vehicle undercarriage . . . . . 248
Real leather . . . . . . . . . . . . . . . . . . . . . . . . . 252
Rubber seals . . . . . . . . . . . . . . . . . . . . . . . . 248
Service position . . . . . . . . . . . . . . . . . . . . . 107
Special features . . . . . . . . . . . . . . . . . 243, 244
Textile covers . . . . . . . . . . . . . . . . . . . . . . . 251
Treating your upholstery . . . . . . . . . . . . . . 250
Upholstery . . . . . . . . . . . . . . . . . . . . . . . . . 251
Vehicle paintwork . . . . . . . . . . . . . . . . . . . . 247
Washing by hand . . . . . . . . . . . . . . . . . . . . 243
Washing the vehicle . . . . . . . . . . . . . . . . . . 243
Windows . . . . . . . . . . . . . . . . . . . . . . . . . . . 245
Wooden trim . . . . . . . . . . . . . . . . . . . . . . . . 253
Vehicle code . . . . . . . . . . . . . . . . . . . . . . . . . . . 345 Vehicle data label . . . . . . . . . . . . . . . . . . . . 345
Vehicle identification number . . . . . . . . . . . . . 345
Vehicle key Synchronising . . . . . . . . . . . . . . . . . . . . . . . . 74
Vehicle key set See "Keys" . . . . . . . . . . . . . . . . . . . . . . . . . . 71
Vehicle specifications . . . . . . . . . . . . . . . . . . . 345
Vehicle telephone . . . . . . . . . . . . . . . . . . . . . . 260
Vehicle's battery Automatic consumer disconnection . . . . . 291
Charging . . . . . . . . . . . . . . . . . . . . . . . . . . . 291
Connecting . . . . . . . . . . . . . . . . . . . . . . . . . 291
Disconnecting . . . . . . . . . . . . . . . . . . . . . . . 291 Replacing . . . . . . . . . . . . . . . . . . . . . . . . . . 291
Runnin
g flat . . . . . . . . . . . . . . . . . . . . . . . . 292
Vibrations Steering . . . . . . . . . . . . . . . . . . . . . . . . . . . 299
W Warning indicator Doors . . . . . . . . . . . . . . . . . . . . . . . . . . . . . . . 80
Tailgate . . . . . . . . . . . . . . . . . . . . . . . . . . . . . 85
Warning lamp AdBlue . . . . . . . . . . . . . . . . . . . . . . . . . . . . 271
Airbag system . . . . . . . . . . . . . . . . . . . . . . . . 30
Alternator . . . . . . . . . . . . . . . . . . . . . . . . . . 289
Brake system . . . . . . . . . . . . . . . . . . . . . . . 184
Catalytic converter . . . . . . . . . . . . . . . . . . . 228
Changing gear . . . . . . . . . . . . . . . . . . . . . . 175
Coolant . . . . . . . . . . . . . . . . . . . . . . . . . . . . 284
Cruise control . . . . . . . . . . . . . . . . . . . . . . . 212
Diesel particulate filter . . . . . . . . . . . . . . . 228
Engine management . . . . . . . . . . . . . . . . . 228
Engine oil pressure . . . . . . . . . . . . . . . . . . 279
Exhaust gas purification system . . . . . . . . 228
Pressing the brake . . . . . . . . . . . . . . . . . . . 184
Seat belts . . . . . . . . . . . . . . . . . . . . . . . . . . . 17
Vehicle battery . . . . . . . . . . . . . . . . . . . . . . 289
Warning lamps Lights . . . . . . . . . . . . . . . . . . . . . . . . . . . . . . 95
Warning triangle . . . . . . . . . . . . . . . . . . . . . . . . 314
Washing . . . . . . . . . . . . . . . . . . . . . . . . . . . . . . 242 by hand . . . . . . . . . . . . . . . . . . . . . . . . . . . . 243
Washing the vehicle . . . . . . . . . . . . . . . . . . . . . 243 Sensors . . . . . . . . . . . . . . . . . . . . . . . . 198, 203 Special features . . . . . . . . . . . . . . . . . . . . . 243
with high pre
ssure cleaning equipment . . 244
Water box . . . . . . . . . . . . . . . . . . . . . . . . . . . . . 249
Wear indicators . . . . . . . . . . . . . . . . . . . . . . . . 299
Wear of tyres . . . . . . . . . . . . . . . . . . . . . . . . . . . 299
Weights . . . . . . . . . . . . . . . . . . . . . . . . . . . . . . . . 15
Wheel bolts . . . . . . . . . . . . . . . . . . . 305, 307, 347 Caps . . . . . . . . . . . . . . . . . . . . . . . . . . . . . . 305
Tightening torque . . . . . . . . . . . . . . . . . . . . 307
Wheel load capacity . . . . . . . . . . . . . . . . . . . . . 302
Wheel rims . . . . . . . . . . . . . . . . . . . . . . . . . . . . 296 Beadlock . . . . . . . . . . . . . . . . . . . . . . . . . . . 296
Bolted trims . . . . . . . . . . . . . . . . . . . . . . . . 296
See "Wheels and tyres" . . . . . . . . . . . . . . . 293
Wheels . . . . . . . . . . . . . . . . . . . . . . . . . . . . . . . 347
Wheels and tyres . . . . . . . . . . . . . . . . . . . . . . . 293 Avoiding damage . . . . . . . . . . . . . . . . . . . . 294
Changing a wheel . . . . . . . . . . . . . . . . . . . 305
Code . . . . . . . . . . . . . . . . . . . . . . . . . . . . . . 302
Damaged tyres . . . . . . . . . . . . . . . . . . . . . . 299
Errors in wheel alignment . . . . . . . . . . . . . 300
Foreign bodies in the tyres . . . . . . . . . . . . 299
Interchanging tyres . . . . . . . . . . . . . . . . . . 295
New tyres . . . . . . . . . . . . . . . . . . . . . . . . . . 296
Older tyres . . . . . . . . . . . . . . . . . . . . . . . . . 295
Replacing tyres . . . . . . . . . . . . . . . . . . . . . . 296
Run-flat tyre codes . . . . . . . . . . . . . . . . . . . 302
Run-out . . . . . . . . . . . . . . . . . . . . . . . . . . . . 300
Serial number . . . . . . . . . . . . . . . . . . . . . . . 303
Snow chains . . . . . . . . . . . . . . . . . . . . . . . . 301
Speed rating . . . . . . . . . . . . . . . . . . . . 302, 303
Storing tyres . . . . . . . . . . . . . . . . . . . . . . . . 295
Technical data . . . . . . . . . . . . . . . . . . . . . . 302380
Index