seat adjustment Seat Alhambra 2012 Owner's Guide
[x] Cancel search | Manufacturer: SEAT, Model Year: 2012, Model line: Alhambra, Model: Seat Alhambra 2012Pages: 388, PDF Size: 6.72 MB
Page 116 of 388
114Seats and storage compartments
Seats and storage compartments
Seat adjustment
Mechanical controls on the front seat
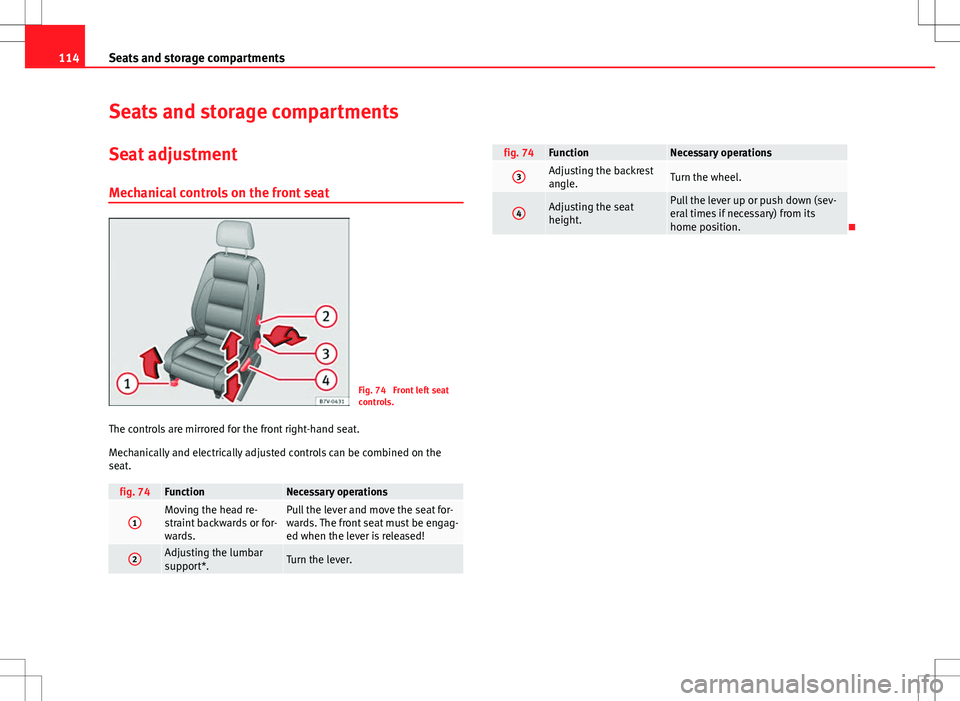
Fig. 74 Front left seat
controls.
The controls are mirrored for the front right-hand seat.
Mechanically and electrically adjusted controls can be combined on the
seat.
fig. 74FunctionNecessary operations
1Moving the head re-
straint backwards or for-
wards.Pull the lever and move the seat for-
wards. The front seat must be engag-
ed when the lever is released!
2Adjusting the lumbar
support*.Turn the lever.
fig. 74FunctionNecessary operations
3Adjusting the backrest
angle.Turn the wheel.
4Adjusting the seat
height.Pull the lever up or push down (sev-
eral times if necessary) from its
home position.
Page 117 of 388
115
Seats and storage compartments
Electrical controls on the front seat*
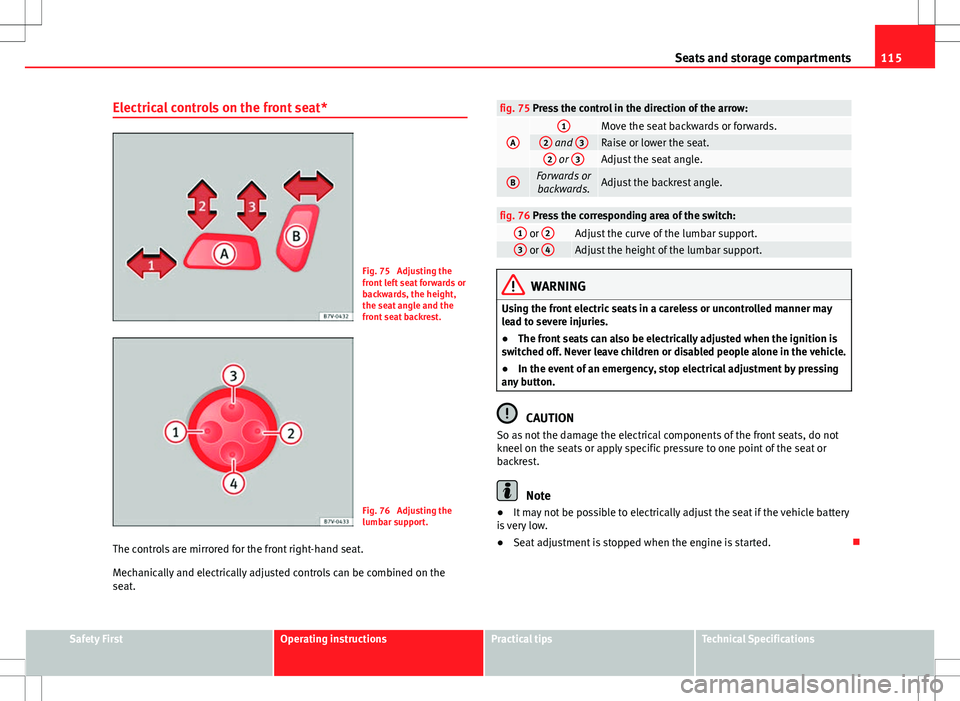
Fig. 75 Adjusting the
front left seat forwards or
backwards, the height,
the seat angle and the
front seat backrest.
Fig. 76 Adjusting the
lumbar support.
The controls are mirrored for the front right-hand seat.
Mechanically and electrically adjusted controls can be combined on the
seat.
fig. 75 Press the control in the direction of the arrow:
A1Move the seat backwards or forwards.2 and 3Raise or lower the seat.2 or 3Adjust the seat angle.
BForwards or
backwards.Adjust the backrest angle.
fig. 76 Press the corresponding area of the switch:1 or 2Adjust the curve of the lumbar support.3 or 4Adjust the height of the lumbar support.
WARNING
Using the front electric seats in a careless or uncontrolled manner may
lead to severe injuries.
● The front seats can also be electrically adjusted when the ignition is
switched off. Never leave children or disabled people alone in the vehicle.
● In the event of an emergency, stop electrical adjustment by pressing
any button.
CAUTION
So as not the damage the electrical components of the front seats, do not
kneel on the seats or apply specific pressure to one point of the seat or
backrest.
Note
● It may not be possible to electrically adjust the seat if the vehicle battery
is very low.
● Seat adjustment is stopped when the engine is started.
Safety FirstOperating instructionsPractical tipsTechnical Specifications
Page 119 of 388

117
Seats and storage compartments
Seat functions Introduction
Additional information and warnings
● Adjust the seat position ⇒ page 10
● Seat belts ⇒ page 21
● Airbag system ⇒ page 31
● Child seats (accessories) ⇒ page 39
● Integrated child seats ⇒ page 45
● Exterior mirrors ⇒ page 110
● Luggage compartment ⇒ page 126
WARNING
Inappropriate use of the seat functions can cause severe injuries.
● Assume the proper sitting position before your trip and remain in it
throughout. This also applies to the other occupants.
● Only adjust the seat position memory when the vehicle is stationary.
● Only switch the lumbar massage function on and off when the vehicle
is stationary.
● Keep hands, fingers, feet and other limbs away from the seat operat-
ing and adjustment radius.
Seat heating*
Fig. 78 Detailed view of
the centre console: front
seat heating controls,
here with the second
temperature level set.
Fig. 79 Detailed view of
the centre console: con-
trols for the front seat
heating in vehicles
equipped with Climatron-
ic.
The seat cushions can be heated electrically when the ignition is switch on.
The backrest is also heated in some versions.
Switch off seat heating if there is nobody in the seat.
Safety FirstOperating instructionsPractical tipsTechnical Specifications
Page 125 of 388

123
Seats and storage compartments
Head restraints Adjusting the head restraints
Fig. 84 A: Adjust the head restraints with no possibili-
ty of lengthways direction adjustment, B: Adjust the
head restraints with lengthways direction adjustment.
Fig. 85 Adjust the head
restraints in the second
or third row of seats.
All seats are equipped with a head restraint. Adjusting height
●
Raise the head restraint in the direction of the arrow or lower it ⇒ fig. 84
or ⇒ fig. 85 1
with the button pressed ⇒ .
● The head restraint must engage securely in position. There are three
possible positions on the second row of seats and two possible positions
on the third row of seats.
Adjusting the front head restraints
● Push the head restraint forward in the direction of the arrow or backward
⇒ fig. 84 1
B with the button pressed.
● The head restraint must engage securely in position.
Correct adjustment of head restraints
Adjust the head restraint so that its upper edge is at the same level as the
top of your head, or as close as possible to the same level as the top of your
Safety FirstOperating instructionsPractical tipsTechnical Specifications
Page 126 of 388
124Seats and storage compartments
head and under no circumstances below eye level. Keep the back of your
neck as close as possible to the head restraint.
Adjusting the head restraint for short people
Lower the head restraint completely, even if your head is below its upper
edge. When the head restraint is at its lowest, it is possible that a small gap
remains between it and the backrest.
Adjusting the head restraint for tall people
Raise the head restraint completely.
WARNING
Travelling with the head restraints removed or improperly adjusted in-
creases the risk of severe or fatal injuries in the event of accidents and
sudden braking or manoeuvres.
● Always fit and adjust the head restraint properly whenever a person
is occupying a seat.
● All occupants must correctly adjust the head restraint according to
their height to reduce the risk of back injuries in the event of an accident.
The upper edge of the head restraint must be as close as possible to the
same level as the top of your head and under no circumstances below eye
level. Keep the back of your neck as close as possible to the head re-
straint.
● Never adjust the head restraint while the vehicle is in motion.
Removing and fitting the head restraints
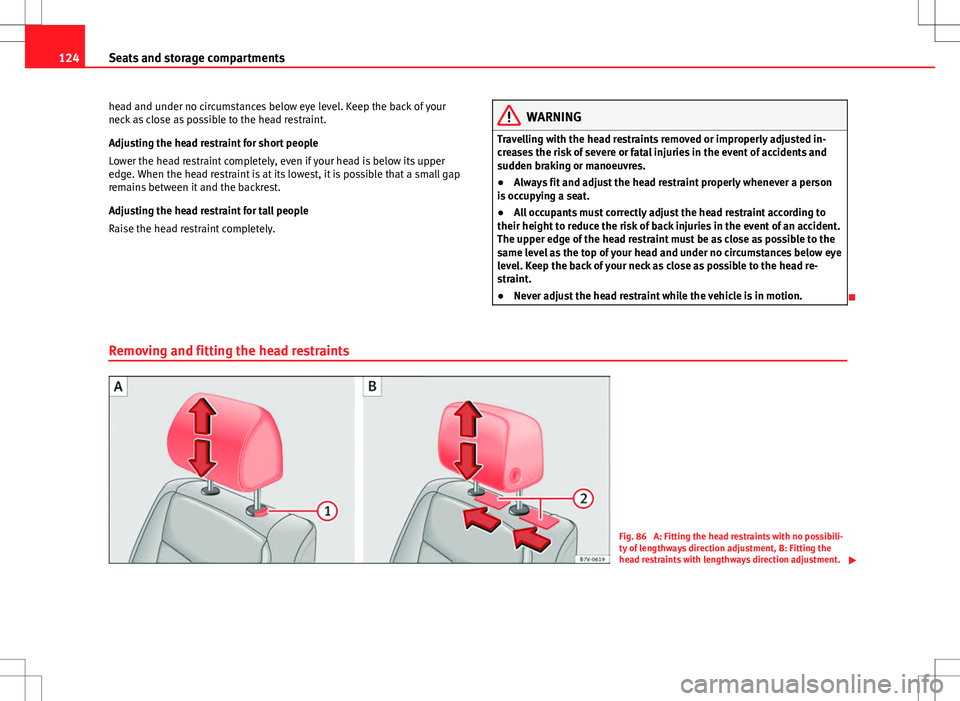
Fig. 86 A: Fitting the head restraints with no possibili-
ty of lengthways direction adjustment, B: Fitting the
head restraints with lengthways direction adjustment.
Page 127 of 388

125
Seats and storage compartments
Fig. 87 Fitting the head
restraints in the second
or third row of seats.
All seats are equipped with a head restraint.
Removing the front head restraints in vehicles without the lengthways
direction adjustment of the head restraints
● If necessary, adjust the backrest so that the head restraint can be fitted.
● Push the head restraint up as far as it will go ⇒
.
● Pull out the head restraint pressing the button completely ⇒ fig. 86 1
A.
Fitting the front head restraints in vehicles without the lengthways
direction adjustment of the head restraints
●
Correctly place the head restraint into the guides on the backrest and in-
sert it.
● Completely press the button 1
A and push the head restraint down-
wards.
● Adjust the head restraint according to the correct seat position and se-
cure it ⇒ page 123. Removing the front head restraints in vehicles with the lengthways
direction adjustment of the head restraints
●
If necessary, adjust the backrest so that the head restraint can be fitted.
● Push the head restraint up and backward as far as it will go ⇒
.
● Place a flat object, e.g. a plastic card 2 B, on both sides between the
backrest cover and the end protector of the backrest retaining bar and un-
lock the retaining bars with a little pressure.
● Completely pull out the head restraint.
Fitting the front head restraints in vehicles with the lengthways direction
adjustment of the head restraints
● Pull out the two retaining bars from the head restraint as far as possible.
● Correctly place the head restraint into the guides on the backrest and in-
sert it.
● Push the head restraint down as far as possible until the two retaining
bars are secured.
● Adjust the head restraint according to the correct seat position and se-
cure it ⇒ page 123.
Removing the head restraints from the second and third row of seats
● Fold the backrest of the rear seat forwards ⇒ page 126.
● Push the head restraint up as far as it will go ⇒
.
● Pull out the head restraint ⇒ fig. 87 1 with the button pressed.
● Fold the backrest of the rear seat backwards until it is engaged.
Installing the head restraints for the second and third row of seats
● Fold the backrest of the rear seat forwards ⇒ page 126.
● Insert the head restraint into the guides on the backrest.
● Push the head restraint down while pressing the button 1
.
● Fold the backrest of the rear seat backwards until it is engaged.
● Adjust the head restraint to the correct position ⇒ page 123.
Safety FirstOperating instructionsPractical tipsTechnical Specifications
Page 196 of 388
194Driving
notably increasing braking distance, and could even result in the total fail-
ure of the brake system. Ensuring that the brake system is always function-
ing correctly is essential for your own safety and the safety of other road
users ⇒
.
Brake fluid specifications
SEAT have developed a special brake fluid optimised for the brake systems
of their vehicles. To ensure the optimum working of the brake system, SEAT
recommends the use of brake fluid in accordance with the VW 501 14
standard. If this brake fluid is not available or another brake fluid is used for
different reasons, use a brake fluid that complies with the United States
standard FMVSS 116 DOT 4 or the German standard DIN ISO 4925 CLASS 4
⇒
.
Brake fluids conforming to the standard VW 501 14, fulfil the American re-
quirements of the FMVSS 116 DOT 4 standard and the German
DIN ISO 4925 CLASS 4 standard. However, fluids that comply with the Amer-
ican FMVSS 116 DOT 4 standard or the German DIN ISO 4925 CLASS 4
standard do not necessarily comply with the VW 501 14 standard. Always
check the information on the brake fluid container and ensure that you are
using suitable brake fluid.
A suitable brake fluid can be obtained from Technical Services.
Brake fluid level
The level of the brake fluid should always be between the MIN and MAX
marks, or above the MIN mark ⇒
.
It is not always possible to check the level of the brake fluid, as in some
models the engine components make it difficult to see the brake fluid reser-
voir. If you cannot read the exact brake fluid level, consult a specialist.
The brake fluid level drops slightly when the vehicle is being used due to
wear of the brake pads and the automatic readjustment of the brake.
Changing the brake fluid
The brake fluid should be changed in accordance with the instructions giv-
en in the Maintenance Programme. Have the brake fluid changed by a Tech- nical Service. SEAT recommends visiting a Technical Service. This means
that only brake fluid complying with the required specifications will be
used.
WARNING
If the brake fluid level is low or unsuitable/old brake fluid is used, the
brake system may fail or braking power will be reduced.
● Check the brake system and the brake fluid level regularly!
● The brake fluid should be changed regularly in accordance with the
instructions given in the Maintenance Programme.
● When the brake fluid is used and brakes are subjected to extreme
braking forces, bubbles of vapour form in the brake system. These bub-
bles of water vapour can significantly reduce braking power, notably in-
creasing braking distance, and could even result in the total failure of the
brake system.
● Only used brake fluid that conforms to the VW 501 14 standard,
FMVSS 116 DOT 4 standard or even the DIN ISO 4925 CLASS 4 standard.
Other types of brake fluid could affect brake operation and reduce brak-
ing power. Do not use a brake fluid if the container does not specify com-
pliance with the VW 501 14, FMVSS 116 DOT 4 or DIN ISO 4925 CLASS 4
standards.
● The replacement brake fluid must be new.
● Always ensure that you use suitable brake fluid. Do not use a brake
fluid if the container does not specify compliance with the VW 501 14,
FMVSS 116 DOT 4 or DIN ISO 4925 CLASS 4 standards.
Page 243 of 388
241
Trailer towing
For the sake of road safety, SEAT recommends using the maximum allowed
drawbar load. The handling of the combined vehicle and trailer will be poor
if the drawbar load is too low.
The drawbar load increases the weight on the rear axle, reducing the vehicle
carrying capacity.
Gross combination weight
This figure refers to the combined weight of the loaded vehicle and loaded
trailer.
Loading the trailer
The combined vehicle and trailer must be balanced. Use the maximum
drawbar load authorised and do not overload the front or the rear of the
trailer:
● Distribute loads in the trailer so that heavy objects are as near to the
axle as possible or even above it.
● Correctly secure the trailer load.
Tyre pressure
Inflate the trailer tyres according to the manufacturer's instructions.
Inflate the towing vehicles tyres to the maximum ⇒ page 297.
WARNING
Exceeding the maximum authorised axle load, drawbar load or the gross
combination weight of the towing vehicle and trailer could cause a seri-
ous accident with severe consequences.
● Never exceed the specifications.
● With the actual load on the front and rear axles, the maximum axle
load should never be exceeded. The weight on the front and rear should
never exceed the gross vehicle weight.
WARNING
If the load moves, the stability and safety of the vehicle and trailer com-
bination will be seriously affected and this could result in a serious acci-
dent.
● Always correctly load the trailer.
● Always secure loads correctly with suitable and undamaged attach-
ment rope or straps.
Driving with a trailer
Adjusting the headlights
When towing a trailer, the front of the vehicle may rise and so the dipped
beam headlights may blind other drivers. Use the headlight range control to
lower the cone of light. If you do not have headlight range control, have the
headlights adjusted by a qualified dealership. Vehicles with high-intensity
discharge lamps adapt automatically and do not require adjustment.
Details of driving with a trailer
● If the trailer has an overrun brake, apply the brakes gently at first and
then, firmly. This will prevent the jerking that can be caused by the trailer
wheels locking.
● As of the combined vehicle and trailer mass, braking distances will be
greater.
● Select a low gear before driving down a steep hill to use the engine
braking effect to slow down the vehicle. Otherwise, the braking system
could overheat and fail.
Safety FirstOperating instructionsPractical tipsTechnical Specifications
Page 371 of 388
Index
A
AbroadExtended stay abroad with your vehicle . . 259
Sale of vehicle . . . . . . . . . . . . . . . . . . . . . . 259
ABS See "Brake assist systems" . . . . . . . . . . . . 191
Accessories . . . . . . . . . . . . . . . . . . . . . . . . . . . . 261
Acoustic warnings Headlights . . . . . . . . . . . . . . . . . . . . . . . . . . 97
Adaptive headlights Dynamic . . . . . . . . . . . . . . . . . . . . . . . . . . . . 99
AdBlue Control lamp . . . . . . . . . . . . . . . . . . . . . . . . 275
Information . . . . . . . . . . . . . . . . . . . . . . . . . 276
Minimum quantity for a refill . . . . . . . . . . . 276
Refilling . . . . . . . . . . . . . . . . . . . . . . . . . . . . 277
Specifications . . . . . . . . . . . . . . . . . . . . . . . 278
Tank filling capacity . . . . . . . . . . . . . . . . . . 276
Warning lamp . . . . . . . . . . . . . . . . . . . . . . . 275
Additional equipment . . . . . . . . . . . . . . . . . . . 262
Additional heater See "Auxiliary heater" . . . . . . . . . . . . . . . . 165
Adjusting passenger exterior mirror . . . . . . . . 112
Adjustment Correct sitting position . . . . . . . . . . . . . . . . 12
Electric front seat . . . . . . . . . . . . . . . . . . . . 115
Head restraints . . . . . . . . . . . . . . . . . . . . . . 123
Mechanical front seat . . . . . . . . . . . . . . . . 114
Rear seats . . . . . . . . . . . . . . . . . . . . . . . . . . 116 Seat with position memory . . . . . . . . . . . . 118
Steering wheel . . . . . . . . . . . . . . . . . . . . . . 171
Adjustments Folding the backrest of the front passengerseat . . . . . . . . . . . . . . . . . . . . . . . . . . . . . 121
Headlight range . . . . . . . . . . . . . . . . . . . . . 101
Aerial . . . . . . . . . . . . . . . . . . . . . . . . . . . . . . . . . 259
Aerial built into the window . . . . . . . . . . . . . . . 259
AFS . . . . . . . . . . . . . . . . . . . . . . . . . . . . . . . . . . . 99
Airbag system . . . . . . . . . . . . . . . . . . . . . . . . 28, 31 Cleaning instrument panel . . . . . . . . . . . . 257
Curtain airbags . . . . . . . . . . . . . . . . . . . . . . . 37
Deactivating the front passenger airbag . . 35
Deactivating using the key switch . . . . . . . . 35
Description . . . . . . . . . . . . . . . . . . . . . . . . . . 31
Differences between front passenger airbagsystems . . . . . . . . . . . . . . . . . . . . . . . . . . . 34
Faults . . . . . . . . . . . . . . . . . . . . . . . . . . . . . 263
Front airbags . . . . . . . . . . . . . . . . . . . . . . . . 33
Function . . . . . . . . . . . . . . . . . . . . . . . . . . . . 31
Knee airbag . . . . . . . . . . . . . . . . . . . . . . . . . 38
Locking the vehicle after airbag deploy- ment . . . . . . . . . . . . . . . . . . . . . . . . . . . . . . 75
Repairs . . . . . . . . . . . . . . . . . . . . . . . . . . . . 263
Side airbags . . . . . . . . . . . . . . . . . . . . . . . . . 36
Use of child seats . . . . . . . . . . . . . . . . . . . . . 35
Vehicle care . . . . . . . . . . . . . . . . . . . . . . . . 257
Warning lamp . . . . . . . . . . . . . . . . . . . . . . . . 30
Air conditioner Faults . . . . . . . . . . . . . . . . . . . . . . . . . . . . . 162 Air conditioning
see "Climate control" . . . . . . . . . . . . . . . . . 157
Air recirculation mode . . . . . . . . . . . . . . . . . . . 163
Air vents . . . . . . . . . . . . . . . . . . . . . . . . . . . . . . 163
Alarm system . . . . . . . . . . . . . . . . . . . . . . . . . . . 78
Alcantara . . . . . . . . . . . . . . . . . . . . . . . . . . . . . . 255
All-wheel drive Snow chains . . . . . . . . . . . . . . . . . . . . . . . . 305
Winter tyres . . . . . . . . . . . . . . . . . . . . . . . . . 304
Alternator . . . . . . . . . . . . . . . . . . . . . . . . . . . . . 293
Ambient lighting . . . . . . . . . . . . . . . . . . . . . . . 102
Anodized surfaces . . . . . . . . . . . . . . . . . . . . . . 251
Anti-lock brake system (ABS) . . . . . . . . . . . . . 191
Anti-theft alarm Trailer . . . . . . . . . . . . . . . . . . . . . . . . . . . . . 240
Anti-theft alarm system False alarms . . . . . . . . . . . . . . . . . . . . . . . . . 79
Anti-theft bolts . . . . . . . . . . . . . . . . . . . . . . . . . 325
Anti-theft locking bolts . . . . . . . . . . . . . . . . . . 309
Anti-theft wheel locking bolts . . . . . . . . . . . . . 311
Anti-tow system . . . . . . . . . . . . . . . . . . . . . . . . . 79
Anti-trap function Electric windows . . . . . . . . . . . . . . . . . . . . . . 90
Panorama sliding sunroof . . . . . . . . . . . . . . 94
Sunshade . . . . . . . . . . . . . . . . . . . . . . . . . . . 94
Antifreeze . . . . . . . . . . . . . . . . . . . . . . . . . . . . . 289
Antitheft alarm . . . . . . . . . . . . . . . . . . . . . . . . . . 78
369
Index
Page 377 of 388
G 12 plus-plus . . . . . . . . . . . . . . . . . . . . . . 289
Refilling . . . . . . . . . . . . . . . . . . . . . . . . . . . . 290
Specifications . . . . . . . . . . . . . . . . . . . . . . . 289
Engine fault . . . . . . . . . . . . . . . . . . . . . . . . . . . 232
Engine management . . . . . . . . . . . . . . . . . . . . 232 Warning lamp . . . . . . . . . . . . . . . . . . . . . . . 232
Engine oil . . . . . . . . . . . . . . . . . . . . . . . . . . . . . 283 changing . . . . . . . . . . . . . . . . . . . . . . . . . . . 286
Checking the oil level . . . . . . . . . . . . . . . . . 285
Consumption . . . . . . . . . . . . . . . . . . . . . . . 286
Dipstick . . . . . . . . . . . . . . . . . . . . . . . . . . . . 285
Filler opening . . . . . . . . . . . . . . . . . . . . . . . 285
Indicator . . . . . . . . . . . . . . . . . . . . . . . . . . . 283
Specifications . . . . . . . . . . . . . . . . . . . . . . . 284
Topping up . . . . . . . . . . . . . . . . . . . . . . . . . 285
ESC See "Assisted braking systems" . . . . . . . . 191
Event Data Recorder . . . . . . . . . . . . . . . . . . . . . 265
Exhaust gas purification system . . . . . . . . . . . 232 Warning lamp . . . . . . . . . . . . . . . . . . . . . . . 232
Exterior aerial . . . . . . . . . . . . . . . . . . . . . . . . . . 264
Exterior mirrors . . . . . . . . . . . . . . . . . . . . . . . . . 112 Automatically folding exterior mirrors . . . 112
Controlling function . . . . . . . . . . . . . . . . . . 113
Synchronised mirror adjustment . . . . . . . . 112
Vehicle care . . . . . . . . . . . . . . . . . . . . . . . . 249
Extinguisher Driving with a trailer . . . . . . . . . . . . . . . . . . 238
F
Fastening rings . . . . . . . . . . . . . . . . . . . . . . . . . 134 Fault
Electric windows . . . . . . . . . . . . . . . . . . . . . . 90
Park assist system . . . . . . . . . . . . . . . . . . . 205
Parking sensor system . . . . . . . . . . . . . . . . 201
Rear assist . . . . . . . . . . . . . . . . . . . . . . . . . 211
Fault memory Connector . . . . . . . . . . . . . . . . . . . . . . . . . . 265
Faults Air conditioner . . . . . . . . . . . . . . . . . . . . . . 162
Panorama sliding sunroof . . . . . . . . . . . . . . 92
Filling capacity AdBlue tank . . . . . . . . . . . . . . . . . . . . . . . . 276
Filling the tank . . . . . . . . . . . . . . . . . . . . . . . . . 268 Control lamp . . . . . . . . . . . . . . . . . . . . . . . . 269
Diesel . . . . . . . . . . . . . . . . . . . . . . . . . . . . . 270
Fuel . . . . . . . . . . . . . . . . . . . . . . . . . . . . . . . 270
Fuel gauge . . . . . . . . . . . . . . . . . . . . . . . . . 269
Petrol . . . . . . . . . . . . . . . . . . . . . . . . . . . . . . 270
Refilling precautions . . . . . . . . . . . . . . . . . 271
Filter pre-heater . . . . . . . . . . . . . . . . . . . . . . . . 273
Fire extinguisher . . . . . . . . . . . . . . . . . . . . . . . . 318
Fire extinguishers . . . . . . . . . . . . . . . . . . . . . . . 318
First-aid kit Storage . . . . . . . . . . . . . . . . . . . . . . . . . . . . 318
First aid kit . . . . . . . . . . . . . . . . . . . . . . . . . . . . 318
Fitting Tow hitch . . . . . . . . . . . . . . . . . . . . . . . . . . . 243
Floor mats . . . . . . . . . . . . . . . . . . . . . . . . . . . . . 178
Fluids . . . . . . . . . . . . . . . . . . . . . . . . . . . . . . . . 262
Fog light . . . . . . . . . . . . . . . . . . . . . . . . . . . . . . . 98
Folding down rear seats Load space . . . . . . . . . . . . . . . . . . . . . . . . . 128 Folding in exterior mirrors . . . . . . . . . . . . . . . . 112
Folding table . . . . . . . . . . . . . . . . . . . . . . . . . . . 148
Folding the backrest of the front passenger
seat . . . . . . . . . . . . . . . . . . . . . . . . . . . . . . . . 121
Four-wheel-drive Towing . . . . . . . . . . . . . . . . . . . . . . . . . . . . . 345
Front airbags See "Airbag system" . . . . . . . . . . . . . . . . . . 33
Front passenger airbag Deactivating using the key switch . . . . . . . . 35
See "Airbag system" . . . . . . . . . . . . . . . . . . 31
Fuel . . . . . . . . . . . . . . . . . . . . . . . . . . . . . . . . . . 271 Depending on the engine . . . . . . . . . . . . . 272
Diesel . . . . . . . . . . . . . . . . . . . . . . . . . . . . . 273
Filling the tank . . . . . . . . . . . . . . . . . . . . . . 270
Information on consumption . . . . . . . . . . . 274
Petrol . . . . . . . . . . . . . . . . . . . . . . . . . . . . . . 272
Type of fuel . . . . . . . . . . . . . . . . . . . . . . . . . 272
Fuel consumption Economic driving . . . . . . . . . . . . . . . . . . . . 229
Why does fuel consumption increase? . . . 233
Fuel gauge . . . . . . . . . . . . . . . . . . . . . . . . . . . . 269 Control lamp . . . . . . . . . . . . . . . . . . . . . . . . 269
Fuel tank flap Closure . . . . . . . . . . . . . . . . . . . . . . . . . . . . 270
Opening . . . . . . . . . . . . . . . . . . . . . . . . . . . 270
Function control Tow hitch . . . . . . . . . . . . . . . . . . . . . . . . . . . 240
Fuses . . . . . . . . . . . . . . . . . . . . . . . . . . . . . . . . . 326 Fuse box . . . . . . . . . . . . . . . . . . . . . . . . . . . 327
Identification using colours . . . . . . . . . . . . 327
Identifying blown fuses . . . . . . . . . . . . . . . 328
375
Index