sensor Seat Alhambra 2012 Owner's Guide
[x] Cancel search | Manufacturer: SEAT, Model Year: 2012, Model line: Alhambra, Model: Seat Alhambra 2012Pages: 388, PDF Size: 6.72 MB
Page 207 of 388
205
Driving
● To ensure that the system works properly, the bumper sensors must be
kept clean, free of ice and snow and uncovered.
● The bumper sensors may become damaged or misaligned, for example,
when parking.
● When cleaning the sensors with high-pressure or steam cleaning equip-
ment, spray the sensors briefly at a distance of no less than 10 cm.
Note
Contact a specialised workshop with any system faults. SEAT recommends
visiting a Technical Service.
Parking using the park assist system
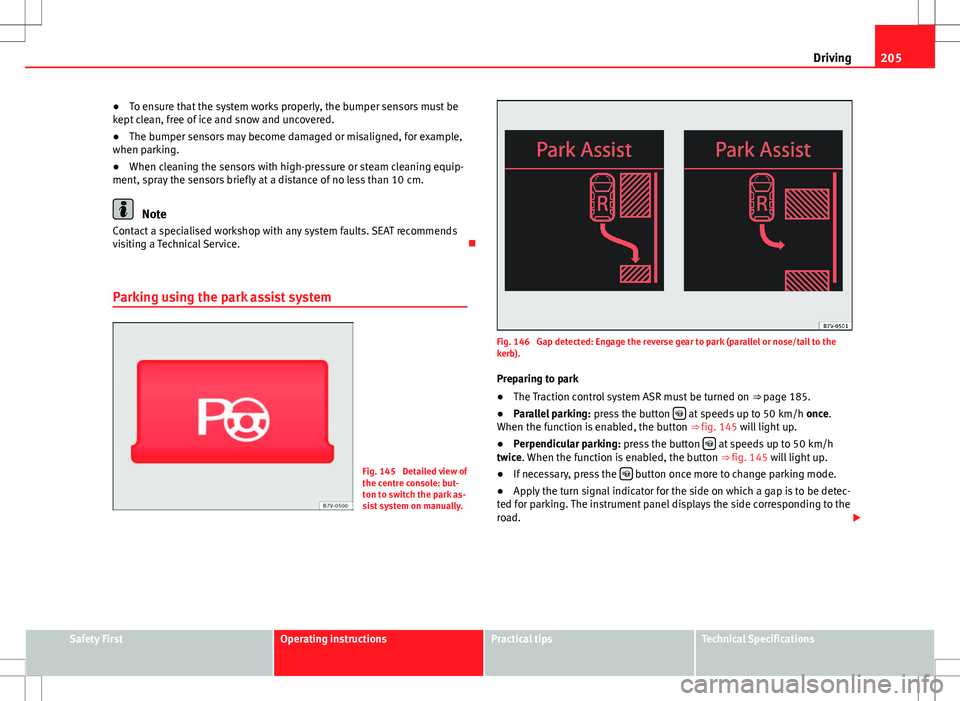
Fig. 145 Detailed view of
the centre console: but-
ton to switch the park as-
sist system on manually.
Fig. 146 Gap detected: Engage the reverse gear to park (parallel or nose/tail to the
kerb). Preparing to park
● The Traction control system ASR must be turned on ⇒ page 185.
● Parallel parking: press the button
at speeds up to 50 km/h once.
When the function is enabled, the button ⇒ fig. 145 will light up.
● Perpendicular parking: press the button
at speeds up to 50 km/h
twice. When the function is enabled, the button ⇒ fig. 145 will light up.
● If necessary, press the
button once more to change parking mode.
● Apply the turn signal indicator for the side on which a gap is to be detec-
ted for parking. The instrument panel displays the side corresponding to the
road.
Safety FirstOperating instructionsPractical tipsTechnical Specifications
Page 208 of 388
206Driving
Parking
● Parking parallel to the road: Drive next to the gap at a speed of no more
than 40 km/h and at a distance of between 0.5 m and 2 m.
● Parking perpendicular to the road: Drive next to the gap at a speed of no
more than 20 km/h and at a distance of between 0.5 m and 2 m.
● The best parking results will be achieved if you position the vehicle as
parallel as possible to the line of parked cars or the kerb.
● When a suitable parking place is displayed on the instrument panel,
stop and select reverse gear.
● Follow the instructions given on the instrument panel display
● Then, release the steering wheel when the warning signal sounds ⇒
:
The system will move the steering wheel! Observe the surrounding area.
● Observe the surrounding area and accelerate carefully at a maximum of
up to 7 km/h.
● The park assist system is only responsible for moving the steering wheel
during the manoeuvre. The driver applies the accelerator, the clutch, the
gears and the brake.
● Follow the instructions given by the park assist system until the ma-
noeuvre is completed.
● The park assist system steers the vehicle forwards and backwards until
it is in a straight position in the parking space.
● The manoeuvre is complete when the corresponding indication is given
on the instrument panel display.
Stopping the parking manoeuvre
The park assist system stops the manoeuvre in the event of one of the fol-
lowing:
● Press button
.
● Driving faster than 7 km/h.
● The driver moves the steering wheel.
● The parking manoeuvre has not been completed after six minutes since
the park assist system was activated. ●
A sliding door is opened. To restart the manoeuvre, close the sliding
door and press the button
again.
● There is a system malfunction (system temporarily unavailable).
● The ASR system is switched off or the ASR or ESC is working.
WARNING
The steering wheel turns quickly by itself when parking using the park
assist system. Placing your hand between the steering wheel spokes
could lead to injuries.
Note
● The park assist system has its limitations. For example, it is not possible
to park on tight bends using the park assist system.
● Even if the park assist system recognises that there is not enough space
for parking the vehicle, the display screen on the instrument panel will still
display this place. In this case, the parking manoeuvre should not be re-
quested.
● Changing gears between forward and reverse gears before indicated
(that is, before the signal from the parking sensor system) the parking re-
sults may not be ideal.
● For parallel parking (parallel to the road), a sound will tell the driver
when they must change from forward gears to reverse; the signal from the
parking sensor system does not indicate changes of direction.
● The park assist can also be activated afterwards, if you pass close to a
parallel parking space at a maximum of 40 km an hour or close to be per-
pendicular parking space at about 20 km an hour then press the button
.
● The progress bar on the screen of the instrument panel shows a display
of the relative distance to be covered.
● When the Park Assist system is turning the steering wheel of the stop-
ped vehicle the symbol is also displayed. Press on the brake pedal so
that the steering can turn with the vehicle at a standstill and thus reduce
the number of manoeuvres.
Page 223 of 388
221
Driving
Indication on display
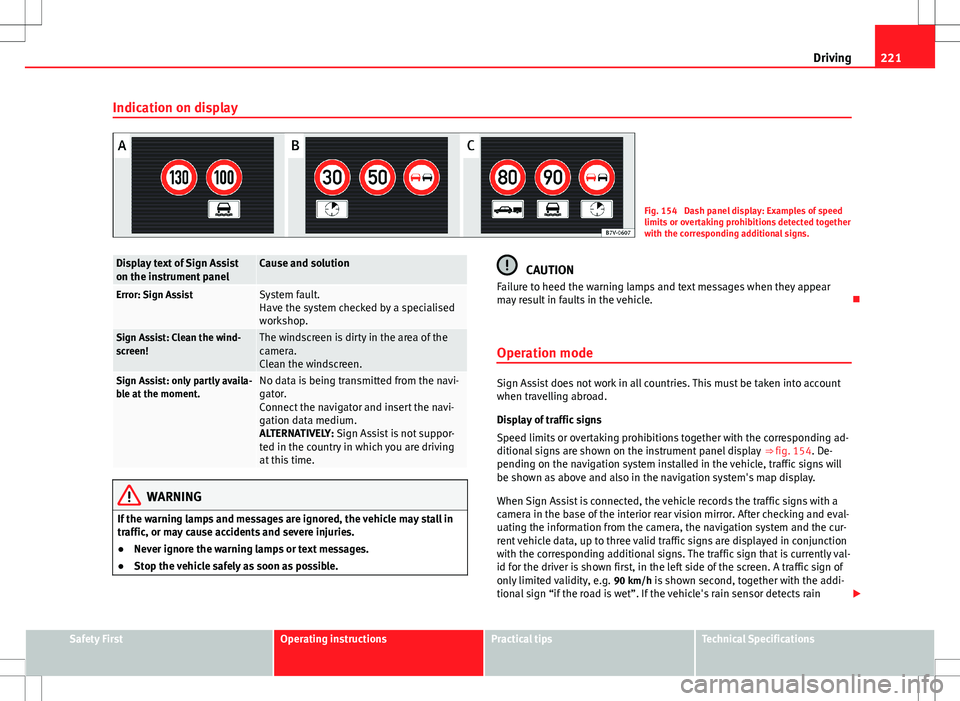
Fig. 154 Dash panel display: Examples of speed
limits or overtaking prohibitions detected together
with the corresponding additional signs.
Display text of Sign Assist
on the instrument panelCause and solution
Error: Sign AssistSystem fault.
Have the system checked by a specialised
workshop.
Sign Assist: Clean the wind-
screen!The windscreen is dirty in the area of the
camera.
Clean the windscreen.
Sign Assist: only partly availa-
ble at the moment.No data is being transmitted from the navi-
gator.
Connect the navigator and insert the navi-
gation data medium.
ALTERNATIVELY: Sign Assist is not suppor-
ted in the country in which you are driving
at this time.
WARNING
If the warning lamps and messages are ignored, the vehicle may stall in
traffic, or may cause accidents and severe injuries.
● Never ignore the warning lamps or text messages.
● Stop the vehicle safely as soon as possible.
CAUTION
Failure to heed the warning lamps and text messages when they appear
may result in faults in the vehicle.
Operation mode
Sign Assist does not work in all countries. This must be taken into account
when travelling abroad.
Display of traffic signs
Speed limits or overtaking prohibitions together with the corresponding ad-
ditional signs are shown on the instrument panel display ⇒ fig. 154. De-
pending on the navigation system installed in the vehicle, traffic signs will
be shown as above and also in the navigation system's map display.
When Sign Assist is connected, the vehicle records the traffic signs with a
camera in the base of the interior rear vision mirror. After checking and eval-
uating the information from the camera, the navigation system and the cur-
rent vehicle data, up to three valid traffic signs are displayed in conjunction
with the corresponding additional signs. The traffic sign that is currently val-
id for the driver is shown first, in the left side of the screen. A traffic sign of
only limited validity, e.g. 90 km/h is shown second, together with the addi- tional sign “if the road is wet”. If the vehicle's rain sensor detects rain
Safety FirstOperating instructionsPractical tipsTechnical Specifications
Page 227 of 388
225
Driving
Tyre monitoring systems Introduction
The tyre monitor indicator monitors the tyre pressure of each wheel during
driving using the ABS sensors. The ABS sensors monitor the tyre tread pe-
rimeter and vibrations of each tire. The tyre monitor indicator warns the driv-
er if it detects a considerable drop in tyre pressure of one or several tyres
while driving. Loss of tyre pressure will be indicated by the indicator as
well as a sound and sometimes a text message on the screen of the instru-
ment panel. When you open the driver's door, you will find a label indicat-
ing the tyre pressure recommended by the manufacturer for the maximum
vehicle load for each tyre approved for the vehicle in question. By pressing
the adjustment button on the tyre monitoring indicator, you may change the
reference pressure for the tyres so that the tyre pressure to be monitored co-
incides with actual tyre pressure ⇒ page 227.
Suitable use of the adjustment button ⇒ page 227.
Additional information and warnings:
● Transporting ⇒ page 13
● Braking, stopping and parking ⇒ page 185
● Caring for and cleaning the vehicle exterior ⇒ page 246
● Wheels and tyres ⇒ page 297
● Accessories, parts replacement, repairs and modifications ⇒ page 261
WARNING
Unsuitable handling of the wheels and tyres may lead to sudden tyre
pressure losses, to tread separation or even to a blow-out.
● Check tyre pressures regularly and ensure they are maintained at the
pressures indicated. If the tyre pressure is too low, the tyres could over-
heat, resulting in tread detachment or even burst tyres.
● Tyre pressure should be that indicated on the label when the tyres are
cold at all times ⇒ page 301.
● Regularly check the cold inflation pressure of the tyres. If necessary,
change the tyre pressure of the vehicle tyres while they are cold.
● Regularly check your tyres for damage and wear.
● Never exceed the maximum permitted speed or loads specified for the
type of tyre fitted on your vehicle.
WARNING
Incorrect use of the tyre monitoring indicator button could result in the
indicator giving erroneous messages or prevented from indicating the
danger caused by a defective tyre ⇒ page 227.
CAUTION
● The tyre valves may be damaged if the cap is not in place. Check that the
caps are identical to the standard caps and have been correctly tightened.
Do not use metal caps ⇒ page 227.
● Do not damage the valves when changing the tyres ⇒ page 227.
For the sake of the environment
Under-inflated tyres lead to increased fuel consumption and tyre wear.
Safety FirstOperating instructionsPractical tipsTechnical Specifications
Page 228 of 388
226Driving
Note
● Do not only rely on the tyre monitoring system. Regularly check your
tyres to ensure that the tyre pressure is correct and that the tyres are not
damaged due to puncture, cuts, tears and impacts/dents. Remove objects
from the tyres only when the tyres have not been pierced by these.
● The tyre monitoring system is set to the tyre pressure recommended by
the manufacturer and indicated on the label ⇒ fig. 178.
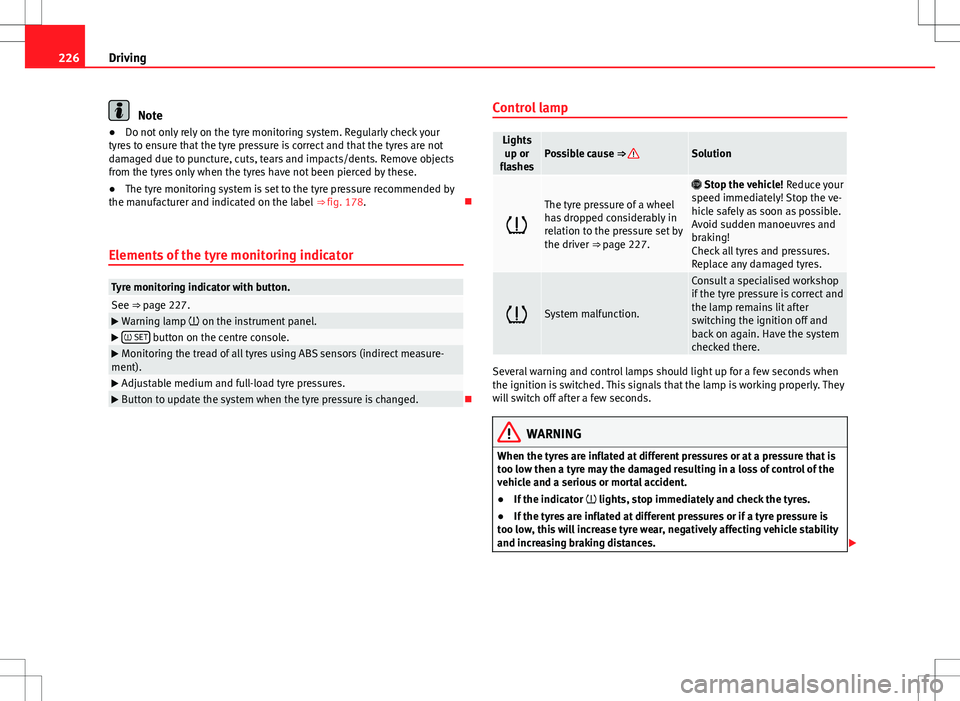
Elements of the tyre monitoring indicator
Tyre monitoring indicator with button.See ⇒ page 227. Warning lamp on the instrument panel. SET button on the centre console.
Monitoring the tread of all tyres using ABS sensors (indirect measure-
ment).
Adjustable medium and full-load tyre pressures. Button to update the system when the tyre pressure is changed. Control lamp
Lights
up or
flashesPossible cause ⇒ Solution
The tyre pressure of a wheel
has dropped considerably in
relation to the pressure set by
the driver ⇒ page 227.
Stop the vehicle! Reduce your
speed immediately! Stop the ve-
hicle safely as soon as possible.
Avoid sudden manoeuvres and
braking!
Check all tyres and pressures.
Replace any damaged tyres.
System malfunction.
Consult a specialised workshop
if the tyre pressure is correct and
the lamp remains lit after
switching the ignition off and
back on again. Have the system
checked there.
Several warning and control lamps should light up for a few seconds when
the ignition is switched. This signals that the lamp is working properly. They
will switch off after a few seconds.
WARNING
When the tyres are inflated at different pressures or at a pressure that is
too low then a tyre may the damaged resulting in a loss of control of the
vehicle and a serious or mortal accident.
● If the indicator lights, stop immediately and check the tyres.
● If the tyres are inflated at different pressures or if a tyre pressure is
too low, this will increase tyre wear, negatively affecting vehicle stability
and increasing braking distances.
Page 229 of 388
227
Driving
WARNING (Continued)
● If tyres are inflated at different pressures or a tyre pressure is too low,
a tyre may be damaged and burst resulting in a loss of control of the ve-
hicle.
● The driver is responsible for ensuring that all of the vehicle tyres are
correctly inflated to the right pressure. The recommended tyre pressure
is indicated on the label ⇒ fig. 178.
● The tyre monitoring system can only operate correctly if all of the
tyres are inflated to the correct pressure when cold.
● Driving with tyres at the wrong pressure can cause damage to them
and result in an accident. Ensure that the tyre pressures of all the tyres
correspond to the vehicle load.
● Before starting a journey, always inflated tyres to the correct pres-
sure.
● If tyre pressure is too low then the tyre is subject to greater forces
and it may be heated to such an extent that the tread can rupture and the
tyre will burst.
● With an overloaded vehicle at high speed, the tyres can overheat and
burst resulting in a loss of vehicle control.
● Tyre pressures which are too high or too low reduce the useful life of
the tyre, affecting the vehicle's performance.
● If a tyre has not been punctured then it does not have to be changed
immediately; drive to the nearest specialised workshop at a moderate
speed and have the tyre checked and inflated to the correct pressure.
WARNING
If the warning lamps and messages are ignored, the vehicle may stall in
traffic, or may cause accidents and severe injuries.
● Never ignore the warning lamps or text messages.
● Stop the vehicle safely as soon as possible.
CAUTION
Failure to heed the warning lamps and text messages when they appear
may result in faults in the vehicle.
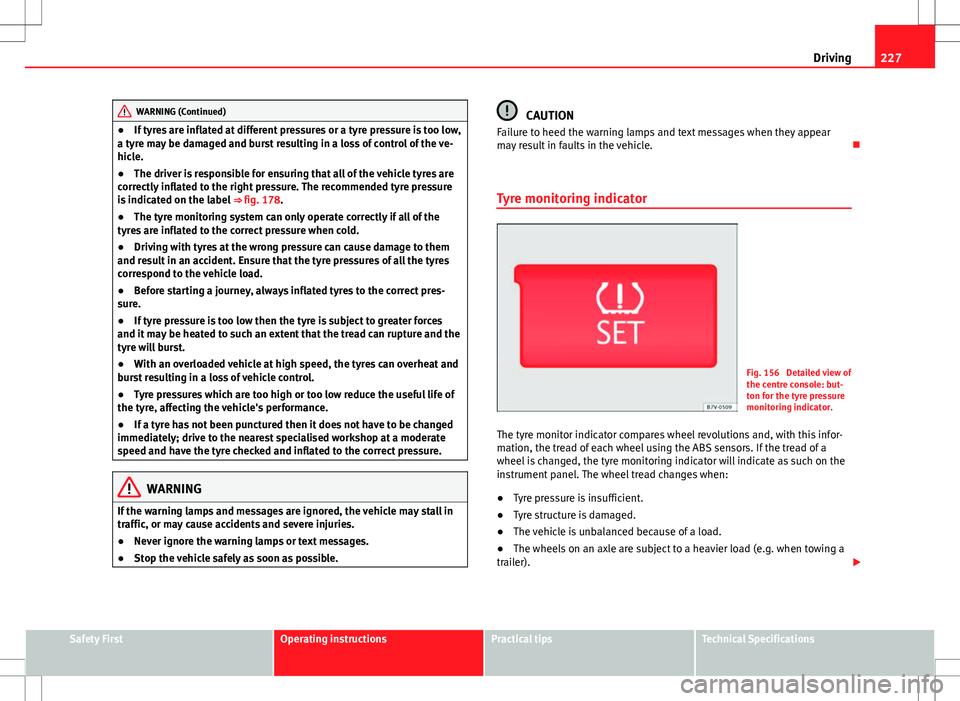
Tyre monitoring indicator
Fig. 156 Detailed view of
the centre console: but-
ton for the tyre pressure
monitoring indicator.
The tyre monitor indicator compares wheel revolutions and, with this infor-
mation, the tread of each wheel using the ABS sensors. If the tread of a
wheel is changed, the tyre monitoring indicator will indicate as such on the
instrument panel. The wheel tread changes when:
● Tyre pressure is insufficient.
● Tyre structure is damaged.
● The vehicle is unbalanced because of a load.
● The wheels on an axle are subject to a heavier load (e.g. when towing a
trailer).
Safety FirstOperating instructionsPractical tipsTechnical Specifications
Page 238 of 388
236Trailer towing
WARNING (Continued)
● Trailers with a high centre of gravity can overturn more easily than
trailers with a low centre of gravity.
● Avoid brusque manoeuvres and sudden braking.
● Always take the following precautions seriously.
● Reduce your speed immediately if you observe the trailer rocking
from side to side.
● Never drive at more than 80 km an hour when towing a trailer (or 100
km an hour in exceptional circumstances). This also applies in countries
where higher speeds are permitted. Always take the speed limits for ve-
hicles with and without trailers in each country into account.
● Never try to stop the “snaking” by increasing speed.
WARNING
When driving with a trailer and using a trailer hitch that was not installed
by SEAT, the Start-Stop function must be manually deactivated. Other-
wise, this could cause a braking anomaly that could result in an accident
with serious consequences.
● Always manually deactivate the Start-Stop function when a trailer is
being used on a trailer hitch that has not been installed by SEAT.
Note
● Always turn off the anti-theft alarm system before connecting or discon-
necting a trailer ⇒ page 78. Otherwise, the tilt sensor may erroneously acti-
vate the alarm.
● Never use a trailer with a new engine (for the first 1000 km or 600 miles)
⇒ page 261. ●
At SEAT, we recommend folding in the trailer hitch ball when a trailer is
not being used. In case of a rear collision, the damage caused to the vehicle
with the extended trailer hitch ball could be more extensive.
● In some models, a trailer hitch is necessary for towing vehicles. For this
reason, you should store the tow hitch in the vehicle at all times.
Page 242 of 388
240Trailer towing
Trailer electric socket
The electric connection between vehicle and trailer is a 13-pin socket. If the
trailer plug has seven pins, an adapter cable must be used.
Trailer rear lights
Check the trailer rear lights to ensure they work correctly and remain legal.
Ensure that the trailer does not use more than the maximum power
⇒ page 237.
Trailer connected to the anti-theft alarm:
● When a vehicle comes from the factory fitted with an anti-theft alarm
and tow hitch.
● When the trailer is connected to the vehicle using the socket.
● When the vehicle and trailer electrical systems work correctly and are
not damaged.
● When the vehicle is locked using the vehicle key and the anti-theft alarm
is turned on.
When the vehicle is locked, the alarm is triggered when the electrical con-
nection between the vehicle and the trailer is removed.
Always turn off the anti-theft alarm system before connecting or disconnect-
ing a trailer. Otherwise, the tilt sensor may erroneously activate the alarm.
WARNING
Erroneous or unsuitable connection of electric cables may supply energy
to the trailer causing an anomaly in the vehicle electronics that could re-
sult in an accident with serious consequences.
● All work on the electrical system must be carried out only by a speci-
alised workshop.
● Never connect the trailer's electric system to the electrical connec-
tions of the rear lights or any other power sources.
CAUTION
Do not leave the trailer connected to the vehicle when parked; places on its
support wheel or its supports. For example, when changing the load or a
puncture, the vehicle will be pushed up or down. The force acting on the
tow hitch and the trailer could damage the vehicle or the trailer.
Note
● In case of a fault in the vehicle or trailer electrical system or in case of
problems with the anti-theft alarm system, have the system checked by a
specialised workshop.
● If the trailer accessories use energy from the socket when the engine is
stopped, the battery will be discharged.
● For technical reasons, trailers fitted with rear LED lights cannot be con-
nected to the anti-theft alarm system.
● If the vehicle battery is running low, the electrical connection with the
trailer is automatically cut.
● With the engine running, the electrical equipment on the trailer will con-
sume power.
Loading the trailer
Trailer weight / drawbar load
The trailer weight is the load that the vehicle can pull ⇒ . The drawbar
load is the vertical weight of the trailer hitch on the tow hitch ball
⇒ page 244.
The figures for trailer weights and draw bar weights given on the data plate
of the towing bracket are for values of this model only. The correct figures
for your specific vehicle, which may be lower than these figures for the tow
hitch, are given in the registration documents. The instructions in the offi-
cial vehicle documents take precedence.
Page 250 of 388
248Vehicle maintenance and cleaning
● Switch off the rain sensor and the Auto Hold function before entering a
car wash.
● Compare the height and width of your vehicle with the available height
and width when entering and driving through the car wash.
● Fold in exterior mirrors Electrically retractable exterior mirrors must NOT
be folded in or out by hand. Always use the electrical power control.
● To avoid damaging the bonnet paintwork, rest the wipers on the wind-
screen after drying them. Do not let them fall!
● Lock the tailgate to prevent it from opening unexpectedly while inside
the car wash.
Washing the vehicle with high pressure cleaning
equipment
When cleaning the vehicle with a high-pressure cleaner, always follow the
operating instructions for the equipment. Pay special attention to the re-
quired pressure of the jet and the distance between the jet and the vehicle
⇒
.
Keep a suitable distance from soft materials, such as rubber hoses or insu-
lating material, and from the parking distance warning system sensors. The
parking distance sensors are fitted in the rear bumpers and, where applica-
ble, in the front bumpers ⇒
.
Do not use a nozzle that sprays the water out in a direct stream or one that
has a rotating jet for forcing off dirt ⇒
.
WARNING
The incorrect use of high pressure cleaning equipment could result in
permanent damage, visible or invisible, to the tyres or other materials.
This could result in serious accident.
● Ensure there is a suitable distance between the nozzle and the tyres.
● Never wash tyres with a concentrated jet or so-called “dirt blasters”.
Even at large spraying distances and short cleaning times, you may dam-
age the tyres.
WARNING
After the vehicle has been washed, the braking effect will be reduced
(and the braking distance increased) due to moisture (and ice in winter)
on the brakes.
● Dry the brakes and remove ice by braking carefully. Ensure that you
are not endangering other road-users or breaking traffic regulations in
the process.
CAUTION
● The temperature of the water must not be above +60 °C (+140 °F).
● To avoid damage to the paintwork, do not wash the vehicle in full sun.
● The sensors on the bumpers should be kept clean and free of ice at all
times to ensure the parking distance warning system and the parking aid
system operate correctly. When cleaning with pressure hoses and steam
cleaners, the sensors should be sprayed only briefly. A distance of 10 cm
between the sensors and the steam / hose nozzle must be observed.
● Do not use a high pressure cleaner to remove ice or snow from windows
● Washing the vehicle in low temperatures: When washing the vehicle
with a hose, do not direct water into the lock cylinders or the gaps around
the doors, tailgate, or sunroof. Locks and seals could freeze!
Page 265 of 388
263
Accessories, parts replacement and modifications
The vehicle owner should keep the documentation for the additional equip-
ment safely and hand it over to the scrap yard at the end of the vehicle's
service life. This ensures that any additional equipment mounted in end-of-
life vehicles is correctly disposed of with respect for the environment.
WARNING
Repairs or modifications which are not performed correctly may result in
damage or errors in the vehicle operation, affecting the efficiency of the
driver assist systems. This could result in serious accident.
● All repairs and modifications to the vehicle should only be performed
by a specialised workshop.
Repair and faults in the airbag system
When performing repairs and technical modifications, SEAT's directives
must be observed! ⇒
Modifications and repairs to the front bumper, doors, front seats, and re-
pairs to the roof or chassis should only be carried out in a Technical Service.
These components may contain parts or sensors belonging to the airbag
system.
If work is carried out on the airbag system or parts have to be removed and
fitted on the system when performing other repair work, parts of the airbag
system may be damaged. The consequence may be that, in the event of an
accident, the airbag inflates incorrectly or does not inflate at all.
So that the effectiveness of the airbag is not reduced and that removed
parts do not cause any injuries or environmental pollution, regulations must
be observed. These requirements are known to qualified dealerships.
Modifications to the vehicle suspension may affect the operation of the air-
bag system in the event of collision. For example, if wheel and tyre combi-
nations not approved by SEAT are used, or if the vehicle height is lowered, the suspension is stiffened or the suspension springs, telescopic arms,
dampers, etc., are modified, the results received by the airbag sensors and
sent to the control unit may not be accurate. For example, some modifica-
tions to the suspension could increase the force measured by the sensors
and result in the triggering of the airbag systems in collisions. Under normal
conditions, the measured values would be lower and the airbag would not
have been triggered. Other modifications may reduce the forces measured
by the sensors and therefore the airbags are not triggered in situations
when they should have triggered.
WARNING
Repairs or modifications which are not performed correctly may result in
damage or errors in the vehicle operation, affecting the efficiency of the
airbag systems. This could result in serious or fatal accident.
● All repairs and modifications to the vehicle should only be performed
by a specialised workshop.
● Airbag modules must never be repaired: if damaged, they must be re-
placed.
● Never fit recycled or reused airbag components in your vehicle.
WARNING
Modifications to the vehicle suspension, including the use of unauthor-
ised wheel and tyre combinations, may affect the performance of the air-
bags and increase the risk of serious or fatal injury in the event of acci-
dent.
● Never fit suspension components which are not identical to the origi-
nal parts mounted in the vehicle.
● Never use wheel and tyre combinations not approved by SEAT.
Safety FirstOperating instructionsPractical tipsTechnical Specifications