maintenance Seat Alhambra 2012 Owner's Manual
[x] Cancel search | Manufacturer: SEAT, Model Year: 2012, Model line: Alhambra, Model: Seat Alhambra 2012Pages: 388, PDF Size: 6.72 MB
Page 3 of 388
Foreword
This Instruction Manual and its corresponding supplements should be read carefully to familiarise yourself
with your vehicle.
Besides the regular care and maintenance of the vehicle, its correct handling will help preserve its value.
For safety reasons, note the information concerning accessories, modifications and part replacements.
If selling the vehicle, give all of the onboard documentation to the new owner, as it should be kept with the
vehicle.
Page 5 of 388
Table of Contents
Manual structure . . . . . . . . . . . . . . . . . . . . 5
Content . . . . . . . . . . . . . . . . . . . . . . . . . . . . . . . . 6
Safety First . . . . . . . . . . . . . . . . . . . . . . . . . . . . 7
Safe driving . . . . . . . . . . . . . . . . . . . . . . . . . . . . . . . 7
Dear SEAT Driver . . . . . . . . . . . . . . . . . . . . . . . . . . 7
Tips for driving . . . . . . . . . . . . . . . . . . . . . . . . . . . 7
Adjusting the seat position . . . . . . . . . . . . . . . . . 10
Transporting objects . . . . . . . . . . . . . . . . . . . . . . . 13
Seat belts . . . . . . . . . . . . . . . . . . . . . . . . . . . . . . . . . 16
Brief introduction . . . . . . . . . . . . . . . . . . . . . . . . . 16
Why wear seat belts? . . . . . . . . . . . . . . . . . . . . . . 19
Seat belts . . . . . . . . . . . . . . . . . . . . . . . . . . . . . . . 21
Seat belt tensioners . . . . . . . . . . . . . . . . . . . . . . . 26
Airbag system . . . . . . . . . . . . . . . . . . . . . . . . . . . . . 28
Brief introduction . . . . . . . . . . . . . . . . . . . . . . . . . 28
Airbag system . . . . . . . . . . . . . . . . . . . . . . . . . . . . 31
Child safety . . . . . . . . . . . . . . . . . . . . . . . . . . . . . . . 39
Child seats (accessories) . . . . . . . . . . . . . . . . . . . 39
Integrated child seat . . . . . . . . . . . . . . . . . . . . . . . 45
Operating instructions . . . . . . . . . . . . . 53
Cockpit . . . . . . . . . . . . . . . . . . . . . . . . . . . . . . . . . . . 53
Overview . . . . . . . . . . . . . . . . . . . . . . . . . . . . . . . . 53
Instrument panel . . . . . . . . . . . . . . . . . . . . . . . . . . 54
Instruments . . . . . . . . . . . . . . . . . . . . . . . . . . . . . . 57
SEAT information system . . . . . . . . . . . . . . . . . . . 62 Unlocking and locking
. . . . . . . . . . . . . . . . . . . . . 71
Vehicle key set . . . . . . . . . . . . . . . . . . . . . . . . . . . 71
Central locking and locking system . . . . . . . . . . . 74
Doors . . . . . . . . . . . . . . . . . . . . . . . . . . . . . . . . . . . 80
Sliding doors . . . . . . . . . . . . . . . . . . . . . . . . . . . . . 80
Tailgate . . . . . . . . . . . . . . . . . . . . . . . . . . . . . . . . . 84
Electric windows . . . . . . . . . . . . . . . . . . . . . . . . . . 88
Panorama sliding sunroof* . . . . . . . . . . . . . . . . . 92
Lights and visibility . . . . . . . . . . . . . . . . . . . . . . . . 95
Lights . . . . . . . . . . . . . . . . . . . . . . . . . . . . . . . . . . . 95
Sun blind . . . . . . . . . . . . . . . . . . . . . . . . . . . . . . . . 103
Windscreen wiper and washer . . . . . . . . . . . . . . . 105
Rear vision mirror . . . . . . . . . . . . . . . . . . . . . . . . . 110
Seats and storage compartments . . . . . . . . . . 114
Seat adjustment . . . . . . . . . . . . . . . . . . . . . . . . . . 114
Seat functions . . . . . . . . . . . . . . . . . . . . . . . . . . . . 117
Head restraints . . . . . . . . . . . . . . . . . . . . . . . . . . . 123
Centre armrest . . . . . . . . . . . . . . . . . . . . . . . . . . . . 126
Loading luggage compartment . . . . . . . . . . . . . . 126
Roof carrier system* . . . . . . . . . . . . . . . . . . . . . . . 139
Storage compartments . . . . . . . . . . . . . . . . . . . . . 142
Cup holders . . . . . . . . . . . . . . . . . . . . . . . . . . . . . . 150
Ashtray and cigarette lighter* . . . . . . . . . . . . . . . 151
Electrical sockets . . . . . . . . . . . . . . . . . . . . . . . . . 153
Air conditioning . . . . . . . . . . . . . . . . . . . . . . . . . . . 157
Climate Control . . . . . . . . . . . . . . . . . . . . . . . . . . . 157
Auxiliary heater* (additional heater) . . . . . . . . . . 165
Driving . . . . . . . . . . . . . . . . . . . . . . . . . . . . . . . . . . . . 169
Steering . . . . . . . . . . . . . . . . . . . . . . . . . . . . . . . . . 169
Stopping and starting the engine . . . . . . . . . . . . 172
Changing gear . . . . . . . . . . . . . . . . . . . . . . . . . . . . 176
Braking, stopping and parking . . . . . . . . . . . . . . 185
Start assist systems . . . . . . . . . . . . . . . . . . . . . . . 196
Parking sensor system* . . . . . . . . . . . . . . . . . . . . 200 Park Assist system* . . . . . . . . . . . . . . . . . . . . . . . 204
Rear Assist system* . . . . . . . . . . . . . . . . . . . . . . . 209
Cruise control system* . . . . . . . . . . . . . . . . . . . . . 214
Lane Assist system* . . . . . . . . . . . . . . . . . . . . . . . 217
Sign Assist* . . . . . . . . . . . . . . . . . . . . . . . . . . . . . . 220
Tiredness detection (recommendation to take a
break) . . . . . . . . . . . . . . . . . . . . . . . . . . . . . . . . . . . 223
Tyre monitoring systems . . . . . . . . . . . . . . . . . . . . 225
Practical tips . . . . . . . . . . . . . . . . . . . . . . . . . . 229
Driving and the environment . . . . . . . . . . . . . . . 229
Running-in . . . . . . . . . . . . . . . . . . . . . . . . . . . . . . . 229
Ecological driving . . . . . . . . . . . . . . . . . . . . . . . . . 229
Engine management and exhaust gas
purification system . . . . . . . . . . . . . . . . . . . . . . . . 232
Trailer towing . . . . . . . . . . . . . . . . . . . . . . . . . . . . . . 235
Introduction . . . . . . . . . . . . . . . . . . . . . . . . . . . . . . 235
Driving with a trailer . . . . . . . . . . . . . . . . . . . . . . . 237
Vehicle maintenance and cleaning . . . . . . . . . 246
Care and cleaning the vehicle exterior . . . . . . . . 246
Caring for and cleaning the vehicle interior . . . . 253
Notes for the user . . . . . . . . . . . . . . . . . . . . . . . . . 259
Accessories, parts replacement and
modifications . . . . . . . . . . . . . . . . . . . . . . . . . . . . . 261
Accessories, replacement of parts and
modifications . . . . . . . . . . . . . . . . . . . . . . . . . . . . 261
Checking and refilling levels . . . . . . . . . . . . . . . 268
Filling the tank . . . . . . . . . . . . . . . . . . . . . . . . . . . . 268
Fuel . . . . . . . . . . . . . . . . . . . . . . . . . . . . . . . . . . . . 271
Selective Catalytic Reduction* (AdBlue) . . . . . . . 275
Working in the engine compartment . . . . . . . . . . 279
Engine oil . . . . . . . . . . . . . . . . . . . . . . . . . . . . . . . . 283
3
Table of Contents
Page 8 of 388
6Content
Content
This manual is structured to provide the information you need in an organ-
ised way. The content of this Manual is divided into sections which belong
to chapters (e.g.“Air conditioning”). The entire manual is divided into five
large parts which are:
1. Safety First Information on the vehicle equipment relating to passive safety such as
seat belts, airbags, seats, etc.
2. Operating instructions
Information about the distribution of controls in the driver position of your
vehicle, about the seat adjustment possibilities, about how to create a suit-
able climate in the passenger compartment, etc.
3. Practical tips
Advice relating to the driving, caring and maintenance of your vehicle and
certain problems you can solve yourself.
4. Technical specifications Figures, data, dimensions and measurements (for example fuel consump-
tion) of your vehicle.
5. Alphabetic index At the end of this manual there is a detailed alphabetical index, this will
help you to rapidly find the information you require.
Page 10 of 388
8Safe driving
● Check that the lights and turn signals operate correctly.
● Check the tyre pressures ( ⇒ page 297) and level of fuel ( ⇒ page 268).
● Ensure there is good visibility through all the windows.
● Make sure that all objects and bags in the storage compartments, in the
luggage compartment and, where applicable, on the roof, are securely fas-
tened ⇒ page 13.
● Ensure there is nothing obstructing the free passage of the foot pedals.
● Use child retention systems appropriate for the child's body weight and
height ⇒ page 39.
● Correctly adjust front seat, head rests and rear-view mirrors to suit your
height ⇒ page 10.
● Wear close-fitting shoes which do not prevent you from using the pedals
correctly.
● The driver's floor mat should be fixed to the floor, leaving the pedal area
unobstructed.
● Before starting out, ensure you are correctly seated and remain in this
position throughout the journey. This applies to all passengers in the vehi-
cle ⇒ page 10.
● Correctly fasten your seat belt before starting to drive and keep it se-
curely fastened throughout the journey. This applies to all passengers in the
vehicle ⇒ page 21.
● Never carry more passengers than the number of available seats and
seat belts in your vehicle.
● Never drive with impaired faculties (for example, due to medication, al-
cohol or drugs).
● Do not allow yourself to be distracted from the traffic, for example, to re-
set or switch on a menu, by other passengers or to answer a phone call.
● Always try to adapt the speed of the vehicle and your style of driving to
the condition of the ground or the road and to weather and traffic condi-
tions.
● Observe the highway code and speed limits. ●
On long journeys, rest at regular intervals (at least every two hours).
● If carrying animals, make sure they are correctly restrained in accord-
ance with their weight and size.
WARNING
Always observe traffic regulations and speed limits and try to anticipate
traffic movements. Correctly anticipating traffic situations may mean the
difference between arriving safe and sound at your destination or having
a serious accident.
Note
Regular servicing of your vehicle not only helps to keep it in good working
order but also helps to ensure road safety. Therefore, please ensure the ve-
hicle is taken for service as indicated in the Maintenance Programme. If the
vehicle is subjected to hard use, it may require certain maintenance work
before the next service date. Hard use may involve frequent driving in traffic
jams, driving in dusty areas or frequent use of the tow-bar. For further infor-
mation, please refer to a Technical Service or specialised workshop.
Driving abroad
Check list
In some countries, certain safety regulations and requirements are in force
relating to exhaust gas emissions, which differ from the technical character-
istics of the vehicle. Before travelling abroad, SEAT recommends you con-
sult a Technical Service about the legal requirements and the following
points:
● Does the vehicle need technical modifications for driving abroad, for ex-
ample, adjustment of the headlamps?
● Does the vehicle have all the tools, diagnostics equipment and spare
parts required for inspections and repairs?
Page 17 of 388
15
Safe driving
WARNING
Toxic gases may enter the vehicle interior when the tailgate is open. This
could cause loss of consciousness, carbon monoxide poisoning, serious
injury and accidents.
● To avoid toxic gases entering the vehicle always drive with the tail-
gate closed.
● In exceptional circumstances, if you must drive with the tailgate
open, observe the following to reduce the entry of toxic gases inside the
vehicle:
–Close all windows and the sliding roof.
– Turn off the air recirculation for the heating and air conditioning.
– Open all of the air outlets in the dashboard.
– Turn the heating fan and heater to the highest level.
CAUTION
An open tailgate changes the length and height of the vehicle.
Driving a loaded vehicle
For the best handling when driving a loaded vehicle, note the following:
● Secure all objects
⇒ page 14.
● Accelerate gently and carefully.
● Avoid sudden braking and manoeuvres.
● Brake early.
● If necessary, read the instructions for driving with a trailer
⇒ page 237.
● If necessary, read the instructions for driving with a roof carrier system
⇒ page 139.
WARNING
A sliding load could considerably affect the stability and safety of the ve-
hicle resulting in an accident with serious consequences.
● Secure loads correctly so they do not move.
● When transporting heavy objects, use suitable ropes or straps.
● Lock the seat backs in vertical position.
Specific vehicle weight information
The instructions in the official vehicle documents take precedence. All the
technical data provided in this documentation is applicable to the basic
model. The vehicle data label in the Maintenance Programme or the vehicle
documents show which engine is installed in your vehicle.
The figures may be different depending on if additional equipment is fitted,
for different models and for special vehicles.
WARNING
Exceeding the maximum authorised weight and the load on the axles
could cause damage to the vehicle, accidents and serious injuries.
● The real load on the axles should never exceed the maximum permit-
ted.
● The load and its distribution in the vehicle have effects on the vehicle
handling and the braking ability. Always drive at a suitable speed.
CAUTION
Distribute the load as uniformly and as low down on the vehicle as possible.
When transporting heavy objects in the trunk/boot, these should be placed
as far forward as possible or over the rear axle to have as little influence on
handling as possible.
Safety FirstOperating instructionsPractical tipsTechnical Specifications
Page 59 of 388
57
Cockpit
WARNING (Continued)
● A faulty vehicle represents a risk of accident for the driver and for oth-
er road users. If necessary, switch on the hazard warning lamps and put
out the warning triangle to advise other drivers.
● Before opening the bonnet, switch off the engine and allow it to cool.
● In any vehicle, the engine compartment is a hazardous area and could
cause severe injury ⇒ page 279.
CAUTION
Failure to heed the warning lamps and text messages when they appear
may result in faults in the vehicle. Instruments
Introduction
Additional information and warnings:
● Indicator lamps ⇒ page 54
● Gear engaged display (automatic gearbox) ⇒ page 176.
● Instructions for inspection intervals ⇒ Booklet Maintenance Programme
WARNING
Any distraction may lead to an accident, with the risk of injury.
● Do not handle the instrument panel controls when driving.
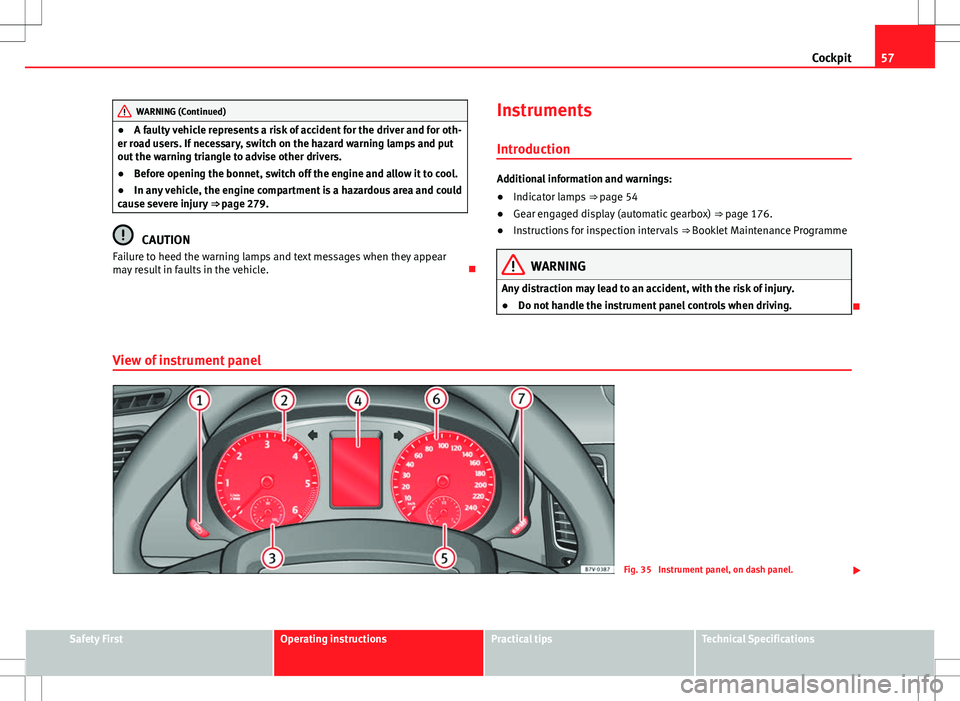
View of instrument panel
Fig. 35 Instrument panel, on dash panel.
Safety FirstOperating instructionsPractical tipsTechnical Specifications
Page 63 of 388
61
Cockpit
Calibrating compass
To calibrate the compass you must be in one of the valid magnetic zones
with sufficient space to be able to trace a circumference with the vehicle.
● Switch the ignition on.
● Select the Settings menu followed by the option Compass and Calibrate.
● Confirm the message Describe a complete circumference to calibrate the
compass with OK
and then trace a complete circumference driving at ap-
proximately 10 km/h (6 mph).
When the corresponding cardinal point is displayed, the calibration is com-
plete.
Service interval display
The inspection display appears on the instrument panel ⇒ fig. 35 4.
SEAT makes a difference between services with engine oil change (Mainte-
nance Service) and services without engine oil change (Inspection Service).
The service interval display only gives information for service dates which
involve an engine oil change. The dates of the remaining services (for exam-
ple, the next Inspection Service or change of brake fluid) are listed on the
label attached to the door strut, or even in the Maintenance Programme.
In vehicles with Services established by time or mileage , the service inter-
vals are already pre-defined.
In vehicles with LongLife Service , the intervals are determined individually.
Technical progress has made it possible to considerably reduce servicing re-
quirements. The technology used by SEAT ensures that your vehicle only
has an maintenance service when it is necessary. To establish when the
Maintenance Service is due (max. 2 years), the vehicle's conditions of use
and individual driving styles are considered. The service pre-warning first
appears 20 days before the date established for the corresponding service.
The kilometres remaining until the next service are always rounded up to the nearest 100 km and the remaining time is given in complete days. The
current service message cannot be viewed until 500 km after the last serv-
ice. Prior to this only lines are visible on the display.
Inspection reminder
When the Service date is approaching, when the ignition is switched on a
Service reminder is displayed.
In vehicles without text messages
, a spanner is displayed on the instrument
panel with a figure given in km. The number of kilometres shown is the
maximum number that may be driven until the next service. After a few sec-
onds,the display mode changes. A clock symbol appears and the number of
days until the next service appointment is due.
In vehicles with text messages , Service in --- km or --- days is displayed on
the instrument panel.
Service due
After the service date, an audible warning is given when the ignition is
switched on and the spanner displayed on the screen flashes for a few sec-
onds. In vehicles with text messages , Service in --- km or --- days is dis-
played on the instrument panel.
Reading a service notification
With the ignition switched on, the engine off and the vehicle at a standstill,
the current service notification can be read:
● Press the button
on the instrument panel several times until the
spanner symbol is displayed .
● ALTERNATIVELY: select the Settings menu.
● From the Service submenu, select the option Info.
When the service date has past , a minus sign is displayed in front of the
number of kilometres or days. In vehicles with text messages the following
is displayed: Service --- km or --- days ago .
Safety FirstOperating instructionsPractical tipsTechnical Specifications
Page 64 of 388
62Cockpit
The service interval display is reset
If the service was not carried out by a Technical Service, the display can be
reset as follows:
In vehicles with text messages:Select the Settings menu.In the submenu Service, select the option Reset.Confirm with OK when requested to do so by the system.
In vehicles without text messages:Switch the ignition off.Press and hold the 0.0 / SET button.Switch the ignition back on.Release the 0.0 / SET button and, press for the next 20 seconds.
Do not reset the indicator to zero between two intervals, otherwise the dis-
play will be incorrect.
If, while the LongLife service is valid, the service interval display is reset to
zero, the “service will be activated by time or mileage”. The service interval
is no longer calculated individually
⇒ Booklet Maintenance Programme.
Note
● The service message disappears after a few seconds, when the engine is
started or when OK
is pressed.
● In vehicles with the LongLife system in which the battery has been dis-
connected for a long period of time, it is not possible to calculate the date
of the next service. Therefore the service interval display may not be correct.
In this case, please check the maximum permitted service intervals ⇒ Book-
let Maintenance Programme. SEAT information system
Introduction
With the ignition switched on, it is possible to read the different functions of
the display by scrolling through the menus.
In vehicles with a multifunction steering wheel, there are no buttons on the
windscreen wiper lever. The multifunction display can only be controlled
from the buttons on the multifunction steering wheel.
The number of menus displayed on the instrument panel will vary according
to the vehicle electronics and equipment.
A specialised dealer will be able to programme or modify additional func-
tions, according to the vehicle equipment. SEAT recommends visiting a
Technical Service.
Some menu options can only be read when the vehicle is at a standstill.
As long as a priority 1 warning is displayed, it will not be possible to read
the menus. To display the menus, confirm the warning by pressing OK
.
Additional information and warnings:
● Exterior mirrors ⇒ page 110
● Auxiliary heating ⇒ page 165
WARNING
Any distraction may lead to an accident, with the risk of injury.
● Do not read the instrument panel menus when driving.
Page 191 of 388
189
Driving
● On slopes, turn the front wheels so that they are against the edge of the
kerb.
● Uphill, turn the wheels towards the centre of the road.
WARNING
The components of the exhaust system reach very high temperatures.
This could cause a fire and considerable damage.
● Always park your vehicle so that no part of the exhaust system can
come in contact with flammable materials (such as wood, leaves, spilled
fuel, dried grass, etc).
CAUTION
● Special care should be taken when parking in areas with high kerbs or
fixed barriers. Objects protruding from the ground may damage the bumper
or other parts of the vehicle during manoeuvres. To avoid damage, stop be-
fore the wheels touched the barrier or kerb.
● Special attention is required when driving through entrances, over
ramps, kerbs or other objects. The vehicle underbody, bumpers, mudguards
and running gear, and the engine and exhaust system could be damaged as
you drive over these objects.
Information about the brakes
For the first 200 to 300 km (100 to 200 miles), new brake pads have not yet
reached their maximum braking capacity, and need to be “run in” first ⇒ .
The slightly reduced braking effect can be compensated for by increasing
pressure on the brake pedal. While running in, the full braking distance or
emergency braking distance is larger then when the brake pads have been
run in. While running in, avoid full power braking or situations requiring
braking performance. For example, in heavy traffic. The rate of wear of the brake pads
depends to a great extent on the condi-
tions in which the vehicle is used and the way the vehicle is driven. If the
vehicle is used frequently in city traffic or for short trips or driven sport style,
visit a specialised workshop regularly more frequently than advised in the
Maintenance Programme to have the bake pads checked.
If you drive with wet brakes, for example, after crossing areas of water, in
heavy rainfall or even after washing the car, the effect of the brakes is less-
ened as the brake discs are wet or even frozen (in winter). At higher speed,
dry the brakes as quickly as possible by braking gently several times. Only
do this without endangering vehicles behind you or any other road users
⇒
.
A layer of salt on the discs and brake pads will reduce brake efficiency and
increase braking distance. If you drive for a prolonged period on salted
roads without braking then brake carefully several times to eliminate the
layer of salt on the brakes ⇒
.
If the vehicle remains parked for considerable lengths of time, is used little,
or if the brakes are not used, there may be corrosion on the brake discs and
a build-up of dirt on the brake pads. If the brakes are not used frequently, or
if rust has formed on the discs, SEAT recommends cleaning the pads and
discs by braking firmly a few times at a moderately high speed. Only do this
without endangering vehicles behind you or any other road users ⇒
.
Faults in the brake system
During braking, if you notice that the vehicle does not react as usual (that
the braking distance has increased suddenly) it may be possible that there
is a fault in the braking system. The warning lamp lights up and a text
message displayed. Take the vehicle to a Technical Service immediately and
have the fault repaired. Drive at a moderate speed and be prepared to use
more pressure on the brake pedal, and allow for longer stopping distances.
Brake servo
The brake servo only operates when the engine is running and the pressure
applied by the driver on the brake pedal increases.
Safety FirstOperating instructionsPractical tipsTechnical Specifications
Page 196 of 388
194Driving
notably increasing braking distance, and could even result in the total fail-
ure of the brake system. Ensuring that the brake system is always function-
ing correctly is essential for your own safety and the safety of other road
users ⇒
.
Brake fluid specifications
SEAT have developed a special brake fluid optimised for the brake systems
of their vehicles. To ensure the optimum working of the brake system, SEAT
recommends the use of brake fluid in accordance with the VW 501 14
standard. If this brake fluid is not available or another brake fluid is used for
different reasons, use a brake fluid that complies with the United States
standard FMVSS 116 DOT 4 or the German standard DIN ISO 4925 CLASS 4
⇒
.
Brake fluids conforming to the standard VW 501 14, fulfil the American re-
quirements of the FMVSS 116 DOT 4 standard and the German
DIN ISO 4925 CLASS 4 standard. However, fluids that comply with the Amer-
ican FMVSS 116 DOT 4 standard or the German DIN ISO 4925 CLASS 4
standard do not necessarily comply with the VW 501 14 standard. Always
check the information on the brake fluid container and ensure that you are
using suitable brake fluid.
A suitable brake fluid can be obtained from Technical Services.
Brake fluid level
The level of the brake fluid should always be between the MIN and MAX
marks, or above the MIN mark ⇒
.
It is not always possible to check the level of the brake fluid, as in some
models the engine components make it difficult to see the brake fluid reser-
voir. If you cannot read the exact brake fluid level, consult a specialist.
The brake fluid level drops slightly when the vehicle is being used due to
wear of the brake pads and the automatic readjustment of the brake.
Changing the brake fluid
The brake fluid should be changed in accordance with the instructions giv-
en in the Maintenance Programme. Have the brake fluid changed by a Tech- nical Service. SEAT recommends visiting a Technical Service. This means
that only brake fluid complying with the required specifications will be
used.
WARNING
If the brake fluid level is low or unsuitable/old brake fluid is used, the
brake system may fail or braking power will be reduced.
● Check the brake system and the brake fluid level regularly!
● The brake fluid should be changed regularly in accordance with the
instructions given in the Maintenance Programme.
● When the brake fluid is used and brakes are subjected to extreme
braking forces, bubbles of vapour form in the brake system. These bub-
bles of water vapour can significantly reduce braking power, notably in-
creasing braking distance, and could even result in the total failure of the
brake system.
● Only used brake fluid that conforms to the VW 501 14 standard,
FMVSS 116 DOT 4 standard or even the DIN ISO 4925 CLASS 4 standard.
Other types of brake fluid could affect brake operation and reduce brak-
ing power. Do not use a brake fluid if the container does not specify com-
pliance with the VW 501 14, FMVSS 116 DOT 4 or DIN ISO 4925 CLASS 4
standards.
● The replacement brake fluid must be new.
● Always ensure that you use suitable brake fluid. Do not use a brake
fluid if the container does not specify compliance with the VW 501 14,
FMVSS 116 DOT 4 or DIN ISO 4925 CLASS 4 standards.