sunroof Seat Alhambra 2012 Owner's Manual
[x] Cancel search | Manufacturer: SEAT, Model Year: 2012, Model line: Alhambra, Model: Seat Alhambra 2012Pages: 388, PDF Size: 6.72 MB
Page 5 of 388
Table of Contents
Manual structure . . . . . . . . . . . . . . . . . . . . 5
Content . . . . . . . . . . . . . . . . . . . . . . . . . . . . . . . . 6
Safety First . . . . . . . . . . . . . . . . . . . . . . . . . . . . 7
Safe driving . . . . . . . . . . . . . . . . . . . . . . . . . . . . . . . 7
Dear SEAT Driver . . . . . . . . . . . . . . . . . . . . . . . . . . 7
Tips for driving . . . . . . . . . . . . . . . . . . . . . . . . . . . 7
Adjusting the seat position . . . . . . . . . . . . . . . . . 10
Transporting objects . . . . . . . . . . . . . . . . . . . . . . . 13
Seat belts . . . . . . . . . . . . . . . . . . . . . . . . . . . . . . . . . 16
Brief introduction . . . . . . . . . . . . . . . . . . . . . . . . . 16
Why wear seat belts? . . . . . . . . . . . . . . . . . . . . . . 19
Seat belts . . . . . . . . . . . . . . . . . . . . . . . . . . . . . . . 21
Seat belt tensioners . . . . . . . . . . . . . . . . . . . . . . . 26
Airbag system . . . . . . . . . . . . . . . . . . . . . . . . . . . . . 28
Brief introduction . . . . . . . . . . . . . . . . . . . . . . . . . 28
Airbag system . . . . . . . . . . . . . . . . . . . . . . . . . . . . 31
Child safety . . . . . . . . . . . . . . . . . . . . . . . . . . . . . . . 39
Child seats (accessories) . . . . . . . . . . . . . . . . . . . 39
Integrated child seat . . . . . . . . . . . . . . . . . . . . . . . 45
Operating instructions . . . . . . . . . . . . . 53
Cockpit . . . . . . . . . . . . . . . . . . . . . . . . . . . . . . . . . . . 53
Overview . . . . . . . . . . . . . . . . . . . . . . . . . . . . . . . . 53
Instrument panel . . . . . . . . . . . . . . . . . . . . . . . . . . 54
Instruments . . . . . . . . . . . . . . . . . . . . . . . . . . . . . . 57
SEAT information system . . . . . . . . . . . . . . . . . . . 62 Unlocking and locking
. . . . . . . . . . . . . . . . . . . . . 71
Vehicle key set . . . . . . . . . . . . . . . . . . . . . . . . . . . 71
Central locking and locking system . . . . . . . . . . . 74
Doors . . . . . . . . . . . . . . . . . . . . . . . . . . . . . . . . . . . 80
Sliding doors . . . . . . . . . . . . . . . . . . . . . . . . . . . . . 80
Tailgate . . . . . . . . . . . . . . . . . . . . . . . . . . . . . . . . . 84
Electric windows . . . . . . . . . . . . . . . . . . . . . . . . . . 88
Panorama sliding sunroof* . . . . . . . . . . . . . . . . . 92
Lights and visibility . . . . . . . . . . . . . . . . . . . . . . . . 95
Lights . . . . . . . . . . . . . . . . . . . . . . . . . . . . . . . . . . . 95
Sun blind . . . . . . . . . . . . . . . . . . . . . . . . . . . . . . . . 103
Windscreen wiper and washer . . . . . . . . . . . . . . . 105
Rear vision mirror . . . . . . . . . . . . . . . . . . . . . . . . . 110
Seats and storage compartments . . . . . . . . . . 114
Seat adjustment . . . . . . . . . . . . . . . . . . . . . . . . . . 114
Seat functions . . . . . . . . . . . . . . . . . . . . . . . . . . . . 117
Head restraints . . . . . . . . . . . . . . . . . . . . . . . . . . . 123
Centre armrest . . . . . . . . . . . . . . . . . . . . . . . . . . . . 126
Loading luggage compartment . . . . . . . . . . . . . . 126
Roof carrier system* . . . . . . . . . . . . . . . . . . . . . . . 139
Storage compartments . . . . . . . . . . . . . . . . . . . . . 142
Cup holders . . . . . . . . . . . . . . . . . . . . . . . . . . . . . . 150
Ashtray and cigarette lighter* . . . . . . . . . . . . . . . 151
Electrical sockets . . . . . . . . . . . . . . . . . . . . . . . . . 153
Air conditioning . . . . . . . . . . . . . . . . . . . . . . . . . . . 157
Climate Control . . . . . . . . . . . . . . . . . . . . . . . . . . . 157
Auxiliary heater* (additional heater) . . . . . . . . . . 165
Driving . . . . . . . . . . . . . . . . . . . . . . . . . . . . . . . . . . . . 169
Steering . . . . . . . . . . . . . . . . . . . . . . . . . . . . . . . . . 169
Stopping and starting the engine . . . . . . . . . . . . 172
Changing gear . . . . . . . . . . . . . . . . . . . . . . . . . . . . 176
Braking, stopping and parking . . . . . . . . . . . . . . 185
Start assist systems . . . . . . . . . . . . . . . . . . . . . . . 196
Parking sensor system* . . . . . . . . . . . . . . . . . . . . 200 Park Assist system* . . . . . . . . . . . . . . . . . . . . . . . 204
Rear Assist system* . . . . . . . . . . . . . . . . . . . . . . . 209
Cruise control system* . . . . . . . . . . . . . . . . . . . . . 214
Lane Assist system* . . . . . . . . . . . . . . . . . . . . . . . 217
Sign Assist* . . . . . . . . . . . . . . . . . . . . . . . . . . . . . . 220
Tiredness detection (recommendation to take a
break) . . . . . . . . . . . . . . . . . . . . . . . . . . . . . . . . . . . 223
Tyre monitoring systems . . . . . . . . . . . . . . . . . . . . 225
Practical tips . . . . . . . . . . . . . . . . . . . . . . . . . . 229
Driving and the environment . . . . . . . . . . . . . . . 229
Running-in . . . . . . . . . . . . . . . . . . . . . . . . . . . . . . . 229
Ecological driving . . . . . . . . . . . . . . . . . . . . . . . . . 229
Engine management and exhaust gas
purification system . . . . . . . . . . . . . . . . . . . . . . . . 232
Trailer towing . . . . . . . . . . . . . . . . . . . . . . . . . . . . . . 235
Introduction . . . . . . . . . . . . . . . . . . . . . . . . . . . . . . 235
Driving with a trailer . . . . . . . . . . . . . . . . . . . . . . . 237
Vehicle maintenance and cleaning . . . . . . . . . 246
Care and cleaning the vehicle exterior . . . . . . . . 246
Caring for and cleaning the vehicle interior . . . . 253
Notes for the user . . . . . . . . . . . . . . . . . . . . . . . . . 259
Accessories, parts replacement and
modifications . . . . . . . . . . . . . . . . . . . . . . . . . . . . . 261
Accessories, replacement of parts and
modifications . . . . . . . . . . . . . . . . . . . . . . . . . . . . 261
Checking and refilling levels . . . . . . . . . . . . . . . 268
Filling the tank . . . . . . . . . . . . . . . . . . . . . . . . . . . . 268
Fuel . . . . . . . . . . . . . . . . . . . . . . . . . . . . . . . . . . . . 271
Selective Catalytic Reduction* (AdBlue) . . . . . . . 275
Working in the engine compartment . . . . . . . . . . 279
Engine oil . . . . . . . . . . . . . . . . . . . . . . . . . . . . . . . . 283
3
Table of Contents
Page 77 of 388

75
Unlocking and locking
● Electric windows ⇒ page 88
● Panorama sliding sunroof ⇒ page 92
● Towing mode ⇒ page 237
● Emergency locking and unlocking ⇒ page 318
WARNING
The incorrect use of the central locking system may cause serious inju-
ries.
● The central locking system will lock all doors. A vehicle locked from
the inside can prevent any non-authorised individual from opening the
doors and accessing the vehicle. Nevertheless, in case of emergency or
accident, locked doors will complicate access to the passenger compart-
ment to help the passengers.
● Never leave children or disabled people alone in the vehicle. The cen-
tral locking button can be used to lock all the doors from within. There-
fore, passengers will be locked inside the vehicle. Individuals locked in
the vehicle can be exposed to very high or very low temperatures.
● Depending on the time of the year, temperatures inside a locked and
closed vehicle can be extremely high or extremely low resulting in seri-
ous injuries and illness or even death, particularly for young children.
● Never leave individuals locked in a closed and locked vehicle. In case
of emergency, they may not be able to exit the vehicle by themselves or
get help.
Description of the central locking system
The central locking system allows all doors and the tailgate to be locked
and unlocked centrally.
● From outside, using the vehicle key.
● From inside, by pushing the central locking button ⇒ page 77. In the submenu Convenience in the Configuration menu, or by visiting a spe-
cialized workshop, special functions of the central locking system can be
switched on or off ⇒ page 62.
In case of a vehicle key fault or central locking system fault, all doors can be
locked or unlocked manually.
Locking the vehicle after the airbags have been deployed
If the airbags are deployed due to an accident, the vehicle will be automati-
cally and completely unlocked. Depending on the amount of damage, the
vehicle can be locked following an accident in the following ways:
FunctionNecessary operationsLocking the vehicle
from within:– Turn off the ignition and turn it on again.
– Push the central locking button .Locking the vehicle
from the outside:– Turn off the ignition and turn it on again.
OR: – Remove the key from the ignition.
– Open any door just once.
– Lock the vehicle with the key.
Safety FirstOperating instructionsPractical tipsTechnical Specifications
Page 78 of 388
76Unlocking and locking
Locking and unlocking the vehicle from the outside
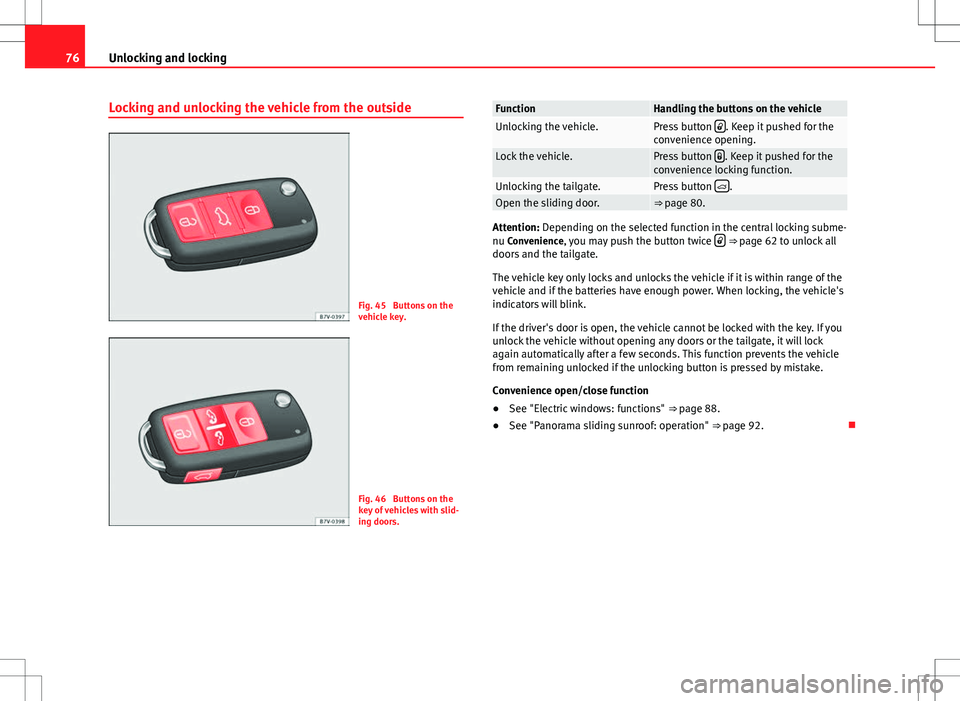
Fig. 45 Buttons on the
vehicle key.
Fig. 46 Buttons on the
key of vehicles with slid-
ing doors.
FunctionHandling the buttons on the vehicleUnlocking the vehicle.Press button . Keep it pushed for the
convenience opening.
Lock the vehicle.Press button . Keep it pushed for the
convenience locking function.
Unlocking the tailgate.Press button .Open the sliding door.⇒ page 80.
Attention: Depending on the selected function in the central locking subme-
nu Convenience, you may push the button twice ⇒
page 62 to unlock all
doors and the tailgate.
The vehicle key only locks and unlocks the vehicle if it is within range of the
vehicle and if the batteries have enough power. When locking, the vehicle's
indicators will blink.
If the driver's door is open, the vehicle cannot be locked with the key. If you
unlock the vehicle without opening any doors or the tailgate, it will lock
again automatically after a few seconds. This function prevents the vehicle
from remaining unlocked if the unlocking button is pressed by mistake.
Convenience open/close function
● See "Electric windows: functions" ⇒ page 88.
● See "Panorama sliding sunroof: operation" ⇒ page 92.
Page 81 of 388

79
Unlocking and locking
● If the driver's door is unlocked mechanically with the key, only the driv-
er's door is unlocked, the rest of the doors remain locked. Only when the
ignition has been turned on will the other doors be available - but not un-
locked - and the central locking button activated.
● If the vehicle battery is run down or flat then the anti-theft alarm will not
operate correctly.
Interior monitoring system and anti-tow system*
Fig. 48 On the roof con-
sole: interior monitoring
sensors.
The interior monitoring system triggers the alarm if the vehicle is locked and
movement is detected inside the vehicle. The anti-tow system triggers the
alarm if the vehicle is locked when the system detects the vehicle is being
raised.
Switching on the interior monitoring and the anti-tow systems
Close the storage compartment ⇒ fig. 48 1
on the roof console otherwise
the interior monitoring function (arrow) may not work without restrictions. Use the key to lock the vehicle. If the anti-theft alarm is turned on, the interi-
or monitoring and the anti-tow systems are also activated.
Switching off the interior monitoring and the anti-tow systems
The interior monitoring is switched off by pressing the remote control lock
button
twice.
● Lock all doors and tailgate.
● Use the key to lock the vehicle. The interior monitoring and / or anti-tow-
ing alarm are switched off until the next time the vehicle is locked.
To turn off the interior monitoring and anti-tow systems before unlocking
the vehicle, for example in the following situations:
● When leaving animals inside the vehicle ⇒ page 74.
● When the vehicle must be loaded.
● When the vehicle is being transported, for example, by ferry.
● When the vehicle must be towed with the axle raised.
Risk of false alarms
The interior monitoring system only operates correctly if the vehicle is com-
pletely closed. Observe legal requirements. The alarm may be accidentally
triggered in the following cases:
● When a window is completely or partially open.
● If the sunglasses storage compartment in the roof console is open.
● When the panorama sliding sunroof is completely or partially open.
● When suspended objects are hung from the interior mirror (air freshen-
er) or there are loose papers in the vehicle.
● If the separation net is fitted and moves (due to heating).
● Due to a vibrating mobile telephone inside the vehicle.
Safety FirstOperating instructionsPractical tipsTechnical Specifications
Page 92 of 388
90Unlocking and locking
Restoring one-touch opening and closing
The one-touch opening and closing function is not active after the vehicle
battery has been disconnected or is flat and will have to be reset.
● Close all windows and doors.
● Pull the button of the corresponding window and hold it for one second
in this position.
● Release the button and pull upwards and hold again. The one-touch
function is now ready for operation.
The automatic one-touch electric windows can be reinitialised individually
or several at a time.
Convenience opening and closing function
The electric windows can be opened or closed from outside using the vehi-
cle key:
● Hold in the unlocking for locking button for the vehicle. All windows
which function electrically will be either opened or closed.
● To interrupt the function, release the locking or unlocking button.
During convenience closing, first the windows and then the sliding sunroof
will be closed.
In the Configuration - convenience menu, there are different settings for oper- ating the windows ⇒ page 62.
WARNING
Careless use of the electric windows can cause serious injury.
● Only operate the electric windows when nobody is in the way.
● Never leave children or disabled people alone in the vehicle if the
doors are to be locked. The windows cannot be opened in case of an
emergency.
WARNING (Continued)
● Always take all the keys with you whenever you leave the vehicle. Af-
ter turning off the ignition, the windows can be opened and closed for a
short time using the buttons on the door as long as the driver's door or
passenger side door is not open.
● When transporting children in the rear seats, always deactivate the
rear electric windows with the child safety lock so that they cannot be
opened and closed.
Note
The one-touch function and roll-back function will not work if there is a mal-
function in the electric windows. Visit a specialised workshop.
Electric Windows anti-trap function
The anti-trap function of the electric windows can reduce the risk of injury
when opening and closing the electric windows ⇒ . If a window is not
able to close because it is stiff or because of an obstruction, it will automati-
cally open again.
● Check why the window does not close.
● Attempt to close the window again.
● If you try within the following 10 seconds and the window closes with
difficulty or there is an obstruction once again, the one-touch closing will
stop working for 10 seconds.
● If the window is still obstructed, it will stop at the corresponding posi-
tion. When the button is operated within 10 seconds, the window will close
without the anti-trap function ⇒
.
Page 94 of 388
92Unlocking and locking
Panorama sliding sunroof*
Introduction
Additional information and warnings:
● SEAT information system ⇒ page 62
● Central locking and locking system ⇒ page 74
● Emergency locking and unlocking ⇒ page 318
WARNING
Careless use of the panorama sliding sunroof can cause serious injury.
● Only close the panorama sliding sunroof and the sunshade when no-
body is in the way.
● Always take all the keys with you whenever you leave the vehicle.
● Never leave children or disabled persons in the vehicle, particularly if
they have access to the keys. Uncontrolled use of the key could lock the
vehicle, start the engine, turn on the ignition and operate the sliding
sunroof.
● The sliding sunroof can be operated for up to about ten minutes after
the ignition has been switched off, provided the driver door and the front
passenger door are not opened.
Note
In case of a fault in the operation of the sliding sunroof, the anti-trap func-
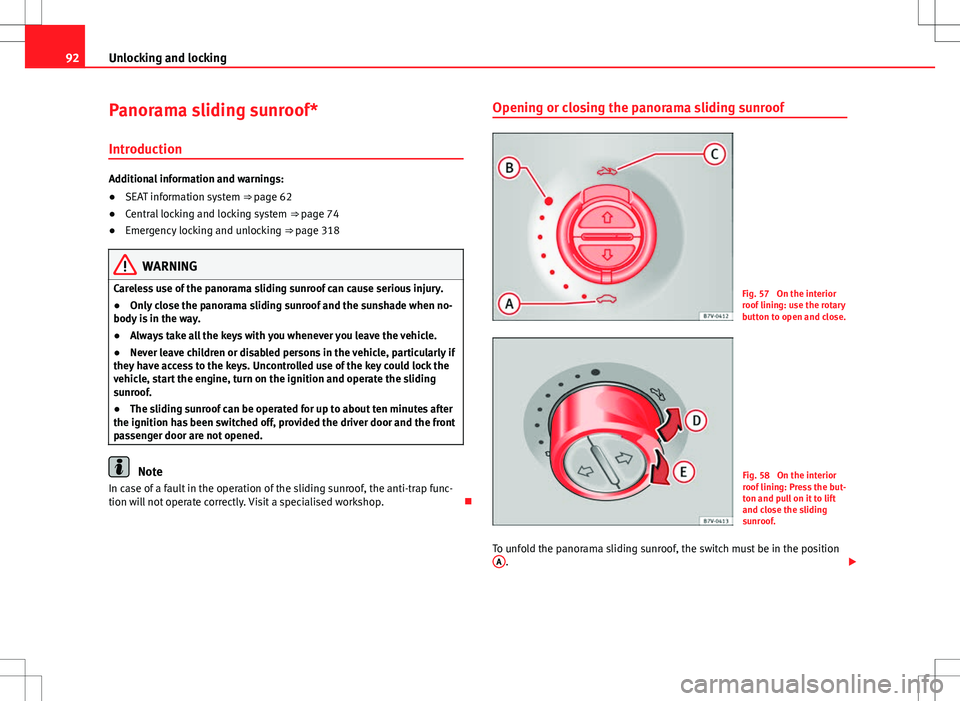
tion will not operate correctly. Visit a specialised workshop. Opening or closing the panorama sliding sunroof
Fig. 57 On the interior
roof lining: use the rotary
button to open and close.
Fig. 58 On the interior
roof lining: Press the but-
ton and pull on it to lift
and close the sliding
sunroof.
To unfold the panorama sliding sunroof, the switch must be in the position A
.
Page 95 of 388

93
Unlocking and locking
FunctionSwitch settingNecessary operations ⇒ fig. 57 To open the sliding
sunroof completely:C
Rotate the switch to the re-
quired position.To choose the con- venience position
for the sliding sun- roof:
B
To close the sliding
sunroof completely:A
⇒ fig. 58 To completely de-
ploy the roof deflec- tor:DBriefly push the switch up
(arrow).
To stop automaticoperation:D or EBriefly push the button
again back or pull on it.
To completely close
the roof deflector:EBriefly push the switch up
(arrow).
To set the inter-
mediate position:D or EHolding the button or hold
it back until the roof is in
the required position.
The panorama sliding sunroof will only work with the ignition on. The slid-
ing sunroof can be operated for up to about ten minutes after the ignition
has been switched off, provided the driver door and the front passenger
door are not opened. Opening or closing the sunshade
Fig. 59 On the interior
roof lining: switches for
the sunshade.
FunctionNecessary operationsTo open completely
(automatic):Press the button ⇒ fig. 59 1 briefly.
To stop automatic
operation:Press the button ⇒ fig. 59 1 or ⇒ fig. 59 2.
To set the intermedi-
ate position:Hold the button ⇒ fig. 59 1 or ⇒ fig. 59 2 until
the required position is reached.
To close completely (automatic):Press the button ⇒ fig. 59 2 briefly.
The sliding sunroof can be operated for up to about ten minutes after the
ignition has been switched off, provided the driver door and the front pas-
senger door are not opened.
Safety FirstOperating instructionsPractical tipsTechnical Specifications
Page 96 of 388
94Unlocking and locking
Panorama sliding sunroof: operation
Convenience open/close function
The panorama sliding sunroof can be opened or closed from outside the ve-
hicle using the vehicle key:
●Hold in the unlocking for locking button for the vehicle. The panorama
sliding sunroof is adjusted or closes.
● Release the unlock or lock button to stop the function.
During convenience closing, first the windows and then the sliding sunroof
will be closed.
Note
The sliding sunroof rotary button remains in the last position selected if the
roof is closed using convenience closing from outside the vehicle and will
have to be re-positioned the next time you drive.
Anti-trap function of the panorama sliding sunroof and the
sunshade
The anti-trap function reduces the risk of injury when opening and closing
the panorama sliding sunroof and sunshade ⇒ . When the panorama
sliding sunroof or the sunshade encounter difficulty or an obstacle when
closing, they will stop and reopen.
● Check why the panorama sliding sunroof or the sunshade did not close.
● Attempt to close the panorama sliding sunroof or sunshade once again.
● If the panorama sliding sunroof or sunshade is still obstructed, it will
stop at the corresponding position. Now close the panorama sliding sun-
roof or sunshade without the anti-trap function. Closing without the roll-back function
●
The ⇒ fig. 57 1
switch should be in the “closed” position A.
● Panorama sliding sunroof: Within five seconds of triggering the anti-trap
function, pull the control all the way back ⇒ fig. 58 (arrow E) until the panor-
ama sliding sunroof closes fully.
● Sunshade: Within five seconds of triggering the anti-trap function, push
the ⇒ fig. 59 2
button until the sunshade closes completely.
● The panorama sliding sunroof or sunshade close without the anti-trap
function.
● If the panorama sliding sunroof still cannot be closed, visited a special-
ised workshop.
WARNING
Closing the panorama sliding sunroof or sunshade without the anti-trap
function can cause serious injuries.
● Always close the panorama sliding sunroof carefully.
● Nobody should be in the way of the panorama sliding sunroof or sun-
shade, especially when they are closed without the anti-trap function.
● The anti-trap function does not prevent fingers or other parts of the
body getting pinched against the window frame and causing injury.
Note
The anti-trap function is activated if the windows and the panorama sliding
sunroof are closed from the outside of the vehicle using the ignition key for
convenience closing ⇒ page 90.
Page 164 of 388
162Air conditioning
The climate control system operates most effectively with the windows and
the electric sliding panoramic roof closed. However, if the vehicle has heat-
ed up after standing in the sun for some time, the air inside can be cooled
more quickly by opening the windows and the sliding electric panoramic
sunroof briefly.
Setting for conditions of optimal visibility
When the air conditioning is switched on, the temperature and the air hu-
midity in the vehicle interior drop. Hence, when the outside air humidity is
high, the windows do not mist over and comfort for the vehicle occupants is
improved:
In the air conditioning unit (Climatic)
● Switch off the air recirculation ⇒ page 163.
● Set the fan to the required setting.
● Turn the temperature control to the centre position.
● Open and direct all the air outlets in the dash panel ⇒ page 163.
● Turn the air distribution control to the required position.
With Climatronic
● Press the AUTO
button.
● Set the temperature to +22 °C (+72 °F).
● Open and direct all the air outlets in the dash panel ⇒ page 163.
Climatronic: Switching the measuring units for temperature on the radio
display or the navigation system installed with the default settings
Switching the temperature indication from Celsius to Fahrenheit on the ra-
dio display or the navigation system is carried out in the menu on the in-
strument panel ⇒ page 67. The cooling system does not switch on
If the air conditioning system cannot be switched on, this may be caused by
the following:
●
The engine is not running.
● The fan is switched off.
● The air conditioning fuse is blown.
● The outside temperature is lower than approximately +3 °C (+38 °F).
● The climate control system compressor has been temporarily switched
off because the engine coolant temperature is too high.
● Another fault in the vehicle. Have the air conditioner checked by a speci-
alised workshop.
Things to note
If the humidity and temperature outside the vehicle are high, condensation
can drip off the vaporiser in the cooling system and form a pool underneath
the vehicle. This is normal and does not indicate a leak!Note
After starting the engine, any residual humidity in the air conditioner could
mist over the windscreen. Switch on the defrost function as soon as possi-
ble to clear the windscreen of condensation.
Page 249 of 388
247
Vehicle maintenance and cleaning
Washing the vehicle
The longer substances such as insects, bird droppings, resinous tree sap,
road dirt, industrial deposits, tar, soot or road salt and other aggressive ma-
terials remain on the vehicle, the more damage they do to the paintwork.
High temperatures (for instance due to strong sunlight) further intensify the
corrosive effect. The vehicle undercarriage should also be thoroughly wash-
ed at regular intervals.
Automatic car washes
Always observe the instructions provided at the automatic car wash. The
standard precautionary measures prior to entering the car wash should be
taken to avoid damage to the vehicle (close all windows, fold in exterior mir-
rors). If the vehicle is fitted with additional components (spoiler, roof-rack,
aerial...), check with the car wash supervisor whether these can enter the
car wash ⇒
.
The vehicle paintwork is so durable that the vehicle can normally be washed
without problems in an automatic car wash tunnel. However, wear and dam-
age to the paintwork will depend on the type of car wash used. SEAT recom-
mends the use of car washed without brushes.
To remove traces of wax on windows and to prevent wiper blades from
scratching, please observe the following ⇒ page 249, Cleaning windows
and exterior mirrors.
Washing the car by hand
When washing the car by hand, use plenty of water to soften the dirt first,
and rinse off as well as possible.
Then clean the vehicle with a soft sponge, glove or brush using only slight
pressure. Start at the roof and work downwards. Special car shampoo
should only be used for very persistent dirt.
Rinse the sponge or glove thoroughly and often.
Wheels, sills and similar should be cleaned last. Use a second sponge for
this.
WARNING
Sharp components on the vehicle may cause injury.
● Protect arms and hands from sharp edges when cleaning the vehicle
undercarriage or the interior of the wheel hubs.
WARNING
After the vehicle has been washed, the braking effect will be reduced
(and the braking distance increased) due to moisture (and ice in winter)
on the brakes.
● Dry the brakes and remove ice by braking carefully. Ensure that you
are not endangering other road-users or breaking traffic regulations in
the process.
CAUTION
● The temperature of the water must not exceed +60 °C (+140 °F).
● To avoid damage to the paintwork, do not wash the vehicle in full sun.
● Do not use rough sponges or similar which could damage the surface to
clean away the traces of insects.
● Never wipe the headlights with a dry cloth or sponge, always moisten
first. It is best to use soapy water.
● Washing the vehicle in low temperatures: When washing the vehicle
with a hose, do not direct water into the lock cylinders or the gaps around
the doors, tailgate, or sunroof. Locks and seals could freeze!
CAUTION
To prevent damage to the vehicle, please observe the following before en-
tering an automatic car wash :
● Compare the distance between the vehicle wheels and the distance be-
tween the guide-rails of the car wash to prevent damage to the wheels and
tyres!
Safety FirstOperating instructionsPractical tipsTechnical Specifications