brake fluid Seat Alhambra 2013 Owner's Manual
[x] Cancel search | Manufacturer: SEAT, Model Year: 2013, Model line: Alhambra, Model: Seat Alhambra 2013Pages: 387, PDF Size: 6.13 MB
Page 11 of 387
9
Safe driving
ŌŚÅ Are there any SEAT dealers in the destination country?
ŌŚÅ For petrol vehicles: Is unleaded petrol available at the right octane rat-
ing?
ŌŚÅ For diesel engines: Is diesel fuel available with a low sulphur content?
ŌŚÅ Are a suitable engine oil ( ŌćÆŌĆŖpage 282) and other engine fluids comply-
ing with SEAT specifications available in the destination country?
ŌŚÅ Will the navigation system fitted at the factory operate correctly in the
destination country with the available navigation data?
ŌŚÅ Are special tyres required in the destination country?
CAUTION
SEAT does not accept liability for any damage to the vehicle due to the use
of a lower quality fuel, an inadequate service or the non-availability of genu-
ine spare parts. ’āÉ
Driving along flooded roadways
To prevent damage to the vehicle when driving through water, for example,
along a flooded road, please observe the following:
ŌŚÅ Check the depth of the water before entering the flooded zone. The wa-
ter should never come above the lower edge of the bodywork ŌćÆŌĆŖ
.
ŌŚÅ Do not drive faster than a pedestrian.
ŌŚÅ Do not stop in the water, use reverse gear or switch off the engine.
ŌŚÅ Oncoming traffic will cause waves which raise the level of the water,
making it difficult to cross the water.
WARNING
When driving through water, mud, melted snow, etc., please remember
that due to damp or frozen brake discs and shoes in winter, the braking
effect may be delayed, therefore the required braking distance is greater.
ŌŚÅ Dry the brakes and remove ice by braking carefully. Ensure that you
are not endangering other road-users or breaking traffic regulations in
the process.
ŌŚÅ After driving through water, avoid sudden sharp manoeuvres.
CAUTION
ŌŚÅ Driving through flooded areas may severely damage vehicle compo-
nents such as the engine, transmission, running gear or electrical system.
ŌŚÅ Never drive through salt water as salt causes corrosion. Always rinse any
parts of the vehicle which have been in contact with salt water. ’āÉ
Safety FirstOperating instructionsPractical tipsTechnical Specifications
Page 57 of 387
55
Cockpit
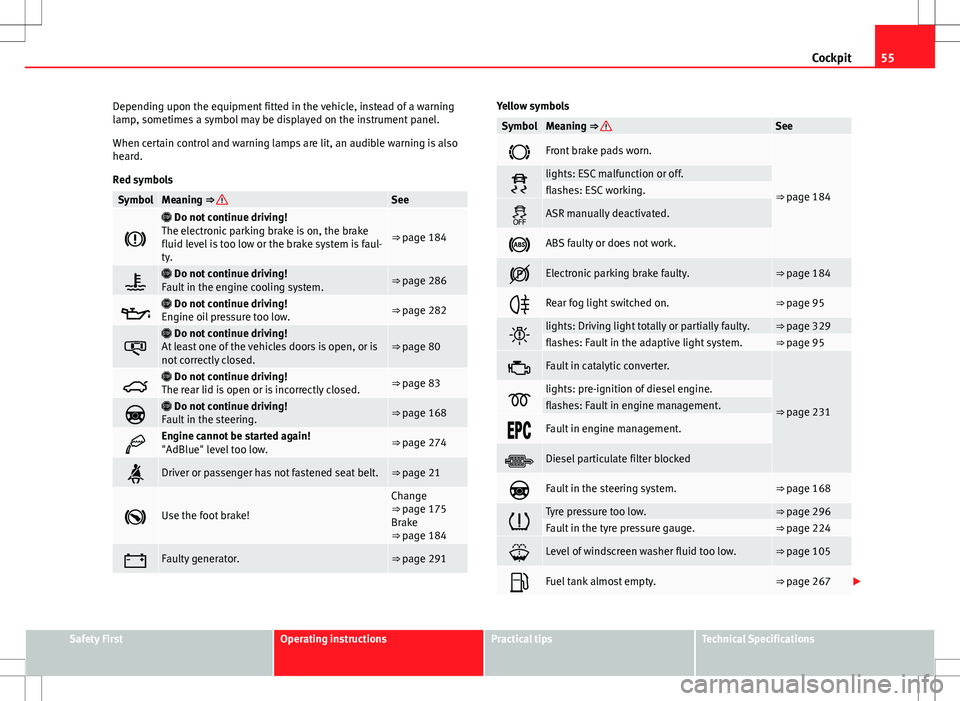
Depending upon the equipment fitted in the vehicle, instead of a warning
lamp, sometimes a symbol may be displayed on the instrument panel.
When certain control and warning lamps are lit, an audible warning is also
heard.
Red symbols
SymbolMeaning ŌćÆŌĆŖSee
’ü©
’é▓ Do not continue driving!
The electronic parking brake is on, the brake
fluid level is too low or the brake system is faul-
ty.
ŌćÆŌĆŖpage 184
’é┐’é▓ Do not continue driving!
Fault in the engine cooling system.ŌćÆŌĆŖpage 286
’üź’é▓ Do not continue driving!
Engine oil pressure too low.ŌćÆŌĆŖpage 282
’é┤
’é▓ Do not continue driving!
At least one of the vehicles doors is open, or is
not correctly closed.ŌćÆŌĆŖpage 80
’é▓’é▓ Do not continue driving!
The rear lid is open or is incorrectly closed.ŌćÆŌĆŖpage 83
’ü║’é▓ Do not continue driving!
Fault in the steering.ŌćÆŌĆŖpage 168
’üŠEngine cannot be started again!
"AdBlue" level too low.ŌćÆŌĆŖpage 274
’é¬Driver or passenger has not fastened seat belt.ŌćÆŌĆŖpage 21
’ü½Use the foot brake!
Change
ŌćÆŌĆŖpage 175
Brake
ŌćÆŌĆŖpage 184
’ü”Faulty generator.ŌćÆŌĆŖpage 291
Yellow symbols
SymbolMeaning ŌćÆŌĆŖSee
’ü®Front brake pads worn.
ŌćÆŌĆŖpage 184’āČlights: ESC malfunction or off.flashes: ESC working.
’é½ASR manually deactivated.
’ü¬ABS faulty or does not work.
’Ć¼Electronic parking brake faulty.ŌćÆŌĆŖpage 184
’ƬRear fog light switched on.ŌćÆŌĆŖpage 95
’ĆĮlights: Driving light totally or partially faulty.ŌćÆŌĆŖpage 329flashes: Fault in the adaptive light system.ŌćÆŌĆŖpage 95
’üĖFault in catalytic converter.
ŌćÆŌĆŖpage 231’üżlights: pre-ignition of diesel engine.flashes: Fault in engine management.
’üģ’üÉ’üāFault in engine management.
’āĘDiesel particulate filter blocked
’ü║Fault in the steering system.ŌćÆŌĆŖpage 168
’āćTyre pressure too low.ŌćÆŌĆŖpage 296Fault in the tyre pressure gauge.ŌćÆŌĆŖpage 224
’ü╣Level of windscreen washer fluid too low.ŌćÆŌĆŖpage 105
’üēFuel tank almost empty.ŌćÆŌĆŖpage 267 ’éŻ
Safety FirstOperating instructionsPractical tipsTechnical Specifications
Page 63 of 387
61
Cockpit
Calibrating compass
To calibrate the compass you must be in one of the valid magnetic zones
with sufficient space to be able to trace a circumference with the vehicle.
ŌŚÅ Switch the ignition on.
ŌŚÅ Select the Settings menu followed by the option Compass and Calibrate.
ŌŚÅ Confirm the message Describe a complete circumference to calibrate the
compass with OK
and then trace a complete circumference driving at ap-
proximately 10 km/h (6 mph).
When the corresponding cardinal point is displayed, the calibration is com-
plete. ’āÉ
Service interval display
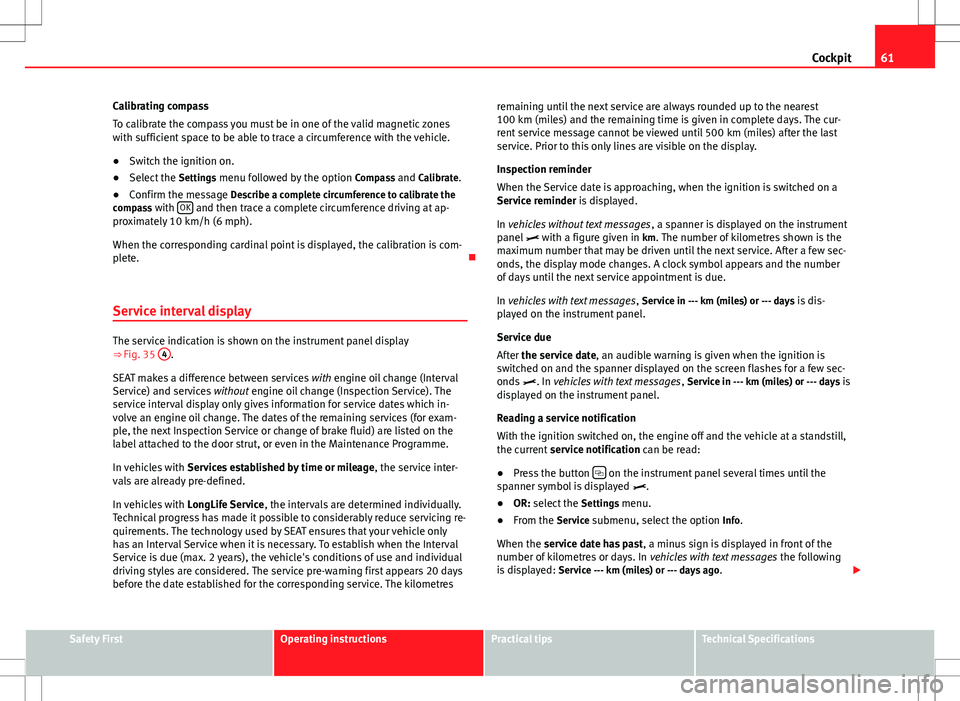
The service indication is shown on the instrument panel display
ŌćÆŌĆŖFig. 35 4.
SEAT makes a difference between services with engine oil change (Interval
Service) and services without engine oil change (Inspection Service). The
service interval display only gives information for service dates which in-
volve an engine oil change. The dates of the remaining services (for exam-
ple, the next Inspection Service or change of brake fluid) are listed on the
label attached to the door strut, or even in the Maintenance Programme.
In vehicles with Services established by time or mileage , the service inter-
vals are already pre-defined.
In vehicles with LongLife Service , the intervals are determined individually.
Technical progress has made it possible to considerably reduce servicing re-
quirements. The technology used by SEAT ensures that your vehicle only
has an Interval Service when it is necessary. To establish when the Interval
Service is due (max. 2 years), the vehicle's conditions of use and individual
driving styles are considered. The service pre-warning first appears 20 days
before the date established for the corresponding service. The kilometres remaining until the next service are always rounded up to the nearest
100 km (miles) and the remaining time is given in complete days. The cur-
rent service message cannot be viewed until 500 km (miles) after the last
service. Prior to this only lines are visible on the display.
Inspection reminder
When the Service date is approaching, when the ignition is switched on a
Service reminder is displayed.
In vehicles without text messages
, a spanner is displayed on the instrument
panel ’üż with a figure given in km. The number of kilometres shown is the
maximum number that may be driven until the next service. After a few sec-
onds, the display mode changes. A clock symbol appears and the number
of days until the next service appointment is due.
In vehicles with text messages , Service in --- km (miles) or --- days is dis-
played on the instrument panel.
Service due
After the service date, an audible warning is given when the ignition is
switched on and the spanner displayed on the screen flashes for a few sec-
onds ’üż. In vehicles with text messages , Service in --- km (miles) or --- days is
displayed on the instrument panel.
Reading a service notification
With the ignition switched on, the engine off and the vehicle at a standstill,
the current service notification can be read:
ŌŚÅ Press the button ’ā½
on the instrument panel several times until the
spanner symbol is displayed ’üż.
ŌŚÅ OR: select the Settings menu.
ŌŚÅ From the Service submenu, select the option Info.
When the service date has past , a minus sign is displayed in front of the
number of kilometres or days. In vehicles with text messages the following
is displayed: Service --- km (miles) or --- days ago .’éŻ
Safety FirstOperating instructionsPractical tipsTechnical Specifications
Page 187 of 387
185
Driving
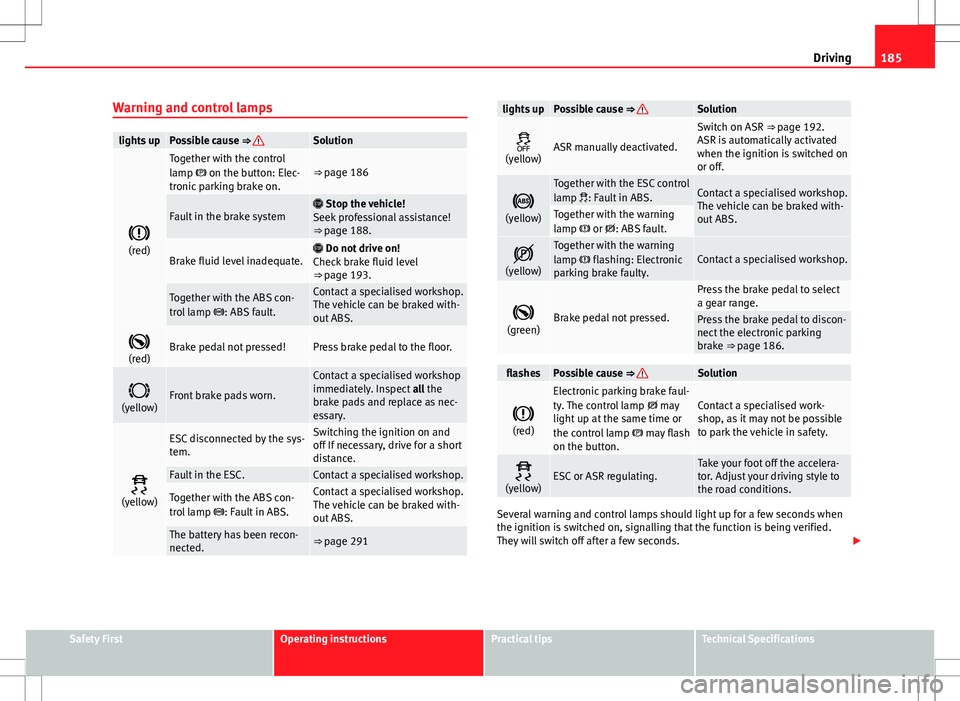
Warning and control lamps
lights upPossible cause ŌćÆŌĆŖSolution
’ü©
(red)
Together with the control
lamp ’ü¦ on the button: Elec-
tronic parking brake on.ŌćÆŌĆŖpage 186
Fault in the brake system’é▓ Stop the vehicle!
Seek professional assistance!
ŌćÆŌĆŖpage 188.
Brake fluid level inadequate.’é▓ Do not drive on!
Check brake fluid level
ŌćÆŌĆŖpage 193.
Together with the ABS con-
trol lamp ’ü¬: ABS fault.Contact a specialised workshop.
The vehicle can be braked with-
out ABS.
’ü½
(red)Brake pedal not pressed!Press brake pedal to the floor.
’ü®
(yellow)Front brake pads worn.
Contact a specialised workshop
immediately. Inspect all the
brake pads and replace as nec-
essary.
’āČ
(yellow)
ESC disconnected by the sys-
tem.Switching the ignition on and
off If necessary, drive for a short
distance.
Fault in the ESC.Contact a specialised workshop.
Together with the ABS con-
trol lamp ’ü¬: Fault in ABS.Contact a specialised workshop.
The vehicle can be braked with-
out ABS.
The battery has been recon-
nected.ŌćÆŌĆŖpage 291
lights upPossible cause ŌćÆŌĆŖSolution
’é½
(yellow)ASR manually deactivated.
Switch on ASR ŌćÆŌĆŖpage 192.
ASR is automatically activated
when the ignition is switched on
or off.
’ü¬
(yellow)
Together with the ESC control
lamp ’āČ : Fault in ABS.Contact a specialised workshop.
The vehicle can be braked with-
out ABS.
Together with the warning
lamp ’ü© or ’Ć¼: ABS fault.
’Ć¼
(yellow)Together with the warning
lamp ’ü© flashing: Electronic
parking brake faulty.Contact a specialised workshop.
’ü½
(green)Brake pedal not pressed.
Press the brake pedal to select
a gear range.
Press the brake pedal to discon-
nect the electronic parking
brake ŌćÆŌĆŖpage 186.
flashesPossible cause ŌćÆŌĆŖSolution
’ü©
(red)
Electronic parking brake faul-
ty. The control lamp ’Ć¼ may
light up at the same time or
the control lamp ’ü¦ may flash
on the button.Contact a specialised work-
shop, as it may not be possible
to park the vehicle in safety.
’āČ
(yellow)ESC or ASR regulating.Take your foot off the accelera-
tor. Adjust your driving style to
the road conditions.
Several warning and control lamps should light up for a few seconds when
the ignition is switched on, signalling that the function is being verified.
They will switch off after a few seconds. ’éŻ
Safety FirstOperating instructionsPractical tipsTechnical Specifications
Page 188 of 387
186Driving
WARNING
If the warning lamps and messages are ignored, the vehicle may stall in
traffic, or may cause accidents and severe injuries.
ŌŚÅ Never ignore the warning lamps or text messages.
ŌŚÅ Stop the vehicle safely as soon as possible.
WARNING
Driving with brakes in bad condition could result in a serious accident.
ŌŚÅ If the brake warning lamp ’ü© does not go out, or if it lights up when
driving, the brake fluid level in the reservoir is too low or there is a fault
in the brake system. Obtain professional assistance immediately
ŌćÆŌĆŖpage 192, Brake fluid.
ŌŚÅ If the brake warning lamp ’ü© lights up together with the ABS warning
lamp ’ü¬, the regulation function of the ABS could be malfunctioning. As a
result, the rear wheels can lock relatively easily when braking. If the rear
wheels lock this could result in loss of vehicle control! If possible, reduce
your speed and drive carefully to a specialised workshop close by to
check the brake system. During the following journey, avoid sudden brak-
ing and manoeuvres.
ŌŚÅ If the ABS warning lamp ’ü¬ does not go out or if it lights while driv-
ing, the ABS is malfunctioning. The vehicle can only be stopped using
normal braking without ABS. The protection provided by the ABS is not
available. Visit a specialised workshop as soon as possible.
ŌŚÅ If ’ü® lights, alone or accompanied by a warning message on the in-
strument panel display, please go immediately to a specialised work-
shop to check the brake pads and to replace them if they are worn.
CAUTION
Failure to heed the control lamps and text messages when they appear may
result in faults in the vehicle. ’āÉElectronic parking brake
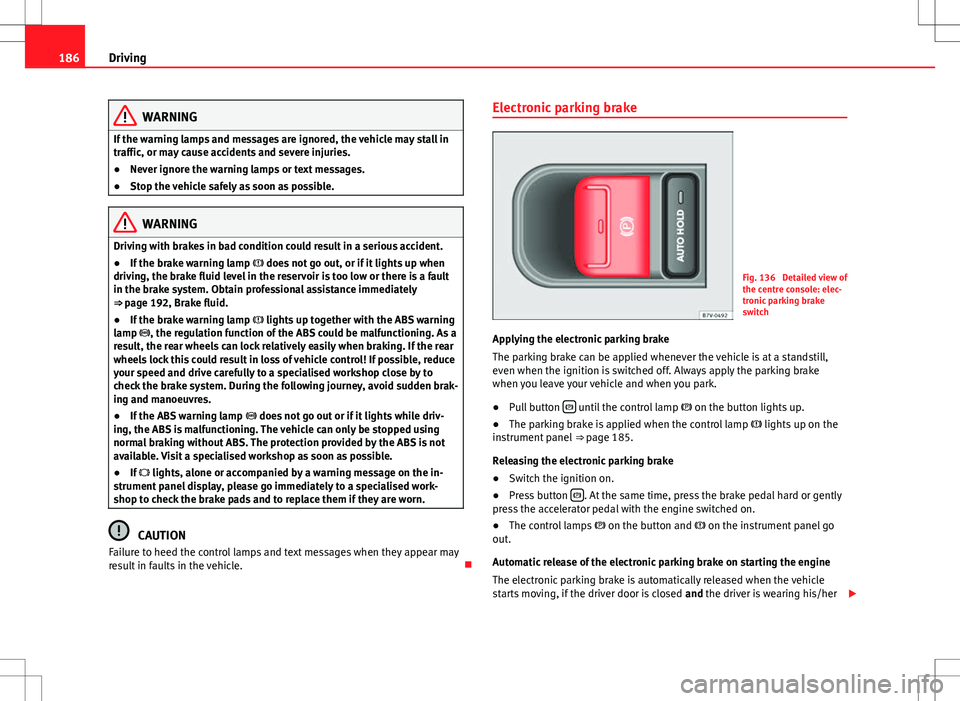
Fig. 136 Detailed view of
the centre console: elec-
tronic parking brake
switch
Applying the electronic parking brake
The parking brake can be applied whenever the vehicle is at a standstill,
even when the ignition is switched off. Always apply the parking brake
when you leave your vehicle and when you park.
ŌŚÅ Pull button ’ü¦
until the control lamp
’ü¦ on the button lights up.
ŌŚÅ The parking brake is applied when the control lamp ’ü© lights up on the
instrument panel ŌćÆŌĆŖpage 185.
Releasing the electronic parking brake
ŌŚÅ Switch the ignition on.
ŌŚÅ Press button ’ü¦
. At the same time, press the brake pedal hard or gently
press the accelerator pedal with the engine switched on.
ŌŚÅ The control lamps ’ü¦ on the button and ’ü© on the instrument panel go
out.
Automatic release of the electronic parking brake on starting the engine
The electronic parking brake is automatically released when the vehicle
starts moving, if the driver door is closed and the driver is wearing his/her’éŻ
Page 194 of 387
192Driving
Note
ŌŚÅ To ensure that the ESC and ASR work properly, all four wheels must be
fitted with identical tyres. Any differences in the rolling radius of the tyres
can cause the system to reduce engine power when this is not desired.
ŌŚÅ If a malfunction should occur in the ABS, the ESC, EDL and ASR will also
be out of action.
ŌŚÅ Noises may be heard while any of the above systems are operating. ’āÉ
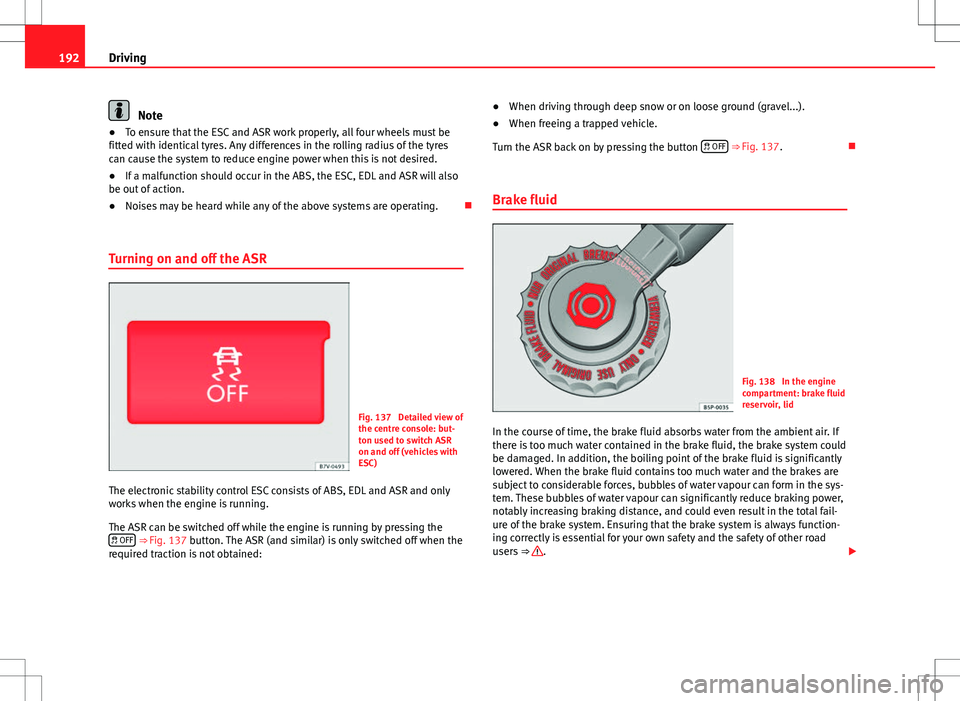
Turning on and off the ASR
Fig. 137 Detailed view of
the centre console: but-
ton used to switch ASR
on and off (vehicles with
ESC)
The electronic stability control ESC consists of ABS, EDL and ASR and only
works when the engine is running.
The ASR can be switched off while the engine is running by pressing the ’āČ OFF
ŌćÆŌĆŖ Fig. 137 button. The ASR (and similar) is only switched off when the
required traction is not obtained: ŌŚÅ
When driving through deep snow or on loose ground (gravel...).
ŌŚÅ When freeing a trapped vehicle.
Turn the ASR back on by pressing the button ’āČ OFF
ŌćÆŌĆŖFig. 137.’āÉ
Brake fluid
Fig. 138 In the engine
compartment: brake fluid
reservoir, lid
In the course of time, the brake fluid absorbs water from the ambient air. If
there is too much water contained in the brake fluid, the brake system could
be damaged. In addition, the boiling point of the brake fluid is significantly
lowered. When the brake fluid contains too much water and the brakes are
subject to considerable forces, bubbles of water vapour can form in the sys-
tem. These bubbles of water vapour can significantly reduce braking power,
notably increasing braking distance, and could even result in the total fail-
ure of the brake system. Ensuring that the brake system is always function-
ing correctly is essential for your own safety and the safety of other road
users ŌćÆŌĆŖ
. ’éŻ
Page 195 of 387
193
Driving
Brake fluid specifications
SEAT have developed a special brake fluid optimised for the brake systems
of their vehicles. To ensure the optimum working of the brake system, SEAT
recommends the use of brake fluid in accordance with the VW 501 14
standard. If this brake fluid is not available or another brake fluid is used for
different reasons, use a brake fluid that complies with the United States
standard FMVSS 116 DOT 4 or the German standard DIN ISO 4925 CLASS 4
ŌćÆŌĆŖ
.
Brake fluids conforming to the standard VW 501 14, fulfil the American re-
quirements of the FMVSS 116 DOT 4 standard and the German
DIN ISO 4925 CLASS 4 standard. However, fluids that comply with the Amer-
ican FMVSS 116 DOT 4 standard or the German DIN ISO 4925 CLASS 4
standard do not necessarily comply with the VW 501 14 standard. Always
check the information on the brake fluid container and ensure that you are
using suitable brake fluid.
A suitable brake fluid can be obtained from Technical Services.
Brake fluid level
The level of the brake fluid should always be between the MIN and MAX
marks, or above the MIN mark ŌćÆŌĆŖ
.
It is not always possible to check the level of the brake fluid, as in some
models the engine components make it difficult to see the brake fluid reser-
voir. If you cannot read the exact brake fluid level, consult a specialist.
The brake fluid level drops slightly when the vehicle is being used due to
wear of the brake pads and the automatic readjustment of the brake.
Changing the brake fluid
The brake fluid should be changed in accordance with the instructions giv-
en in the Maintenance Programme. Have the brake fluid changed by a spe-
cialised workshop. SEAT recommends visiting a Technical Service. This
means that only brake fluid complying with the required specifications will
be used.
WARNING
If the brake fluid level is low or unsuitable/old brake fluid is used, the
brake system may fail or braking power will be reduced.
ŌŚÅ Check the brake system and the brake fluid level regularly!
ŌŚÅ The brake fluid should be changed regularly in accordance with the
instructions given in the Maintenance Programme.
ŌŚÅ When the brake fluid is used and brakes are subjected to extreme
braking forces, bubbles of vapour form in the brake system. These bub-
bles of water vapour can significantly reduce braking power, notably in-
creasing braking distance, and could even result in the total failure of the
brake system.
ŌŚÅ Only used brake fluid that conforms to the VW 501 14 standard,
FMVSS 116 DOT 4 standard or even the DIN ISO 4925 CLASS 4 standard.
Other types of brake fluid could affect brake operation and reduce brak-
ing power. Do not use a brake fluid if the container does not specify com-
pliance with the VW 501 14, FMVSS 116 DOT 4 or DIN ISO 4925 CLASS 4
standards.
ŌŚÅ The replacement brake fluid must be new.
ŌŚÅ Always ensure that you use suitable brake fluid. Do not use a brake
fluid if the container does not specify compliance with the VW 501 14,
FMVSS 116 DOT 4 or DIN ISO 4925 CLASS 4 standards.
WARNING
Brake fluid is poisonous.
ŌŚÅ To reduce the risk of poisoning, do not keep brake fluid in drinks bot-
tles/containers or similar. Other people could drink from these recipients
even if the contents are clearly marked.
ŌŚÅ Always keep brake fluid in the original container; keep it correctly
sealed and out of reach of children. ’éŻ
Safety FirstOperating instructionsPractical tipsTechnical Specifications
Page 196 of 387
194Driving
CAUTION
Brake fluid damages the vehicle paintwork. Wipe off any brake fluid from
the paintwork immediately.
For the sake of the environment
Brake fluid is an environmental pollutant. Collect any spilt service fluids and
allow a professional to dispose of them. ’āÉ
Page 272 of 387
270Checking and refilling levels
Closing the fuel tank flap
ŌŚÅ Screw on the tank cap clockwise until it you hear it click into position.
ŌŚÅ Press the tank flap until you hear it click into place. The tank flap must
be flush with the body contour.
WARNING
Do not continue refilling once the fuel nozzle has switched itself off. The
fuel tank may be filled too much. As a result, fuel may spurt out and spill.
This could lead to a fire, explosion and severe injuries.
CAUTION
ŌŚÅ Always remove any fuel spilled on the vehicle paintwork immediately to
avoid damage to the wheel housing, the tyre and vehicle paintwork.
For the sake of the environment
Spilt fuel can contaminate the environment. ’āÉ
Refilling precautions
Information on bulb replacement ŌćÆŌĆŖpage 329.
Checklist
Never work on the engine or in the engine compartment if you are not famil-
iar with the operations to be carried out, the applicable safety standards
and especially if you do not have the instruments, liquids and tools neces-
sary ŌćÆŌĆŖpage 278, Working in the engine compartment! Have the work car-
ried out by a specialised workshop if you are uncertain. Check the following
regularly, preferably when you refuel:
ŌŚÅ Windscreen washer fluid level ŌćÆŌĆŖpage 105
ŌŚÅ Engine oil level ŌćÆŌĆŖpage 282 ŌŚÅ
Engine coolant level ŌćÆŌĆŖpage 286
ŌŚÅ Brake fluid level ŌćÆŌĆŖpage 184
ŌŚÅ Tyre pressure ŌćÆŌĆŖ page 296
ŌŚÅ Vehicle lighting required to guarantee road safety:
Turn signals
Side lights, dipped beam headlights and main beam headlights
Rear lights
Brake lights
Rear fog light ŌćÆŌĆŖpage 97
WARNING
Not following the checklist prepared for your own safety could lead to ac-
cidents and severe injuries.
ŌŚÅ Always follow the check list and perform the necessary operations.
’āÉ
Fuel Introduction
You will find a factory-fitted sticker containing information on the type of
fuel for your vehicle on the inside of the fuel tank flap.
Additional information and warnings:
ŌŚÅ ŌćÆŌĆŖBooklet Maintenance Programme
ŌŚÅ Refuelling ŌćÆŌĆŖpage 267
ŌŚÅ Engine and exhaust system management ŌćÆŌĆŖpage 231’éŻ
ŌĆō
ŌĆō
ŌĆō
ŌĆō
ŌĆō
Page 280 of 387
278Checking and refilling levels
Working in the engine compartment
Introduction
Before working in the engine compartment, make sure that the vehicle is
parked on horizontal and firm ground.
The engine compartment of the vehicle is a hazardous area. Never work on
the engine or in the engine compartment if you are not familiar with the op-
erations to be carried out, the applicable safety standards and especially if
you do not have the instruments, liquids and tools necessary ŌćÆŌĆŖ
! Have
the work carried out by a specialised workshop if you are uncertain. Negli-
gent work can cause serious injury.
Additional information and warnings:
ŌŚÅ Windscreen wash system ŌćÆŌĆŖpage 105
ŌŚÅ Start and stop the engine ŌćÆŌĆŖpage 171
ŌŚÅ Brake fluid ŌćÆŌĆŖpage 184
ŌŚÅ Vehicle battery ŌćÆŌĆŖpage 291
ŌŚÅ Checks when filling up ŌćÆŌĆŖpage 267
ŌŚÅ Engine oil ŌćÆŌĆŖpage 282
ŌŚÅ Engine coolant ŌćÆŌĆŖpage 286
ŌŚÅ Accessories, parts replacement, repairs and modifications ŌćÆŌĆŖpage 260
WARNING
If the vehicle moves unexpectedly, this could cause serious injury.
ŌŚÅ Never work underneath the vehicle if it is not secured against moving.
If you must work underneath the vehicle with the wheels in contact with
the ground then it should be parked on flat ground, the wheels should be
prevented from moving and the key must be removed from the ignition.
ŌŚÅ If you have to work underneath the vehicle, you must use suitable
stands additionally to support the vehicle, there is a risk of accident!.
The jack is not intended for this kind of work and its failure could lead to
severe injuries.
WARNING
The engine compartment is a dangerous area capable of causing serious
injury.
ŌŚÅ For all type of work, always take the utmost precautions, work care-
fully and note the general safety standards in force. Never take personal
risks.
ŌŚÅ Never work on the engine or in the engine compartment if you are not
familiar with the necessary operations. If you are not sure about proce-
dures then visit a specialised workshop to carry out the necessary work.
Incorrect work can cause serious injuries.
ŌŚÅ Never open the bonnet if you see steam or coolant escaping from the
engine compartment. Hot vapours and coolant can cause serious burns.
Always wait until you cannot see or hear the sound of steam or coolant
coming from the engine compartment.
ŌŚÅ Always allow the engine to cool down before opening the bonnet.
ŌŚÅ Contact with hot elements of the engine and the exhaust system can
cause burns. ’éŻ