heating Seat Alhambra 2014 Owner's Manual
[x] Cancel search | Manufacturer: SEAT, Model Year: 2014, Model line: Alhambra, Model: Seat Alhambra 2014Pages: 381, PDF Size: 5.75 MB
Page 16 of 381
14Safe driving
WARNING
The driving behaviour and braking ability change when transporting
heavy and large objects.
● Adjust your speed and driving style to visibility, road, traffic and
weather conditions.
● Accelerate gently and carefully.
● Avoid sudden braking and manoeuvres.
● Brake early.
Transporting a load
Secure all objects in the vehicle
● Distribute the load throughout the vehicle, on the roof and in a trailer as
uniformly as possible.
● Transport heavy objects as far forward as possible in the luggage com-
partment and lock the seat backs in the vertical position.
● Secure luggage in the luggage compartment with suitable straps on the
fastening rings ⇒ page 127.
● Check the headlight adjustment ⇒ page 96.
● Use the suitable tyre pressure according to the load being transported.
Read the tire inflation information label ⇒ page 297.
● For vehicles with a tire pressure indicator, change the vehicle load status
⇒ page 225.
CAUTION
Objects on the shelf could chafe against the wires of the heating element in
the heated rear window and cause damage.
Note
Please note the information about loading a trailer ⇒ page 237 and the
roof carrier system ⇒ page 140.
Driving with the rear lid open
Driving with the rear lid open creates an additional risk. Secure all objects
and secure the rear lid correctly and take all measures possible to reduce
toxic gases from entering the vehicle.
WARNING
Driving with the rear lid unlocked or open could cause serious injuries.
● Always drive with the rear lid closed.
● Secure all objects in the vehicle. Loose items could fall out of the ve-
hicle and injure other road users or damage other vehicles.
● Drive particularly carefully and think ahead.
● Avoid sudden manoeuvres and braking given that this could cause an
uncontrolled movement of the open rear lid.
● When transporting objects that protrude out of the luggage compart-
ment, indicate them suitably. Observe legal requirements.
● If objects must project out of the luggage compartment, the rear lid
must never be used to “secure” or “attach” objects.
● If a baggage rack is fitted on the rear lid, it should be removed before
travelling with the rear lid open.
Page 17 of 381
15
Safe driving
WARNING
Toxic gases may enter the vehicle interior when the rear lid is open. This
could cause loss of consciousness, carbon monoxide poisoning, serious
injury and accidents.
● To avoid toxic gases entering the vehicle always drive with the rear lid
closed.
● In exceptional circumstances, if you must drive with the rear lid open,
observe the following to reduce the entry of toxic gases inside the vehi-
cle:
–Close all windows and the sliding sunroof.
– Turn off the air recirculation for the heating and air conditioner.
– Open all of the air outlets in the dash panel.
– Turn the heating fan and heater to the highest level.
CAUTION
An open rear lid changes the length and height of the vehicle.
Driving a loaded vehicle
For the best handling when driving a loaded vehicle, note the following:
● Secure all objects
⇒ page 14.
● Accelerate gently and carefully.
● Avoid sudden braking and manoeuvres.
● Brake early.
● If necessary, read the instructions for driving with a trailer
⇒ page 237.
● If necessary, read the instructions for driving with a roof carrier system
⇒ page 140.
WARNING
A sliding load could considerably affect the stability and safety of the ve-
hicle resulting in an accident with serious consequences.
● Secure loads correctly so they do not move.
● When transporting heavy objects, use suitable ropes or straps.
● Lock the seat backs in vertical position.
Specific vehicle weight information
The instructions in the official vehicle documents take precedence. All the
technical data provided in this documentation is applicable to the basic
model. The vehicle data label in the Maintenance Programme or the vehicle
documentation shows which engine is installed in your vehicle.
The figures may be different depending whether additional equipment is fit-
ted, for different models and for special vehicles.
WARNING
Exceeding the maximum authorised weight and the load on the axles
could cause damage to the vehicle, accidents and serious injuries.
● The real load on the axles should never exceed the maximum permit-
ted.
● The load and its distribution in the vehicle have effects on the vehicle
handling and the braking ability. Always drive at a suitable speed.
CAUTION
Distribute the load as uniformly and as low down on the vehicle as possible.
When transporting heavy objects in the luggage compartment, these
should be placed as far forward as possible or over the rear axle to have as
little influence on handling as possible.
Safety FirstOperating instructionsPractical TipsTechnical Specifications
Page 55 of 381
53
Cockpit
Operating instructions Cockpit
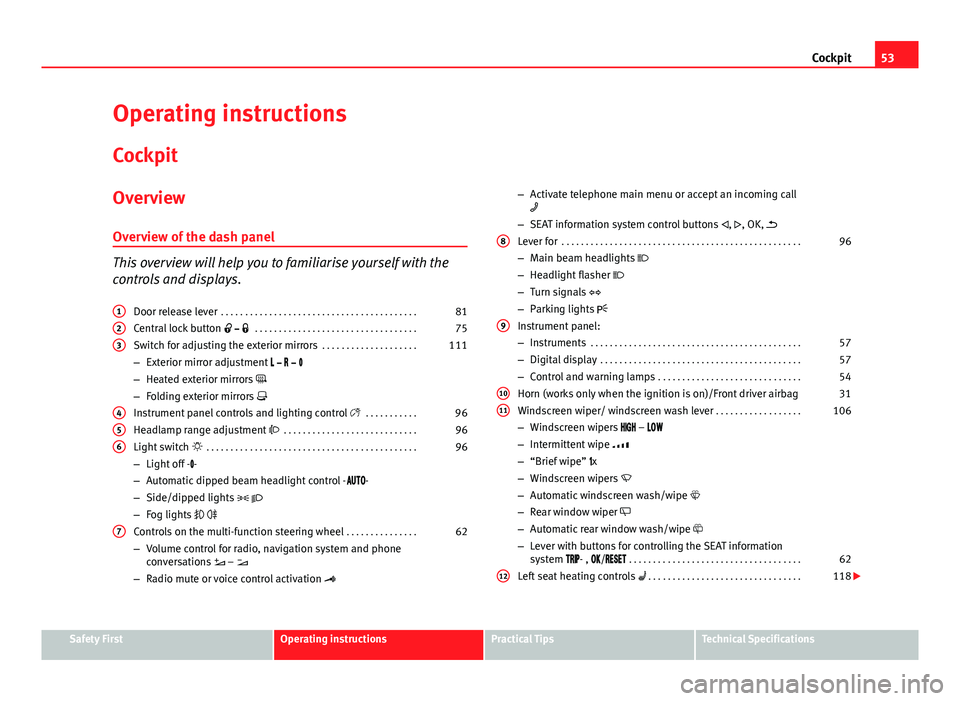
Overview Overview of the dash panel
This overview will help you to familiarise yourself with the
controls and displays. Door release lever . . . . . . . . . . . . . . . . . . . . . . . . . . . . . . . . . . . . . . . . . 81
Central lock button . . . . . . . . . . . . . . . . . . . . . . . . . . . . . . . . . . 75
Switch for adjusting the exterior mirrors . . . . . . . . . . . . . . . . . . . .111
– Exterior mirror adjustment
– Heated exterior mirrors
– Folding exterior mirrors
Instrument panel controls and lighting control . . . . . . . . . . .96
Headlamp range adjustment . . . . . . . . . . . . . . . . . . . . . . . . . . . . 96
Light switch . . . . . . . . . . . . . . . . . . . . . . . . . . . . . . . . . . . . . . . . . . . . 96
– Light off - -
– Automatic dipped beam headlight control - -
– Side/dipped lights
– Fog lights
Controls on the multi-function steering wheel . . . . . . . . . . . . . . .62
– Volume control for radio, navigation system and phone
conversations –
– Radio mute or voice control activation
1
23
456
7
–
Activate telephone main menu or accept an incoming call
– SEAT information system control buttons , , OK,
Lever for . . . . . . . . . . . . . . . . . . . . . . . . . . . . . . . . . . . . . . . . . . . . . . . . . . 96
– Main beam headlights
– Headlight flasher
– Turn signals
– Parking lights
Instrument panel:
– Instruments . . . . . . . . . . . . . . . . . . . . . . . . . . . . . . . . . . . . . . . . . . . . 57
– Digital display . . . . . . . . . . . . . . . . . . . . . . . . . . . . . . . . . . . . . . . . . . 57
– Control and warning lamps . . . . . . . . . . . . . . . . . . . . . . . . . . . . . . 54
Horn (works only when the ignition is on)/Front driver airbag 31
Windscreen wiper/ windscreen wash lever . . . . . . . . . . . . . . . . . .106
– Windscreen wipers –
– Intermittent wipe
– “Brief wipe” x
– Windscreen wipers
– Automatic windscreen wash/wipe
– Rear window wiper
– Automatic rear window wash/wipe
– Lever with buttons for controlling the SEAT information
system - , / . . . . . . . . . . . . . . . . . . . . . . . . . . . . . . . . . . . . 62
Left seat heating controls . . . . . . . . . . . . . . . . . . . . . . . . . . . . . . . . 118
8
9
1011
12
Safety FirstOperating instructionsPractical TipsTechnical Specifications
Page 56 of 381
54Cockpit
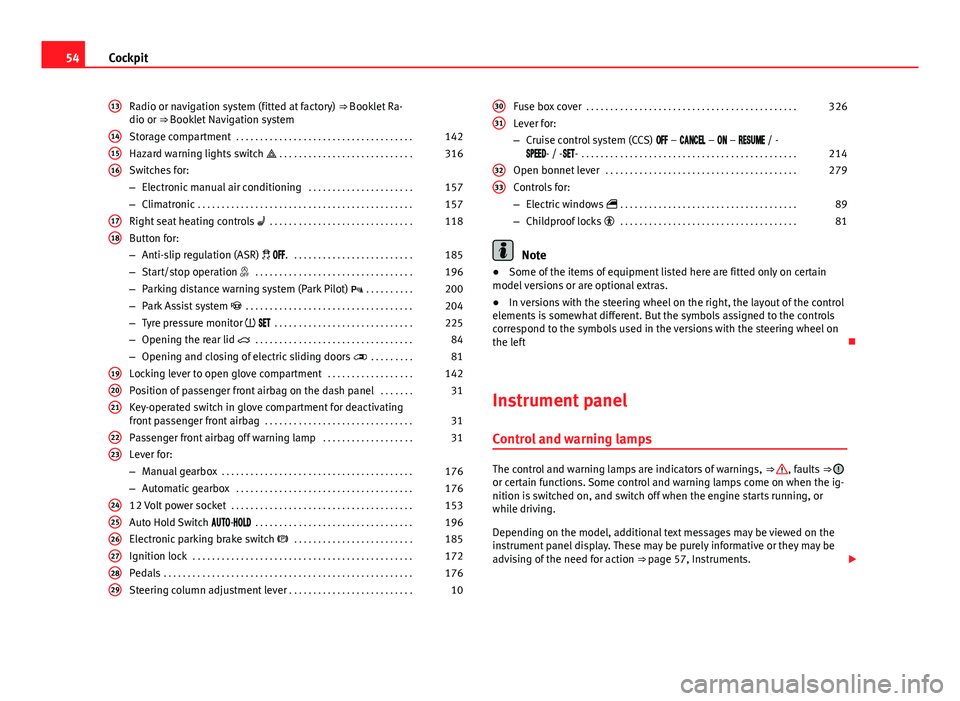
Radio or navigation system (fitted at factory) ⇒ Booklet Ra-
dio or ⇒ Booklet Navigation system
Storage compartment . . . . . . . . . . . . . . . . . . . . . . . . . . . . . . . . . . . . . 142
Hazard warning lights switch . . . . . . . . . . . . . . . . . . . . . . . . . . . . 316
Switches for:
– Electronic manual air conditioning . . . . . . . . . . . . . . . . . . . . . .157
– Climatronic . . . . . . . . . . . . . . . . . . . . . . . . . . . . . . . . . . . . . . . . . . . . . 157
Right seat heating controls . . . . . . . . . . . . . . . . . . . . . . . . . . . . . . 118
Button for:
– Anti-slip regulation (ASR) . . . . . . . . . . . . . . . . . . . . . . . . . . 185
– Start/stop operation . . . . . . . . . . . . . . . . . . . . . . . . . . . . . . . . . 196
– Parking distance warning system (Park Pilot) . . . . . . . . . . 200
– Park Assist system . . . . . . . . . . . . . . . . . . . . . . . . . . . . . . . . . . . 204
– Tyre pressure monitor . . . . . . . . . . . . . . . . . . . . . . . . . . . . . 225
– Opening the rear lid . . . . . . . . . . . . . . . . . . . . . . . . . . . . . . . . . 84
– Opening and closing of electric sliding doors . . . . . . . . . 81
Locking lever to open glove compartment . . . . . . . . . . . . . . . . . .142
Position of passenger front airbag on the dash panel . . . . . . .31
Key-operated switch in glove compartment for deactivating
front passenger front airbag . . . . . . . . . . . . . . . . . . . . . . . . . . . . . . . 31
Passenger front airbag off warning lamp . . . . . . . . . . . . . . . . . . .31
Lever for:
– Manual gearbox . . . . . . . . . . . . . . . . . . . . . . . . . . . . . . . . . . . . . . . . 176
– Automatic gearbox . . . . . . . . . . . . . . . . . . . . . . . . . . . . . . . . . . . . . 176
12 Volt power socket . . . . . . . . . . . . . . . . . . . . . . . . . . . . . . . . . . . . . . 153
Auto Hold Switch - . . . . . . . . . . . . . . . . . . . . . . . . . . . . . . . . . 196
Electronic parking brake switch . . . . . . . . . . . . . . . . . . . . . . . . . 185
Ignition lock . . . . . . . . . . . . . . . . . . . . . . . . . . . . . . . . . . . . . . . . . . . . . . 172
Pedals . . . . . . . . . . . . . . . . . . . . . . . . . . . . . . . . . . . . . . . . . . . . . . . . . . . . 176
Steering column adjustment lever . . . . . . . . . . . . . . . . . . . . . . . . . . 10
13
141516
1718
192021
2223
242526272829
Fuse box cover
. . . . . . . . . . . . . . . . . . . . . . . . . . . . . . . . . . . . . . . . . . . . 326
Lever for:
– Cruise control system (CCS) – – – / -
- / -- . . . . . . . . . . . . . . . . . . . . . . . . . . . . . . . . . . . . . . . . . . . . . 214
Open bonnet lever . . . . . . . . . . . . . . . . . . . . . . . . . . . . . . . . . . . . . . . . 279
Controls for:
– Electric windows . . . . . . . . . . . . . . . . . . . . . . . . . . . . . . . . . . . . . 89
– Childproof locks . . . . . . . . . . . . . . . . . . . . . . . . . . . . . . . . . . . . . 81
Note
● Some of the items of equipment listed here are fitted only on certain
model versions or are optional extras.
● In versions with the steering wheel on the right, the layout of the control
elements is somewhat different. But the symbols assigned to the controls
correspond to the symbols used in the versions with the steering wheel on
the left
Instrument panel Control and warning lamps
The control and warning lamps are indicators of warnings, ⇒ , faults ⇒ or certain functions. Some control and warning lamps come on when the ig-
nition is switched on, and switch off when the engine starts running, or
while driving.
Depending on the model, additional text messages may be viewed on the
instrument panel display. These may be purely informative or they may be
advising of the need for action ⇒ page 57, Instruments.
30
31
3233
Page 61 of 381
59
Cockpit
Type of mes-
sageSymbol
colourDescription
Priority 1
warning.Red
Symbol flashing or lit; partly combined with
audible warnings.
Stop the vehicle! It is dangerous ⇒
!
Check the function that is faulty and repair it.
If necessary, request assistance from special-
ised personnel.
Priority 2
warning.Yellow
Symbol flashing or lit; partly combined with
audible warnings.
A faulty function, or fluids which are below
the correct levels may cause damage to the
vehicle! ⇒
Check the faulty function as soon as possible.
If necessary, request assistance from special-
ised personnel.
Informative
text.–Information relating to different vehicle pro-
cesses.
Mileage
The odometer registers the total distance travelled by the car.
The odometer (trip) shows the distance travelled since the last odometer re- set. The last digit of the trip recorder indicates distances of 100 metres or
one tenths of a mile.
Outside temperature display
When the outside temperature is below +4 °C (+39 °F), the symbol “ice crys-
tal” (warning of risk of freezing) is also displayed next to the temperature.
At first this symbol flashes and then it remains lit until the outside tempera-
ture rises above +6 °C (+43 °F) ⇒
.
When the vehicle is at a standstill, with the auxiliary heating on
(⇒ page 165), or when travelling at very low speeds, the temperature dis-
played may be higher than the true outside temperature, as a result of the
heat produced by the engine. The temperatures measured range from -40 °C to +50 °C (-40 °F to +122 °F).
Compass
With the ignition on and the navigation system on, the cardinal point corre-
sponding to the vehicle's direction of travel is displayed on the instrument
panel
⇒ page 60.
Selector lever positions
The range of engaged gears of the selector lever is shown on the side of the
lever, and on the instrument panel display. In positions D and S, and with
the Tiptronic, the corresponding gear is also displayed.
Recommended gear (manual gearbox)
The recommended gear in order to save fuel is displayed on the instrument
panel while you are driving ⇒ page 176.
Second speed display (mph or km/h)
In addition to the speedometer, the speed can also be displayed in a differ-
ent unit of measurement (in miles or in km per hour). To change the units, in
the Settings menu, select the option Second speed ⇒ page 62.
Vehicles without menu display on the instrument panel
● Switch on the engine.
● Press button
three times. The odometer display flashes on the instru-
ment panel display.
● Press button 0.0 / SET
once. “mph” or “km/h” is displayed briefly in-
stead of the odometer.
● This activates the second speed display. To switch it off, repeat the pro-
cedure.
This option cannot be deactivated in models destined for countries in which
the second speed must always be visible.
Start/Stop operating display
Updated information relating to the status is displayed on the instrument
panel ⇒ page 196.
Safety FirstOperating instructionsPractical TipsTechnical Specifications
Page 64 of 381
62Cockpit
The service interval display is reset
If the service was not carried out by a Technical Service, the display can be
reset as follows:
In vehicles with text messages:Select the Settings menu.In the submenu Service, select the option Reset.Confirm with OK when requested to do so by the system.
In vehicles without text messages:Switch the ignition off.Press and hold the 0.0 / SET button.Switch the ignition back on.Release the 0.0 / SET button and, press for the next 20 seconds.
Do not reset the indicator to zero between two intervals, otherwise the dis-
play will be incorrect.
If, while the LongLife service is valid, the service interval display is reset to
zero, the “service will be activated by time or mileage”. The service interval
is no longer calculated individually
⇒ Booklet Maintenance Programme.
Note
● The service message disappears after a few seconds, when the engine is
started or when OK
is pressed.
● In vehicles with the LongLife system in which the battery has been dis-
connected for a long period of time, it is not possible to calculate the date
of the next service. Therefore the service interval display may not be correct.
In this case, please check the maximum permitted service intervals ⇒ Book-
let Maintenance Programme. SEAT information system
Introduction
With the ignition switched on, it is possible to read the different functions of
the display by scrolling through the menus.
In vehicles with a multifunction steering wheel, there are no buttons on the
windscreen wiper lever. The multifunction display can only be controlled
from the buttons on the multifunction steering wheel.
The number of menus displayed on the instrument panel will vary according
to the vehicle electronics and equipment.
A specialised dealer will be able to programme or modify additional func-
tions, according to the vehicle equipment. SEAT recommends visiting a
Technical Service.
Some menu options can only be read when the vehicle is at a standstill.
As long as a priority 1 warning is displayed, it will not be possible to read
the menus. To display the menus, confirm the warning by pressing OK
.
Additional information and warnings:
● Exterior mirrors ⇒ page 111
● Auxiliary heating ⇒ page 165
WARNING
Any distraction may lead to an accident, with the risk of injury.
● Do not read the instrument panel menus when driving.
Page 65 of 381
63
Cockpit
Summary of the menu structure
■ Multifunction display (MFI) ⇒ page 66
■ Journey duration
■ Current fuel consumption
■ Average fuel consumption
■ Operating range
■ Distance covered
■ Average speed
■ Digital display of speed
■ Oil temperature digital display
■ Speed warning
■ Audio ⇒ Booklet Radio or ⇒ Booklet navigation system
■ Navigation ⇒ Booklet Navigation system
■ Auxiliary heating ⇒ page 165
■ Activation
■ Programme On / Off
■ Disconnection
■ Timer 1-3
■ Day
■ Time
■ Minute
■ Activate
■ Duration
■ Operating mode
■ Heat
■ Ventilation
■ Day
■ Default setting
■ Vehicle condition ⇒ page 66 ■
Configuration ⇒ page 67
■ Multifunction display data
■ Journey duration
■ Current fuel consumption
■ Average fuel consumption
■ Distance covered
■ Operating range
■ Average speed
■ Digital display of speed
■ Speed warning
■ Compass
■ Convenience ⇒ page 68
■ Open door
■ Manual
■ automatic mode
■ Anti-theft alarm confirmation On / Off
■ Handling windows
■ Off
■ All
■ Driver
■ Mirror adjustment On / Off
■ Rear vision mirror adjustment
■ Synchronised
■ Individual
■ Default setting
■ Lights & visibility ⇒ page 69
■ Coming Home
■ Leaving Home
■ Footwell light
■ Convenience turn signals On / Off
■ Default setting
■ Tourist light On / Off
Safety FirstOperating instructionsPractical TipsTechnical Specifications
Page 68 of 381
66Cockpit
Main menu
MenueffectSeeMFIInformation and possible configurations of
the multifunction display (MFD).⇒ page 66
AudioIf the radio is on, the station is displayed.
In CD mode, the current CD is played.⇒ Booklet Ra-
dio or ⇒ Book- let navigation system
NavigationNavigation system information:
when the navigation to destination is on,
change of direction arrows and a proximity
bar are displayed. These symbols are similar
to those used in the navigation system.
If navigation to destination is not on, the di-
rection of travel (compass) and the name of
the street on which you are driving are dis-
played.⇒ Book-
let Navigation system
Parking
heatingInformation and configurations of the park-
ing heating:
switching the parking heating on or off. Se-
lect the operating mode and duration.⇒ page 165
Vehicle con-
ditionCurrent warning or information texts.
This option only appears when one of the
following texts is available. The number of
available messages is displayed. Example
1/1 or 2/2.⇒ page 57
SettingsDifferent setting options, for example, the
Convenience, Lighting & Visibility menus,
and the time, speed warning with winter
tyres, language, units of measurement, or
“Display off”.⇒ page 67
MFI (multifunction display) menu
The multifunction display (MFI) has two automatic memories:
1 - Partial
memory and 2 - Total memory . The selected memory will be shown in the
upper right-hand corner of the display.
With the ignition switched on, and memory 1 or 2 displayed, briefly press OK to change from one memory to another.
1
Trip memo-
ry (for a
single jour-
ney).
The memory stores the values for the journey and the con-
sumption from the moment the ignition is switched on un-
til it is switched off again.
If the journey is broken for more than two hours, the mem-
ory is automatically erased. If the journey is continued in
less than two hours after the ignition is switched off, the
new data is added to the data already stored in the memo-
ry.
2Total mem-
ory (for all
journeys).
The memory records the values for a specific number of
partial trips, up to a total of 19 hours and 59 minutes or 99
hours and 59 minutes, or 1,999.9 km (or miles) for
9,999 km (or miles), depending on the model of instru-
ment panel. On reaching either of these limits, the memo-
ry is automatically erased and starts to count from 0 again.
Possible displays
MenueffectJourney durationThis indicates the hours (h) and minutes (min) since
the ignition was switched on.
Current fuel con-
sumptionThe current fuel consumption while driving is dis-
played in l/100 km (or miles per gallon, mpg); when
the engine is running but the vehicle is not moving,
in l/h (or gallons per hour).
Page 71 of 381
69
Cockpit
Convenience menueffectRear vision mirror adjustmentTilts passenger mirror downwards when reverse gear is engaged. This enables the driver to see the edge of the pavement,
for example ⇒ page 111.
Exterior mirror adjust.If synchronised adjustment is selected, when the driver side exterior mirror is adjusted, the passenger exterior mirror is also
moved.
Factory settingsSome functions of the Convenience submenu will be reset to the factory value.BackThe Configuration menu is displayed again.
Lights & visibility submenu
Lights & visi-
bility menueffect
Coming HomeThis permits the adjustment of the time the headlamps
stay on after locking or unlocking the vehicle, the function
can also be connected or disconnected here ⇒ page 101.Leaving Home
Footwell lightThis permits the adjustment of the brightness of the foot-
well lighting when the doors are open, the function can al-
so be connected or disconnected here
Convenience
turn signalsSwitching convenience turn signals on and off When the
convenience turn signals are connected, when the turn
signal is switched on, these flash at least three times
⇒ page 96.
Factory set-
tingsAll the configurations in the submenu Lights & visibility are
reset to the predefined factory values.
Tourist lightHeadlamp adjustment for countries in which vehicles are
driven on the other side of the road. When the mark is acti-
vated, the headlamps of a left-hand drive vehicle are ad-
justed for driving on the left. This function must only be
used for a short period.
BackThe Configuration menu is displayed again. Personal convenience settings
When two people use a vehicle, SEAT recommends that each person always
uses “their” own remote control key. When the ignition is switched off, or
the vehicle is locked, the personal convenience settings are stored and au-
tomatically allocated to the vehicle key
⇒ page 62.
The values of the personalised convenience settings of the following menu
options are allocated to the vehicle key: ■ Parking heating menu
■ Configuration Menu
■ Time
■ Language
■ Units
■ Convenience settings menu
■ Door unlock (individual opening, Auto Lock)
■ Convenience handling of windows
■ Rear vision mirror adjustment
■ Lights & visibility settings menu
■ Coming home and leaving home
■ Footwell light
■ Convenience turn signals
Safety FirstOperating instructionsPractical TipsTechnical Specifications
Page 82 of 381
80Opening and closing
Interior monitoring system and anti-tow system*
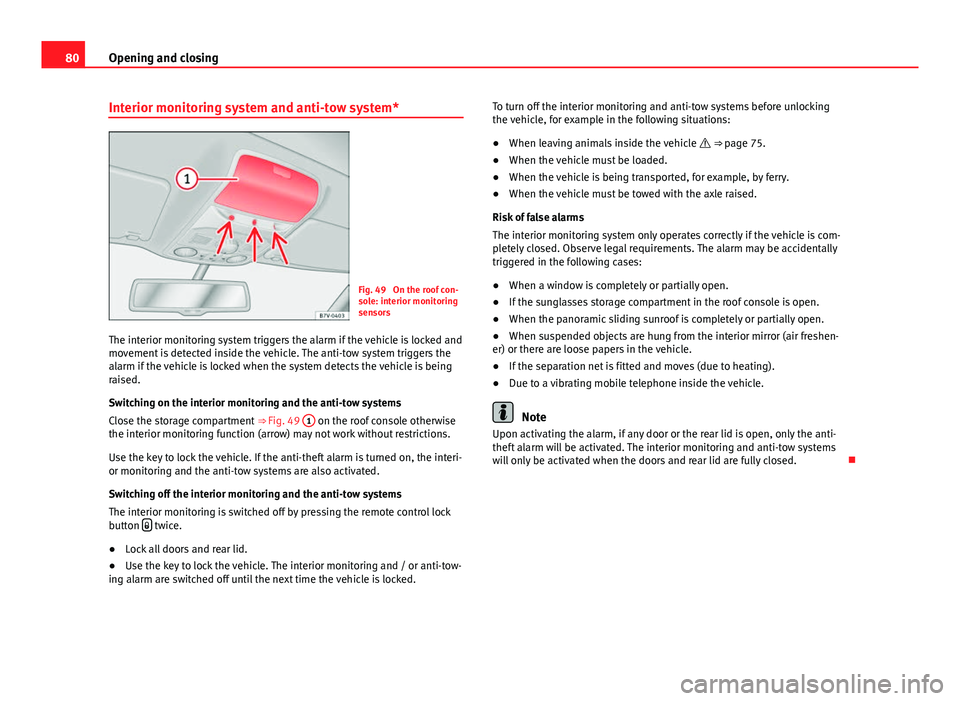
Fig. 49 On the roof con-
sole: interior monitoring
sensors
The interior monitoring system triggers the alarm if the vehicle is locked and
movement is detected inside the vehicle. The anti-tow system triggers the
alarm if the vehicle is locked when the system detects the vehicle is being
raised.
Switching on the interior monitoring and the anti-tow systems
Close the storage compartment ⇒ Fig. 49 1
on the roof console otherwise
the interior monitoring function (arrow) may not work without restrictions.
Use the key to lock the vehicle. If the anti-theft alarm is turned on, the interi-
or monitoring and the anti-tow systems are also activated.
Switching off the interior monitoring and the anti-tow systems
The interior monitoring is switched off by pressing the remote control lock
button
twice.
● Lock all doors and rear lid.
● Use the key to lock the vehicle. The interior monitoring and / or anti-tow-
ing alarm are switched off until the next time the vehicle is locked. To turn off the interior monitoring and anti-tow systems before unlocking
the vehicle, for example in the following situations:
●
When leaving animals inside the vehicle ⇒ page 75.
● When the vehicle must be loaded.
● When the vehicle is being transported, for example, by ferry.
● When the vehicle must be towed with the axle raised.
Risk of false alarms
The interior monitoring system only operates correctly if the vehicle is com-
pletely closed. Observe legal requirements. The alarm may be accidentally
triggered in the following cases:
● When a window is completely or partially open.
● If the sunglasses storage compartment in the roof console is open.
● When the panoramic sliding sunroof is completely or partially open.
● When suspended objects are hung from the interior mirror (air freshen-
er) or there are loose papers in the vehicle.
● If the separation net is fitted and moves (due to heating).
● Due to a vibrating mobile telephone inside the vehicle.
Note
Upon activating the alarm, if any door or the rear lid is open, only the anti-
theft alarm will be activated. The interior monitoring and anti-tow systems
will only be activated when the doors and rear lid are fully closed.