brake Seat Alhambra 2015 Repair Manual
[x] Cancel search | Manufacturer: SEAT, Model Year: 2015, Model line: Alhambra, Model: Seat Alhambra 2015Pages: 305, PDF Size: 5.46 MB
Page 248 of 305
Advice
WARNING
If the folding chocks are assembled or used
incorrectly, an accident may occur and seri-
ous injury caused.
● Never use damaged chocks.
● Never use chocks to immobilize the vehicle
on a slope. Changing a wheel*
Introduction The tyres mounted on the vehicle are anti-
puncture. The wheels should only be
changed when switching from summer to
winter tyres or vice-versa. See
›››
page 237
The vehicle only comes with the necessary
tools for changing wheels if factory supplied
with winter tyres. If this is not the case, you
need to go to a specialised workshop to get
the wheels changed.
You should only change the wheels yourself if
the vehicle is parked in a safe place, you are
familiar with the procedure and safety stand-
ards and you have all the necessary tools!
Otherwise, you should seek professional as-
sistance. WARNING
Changing a wheel can be dangerous, espe-
cially on the hard shoulder. Please observe
the following rules to minimise the risk of in-
jury:
● Stop the vehicle safely as soon as possible.
Park at a safe distance from surrounding traf-
fic to change a wheel.
● When changing a wheel, keep all passen-
gers, and particularly children, a safe dis-
tance away from the work area.
● Turn on the hazard warning lights to warn
other road users.
● Ensure the ground on which you park is flat
and solid. If necessary, support the jack on a
wide solid base.
● If you are changing a wheel yourself, you
should be familiar with the required proce-
dure. Otherwise, you should seek professio-
nal assistance.
● Only use suitable tools that are not dam-
aged when changing a wheel.
● Always stop the engine, turn on the elec-
tronic parking brake and place the gear selec-
tor lever in position P, for an automatic gear-
box, or engage a gear for a manual gearbox to
reduce the risk of the vehicle moving acciden-
tally.
● Have the tightening torque of the wheel
bolts checked as soon as possible with a reli-
able torque wrench. WARNING
If the wheel trims are not appropriate or not
fitted correctly, they could cause major acci-
dents or damage.
● Incorrectly mounted wheel trims may come
off while driving and endanger other road
users.
● Damaged trims must never be mounted on
the wheels.
● Always ensure that the brake ventilation
and cooling is not cut off or blocked. This is
also valid if hubcaps are fitted later. If there
is not enough air, you may require signifi-
cantly longer braking distances. CAUTION
Remove and remount wheel trims taking care
to avoid damage to the vehicle. 246
Page 250 of 305
Advice
If the wheel bolt is very tight, you may be
able to loosen it by pushing down on the end
of the wheel brace carefully with your foot.
Hold on to the vehicle for support and take
care not to slip.
Loosening wheel bolts
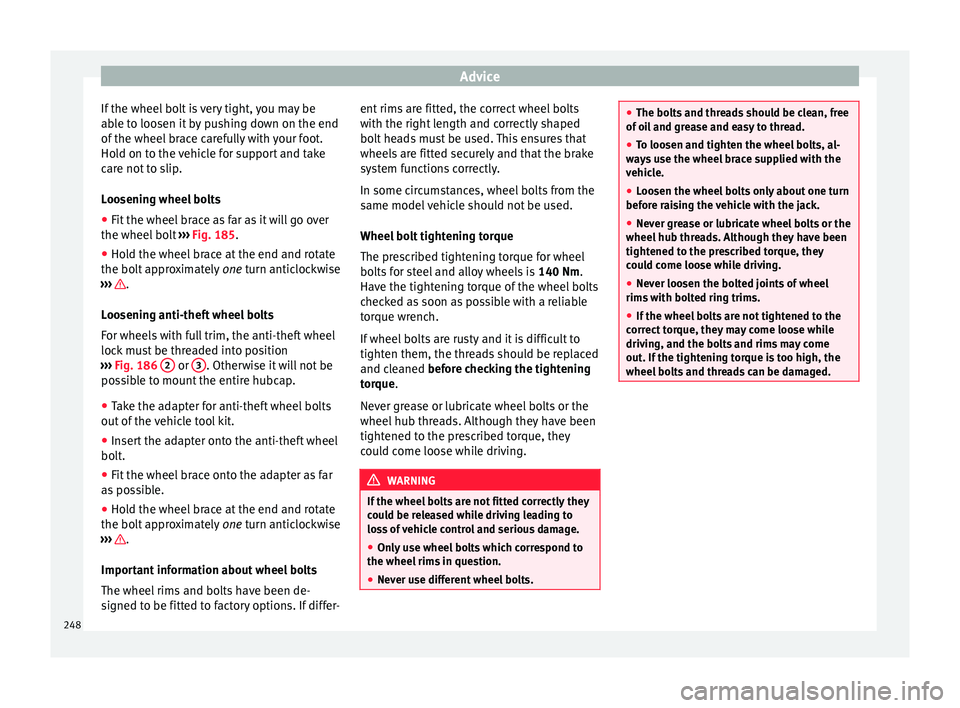
● Fit the wheel brace as far as it will go over
the wheel bolt ››› Fig. 185 .
● Ho l
d the wheel brace at the end and rotate
the bolt approximately one turn anticlockwise
››
› .
Loosening anti-theft wheel bolts
For wheels with full trim, the anti-theft wheel
lock must be threaded into position
››› Fig. 186 2 or
3 . Otherwise it will not be
possible to mount the entire hubcap.
● Take the adapter for anti-theft wheel bolts
out of the vehicle tool kit.
● Insert the adapter onto the anti-theft wheel
bolt.
● Fit the wheel brace onto the adapter as far
as possible.
● Hold the wheel brace at the end and rotate
the bolt approximately one turn anticlockwise
› ›
› .
Important information about wheel bolts
The wheel rims and bolts have been de-
signed to be fitted to factory options. If differ- ent rims are fitted, the correct wheel bolts
with the right length and correctly shaped
bolt heads must be used. This ensures that
wheels are fitted securely and that the brake
system functions correctly.
In some circumstances, wheel bolts from the
same model vehicle should not be used.
Wheel bolt tightening torque
The prescribed tightening torque for wheel
bolts for steel and alloy wheels is
140 Nm.
Hav e the tight
ening torque of the wheel bolts
checked as soon as possible with a reliable
torque wrench.
If wheel bolts are rusty and it is difficult to
tighten them, the threads should be replaced
and cleaned before checking the tightening
tor
que.
Never grease or lubricate wheel bolts or the
wheel hub threads. Although they have been
tightened to the prescribed torque, they
could come loose while driving. WARNING
If the wheel bolts are not fitted correctly they
could be released while driving leading to
loss of vehicle control and serious damage.
● Only use wheel bolts which correspond to
the wheel rims in question.
● Never use different wheel bolts. ●
The bolts and threads should be clean, free
of oil and grease and easy to thread.
● To loosen and tighten the wheel bolts, al-
ways use the wheel brace supplied with the
vehicle.
● Loosen the wheel bolts only about one turn
before raising the vehicle with the jack.
● Never grease or lubricate wheel bolts or the
wheel hub threads. Although they have been
tightened to the prescribed torque, they
could come loose while driving.
● Never loosen the bolted joints of wheel
rims with bolted ring trims.
● If the wheel bolts are not tightened to the
correct torque, they may come loose while
driving, and the bolts and rims may come
out. If the tightening torque is too high, the
wheel bolts and threads can be damaged. 248
Page 251 of 305
Emergencies
Raising the vehicle with the jack Fig. 187
Jack position points Fig. 188
Jack mounted on the left rear part of
the vehicle The jack may be applied only at the jacking
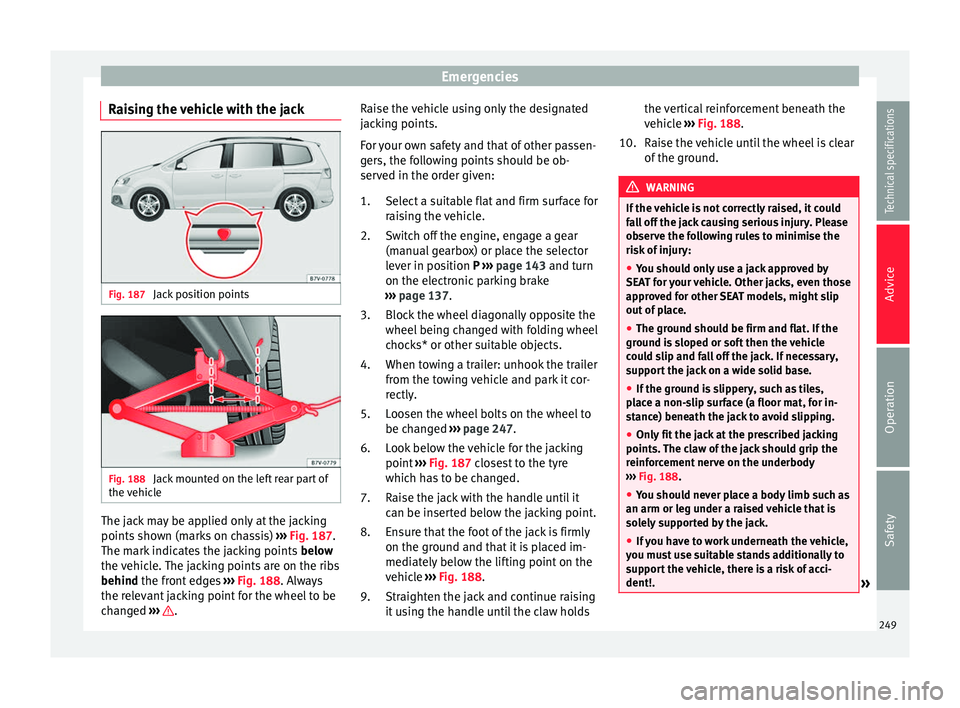
points shown (marks on chassis)
››› Fig. 187 .
The m ark
indicates the jacking points below
the vehicle. The jacking points are on the ribs
behind
the front edges ››› Fig. 188. Always
the rel
evant jacking point for the wheel to be
changed ››› . Raise the vehicle using only the designated
jacking points.
For your own safety and that of other passen-
gers, the following points should be ob-
served in the order given:
Select a suitable flat and firm surface for
raising the vehicle.
Switch off the engine, engage a gear
(manual gearbox) or place the selector
lever in position P
›
›› p
age 143 and turn
on the electronic parking brake
››› page 137.
Block
the wheel diagonally opposite the
wheel being changed with folding wheel
chocks* or other suitable objects.
When towing a trailer: unhook the trailer
from the towing vehicle and park it cor-
rectly.
Loosen the wheel bolts on the wheel to
be changed ››› page 247.
Look below the vehicle for the jacking
point ››› Fig. 187 closest to the tyre
which h
as to be changed.
Raise the jack with the handle until it
can be inserted below the jacking point.
Ensure that the foot of the jack is firmly
on the ground and that it is placed im-
mediately below the lifting point on the
vehicle ››› Fig. 188
.
Straighten the jack and continue raising
it using the handle until the claw holds
1.
2.
3.
4.
5.
6.
7.
8.
9. the vertical reinforcement beneath the
vehicle
››› Fig. 188
.
Raise the vehicle until the wheel is clear
of the ground. WARNING
If the vehicle is not correctly raised, it could
fall off the jack causing serious injury. Please
observe the following rules to minimise the
risk of injury:
● You should only use a jack approved by
SEAT for your vehicle. Other jacks, even those
approved for other SEAT models, might slip
out of place.
● The ground should be firm and flat. If the
ground is sloped or soft then the vehicle
could slip and fall off the jack. If necessary,
support the jack on a wide solid base.
● If the ground is slippery, such as tiles,
place a non-slip surface (a floor mat, for in-
stance) beneath the jack to avoid slipping.
● Only fit the jack at the prescribed jacking
points. The claw of the jack should grip the
reinforcement nerve on the underbody
››› Fig. 188.
● You shou
ld never place a body limb such as
an arm or leg under a raised vehicle that is
solely supported by the jack.
● If you have to work underneath the vehicle,
you must use suitable stands additionally to
support the vehicle, there is a risk of acci-
dent!. » 10.
249
Technical specifications
Advice
Operation
Safety
Page 253 of 305
Emergencies
and the necessary safety measures, and if
you have the right kit! Otherwise, you should
seek professional assistance.
The tyre sealant should not be used in the
following cases:
● If the wheel is damaged.
● The outside temperature is lower than -20
℃ (-4 °F).
● If the tear or puncture on the tyre is over 4
mm wide.
● If you have driven with very low pressure or
a flat tyre.
● If the expiry date on the bottle of tyre seal-
ant has passed. WARNING
Using the tyre mobility system can be dan-
gerous, especially when filling the tyre at the
roadside. Please observe the following rules
to minimise the risk of injury:
● Stop the vehicle safely as soon as possible.
Park it at a safe distance from surrounding
traffic to fill the tyre.
● Ensure the ground is flat and firm.
● All occupants, and especially children,
should always be at a safe distance outside
the work area.
● Turn on the hazard warning lights to warn
other road users. ●
Use the tyre mobility system only if you are
familiar with the necessary procedures. Oth-
erwise, you should seek professional assis-
tance.
● Only use the tyre mobility system in the
event of an emergency to get to the nearest
workshop.
● Replace the repaired tyre with the tire mo-
bility set as soon as possible.
● The sealant is hazardous for your health
and if it touches your skin, it must be imme-
diately washed off.
● Keep children away from the tyre mobility
system.
● Never use a jack even if it is approved for
the vehicle.
● To reduce the risk of the vehicle possibly
moving on its own, always turn off the en-
gine, set the electronic parking brake and put
the selector lever in position P or put into
gear if the gearbox is a manual. WARNING
A tyre repaired with sealant does not have
the normal drive properties.
● Never drive faster than 80 km/h (50 mph).
● Avoid hard acceleration, heavy braking and
fast cornering.
● Check the tyre after travelling 10 minutes
at no more than 80 km/h (50 mph). For the sake of the environment
Once used or expired, dispose of the sealant
according to legal provisions. Note
● Sealant bottles can be purchased from
SEAT dealers.
● Observe the usage instructions provided by
the snow chain manufacturer. Contents of the tyre mobility system*
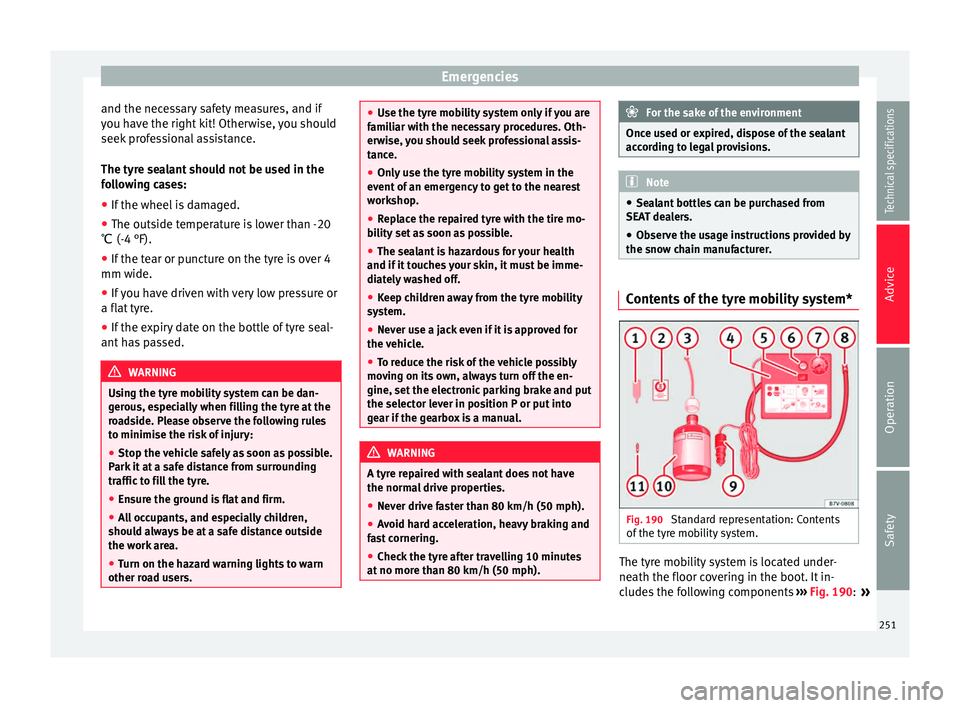
Fig. 190
Standard representation: Contents
of the tyre mobility system. The tyre mobility system is located under-
neath the floor covering in the boot. It in-
cludes the following components
››› Fig. 190 :
»
251Technical specifications
Advice
Operation
Safety
Page 257 of 305
Emergencies
Starting
7. Start the engine of the vehicle with the boosting battery and let it run at idling
speed.
8. Start the engine of the vehicle with the flat battery and wait 2 or 3 minutes until the
engine is “running”.
Removing the jump leads
9. Before you remove the jump leads, switch off the dipped beam headlights (if they
are switched on).
10. Turn on the heater blower and heated rear
w indo
w in the vehicle with the flat battery.
This helps minimise voltage peaks which
are generated when the leads are discon-
nected.
11.When the engine is running, disconnect the leads in reverse order to the details
given above.
Connect the battery clamps so they have
good metal-to-metal contact with the battery
terminals.
If the engine fails to start, switch off the start-
er after about 10 seconds and try again after
about 1 minute. WARNING
● Please note the safety warnings referring to
working in the engine compartment
››› page 214.
● The b att
ery providing assistance must have
the same voltage as the flat battery (12V) and
approximately the same capacity (see imprint
on battery). Failure to comply could result in
an explosion.
● Never use jump leads when one of the bat-
teries is frozen. Danger of explosion! Even af-
ter the battery has thawed, battery acid could
leak and cause chemical burns. If a battery
freezes, it should be replaced.
● Keep sparks, flames and lighted cigarettes
away from batteries, danger of explosion.
Failure to comply could result in an explo-
sion.
● Observe the instructions provided by the
manufacturer of the jump leads.
● Do not connect the negative cable from the
other vehicle directly to the negative terminal
of the flat battery. The gas emitted from the
battery could be ignited by sparks. Danger of
explosion.
● Do not attach the negative cable from the
other vehicle to parts of the fuel system or to
the brake line.
● The non-insulated parts of the battery
clamps must not be allowed to touch. The
jump lead attached to the positive battery
terminal must not touch metal parts of the ve-
hicle, this can cause a short circuit. ●
Position the leads in such a way that they
cannot come into contact with any moving
parts in the engine compartment.
● Do not lean on the batteries. This could re-
sult in chemical burns. Note
The vehicles must not touch each other, oth-
erwise electricity could flow as soon as the
positive terminals are connected. Towing and tow starting
Introduction When towing, always respect legal require-
ments.
For technical reasons, it is not possible to
tow a vehicle if the battery is flat.
If the vehicle comes with the Keyless Access
system, towing is only allowed with the igni-
tion on!
The vehicle battery drains if the vehicle is
towed with the engine switched off and the
ignition connected. Depending on the battery
charge status, the drop in voltage may be so
large, even after just a few minutes, that no
electrical device in the vehicle may work e.g.
the hazard warning lights. In vehicles with
»
255
Technical specifications
Advice
Operation
Safety
Page 258 of 305
Advice
the Keyless Access system, the steering
wheel could lock ››› .
WARNING
A vehicle with a flat battery should never be
towed.
● Never remove the key from the ignition
lock. Otherwise, the steering wheel lock
could suddenly lock. The vehicle would not
be controlled and a serious accident could
ensue. WARNING
When towing the vehicle, the handling and
braking efficiency change considerably.
Please observe the following instructions to
minimise the risk of serious accidents and in-
jury:
● As the driver of the vehicle being towed:
– The brake must be depressed must hard-
er as the brake servo does not operate.
Always remain aware to avoid collision
with the towing vehicle.
– More strength is required at the steering
wheel as the power steering does not op-
erate when the engine is switched off.
● As the driver of the towing vehicle:
– Accelerate gently and carefully.
– Avoid sudden braking and manoeuvres.
– Brake well in advance than usual and
brake gently. CAUTION
● Carefully fit and remove the towline anchor-
age and its cover to avoid damage to the ve-
hicle (e.g. paintwork).
● When towing, fuel could enter the catalytic
converter and cause damage! Instructions for tow starting
In general, the vehicle should not be started
by towing. Jump-starting is much more pref-
erable
› › ›
page 253.
For technical reasons, the following vehicles
can
not be tow started:
● Vehicles with an automatic gearbox.
● Vehicles with the Keyless Access locking
and ignition system, since the electronic
steering lock may not unlock.
● Vehicles with an electronic parking brake,
given that it is possible that the brake will
not be disengaged.
● If the vehicle battery is flat, it is possible
that the engine control units do not operate
correctly.
However, if your vehicle must absolutely be
tow-started (manual gearbox):
● Put it into second or third gear.
● Keep the clutch pressed down. ●
Switch on the ignition and the hazard warn-
ing lights.
● Release the clutch when both vehicles are
moving.
● As soon as the engine starts, press the
clutch and move the gear lever into neutral.
This helps to prevent a collision with the tow-
ing vehicle. CAUTION
When tow-starting, fuel could enter the cata-
lytic converter and damage it. Towing instructions
Tow rope or tow bar
When towing, the tow bar is the safest and
vehicle friendly way. You should only use a
tow rope if you do not have a tow bar.
A tow rope should be slightly elastic to avoid
damage to both vehicles. It is advisable to
use a tow rope made of synthetic fibre or sim-
ilarly elastic material.
Only secure the tow rope or tow bar to the
towline anchorage or specially designed fit-
ting.
Vehicles with a
factory fitted towing device ,
can only
be used for towing with a tow bar,
s
pecially designed to fit on a tow hitch ball
››› page 179.
256
Page 259 of 305
Emergencies
Towing vehicles with an automatic gearbox
Note the following for a towed vehicle:
● Make sure the gear selector lever is in the N
position.
● Do not drive faster than 50 km/h (30 mph).
● Do not tow further than 50 km (30 miles).
● If a breakdown truck is used, the vehicle
must be towed with the front wheels raised.
Note the following instructions for towing
four all-wheel drive vehicles.
Instructions for towing all-wheel drive
vehicles
All-wheel drive vehicles can be towed using a
toolbar or tow rope. If the vehicle is towed
with the front or rear axle raised, the engine
must be turned off to avoid transmission
damage.
For vehicles with a double clutched DSG ®
(di-
rect shift gearbox) the instructions for towing
vehicles with an automatic gearbox apply
››› page 257 .
Sit uation
s in which the vehicle should not be
towed
In the following cases, the vehicle should not
be towed but transported on a trailer or spe-
cial vehicle:
● If the vehicle gearbox does not contain lu-
bricant due to a fault. ●
If the vehicle battery is flat and, as a result,
the electronic steering lock and electronic
parking brake cannot be disengaged if ap-
plied.
● If the vehicle to be towed has an automatic
gearbox and the distance to be covered is
greater than 50 km (30 miles). Note
● The vehicle can only be towed if the elec-
tronic parking brake and steering lock are de-
activated. If the vehicle has no power supply
or there is an electric system fault, the en-
gine must be started using jump leads to de-
activate the electronic parking brake and
electronic steering lock.
● Vehicles with the Keyless Access locking
and ignition system should only be towed
with the ignition connected since, otherwise,
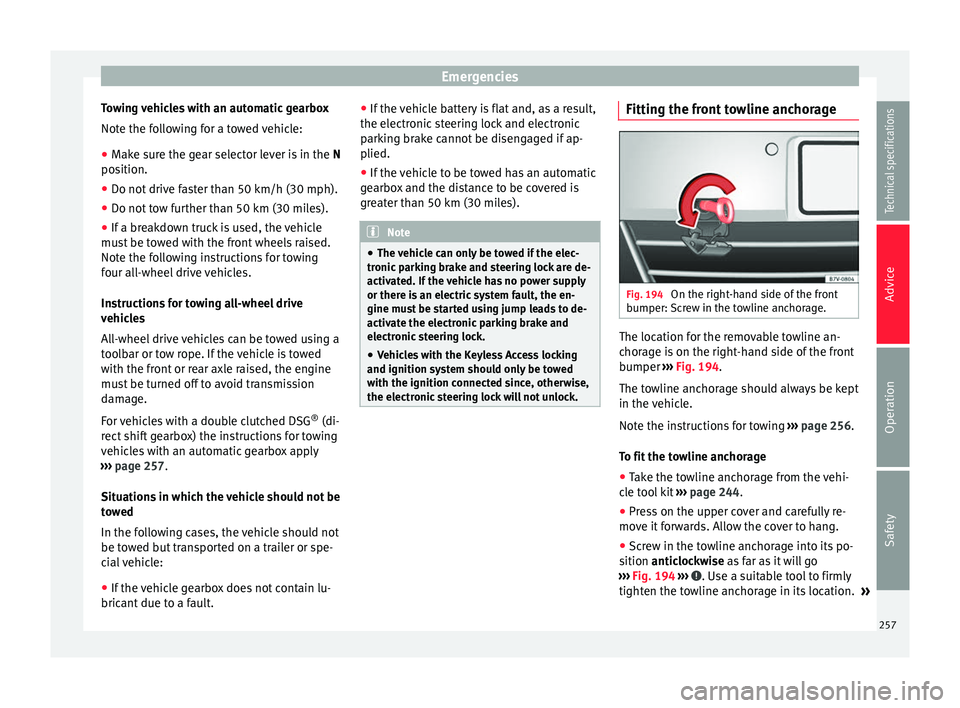
the electronic steering lock will not unlock. Fitting the front towline anchorage
Fig. 194
On the right-hand side of the front
bumper: Screw in the towline anchorage. The location for the removable towline an-
chorage is on the right-hand side of the front
bumper
››› Fig. 194 .
The t o
wline anchorage should always be kept
in the vehicle.
Note the instructions for towing ››› page 256.
To fit the towline anchorage
● Take the towline anchorage from the vehi-
cle tool kit ››› page 244.
● Pre
ss on the upper cover and carefully re-
move it forwards. Allow the cover to hang.
● Screw in the towline anchorage into its po-
sition anticlockwise as far as it will go
›
›› Fig. 194 ››› . Use a suitable tool to firmly
tighten the towline anchorage in its location. »
257
Technical specifications
Advice
Operation
Safety
Page 260 of 305
Advice
● After towing, remove the towline anchorage
by turning it clockwise and put the cover
b ac
k in place. CAUTION
The towline anchorage must always be com-
pletely and firmly tightened. Otherwise, it
could be released while towing and tow-start-
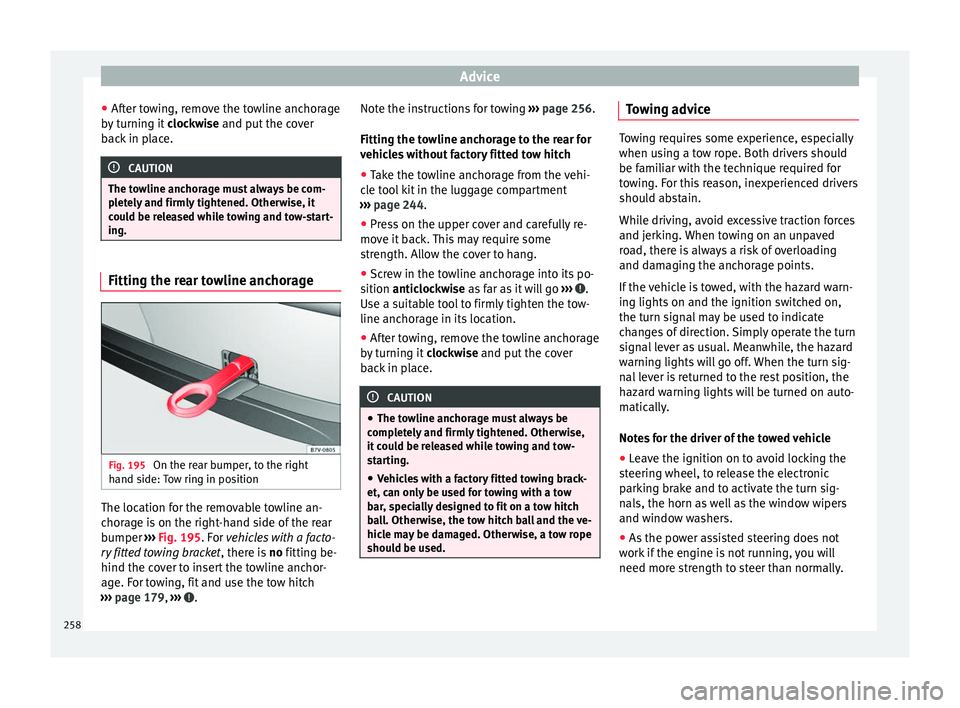
ing. Fitting the rear towline anchorage
Fig. 195
On the rear bumper, to the right
hand side: Tow ring in position The location for the removable towline an-
chorage is on the right-hand side of the rear
bumper
››› Fig. 195 . For
vehicles with a facto-
ry
fitted towing bracket , there is no fitting be-
hind the cover to insert the towline anchor-
age. For towing, fit and use the tow hitch
››› page 179, ››› . Note the instructions for towing
››› page 256.
Fitting the towline anchorage to the rear for
vehicles without factory fitted tow hitch ● Take the towline anchorage from the vehi-
cle tool kit in the luggage compartment
››› page 244 .
● Pr e
ss on the upper cover and carefully re-
move it back. This may require some
strength. Allow the cover to hang.
● Screw in the towline anchorage into its po-
sition anticlockwise as far as it will go ›
›› .
Use a suitable tool to firmly tighten the tow-
line anchorage in its location.
● After towing, remove the towline anchorage
by turning it clockwise and put the cover
b ac
k in place. CAUTION
● The towline anchorage must always be
completely and firmly tightened. Otherwise,
it could be released while towing and tow-
starting.
● Vehicles with a factory fitted towing brack-
et, can only be used for towing with a tow
bar, specially designed to fit on a tow hitch
ball. Otherwise, the tow hitch ball and the ve-
hicle may be damaged. Otherwise, a tow rope
should be used. Towing advice
Towing requires some experience, especially
when using a tow rope. Both drivers should
be familiar with the technique required for
towing. For this reason, inexperienced drivers
should abstain.
While driving, avoid excessive traction forces
and jerking. When towing on an unpaved
road, there is always a risk of overloading
and damaging the anchorage points.
If the vehicle is towed, with the hazard warn-
ing lights on and the ignition switched on,
the turn signal may be used to indicate
changes of direction. Simply operate the turn
signal lever as usual. Meanwhile, the hazard
warning lights will go off. When the turn sig-
nal lever is returned to the rest position, the
hazard warning lights will be turned on auto-
matically.
Notes for the driver of the towed vehicle
●
Leave the ignition on to avoid locking the
steering wheel, to release the electronic
parking brake and to activate the turn sig-
nals, the horn as well as the window wipers
and window washers.
● As the power assisted steering does not
work if the engine is not running, you will
need more strength to steer than normally.
258
Page 261 of 305
Emergencies
● The brake must be depressed must harder
as the brake servo does not operate. Avoid
hitting the towing vehicle.
● Note the instructions and information con-
tained in the Instruction Manual for the vehi-
cle to be towed.
Notes for the driver of the towing vehicle
● Accelerate gently and carefully. Avoid sud-
den manoeuvres.
● Brake well in advance than usual and brake
gently.
● Note the instructions and information con-
tained in the Instruction Manual for the vehi-
cle to be towed.
Emergency locking and
unlocking
Introduction The doors, rear lid and panoramic sliding
sunroof can be locked manually and partially
opened, for example if the key or the central
locking is damaged.
WARNING
Opening and closing doors carelessly can
cause serious injury. ●
If the vehicle is locked from outside, the
doors and windows cannot be opened from
the inside.
● Never leave children or disabled people
alone in the car. They could be trapped in the
car in an emergency and will not be able to
get themselves to safety.
● Depending on the time of the year, temper-
atures inside a locked and closed vehicle can
be extremely high or extremely low resulting
in serious injuries and illness or even death,
particularly for young children. WARNING
Getting in the way of the doors and the pan-
oramic sliding sunroof is dangerous and can
lead to serious injury.
● Open and close the doors and the panor-
amic sliding sunroof only when nobody is in
the way. CAUTION
When opening and closing in an emergency,
carefully disassemble components and then
reassemble them carefully to avoid damage
to the vehicle. Manually locking and unlocking the
driver door
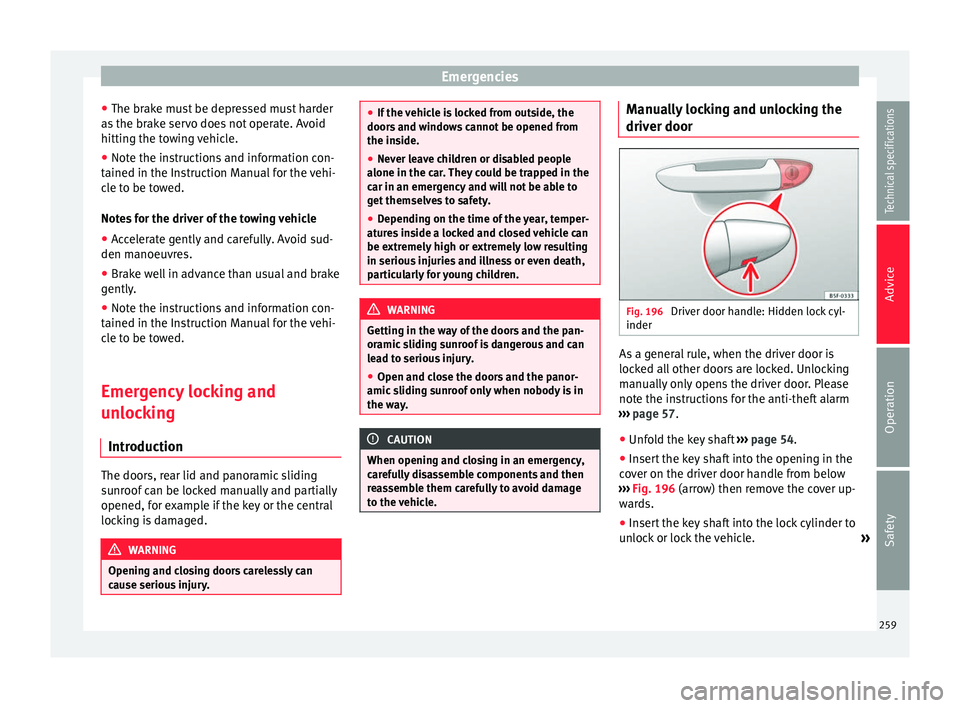
Fig. 196
Driver door handle: Hidden lock cyl-
inder As a general rule, when the driver door is
locked all other doors are locked. Unlocking
manually only opens the driver door. Please
note the instructions for the anti-theft alarm
››› page 57 .
● Unf o
ld the key shaft ››› page 54.
● Insert the key shaft into the opening in the
cover on the driver door handle from below
››› Fig. 196 (arrow) then remove the cover up-
war
ds.
● Insert the key shaft into the lock cylinder to
unlock or lock the vehicle. »
259
Technical specifications
Advice
Operation
Safety
Page 264 of 305
Advice
Manually unlocking the gear selector
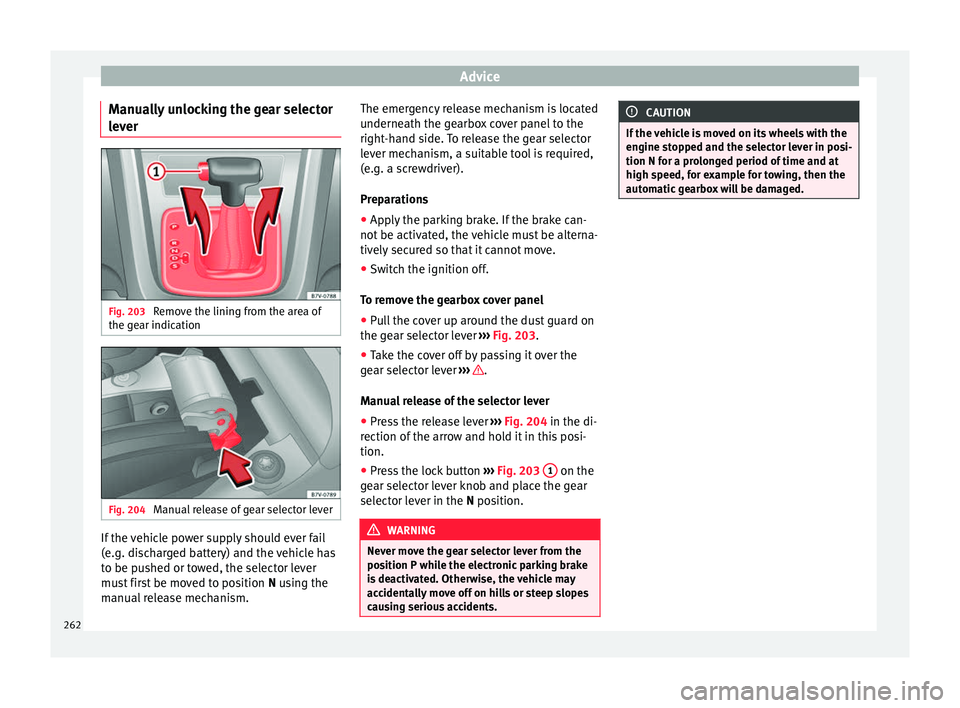
lever Fig. 203
Remove the lining from the area of
the gear indication Fig. 204
Manual release of gear selector lever If the vehicle power supply should ever fail
(e.g. discharged battery) and the vehicle has
to be pushed or towed, the selector lever
must first be moved to position
N using the
m anual
release mechanism. The emergency release mechanism is located
underneath the gearbox cover panel to the
right-hand side. To release the gear selector
lever mechanism, a suitable tool is required,
(e.g. a screwdriver).
Preparations
●
Apply the parking brake. If the brake can-
not be activated, the vehicle must be alterna-
tively secured so that it cannot move.
● Switch the ignition off.
To remove the gearbox cover panel
● Pull the cover up around the dust guard on
the gear selector lever ››› Fig. 203.
● Tak
e the cover off by passing it over the
gear selector lever ››› .
Manual release of the selector lever
● Press the release lever ››› Fig. 204 in the di-
r ection of
the arrow and hold it in this posi-
tion.
● Press the lock button ››› Fig. 203
1 on the
gear selector lever knob and place the gear
selector lever in the N
position. WARNING
Never move the gear selector lever from the
position P while the electronic parking brake
is deactivated. Otherwise, the vehicle may
accidentally move off on hills or steep slopes
causing serious accidents. CAUTION
If the vehicle is moved on its wheels with the
engine stopped and the selector lever in posi-
tion N for a prolonged period of time and at
high speed, for example for towing, then the
automatic gearbox will be damaged. 262