ad blue Seat Alhambra 2015 Owner's Manual
[x] Cancel search | Manufacturer: SEAT, Model Year: 2015, Model line: Alhambra, Model: Seat Alhambra 2015Pages: 305, PDF Size: 5.46 MB
Page 5 of 305
Table of Contents
Table of Contents
Safety . . . . . . . . . . . . . . . . . . . . . . . . . . . . . . . . 5
Safe driving . . . . . . . . . . . . . . . . . . . . . . . . . . . . 5
Safety first! . . . . . . . . . . . . . . . . . . . . . . . . . . . . . 5
Tips for driving . . . . . . . . . . . . . . . . . . . . . . . . . . 5
Sitting position for occupants . . . . . . . . . . . . . . 6
Pedal area . . . . . . . . . . . . . . . . . . . . . . . . . . . . . . 9
Seat belts . . . . . . . . . . . . . . . . . . . . . . . . . . . . . . 10
The whys and wherefores of seat belts . . . . . . . 10
How to properly adjust your seatbelt . . . . . . . . 14
Seat belt tensioners . . . . . . . . . . . . . . . . . . . . . . 17
Airbag system . . . . . . . . . . . . . . . . . . . . . . . . . . 18
Brief introduction . . . . . . . . . . . . . . . . . . . . . . . . 18
General overview of the airbag . . . . . . . . . . . . . 20
Deactivating airbags . . . . . . . . . . . . . . . . . . . . . 25
Transporting children safely . . . . . . . . . . . . . . . 26
Child safety . . . . . . . . . . . . . . . . . . . . . . . . . . . . . 26
Integrated child seat . . . . . . . . . . . . . . . . . . . . . 33
Operation . . . . . . . . . . . . . . . . . . . . . . . . . . . . . 39
Cockpit . . . . . . . . . . . . . . . . . . . . . . . . . . . . . . . . 39
Overview . . . . . . . . . . . . . . . . . . . . . . . . . . . . . . . 38
Instruments . . . . . . . . . . . . . . . . . . . . . . . . . . . . 40
Control lamps . . . . . . . . . . . . . . . . . . . . . . . . . . . 45
SEAT information system . . . . . . . . . . . . . . . . . . 47
Three button unit in headliner . . . . . . . . . . . . . . 53
Opening and closing . . . . . . . . . . . . . . . . . . . . . 54
Vehicle key set . . . . . . . . . . . . . . . . . . . . . . . . . . 54
Central locking and locking system . . . . . . . . . 57
Doors . . . . . . . . . . . . . . . . . . . . . . . . . . . . . . . . . . 63
Sliding doors . . . . . . . . . . . . . . . . . . . . . . . . . . . 64
Rear lid . . . . . . . . . . . . . . . . . . . . . . . . . . . . . . . . 66
Electric windows . . . . . . . . . . . . . . . . . . . . . . . . . 70
Panoramic sliding sunroof* . . . . . . . . . . . . . . . . 72 Lights and visibility
. . . . . . . . . . . . . . . . . . . . . . 74
Lights . . . . . . . . . . . . . . . . . . . . . . . . . . . . . . . . . 74
Visibility . . . . . . . . . . . . . . . . . . . . . . . . . . . . . . . 80
Windscreen wiper and window wiper systems . 81
Rear vision mirror . . . . . . . . . . . . . . . . . . . . . . . . 85
Seats and head restraints . . . . . . . . . . . . . . . . . 88
Adjusting the seats and head restraints . . . . . . 88
Seat functions . . . . . . . . . . . . . . . . . . . . . . . . . . 93
Transport and practical equipment . . . . . . . . . 98
Transporting objects . . . . . . . . . . . . . . . . . . . . . 98
Loading luggage compartment . . . . . . . . . . . . . 100
Roof carrier system* . . . . . . . . . . . . . . . . . . . . . . 110
Storage compartments . . . . . . . . . . . . . . . . . . . 112
Drink holders . . . . . . . . . . . . . . . . . . . . . . . . . . . 117
Ashtray and cigarette lighter* . . . . . . . . . . . . . . 118
Power sockets . . . . . . . . . . . . . . . . . . . . . . . . . . . 119
Air conditioning . . . . . . . . . . . . . . . . . . . . . . . . . 122
Air conditioner . . . . . . . . . . . . . . . . . . . . . . . . . . 122
Auxiliary heater* (additional heater) . . . . . . . . 128
Driving . . . . . . . . . . . . . . . . . . . . . . . . . . . . . . . . 131
Address . . . . . . . . . . . . . . . . . . . . . . . . . . . . . . . . 131
Stopping and starting the engine . . . . . . . . . . . 133
Braking and parking . . . . . . . . . . . . . . . . . . . . . 137
Changing gear . . . . . . . . . . . . . . . . . . . . . . . . . . 143
Run-in and economical driving . . . . . . . . . . . . . 148
Engine management and exhaust gas
purification system . . . . . . . . . . . . . . . . . . . . . . 151
Driving abroad . . . . . . . . . . . . . . . . . . . . . . . . . . 153
Driving along flooded roadways . . . . . . . . . . . . 153
Driver assistance systems . . . . . . . . . . . . . . . . . 154
Braking and stability systems . . . . . . . . . . . . . . 154
Start assist systems . . . . . . . . . . . . . . . . . . . . . . 156
Parking sensor system* . . . . . . . . . . . . . . . . . . . 159
Park Assist system* . . . . . . . . . . . . . . . . . . . . . . 162
Rear Assist system* . . . . . . . . . . . . . . . . . . . . . . 166
Cruise control* (Cruise control system - CCS) . . 169
Lane Assist system* . . . . . . . . . . . . . . . . . . . . . . 172
Sign Assist* . . . . . . . . . . . . . . . . . . . . . . . . . . . . 174 Tiredness detection (recommendation to take
a break) . . . . . . . . . . . . . . . . . . . . . . . . . . . . . . . . 176
Tyre monitoring systems . . . . . . . . . . . . . . . . . . 177
Towing bracket device
. . . . . . . . . . . . . . . . . . . . 179
Driving with a trailer . . . . . . . . . . . . . . . . . . . . . . 179
Advice . . . . . . . . . . . . . . . . . . . . . . . . . . . . . . . . 189
Care and maintenance . . . . . . . . . . . . . . . . . . . . 189
Accessories, replacement of parts and
modifications . . . . . . . . . . . . . . . . . . . . . . . . . . . 189
Care and cleaning the vehicle exterior . . . . . . . 195
Caring for and cleaning the vehicle interior . . . 200
Notes for the user . . . . . . . . . . . . . . . . . . . . . . . . 205
Checking and refilling levels . . . . . . . . . . . . . . . 206
Filling the tank . . . . . . . . . . . . . . . . . . . . . . . . . . 206
Fuel . . . . . . . . . . . . . . . . . . . . . . . . . . . . . . . . . . . 209
Selective catalytic reduction* (AdBlue) . . . . . . 212
Working in the engine compartment . . . . . . . . 214
Engine oil . . . . . . . . . . . . . . . . . . . . . . . . . . . . . . 218
Engine coolant . . . . . . . . . . . . . . . . . . . . . . . . . . 221
Brake fluid . . . . . . . . . . . . . . . . . . . . . . . . . . . . . 225
Checking and topping up the windscreen
washer reservoir with water . . . . . . . . . . . . . . . . 226
Vehicle battery . . . . . . . . . . . . . . . . . . . . . . . . . . 227
Wheels and tyres . . . . . . . . . . . . . . . . . . . . . . . . 231
Wheels . . . . . . . . . . . . . . . . . . . . . . . . . . . . . . . . 231
Winter service . . . . . . . . . . . . . . . . . . . . . . . . . . . 241
Emergencies . . . . . . . . . . . . . . . . . . . . . . . . . . . . 242
In case of emergency . . . . . . . . . . . . . . . . . . . . . 242
Vehicle tool kit* . . . . . . . . . . . . . . . . . . . . . . . . . 244
Changing a wheel* . . . . . . . . . . . . . . . . . . . . . . . 246
Tyre repair . . . . . . . . . . . . . . . . . . . . . . . . . . . . . . 250
Starting assistance . . . . . . . . . . . . . . . . . . . . . . 253
Towing and tow starting . . . . . . . . . . . . . . . . . . . 255
3
Page 47 of 305
CockpitIn vehicles without text messages:
Release the
0.0 / SET button and, press for the next
20 seconds. Do not
reset the indicator to zero between
tw
o intervals, otherwise the display will be
incorrect.
If, while the LongLife service is valid, the
service interval display is reset to zero, the
“service will be activated by time or mile-
age”. The service interval is no longer calcu-
lated individually ›››
Booklet Maintenance
Programme. Note
● The service message disappears after a few
seconds, when the engine is started or when OK is pressed.
● In vehicles with the LongLife system in
which the battery has been disconnected for
a long period of time, it is not possible to cal-
culate the date of the next service. Therefore
the service interval display may not be cor-
rect. In this case, bear in mind the maximum
service intervals permitted in the ››› Book-
let Maintenance Programme. Control lamps
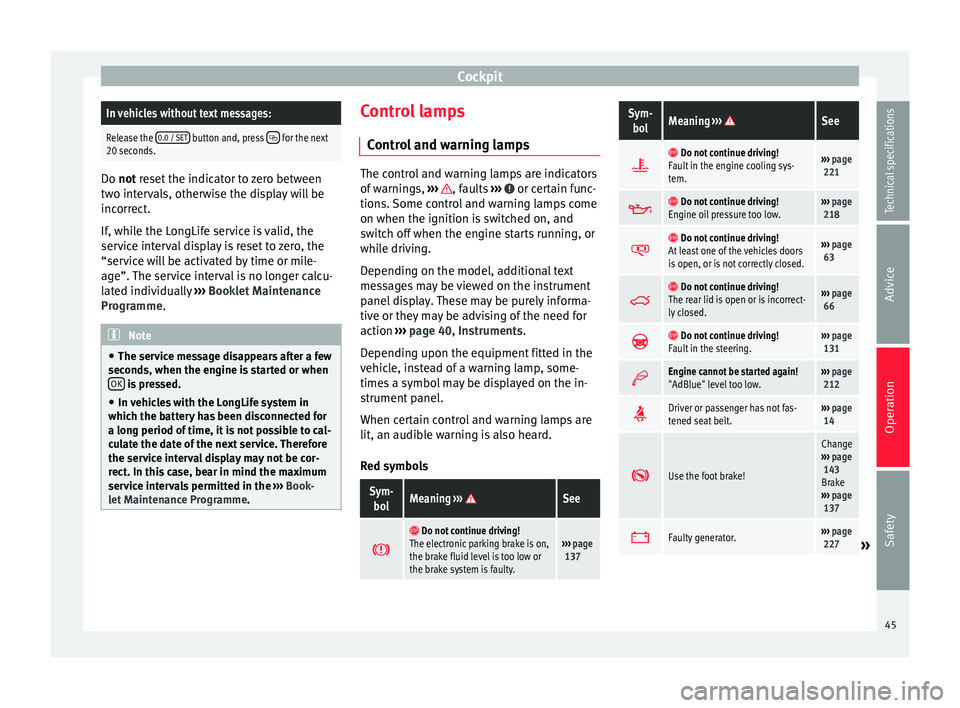
Control and warning lamps The control and warning lamps are indicators
of warnings,
››› , faults
››› or certain func-
tions. Some control and warning lamps come
on when the ignition is switched on, and
switch off when the engine starts running, or
while driving.
Depending on the model, additional text
messages may be viewed on the instrument
panel display. These may be purely informa-
tive or they may be advising of the need for
action ›››
page 40, Instruments .
D ependin
g upon the equipment fitted in the
vehicle, instead of a warning lamp, some-
times a symbol may be displayed on the in-
strument panel.
When certain control and warning lamps are
lit, an audible warning is also heard.
Red symbols
Sym- bolMeaning ››› See
Do not continue driving!
The electronic parking brake is on,
the brake fluid level is too low or
the brake system is faulty.››› page
137
Sym-
bolMeaning ››› See
Do not continue driving!
Fault in the engine cooling sys-
tem.››› page
221
Do not continue driving!
Engine oil pressure too low.››› page
218
Do not continue driving!
At least one of the vehicles doors
is open, or is not correctly closed.››› page
63
Do not continue driving!
The rear lid is open or is incorrect-
ly closed.››› page
66
Do not continue driving!
Fault in the steering.››› page
131
Engine cannot be started again!
"AdBlue" level too low.›››
page
212
Driver or passenger has not fas-
tened seat belt.›››
page
14
Use the foot brake!
Change
››› page
143
Brake
››› page
137
Faulty generator.›››
page
227» 45
Technical specifications
Advice
Operation
Safety
Page 48 of 305
Operation
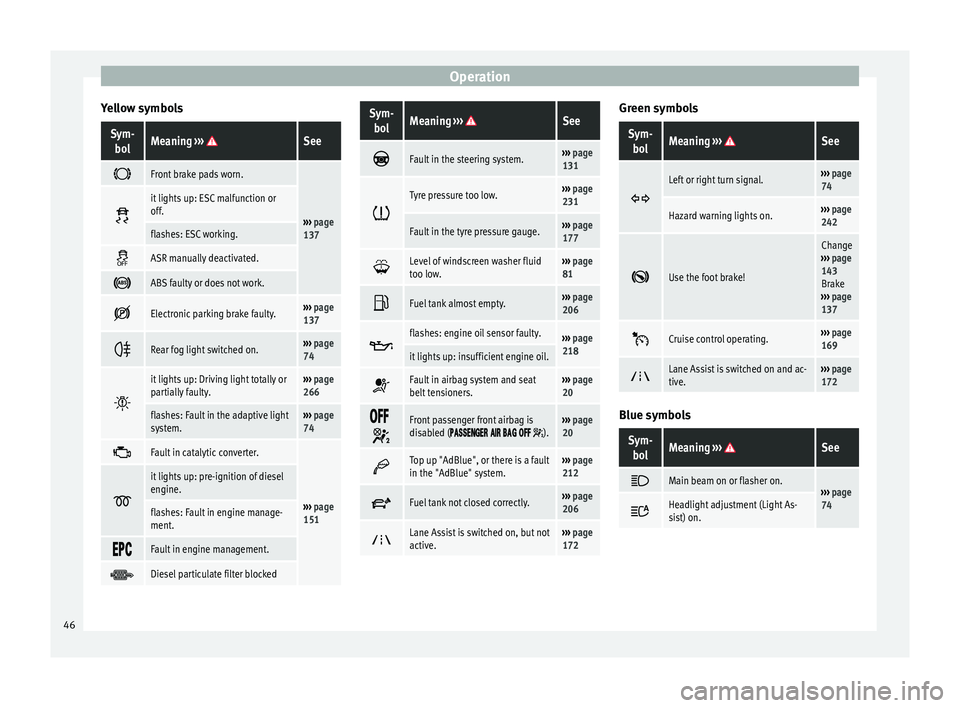
Yellow symbolsSym- bolMeaning ››› See
Front brake pads worn.
›››
page
137
it lights up: ESC malfunction or
off.
flashes: ESC working.
ASR manually deactivated.
ABS faulty or does not work.
Electronic parking brake faulty.›››
page
137
Rear fog light switched on.›››
page
74
it lights up: Driving light totally or
partially faulty.›››
page
266
flashes: Fault in the adaptive light
system.››› page
74
Fault in catalytic converter.
›››
page
151
it lights up: pre-ignition of diesel
engine.
flashes: Fault in engine manage-
ment.
Fault in engine management.
Diesel particulate filter blocked
Sym-
bolMeaning ››› See
Fault in the steering system.›››
page
131
Tyre pressure too low.›››
page
231
Fault in the tyre pressure gauge.››› page
177
Level of windscreen washer fluid
too low.›››
page
81
Fuel tank almost empty.›››
page
206
flashes: engine oil sensor faulty.›››
page
218
it lights up: insufficient engine oil.
Fault in airbag system and seat
belt tensioners.›››
page
20
Front passenger front airbag is
disabled ( ).››› page
20
Top up "AdBlue", or there is a fault
in the "AdBlue" system.›››
page
212
Fuel tank not closed correctly.›››
page
206
Lane Assist is switched on, but not
active.›››
page
172 Green symbols
Sym-
bolMeaning ››› See
Left or right turn signal.›››
page
74
Hazard warning lights on.››› page
242
Use the foot brake!
Change
››› page
143
Brake
››› page
137
Cruise control operating.›››
page
169
Lane Assist is switched on and ac-
tive.›››
page
172 Blue symbols
Sym-
bolMeaning ››› See
Main beam on or flasher on.›››
page
74 Headlight adjustment (Light As-
sist) on.
46
Page 49 of 305
Cockpit
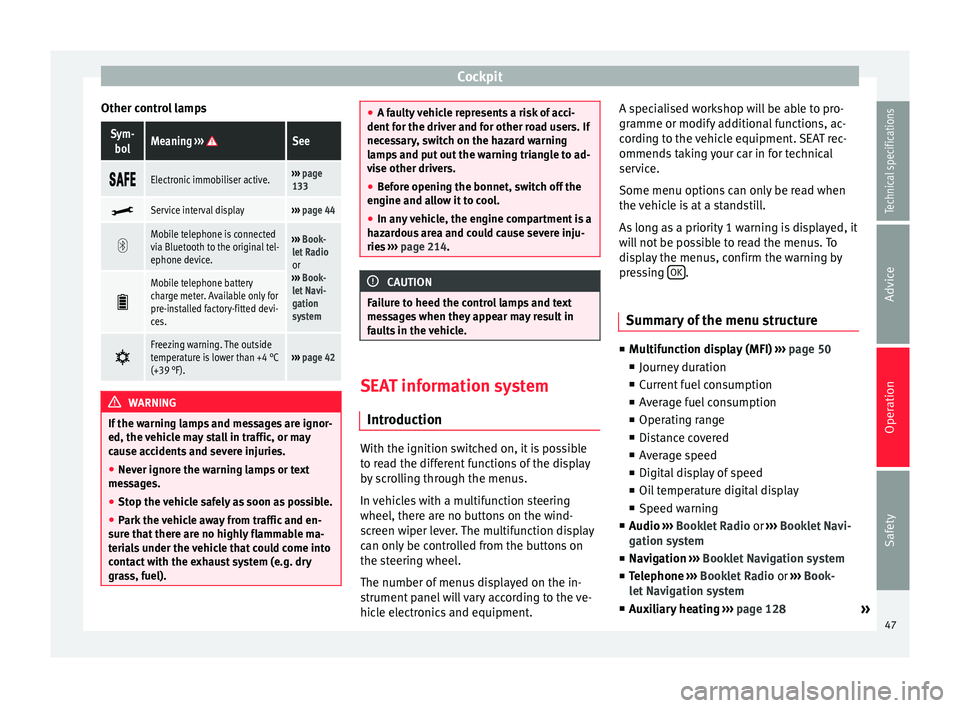
Other control lampsSym- bolMeaning ››› See
Electronic immobiliser active.›››
page
133
Service interval display›››
page 44
Mobile telephone is connected
via Bluetooth to the original tel-
ephone device.›››
Book-
let Radio
or
››› Book-
let Navi-
gation
system
Mobile telephone battery
charge meter. Available only for
pre-installed factory-fitted devi-
ces.
Freezing warning. The outside
temperature is lower than +4 °C
(+39 °F).›››
page 42 WARNING
If the warning lamps and messages are ignor-
ed, the vehicle may stall in traffic, or may
cause accidents and severe injuries.
● Never ignore the warning lamps or text
messages.
● Stop the vehicle safely as soon as possible.
● Park the vehicle away from traffic and en-
sure that there are no highly flammable ma-
terials under the vehicle that could come into
contact with the exhaust system (e.g. dry
grass, fuel). ●
A faulty vehicle represents a risk of acci-
dent for the driver and for other road users. If
necessary, switch on the hazard warning
lamps and put out the warning triangle to ad-
vise other drivers.
● Before opening the bonnet, switch off the
engine and allow it to cool.
● In any vehicle, the engine compartment is a
hazardous area and could cause severe inju-
ries ››› page 214. CAUTION
Failure to heed the control lamps and text
messages when they appear may result in
faults in the vehicle. SEAT information system
Introduction With the ignition switched on, it is possible
to read the different functions of the display
by scrolling through the menus.
In vehicles with a multifunction steering
wheel, there are no buttons on the wind-
screen wiper lever. The multifunction display
can only be controlled from the buttons on
the steering wheel.
The number of menus displayed on the in-
strument panel will vary according to the ve-
hicle electronics and equipment.A specialised workshop will be able to pro-
gramme or modify additional functions, ac-
cording to the vehicle equipment. SEAT rec-
ommends taking your car in for technical
service.
Some menu options can only be read when
the vehicle is at a standstill.
As long as a priority 1 warning is displayed, it
will not be possible to read the menus. To
display the menus, confirm the warning by
pressing
OK .
Summary of the menu structure ■
Multifunction display (MFI) ››› page 50
■ Journey duration
■ Current fuel consumption
■ Average fuel consumption
■ Operating range
■ Distance covered
■ Average speed
■ Digital display of speed
■ Oil temperature digital display
■ Speed warning
■ Audio ›
›
›
Booklet Radio or ›››
Booklet Navi-
gation system
■ Navigation ››
›
Booklet Navigation system
■ Telephone ›››
Booklet Radio or ›››
Book-
let Navigation system
■ Auxiliary heating ››› page 128
»
47
Technical specifications
Advice
Operation
Safety
Page 55 of 305
Cockpit
■ Parking heating menu
■ Configuration Menu
■ Time
■ Language
■ Units
■ Convenience settings menu
■ Door unlock (individual opening, Auto
Lock)
■ Convenience handling of windows
■ Rear vision mirror adjustment
■ Lights & visibility settings menu
■ Coming home and leaving home
■ Footwell light
■ Convenience turn signals
The stored settings are automatically activa-
ted, at the latest when the ignition is switch-
ed on. Please refer to the information and
tips relating to the seat memory
››› page 93 . Thr
ee b utton unit in headliner
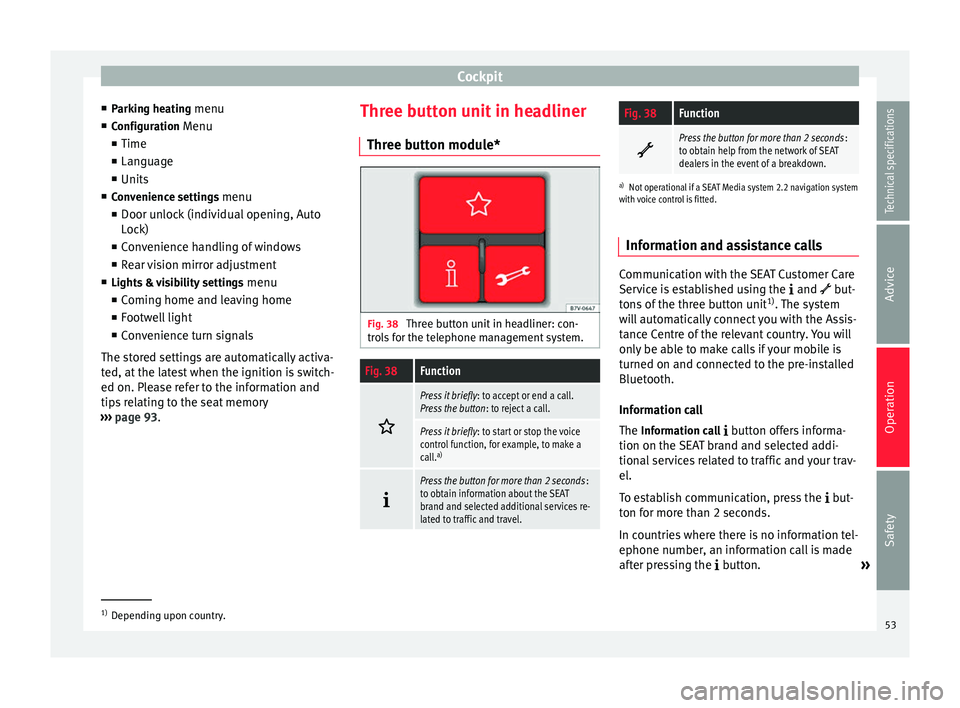
Three button module* Fig. 38
Three button unit in headliner: con-
trols for the telephone management system.
Fig. 38Function
Press it briefly
: to accept or end a call.
Press the button : to reject a call.
Press it briefly: to start or stop the voice
control function, for example, to make a
call. a)
Press the button for more than 2 seconds
:
to obtain information about the SEAT
brand and selected additional services re-
lated to traffic and travel.
Fig. 38Function
Press the button for more than 2 seconds
:
to obtain help from the network of SEAT
dealers in the event of a breakdown.
a) Not operational if a SEAT Media system 2.2 navigation system
with voice control is fitted.
Information and assistance calls Communication with the SEAT Customer Care
Service is established using the
and but-
tons of the three button unit 1)
. The system
will automatically connect you with the Assis-
tance Centre of the relevant country. You will
only be able to make calls if your mobile is
turned on and connected to the pre-installed
Bluetooth.
Information call
The Information call
button offers informa-
tion on the SEAT brand and selected addi-
tional services related to traffic and your trav-
el.
To establish communication, press the but-
ton for more than 2 seconds.
In countries where there is no information tel-
ephone number, an information call is made
after pressing the button. »1)
Depending upon country.
53
Technical specifications
Advice
Operation
Safety
Page 195 of 305
Care and maintenance
equipment at the workshop. If this is the
case, the information and descriptions given
in the Instruction Manual will not match the
original functions. Therefore, SEAT recom-
mends that any modifications be recorded in
the section “Other workshop notes” in the
Maintenance Programme.
The technical service centre must have a re-
cord of any modification to the programming.
Reading the vehicle fault memory
There is a diagnostics connector in the vehi-
cle interior for reading the vehicle fault mem-
ory. The fault memory documents errors and
deviations from the theoretical values of the
electronic control units.
The diagnostics connector is in the driver
side footwell area, next to the lever for open-
ing the bonnet, below a cover.
The fault memory should only be read and re-
set by a specialised workshop.
Using a mobile telephone in a vehicle
without connection to an exterior
aerial Mobile telephones transmit and receive radio
waves, both when in use and when on stand-
by. Scientific studies state that radio waves
exceeding certain values may be harmful to
the human body. International committees and authorities have established limits and
directives in order to ensure electromagnetic
radiation from mobile phones remains within
certain limits that do not endanger health.
Nevertheless, there is no conclusive scientif-
ic evidence that wireless telephones are to-
tally safe.
Therefore, some experts recommend that use
of mobile phone be kept to a minimum until
the results of current research are published.
When a mobile phone not connected to an
exterior aerial is used inside the vehicle, the
electromagnetic radiation may be greater
than if the mobile phone were connected to a
built-in aerial or to another exterior aerial.
If the vehicle is fitted with a suitable hands-
free device, it will comply with the legislation
in many countries which only permits the use
of mobile phones inside vehicles using a
hands-free device.
The hands-free system mounted at the facto-
ry has been designed for use with conven-
tional mobile phones and phones with Blue-
tooth technology. Mobile phones should be
placed on a suitable phone cradle. In addi-
tion, the cradle should always be correctly fit-
ted into the base plate. This ensures that the
mobile phone is securely attached to the
dash panel, it is always within reach of the
driver and is connected to the vehicle exterior
aerial.
If the mobile phone is connected to an aerial
incorporated into the vehicle or an exterior
aerial connected to the vehicle, it will help re-
duce the electromagnetic radiation transmit-
ted and the risk to human health. It will also
improve the quality of the connection.
If the phone is used inside the vehicle with-
out the hands-free system, it will not be se-
curely fastened and will not be connected to
the exterior aerial of the vehicle telephone.
Nor will the telephone charge if it is not on
the support. In addition, some calls may
break off and the quality of the connection
will be affected.
Mobile phones should only be used inside
the vehicle if they are connected to a hands-
free system with an exterior aerial.
WARNING
If the mobile phone is not securely fastened
in position, it could be sent flying around the
vehicle in the event of sharp braking, sudden
manoeuvres or accident, causing injury.
● While driving, mobile phones must be se-
curely fastened in position, outside the radi-
us of action of the airbags, or safely stowed
away. WARNING
When using a mobile phone without a con-
nection to an exterior aerial, the maximum
permitted levels of electromagnetic radiation » 193Technical specifications
Advice
Operation
Safety
Page 214 of 305
AdviceCO
2 emis-
sions of
the combi-
nationThe exhaust gases are collected during
both driving cycles to calculate carbon di-
oxide emissions (urban and road). The gas
composition is then analysed to evaluate
the CO 2 content and other emissions. Note
● The kerb weight may vary according to the
vehicle equipment. This could raise consump-
tion and the CO 2 emissions slightly.
● In practice, consumption values could be
different to the values calculated based on
the 715/2007/EC or 80/1268/EEC regula-
tions. Selective catalytic reduction*
(AdBlue)
Introduction The AdBlue fill level must be checked when
the vehicle is being serviced.
WARNING
If the AdBlue fill level is too low, the vehicle
may not restart after switching the ignition
off. The emergency start or jump start will not
be possible either!
● Top up with AdBlue at the latest 1,000 km
or 600 miles before it runs out.
● Do not allow the AdBlue to run too low. WARNING
AdBlue is an irritant, corrosive liquid that can
cause injuries if it touches the skin, eyes or
respiratory organs.
● If AdBlue get in contact with eyes and skin,
rinse for at least 15 minutes with plenty of
water and seek medical help.
● If the AdBlue is swallowed, wash your
mouth with plenty of water for at least 15 mi-
nutes. Do not try to provoke vomiting unless
recommended by a Doctor. Seek medical ad-
vice immediately. CAUTION
AdBlue damages surfaces such as painted ve-
hicle parts, plastic, items of clothing and car-
pets. Spilt AdBlue should be removed as
quickly as possible using a damp cloth and
plenty of cold water.
● If the AdBlue has crystallised, remove with
warm water and a sponge. Control and warning lamps
It lights
upPossible causeSolution
(red)
The engine cannot
be restarted! The
level of AdBlue is
too low.Stop the vehicle in a
suitable, safe and flat
area then top up with
the minimum quanti-
ty of AdBlue required
››› page 213.
(red)
with
The engine cannot
be restarted! AdBl-
ue system malfunc-
tion.Contact a specialised
workshop. Have the
system checked
there.
(yellow)The AdBlue reserve
is low.
Refill AdBlue over the
next kilometres or
miles as indicated
››› page 213. SEAT
recommends contact-
ing a specialised
workshop.
(yellow)
together with
There is a fault in
the AdBlue system
or unsuitable AdBl-
ue fluid has been
used.Contact a specialised
workshop. Have the
system checked
there. Several warning and control lamps should
light up for a few seconds when the ignition
is switched on, signalling that the function is
212
Page 215 of 305
Checking and refilling levels
being verified. They will switch off after a few
seconds. WARNING
Observe the safety warnings ››› in Control
and warning lamps on page 47. Information on AdBlue
In vehicles with "Selective Catalytic Reduc-
tion", a special urea solution (AdBlue) is in-
jected into the exhaust gas system in front of
the catalytic converter to reduce nitrogen ox-
ide emissions.
The consumption of AdBlue depends on indi-
vidual driving style, the temperature at which
the system operates and the outside temper-
ature where the vehicle is driven.
AdBlue is kept in an independent tank in the
vehicle and should be refilled at an official
supplier. The AdBlue tank holds about 17 li-
tres.
A message will be displayed on the dash
panel around 2,400 km before the next serv-
ice to indicate that AdBlue must be refilled
››› page 213 . If you ignore this message and
do not r
efill, you will be unable to start the
engine afterwards ›››
page 212.
SEAT recommends contacting a specialised
workshop. If not possible, it should be parti-
ally filled with a minimum 10 litres of AdBlue. Only refill using AdBlue expressly approved
by SEAT.
When the indicators
and
light simulta-
neously, there is a fault. SEAT recommends
visiting the closest specialised workshop.
AdBlue ®
is a registered trademark in the US,
Germany, the European Union and other
countries belonging to the German automo-
bile industry ("Verband der Automobilindus-
trie e. V.", VDA).
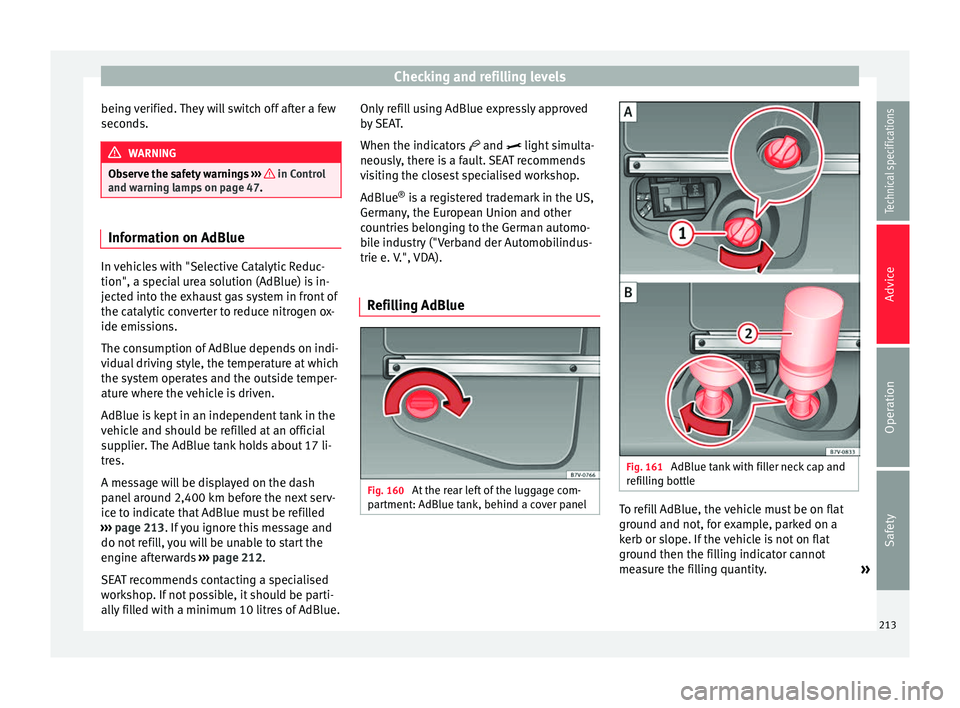
Refilling AdBlue Fig. 160
At the rear left of the luggage com-
partment: AdBlue tank, behind a cover panel Fig. 161
AdBlue tank with filler neck cap and
refilling bottle To refill AdBlue, the vehicle must be on flat
ground and not, for example, parked on a
kerb or slope. If the vehicle is not on flat
ground then the filling indicator cannot
measure the filling quantity.
»
213
Technical specifications
Advice
Operation
Safety
Page 216 of 305
Advice
Opening the tank filling neck
● Open the rear lid.
● Rotate the shut off on the cover clockwise
››› Fig. 160 and open the cover forwards.
● Un s
crew the tank filler neck cap ››› Fig. 161
1 anticlockwise.
Refilling AdBlue
Only use AdBlue that is approved by SEAT
and that complies with the ISO 22241-1
Standard. Only use genuine bottles.
● Observe the instructions and information
provided by the refill bottle manufacturer.
● Observe the expiry date.
● Unscrew the cap on the refill bottle.
● Place the refill bottle 2 upside down in-
side the tank filler neck.
● Press the refill bottle against the filler neck
and keep in this position.
● Add at least 10 litres of AdBlue (6 bottles).
A lower quantity would be insufficient.
● Wait until the contents of the refill bottle
have been poured into the AdBlue tank. Do
not crush or damage the bottle!
● Unscrew the liquid bottle anticlockwise and
remove it carefully ››› .
● You can tell when the AdBlue tank is full
because the bottle will be empty. Closing the tank filling neck
●
Screw on the tank filler neck cap ››› Fig. 161
1 clockwise until it is fully inserted.
● Place the cover and turn the shut off anti-
clockwise to close it.
Operations before driving
● Only switch the ignition on after refilling.
● Keep the ignition sw
itch on for at least 30
seconds so that the system detects tank re-
filling.
● Wait 30 seconds before starting the en-
gine! WARNING
Only keep AdBlue in its original container,
tightly shut and in a safe place.
● Never keep AdBlue in empty food cans, bot-
tles or other containers to avoid other people
mistaking it for something else.
● Keep the AdBlue out of the reach of small
children. CAUTION
● Only refill using AdBlue expressly approved
by SEAT. The use of any other type of AdBlue
could cause engine damage!
● AdBlue should never be mixed with water
or any other additives. Any type of damage
caused by a mixture will not be covered by
the warranty. ●
Do not add AdBlue to the diesel fuel tank!
Otherwise you may damage the engine.
● Never leave the refill bottle in the vehicle. It
could become permeable due to temperature
changes and bottle damage and the AdBlue
could damage the vehicle interior. For the sake of the environment
Dispose of the refill bottle in an environment-
friendly manner. Note
Suitable AdBlue refill bottles can be pur-
chased from a technical service centre. Working in the engine
compartment
Introduction Before working in the engine compartment,
make sure that the vehicle is parked on hori-
zontal and firm ground.
The engine compartment of the vehicle is a
hazardous area. Never work on the engine or
in the engine compartment if you are not fa-
miliar with the operations to be carried out,
the applicable safety standards and especial-
ly if you do not have the necessary instru-
ments, liquids and tools
››› ! Have the work
214
Page 225 of 305
Checking and refilling levelsFlashesPossible causeSolution
Engine coolant sys-
tem faulty.Seek specialist as-
sistance.
WARNING
Observe the safety warnings ››› in Control
and warning lamps on page 47. Engine coolant specifications
The engine cooling system is supplied from
the factory with a specially treated mixture of
water and, at least, 40 % of the additive
G 13
(TLVW 774 J). The engine coolant additive is
recognisable by its purple colour. This mix-
ture of water and additive gives the necessa-
ry frost protection down to -25°C (-13 F) and
protects the light alloy parts of the cooling
system against corrosion. It also prevents
scaling and considerably raises the boiling
point of the coolant.
To protect the engine cooling system, the
percentage of additive must always be at
l e
ast 40 %, even in warm climates where an-
ti-freeze protection is not required.
If greater frost protection is required in very
cold climates, the proportion of additive can
be increased. However, the percentage of ad-
ditive should not exceed 60%, as this would
reduce the frost protection and, in turn, de-
crease the cooling capacity. When the coolant is topped up, use a mixture
of
distilled water and, at least, 40 % of the G
13 or G 12 plu
s-plus (TL-VW 774 G) additive
(both are purple) to obtain an optimum anti-
corrosion protection ››› . The mixture of G
13 with G 12 plus (TL-VW 774 F), G 12 (red) or
G 11 (green-blue) engine coolants will signifi-
cantly reduce the anticorrosion protection
and should, therefore be avoided ››› .
WARNING
If there is not enough anti-freeze in the cool-
ant system, the engine may fail leading to se-
rious damage.
● Please make sure that the percentage of
additive is correct with respect to the lowest
expected ambient temperature in the zone in
which the vehicle is to be used.
● When the outside temperature is very low,
the coolant could freeze and the vehicle
would be immobilised. In this case, the heat-
ing would not work either and inadequately
dressed passengers could die of cold. CAUTION
The original additives should never be mixed
with coolants which are not approved by
SEAT. Otherwise, you run the risk of causing
severe damage to the engine and the engine
cooling system. ● If the fluid in the expansion tank is not pur-
ple but is, for example, brown, this indicates
that the G 13 additive has been mixed with an inadequate coolant. The coolant must be
changed as soon as possible if this is the
case! This could result in serious faults and
engine damage.
For the sake of the environment
Coolants and additives can contaminate the
environment. If any fluids are spilled, they
should be collected and correctly disposed
of, with respect to the environment. 223
Technical specifications
Advice
Operation
Safety