brake light Seat Alhambra 2016 Owner's Guide
[x] Cancel search | Manufacturer: SEAT, Model Year: 2016, Model line: Alhambra, Model: Seat Alhambra 2016Pages: 324, PDF Size: 5.93 MB
Page 218 of 324
Operation
● Ob
ser
ve the surrounding area and acceler-
ate carefully at a maximum of 7 km/h
(4 mph).
● The park assist system is only r
esponsible
for moving the steering wheel during the ma-
noeuvre. The driver applies the accelerator,
the clutch, the gears and the brake.
● Follow the instructions given by the park
ass
ist system until the manoeuvre is comple-
ted.
● The park assist system steers the vehicle
forw
ards and backwards until it is in a
straight position in the parking space.
● The manoeuvre is complete when the corre-
sponding indic
ation is given on the instru-
ment panel display.
Stopping the parking manoeuvre
The park assist system stops the manoeuvre
in advance in the event of one of the follow-
ing:
● Press button .
● Driving faster than 7 km/h (4 mph).
● The driver moves the steering wheel.
● The parking manoeuvre has not been com-
p l
et
ed after 6 minutes since the park assist
system was activated.
● A sliding door is opened. To restart the ma-
noeuvr e, c
lose the sliding door and press the
button again. ●
Ther e i
s
a system malfunction (system tem-
porarily unavailable).
● The ASR system is switched off or the ASR
or ESC i
s working. WARNING
The steering wheel turns quickly by itself
when park in
g using the park assist system.
Placing your hand between the steering
wheel spokes could lead to injuries. Note
● The park a
ssist system has its limitations.
For example, it is not possible to park on
tight bends using the park assist system.
● Even if the park assist system recognises
that ther
e is not enough space for parking
the vehicle, the instrument panel display will
still show this place. In this case, the parking
manoeuvre should not be requested.
● Changing gears between forward and re-
verse g
ears before indicated (that is, before
the signal from the parking sensor system)
the parking results may not be ideal.
● For parallel parking (parallel to the road), a
sound wi
ll tell the driver when they must
change from forward gears to reverse; the
signal from the parking sensor system does
not indicate changes of direction.
● The park assist can also be activated after-
ward
s, if you pass close to a parallel parking
space at a maximum of 40 km an hour
(25 mph) or close to be perpendicular parking space at about 20 km an hour (12 mph) then
pre
s
s the button .
● The progress bar on the screen of the in-
strument p
anel shows a display of the rela-
tive distance to be covered.
● When the Park Assist system is turning the
steerin
g wheel of the stopped vehicle the
symbol is also displayed. Press on the
brake pedal so that the steering can turn with
the vehicle at a standstill and thus reduce the
number of manoeuvres.
● A “suitable” parking space length is at
lea
st 1.1 m greater than the length of the ve-
hicle.
● If the results of the park assist system are
not as
good after changing the wheels, the
system must memorise the perimeter of the
new wheels. This process is performed auto-
matically while the vehicle is in motion. To
help this process, turn slowly (at less than
20 km/h [12 mph]), e.g. in an empty car park. Leaving a parking space using the
P
ark
As
sist system Driving off
● Switch on the engine.
● Press button . When the function is ena-
b l
ed, the b
utton ››› Fig. 213 will light up.
● Apply the turn signal for the side on which
you w ant
to leave the parking space.
● Select reverse gear.
216
Page 231 of 324
Driver assistance systems
● in the c a
se of
special constructions to the
side of the vehicle, e.g., high or irregular di-
viders
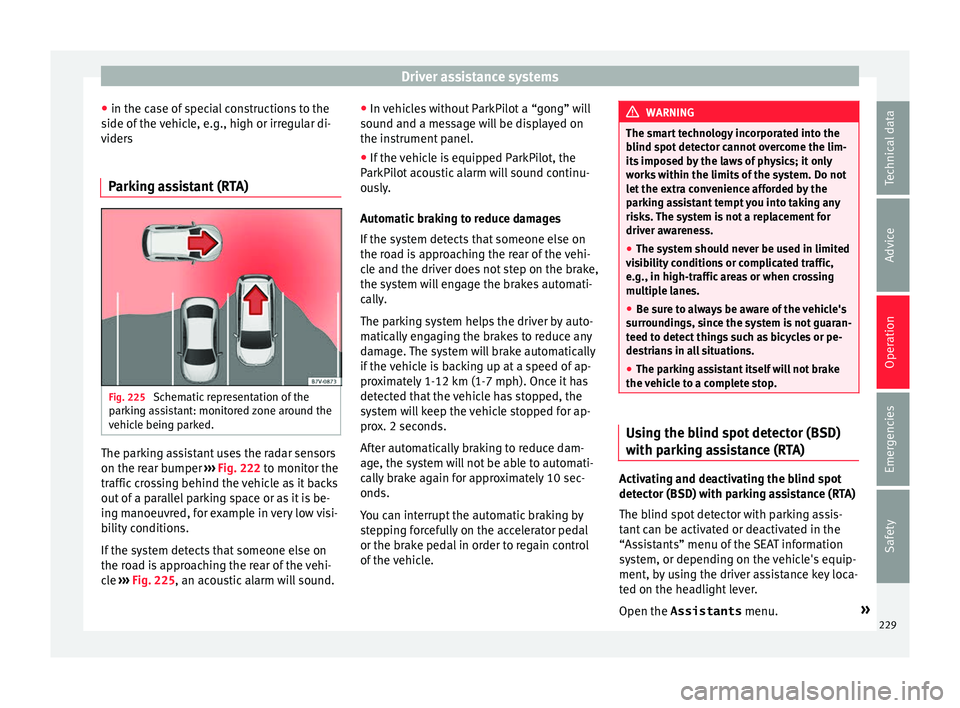
Parking assistant (RTA) Fig. 225
Schematic representation of the
p ark
in
g assistant: monitored zone around the
vehicle being parked. The parking assistant uses the radar sensors
on the r
e
ar b
umper ››› Fig. 222 to monitor the
traffic crossing behind the vehicle as it backs
out of a parallel parking space or as it is be-
ing manoeuvred, for example in very low visi-
bility conditions.
If the system detects that someone else on
the road is approaching the rear of the vehi-
cle ››› Fig. 225, an acoustic alarm will sound. ●
In vehic
les without ParkPilot a “gong” will
sound and a message will be displayed on
the instrument panel.
● If the vehicle is equipped ParkPilot, the
ParkPilot
acoustic alarm will sound continu-
ously.
Automatic braking to reduce damages
If the system detects that someone else on
the road is approaching the rear of the vehi-
cle and the driver does not step on the brake,
the system will engage the brakes automati-
cally.
The parking system helps the driver by auto-
matically engaging the brakes to reduce any
damage. The system will brake automatically
if the vehicle is backing up at a speed of ap-
proximately 1-12 km (1-7 mph). Once it has
detected that the vehicle has stopped, the
system will keep the vehicle stopped for ap-
prox. 2 seconds.
After automatically braking to reduce dam-
age, the system will not be able to automati-
cally brake again for approximately 10 sec-
onds.
You can interrupt the automatic braking by
stepping forcefully on the accelerator pedal
or the brake pedal in order to regain control
of the vehicle. WARNING
The smart technology incorporated into the
blind s pot
detector cannot overcome the lim-
its imposed by the laws of physics; it only
works within the limits of the system. Do not
let the extra convenience afforded by the
parking assistant tempt you into taking any
risks. The system is not a replacement for
driver awareness.
● The system should never be used in limited
vis
ibility conditions or complicated traffic,
e.g., in high-traffic areas or when crossing
multiple lanes.
● Be sure to always be aware of the vehicle's
surrou
ndings, since the system is not guaran-
teed to detect things such as bicycles or pe-
destrians in all situations.
● The parking assistant itself will not brake
the vehic
le to a complete stop. Using the blind spot detector (BSD)
w
ith p
ark
ing assistance (RTA) Activating and deactivating the blind spot
det
ect
or (BSD) w
ith parking assistance (RTA)
The blind spot detector with parking assis-
tant can be activated or deactivated in the
“Assistants” menu of the SEAT information
system, or depending on the vehicle's equip-
ment, by using the driver assistance key loca-
ted on the headlight lever.
Open the Assistants menu.»
229
Technical data
Advice
Operation
Emergencies
Safety
Page 240 of 324
Operation
Note
● Alw a
ys turn off the anti-theft alarm system
before connecting or disconnecting a trailer
››› page 119. Otherwise, the tilt sensor may
erroneously activate the alarm.
● Never use a trailer with a new engine (for
the first
1,000 km or 600 miles) ››› page 247.
● At SEAT, we recommend folding in the tow
hitch b
all when a trailer is not being used. In
case of a rear collision, the damage caused to
the vehicle with the extended tow hitch ball
could be more extensive.
● In some models, a tow hitch is necessary
for to
wing vehicles. For this reason, you
should store the tow hitch in the vehicle at all
times. Technical requirements
If the car is supplied with a
fact
or
y-fitted tow-
ing bracket it will already have the necessary
technical modifications and meet the statuto-
ry requirements for towing a trailer.
Only use an approved tow hitch for the gross
trailer weight rating. The tow hitch must be
suitable for both the vehicle and trailer and
must be securely fitted to the vehicle chassis.
Only use a tow hitch with a removable ball
joint. Always check and take into account the
tow hitch manufacturer's instructions. Never
fit a trailer tow hitch “that distributes the
load” or “balances the load”. Bumper mounted tow hitch
Never fit a t
ow hitch or its attachments to the
bumper. A tow hitch should never interfere
with the bumper performance. Do not modify
the exhaust system and brake system. Regu-
larly check the tow hitch to ensure it is firmly
fitted.
Engine cooling system
Driving with a trailer increases the load on
the engine and cooling system. The cooling
system should always have sufficient coolant
and to be able to cope with the vehicle and
trailer.
Electric trailer brake
If the trailer has its own braking system,
please note the relevant legal requirements.
The trailer braking system should never be
connected to the vehicle braking system.
Trailer cable
Always use a cable between the vehicle and
the trailer ››› page 240.
Trailer rear lights
The rear lights of a trailer must fulfil the cor-
responding standards ››› page 240.
Never connect the trailer's rear lights directly
to the vehicle electric system. In case of any
doubt about the electrical connection of the trailer, ask a specialised workshop. SEAT rec-
ommends
visiting a technical service.
Wing mirrors
When the field of vision behind the trailer
cannot be seen using the standard wing mir-
rors of the towing vehicle, additional wing
mirrors are required according to the legal re-
quirements of each country. The wing mirrors
must be fitted before driving and must pro-
vide a sufficient field of vision behind.
Trailer electricity consumption
Never exceed the specifications:
DevicesMaximum power
Side lights and rear lights50 Watts
Turn signal (each side)54 Watts
Brake lights (total)84 Watts
Reversing lights (total)42 Watts
Rear fog light42 Watts WARNING
If the tow hitch is badly fitted or unsuitable,
the trai l
er may separate from the vehicle
causing an accident with serious consequen-
ces. 238
Page 241 of 324
Towing bracket device
CAUTION
● If the r e
ar lights of the trailer are not cor-
rectly connected, the vehicle electronics may
be damaged.
● If the trailer absorbs excessive electric cur-
rent, the v
ehicle electronics may be dam-
aged.
● Never connect the trailer's electric system
to the electric
al connections of the rear lights
or any other power sources. Only use suitable
connections for providing electric current to
the trailer. Note
● To w
ing a trailer places additional demands
on the vehicle. At SEAT, we recommend addi-
tional services between the normal inspec-
tion intervals if the vehicle is used frequently
for towing a trailer.
● In some countries, an additional fire extin-
guisher is
required if the trailer weight is
more than 2500 kg Electric tow hitch ball*
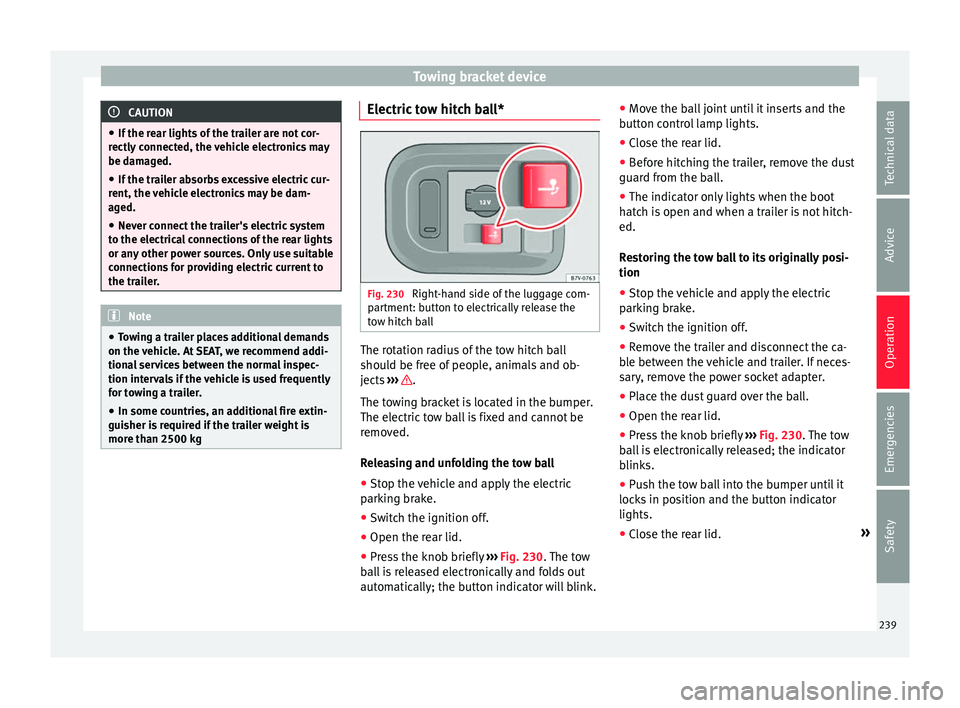
Fig. 230
Right-hand side of the luggage com-
p ar
tment: b
utton to electrically release the
tow hitch ball The rotation radius of the tow hitch ball
shou
l
d be fr
ee of people, animals and ob-
jects ››› .
The t o
w
ing bracket is located in the bumper.
The electric tow ball is fixed and cannot be
removed.
Releasing and unfolding the tow ball
● Stop the vehicle and apply the electric
parkin
g brake.
● Switch the ignition off.
● Open the rear lid.
● Press the knob briefly ›››
Fig. 230. The tow
ball is released electronically and folds out
automatically; the button indicator will blink. ●
Move the b
all joint until it inserts and the
button control lamp lights.
● Close the rear lid.
● Before hitching the trailer, remove the dust
guard from the b
all.
● The indicator only lights when the boot
hatc
h is open and when a trailer is not hitch-
ed.
Restoring the tow ball to its originally posi-
tion
● Stop the vehicle and apply the electric
parkin
g brake.
● Switch the ignition off.
● Remove the trailer and disconnect the ca-
ble betw
een the vehicle and trailer. If neces-
sary, remove the power socket adapter.
● Place the dust guard over the ball.
● Open the rear lid.
● Press the knob briefly ›››
Fig. 230. The tow
ball is electronically released; the indicator
blinks.
● Push the tow ball into the bumper until it
locks
in position and the button indicator
lights.
● Close the rear lid. »
239
Technical data
Advice
Operation
Emergencies
Safety
Page 243 of 324
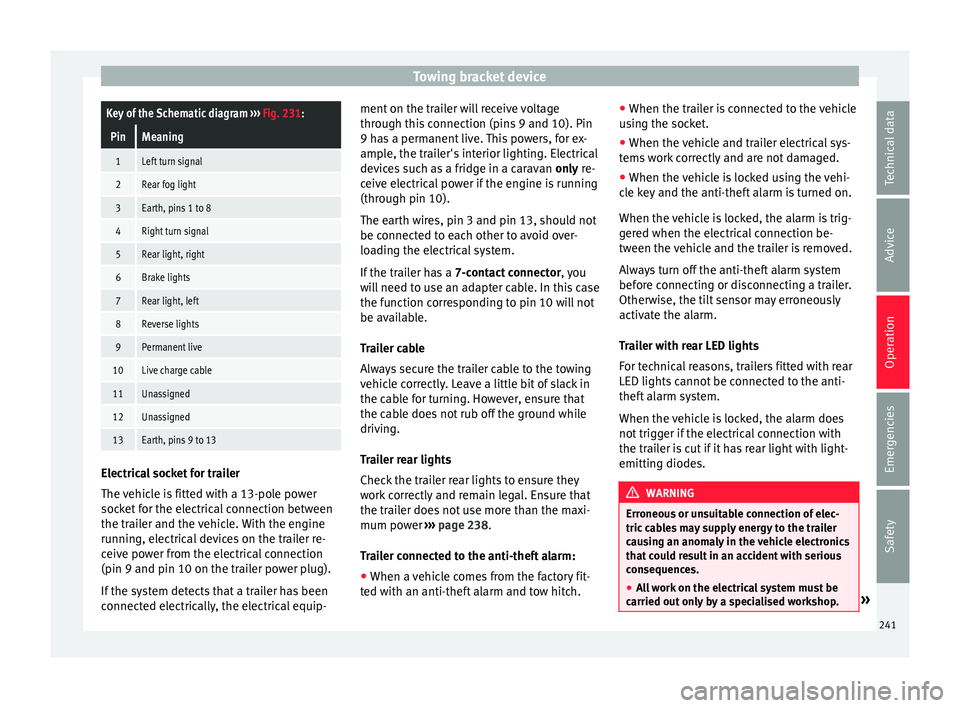
Towing bracket deviceKey of the Schematic diagram
››› Fig. 231:
PinMeaning
1Left turn signal
2Rear fog light
3Earth, pins 1 to 8
4Right turn signal
5Rear light, right
6Brake lights
7Rear light, left
8Reverse lights
9Permanent live
10Live charge cable
11Unassigned
12Unassigned
13Earth, pins 9 to 13 Electrical socket for trailer
The
v
ehic
le is fitted with a 13-pole power
socket for the electrical connection between
the trailer and the vehicle. With the engine
running, electrical devices on the trailer re-
ceive power from the electrical connection
(pin 9 and pin 10 on the trailer power plug).
If the system detects that a trailer has been
connected electrically, the electrical equip- ment on the trailer will receive voltage
through this
connection (pins 9 and 10). Pin
9 has a permanent live. This powers, for ex-
ample, the trailer's interior lighting. Electrical
devices such as a fridge in a caravan only re-
ceive electrical power if the engine is running
(through pin 10).
The earth wires, pin 3 and pin 13, should not
be connected to each other to avoid over-
loading the electrical system.
If the trailer has a 7-contact connector , you
will need to use an adapter cable. In this case
the function corresponding to pin 10 will not
be available.
Trailer cable
Always secure the trailer cable to the towing
vehicle correctly. Leave a little bit of slack in
the cable for turning. However, ensure that
the cable does not rub off the ground while
driving.
Trailer rear lights
Check the trailer rear lights to ensure they
work correctly and remain legal. Ensure that
the trailer does not use more than the maxi-
mum power ››› page 238.
Trailer connected to the anti-theft alarm:
● When a vehicle comes from the factory fit-
ted w ith an anti-thef
t alarm and tow hitch. ●
When the trai l
er is connected to the vehicle
using the socket.
● When the vehicle and trailer electrical sys-
tems w
ork correctly and are not damaged.
● When the vehicle is locked using the vehi-
cle k
ey and the anti-theft alarm is turned on.
When the vehicle is locked, the alarm is trig-
gered when the electrical connection be-
tween the vehicle and the trailer is removed.
Always turn off the anti-theft alarm system
before connecting or disconnecting a trailer.
Otherwise, the tilt sensor may erroneously
activate the alarm.
Trailer with rear LED lights
For technical reasons, trailers fitted with rear
LED lights cannot be connected to the anti-
theft alarm system.
When the vehicle is locked, the alarm does
not trigger if the electrical connection with
the trailer is cut if it has rear light with light-
emitting diodes. WARNING
Erroneous or unsuitable connection of elec-
tric c ab
les may supply energy to the trailer
causing an anomaly in the vehicle electronics
that could result in an accident with serious
consequences.
● All work on the electrical system must be
carried out on
ly by a specialised workshop. » 241
Technical data
Advice
Operation
Emergencies
Safety
Page 245 of 324
Towing bracket device
●
Alw a
ys correctly load the trailer.
● Always secure loads correctly with suitable
and undam
aged attachment rope or straps. Driving with a trailer
Adjusting the headlights
When to
w
ing a trailer, the front of the vehicle
may rise and so the dipped beam headlights
may blind other drivers. Use the headlight
range control to lower the cone of light. If you
do not have headlight range control, have
the headlights adjusted by a specialised
workshop. Vehicles with high-intensity dis-
charge lamps adapt automatically and do not
require adjustment.
Things to note when towing a trailer or cara-
van
● If the trailer has an overru
n brake, apply
the brakes gently at first and then, firmly.
This will prevent the jerking that can be
caused by the trailer wheels locking.
● As of the combined vehicle and trailer
mas
s, braking distances will be greater.
● Select a low gear before driving down a
steep hi
ll to use the engine braking effect to
slow down the vehicle. Otherwise, the brak-
ing system could overheat and fail.
● The vehicle centre of gravity and handling
chan
ge because of the trailer load and be- cause of the increased combined mass of the
vehicl
e and trailer.
● If the towing vehicle is empty and the trail-
er loaded then the lo
ad distribution is incor-
rect. If you must travel in these conditions,
drive carefully and reduce your speed accord-
ingly.
Hill starts with a trailer
Depending on the hill and the gross com-
bined weight, it is possible that the com-
bined vehicle and trailer move backwards
slightly when starting.
For a hill start with a trailer, proceed as fol-
lows:
● Press and hold the brake pedal.
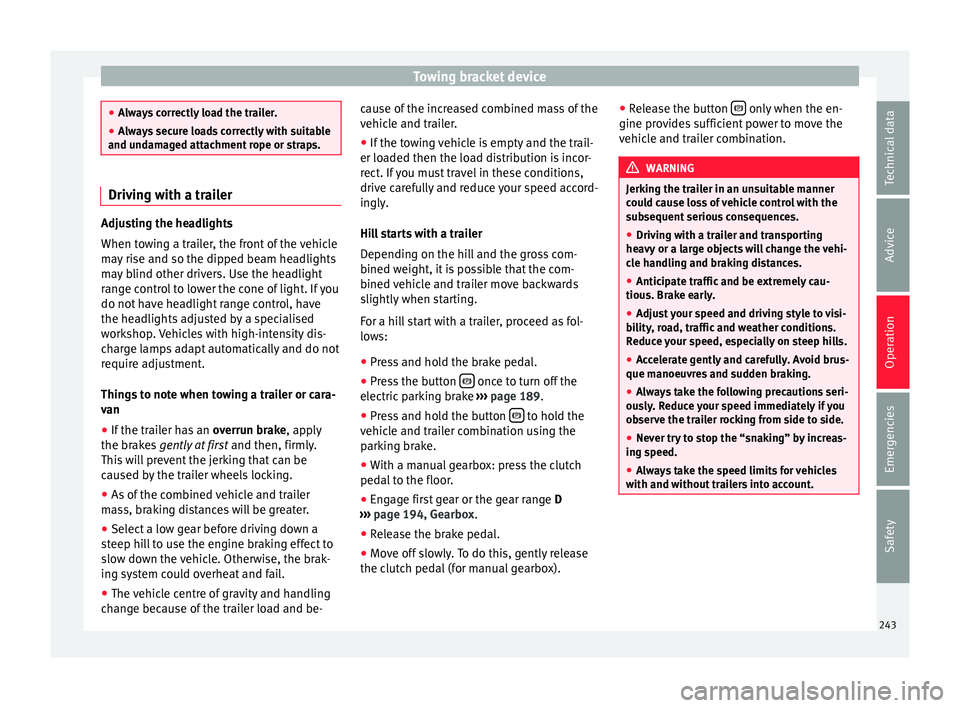
● Press the button once to turn off the
el ectric
p
arking brake ››› page 189.
● Press and hold the button to hold the
v ehic
l
e and trailer combination using the
parking brake.
● With a manual gearbox: press the clutch
pedal t
o the floor.
● Engage first gear or the gear range D
›››
page 194, Gearbox.
● Release the brake pedal.
● Move off slowly. To do this, gently release
the clutc
h pedal (for manual gearbox). ●
Rele
ase the button only when the en-
gine pr o
v
ides sufficient power to move the
vehicle and trailer combination. WARNING
Jerking the trailer in an unsuitable manner
cou l
d cause loss of vehicle control with the
subsequent serious consequences.
● Driving with a trailer and transporting
heavy or a l
arge objects will change the vehi-
cle handling and braking distances.
● Anticipate traffic and be extremely cau-
tious. Brak
e early.
● Adjust your speed and driving style to visi-
bility
, road, traffic and weather conditions.
Reduce your speed, especially on steep hills.
● Accelerate gently and carefully. Avoid brus-
que manoeuvr
es and sudden braking.
● Always take the following precautions seri-
ously
. Reduce your speed immediately if you
observe the trailer rocking from side to side.
● Never try to stop the “snaking” by increas-
ing speed.
● A
lways take the speed limits for vehicles
with and without
trailers into account. 243
Technical data
Advice
Operation
Emergencies
Safety
Page 246 of 324
Operation
Stabilising the vehicle and trailer
c omb
in
ation Stabilisation of the vehicle and trailer combi-
nation i
s
an extension of the electronic sta-
bility control (ESC) and helps, with the assis-
tance of the trajectory control, to reduce trail-
er “snaking”.
Stabilisation of the vehicle and trailer combi-
nation is active when the ESC indicator on
the dash panel remains lit for about two sec-
onds more than the ABS indicator.
Requirements for stabilising the vehi-
cle/trailer combination
● An original tow hitch is fitted by the manu-
fact ur
er or a compatible model is retrofitted.
● The ECS is switched on. The warning lamp
on the dash p
anel is not lit.
● The trailer is connected to the vehicle using
the power soc
ket.
● It travels faster than 60 km/h (37 mph).
● The maximum drawbar load is used.
● The trailer must have a fixed drawbar.
● Trailers with brakes must be equipped with
a mechanic
al inertia brake. WARNING
Do not let the extra safety afforded by the
st ab
ilisation system tempt you into taking
any risks when driving. ●
Adjus t
your speed and driving style to visi-
bility, road, traffic and weather conditions.
● If the road surface is slippery, take care
when accel
erating.
● When a system is operating, lift your foot
off the acc
elerator. WARNING
It is possible that the combination stabilisa-
tion sy st
em does not correctly recognised all
driving situations.
● It is possible that the stabilisation system
does not
detect snaking of a light trailer and
thus does not intervene.
● When driving on slippery ground, the trail-
er coul
d jack-knife despite the stabilisation
system.
● Trailers with a high centre of gravity may
even tip ov
er before they start to rock side-
ways.
● If a trailer is not used and the trailer power
socket
is connected (e.g. installation of a bi-
cycle carrier with lights), repeated automatic
braking may occur in extreme driving condi-
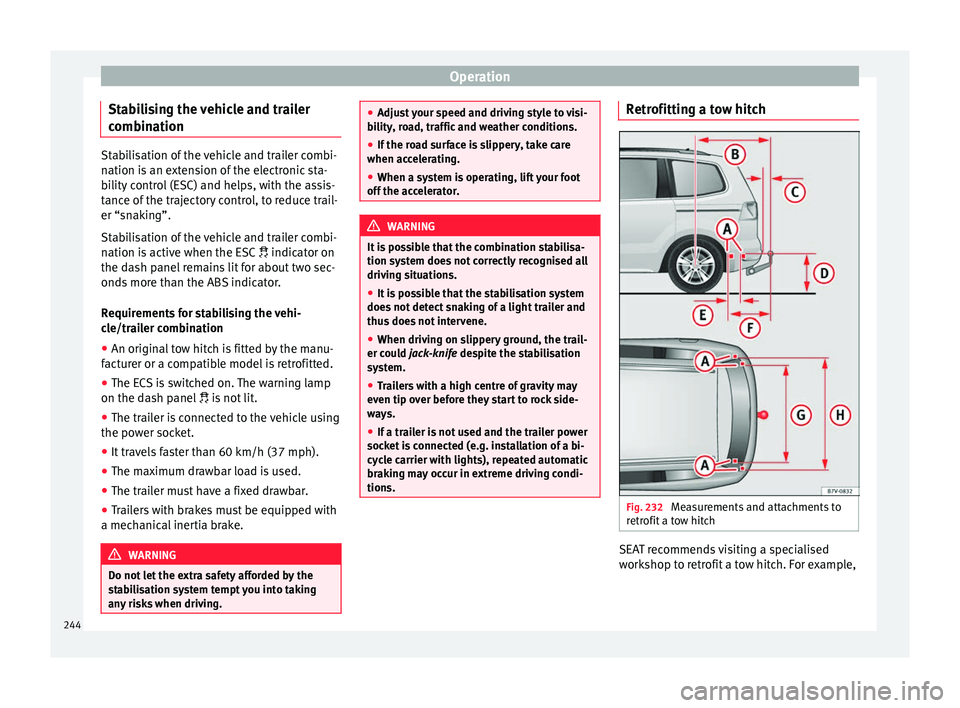
tions. Retrofitting a tow hitch
Fig. 232
Measurements and attachments to
r etr
ofit
a tow hitch SEAT recommends visiting a specialised
w
ork
shop t
o retrofit a tow hitch. For example,
244
Page 256 of 324
Advice
Automatic car washes
A lw
a
ys observe the instructions provided at
the automatic car wash. The standard pre-
cautionary measures prior to entering the car
wash should be taken to avoid damage to
the vehicle (close all windows, fold in exterior
mirrors). If the vehicle is fitted with additional
components (spoiler, roof-rack, aerial, etc.),
check with the car wash supervisor whether
these can enter the car wash ››› .
The v
ehic
le paintwork is so durable that the
vehicle can normally be washed without
problems in an automatic car wash tunnel.
However, wear and damage to the paintwork
will depend on the type of car wash used.
SEAT recommends the use of car washes
without brushes.
To remove traces of wax on windows and to
prevent wiper blades from scratching, please
observe the following ››› page 255, Cleaning
windows and exterior mirrors .
Washing the car by hand
When washing the car by hand, use plenty of
water to soften the dirt first, and rinse off as
well as possible.
Then clean the vehicle with a soft sponge,
glove or brush using only slight pressure.
Start at the roof and work downwards. Spe-
cial car shampoo should only be used for
very persistent dirt. Rinse the sponge or glove thoroughly and of-
ten.
Wheels, s
ills and similar should be cleaned
last. Use a second sponge for this. WARNING
Sharp components on the vehicle may cause
injury .
● Pr
otect arms and hands from sharp edges
when cle
aning the vehicle undercarriage or
the interior of the wheel hubs. WARNING
After the vehicle has been washed, the brak-
ing eff ect
will be reduced (and the braking
distance increased) due to moisture (and ice
in winter) on the brakes.
● “Dry the brakes and remove ice” by braking
caref
ully. Ensure that you are not endanger-
ing other road-users or breaking traffic regu-
lations in the process. CAUTION
● The temper at
ure of the water must not ex-
ceed +60°C (+140°F).
● To avoid damage to the paintwork, do not
wash the
vehicle in full sun.
● Do not use rough sponges or similar which
coul
d damage the surface to clean away the
traces of insects. ●
Never w ipe the he
adlights with a dry cloth
or sponge, always moisten first. It is best to
use soapy water.
● Washing the vehicle in low temperatures:
When washin
g the vehicle with a hose, do
not direct water into the lock cylinders or the
gaps around the doors or roof. Locks and
seals could freeze! CAUTION
To avoid any risk of damage to the vehicle,
p le
ase check the following points before us-
ing an automatic car wash:
● Compare the distance between the vehicle
wheels and the di
stance between the guide-
rails of the car wash to prevent damage to the
wheels and tyres!
● Switch off the rain sensor and the Au-
to Hol
d function before entering a car wash.
● Compare the height and width of your vehi-
cle w
ith the available height and width when
entering and driving through the car wash.
● Fold in exterior mirrors Electrically retracta-
ble e
xterior mirrors must not be folded in or
out by hand. Always use the electrical power
control.
● To avoid damaging the bonnet paintwork,
res
t the wipers on the windscreen after dry-
ing them. Do not let them fall!
● Lock the rear lid to prevent it from opening
unexpect
edly while inside the car wash.254
Page 285 of 324
Checking and refilling levels
Brake fluid level
The l ev
el
of the brake fluid should always be
between the MIN and MAX marks, or above
the MIN mark ››› .
It i
s
not always possible to check the level of
the brake fluid, as in some models the en-
gine components make it difficult to see the
brake fluid reservoir. If you cannot read the
exact brake fluid level, consult a specialist.
The brake fluid level drops slightly when the
vehicle is being used due to wear of the
brake pads and the automatic readjustment
of the brake.
Changing the brake fluid
The brake fluid should be changed in accord-
ance with the instructions given in the Main-
tenance Programme. Have the brake fluid
changed by a specialised workshop. SEAT
recommends taking your car in for technical
service. This means that only brake fluid
complying with the required specifications
will be used. WARNING
If the brake fluid level is low or unsuita-
bl e/o
ld brake fluid is used, the brake system
may fail or braking power may be reduced.
● Check the brake system and the brake fluid
level
regularly! ●
The brak e fluid shou
ld be changed regular-
ly in accordance with the instructions given
in the Maintenance Programme.
● When the brake fluid is used and brakes
are sub
jected to extreme braking forces, bub-
bles of vapour form in the brake system.
These bubbles can significantly reduce brak-
ing power, notably increasing braking dis-
tance, and could result in the total failure of
the brake system.
● Only used brake fluid that conforms to the
VW 501 14 stand
ard, FMVSS 116 DOT 4
standard or even the DIN ISO 4925 CLASS 4
standard. Other types of brake fluid could af-
fect brake operation and reduce braking pow-
er. Do not use a brake fluid if the container
does not specify compliance with the
VW 501 14, FMVSS 116 DOT 4 or
DIN ISO 4925 CLASS 4 standards.
● The replacement brake fluid must be new.
● Always ensure that you use suitable brake
fluid. Do not use a br
ake fluid if the container
does not specify compliance with the
VW 501 14, FMVSS 116 DOT 4 or
DIN ISO 4925 CLASS 4 standards. WARNING
Brake fluid is poisonous.
● To reduce the risk of poisoning, do not keep
brak e fluid in drink
s bottles/containers or
similar. Other people could drink from these
recipients even if the contents are clearly
marked. ●
Alw a
ys keep brake fluid in the original con-
tainer; keep it correctly sealed and out of
reach of children. CAUTION
Brake fluid damages the vehicle paintwork.
W ipe off an
y brake fluid from the paintwork
immediately. For the sake of the environment
Brake fluid is an environmental pollutant.
Co l
lect any spilt service fluids and allow a
professional to dispose of them. 283
Technical data
Advice
Operation
Emergencies
Safety
Page 309 of 324
Index
Index
A
Abr o
a
d
extended stay abroad with your vehicle . . . . . 263
sale of vehicle . . . . . . . . . . . . . . . . . . . . . . . . . . 263
ABS see Anti-lock brake system . . . . . . . . . . . . . . . 205
Accessories . . . . . . . . . . . . . . . . . . . . . . . . . . . . . . 247
Acoustic alarms seatbelt unfastened . . . . . . . . . . . . . . . . . . . . . . 62
warning and indication lamps . . . . . . . . . . . . . . 32
Adaptive headlights dynamic . . . . . . . . . . . . . . . . . . . . . . . . . . . . . . . 132
AdBlue information . . . . . . . . . . . . . . . . . . . . . . . . . . . . 271
minimum quantity for a refill . . . . . . . . . . . . . . 271
refilling . . . . . . . . . . . . . . . . . . . . . . . . . . . . . . . 271
specifications . . . . . . . . . . . . . . . . . . . . . . . . . . 272
tank filling capacity . . . . . . . . . . . . . . . . . . . . . 270
warning and indication lamps . . . . . . . . . . . . . 270
Additional heater see "Auxiliary heater" . . . . . . . . . . . . . . . . . . . . 180
Adjusting folding the backrest of the front passengerseat . . . . . . . . . . . . . . . . . . . . . . . . . . . . . . . . 150
front seats . . . . . . . . . . . . . . . . . . . . . . . . . . . . . 142
lights . . . . . . . . . . . . . . . . . . . . . . . . . . . . . . . . . 135
seats . . . . . . . . . . . . . . . . . . . . . . . . . . . . . . . . . . 57
seat with position memory . . . . . . . . . . . . . . . 148
Adjusting the head restraint rear head restraints . . . . . . . . . . . . . . . . . 14, 144
Adjusting the seats front seats . . . . . . . . . . . . . . . . . . . . . . . . . . . . . 142
rear seats . . . . . . . . . . . . . . . . . . . . . . . . . . . . . 143
AFS . . . . . . . . . . . . . . . . . . . . . . . . . . . . . . . . . . . . 132 Air-conditioning
malfu nctions . . . . . . . . . . . . . . . . . . . . . . . . . . . 177
Airbag covers . . . . . . . . . . . . . . . . . . . . . . . . . . . . . 17
Airbags see Airbag system . . . . . . . . . . . . . . . . . . . . . . . 18
Airbag system . . . . . . . . . . . . . . . . . . . . . . . . . . 17, 68 activation . . . . . . . . . . . . . . . . . . . . . . . . . . . . . . 70
cleaning dash panel . . . . . . . . . . . . . . . . . . . . . 262
control lamp . . . . . . . . . . . . . . . . . . . . . . . . . . . . 72
description . . . . . . . . . . . . . . . . . . . . . . . . . . . . . 69
front airbags . . . . . . . . . . . . . . . . . . . . . . . . . 17, 71
functioning . . . . . . . . . . . . . . . . . . . . . . . . . . . . . 70
head-protection airbag . . . . . . . . . . . . . . . . . . . 20
knee airbag . . . . . . . . . . . . . . . . . . . . . . . . . . . . . 18
locking the vehicle after deployment . . . . . . . 115
repairs . . . . . . . . . . . . . . . . . . . . . . . . . . . . . . . . 249
side airbags . . . . . . . . . . . . . . . . . . . . . . . . . . . . 19
use of child seats . . . . . . . . . . . . . . . . . . . . . 18, 73
vehicle care . . . . . . . . . . . . . . . . . . . . . . . . . . . . 262
Air conditioning . . . . . . . . . . . . . . . . . . . . . . . . . . 176 air recirculation . . . . . . . . . . . . . . . . . . . . . . . . . 179
air vents . . . . . . . . . . . . . . . . . . . . . . . . . . . . . . 178
climatronic . . . . . . . . . . . . . . . . . . . . . . . . 36, 176
controls . . . . . . . . . . . . . . . . . . . . . . . . . . . 36, 176
electronic manual air conditioning . . . . . . . . . 176
indirect ventilation . . . . . . . . . . . . . . . . . . . . . . 178
rear seats . . . . . . . . . . . . . . . . . . . . . . . . . . . . . 177
special features . . . . . . . . . . . . . . . . . . . . . . . . 178
user instructions . . . . . . . . . . . . . . . . . . . . . . . . 177
Air recirculation . . . . . . . . . . . . . . . . . . . . . . . . . . 179
Air vents . . . . . . . . . . . . . . . . . . . . . . . . . . . . . . . . 178
Alcantara . . . . . . . . . . . . . . . . . . . . . . . . . . . . . . . . 259
All-wheel drive snow chains . . . . . . . . . . . . . . . . . . . . . . . . . . . . 49
winter tyres . . . . . . . . . . . . . . . . . . . . . . . . . . . . 297
Ambient lighting . . . . . . . . . . . . . . . . . . . . . . . . . 136
Anodized surfaces . . . . . . . . . . . . . . . . . . . . . . . . 257 Antenna . . . . . . . . . . . . . . . . . . . . . . . . . . . 249, 263
Anti-freeze
. . . . . . . . . . . . . . . . . . . . . . . . . . . . . . . 40
Anti-lock brake system . . . . . . . . . . . . . . . . . . . . . 205
Anti-lock system . . . . . . . . . . . . . . . . . . . . . . . . . . 206
Anti-puncture kit . . . . . . . . . . . . . . . . . . . . . . . . 44, 85
Anti-theft alarm . . . . . . . . . . . . . . . . . . . . . . . . . . 119 Anti-tow system . . . . . . . . . . . . . . . . . . . . . . . . 120
false alarms . . . . . . . . . . . . . . . . . . . . . . . . . . . 120
Interior monitoring . . . . . . . . . . . . . . . . . . . . . . 120
trailer . . . . . . . . . . . . . . . . . . . . . . . . . . . . . . . . . 241
Anti-theft security system . . . . . . . . . . . . . . . . . . 119
Anti-tow system . . . . . . . . . . . . . . . . . . . . . . . . . . 120
Anti-trap function panoramic sunroof . . . . . . . . . . . . . . . . . . . . . . 129
sun blind . . . . . . . . . . . . . . . . . . . . . . . . . . . . . . 129
Antifreeze . . . . . . . . . . . . . . . . . . . . . . . . . . . 40, 280
Armrests . . . . . . . . . . . . . . . . . . . . . . . . . . . . . . . . 151
Ashtray . . . . . . . . . . . . . . . . . . . . . . . . . . . . . . . . . 172
ASR see Braking assist systems . . . . . . . . . . 206, 207
switching on and off . . . . . . . . . . . . . . . . . . . . . 207
see also Traction control system . . . . . . . . . . . 205
Assistance call . . . . . . . . . . . . . . . . . . . . . . . . . . . 110
Assistance systems Electronic differential lock system (EDS) . . . . 206
Electronic drive torque management (XDS) . . 206
Launch-Control programme . . . . . . . . . . . . . . . 198
tiredness detection . . . . . . . . . . . . . . . . . . . . . 232
tyre monitoring systems . . . . . . . . . . . . . . . . . 236
Assisted starting . . . . . . . . . . . . . . . . . . . . . . . . . . 51
Assist systems adaptive headlights . . . . . . . . . . . . . . . . . . . . . 132
auto Hold . . . . . . . . . . . . . . . . . . . . . . . . . . . . . 208
blind spot detector (BSD) with parking assis-tant (RTA) . . . . . . . . . . . . . . . . . . . . . . . . . . . . 225
brake assist system (BAS) . . . . . . . . . . . . . . . . 206
cruise control system . . . . . . . . . . . . . . . . . . . . 221
dynamic chassis control (DCC) . . . . . . . . . . . . 233 307