airbag Seat Alhambra 2018 Owner's Manual
[x] Cancel search | Manufacturer: SEAT, Model Year: 2018, Model line: Alhambra, Model: Seat Alhambra 2018Pages: 324, PDF Size: 7.04 MB
Page 3 of 324
Foreword
Thi s
In
struction Manual and its correspond-
ing supplements should be read carefully to
familiarise yourself with your vehicle.
Besides the regular care and maintenance of
the vehicle, its correct handling will help pre-
serve its value.
For safety reasons, always note the informa-
tion concerning accessories, modifications
and part replacements.
If selling the vehicle, give all of the on-board
documentation to the new owner, as it
should be kept with the vehicle.
You can access the information in this man-
ual using:
● Thematic table of contents that follows the
manual’s g
eneral chapter structure.
● Visual table of contents that uses graphics
to indicat
e the pages containing “essential”
information, which is detailed in the corre-
sponding chapters.
● Alphabetical index with many terms and
synonyms
to help you find information. WARNING
Read and always observe safety informa-
tion conc ernin
g the passenger's front air-
bag ››› page 76, Important information
regarding the front passenger's airbag .
Thank you for trusting in us.
We wish you safe and enjoya-
ble motoring.
SEAT, S.A.
Page 7 of 324
Table of Contents
Table of Contents
The e s
senti
als . . . . . . . . . . . . . . . . . . . . . . . . 7
Exterior view . . . . . . . . . . . . . . . . . . . . . . . . . . . . 7
Exterior view . . . . . . . . . . . . . . . . . . . . . . . . . . . . 8
Interior view (left-hand drive) . . . . . . . . . . . . . . 9
How it works . . . . . . . . . . . . . . . . . . . . . . . . . . . . 10
Unlocking and locking . . . . . . . . . . . . . . . . . . . . 10
Before driving . . . . . . . . . . . . . . . . . . . . . . . . . . . 15
Airbags . . . . . . . . . . . . . . . . . . . . . . . . . . . . . . . . 19
Child seats . . . . . . . . . . . . . . . . . . . . . . . . . . . . . 22
Starting the vehicle . . . . . . . . . . . . . . . . . . . . . . 25
Lights and visibility . . . . . . . . . . . . . . . . . . . . . . 25
SEAT information system . . . . . . . . . . . . . . . . . . 27
Cruise control . . . . . . . . . . . . . . . . . . . . . . . . . . . 33
Warning lamps . . . . . . . . . . . . . . . . . . . . . . . . . . 34
Gearbox lever . . . . . . . . . . . . . . . . . . . . . . . . . . . 35
Air conditioning . . . . . . . . . . . . . . . . . . . . . . . . . 37
Fluid Level control . . . . . . . . . . . . . . . . . . . . . . . 40
Emergencies . . . . . . . . . . . . . . . . . . . . . . . . . . . . 43
Fuses . . . . . . . . . . . . . . . . . . . . . . . . . . . . . . . . . . 43
Bulbs . . . . . . . . . . . . . . . . . . . . . . . . . . . . . . . . . . 44
Action in the event of a puncture . . . . . . . . . . . 45
Changing a wheel . . . . . . . . . . . . . . . . . . . . . . . 46
Snow chains . . . . . . . . . . . . . . . . . . . . . . . . . . . . 50
Emergency towing of the vehicle . . . . . . . . . . . 51
How to jump start . . . . . . . . . . . . . . . . . . . . . . . . 52
Changing windscreen wipers . . . . . . . . . . . . . . 55
Safety . . . . . . . . . . . . . . . . . . . . . . . . . . . . . . . . 57
Safe driving . . . . . . . . . . . . . . . . . . . . . . . . . . . . 57
Safety first! . . . . . . . . . . . . . . . . . . . . . . . . . . . . . 57
Advice about driving . . . . . . . . . . . . . . . . . . . . . 57
Correct position of the vehicle occupants . . . . 58
Pedal area . . . . . . . . . . . . . . . . . . . . . . . . . . . . . . 61 Seat belts
. . . . . . . . . . . . . . . . . . . . . . . . . . . . . . 62
Why wear a seat belt . . . . . . . . . . . . . . . . . . . . . 62
How to properly adjust your seatbelt . . . . . . . . 65
Seat belt tensioners . . . . . . . . . . . . . . . . . . . . . . 68
Airbag system . . . . . . . . . . . . . . . . . . . . . . . . . . 69
Brief introduction . . . . . . . . . . . . . . . . . . . . . . . . 69
Airbag safety instructions . . . . . . . . . . . . . . . . . 72
Deactivating airbags . . . . . . . . . . . . . . . . . . . . . 73
Transporting children safely . . . . . . . . . . . . . . . 75
Safety for children . . . . . . . . . . . . . . . . . . . . . . . 75
Child seats . . . . . . . . . . . . . . . . . . . . . . . . . . . . . 76
Integrated child seat . . . . . . . . . . . . . . . . . . . . . 79
Emergencies . . . . . . . . . . . . . . . . . . . . . . . . . . 83
Self-help . . . . . . . . . . . . . . . . . . . . . . . . . . . . . . . 83
In case of emergency . . . . . . . . . . . . . . . . . . . . . 83
Vehicle tool kit* . . . . . . . . . . . . . . . . . . . . . . . . . 83
Changing a wheel* . . . . . . . . . . . . . . . . . . . . . . . 85
Tyre repair . . . . . . . . . . . . . . . . . . . . . . . . . . . . . . 86
Changing the windscreen wiper blades . . . . . . 88
Tow-starting and towing . . . . . . . . . . . . . . . . . . 88
Emergency locking and unlocking . . . . . . . . . . 90
Fuses and bulbs . . . . . . . . . . . . . . . . . . . . . . . . . 91
Fuses . . . . . . . . . . . . . . . . . . . . . . . . . . . . . . . . . . 91
Changing bulbs . . . . . . . . . . . . . . . . . . . . . . . . . 92
Operation . . . . . . . . . . . . . . . . . . . . . . . . . . . . . 101
General instrument panel . . . . . . . . . . . . . . . . . 101
Instrument panel . . . . . . . . . . . . . . . . . . . . . . . . 100
Instruments . . . . . . . . . . . . . . . . . . . . . . . . . . . . 102
Control lamps . . . . . . . . . . . . . . . . . . . . . . . . . . . 107
Communications and multimedia . . . . . . . . . . . 108
Steering wheel controls* . . . . . . . . . . . . . . . . . . 108
Multimedia . . . . . . . . . . . . . . . . . . . . . . . . . . . . . 110
Three button unit in headliner . . . . . . . . . . . . . . 110
Opening and closing . . . . . . . . . . . . . . . . . . . . . 112
Vehicle key set . . . . . . . . . . . . . . . . . . . . . . . . . . 112
Central locking and locking system . . . . . . . . . 114 Doors . . . . . . . . . . . . . . . . . . . . . . . . . . . . . . . . . . 121
Sliding doors . . . . . . . . . . . . . . . . . . . . . . . . . . . 122
Rear lid . . . . . . . . . . . . . . . . . . . . . . . . . . . . . . . . 124
Controls for the windows . . . . . . . . . . . . . . . . . . 127
Panoramic sliding sunroof* . . . . . . . . . . . . . . . . 129
Lights and visibility
. . . . . . . . . . . . . . . . . . . . . . 130
Lights . . . . . . . . . . . . . . . . . . . . . . . . . . . . . . . . . 130
Visibility . . . . . . . . . . . . . . . . . . . . . . . . . . . . . . . 136
Windscreen wiper and window wiper sys-
tems . . . . . . . . . . . . . . . . . . . . . . . . . . . . . . . . . . 137
R
ear vision mirror . . . . . . . . . . . . . . . . . . . . . . . . 140
Seats and head restraints . . . . . . . . . . . . . . . . . 143
Adjusting the seats and headrests . . . . . . . . . . 143
Seat functions . . . . . . . . . . . . . . . . . . . . . . . . . . 147
Transport and practical equipment . . . . . . . . . 152
Transporting objects . . . . . . . . . . . . . . . . . . . . . 152
Luggage compartment . . . . . . . . . . . . . . . . . . . . 154
Roof carrier* . . . . . . . . . . . . . . . . . . . . . . . . . . . . 164
Storage compartments . . . . . . . . . . . . . . . . . . . 166
Drink holders . . . . . . . . . . . . . . . . . . . . . . . . . . . 171
Ashtray and cigarette lighter* . . . . . . . . . . . . . . 172
Power sockets . . . . . . . . . . . . . . . . . . . . . . . . . . . 173
Air conditioning . . . . . . . . . . . . . . . . . . . . . . . . . 176
Air conditioning . . . . . . . . . . . . . . . . . . . . . . . . . 176
Auxiliary heater* (additional heater) . . . . . . . . 180
Driving . . . . . . . . . . . . . . . . . . . . . . . . . . . . . . . . 183
Stopping and starting the engine . . . . . . . . . . . 183
Braking and parking . . . . . . . . . . . . . . . . . . . . . 188
Gearbox . . . . . . . . . . . . . . . . . . . . . . . . . . . . . . . . 193
Address . . . . . . . . . . . . . . . . . . . . . . . . . . . . . . . . 198
Run-in and economical driving . . . . . . . . . . . . . 199
Engine management and exhaust gas purifica-
tion syst
em . . . . . . . . . . . . . . . . . . . . . . . . . . . . . 202
Driving tips . . . . . . . . . . . . . . . . . . . . . . . . . . . . . 204
Driver assistance systems . . . . . . . . . . . . . . . . . 205
Braking and stability systems . . . . . . . . . . . . . . 205
Start assist systems . . . . . . . . . . . . . . . . . . . . . . 208
Parking distance warning system* . . . . . . . . . . 211 5
Page 21 of 324
The essentials
Airbags Fr ont
Airb
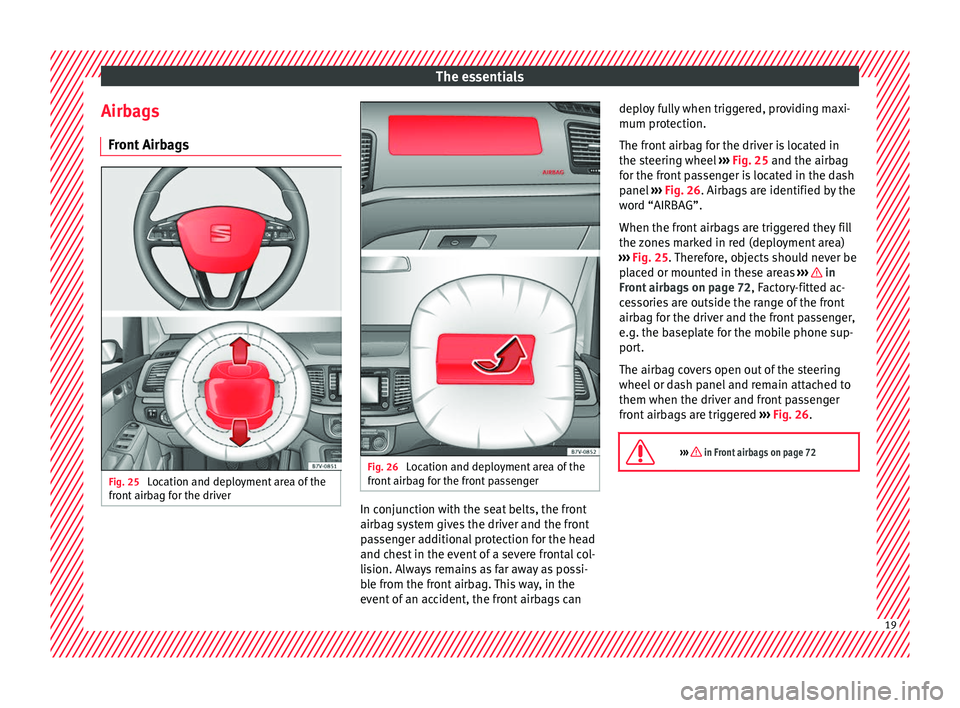
agsFig. 25
Location and deployment area of the
fr ont
airb
ag for the driver Fig. 26
Location and deployment area of the
fr ont
airb
ag for the front passenger In conjunction with the seat belts, the front
airb
ag sy
s
tem gives the driver and the front
passenger additional protection for the head
and chest in the event of a severe frontal col-
lision. Always remains as far away as possi-
ble from the front airbag. This way, in the
event of an accident, the front airbags can deploy fully when triggered, providing maxi-
mum protection.
The fr
ont airbag for the driver is located in
the steering wheel ››› Fig. 25 and the airbag
for the front passenger is located in the dash
panel ››› Fig. 26. Airbags are identified by the
word “AIRBAG”.
When the front airbags are triggered they fill
the zones marked in red (deployment area)
››› Fig. 25. Therefore, objects should never be
placed or mounted in these areas ››› in
Fr ont
airb
ags on page 72, Factory-fitted ac-
cessories are outside the range of the front
airbag for the driver and the front passenger,
e.g. the baseplate for the mobile phone sup-
port.
The airbag covers open out of the steering
wheel or dash panel and remain attached to
them when the driver and front passenger
front airbags are triggered ››› Fig. 26.
››› in Front airbags on page 72 19
Page 22 of 324
The essentials
Disconnecting the passenger front air-
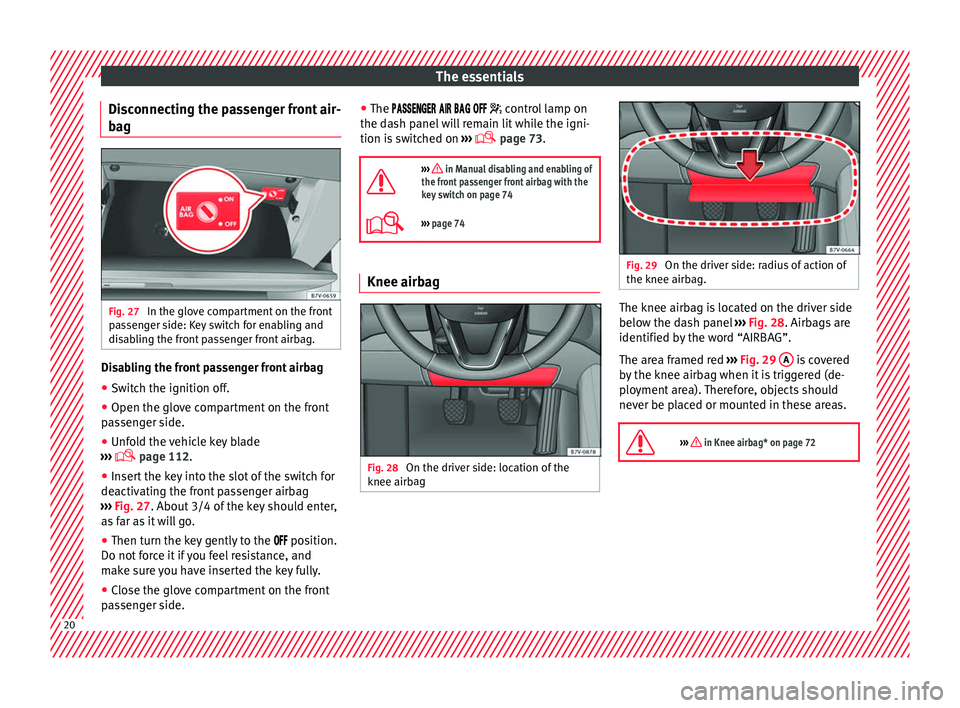
b ag Fig. 27
In the glove compartment on the front
p a
s
senger side: Key switch for enabling and
disabling the front passenger front airbag. Disabling the front passenger front airbag
● Switch the ignition off.
● Open the glove compartment on the front
p a
s
senger side.
● Unfold the vehicle key blade
›››
page 112.
● Insert the key into the slot of the switch for
deactivatin
g the front passenger airbag
››› Fig. 27. About 3/4 of the key should enter,
as far as it will go.
● Then turn the key gently to the position.
Do not
force it if you feel resistance, and
make sure you have inserted the key fully.
● Close the glove compartment on the front
pas
senger side. ●
The
control lamp on
the dash panel will remain lit while the igni-
tion is switched on ›››
page 73.
››› in Manual disabling and enabling of
the front passenger front airbag with the
key switch on page 74
››› page 74 Knee airbag
Fig. 28
On the driver side: location of the
knee airb ag Fig. 29
On the driver side: radius of action of
the knee airbag. The knee airbag is located on the driver side
belo
w the d
a
sh panel ››› Fig. 28. Airbags are
identified by the word “AIRBAG”.
The area framed red ››› Fig. 29 A is covered
b y
the knee airb
ag when it is triggered (de-
ployment area). Therefore, objects should
never be placed or mounted in these areas.
››› in Knee airbag* on page 72 20
Page 23 of 324
The essentials
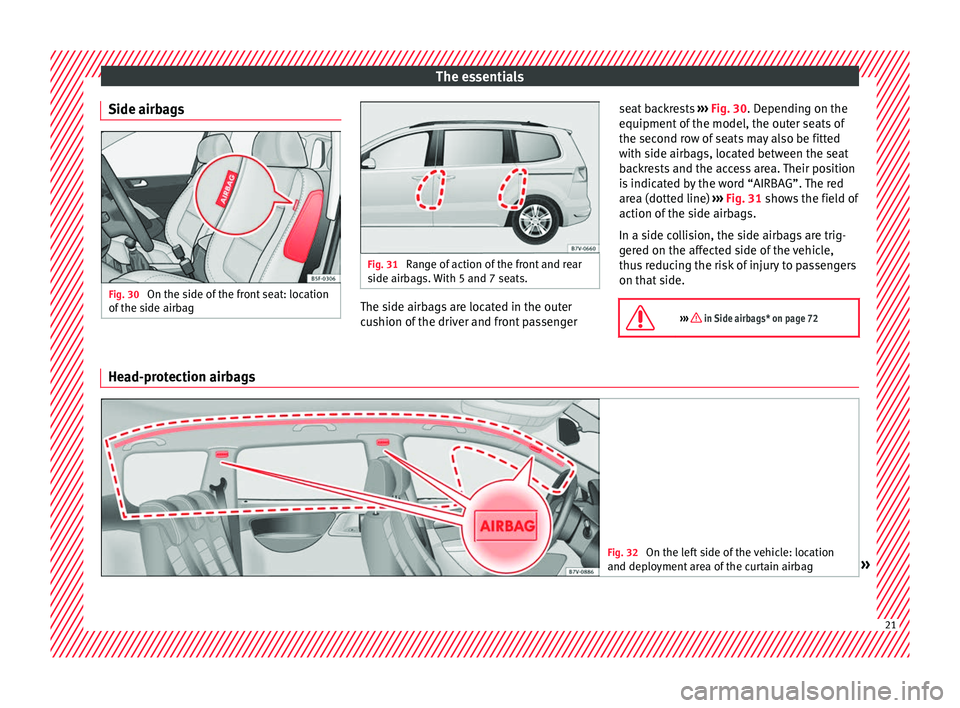
Side airbags Fig. 30
On the side of the front seat: location
of the s
ide airb
ag Fig. 31
Range of action of the front and rear
side airb ag
s. With 5 and 7 seats. The side airbags are located in the outer
c
u
shion of
the driver and front passenger seat backrests
›››
Fig. 30. Depending on the
equipment of the model, the outer seats of
the second row of seats may also be fitted
with side airbags, located between the seat
backrests and the access area. Their position
is indicated by the word “AIRBAG”. The red
area (dotted line) ››› Fig. 31 shows the field of
action of the side airbags.
In a side collision, the side airbags are trig-
gered on the affected side of the vehicle,
thus reducing the risk of injury to passengers
on that side.
››› in Side airbags* on page 72 Head-protection airbags
Fig. 32
On the left side of the vehicle: location
and deplo yment
area of the curtain airbag » 21
Page 24 of 324
The essentials
Fig. 33
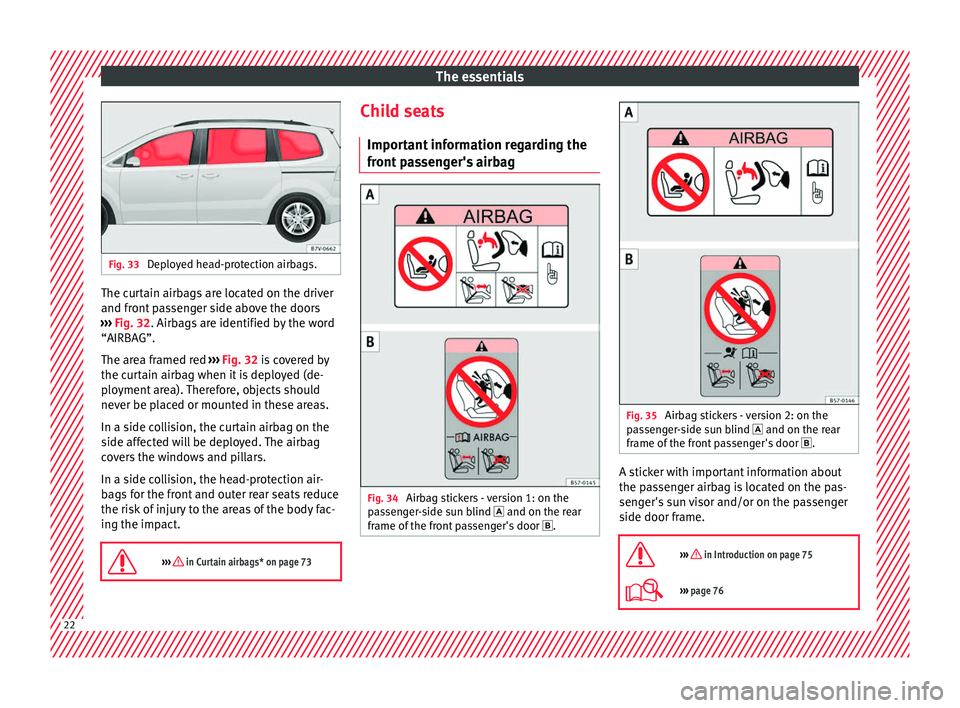
Deployed head-protection airbags. The curtain airbags are located on the driver
and fr
ont
p
assenger side above the doors
››› Fig. 32. Airbags are identified by the word
“AIRBAG”.
The area framed red ››› Fig. 32 is covered by
the curtain airbag when it is deployed (de-
ployment area). Therefore, objects should
never be placed or mounted in these areas.
In a side collision, the curtain airbag on the
side affected will be deployed. The airbag
covers the windows and pillars.
In a side collision, the head-protection air-
bags for the front and outer rear seats reduce
the risk of injury to the areas of the body fac-
ing the impact.
››› in Curtain airbags* on page 73 Child seats
Impor t
ant
information regarding the
front passenger's airbag Fig. 34
Airbag stickers - version 1: on the
p a
s
senger-side sun blind and on the rear
frame of the front passenger's door . Fig. 35
Airbag stickers - version 2: on the
p a
s
senger-side sun blind and on the rear
frame of the front passenger's door . A sticker with important information about
the p
a
s
senger airbag is located on the pas-
senger's sun visor and/or on the passenger
side door frame.
››› in Introduction on page 75
››› page 76 22
Page 36 of 324
The essentials
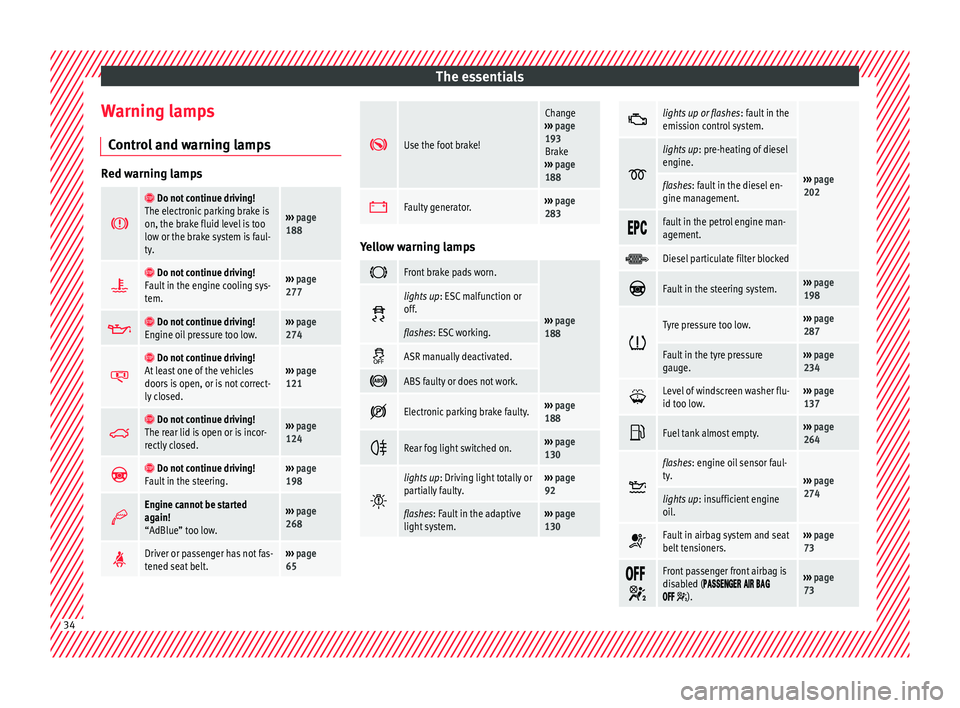
Warning lamps C ontr
o
l and warning lamps Red warning lamps
Do not continue driving!
The electronic parking brake is
on, the brake fluid level is too
low or the brake system is faul-
ty.
››› page
188
Do not continue driving!
Fault in the engine cooling sys-
tem.››› page
277
Do not continue driving!
Engine oil pressure too low.››› page
274
Do not continue driving!
At least one of the vehicles
doors is open, or is not correct-
ly closed.››› page
121
Do not continue driving!
The rear lid is open or is incor-
rectly closed.››› page
124
Do not continue driving!
Fault in the steering.››› page
198
Engine cannot be started
again!
“AdBlue” too low.›››
page
268
Driver or passenger has not fas-
tened seat belt.›››
page
65
Use the foot brake!
Change
››› page
193
Brake
››› page
188
Faulty generator.›››
page
283 Yellow warning lamps
Front brake pads worn.
›››
page
188
lights up
: ESC malfunction or
off.
flashes: ESC working.
ASR manually deactivated.
ABS faulty or does not work.
Electronic parking brake faulty.›››
page
188
Rear fog light switched on.›››
page
130
lights up
: Driving light totally or
partially faulty.››› page
92
flashes: Fault in the adaptive
light system.››› page
130
lights up or flashes
: fault in the
emission control system.
››› page
202
lights up
: pre-heating of diesel
engine.
flashes: fault in the diesel en-
gine management.
fault in the petrol engine man-
agement.
Diesel particulate filter blocked
Fault in the steering system.›››
page
198
Tyre pressure too low.›››
page
287
Fault in the tyre pressure
gauge.››› page
234
Level of windscreen washer flu-
id too low.›››
page
137
Fuel tank almost empty.›››
page
264
flashes: engine oil sensor faul-
ty.
›››
page
274
lights up : insufficient engine
oil.
Fault in airbag system and seat
belt tensioners.›››
page
73
Front passenger front airbag is
disabled (
).
››› page
73 34
Page 60 of 324
Safety
– Ob
ser
ve traffic laws and speed limits.
– Always reduce your speed as appropriate
for ro
ad, traffic and weather conditions.
– When travelling long distances, take
break
s regularly - at least every two hours.
– If possible, avoid driving when you are tired
or stre
ssed. WARNING
When driving safety is impaired during a trip,
the risk of
injury and accidents increases. Safety equipment
Never put your safety or the safety of your
p
a
s
sengers in danger. In the event of an acci-
dent, the safety equipment may reduce the
risk of injury. The following points cover part
of the safety equipment in your SEAT:
● three-point seat belts,
● belt tension limiters for the front and rear
side seats,
● B
elt tensioners for the front seats,
● front airbags,
● knee airbags,
● side airbags in the front seat backrests,
● side airbags in the rear seat backrests*,
● head-protection airbags, ●
“ISOFIX” anchor points f
or child seats in
the rear side seats with the “ISOFIX” system,
● height-adjustable front head restraints,
● belt height adjustment for the front seats,
● rear head restraints with in-use position
and non-use pos
ition,
● adjustable steering column.
The safety
equipment mentioned above
works together to provide you and your pas-
sengers with the best possible protection in
the event of an accident. However, these
safety systems can only be effective if you
and your passengers are sitting in a correct
position and use this equipment properly.
Safety is everyone's business! Correct position of the vehicle
occup
ants
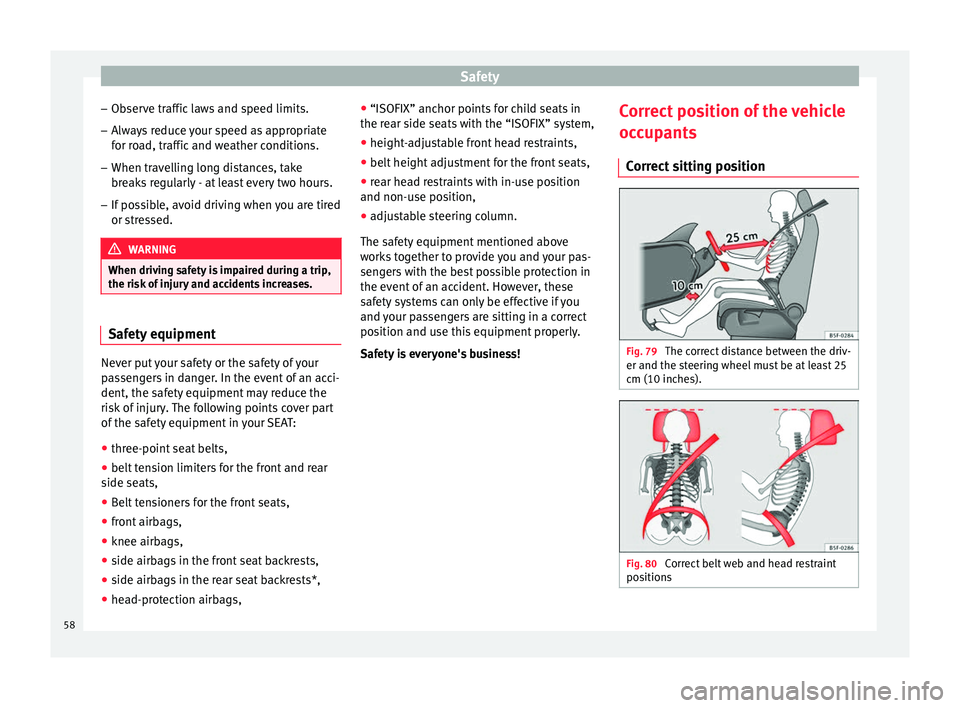
Correct sitting position Fig. 79
The correct distance between the driv-
er and the s t
eerin
g wheel must be at least 25
cm (10 inches). Fig. 80
Correct belt web and head restraint
po s
ition
s 58
Page 61 of 324
Safe driving
The correct sitting positions for the driver and
p a
s
sengers are shown below.
If your physical constitution prevents you
from maintaining the correct sitting position,
contact a specialised workshop for help with
any special devices. The seat belt and airbag
can only provide optimum protection if a cor-
rect sitting position is adopted. SEAT recom-
mends taking your car in for technical serv-
ice.
For your own safety and to reduce the risk of
injury in the event of an accident or sudden
braking or manoeuvre, SEAT recommend the
following positions:
Valid for all vehicle occupants:
● Adjust the head restraint so that its upper
edge is
at the same level as the top of your
head, or as close as possible to the same lev-
el as the top of your head and under no cir-
cumstances below eye level. Keep the back
of your neck as close as possible to the head
restraint ››› Fig. 79 and ››› Fig. 80.
● Short people must lower the head restraint
compl
etely, even if your head is below its up-
per edge.
● Tall people must raise the head restraint
compl
etely.
● Adjust the seat backrest to an upright posi-
tion so that
your back rests completely
against it. ●
Alwa
ys keep your feet in the footwell while
the vehicle is in motion.
● Adjust and fasten your seat belt correctly
›››
page 65.
Also valid for the driver:
● Adjust the steering wheel so that there is a
dist
ance of at least 25 cm (10 inches) be-
tween it and your chest ››› Fig. 79 and so that
you can hold the steering wheel with both
hands on the outside of the ring at the 9
o'clock and 3 o'clock positions with your
arms slightly bent.
● The adjusted steering wheel must face your
ches
t and not your face.
● Adjust the driver seat forwards or back-
ward
s so that you are able to press the accel-
erator, brake and clutch pedals to the floor
with your knees slightly angled and the dis-
tance between your knees and the dash pan-
el is at least 10 cm (4 inches) ››› Fig. 79.
● Adjust the height of the driver seat so that
you can e
asily reach the top of the steering
wheel.
● Keep both feet in the footwell so that you
have the
vehicle under control at all times.
Also valid for the front passenger:
● Move the front passenger seat back as far
as po
ssible for optimum protection should
the airbag deploy. Adjusting the steering wheel position Read the additional information carefully
›› ›
page 18. WARNING
Incorrect use of the steering wheel adjust-
ment f u
nction and an incorrect adjustment of
the steering wheel can result in severe or fa-
tal injury.
● After adjusting the steering column, push
the lever ›
›› Fig. 24
1 firmly upwards to
ens ur
e the steering wheel does not acciden-
tally change position while driving.
● Never adjust the steering wheel while the
vehicl
e is in motion. If you need to adjust the
steering wheel while the vehicle is in motion,
stop safely and make the proper adjustment.
● The adjusted steering wheel should be fac-
ing y
our chest and not your face so as not to
hinder the driver's front airbag protection in
the event of an accident.
● When driving, always hold the steering
wheel with both h
ands on the outside of the
ring at the 9 o'clock and 3 o'clock positions
to reduce injuries when the driver's front air-
bag deploys.
● Never hold the steering wheel at the 12
o'clock
position or in any other manner (e.g.
in the centre of the steering wheel). In such
cases, if the driver's airbag deploys, you may
sustain injuries to your arms, hands and
head. 59
Technical data
Advice
Operation
Emergencies
Safety
Page 62 of 324
Safety
Danger of injuries due to an incorrect
s ittin
g po
sitionNumber of seats
Dependin
g on the equipment,
your vehicle
has a total of five or seven seats. Each seat is
equipped with a seat belt.
5 seats
Seats in the frontSeats in thesecond rowSeats in the third row
23–
7 seats
Seats in the frontSeats in thesecond rowSeats in the third row
232 If the seat belts are worn incorrectly or not at
al
l, the ri
sk
of severe injuries increases. Seat
belts can provide optimal protection only if
the belt web is properly worn. Being seated
in an incorrect position means the seat belt
cannot offer its full protection. This could re-
sult in severe and even fatal injuries. The risk
of severe or fatal injuries is especially height-
ened when a deploying airbag strikes a vehi-
cle occupant who has assumed an incorrect
sitting position. The driver is responsible for
all passengers in the vehicle, particularly
children. The following list shows just some examples
of incorr
ect sitting positions which can be
dangerous to all vehicle occupants.
Whenever the vehicle is in motion:
● Never stand in the vehicle.
● Never stand on the seats.
● Never kneel on the seats.
● Never tilt your seat backrest too far to the
rear
.
● Never lean against the dash panel.
● Never lie on the rear bench.
● Never sit on the front edge of a seat.
● Never sit sideways.
● Never lean out of a window.
● Never put your feet out of a window.
● Never put your feet on the dash panel.
● Never put your feet on the surface of a seat
or seat b
ackrest.
● Never travel in a footwell.
● Never sit on the armrests.
● Never travel on a seat without wearing the
seat belt
.
● Never carry any person in the luggage com-
partment
. WARNING
An incorrect sitting position in the vehicle
can l e
ad to severe injuries or death in the event of sudden braking or manoeuvres, colli-
sion or ac
c
idents or if the airbag deploys.
● Before the vehicle moves, assume the prop-
er sitting po
sition and maintain it throughout
the trip. This also includes fastening the seat
belt.
● Never transport more people than there are
seats
with a seat belt available in the vehicle.
● Children must always be protected with an
appro
ved child restraint system suited to
their height and weight ››› page 75.
● Always keep your feet in the footwell while
the vehic
le is in motion. Never, for example,
put your feet on the surface of a seat or on
the dash panel and never put them out of a
window. Otherwise the airbag and seat belt
offer insufficient protection and the risk of in-
jury in the event of an accident is increased. WARNING
Before every trip, adjust the seat, the seat
belt and the he a
d restraints and instruct your
passengers to fasten their seat belts proper-
ly.
● Move the front passenger seat back as far
as po
ssible.
● Adjust the driver seat so that there is a dis-
tance of
at least 25 cm (10 inches) between
the centre of your chest and the hub of the
steering wheel. Adjust the driver seat so that
you are able to press the accelerator, brake
and clutch pedals to the floor with your knees
slightly angled and that the distance 60