oil level Seat Alhambra 2018 Owner's Manual
[x] Cancel search | Manufacturer: SEAT, Model Year: 2018, Model line: Alhambra, Model: Seat Alhambra 2018Pages: 324, PDF Size: 7.04 MB
Page 8 of 324
Table of Contents
Park Assist system* (Park Assist) . . . . . . . . . . . 214
Rear assist* (Rear View Camera) . . . . . . . . . . . . 217
Cruise control* (Cruise control system -
C C
S)
. . . . . . . . . . . . . . . . . . . . . . . . . . . . . . . . . . . 221
Lane Assist system* . . . . . . . . . . . . . . . . . . . . . . 222
Blind spot detector (BSD) with rear cross traffic
alert
(RCTA) . . . . . . . . . . . . . . . . . . . . . . . . . . . . . 225
Traffic signal detection (Sign Assist)* . . . . . . . . 230
Tiredness detection (recommendation to take
a break)
. . . . . . . . . . . . . . . . . . . . . . . . . . . . . . . . 232
Dynamic Chassis control (DCC)* . . . . . . . . . . . . 233
Tyre monitoring systems . . . . . . . . . . . . . . . . . . 234
Towing bracket device . . . . . . . . . . . . . . . . . . . . 237
Driving with a trailer . . . . . . . . . . . . . . . . . . . . . . 237
Advice . . . . . . . . . . . . . . . . . . . . . . . . . . . . . . . . 247
Care and maintenance . . . . . . . . . . . . . . . . . . . . 247
Accessories, replacement of parts and modifi-
cations
. . . . . . . . . . . . . . . . . . . . . . . . . . . . . . . . 247
Caring for and cleaning the vehicle exterior . . . 253
Caring for and cleaning the vehicle interior . . . 259
Notes for the user . . . . . . . . . . . . . . . . . . . . . . . . 263
Checking and refilling levels . . . . . . . . . . . . . . . 264
Filling the tank . . . . . . . . . . . . . . . . . . . . . . . . . . 264
Fuel . . . . . . . . . . . . . . . . . . . . . . . . . . . . . . . . . . . 267
Selective catalytic reduction* (AdBlue) . . . . . . 268
Working in the engine compartment . . . . . . . . 271
Engine oil . . . . . . . . . . . . . . . . . . . . . . . . . . . . . . 274
Engine coolant . . . . . . . . . . . . . . . . . . . . . . . . . . 277
Brake fluid . . . . . . . . . . . . . . . . . . . . . . . . . . . . . 281
Windscreen washer reservoir . . . . . . . . . . . . . . 283
Vehicle battery . . . . . . . . . . . . . . . . . . . . . . . . . . 283
Wheels and tyres . . . . . . . . . . . . . . . . . . . . . . . . 287
Tyres . . . . . . . . . . . . . . . . . . . . . . . . . . . . . . . . . . 287
Winter service . . . . . . . . . . . . . . . . . . . . . . . . . . . 295 Technical data
. . . . . . . . . . . . . . . . . . . . . . . . 297
Technical features . . . . . . . . . . . . . . . . . . . . . . . 297
Important information . . . . . . . . . . . . . . . . . . . . 297
Towing a trailer . . . . . . . . . . . . . . . . . . . . . . . . . . 298
Wheels . . . . . . . . . . . . . . . . . . . . . . . . . . . . . . . . 299
Engine data . . . . . . . . . . . . . . . . . . . . . . . . . . . . . 300
Dimensions . . . . . . . . . . . . . . . . . . . . . . . . . . . . . 305
Index . . . . . . . . . . . . . . . . . . . . . . . . . . . . . . . . . 307
6
Page 36 of 324
The essentials
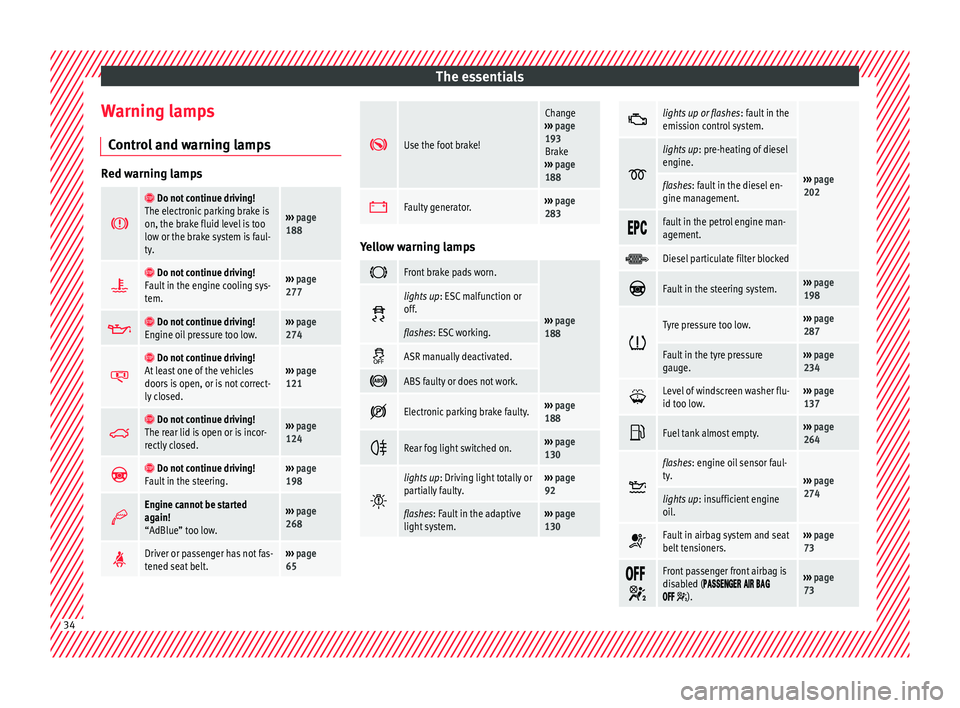
Warning lamps C ontr
o
l and warning lamps Red warning lamps
Do not continue driving!
The electronic parking brake is
on, the brake fluid level is too
low or the brake system is faul-
ty.
››› page
188
Do not continue driving!
Fault in the engine cooling sys-
tem.››› page
277
Do not continue driving!
Engine oil pressure too low.››› page
274
Do not continue driving!
At least one of the vehicles
doors is open, or is not correct-
ly closed.››› page
121
Do not continue driving!
The rear lid is open or is incor-
rectly closed.››› page
124
Do not continue driving!
Fault in the steering.››› page
198
Engine cannot be started
again!
“AdBlue” too low.›››
page
268
Driver or passenger has not fas-
tened seat belt.›››
page
65
Use the foot brake!
Change
››› page
193
Brake
››› page
188
Faulty generator.›››
page
283 Yellow warning lamps
Front brake pads worn.
›››
page
188
lights up
: ESC malfunction or
off.
flashes: ESC working.
ASR manually deactivated.
ABS faulty or does not work.
Electronic parking brake faulty.›››
page
188
Rear fog light switched on.›››
page
130
lights up
: Driving light totally or
partially faulty.››› page
92
flashes: Fault in the adaptive
light system.››› page
130
lights up or flashes
: fault in the
emission control system.
››› page
202
lights up
: pre-heating of diesel
engine.
flashes: fault in the diesel en-
gine management.
fault in the petrol engine man-
agement.
Diesel particulate filter blocked
Fault in the steering system.›››
page
198
Tyre pressure too low.›››
page
287
Fault in the tyre pressure
gauge.››› page
234
Level of windscreen washer flu-
id too low.›››
page
137
Fuel tank almost empty.›››
page
264
flashes: engine oil sensor faul-
ty.
›››
page
274
lights up : insufficient engine
oil.
Fault in airbag system and seat
belt tensioners.›››
page
73
Front passenger front airbag is
disabled (
).
››› page
73 34
Page 42 of 324
The essentials
Fluid Level control Fi l
lin
g capacities
Tank level
73 litres. 8 litre reserve
Capacity of the windscreen washer fluid con-
tainer
Versions without headlight
washer system3.5 litres
Versions with headlight washer
system6 litres Fuel
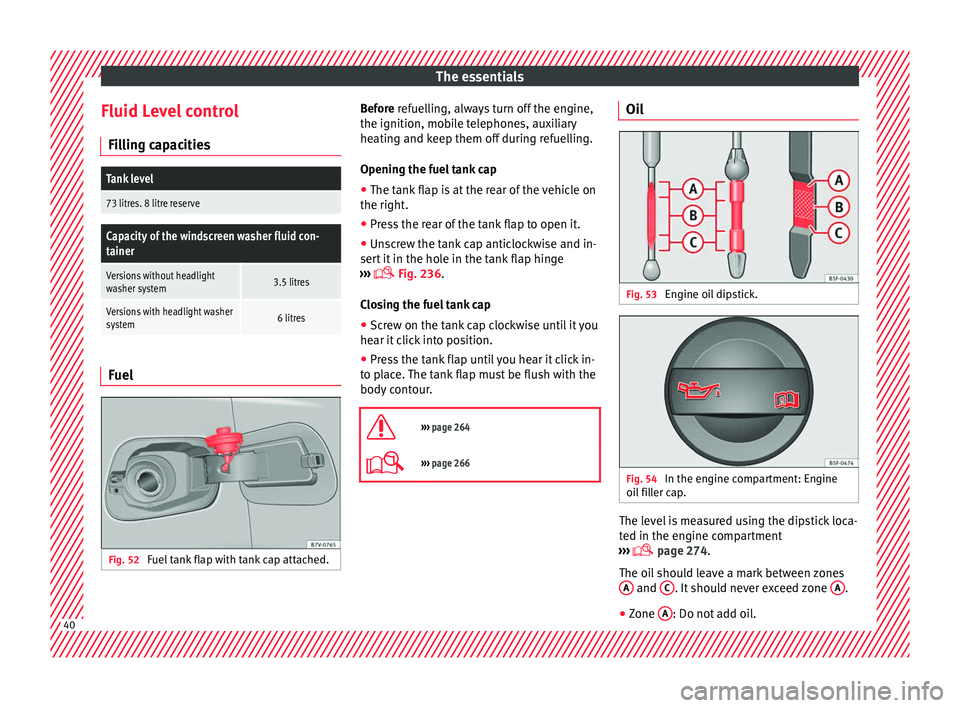
Fig. 52
Fuel tank flap with tank cap attached. Before r
efuelling, always turn off the engine,
the ignition, mo b
ile telephones, auxiliary
heating and keep them off during refuelling.
Opening the fuel tank cap
● The tank flap is at the rear of the vehicle on
the right.
● Pre
ss the rear of the tank flap to open it.
● Unscrew the tank cap anticlockwise and in-
sert it
in the hole in the tank flap hinge
››› Fig. 236.
Closing the fuel tank cap ● Screw on the tank cap clockwise until it you
hear it c
lick into position.
● Press the tank flap until you hear it click in-
to pl
ace. The tank flap must be flush with the
body contour.
››› page 264
››› page 266 Oil
Fig. 53
Engine oil dipstick. Fig. 54
In the engine compartment: Engine
oi l
fi
ller cap. The level is measured using the dipstick loca-
t
ed in the en
gine c
ompartment
››› page 274.
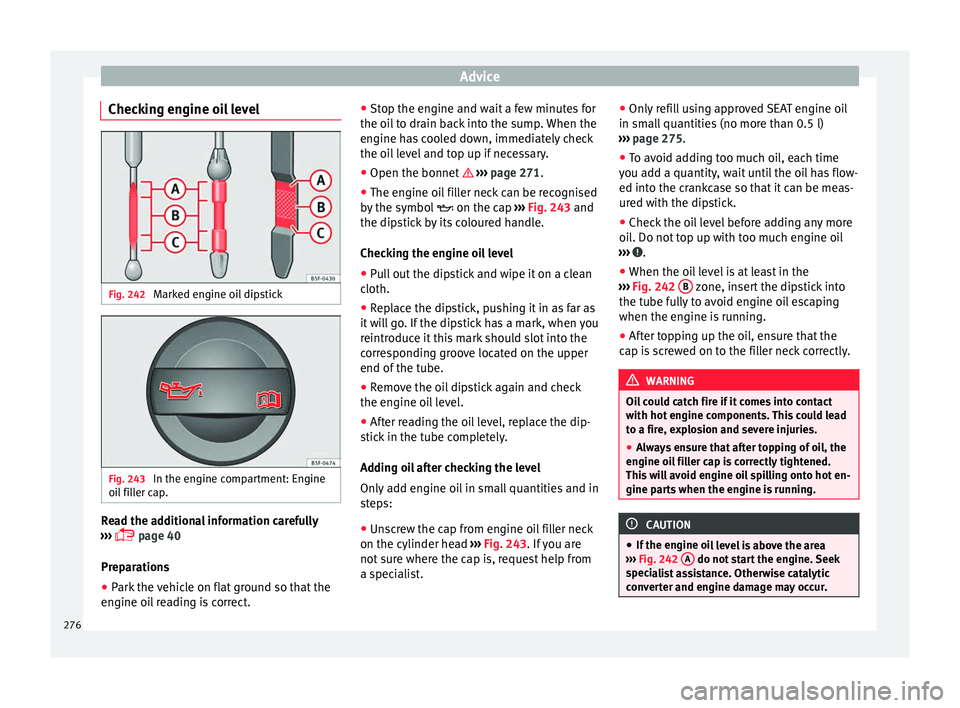
The oil should leave a mark between zones A and
C . It should never exceed zone
A .
● Zone A : Do not add oil.
40
Page 43 of 324
The essentials
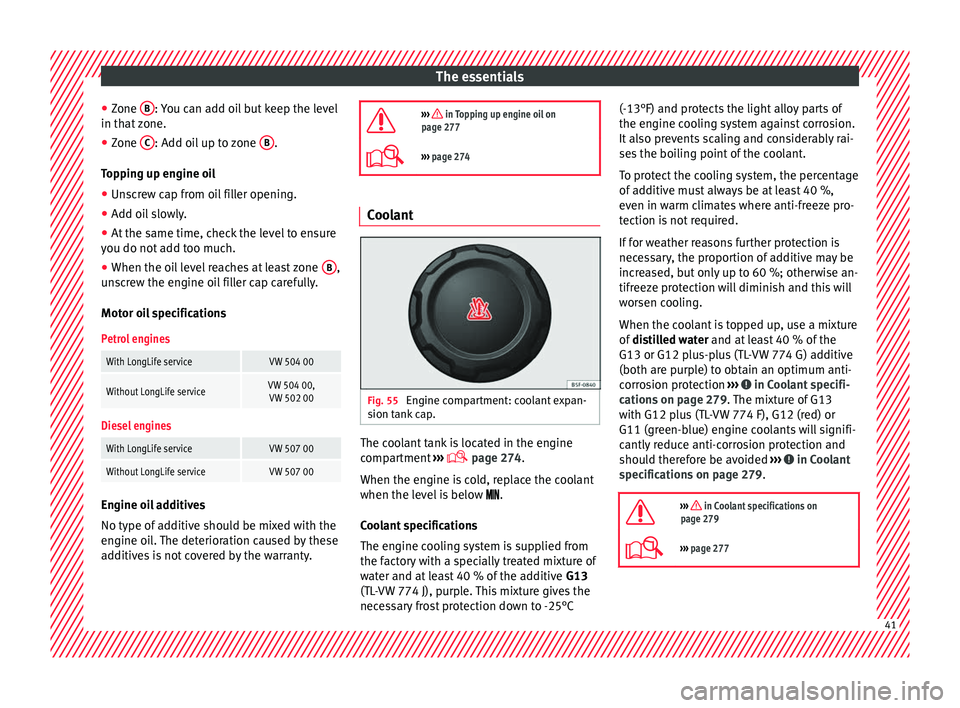
● Zone B : You can add oil but keep the level
in th at
zone.
● Zone C : Add oil up to zone
B .
T op
pin
g up engine oil
● Unscrew cap from oil filler opening.
● Add oil slowly.
● At the same time, check the level to ensure
you do not a
dd too much.
● When the oil level reaches at least zone B ,
u n
s
crew the engine oil filler cap carefully.
Motor oil specifications
Petrol engines
With LongLife serviceVW 504 00
Without LongLife serviceVW 504 00, VW 502 00
Diesel engines
With LongLife serviceVW 507 00
Without LongLife serviceVW 507 00 Engine oil additives
No type of
a
d
ditive should be mixed with the
engine oil. The deterioration caused by these
additives is not covered by the warranty.
››› in Topping up engine oil on
page 277
››› page 274 Coolant
Fig. 55
Engine compartment: coolant expan-
s ion t
ank
cap. The coolant tank is located in the engine
c
omp
ar
tment ›››
page 274.
When the engine is cold, replace the coolant
when the level is below .
Coolant specifications
The engine cooling system is supplied from
the factory with a specially treated mixture of
water and at least 40 % of the additive G13
(TL-VW 774 J), purple. This mixture gives the
necessary frost protection down to -25°C (-13°F) and protects the light alloy parts of
the engine coo
ling system against corrosion.
It also prevents scaling and considerably rai-
ses the boiling point of the coolant.
To protect the cooling system, the percentage
of additive must always be at least 40 %,
even in warm climates where anti-freeze pro-
tection is not required.
If for weather reasons further protection is
necessary, the proportion of additive may be
increased, but only up to 60 %; otherwise an-
tifreeze protection will diminish and this will
worsen cooling.
When the coolant is topped up, use a mixture
of distilled water and at least 40 % of the
G13 or G12 plus-plus (TL-VW 774 G) additive
(both are purple) to obtain an optimum anti-
corrosion protection ››› in Coolant specifi-
c ation
s on p
age 279. The mixture of G13
with G12 plus (TL-VW 774 F), G12 (red) or
G11 (green-blue) engine coolants will signifi-
cantly reduce anti-corrosion protection and
should therefore be avoided ››› in Coolant
s pec
ific
ations on page 279.
››› in Coolant specifications on
page 279
››› page 277 41
Page 267 of 324
Checking and refilling levels
●
Never ent er the
vehicle while refuelling. If it
is absolutely necessary to enter, close the
door and touch a metal surface before touch-
ing the filler nozzle again. This will prevent
the generation of static electricity. Sparks
could cause a fire when refuelling.
● Never handle fuel close to flames, sparks or
obj
ects with slow combustion (e.g. ciga-
rettes).
● Avoid static electricity and electro-magnet-
ic ra
diation when refuelling.
● Observe the safety regulations of the serv-
ice st
ation.
● Never spill fuel on the vehicle or in the lug-
gage c
ompartment. WARNING
For safety reasons, SEAT does not recommend
carr y
ing a spare fuel canister in the vehicle.
Fuel could be spilled and catch fire, above all
in case of an accident and this applies to a
full container as well as empty containers.
This could lead to explosions, fires and inju-
ries.
● Observe the following if you exceptionally
have t
o carry fuel in a canister:
– Never place a fuel container to fill it in-
side the vehicle or on the vehicle, for ex-
ample, in the boot or on the hatch. Filling
in these circumstances could create an
electrostatic charge and spark that could
ignite fuel fumes. –
Alw a
ys place the canister on the ground
to fill it.
– Insert the fuel nozzle into the neck of the
canister as far as possible.
– If you are using a metal fuel canister, the
nozzle must always touch the canister
while it is being filled to avoid static elec-
tricity.
– Follow the legal requirements for the use,
storage and transport of spare fuel canis-
ters.
– Insure that the fuel container complies
with manufacturing standards, for exam-
ple, ANSI or ASTM F852-86. CAUTION
● Alw a
ys remove any fuel spilled on the vehi-
cle paintwork immediately to avoid damage
to the wheel housing, the tyre and vehicle
paintwork.
● Refuelling a petrol engine with diesel or a
diesel en
gine with petrol can cause serious
engine and fuel system damage; the resulting
malfunctions are not covered by the SEAT
warranty. If you refuel with the wrong type of
fuel, never start the engine. This applies to
even the smallest amount of the wrong fuel.
Seek specialist assistance. With the engine
running, the composition of the wrong fuel
could significantly damage the fuel system
and the engine itself.
● In vehicles with a diesel engine, under no
circ
umstances should you refuel or drive with petrol, kerosene, heating oil or any other
type of
diff
erent fuel. Other types of fuels
could cause serious damage to the engine
and to the fuel supply system and the result-
ing problems are not covered by the SEAT
warranty. For the sake of the environment
Fuels can contaminate the environment. Col-
l ect an
y spilt service fluids and allow a pro-
fessional to dispose of them. Note
There is no emergency mechanism for the
manua l
release of the fuel tank flap. If neces-
sary, request assistance from specialised per-
sonnel. 265
Technical data
Advice
Operation
Emergencies
Safety
Page 275 of 324
Checking and refilling levels
●
If it i
s necessary to work on the fuel system
or the electrical system, please follow the in-
structions below:
–Always disconnect the vehicle battery.
When disconnecting the battery, ensure
that the vehicle is unlocked otherwise
the anti-theft alarm will be triggered.
– Never work close to heaters, heat sources
or places exposed to flames or sparks.
● Always keep a recently serviced and per-
fectly w
orking fire extinguisher close by.
● Never cover the engine with additional in-
sul
ating materials such as a blanket. Risk of
fire! CAUTION
When refilling or changing service liquids,
ens ur
e that you put the liquids into the right
tank. Making a mistake when refilling could
cause serious malfunctions and damage the
engine! For the sake of the environment
Service fluids leaks are harmful to the envi-
ronment . F
or this reason you should make
regular checks on the ground underneath
your vehicle. Take the vehicle to a specialised
workshop to be checked if you see stains, oil
or other fluids on the ground. Collect any
spilt service fluids and allow a professional to
dispose of them. Opening and closing the bonnet
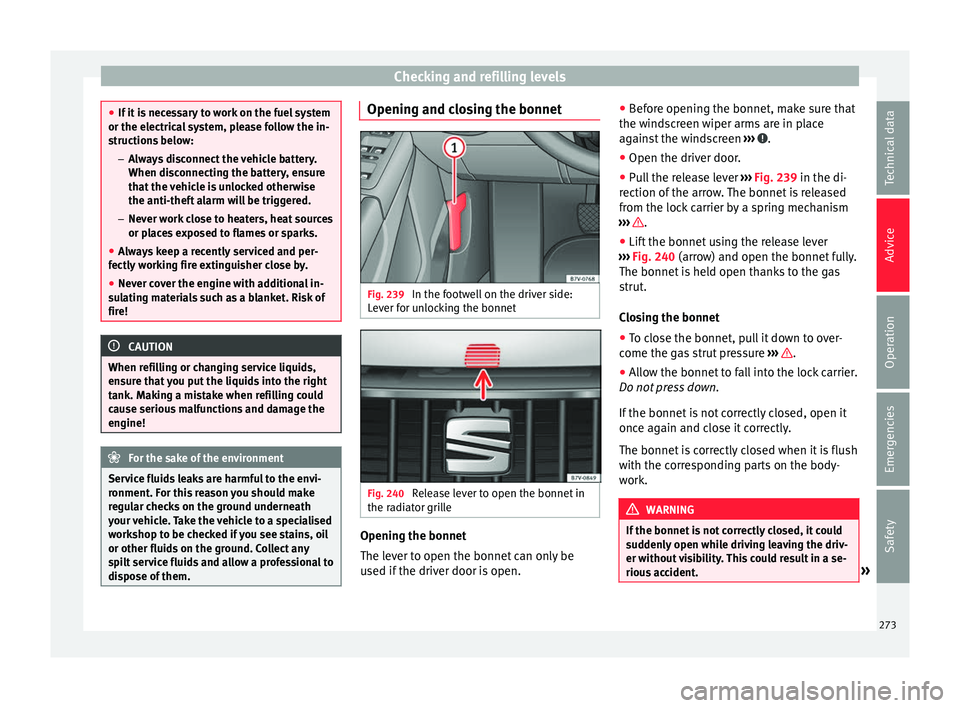
Fig. 239
In the footwell on the driver side:
L ev
er f
or unlocking the bonnet Fig. 240
Release lever to open the bonnet in
the r a
di
ator grille Opening the bonnet
The l
ev
er t
o open the bonnet can only be
used if the driver door is open. ●
Befor
e opening the bonnet, make sure that
the windscreen wiper arms are in place
against the windscreen ››› .
● Open the driver door.
● Pull the release lever ››
›
Fig. 239 in the di-
rection of the arrow. The bonnet is released
from the lock carrier by a spring mechanism
››› .
● Lift the bonnet using the release lever
› ›
›
Fig. 240 (arrow) and open the bonnet fully.
The bonnet is held open thanks to the gas
strut.
Closing the bonnet
● To close the bonnet, pull it down to over-
come the ga
s strut pressure ››› .
● Allow the bonnet to fall into the lock carrier.
Do not pr
e
ss down.
If the bonnet is not correctly closed, open it
once again and close it correctly.
The bonnet is correctly closed when it is flush
with the corresponding parts on the body-
work. WARNING
If the bonnet is not correctly closed, it could
sud den
ly open while driving leaving the driv-
er without visibility. This could result in a se-
rious accident. » 273
Technical data
Advice
Operation
Emergencies
Safety
Page 276 of 324
Advice
●
Aft er c
losing the bonnet, always check that
it is properly secured by the locking mecha-
nism in the lock carrier. The bonnet must be
flush with the surrounding body panels.
● While driving, if you notice that the bonnet
is not
correctly closed then stop immediately
and close it correctly.
● Only open and close the bonnet when there
is no
body within its range. CAUTION
● To av oid d
amage to the bonnet and to the
windscreen wiper arms, only open it when
the windscreen wipers are in place against
the windscreen.
● Before driving, always lower the wiper
arms. Checking fluid levels
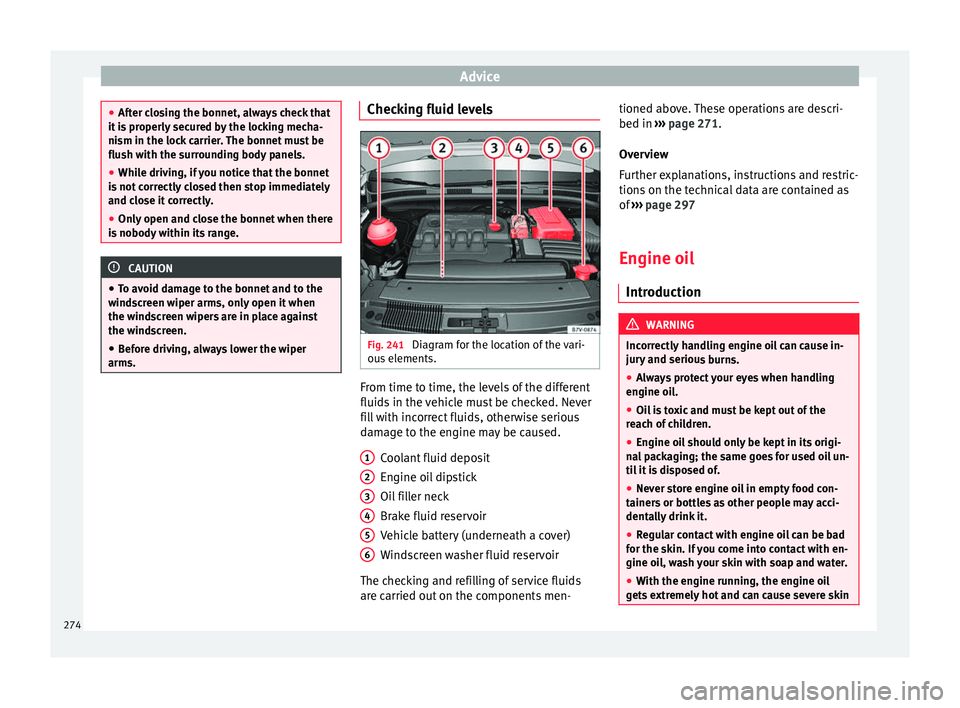
Fig. 241
Diagram for the location of the vari-
ou s
el
ements. From time to time, the levels of the different
fluid
s
in the
vehicle must be checked. Never
fill with incorrect fluids, otherwise serious
damage to the engine may be caused.
Coolant fluid deposit
Engine oil dipstick
Oil filler neck
Brake fluid reservoir
Vehicle battery (underneath a cover)
Windscreen washer fluid reservoir
The checking and refilling of service fluids
are carried out on the components men- 1 2
3
4
5
6 tioned above. These operations are descri-
bed in
››
›
page 271.
Overview
Further explanations, instructions and restric-
tions on the technical data are contained as
of ››› page 297
Engine oil Introduction WARNING
Incorrectly handling engine oil can cause in-
jury and seriou
s burns.
● Always protect your eyes when handling
engine oil
.
● Oil is toxic and must be kept out of the
reac
h of children.
● Engine oil should only be kept in its origi-
nal
packaging; the same goes for used oil un-
til it is disposed of.
● Never store engine oil in empty food con-
tainers
or bottles as other people may acci-
dentally drink it.
● Regular contact with engine oil can be bad
for the skin. If
you come into contact with en-
gine oil, wash your skin with soap and water.
● With the engine running, the engine oil
gets
extremely hot and can cause severe skin 274
Page 277 of 324
Checking and refilling levels
burns. Always wait until the engine has fully
coo
l
ed. For the sake of the environment
Similar to the other service liquids, spilled
en gine oi l
can be bad for the environment.
Collect these liquids in suitable containers
and dispose of them while respecting the en-
vironment. Warning and control lamps
It lights up
Insufficient en-
gine oil.Switch the ignition off. Check the en-
gine oil level
››› page 276.
Flashes
Engine oil sen-
sor faulty.Contact a specialised workshop.
Have the engine oil sensor checked.
Meanwhile, check the oil level man-
ually.
Flashes
Engine oil pres-
sure too low.
Stop the vehicle!
Switch off the engine. Check the en-
gine oil level.
- If the warning lamp flashes al-
though the oil level is correct, do not
continue driving or leave the engine
running. Otherwise, the engine
could be damaged. Seek specialist
assistance. WARNING
Observe the safety warnings ›››
in Control
and warnin g l
amps on page 107. Engine oil specifications
Replacement engine oil must strictly comply
w
ith the s
pec
ifications.
The correct oil must be used to ensure the
correct operation and long service life of the
engine. The engine comes with a high-quality
multigrade oil that can generally be used all
year round.
Only use an engine oil that complies to SEAT
standards whenever possible ››› . If you
w i
sh t
o maintain the long-life service dura-
tion, only engine oils approved for this serv-
ice according to the corresponding VW stand-
ard ( ›››
table on page 41) may be used.
All oils indicated are synthetic multigrade
oils. Engine oils are being continuously further
developed. T
echnical services are constantly
updated with any modifications. SEAT there-
fore recommends that you have the engine
oil changed by a technical service. CAUTION
● Only u
se engine oils whose specifications
are expressly approved by SEAT. The use of
any other type of oil could cause engine dam-
age! 275
Technical data
Advice
Operation
Emergencies
Safety
Page 278 of 324
Advice
Checking engine oil level Fig. 242
Marked engine oil dipstick Fig. 243
In the engine compartment: Engine
oi l
fi
ller cap. Read the additional information carefully
› ›
›
page 40
Preparations ● Park the vehicle on flat ground so that the
engine oil
reading is correct. ●
Stop the engine and w
ait a few minutes for
the oil to drain back into the sump. When the
engine has cooled down, immediately check
the oil level and top up if necessary.
● Open the bonnet ›››
page 271.
● The engine oil filler neck can be recognised
by the symbo
l on the cap ››› Fig. 243 and
the dipstick by its coloured handle.
Checking the engine oil level
● Pull out the dipstick and wipe it on a clean
cloth.
● Rep
lace the dipstick, pushing it in as far as
it wi
ll go. If the dipstick has a mark, when you
reintroduce it this mark should slot into the
corresponding groove located on the upper
end of the tube.
● Remove the oil dipstick again and check
the engine oil
level.
● After reading the oil level, replace the dip-
stick
in the tube completely.
Adding oil after checking the level
Only add engine oil in small quantities and in
steps:
● Unscrew the cap from engine oil filler neck
on the cylinder head ›
›› Fig. 243. If you are
not sure where the cap is, request help from
a specialist. ●
Only r
efill using approved SEAT engine oil
in small quantities (no more than 0.5 l)
››› page 275.
● To avoid adding too much oil, each time
you ad
d a quantity, wait until the oil has flow-
ed into the crankcase so that it can be meas-
ured with the dipstick.
● Check the oil level before adding any more
oil. Do not
top up with too much engine oil
››› .
● When the oil level is at least in the
› ›
›
Fig. 242 B zone, insert the dipstick into
the t ube f
u
lly to avoid engine oil escaping
when the engine is running.
● After topping up the oil, ensure that the
cap is
screwed on to the filler neck correctly. WARNING
Oil could catch fire if it comes into contact
with hot en
gine components. This could lead
to a fire, explosion and severe injuries.
● Always ensure that after topping of oil, the
engine oil
filler cap is correctly tightened.
This will avoid engine oil spilling onto hot en-
gine parts when the engine is running. CAUTION
● If the en gine oi
l level is above the area
››› Fig. 242 A do not start the engine. Seek
spec i
alist assistance. Otherwise catalytic
converter and engine damage may occur. 276
Page 279 of 324
Checking and refilling levels
●
When refi l
ling or changing service liquids,
ensure that you put the liquids into the right
tank. Making a mistake when refilling could
cause serious malfunctions and damage the
engine! For the sake of the environment
The oil level must never be above area
› ››
Fig. 242 A . Otherwise oil can be drawn in
through the c r
ankcase breather and escape
into the atmosphere via the exhaust system. Engine oil consumption
The consumption of engine oil can be differ-
ent
fr
om one en
gine to another and can vary
during the useful life of the engine.
Depending on driving style and the condi-
tions of use, the consumption of engine oil
can reach 1 litre every 2,000 km (one quarter
of a gallon every 1,200 miles); for new vehi-
cles, this could be higher for the first
5,000 km (3,000 miles). For this reason the
engine oil level must be checked at regular
intervals, preferably when filling the tank and
before a journey.
Topping up engine oil Read the additional information carefully
› ›
›
page 40 The engine oil must be changed regularly ac-
cordin
g to the specifications of the Mainte-
nance Programme.
Due to the problems linked with disposing of
used oil and the need for suitable tools and
special knowledge, always visit a specialised
workshop to have the engine oil and filter
changed. SEAT recommends taking your car
in for technical service.
Detailed information on the service intervals
is shown in the Maintenance Programme. WARNING
If, in exceptional circumstances, you must
ch an
ge the engine oil yourself, please note
the following:
● Wear eye protection.
● Always wait until the engine has complete-
ly coo
led to avoid being burned.
● Always keep your arms horizontal when un-
scr
ewing the oil drainage bolt so that it does
not run down your arms.
● Use a suitable container large enough to
col
lect all of the used oil in the engine.
● Never collect engine oil in empty food con-
tainers, c
ans, bottles or other containers as
not all people are able to identify engine oil.
● Oil is toxic and must be kept out of the
reac
h of children. CAUTION
No additives should be used with engine oil.
This c
ould result in engine damage. Any dam-
age caused by the use of such additives
would not be covered by the factory warranty. For the sake of the environment
● Bef or
e changing the engine oil, find a suita-
ble location or service for proper disposal.
● Always dispose of engine oil with the ut-
most
respect for the environment. Never dis-
pose of used engine oil in places such as a
garden, woods, drains, roads, paths, rivers
and drainage systems. Engine coolant
Intr oduction WARNING
Engine coolant is toxic!
● Only keep engine coolant in its original
cont ainer
, tightly shut and in a safe place.
● Never store engine coolant in empty food
container
s or bottles as other people may ac-
cidentally drink it.
● Always keep engine coolant out of reach of
chil
dren. » 277
Technical data
Advice
Operation
Emergencies
Safety