check engine Seat Altea 2015 User Guide
[x] Cancel search | Manufacturer: SEAT, Model Year: 2015, Model line: Altea, Model: Seat Altea 2015Pages: 236, PDF Size: 4.23 MB
Page 48 of 236
Operation
The warning lamp
has the following
f
unctions:
● It flashes whilst driving when the ASR/ESC
is activated.
● It will light up if there is a fault in the ESC.
● As the ESC operates in conjunction with the
ABS, the ESC light will also come on if a fault
should occur in the ABS.
If the ESC control lamp
stays on after the
engine is started, this may mean that the
control system has temporarily switched off
the ESC. In this case the ESC can be reactiva-
ted by switching the ignition off and then on
again. If the control lamp goes out, this
means the system is fully functional.
The lamp provides information about the
disconnection status of the system:
● It stays lit when the ASR is disconnected
when pressing the switch.
Differential lock fault (EDL)* The EDL operates along with the ABS in vehi-
cles equipped with Electronic Stability Con-
trol (ESC)*.
A malfunction in the EDL is indicated by the
ABS control lamp
. Take the vehicle to a specialised workshop as soon as possible.
For further information on the EDL see
››› page 135, Electronic differential lock
(EDL)* .
T r
action control system (ASR)* / The traction control system prevents the driv-
en wheels from spinning when the vehicle is
accelerating.
There are two warning lamps for the traction
control system:
and . Both warning lamps
light up together when the ignition is switch-
ed on and should turn off after approximately
2 seconds. This is the time taken for the func-
tion check.
The lamp has the following function:
● It flashes when the ASR is working if the ve-
hicle is moving.
If the system is deactivated or if it has any
fault, the warning lamp will remain lit. The
warning lamp will also light up if a fault
should occur in the ABS because the ASR op-
erates in conjunction with the ABS. For fur-
ther information, see ›››
page 137. The
lamp provides information about the
di
sconnection status of the system:
● It stays lit when the ASR is disconnected
when pressing the ASR OFF switch.
By pressing it again, the ASR function is reac-
tivated and the warning lamp switched off.
Speed selector lever lock The brake pedal must be depressed when
this warning lamp lights up. This is necessary
when the automatic gearbox* selector lever
is moved out of the positions
P
or N
.
Electronic immobiliser* “Safe” This warning lamp flashes if an unauthorised
key is used.
Inside the key there is a chip that deactivates
the electronic immobiliser automatically
when the key is inserted into the ignition.
The electronic immobiliser will be activated
again automatically as soon as you pull the
key out of the ignition lock.
The instrument panel displays the following
message
1)
: IMMOBILISER
. The vehicle cannot
be used in that case ›››
page 121. 1)
Depending on the version of the model.
46
Page 50 of 236
Operation
to the gear display indicating whether you
should change up or down. Note
The gear change indication should not be tak-
en into account when quick acceleration is re-
quired (for example when overtaking). Odometer
The left-hand counter in the display registers
the total amount of distance covered by the
vehicle.
The right-hand counter registers the short
journeys. The last digit indicates steps of 100
metres. The trip recorder counter may be re-
set by holding down the reset button for a
few seconds.
Flexible service interval display Vehicles with
Service intervals dependent on
time/distance travelled already have certain
service intervals set. The intervals are calcu-
lated individually in vehicles with LongLife
service .
The ser v
ice interval display only indicates the
dates of services that include engine oil
change. The dates of all other services, such
as the Inspection Service or brake fluid change, appear in the sticker on the door pil-
lar or in the Maintenance Programme.
A
Service pre-warning will appear in the od-
ometer if a service is due soon. A “spanner”
symbol appears and the display “km” with
the distance that can be driven until the next
service appointment is due. This signal
changes after around 10 seconds. A “clock
symbol” appears and the number of days un-
til the service appointment should be carried
out. The following message is shown in the
instrument panel display*:
Service in
[XXXX]
kmor
[XXXX]
days
The service message will disappear approxi-
mately 20 seconds after the ignition is
switched on or the engine is running. The
normal display can be resumed by briefly
pressing the reset button on the trip counter
or by pressing the OK button on the steering
wheel controls.
With the ignition on, you can check the cur-
rent service message at any moment in the
Vehicle status menu or turning the reset but-
ton to access the service display. An
overdue service
is indicated by a minus
s
ign in front of the mileage or day informa-
tion.
Indications for vehicles with LongLife service
Technical progress has made it possible to
considerably reduce servicing requirements.
With the LongLife System, SEAT ensures that
your vehicle only has an Interval Service
when it is necessary. The length of the Inter-
val Services (max. 2 years) is determined by
factors such as conditions under which the
vehicle is used and personal driving style.
The service pre-warning will first appear 20
days before the date on which the service is
due. The distance travelled is rounded off to
the nearest 100 km and the time to full days.
The current service message can only be con-
sulted 500 km after the last service. Until
that time, only dashes are displayed. Note
● If you reset the display manually, the next
service interval will be indicated after
15,000 km or one year and will not be calcu-
lated individually.
● Do not reset the display between service
intervals as the display will otherwise be in-
correct. 48
Page 51 of 236
Dash panel
●
In LongLife Service vehicles, if the battery
is disconnected for a long period, the days re-
maining until the next service cannot be cal-
culated. Therefore, the service message dis-
plays on the instrument panel may be incor-
rect. Take into account the maximum author-
ised service intervals. Warning or information message in
the display
The system runs a check on certain compo-
nents and functions when the ignition is
switched on and while the vehicle is moving.
Functional faults are indicated by symbols
with warning or information messages in the
display. An audible warning is given in cer-
tain cases.
Warning symbols
There are red warning symbols (priority 1)
and yellow warning symbols (priority 2).
Information text
In addition to warning messages given on a
fault, you will receive information in the dis-
play on procedures or will be asked to carry
out certain tasks. Note
In the case of screens without warning or in-
formation messages, faults are indicated ex-
clusively by the control lamps. Warning messages, Priority 1 (red)
If one of these faults occurs, the warning
lamp will light up or flash and will be accom-
panied by
three audible warnings. This is a
danger warning. Stop the vehicle and switch
off the en
gine. Check the fault and correct it.
Obtain professional assistance if necessary.
If several priority 1 faults are detected at the
same time, the symbols will be displayed one
after the other for about 2 seconds at a time
and will continue until the fault is corrected.
No menus will be shown in the display for the
duration of a priority 1 warning message.
Examples of priority 1 warning messages
(red)
● Brake system symbol with the warning
message STOP BRAKE FLUID INSTRUCTION
MANUAL or STOP BRAKE FAULT INSTRUCTION
MANUAL . ●
Coolant symbol with the warning mes-
s ag
e STOP SEE COOLANT INSTRUCTION MAN-
UAL.
● Engine oil pressure symbol with the
warnin
g message STOP ENGINE OIL PRESSURE
LOW! INSTRUCTION MANUAL.
Warning messages, Priority 2 (yellow) If one of these faults occurs, the correspond-
ing warning lamp lights up and is accompa-
nied by
an audible warning. The function
should be checked as soon as possible.
If several priority 2 warning messages are de-
tected at the same time, the symbols are dis-
played one after the other for about 2 sec-
onds at a time. After a set time, the informa-
tion text will disappear and the symbol will
be shown as a reminder at the side of the
display.
Priority 2 warning messages will not be
shown until all Priority 1 warning messages
have been dealt with!
Examples of priority 2 warning messages
(yellow): 1)
● Fuel warning light with the information text
PLEASE REFUEL .
»1)
Depending on the version of the model.
49
Technical specifications
Advice
Operation
Safety
Page 74 of 236
Operation
Electric windows Opening or closing the electric
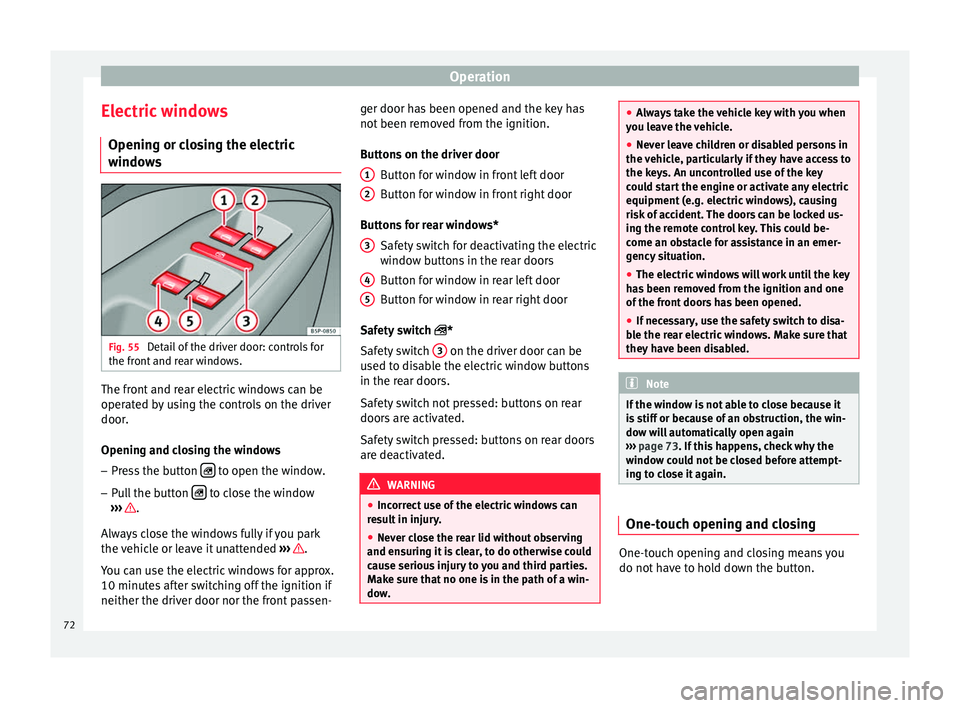
windows Fig. 55
Detail of the driver door: controls for
the front and rear windows. The front and rear electric windows can be
operated by using the controls on the driver
door.
Opening and closing the windows
– Press the button to open the window.
– Pull the button to close the window
››› .
Always close the windows fully if you park
the vehicle or leave it unattended ››› .
You can use the electric windows for approx.
10 minutes after switching off the ignition if
neither the driver door nor the front passen- ger door has been opened and the key has
not been removed from the ignition.
Buttons on the driver door
Button for window in front left door
Button for window in front right door
Buttons for rear windows* Safety switch for deactivating the electric
window buttons in the rear doors
Button for window in rear left door
Button for window in rear right door
Safety switch *
Safety switch 3 on the driver door can be
used to disable the electric window buttons
in the rear doors.
Safety switch not pressed: buttons on rear
doors are activated.
Safety switch pressed: buttons on rear doors
are deactivated. WARNING
● Incorrect use of the electric windows can
result in injury.
● Never close the rear lid without observing
and ensuring it is clear, to do otherwise could
cause serious injury to you and third parties.
Make sure that no one is in the path of a win-
dow. 1
2
3
4
5 ●
Always take the vehicle key with you when
you leave the vehicle.
● Never leave children or disabled persons in
the vehicle, particularly if they have access to
the keys. An uncontrolled use of the key
could start the engine or activate any electric
equipment (e.g. electric windows), causing
risk of accident. The doors can be locked us-
ing the remote control key. This could be-
come an obstacle for assistance in an emer-
gency situation.
● The electric windows will work until the key
has been removed from the ignition and one
of the front doors has been opened.
● If necessary, use the safety switch to disa-
ble the rear electric windows. Make sure that
they have been disabled. Note
If the window is not able to close because it
is stiff or because of an obstruction, the win-
dow will automatically open again
››› page 73. If this happens, check why the
w indo
w could not be closed before attempt-
ing to close it again. One-touch opening and closing
One-touch opening and closing means you
do not have to hold down the button.
72
Page 76 of 236
Operation
Using the remote control
– Push the lock or unlock button on the re-
mote control for approximately 3 seconds.
All windows which function electrically will
be either opened or closed.
– Release the unlock button to interrupt the
function.
– Once the windows are completely closed,
the turn signals will flash.
Sliding/tilting sunroof* Opening and closing the
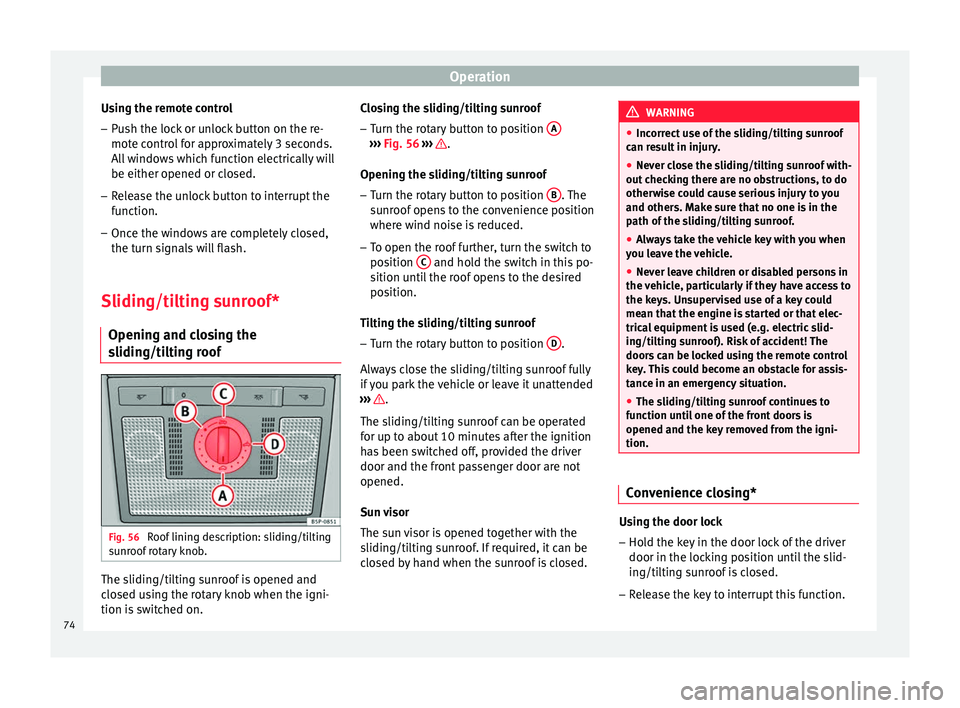
sliding/tilting roof Fig. 56
Roof lining description: sliding/tilting
sunroof rotary knob. The sliding/tilting sunroof is opened and
closed using the rotary knob when the igni-
tion is switched on. Closing the sliding/tilting sunroof
– Turn the rotary button to position A ›››
Fig. 56
›
›› .
Opening the sliding/tilting sunroof
– Turn the rotary button to position B . The
sunroof opens to the convenience position
where wind noise is reduced.
– To open the roof further, turn the switch to
position C and hold the switch in this po-
sition until the roof opens to the desired
position.
Tilting the sliding/tilting sunroof
– Turn the rotary button to position D .
Always close the sliding/tilting sunroof fully
if you park the vehicle or leave it unattended
››› .
The sliding/tilting sunroof can be operated
for up to about 10 minutes after the ignition
has been switched off, provided the driver
door and the front passenger door are not
opened.
Sun visor
The sun visor is opened together with the
sliding/tilting sunroof. If required, it can be
closed by hand when the sunroof is closed. WARNING
● Incorrect use of the sliding/tilting sunroof
can result in injury.
● Never close the sliding/tilting sunroof with-
out checking there are no obstructions, to do
otherwise could cause serious injury to you
and others. Make sure that no one is in the
path of the sliding/tilting sunroof.
● Always take the vehicle key with you when
you leave the vehicle.
● Never leave children or disabled persons in
the vehicle, particularly if they have access to
the keys. Unsupervised use of a key could
mean that the engine is started or that elec-
trical equipment is used (e.g. electric slid-
ing/tilting sunroof). Risk of accident! The
doors can be locked using the remote control
key. This could become an obstacle for assis-
tance in an emergency situation.
● The sliding/tilting sunroof continues to
function until one of the front doors is
opened and the key removed from the igni-
tion. Convenience closing*
Using the door lock
– Hold the key in the door lock of the driver
door in the locking position until the slid-
ing/tilting sunroof is closed.
– Release the key to interrupt this function.
74
Page 113 of 236
Air conditioning
● The air conditioning system compressor
has been temporarily switched off because
the engine coolant temperature is too high.
● The air conditioner fuse is faulty.
● Another fault in the vehicle. Have the air
conditioner checked by a specialised work-
shop.
Air recirculation mode Air recirculation mode
››› Fig. 116 4
pre-
vents strong odours or contaminated air from the outside from entering the vehicle, for ex-
ample when passing through a tunnel or in a
traffic jam.
With low temperatures outside, the air recir-
culation increases the effectiveness of the
heating system by warming the air inside the
vehicle rather than the cold air from outside.
With high outside temperatures, the air recir-
culation increases the effectiveness of the air
conditioning system by cooling the air inside
the vehicle rather than the ambient air.
If the windscreen air output is on and air re-
circulation mode is pressed, it is activated.When the recirculation mode is on, if the air
distribution towards the windscreen mode is
selected, the recirculation mode is deactiva-
ted. For safety reasons, the air recirculation
mode should not be connected. WARNING
In air recirculation mode, no cold air from the
outside enters the vehicle interior. If the air
conditioning system is switched off, the win-
dows can quickly mist over. Therefore, never
leave the air recirculation mode switched on
for a long time (risk of accident). 111Technical specifications
Advice
Operation
Safety
Page 118 of 236
Operation
If the windscreen air output is on and air re-
circulation mode is pressed, this remains ac-
tive. When the recirculation mode is on, if the
air distribution towards the windscreen mode
is selected, the recirculation mode is deacti-
vated. For safety reasons, the air recirculation
mode should not be connected. WARNING
In air recirculation mode, no cold air from the
outside enters the vehicle interior. If the air
conditioning system is switched off, the win-
dows can quickly mist over. Therefore, never
leave the air recirculation mode switched on
for a long time (risk of accident). General notes
Pollution filter
The pollution filter (a combined particulate
filter and active carbon filter) serves as a bar-
rier against impurities in the outside air, in-
cluding dust and pollen.
For the climate control system to work with
maximum efficiency, the pollution filter must
be replaced at the specified intervals in the
Maintenance Programme.
If the filter loses efficiency prematurely due
to use in areas reaching very high pollution
levels, the pollen filter must be changed
more frequently than stated in the Service
Schedule. Air conditioner
When the air conditioning system is switched
on, not only the temperature, but also the air
humidity in the vehicle interior is reduced.
This improves comfort for the vehicle occu-
pants and prevents misting of the windows
when the ambient air humidity is high.
If the air conditioning system cannot be
switched on this may be caused by the fol-
lowing reasons:
● The engine is not running.
● The A/C button is switched off.
● The outside temperature is lower than ap-
proximately +3 °C (+37 °F).
● The air conditioning system compressor
has been temporarily switched off because
the engine coolant temperature is too high.
● The air conditioner fuse is faulty.
● Another fault in the vehicle. Have the air
conditioner checked by a specialised work-
shop. CAUTION
● If you suspect that the air conditioner is
damaged, switch it off with the A/C button to
prevent further damage and have it checked
by a specialised workshop.
● Repairs to the air conditioner require spe-
cialist knowledge and special tools. There-
fore, we recommend you to take the vehicle
to a specialised workshop. Note
● If the humidity and temperature outside the
vehicle are high, condensation can drip off
the evaporator in the cooling system and
form a pool underneath the vehicle. This is
normal and does not indicate a leak.
● Keep the air intake slots in front of the
windscreen free of snow, ice and leaves to en-
sure heating and cooling are not impaired,
and to prevent the windows from misting
over.
● The air from the vents flows through the ve-
hicle interior and is extracted by slots de-
signed for this purpose. Therefore, do not
cover these slots with items of clothing or
other objects.
● The air conditioner operates most effective-
ly with the windows and the sliding/tilting
sunroof* closed. However, if the temperature
inside the vehicle is excessive because of the
sun, the air inside can be cooled faster by
opening the windows for a short time.
● Do not smoke while air recirculation mode
is on, as smoke drawn into the air condition-
ing system leaves residue on the evaporator,
producing a permanent unpleasant odour.
● It is advisable to turn on the air condition-
ing at least once a month, to lubricate the
system gaskets and prevent leaks. If a de-
crease in the cooling capacity is detected, a
Technical Service should be consulted to
check the system. 116
Page 119 of 236
Driving
Driving Power steering (servotronic*) Power steering assists the driver by reducing
the force needed to turn the steering wheel.
In cars equipped with servotronic* power
steering the degree of power assistance is
regulated electronically
according to road
s
peed.
The power steering will keep on working even
if
the servotronic* device fails. The degree of
po w
er assistance will, however, no longer
adapt to different speeds. If the electronic
regulating system is not working properly,
this is most noticeable when turning the
steering wheel at low speeds (for instance
when parking), as more effort will be required
than usual. The fault should be corrected by
a specialised workshop as soon as possible.
Power steering does not work if the engine is
off. In this case the steering wheel requires
much more force to turn.
Turning the steering to its limit when the ve-
hicle is stationary will place an excessive
load on the power steering system. Turning
the steering wheel to its limit places a load
on the system, which causes noise. It will al-
so reduce the idling speed of the engine. CAUTION
When the engine is running, do not turn the
steering wheel to its limit for more than 15
seconds. Otherwise, there is a risk of damag-
ing the power steering. Note
● If the power steering should fail at any time
or the engine is switched off (for instance
when being towed), the vehicle can still be
steered. However, more effort will be required
to turn the steering wheel.
● If the system is leaking or malfunctioning,
please take the car to a specialised workshop
immediately.
● The power steering system requires a spe-
cial hydraulic fluid. The container is located
in the engine compartment (front left). The
correct fluid level in the reservoir is impor-
tant for the power steering to function prop-
erly. The hydraulic fluid level is checked at
the Inspection Service. All-wheel drive*
On all-wheel drive models, the engine power
is distributed to all four wheels
General notes
The all-wheel drive system operates com-
pletely automatically. The propulsion force is
distributed among the four wheels and adap-ted to the driving style and the road condi-
tions.
The all-wheel drive is specially designed to
complement the superior engine power. This
combination gives the vehicle exceptional
handling and performance capabilities, both
on normal roads and in more difficult condi-
tions, such as snow and ice.
Winter tyres
Thanks to its all-wheel drive, your vehicle will
have plenty of traction in winter conditions,
even with the standard tyres. Nevertheless,
we still recommend that winter tyres or all-
season tyres should be fitted on all four
wheels when winter road conditions are ex-
pected, mainly because this will give a better
braking response.
Snow chains
On roads where snow chains are mandatory,
this also applies to cars with all-wheel drive.
Changing tyres
On vehicles with all-wheel drive, all four tyres
must have the same rolling circumference
››› page 179 . WARNING
● Even with all-wheel drive, you should al-
ways adjust your speed to suit the condi-
tions. Do not let the extra safety features » 117
Technical specifications
Advice
Operation
Safety
Page 120 of 236
Operation
tempt you into taking any risks when driving.
Failure to follow this instruction could result
in an accident.
●
The braking capability of your vehicle is
limited by the tyres' grip. Vehicle behaviour
is no different from a vehicle without four-
wheel drive. So do not be tempted to drive
too fast on icy or slippery roads just because
the vehicle still has good acceleration in
these conditions. Failure to do so could result
in an accident.
● On wet roads bear in mind that the front
wheels may lose contact with the road and
start to float (aquaplaning) if the vehicle is
driven too fast. If this should happen, there
will be no sudden increase in engine speed
when aquaplaning begins to warn the driver,
as with a front-wheel drive vehicle. For this
reason and for that mentioned above, always
choose a driving speed suitable for the road
conditions. Failure to follow this instruction
could result in an accident. Driving with LPG*
3 Applies to the model: ALTEA / ALTEA XL
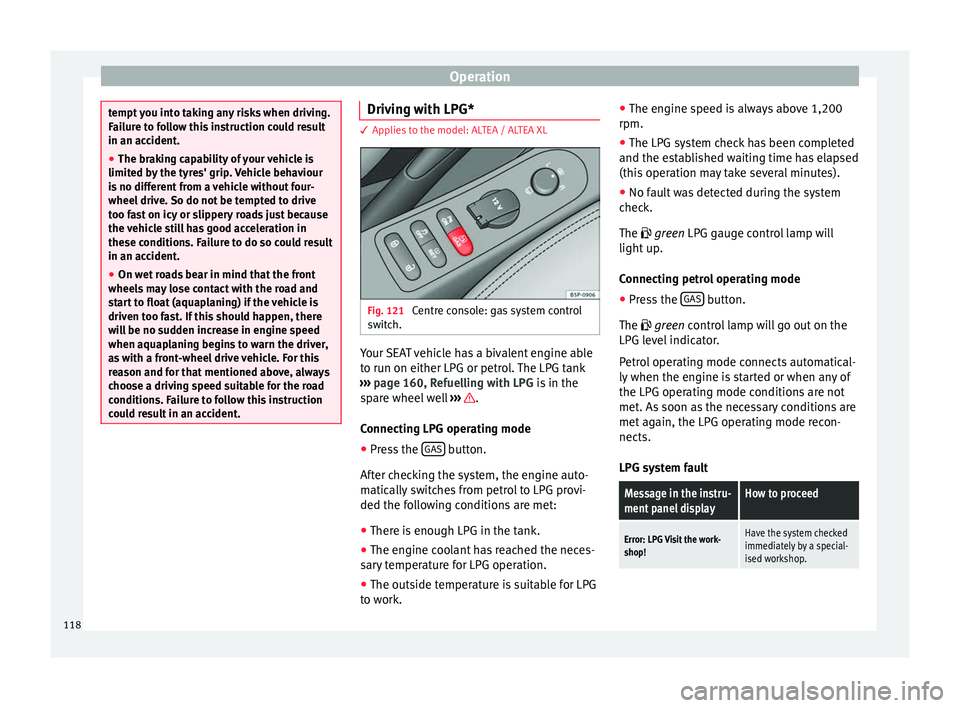
Fig. 121
Centre console: gas system control
switch. Your SEAT vehicle has a bivalent engine able
to run on either LPG or petrol. The LPG tank
››› page 160, Refuelling with LPG is in the
spare wheel well ››› .
Connecting LPG operating mode
● Press the GAS button.
After checking the system, the engine auto-
matically switches from petrol to LPG provi-
ded the following conditions are met:
● There is enough LPG in the tank.
● The engine coolant has reached the neces-
sary temperature for LPG operation.
● The outside temperature is suitable for LPG
to work. ●
The engine speed is always above 1,200
rpm.
● The LPG system check has been completed
and the established waiting time has elapsed
(this operation may take several minutes).
● No fault was detected during the system
check.
The
green LPG gauge control lamp will
light up.
Connecting petrol operating mode
● Press the GAS button.
The green
control lamp will go out on the
LPG l
evel indicator.
Petrol operating mode connects automatical-
ly when the engine is started or when any of
the LPG operating mode conditions are not
met. As soon as the necessary conditions are
met again, the LPG operating mode recon-
nects.
LPG system fault
Message in the instru-
ment panel displayHow to proceed
Error: LPG Visit the work-
shop!Have the system checked
immediately by a special-
ised workshop. 118
Page 121 of 236
DrivingMessage in the instru-
ment panel displayHow to proceed
Gas operating mode cur-
rently impossible See the
manual!
Check that all conditions
for LPG operating mode
have been met
››› page 118. If so, have
the system checked imme-
diately by a specialised
workshop.
Petrol operating mode cur-
rently impossible. See the
manual!Have the system checked
immediately by a special-
ised workshop. LPG quality and consumption
Quality requirements for LPG are regulated
for all Europe in DIN EN 589 and permit the
use of LPG throughout Europe without any
problems.
LPG is a mixture of propane and butane.
A difference is drawn between winter gas and
summer gas. Winter gas has a higher propor-
tion of propane gas. As a result, the driving
range of winter gas may be lower (due to in-
creased consumption) than that of summer
gas.
The vehicle's engine management adapts au-
tomatically to the LPG used. Therefore, both
types of LPG can be mixed in the tank, with-
out the need for comprehensive draining be-
fore applying a different quality LPG. LPG and safety
If you smell gas or suspect that there is a
leak in the LPG system.
››› ●
Stop the vehicle immediately.
● Switch the ignition off.
● Open all the doors to properly ventilate the
vehicle.
● Extinguish cigarettes immediately.
● Move away from the vehicle or switch off
objects that may cause sparks or a fire.
● If you continue to smell gas, do not contin-
ue driving!
● Seek specialist assistance. Have the fault
repaired. WARNING
LPG is a highly explosive and inflammable
substance. It may cause severe burns and
other injury.
● Due care must be taken to avoid any risk of
fire or explosion.
● When parking the vehicle in a closed area
(for example in a garage), make sure that
there is adequate ventilation, either natural
or mechanical, to neutralise the LPG in the
event of a leak. WARNING
Failure to act when you can smell gas in the
vehicle or when refuelling can cause serious
injuries.
● Carry out the necessary operations.
● Leave the danger zone.
● If necessary, warn the emergency services. Note
● The LPG system must be subject to regular
inspections at a specialised workshop in ac-
cordance with the Maintenance Plan.
● The engine is always started with petrol,
even when LPG was being used when it was
switched off. For this reason the tank should
never be drained of petrol completely.
● If frequent short journeys are made, espe-
cially when the outside temperature is low,
the vehicle will tend to run on petrol more of-
ten than on LPG. Therefore, the petrol tank
may empty before the LPG tank.
● If while driving the system switches auto-
matically to petrol operating mode because
the LPG tank is almost empty, the next few
times the engine starts up, and depending on
the outside temperature and driving style, it
may automatically switch briefly to LPG oper-
ating mode to use up what is left in the tank.
● When the system automatically switches to
petrol operating mode because the LPG tank
is almost empty, you can revert to gas operat-
ing mode by pressing the ››› Fig. 121 GAS »
119
Technical specifications
Advice
Operation
Safety