stop start Seat Altea 2015 Owner's Guide
[x] Cancel search | Manufacturer: SEAT, Model Year: 2015, Model line: Altea, Model: Seat Altea 2015Pages: 236, PDF Size: 4.23 MB
Page 165 of 236
Checking and refilling levels
LPG quality and consumption
Quality requirements for LPG are regulated
for all Europe in DIN EN 589 and permit the
use of LPG throughout Europe.
A difference is drawn between winter gas and
summer gas. Winter gas has a higher propor-
tion of propane gas. As a result, the driving
range of winter gas may be lower (due to in-
creased consumption) than that of summer
gas.
LPG supplier network
The number of LPG pumps is constantly in-
creasing.
Lists of existing LPG pumps may be found on
Internet.
LPG safety A series of collision tests performed on this
vehicle while running with LPG have con-
firmed its high level of safety.
The safety of the LPG system guarantees op-
eration without risk. The following safety
measures have been adopted:
● The LPG tank has a solenoid valve which
closes automatically when the engine is
switched off (ignition off) or when running on
petrol. ●
A solenoid type main valve disconnects the
supply of gas to the engine compartment
when the engine is switched off or running
on petrol.
● A safety valve in the LPG tank with pipes to
the outside prevents the gas from entering
the vehicle interior.
● All anchorage points and materials have
been designed to ensure the maximum pos-
sible levels of safety.
The condition of the LPG system should be
checked regularly to guarantee safe driving
conditions ››› . These checks are included
in the Maintenance Programme. WARNING
● If there is a smell of gas or a suspected
leak, stop the vehicle immediately and switch
off the ignition. Open the doors to ventilate
the vehicle. Do not carry on driving! Take the
vehicle to a specialised workshop and have
the fault repaired.
● Immediately extinguish any cigarettes and
remove from the vehicle any objects which
might produce a spark or cause a fire, and
switch off immediately if gas is smelt or a
leak is detected.
● LPG tanks are subject to pressure and must
be checked regularly. The owner of the vehi-
cle must check that these services are per-
formed correctly. ●
When parking the vehicle in a closed area
(e.g. in a garage), make sure that there is ad-
equate ventilation, either natural or mechani-
cal, to neutralise the LPG in the event of a
leak. Note
For any fault in the LPG system, please refer
to the SEAT web page, which lists the work-
shops authorised to repair these faults. Working in the engine
compartment
Safety instructions on working in the
engine compartment Before starting any work on the engine or in
the engine compartment:
1. Switch off the engine and remove the key
from the ignition.
2. Apply the handbrake.
3. Move the gear lever to neutral or the selec- tor lever to position P.
4. Wait for the engine to cool down.
5. Keep children away from the vehicle.
6. Raise the bonnet ››› page 165.
»
163Technical specifications
Advice
Operation
Safety
Page 177 of 236
Wheels
Wheels
Wheels and tyres General notes Avoiding damage
– If you have to drive over a kerb or similar
obstacle, drive very slowly and at a right
angle.
– Keep grease, oil and fuel off the tyres.
– Inspect the tyres regularly for damage
(cuts, cracks or blisters, etc.). Remove any
foreign objects embedded in the treads.
Storing tyres
– When you remove the tyres, mark them in
order to maintain the same direction of ro-
tation when they are installed again.
– When removed, the wheels and/or tyres
should be stored in a cool, dry and prefera-
bly dark location.
– Store tyres in a vertical position if they are
not fitted on wheel rims.
New tyres
New tyres must be run in ›››
page 130.
The tread depth of new tyres may vary, ac-
cording to the type and make of tyre and the
tread pattern. Concealed damage
Damage to tyres and rims is often not readily
visible. If you notice unusual vibrations or the
vehicle pulling to one side, this may indicate
that one of the tyres is damaged. They
should be checked immediately by a Techni-
cal Service.
Tyres with directional tread pattern
An arrow on the tyre sidewall indicates the di-
rection of rotation on tyres with directional
tread. Always observe the direction of rota-
tion indicated when fitting the wheel. This
guarantees optimum grip and helps to avoid
aquaplaning, excessive noise and wear.
WARNING
● New tyres do not have maximum grip dur-
ing the first 500 km (300 miles). Drive partic-
ularly carefully to avoid possible accidents.
● Never drive with damaged tyres. This may
cause an accident.
● If you notice unusual vibrations or if the ve-
hicle pulls to one side when driving, stop the
vehicle immediately and check the tyres for
damage. Checking tyre pressure
The correct tyre pressure can be seen on the
sticker on the inside of the fuel tank flap.1. Read the required tyre inflation pressure
from the sticker. The values refer to Sum-
mer tyres. For winter tyres, you must add
0.2 bar (2.9 psi / 20 kPa) to the values
given for summer tyres.
2. The tyre pressures should only be checked when the tyres are cold. The slightly raised
pressures of warm tyres must not be re-
duced.
3. Adjust the tyre pressure to the load you are carrying.
Tyre pressure
The correct tyre pressure is especially impor-
tant at high speeds. The pressure should
therefore be checked at least once a month
and before starting a journey.
The sticker with the tyre pressure values can
be found on the inside of the fuel tank flap.
The tyre pressure values given are for cold
tyres. Do not reduce the slightly raised pres-
sures of warm tyres ››› .
WARNING
● Check the tyre pressure at least once per
month. Checking the tyre pressure is very im-
portant. If the tyre pressure is too high or too
low, there is an increased danger of accidents
- particularly at high speeds.
● A tyre can easily burst if the pressure is too
low, causing an accident! » 175Technical specifications
Advice
Operation
Safety
Page 180 of 236
Advice
For the sake of the environment
Under-inflated tyres will increase fuel con-
sumption. Run-flat tyres
Run-flat tyres allow you to continue driving
even with a punctured tyre, in the majority of
cases.
In vehicles that are factory-fitted with run-flat
tyres
1)
the loss of tyre pressure is indicated
on the instrument panel.
Driving with run-flat tyres (emergency
running)
– Leave the ESC/ASR on (Electronic Stability
Control), or switch it on ›››
page 137.
– Continue driving carefully and slowly
(80 km/h [50 mph] maximum).
– Avoid sudden manoeuvres and sharp turns.
– Avoid driving over obstacles (e.g. kerbs) or
potholes.
– Pay attention if the ESC/ASR activates of-
ten, if smoke comes from the tyres or there
is a smell of rubber, the vehicle vibrates or
there are clattering noises. If any of these
occur, stop the vehicle. The run-flat tyres have a tag on the side of
the tyre, with the description: “DSST”, “Eufo-
nia”, “RFT”, “ROF”, “RSC”, “SSR” or “ZP”.
The sides of this type of tyre are reinforced.
When the tyres lose air they are supported on
the sides (emergency driving).
The loss of pressure in the tyre is shown on
the instrument panel. You can then drive a
maximum of 80 km (50 miles) and if the cir-
cumstances are favourable (e.g. low load),
even more.
The damaged tyre should be changed as
soon as possible. The rim should be checked
in a specialised workshop to detect possible
damage and replace it if necessary. We rec-
ommend you contact your technical service.
If more than one tyre is being used under
emergency conditions, this reduces the dis-
tance that can be travelled.
Starting driving in emergency conditions
When loss in tyre pressure is displayed on
the instrument panel, this means that at least
one tyre is being driven in emergency condi-
tions
››› .
End of emergency operation
Do not drive on if:
● smoke is coming from one of the tyres, ●
there is a smell of rubber,
● the vehicle vibrates,
● there is a rattling noise.
When is it no longer possible to continue
driving even using run-flat tyres?
● If one of the tyres has been severely dam-
aged in an accident, etc. If a tyre has been
badly damaged there is a risk that parts of
the tread can be thrown off and cause dam-
age to the fuel lines, brake pipes or fuel filler.
● It is also advisable to stop driving if severe
vibrations occur, or if the wheel starts over-
heating and gives off smoke. WARNING
When driving in emergency conditions, the
driving quality of the vehicle is considerably
impaired.
● The maximum permitted speed of 80 km/h
(50 mph) is subject to road and weather con-
ditions. Please observe related legal require-
ments.
● Avoid sharp turns and rapid manoeuvres,
and brake earlier than usual.
● Avoid driving over obstacles (e.g. kerbs) or
potholes.
● If one or more tyres are being driven in
emergency conditions, the driving quality of 1)
Depending upon version and country.
178
Page 189 of 236
Emergencies
After inserting the sealant residue in the tyre,
you must again check the tyre pressure about
10 minutes after starting the engine.
You should only use the tire mobility set if
the vehicle is parked in a safe place, you are
familiar with the procedure and you have the
necessary tire mobility set! Otherwise, you
should seek professional assistance.
The tyre sealant must not be used in the
following cases:
● If the wheel rim has been damaged.
● In outside temperatures below -20 °C
(-4 °F).
● In the event of cuts or perforations in the
tyre greater than 4 mm.
● If you have been driving with very low pres-
sure or a completely flat tyre.
● If the sealant bottle has passed its use by
date. WARNING
Using the tyre mobility system can be dan-
gerous, especially when filling the tyre at the
roadside. Please observe the following rules
to minimise the risk of injury:
● Stop the vehicle safely as soon as possible.
Park it at a safe distance from surrounding
traffic to fill the tyre.
● Ensure the ground on which you park is flat
and solid. ●
All passengers and particularly children
must keep a safe distance from the work area.
● Turn on the hazard warning lights to warn
other road users.
● Use the tyre mobility system only if you are
familiar with the necessary procedures. Oth-
erwise, you should seek professional assis-
tance.
● The tyre mobility set is intended for tempo-
rary emergency use only until you can reach
the nearest specialised workshop.
● Replace the repaired tyre with the tire mo-
bility set as soon as possible.
● The sealant is a health hazard and must be
cleaned immediately if it comes into contact
with the skin.
● Always keep the tire mobility set out of the
reach of small children.
● Never use an equivalent jack, even if it has
been approved for your vehicle.
● Always stop the engine, apply the hand-
brake lever firmly and engage gear if using a
manual gearbox, in order to reduce the risk of
vehicle involuntary movement. WARNING
A tyre filled with sealant does not have the
same performance properties as a conven-
tional tyre.
● Never drive faster than 80 km/h (50 mph).
● Avoid heavy acceleration, hard braking and
fast cornering. ●
Drive only during 10 minutes at a maximum
speed of 80 km/h (50 mph) and subsequently
check the tyre. For the sake of the environment
Dispose of used or expired sealant observing
any legal requirements. Note
● A new bottle of sealant can be purchased at
SEAT dealerships.
● Take into account the separate instruction
manual from the tyre mobility set* manufac-
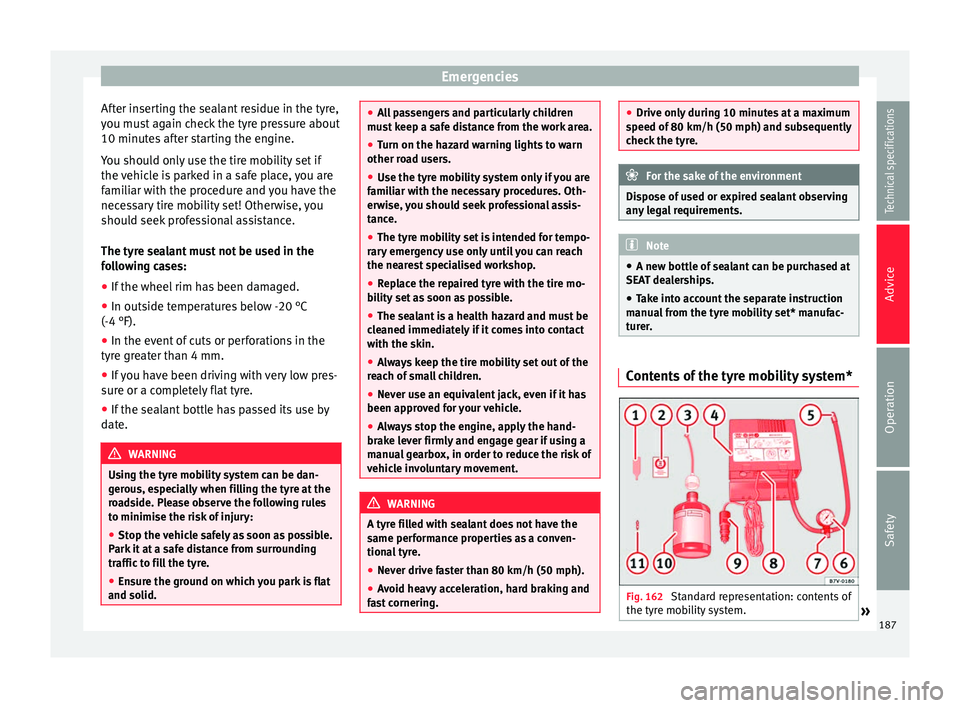
turer. Contents of the tyre mobility system*
Fig. 162
Standard representation: contents of
the tyre mobility system. » 187Technical specifications
Advice
Operation
Safety
Page 191 of 236
Emergencies
● If the indicated pressure still cannot be
reached, the tyre is too badly damaged. The
tyre cannot be sealed with the anti-puncture
kit. Do not continue driving. You should ob-
tain professional assistance ››› .
● Disconnect the air compressor and unscrew
the flexible inflator tube from the tyre valve.
● When the tyre pressure is between 2.5 and
2.0 bars, immediately continue driving with-
out exceeding 80 km/h (50 mph).
● After 10 minutes
, Check the pressure again
›
›› page 189. WARNING
When inflating the wheel, the air compressor
and the inflator tube may become hot.
● Protect hands and skin from hot parts.
● Do not place the hot flexible inflator tube or
hot air compressor on flammable material.
● Allow them to cool before storing the de-
vice.
● If it is not possible to inflate the tyre to at
least 2.0 bars (29 psi / 200 kPa), the tyre is
too badly damaged. The sealant is not in a
good condition to seal the tyre. Do not con-
tinue driving. Seek specialist assistance. CAUTION
Switch off the air compressor after a maxi-
mum of 8 operational minutes to prevent it
from overheating! Before switching on the air compressor again, let it cool for several mi-
nutes.
Check after 10 minutes of driving
Screw the inflator tube
››› Fig. 162 5 again
and check the pressure on the gauge 6 .
1.3 bar (19 psi / 130 kPa) and lower:
● Stop the vehicle! The tyre cannot be sealed
sufficiently with the tyre mobility set.
● You should obtain professional assistance
››› .
1.4 bar (20 psi / 140 kPa) and higher:
● Set the tyre pressure to the correct value
again.
● Carefully resume your journey until you
reach the nearest specialised workshop with-
out exceeding 80 km/h (50 mph).
● Have the damaged tyre replaced. WARNING
Driving with an unsealed tyre is dangerous
and can cause accidents and serious injury.
● Do not continue driving if the tyre pressure
is 1.3 bar (19 psi / 130 kPa) and lower.
● Seek specialist assistance. Jump-starting
Jump leads The jump lead must have a sufficient wire
cross section.
If the engine fails to start because of a dis-
charged battery, the battery can be connec-
ted to the battery of another vehicle to start
the engine.
Jump leads
Jump leads must comply with standard
DIN
72553 (see cable manufacturer's instruc-
tion s).
The wire cross section must be at least
25 mm 2
for petrol engines and at least
35 mm 2
for diesel engines. Note
● The vehicles must not touch each other,
otherwise electricity could flow as soon as
the positive terminals are connected.
● The discharged battery must be properly
connected to the on-board network. 189
Technical specifications
Advice
Operation
Safety
Page 192 of 236
Advice
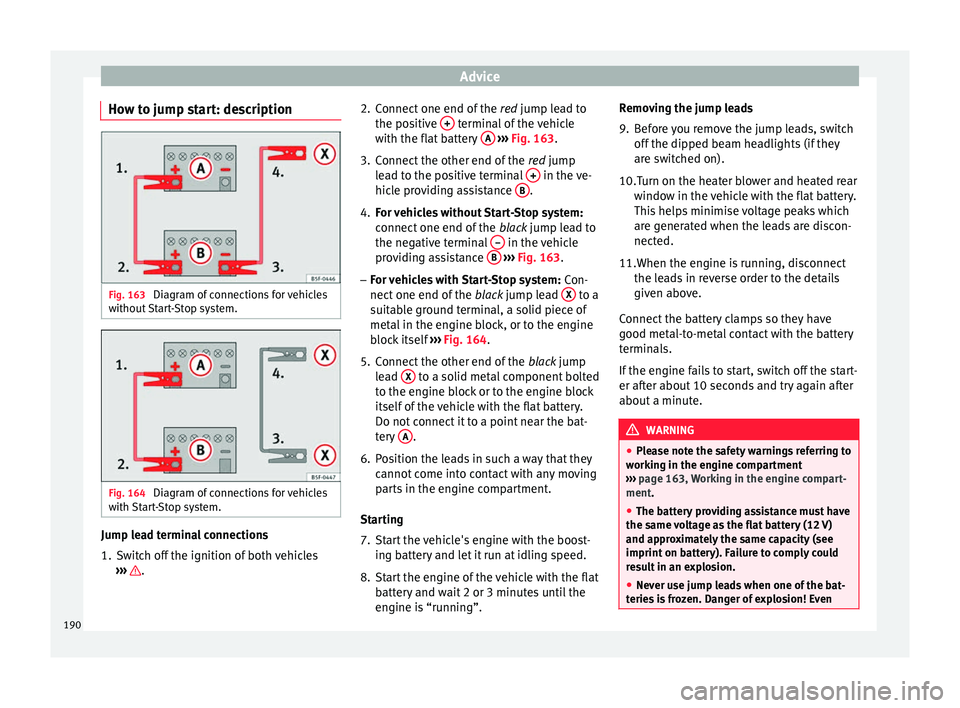
How to jump start: description Fig. 163
Diagram of connections for vehicles
without Start-Stop system. Fig. 164
Diagram of connections for vehicles
with Start-Stop system. Jump lead terminal connections
1. Switch off the ignition of both vehicles
››› . 2. Connect one end of the
red jump lead to
the po s
itive + terminal of the vehicle
with the flat battery A
››› Fig. 163 .
3. C
onnect the other end of the red
jump
lead to the positive terminal + in the ve-
hicle providing assistance B .
4. For vehicles without Start-Stop system:
connect one end of the black jump lead to
the negative terminal – in the vehicle
providing assistance B
››› Fig. 163 .
– For
vehicles with Start-Stop system: Con-
nect one end of the black jump lead X to a
suitable ground terminal, a solid piece of
metal in the engine block, or to the engine
block itself ››› Fig. 164.
5. Connect the other end of the black jump
lead X to a solid metal component bolted
to the engine block or to the engine block
itself of the vehicle with the flat battery.
Do not connect it to a point near the bat-
tery A .
6. Position the leads in such a way that they cannot come into contact with any moving
parts in the engine compartment.
Starting
7. Start the vehicle's engine with the boost- ing battery and let it run at idling speed.
8. Start the engine of the vehicle with the flat battery and wait 2 or 3 minutes until the
engine is “running”. Removing the jump leads
9. Before you remove the jump leads, switch
off the dipped beam headlights (if they
are switched on).
10.Turn on the heater blower and heated rear window in the vehicle with the flat battery.
This helps minimise voltage peaks which
are generated when the leads are discon-
nected.
11. When the engine is running, disconnect
the l e
ads in reverse order to the details
given above.
Connect the battery clamps so they have
good metal-to-metal contact with the battery
terminals.
If the engine fails to start, switch off the start-
er after about 10 seconds and try again after
about a minute. WARNING
● Please note the safety warnings referring to
working in the engine compartment
››› page 163, Working in the engine compart-
ment.
● The b att
ery providing assistance must have
the same voltage as the flat battery (12 V)
and approximately the same capacity (see
imprint on battery). Failure to comply could
result in an explosion.
● Never use jump leads when one of the bat-
teries is frozen. Danger of explosion! Even 190
Page 215 of 236
Technical features
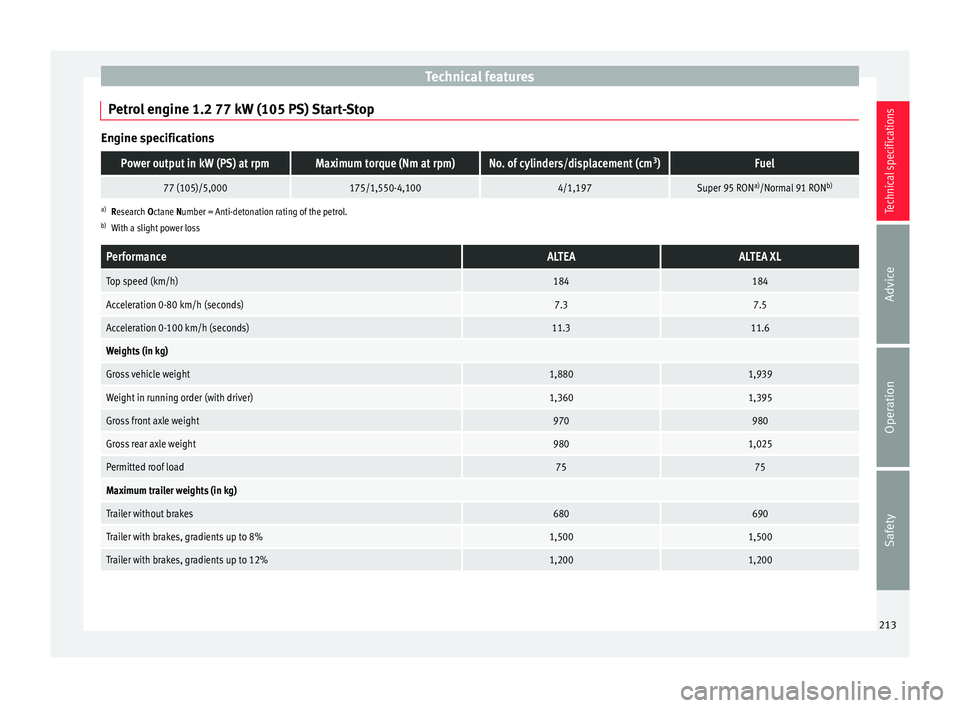
Petrol engine 1.2 77 kW (105 PS) Start-Stop Engine specificationsPower output in kW (PS) at rpmMaximum torque (Nm at rpm)No. of cylinders/displacement (cm
3
)Fuel
77 (105)/5,000175/1,550-4,1004/1,197Super 95 RON a)
/Normal 91 RON b)
a)
Research Octane Number = Anti-detonation rating of the petrol.
b) With a slight power loss
PerformanceALTEAALTEA XL
Top speed (km/h)184184
Acceleration 0-80 km/h (seconds)7.37.5
Acceleration 0-100 km/h (seconds)11.311.6
Weights (in kg)
Gross vehicle weight1,8801,939
Weight in running order (with driver)1,3601,395
Gross front axle weight970980
Gross rear axle weight9801,025
Permitted roof load7575
Maximum trailer weights (in kg)
Trailer without brakes680690
Trailer with brakes, gradients up to 8%1,5001,500
Trailer with brakes, gradients up to 12%1,2001,200 213
Technical specifications
Advice
Operation
Safety
Page 221 of 236
Technical features
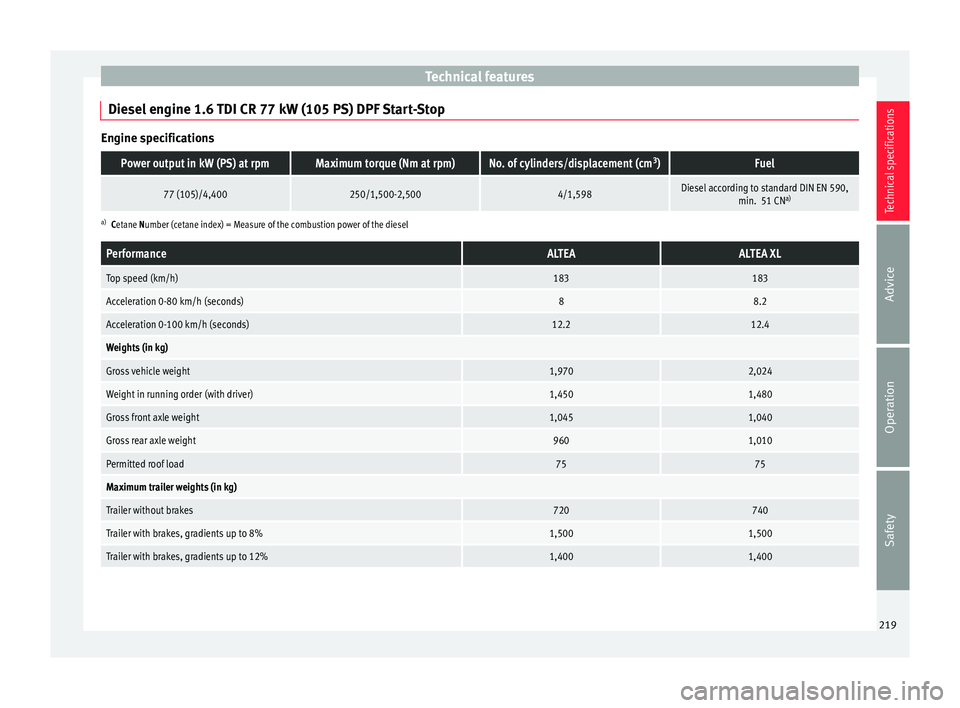
Diesel engine 1.6 TDI CR 77 kW (105 PS) DPF Start-Stop Engine specificationsPower output in kW (PS) at rpmMaximum torque (Nm at rpm)No. of cylinders/displacement (cm
3
)Fuel
77 (105)/4,400250/1,500-2,5004/1,598Diesel according to standard DIN EN 590,
min. 51 CNa)
a)
Cetane Number (cetane index) = Measure of the combustion power of the diesel
PerformanceALTEAALTEA XL
Top speed (km/h)183183
Acceleration 0-80 km/h (seconds)88.2
Acceleration 0-100 km/h (seconds)12.212.4
Weights (in kg)
Gross vehicle weight1,9702,024
Weight in running order (with driver)1,4501,480
Gross front axle weight1,0451,040
Gross rear axle weight9601,010
Permitted roof load7575
Maximum trailer weights (in kg)
Trailer without brakes720740
Trailer with brakes, gradients up to 8%1,5001,500
Trailer with brakes, gradients up to 12%1,4001,400 219
Technical specifications
Advice
Operation
Safety
Page 230 of 236
Index
Roll-back function Sliding/tilting sunroof . . . . . . . . . . . . . . . . . . . . 75
Windows . . . . . . . . . . . . . . . . . . . . . . . . . . . . . . . 73
Roof aerial . . . . . . . . . . . . . . . . . . . . . . . . . . . . . . . 147
Roof carrier attachment points . . . . . . . . . . . . . . . . . . . . . . 105
Roof carrier system . . . . . . . . . . . . . . . . . . . . . . . . 104
Roof rack . . . . . . . . . . . . . . . . . . . . . . . . . . . . . . . . 104
Roof storage compartment . . . . . . . . . . . . . . . . . . 94
Rubber seals . . . . . . . . . . . . . . . . . . . . . . . . . . . . . 151
Run-flat tyres . . . . . . . . . . . . . . . . . . . . . . . . . . . . 178
Running in Engine . . . . . . . . . . . . . . . . . . . . . . . . . . . . . . . . 130
S Safe - security system . . . . . . . . . . . . . . . . . . . . . . 64
Safe driving . . . . . . . . . . . . . . . . . . . . . . . . . . . . . . . 5
Safety . . . . . . . . . . . . . . . . . . . . . . . . . . . . . . . . . . . . 5 child safety . . . . . . . . . . . . . . . . . . . . . . . . . . . . . 24
child seats . . . . . . . . . . . . . . . . . . . . . . . . . . . . . . 24
Safety equipment . . . . . . . . . . . . . . . . . . . . . . . . . . . 5
Safety instructions Coolant temperature . . . . . . . . . . . . . . . . . . . . . 40
deactivating front passenger airbags . . . . . . . . 24
front airbags . . . . . . . . . . . . . . . . . . . . . . . . . . . . 20
head-protection airbags . . . . . . . . . . . . . . . . . . 22
side airbags . . . . . . . . . . . . . . . . . . . . . . . . . . . . 21
using child seats . . . . . . . . . . . . . . . . . . . . . . . . 25
Safety notes Seat belt tensioners . . . . . . . . . . . . . . . . . . . . . . 16
Using seat belts . . . . . . . . . . . . . . . . . . . . . . . . . 13
Seals . . . . . . . . . . . . . . . . . . . . . . . . . . . . . . . . . . . 151
Seat adjustment . . . . . . . . . . . . . . . . . . . . 88, 89, 92
Seat belt control lamp . . . . . . . . . . . . . . . . . . . . . . 11
Seat belt position for pregnant women . . . . . . . . . . . . . . . . . . . . . . 15
Seat belts . . . . . . . . . . . . . . . . . . . . . . . . . . . . . . 15 Seat belt protection . . . . . . . . . . . . . . . . . . . . . . . . 12
Seat belt release . . . . . . . . . . . . . . . . . . . . . . . . . . 15
Seat belts . . . . . . . . . . . . . . . . . . . . . . . . . . . . . . . . 11
Adjustment . . . . . . . . . . . . . . . . . . . . . . . . . . . . . 14
control lamp . . . . . . . . . . . . . . . . . . . . . . . . . . . . 11
Safety notes . . . . . . . . . . . . . . . . . . . . . . . . . . . . 13
unfastened . . . . . . . . . . . . . . . . . . . . . . . . . . . . . 13
Seat belts cleaning . . . . . . . . . . . . . . . . . . . . . . . 157
Seat belt tensioner control lamp . . . . . . . . . . . . . . . . . . . . . . . . . . . . 19
Seat belt tensioners . . . . . . . . . . . . . . . . . . . . . . . . 16
Seat heating . . . . . . . . . . . . . . . . . . . . . . . . . . . . . . 91
Seat upholstery Alcantara . . . . . . . . . . . . . . . . . . . . . . . . . . . . . . 154
cleaning Alcantara . . . . . . . . . . . . . . . . . . . . . . 154
Cleaning and maintenance of natural leather 156
cleaning the trim fabric . . . . . . . . . . . . . . . . . . 154
synthetic leather . . . . . . . . . . . . . . . . . . . . . . . . 156
Selecting a gear . . . . . . . . . . . . . . . . . . . . . . . . . . 126
Selective opening . . . . . . . . . . . . . . . . . . . . . . . . . 64
Selector lever locking . . . . . . . . . . . . . . . . . . . . . . 127
Selector lever positions . . . . . . . . . . . . . . . . . . . . 127
servotronic . . . . . . . . . . . . . . . . . . . . . . . . . . . . . . 117
Side airbags . . . . . . . . . . . . . . . . . . . . . . . . . . . . . . 21 safety instructions . . . . . . . . . . . . . . . . . . . . . . . 21
Side lights . . . . . . . . . . . . . . . . . . . . . . . . . . . . . . . . 75
Sitting position driver . . . . . . . . . . . . . . . . . . . . . . . . . . . . . . . . . . . 6
Sitting position, occupants . . . . . . . . . . . . . . . . . . . 6
Sliding/tilting sunroof . . . . . . . . . . . . . . . . . . . . . . 74
Snow chains . . . . . . . . . . . . . . . . . . . . . . . . 181, 210
Soot accumulation in the diesel engine particu- late filter
control lamp . . . . . . . . . . . . . . . . . . . . . . . . . . . . 41
Spare parts . . . . . . . . . . . . . . . . . . . . . . . . . . . . . . 147
Spare wheel . . . . . . . . . . . . . . . . . . . . . . . . . . . . . 182
Speed selector lever lock Control lamp . . . . . . . . . . . . . . . . . . . . . . . . . . . . 46 Start-Stop
Activating and deactivating . . . . . . . . . . . . . . . 139
functioning . . . . . . . . . . . . . . . . . . . . . . . . . . . . 138
Starting petrol engines . . . . . . . . . . . . . . . 121, 122
Starting the engine . . . . . . . . . . . . . . . . . . 121, 122 after the fuel tank has been run dry . . . . . . . . 122
Steam jets . . . . . . . . . . . . . . . . . . . . . . . . . . . . . . . 150
Steering . . . . . . . . . . . . . . . . . . . . . . . . . . . . . . . . . . 7
Steering wheel audio controls Audio version . . . . . . . . . . . . . . . . . . . . . . . . . . . 57
Audio + telephone version . . . . . . . . . . . . . . . . . 57
Steering wheel height adjustment . . . . . . . . . . . . . 7
Stopping distance . . . . . . . . . . . . . . . . . . . . . . . . 123
Storage compartment Centre armrest . . . . . . . . . . . . . . . . . . . . . . . . . . 93
Front passenger side . . . . . . . . . . . . . . . . . . . . . 93
Front seats . . . . . . . . . . . . . . . . . . . . . . . . . . . . . 94
Lock . . . . . . . . . . . . . . . . . . . . . . . . . . . . . . . . . . 101
Other storage compartments . . . . . . . . . . . . . . . 95
Storage in the boot floor . . . . . . . . . . . . . . . . . . . 104
Sun blind . . . . . . . . . . . . . . . . . . . . . . . . . . . . . . . . 83
Sun visor Sliding/tilting sunroof . . . . . . . . . . . . . . . . . . . . 74
Sun visors . . . . . . . . . . . . . . . . . . . . . . . . . . . . . . . . 83
Switch Hazard warning lights . . . . . . . . . . . . . . . . . . . . 81
Light switch . . . . . . . . . . . . . . . . . . . . . . . . . . . . . 75
Switches electric windows . . . . . . . . . . . . . . . . . . . . . . . . . 72
Switching off the engine . . . . . . . . . . . . . . . . . . . 122
Switch lighting . . . . . . . . . . . . . . . . . . . . . . . . . . . . 31
T
Tank Fuel level . . . . . . . . . . . . . . . . . . . . . . . . . . . . . . . 33
Reserve indicator . . . . . . . . . . . . . . . . . . . . . . . . 33
Tank capacity . . . . . . . . . . . . . . . . . . . . . . . . . . . 33
228