oil change Seat Altea 2015 Owner's Manual
[x] Cancel search | Manufacturer: SEAT, Model Year: 2015, Model line: Altea, Model: Seat Altea 2015Pages: 236, PDF Size: 4.23 MB
Page 5 of 236
Table of Contents
Table of Contents
Safety . . . . . . . . . . . . . . . . . . . . . . . . . . . . . . . . 5
Safe driving . . . . . . . . . . . . . . . . . . . . . . . . . . . . 5
Safety first! . . . . . . . . . . . . . . . . . . . . . . . . . . . . . 5
Advice about driving . . . . . . . . . . . . . . . . . . . . . 5
Proper sitting position for occupants . . . . . . . . 6
Pedal area . . . . . . . . . . . . . . . . . . . . . . . . . . . . . . 11
Seat belts . . . . . . . . . . . . . . . . . . . . . . . . . . . . . . 11
The reason why we should wear seat belts . . . 11
How to properly adjust your seatbelt . . . . . . . . 14
Seat belt tensioners . . . . . . . . . . . . . . . . . . . . . . 16
Airbag system . . . . . . . . . . . . . . . . . . . . . . . . . . 17
Brief introduction . . . . . . . . . . . . . . . . . . . . . . . . 17
Airbag overview . . . . . . . . . . . . . . . . . . . . . . . . . 20
Deactivating airbags . . . . . . . . . . . . . . . . . . . . . 23
Transporting children safety . . . . . . . . . . . . . . . 24
Safety for children . . . . . . . . . . . . . . . . . . . . . . . 24
Child seats . . . . . . . . . . . . . . . . . . . . . . . . . . . . . 26
Operation . . . . . . . . . . . . . . . . . . . . . . . . . . . . . 31
Dash panel . . . . . . . . . . . . . . . . . . . . . . . . . . . . . 31
Overview . . . . . . . . . . . . . . . . . . . . . . . . . . . . . . . 31
Instruments . . . . . . . . . . . . . . . . . . . . . . . . . . . . 32
Warning lamps . . . . . . . . . . . . . . . . . . . . . . . . . . 35
Digital instrument panel display . . . . . . . . . . . . 47
Instrument panel menus* . . . . . . . . . . . . . . . . . 50
Steering wheel controls* . . . . . . . . . . . . . . . . . . 57
General information . . . . . . . . . . . . . . . . . . . . . . 57
Audio system . . . . . . . . . . . . . . . . . . . . . . . . . . . 57
Radio navigation system . . . . . . . . . . . . . . . . . . 61
Opening and closing . . . . . . . . . . . . . . . . . . . . . 63
Central locking . . . . . . . . . . . . . . . . . . . . . . . . . . 63
Keys . . . . . . . . . . . . . . . . . . . . . . . . . . . . . . . . . . . 66
Radio frequency remote control . . . . . . . . . . . . 67
Anti-theft alarm system* . . . . . . . . . . . . . . . . . . 68
Boot hatch . . . . . . . . . . . . . . . . . . . . . . . . . . . . . 71 Electric windows . . . . . . . . . . . . . . . . . . . . . . . . . 72
Sliding/tilting sunroof* . . . . . . . . . . . . . . . . . . . 74
Lights and visibility
. . . . . . . . . . . . . . . . . . . . . . 75
Lights . . . . . . . . . . . . . . . . . . . . . . . . . . . . . . . . . 75
Interior lights . . . . . . . . . . . . . . . . . . . . . . . . . . . 82
Visibility . . . . . . . . . . . . . . . . . . . . . . . . . . . . . . . 83
Windscreen wiper and rear window wiper
systems . . . . . . . . . . . . . . . . . . . . . . . . . . . . . . . . 84
Rear vision mirrors . . . . . . . . . . . . . . . . . . . . . . . 86
Seats and head restraints . . . . . . . . . . . . . . . . . 88
Adjusting the seat and head restraints . . . . . . 88
Seat functions . . . . . . . . . . . . . . . . . . . . . . . . . . 91
Rear seats . . . . . . . . . . . . . . . . . . . . . . . . . . . . . . 92
Transport and practical equipment . . . . . . . . . 93
Compartments . . . . . . . . . . . . . . . . . . . . . . . . . . 93
Multi-purpose mobile storage compartment* . 96
Ashtray*, cigarette lighter* and power sockets 98
First-aid kit, warning triangle, fire extinguisher 100
Luggage compartment . . . . . . . . . . . . . . . . . . . . 101
Roof carrier/rack system* . . . . . . . . . . . . . . . . . 104
Air conditioning . . . . . . . . . . . . . . . . . . . . . . . . . 107
Heating . . . . . . . . . . . . . . . . . . . . . . . . . . . . . . . . 107
Climatic* . . . . . . . . . . . . . . . . . . . . . . . . . . . . . . . 109
2C-Climatronic* . . . . . . . . . . . . . . . . . . . . . . . . . 112
General notes . . . . . . . . . . . . . . . . . . . . . . . . . . . 116
Driving . . . . . . . . . . . . . . . . . . . . . . . . . . . . . . . . 117
Power steering (servotronic*) . . . . . . . . . . . . . . 117
All-wheel drive* . . . . . . . . . . . . . . . . . . . . . . . . . 117
Driving with LPG* . . . . . . . . . . . . . . . . . . . . . . . . 118
Journeys abroad . . . . . . . . . . . . . . . . . . . . . . . . . 120
Ignition lock . . . . . . . . . . . . . . . . . . . . . . . . . . . . 120
Braking and parking . . . . . . . . . . . . . . . . . . . . . 123
Manual gearbox . . . . . . . . . . . . . . . . . . . . . . . . . 126
Automatic gearbox/DSG automatic gearbox* . 127
Run-in and economical driving . . . . . . . . . . . . . 130
Driver assistance systems . . . . . . . . . . . . . . . . . 134
Braking and stability systems . . . . . . . . . . . . . . 134
Start-Stop System* . . . . . . . . . . . . . . . . . . . . . . . 138 Parking aid acoustic system* . . . . . . . . . . . . . . 140
Cruise speed* (cruise control system - CCS) . . . 142
Towing bracket device
. . . . . . . . . . . . . . . . . . . . 144
Trailer towing . . . . . . . . . . . . . . . . . . . . . . . . . . . 144
Advice . . . . . . . . . . . . . . . . . . . . . . . . . . . . . . . . 147
Care and maintenance . . . . . . . . . . . . . . . . . . . . 147
Accessories and technical modifications . . . . . 147
Care and cleaning . . . . . . . . . . . . . . . . . . . . . . . 148
Care of the vehicle exterior . . . . . . . . . . . . . . . . 149
Caring for the vehicle interior . . . . . . . . . . . . . . 153
Checking and refilling levels . . . . . . . . . . . . . . . 158
Fuel . . . . . . . . . . . . . . . . . . . . . . . . . . . . . . . . . . . 158
Petrol . . . . . . . . . . . . . . . . . . . . . . . . . . . . . . . . . . 159
Diesel . . . . . . . . . . . . . . . . . . . . . . . . . . . . . . . . . 160
LPG system (Liquefied petroleum gas)* . . . . . . 160
Working in the engine compartment . . . . . . . . 163
Engine oil . . . . . . . . . . . . . . . . . . . . . . . . . . . . . . 166
Cooling system . . . . . . . . . . . . . . . . . . . . . . . . . . 169
Windscreen washer reservoir . . . . . . . . . . . . . . 171
Brake fluid . . . . . . . . . . . . . . . . . . . . . . . . . . . . . 172
Vehicle battery . . . . . . . . . . . . . . . . . . . . . . . . . . 173
Wheels . . . . . . . . . . . . . . . . . . . . . . . . . . . . . . . . 175
Wheels and tyres . . . . . . . . . . . . . . . . . . . . . . . . 175
Winter service . . . . . . . . . . . . . . . . . . . . . . . . . . . 180
Emergencies . . . . . . . . . . . . . . . . . . . . . . . . . . . . 181
Vehicle tools, spare wheel . . . . . . . . . . . . . . . . . 181
Wheel change . . . . . . . . . . . . . . . . . . . . . . . . . . . 182
Tyre repair . . . . . . . . . . . . . . . . . . . . . . . . . . . . . . 186
Jump-starting . . . . . . . . . . . . . . . . . . . . . . . . . . . 189
Towing and tow-starting . . . . . . . . . . . . . . . . . . 191
Emergency locking and unlocking . . . . . . . . . . 193
Changing the wiper blades . . . . . . . . . . . . . . . . 194
Fuses and bulbs . . . . . . . . . . . . . . . . . . . . . . . . . 196
Fuses . . . . . . . . . . . . . . . . . . . . . . . . . . . . . . . . . . 196
Changing the lights . . . . . . . . . . . . . . . . . . . . . . 198
3
Page 41 of 236
Dash panel
● Coolant symbol with the warning mes-
s ag
e STOP SEE COOLANT INSTRUCTION MAN-
UAL.
● Engine oil pressure symbol with the
warnin
g message STOP ENGINE OIL PRESSURE
LOW! INSTRUCTION MANUAL.
Warning messages, Priority 2 (yellow)
If one of these faults occurs, the correspond-
ing warning lamp lights up and is accompa-
nied by an audible warning. Check the corre-
sponding function as soon as possible al-
though the vehicle may be used without risk.
If several priority 2 warning messages are de-
tected at the same time, the symbols are dis-
played one after the other for about 2 sec-
onds at a time. After a set time, the informa-
tion text will disappear and the symbol will
be shown as a reminder at the side of the
display.
Priority 2 warning messages will not be
shown until all Priority 1 warning messages
have been dealt with!
Examples of priority 2 warning messages
(yellow): 1)
● Fuel warning light with the information text
PLEASE REFUEL . ●
Windscreen washer fluid symbol with the
inform
ation text REFILL WINDSCREEN WASHER
FLUID. Top up the washer fluid level.
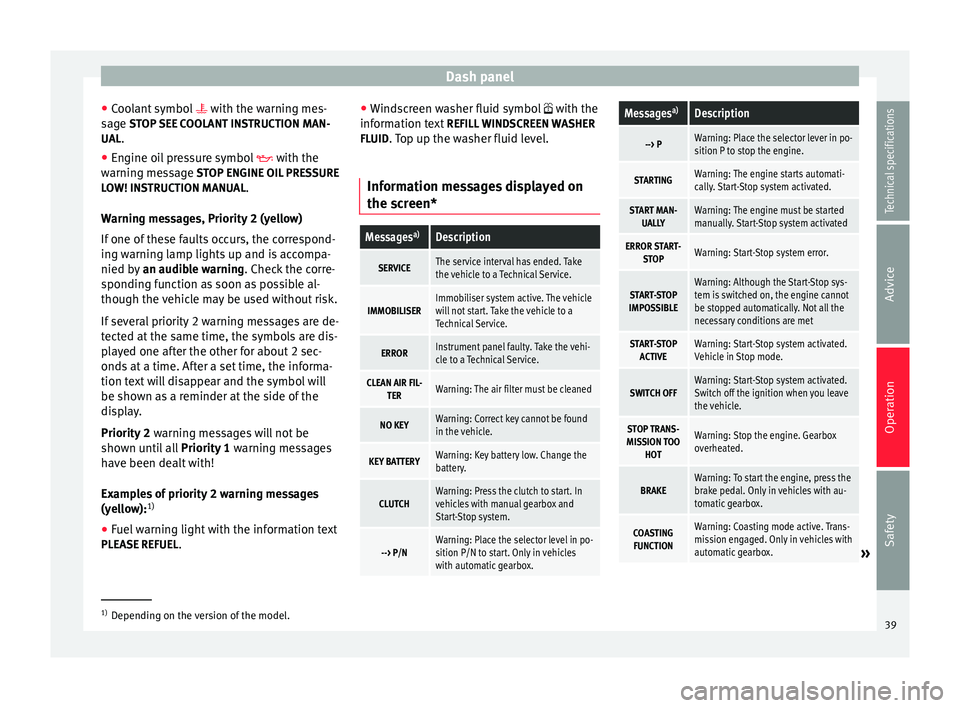
Information messages displayed on
the screen*
Messages a)Description
SERVICEThe service interval has ended. Take
the vehicle to a Technical Service.
IMMOBILISERImmobiliser system active. The vehicle
will not start. Take the vehicle to a
Technical Service.
ERRORInstrument panel faulty. Take the vehi-
cle to a Technical Service.
CLEAN AIR FIL-
TERWarning: The air filter must be cleaned
NO KEYWarning: Correct key cannot be found
in the vehicle.
KEY BATTERYWarning: Key battery low. Change the
battery.
CLUTCHWarning: Press the clutch to start. In
vehicles with manual gearbox and
Start-Stop system.
--> P/NWarning: Place the selector level in po-
sition P/N to start. Only in vehicles
with automatic gearbox.
Messages a)Description
--> PWarning: Place the selector lever in po-
sition P to stop the engine.
STARTINGWarning: The engine starts automati-
cally. Start-Stop system activated.
START MAN-
UALLYWarning: The engine must be started
manually. Start-Stop system activated
ERROR START- STOPWarning: Start-Stop system error.
START-STOP
IMPOSSIBLEWarning: Although the Start-Stop sys-
tem is switched on, the engine cannot
be stopped automatically. Not all the
necessary conditions are met
START-STOP ACTIVEWarning: Start-Stop system activated.
Vehicle in Stop mode.
SWITCH OFFWarning: Start-Stop system activated.
Switch off the ignition when you leave
the vehicle.
STOP TRANS-
MISSION TOO HOTWarning: Stop the engine. Gearbox
overheated.
BRAKEWarning: To start the engine, press the
brake pedal. Only in vehicles with au-
tomatic gearbox.
COASTINGFUNCTIONWarning: Coasting mode active. Trans-
mission engaged. Only in vehicles with
automatic gearbox.
» 1)
Depending on the version of the model.
39
Technical specifications
Advice
Operation
Safety
Page 50 of 236
Operation
to the gear display indicating whether you
should change up or down. Note
The gear change indication should not be tak-
en into account when quick acceleration is re-
quired (for example when overtaking). Odometer
The left-hand counter in the display registers
the total amount of distance covered by the
vehicle.
The right-hand counter registers the short
journeys. The last digit indicates steps of 100
metres. The trip recorder counter may be re-
set by holding down the reset button for a
few seconds.
Flexible service interval display Vehicles with
Service intervals dependent on
time/distance travelled already have certain
service intervals set. The intervals are calcu-
lated individually in vehicles with LongLife
service .
The ser v
ice interval display only indicates the
dates of services that include engine oil
change. The dates of all other services, such
as the Inspection Service or brake fluid change, appear in the sticker on the door pil-
lar or in the Maintenance Programme.
A
Service pre-warning will appear in the od-
ometer if a service is due soon. A “spanner”
symbol appears and the display “km” with
the distance that can be driven until the next
service appointment is due. This signal
changes after around 10 seconds. A “clock
symbol” appears and the number of days un-
til the service appointment should be carried
out. The following message is shown in the
instrument panel display*:
Service in
[XXXX]
kmor
[XXXX]
days
The service message will disappear approxi-
mately 20 seconds after the ignition is
switched on or the engine is running. The
normal display can be resumed by briefly
pressing the reset button on the trip counter
or by pressing the OK button on the steering
wheel controls.
With the ignition on, you can check the cur-
rent service message at any moment in the
Vehicle status menu or turning the reset but-
ton to access the service display. An
overdue service
is indicated by a minus
s
ign in front of the mileage or day informa-
tion.
Indications for vehicles with LongLife service
Technical progress has made it possible to
considerably reduce servicing requirements.
With the LongLife System, SEAT ensures that
your vehicle only has an Interval Service
when it is necessary. The length of the Inter-
val Services (max. 2 years) is determined by
factors such as conditions under which the
vehicle is used and personal driving style.
The service pre-warning will first appear 20
days before the date on which the service is
due. The distance travelled is rounded off to
the nearest 100 km and the time to full days.
The current service message can only be con-
sulted 500 km after the last service. Until
that time, only dashes are displayed. Note
● If you reset the display manually, the next
service interval will be indicated after
15,000 km or one year and will not be calcu-
lated individually.
● Do not reset the display between service
intervals as the display will otherwise be in-
correct. 48
Page 133 of 236
Driving
From 1,000 to 1,500 kilometres
– Speeds can be gradually increased to the
maximum road speed or maximum
permissible engine speed (rpm).
During its first few hours of running, the in-
ternal friction in the engine is greater than
later on, when all the moving parts have bed-
ded in. For the sake of the environment
If the engine is run in gently, its life will be in-
creased and its oil consumption reduced. Environmental friendliness
Environmental protection is a top priority in
the design, choice of materials and manufac-
ture of your new SEAT.
Constructive measures to encourage
recycling
● Joints and connections designed for easy
dismantling
● Modular construction to facilitate disman-
tling
● Increased use of single-grade materials.
● Plastic parts and elastomers are marked in
accordance with ISO 1043, ISO 11469 and
ISO 1629. Choice of materials
●
Use of recycled materials.
● Use of compatible plastics in the same part
if its components are not easily separated.
● Use of recycled materials and/or materials
originating from renewable sources.
● Reduction of volatile components, includ-
ing odour, in plastic materials.
● Use of CFC-free coolants.
Ban on heavy metals, with the exceptions
dictated by law (Annex II of ELV Directive
2000/53/EC): cadmium, lead, mercury, hexa-
v al
ent chromium.
Manufacturing methods
● Reduction of the quantity of thinner in the
protective wax for cavities.
● Use of plastic film as protection during ve-
hicle transport.
● Use of solvent-free adhesives.
● Use of CFC-free coolants in cooling sys-
tems.
● Recycling and energy recovery from resi-
dues (RDF).
● Improvement in the quality of waste water.
● Use of systems for the recovery of residual
heat (thermal recovery, enthalpy wheels,
etc.).
● Use of water-soluble paints. Catalytic converter To maintain the useful life of the catalytic
converter
– Use only unleaded petrol with petrol en-
gines, as lead damages the catalytic con-
verter.
– Do not let the fuel get too low in the tank.
– For engine oil changes, do not replenish
with too much engine oil ››› page 168, Top-
ping up engine oil .
– Never tow the vehicle to start it, use jump
leads if necessary ›››
page 189.
If you notice misfiring, uneven running or
loss of power when the vehicle is moving, re-
duce speed immediately and have the vehi-
cle inspected at the nearest specialised
workshop. In general, the exhaust warning
lamp will light up when any of the described
symptoms occur ›››
page 35 . If this happens,
u nb
urnt fuel can enter the exhaust system
and escape into the environment. The cata-
lytic converter can also be damaged by over-
heating. WARNING
The catalytic converter reaches very high
temperatures! Risk of fire!
● Never park where the catalytic converter
could come into contact with dry grass or
flammable materials under the vehicle. » 131
Technical specifications
Advice
Operation
Safety
Page 168 of 236
Advice
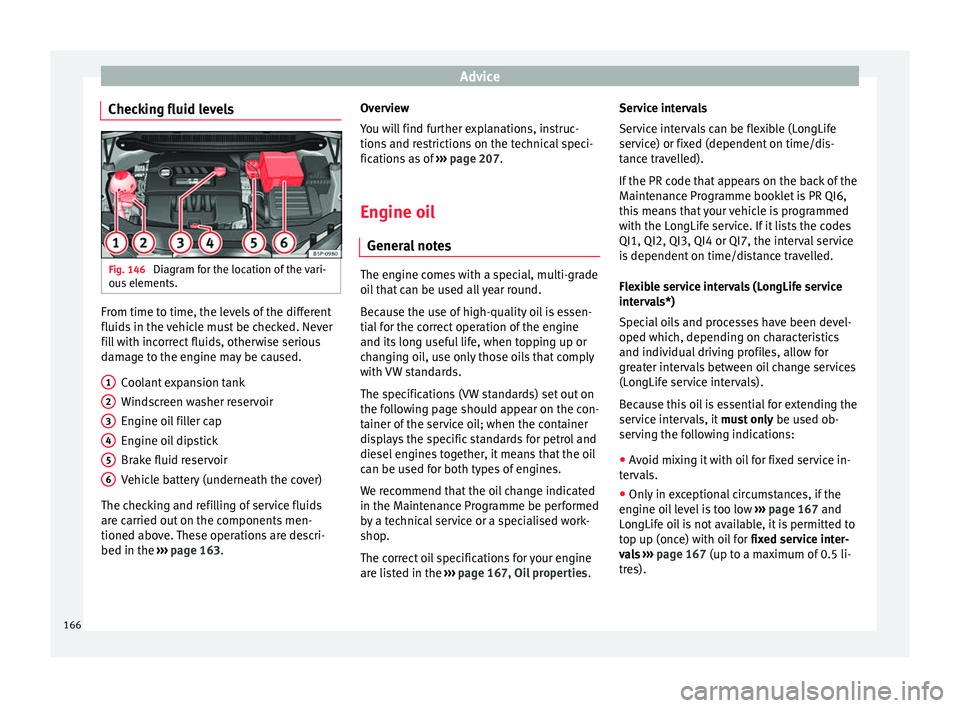
Checking fluid levels Fig. 146
Diagram for the location of the vari-
ous elements. From time to time, the levels of the different
fluids in the vehicle must be checked. Never
fill with incorrect fluids, otherwise serious
damage to the engine may be caused.
Coolant expansion tank
Windscreen washer reservoir
Engine oil filler cap
Engine oil dipstick
Brake fluid reservoir
Vehicle battery (underneath the cover)
The checking and refilling of service fluids
are carried out on the components men-
tioned above. These operations are descri-
bed in the ››› page 163 .
1 2
3
4
5
6 Overview
You will find further explanations, instruc-
tions and restrictions on the technical speci-
fications as of
››› page 207 .
En gine oi
l
General notes The engine comes with a special, multi-grade
oil that can be used all year round.
Because the use of high-quality oil is essen-
tial for the correct operation of the engine
and its long useful life, when topping up or
changing oil, use only those oils that comply
with VW standards.
The specifications (VW standards) set out on
the following page should appear on the con-
tainer of the service oil; when the container
displays the specific standards for petrol and
diesel engines together, it means that the oil
can be used for both types of engines.
We recommend that the oil change indicated
in the Maintenance Programme be performed
by a technical service or a specialised work-
shop.
The correct oil specifications for your engine
are listed in the
›››
page 167, Oil properties .Service intervals
Service intervals can be flexible (LongLife
service) or fixed (dependent on time/dis-
tance travelled).
If the PR code that appears on the back of the
Maintenance Programme booklet is PR QI6,
this means that your vehicle is programmed
with the LongLife service. If it lists the codes
QI1, QI2, QI3, QI4 or QI7, the interval service
is dependent on time/distance travelled.
Flexible service intervals (LongLife service
intervals*)
Special oils and processes have been devel-
oped which, depending on characteristics
and individual driving profiles, allow for
greater intervals between oil change services
(LongLife service intervals).
Because this oil is essential for extending the
service intervals, it
must only be used ob-
serving the following indications:
● Avoid mixing it with oil for fixed service in-
tervals.
● Only in exceptional circumstances, if the
engine oil level is too low ››› page 167 and
LongLife oil is not available, it is permitted to
top up (once) with oil for fixed service inter-
vals › ›
›
page 167 (up to a maximum of 0.5 li-
tres).
166
Page 171 of 236
Checking and refilling levels
Changing engine oil The engine oil must be changed at the inter-
vals given in the service schedule.
We recommend that you have the engine oil
changed by a Technical Service.
The oil change intervals are shown in the
Maintenance Programme.
WARNING
Only change the engine oil yourself if you
have the specialist knowledge required!
● Before opening the bonnet, read and ob-
serve the warnings ››› page 163, Safety in-
structions on working in the engine compart-
ment.
● Wait
for the engine to cool down. Hot oil
may cause burn injuries.
● Wear eye protection to avoid injuries, such
as acid burns, caused by splashes of oil.
● When removing the oil drain plug with your
fingers, keep your arm horizontal to help pre-
vent oil from running down your arm.
● Wash your skin thoroughly if it comes into
contact with engine oil.
● Engine oil is poisonous! Used oil must be
stored in a safe place out of the reach of chil-
dren. CAUTION
No additives should be used with engine oil.
This could result in engine damage. Any dam-
age caused by the use of such additives
would not be covered by the factory warranty. For the sake of the environment
● Because of disposal problems and the spe-
cial tools and specialist knowledge required,
we recommend that you have the engine oil
and filter changed by a Technical Service.
● Never pour oil down drains or into the
ground.
● Use a suitable container when draining the
used oil. It must be large enough to hold all
the engine oil. Cooling system
Engine coolant specifications The engine cooling system is supplied from
the factory with a specially treated mixture of
water and, at least, 40 % of the additive
G 13
(TLVW 774 J). The engine coolant additive is
recognisable by its purple colour. This mix-
ture of water and additive gives the necessa-
ry frost protection down to -25°C (-13 F) and
protects the light alloy parts of the cooling
system against corrosion. It also prevents scaling and considerably raises the boiling
point of the coolant.
To protect the engine cooling system, the
percentage of additive must
always be at
l e
ast 40 %, even in warm climates where an-
ti-freeze protection is not required.
If greater frost protection is required in very
cold climates, the proportion of additive can
be increased. However, the percentage of ad-
ditive should not exceed 60%, as this would
reduce frost protection and, in turn, decrease
cooling capacity.
When the coolant is topped up, use a mixture
of distilled water and, at least, 40 % of the G
13 or G 12 plu
s-plus (TL-VW 774 G) additive
(both are purple) to obtain an optimum anti-
corrosion protection ››› . The mixture of G
13 with G 12 plus (TL-VW 774 F), G 12 (red) or
G 11 (green-blue) engine coolants will signifi-
cantly reduce the anticorrosion protection
and should, therefore be avoided ››› .
WARNING
If there is not enough anti-freeze in the cool-
ant system, the engine may fail leading to se-
rious damage.
● Please make sure that the percentage of
additive is correct with respect to the lowest
expected ambient temperature in the zone
where the vehicle is to be used.
● When the outside temperature is very low,
the coolant could freeze and the vehicle » 169
Technical specifications
Advice
Operation
Safety
Page 174 of 236
Advice
Brake fluid Checking the brake fluid level Fig. 151
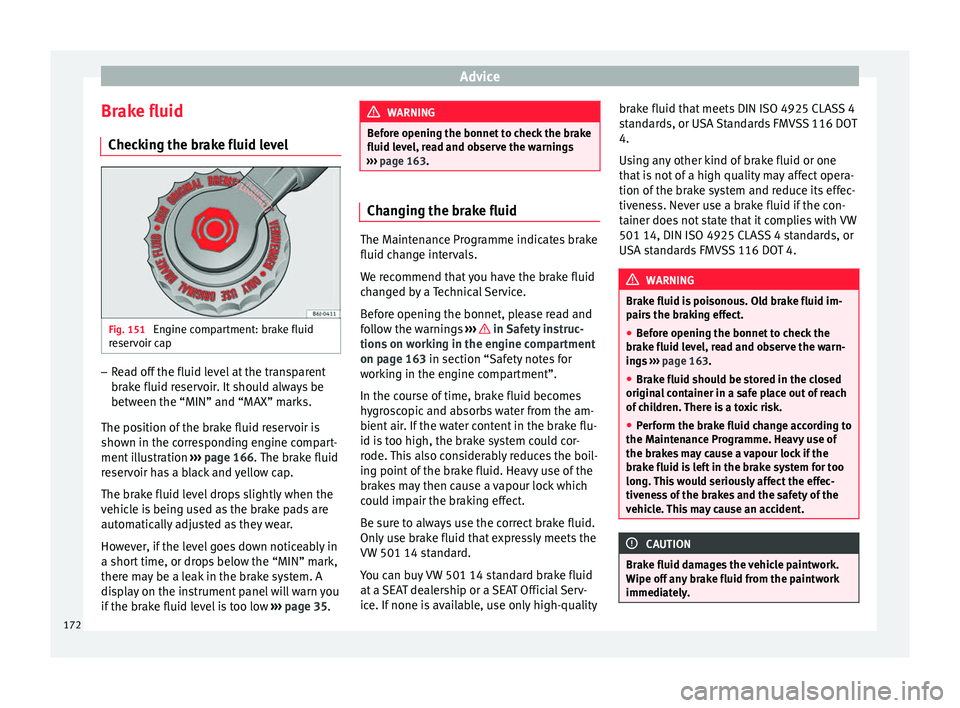
Engine compartment: brake fluid
reservoir cap –
Read off the fluid level at the transparent
brake fluid reservoir. It should always be
between the “MIN” and “MAX” marks.
The position of the brake fluid reservoir is
shown in the corresponding engine compart-
ment illustration ››› page 166. The brake fluid
reservoir has a black and yellow cap.
The brake fluid level drops slightly when the
vehicle is being used as the brake pads are
automatically adjusted as they wear.
However, if the level goes down noticeably in
a short time, or drops below the “MIN” mark,
there may be a leak in the brake system. A
display on the instrument panel will warn you
if the brake fluid level is too low ››› page 35. WARNING
Before opening the bonnet to check the brake
fluid level, read and observe the warnings
››› page 163. Changing the brake fluid
The Maintenance Programme indicates brake
fluid change intervals.
We recommend that you have the brake fluid
changed by a Technical Service.
Before opening the bonnet, please read and
follow the warnings
››› in Safety instruc-
tions on working in the engine compartment
on page 163 in section “Safety notes for
w ork
ing in the engine compartment”.
In the course of time, brake fluid becomes
hygroscopic and absorbs water from the am-
bient air. If the water content in the brake flu-
id is too high, the brake system could cor-
rode. This also considerably reduces the boil-
ing point of the brake fluid. Heavy use of the
brakes may then cause a vapour lock which
could impair the braking effect.
Be sure to always use the correct brake fluid.
Only use brake fluid that expressly meets the
VW 501 14 standard.
You can buy VW 501 14 standard brake fluid
at a SEAT dealership or a SEAT Official Serv-
ice. If none is available, use only high-quality brake fluid that meets DIN ISO 4925 CLASS 4
standards, or USA Standards FMVSS 116 DOT
4.
Using any other kind of brake fluid or one
that is not of a high quality may affect opera-
tion of the brake system and reduce its effec-
tiveness. Never use a brake fluid if the con-
tainer does not state that it complies with VW
501 14, DIN ISO 4925 CLASS 4 standards, or
USA standards FMVSS 116 DOT 4.
WARNING
Brake fluid is poisonous. Old brake fluid im-
pairs the braking effect.
● Before opening the bonnet to check the
brake fluid level, read and observe the warn-
ings ››› page 163.
● Br ak
e fluid should be stored in the closed
original container in a safe place out of reach
of children. There is a toxic risk.
● Perform the brake fluid change according to
the Maintenance Programme. Heavy use of
the brakes may cause a vapour lock if the
brake fluid is left in the brake system for too
long. This would seriously affect the effec-
tiveness of the brakes and the safety of the
vehicle. This may cause an accident. CAUTION
Brake fluid damages the vehicle paintwork.
Wipe off any brake fluid from the paintwork
immediately. 172
Page 179 of 236
Wheels
Tyre useful life Fig. 152
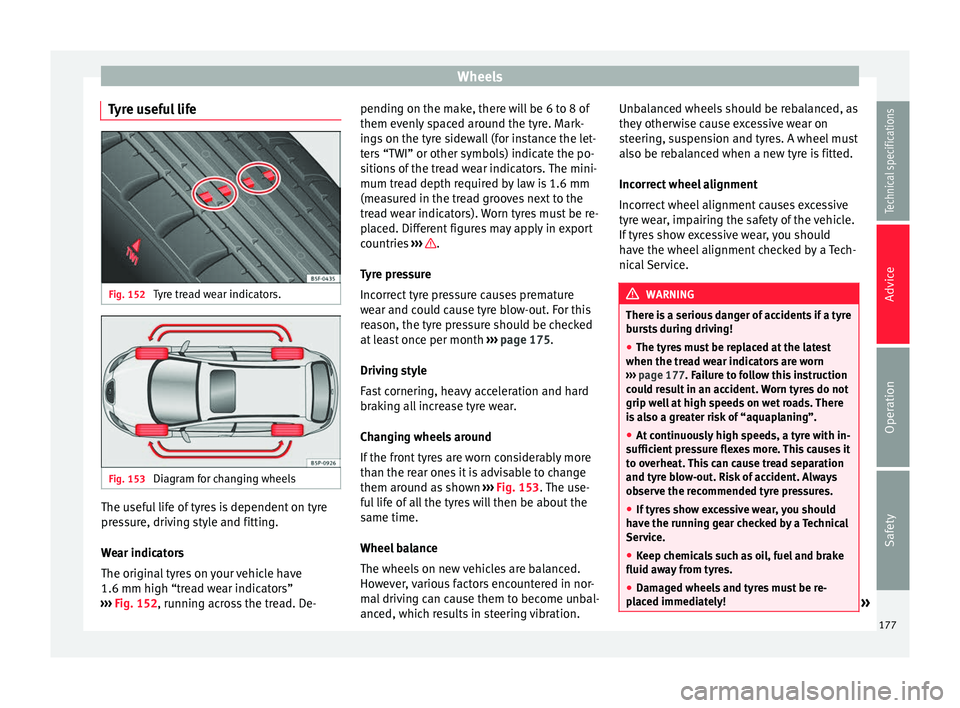
Tyre tread wear indicators. Fig. 153
Diagram for changing wheels The useful life of tyres is dependent on tyre
pressure, driving style and fitting.
Wear indicators
The original tyres on your vehicle have
1.6 mm high “tread wear indicators”
››› Fig. 152 , running across the tread. De- pendin
g on the m ake, there will be 6 to 8 of
them evenly spaced around the tyre. Mark-
ings on the tyre sidewall (for instance the let-
ters “TWI” or other symbols) indicate the po-
sitions of the tread wear indicators. The mini-
mum tread depth required by law is 1.6 mm
(measured in the tread grooves next to the
tread wear indicators). Worn tyres must be re-
placed. Different figures may apply in export
countries ››› .
Tyre pressure
Incorrect tyre pressure causes premature
wear and could cause tyre blow-out. For this
reason, the tyre pressure should be checked
at least once per month ››› page 175.
Driving style
Fast cornering, heavy acceleration and hard
braking all increase tyre wear.
Changing wheels around
If the front tyres are worn considerably more
than the rear ones it is advisable to change
them around as shown ››› Fig. 153 . The use-
f u
l life of all the tyres will then be about the
same time.
Wheel balance
The wheels on new vehicles are balanced.
However, various factors encountered in nor-
mal driving can cause them to become unbal-
anced, which results in steering vibration. Unbalanced wheels should be rebalanced, as
they otherwise cause excessive wear on
steering, suspension and tyres. A wheel must
also be rebalanced when a new tyre is fitted.
Incorrect wheel alignment
Incorrect wheel alignment causes excessive
tyre wear, impairing the safety of the vehicle.
If tyres show excessive wear, you should
have the wheel alignment checked by a Tech-
nical Service.
WARNING
There is a serious danger of accidents if a tyre
bursts during driving!
● The tyres must be replaced at the latest
when the tread wear indicators are worn
››› page 177. Failure to follow this instruction
could result in an accident. Worn tyres do not
grip well at high speeds on wet roads. There
is also a greater risk of “aquaplaning”.
● At continuously high speeds, a tyre with in-
sufficient pressure flexes more. This causes it
to overheat. This can cause tread separation
and tyre blow-out. Risk of accident. Always
observe the recommended tyre pressures.
● If tyres show excessive wear, you should
have the running gear checked by a Technical
Service.
● Keep chemicals such as oil, fuel and brake
fluid away from tyres.
● Damaged wheels and tyres must be re-
placed immediately! » 177
Technical specifications
Advice
Operation
Safety
Page 182 of 236
Advice
For the sake of the environment
Old tyres must be disposed of according to
the laws in the country concerned. Note
● For technical reasons, it is not generally
possible to use the wheels from other vehi-
cles. This can also apply to wheels of the
same model. The use of wheels or tyres
which have not been approved by SEAT for
use with your model may invalidate the vehi-
cle's type approval for use on public roads.
● If the spare tyre is not the same as the
tyres that are mounted on the vehicle (e.g.
winter tyres) you should only use the spare
tyre for a short period of time and drive with
extra care. Refit the normal road wheel as
soon as possible. Wheel bolts
The design of wheel bolts is matched to the
rims. If different wheel rims are fitted, the
correct wheel bolts with the right length and
correctly shaped bolt heads must be used.
This ensures that wheels are fitted securely
and that the brake system functions correctly.
In certain circumstances, you should not use
wheel bolts from a different vehicle, even if it
is the same model
›››
page 147. After the wheels have been changed, the
tightening torque of the wheel bolts should
be checked as soon as possible with a torque
wrench
››› . The tightening torque for steel
and alloy wheels is 120 Nm. WARNING
If the wheel bolts are not tightened correctly,
the wheel could become loose while driving.
Risk of accident.
● The wheel bolts must be clean and turn
easily. Never apply grease or oil to them.
● Use only wheel bolts which belong to the
wheel.
● If the tightening torque of the wheel bolts
is too low, they could loosen whilst the vehi-
cle is in motion. Risk of accident! If the tight-
ening torque is too high, the wheel bolts and
threads can be damaged. CAUTION
The prescribed tightening torque for wheel
bolts for steel and alloy wheels is 120 Nm. Winter service
Winter tyres In winter conditions winter tyres will consid-
erably improve the vehicle's handling. Sum-mer tyres (width, rubber compound, tread
pattern) provide less grip on ice and snow.
Winter tyres must be inflated to a
pressure of
0.2 bar (2.9 psi/20 kPa) higher than the pres-
sures specified for summer tyres (see sticker
on fuel tank flap).
Winter tyres must be fitted on all four wheels.
Information on permitted winter tyre sizes
can be found in the vehicle's registration
documentation. Use only radial winter tyres.
All tyre sizes listed in the vehicle documenta-
tion also apply to winter tyres.
Winter tyres lose their effectiveness when the
tread is worn down to a depth of 4 mm.
The speed rating code ››› page 179, New
tyres and wheels determines the following
speed limits for winter tyres:
›
› › max. 160 km/h
max. 180 km/h
max. 190 km/h
max. 210 km/h
In some countries, vehicles which can exceed
the speed rating of the fitted tyre must have
an appropriate sticker in the driver's field of
view. These stickers are available from your
technical service. The legal requirements of
each country must be followed.
Do not have winter tyres fitted for unnecessa-
rily long periods. Vehicles with summer tyres Q
S
T
H
180
Page 197 of 236
Emergencies
If the windscreen wipers scratch , they should
be replaced if they are damaged, or cleaned
if they are soiled.
If this does not produce the desired results,
the setting angle of the windscreen wiper
arms might be incorrect. They should be
checked by a specialised workshop and cor-
rected if necessary. WARNING
Do not drive unless you have good visibility
through all windows!
● Clean the windscreen wiper blades and all
windows regularly.
● The wiper blades should be changed once
or twice a year. CAUTION
● Damaged or dirty windscreen wipers could
scratch the windscreen.
● Never use fuel, nail varnish remover, paint
thinner or similar products to clean the win-
dows. This could damage the windscreen
wiper blades.
● Never move the windscreen wiper or wind-
screen wiper arm manually. This could cause
damage.
● To prevent damage to the bonnet and the
windscreen wiper arms, the latter should only
be lifted off the windscreen when in service
position. Note
● The windscreen wiper arms can be moved
to the service position only when the bonnet
is properly closed. Changing the rear wiper blade
3 Applies to the model: ALTEA
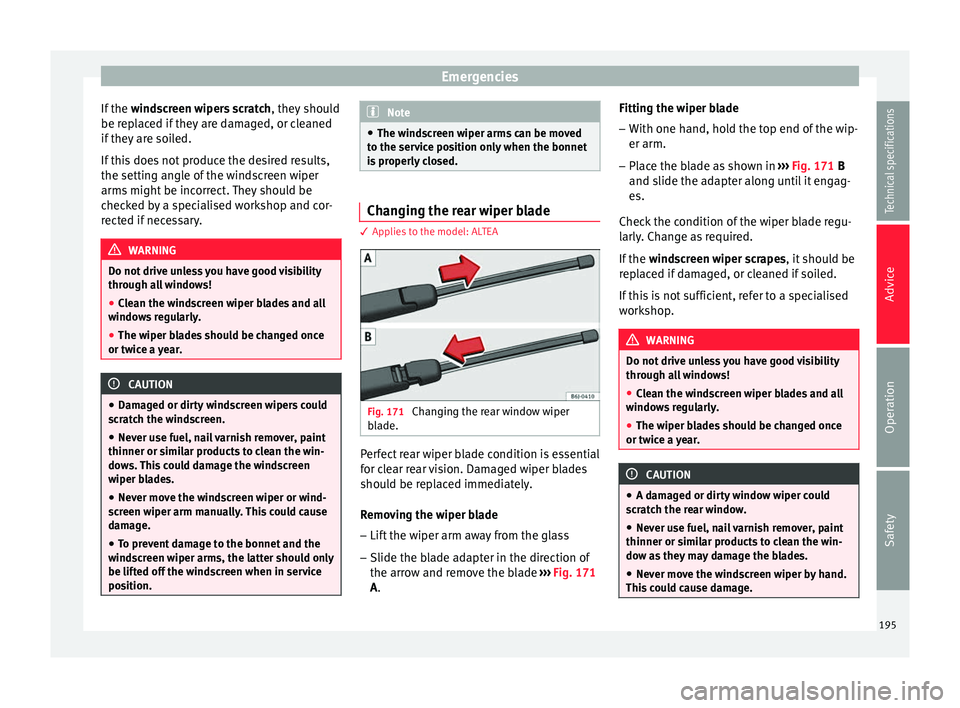
Fig. 171
Changing the rear window wiper
blade. Perfect rear wiper blade condition is essential
for clear rear vision. Damaged wiper blades
should be replaced immediately.
Removing the wiper blade
– Lift the wiper arm away from the glass
– Slide the blade adapter in the direction of
the arrow and remove the blade ››› Fig. 171
A . Fittin
g the w iper blade
– With one hand, hold the top end of the wip-
er arm.
– Place the blade as shown in ››› Fig. 171
B
and slide the adapter along until it engag-
es.
Check the condition of the wiper blade regu-
larly. Change as required.
If the windscreen wiper scrapes, it should be
replaced if damaged, or cleaned if soiled.
If this is not sufficient, refer to a specialised
workshop. WARNING
Do not drive unless you have good visibility
through all windows!
● Clean the windscreen wiper blades and all
windows regularly.
● The wiper blades should be changed once
or twice a year. CAUTION
● A damaged or dirty window wiper could
scratch the rear window.
● Never use fuel, nail varnish remover, paint
thinner or similar products to clean the win-
dow as they may damage the blades.
● Never move the windscreen wiper by hand.
This could cause damage. 195
Technical specifications
Advice
Operation
Safety