fog light Seat Altea XL 2009 Owner's Manual
[x] Cancel search | Manufacturer: SEAT, Model Year: 2009, Model line: Altea XL, Model: Seat Altea XL 2009Pages: 297, PDF Size: 9.36 MB
Page 75 of 297
Cockpit
74
WARNING
•
Failure to observe warning lamps and warning messages can result in
serious personal injury or damage to your vehicle.
•
The risk of an accident increases if your vehicle breaks down. Use a
warning triangle to draw the attention of other road users in order to
prevent danger to thirds.
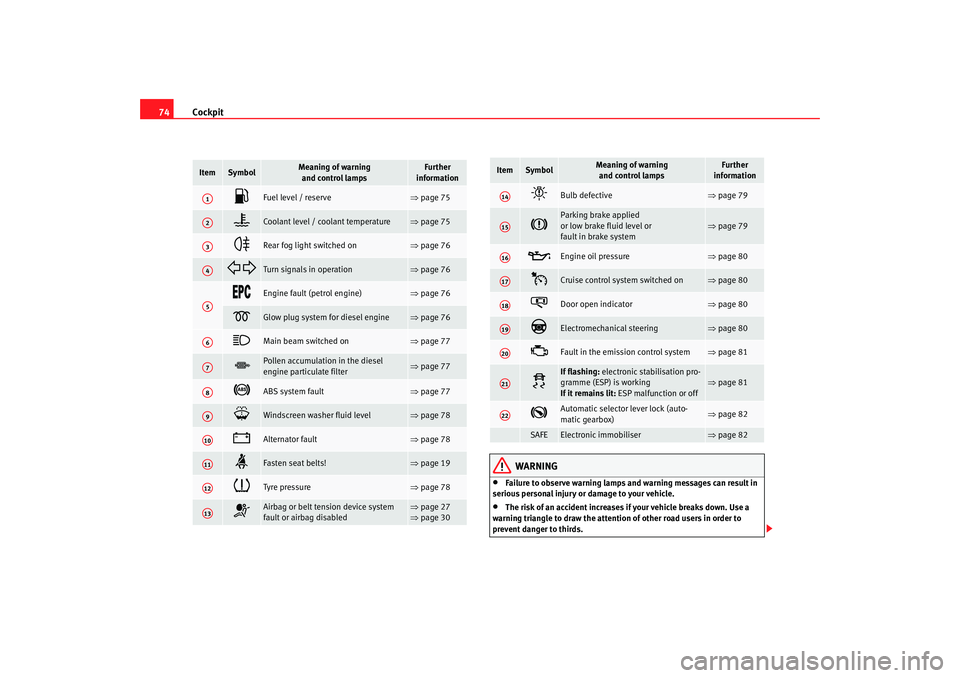
Item
Symbol
Meaning of warning and control lamps
Further
information
Fuel level / reserve
⇒ page 75
Coolant level / coolant temperature
⇒page 75
Rear fog light switched on
⇒page 76
Turn signals in operation
⇒page 76
Engine fault (petrol engine)
⇒page 76
Glow plug system for diesel engine
⇒page 76
Main beam switched on
⇒page 77
Pollen accumulation in the diesel
engine particulate filter
⇒page 77
ABS system fault
⇒page 77
Windscreen washer fluid level
⇒page 78
Alternator fault
⇒page 78
Fasten seat belts!
⇒page 19
Tyre pressure
⇒page 78
Airbag or belt tension device system
fault or airbag disabled
⇒page 27
⇒ page 30
A1A2A3A4A5A6A7A8A9A10A11A12A13
Bulb defective
⇒page 79
Parking brake applied
or low brake fluid level or
fault in brake system
⇒page 79
Engine oil pressure
⇒page 80
Cruise control system switched on
⇒page 80
Door open indicator
⇒page 80
Electromechanical steering
⇒page 80
Fault in the emission control system
⇒page 81
If flashing: electronic stabilisation pro-
gramme (ESP) is working
If it remains lit: ESP malfunction or off
⇒page 81
Automatic selector lever lock (auto-
matic gearbox)
⇒page 82
SAFE
Electronic immobiliser
⇒page 82
Item
Symbol
Meaning of warning
and control lamps
Further
information
A14A15A16A17A18A19A20A21A22
AlteaXL_EN.book Seite 74 M ontag, 2. Februar 2009 12:26 12
Page 77 of 297
Cockpit
76First look at the coolant temperature gauge. If the needle is in the normal
range, top up with coolant at the earliest opportunity ⇒ .
WARNING
•
If your vehicle is immobilised for any technical reasons, move it to a
safe distance from traffic. Turn the engine off, turn the hazard lights on and
place the warning triangle.
•
Never open the bonnet if you can see or hear steam or coolant escaping
from the engine compartment. Risk of scalding. Wait until you can no
longer see or hear escaping steam or coolant.
•
The engine compartment is a dangerous area! Before carrying out any
work in the engine compartment, swit ch off the engine and allow it to cool
down. Always note the corresponding warnings ⇒page 213.
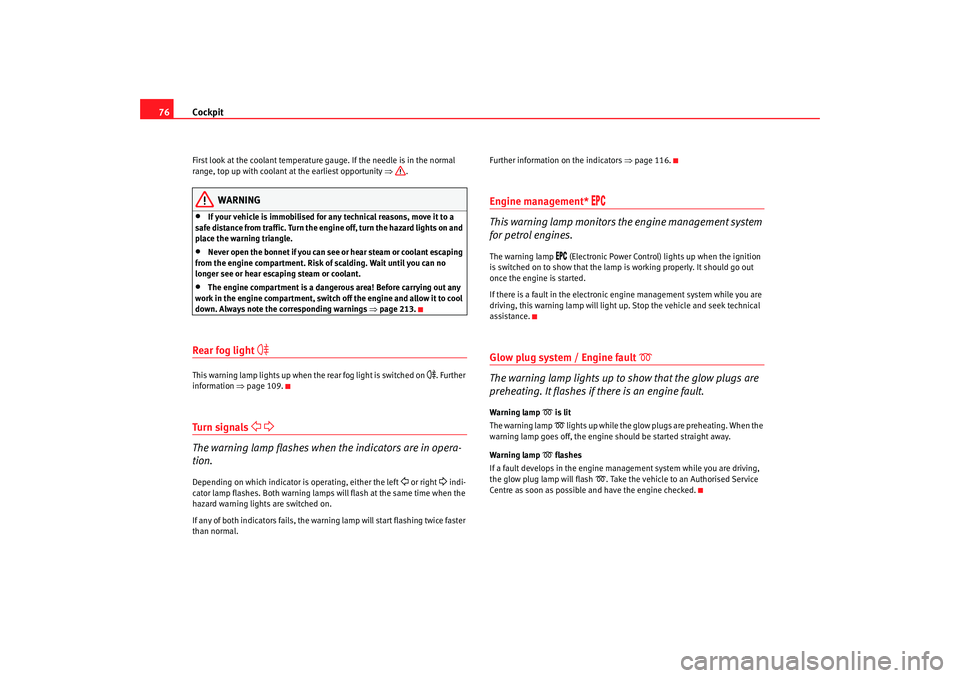
Rear fog light
This warning lamp lights up when the rear fog light is switched on
. Further
information ⇒page 109.
Tu r n si g nal s
The warning lamp flashes when the indicators are in opera-
tion.Depending on which indicator is operating, either the left
or right
indi-
cator lamp flashes. Both warning lamps will flash at the same time when the
hazard warning lights are switched on.
If any of both indicators fails, the warning lamp will start flashing twice faster
than normal. Further information on the indicators
⇒page 116.
Engine management*
This warning lamp monitors the engine management system
for petrol engines.
The warning lamp
(Electronic Power Control) lights up when the ignition
is switched on to show that the lamp is working properly. It should go out
once the engine is started.
If there is a fault in the electronic engine management system while you are
driving, this warning lamp will light up. Stop the vehicle and seek technical
assistance.
Glow plug system / Engine fault
The warning lamp lights up to show that the glow plugs are
preheating. It flashes if there is an engine fault.
Warning lamp
is lit
The warning lamp lights up while the glow plugs are preheating. When the
warning lamp goes off, the engine should be started straight away.
Warning lamp
flashes
If a fault develops in the engine management system while you are driving,
the glow plug lamp will flash
. Take the vehicle to an Authorised Service
Centre as soon as possible and have the engine checked.
AlteaXL_EN.book Seite 76 M ontag, 2. Februar 2009 12:26 12
Page 104 of 297
Unlocking and locking103
Safety First
Operating instructions
Practical tips
Te c h n i c a l D a t a
WARNING
•
Always close the tailgate properly. Risk of accident or injury.
•
The tailgate must not be opened when the reverse or rear fog lights are
lit. This may damage the lighting units.
•
Do not close the tailgate by pushing it down with your hand on the rear
window. The glass could smash. Risk of injury!
•
Ensure the tailgate is locked after closing it. If not, it may open unex-
pectedly while driving.
•
If the tailgate is not fully closed, open it with the handle and close it
again correctly. Do not try to close it by pressing on the surface of the tail-
gate, as this may damage the surface.
•
Never allow children to play in or ar ound the vehicle. A locked vehicle
can be subjected to extremely high and low temperatures, depending on
the time of year, thus causing serious injuries/illness. It could even have
fatal consequences. Close and lock both the tailgate and all the other doors
when you are not using the vehicle.
•
Closing the tailgate without observing and ensuring it is clear could
cause serious injury to you and to third parties. Make sure that no one is in
the path of the tailgate.
•
Never drive with the tailgate open or half-closed, exhaust gases may
penetrate into the interior of th e vehicle. Danger of poisoning!
•
If you only open the tailgate, do not leave the key inside. The vehicle
will not be opened if the key is left inside.
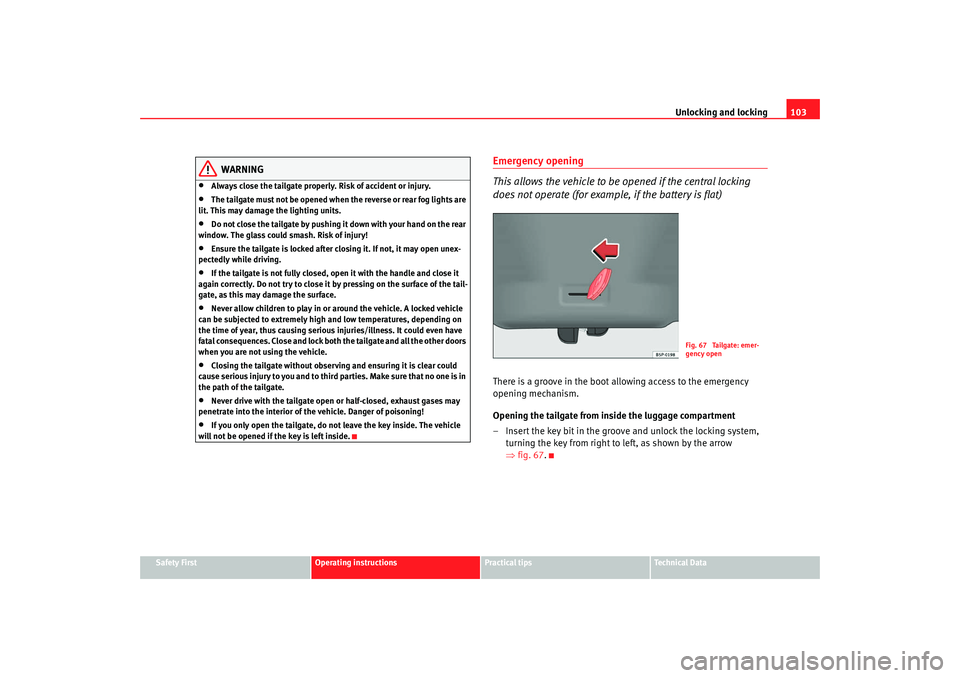
Emergency opening
This allows the vehicle to be opened if the central locking
does not operate (for example, if the battery is flat)There is a groove in the boot allowing access to the emergency
opening mechanism.
Opening the tailgate from inside the luggage compartment
– Insert the key bit in the groove and unlock the locking system, turning the key from right to left, as shown by the arrow
⇒fig. 67 .
Fig. 67 Tailgate: emer-
gency open
AlteaXL_EN.book Seite 103 M ontag, 2. Februar 2009 12:26 12
Page 110 of 297
Lights and visibility109
Safety First
Operating instructions
Practical tips
Te c h n i c a l D a t a
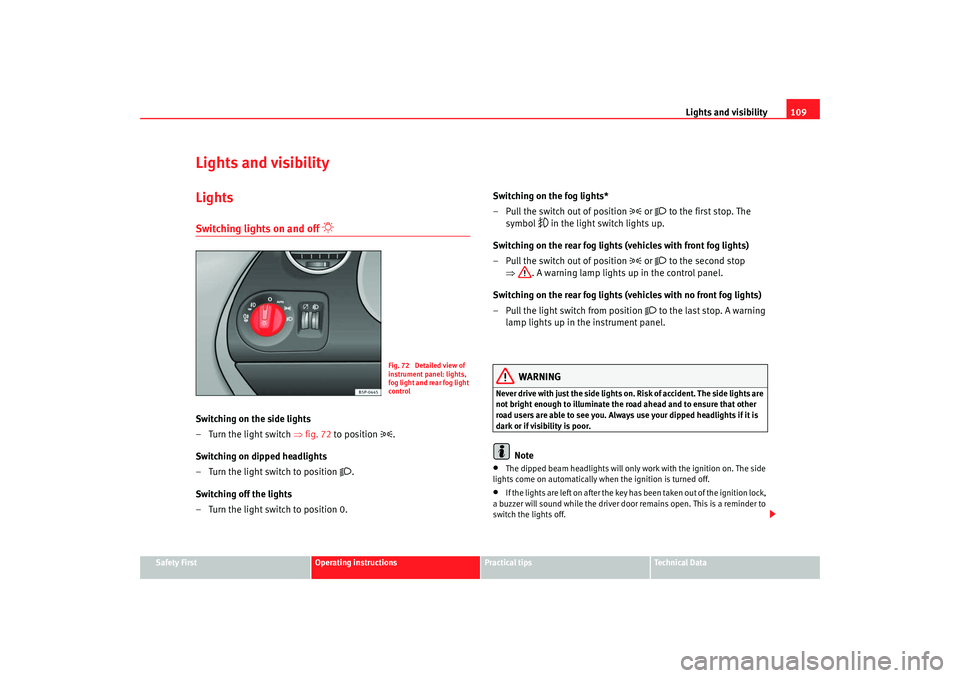
Lights and visibilityLightsSwitching lights on and off
Switching on the side lights
– Turn the light switch ⇒ fig. 72 to position
.
Switching on dipped headlights
– Turn the light switch to position
.
Switching off the lights
– Turn the light switch to position 0. Switching on the fog lights*
– Pull the switch out of position
or
to the first stop. The
symbol
in the light switch lights up.
Switching on the rear fog lights (vehicles with front fog lights)
– Pull the switch out of position
or
to the second stop
⇒ . A warning lamp lights up in the control panel.
Switching on the rear fog lights (vehicles with no front fog lights)
– Pull the light switch from position
to the last stop. A warning
lamp lights up in the instrument panel.
WARNING
Never drive with just the side lights on . Risk of accident. The side lights are
not bright enough to illuminate the road ahead and to ensure that other
road users are able to see you. Always use your dipped headlights if it is
dark or if visibility is poor.
Note
•
The dipped beam headlights will only work with the ignition on. The side
lights come on automatically when the ignition is turned off.
•
If the lights are left on after the key has been taken out of the ignition lock,
a buzzer will sound while the driver door remains open. This is a reminder to
switch the lights off.
Fig. 72 Detailed view of
instrument panel: lights,
fog light and rear fog light
control
AlteaXL_EN.book Seite 109 M ontag, 2. Februar 2009 12:26 12
Page 111 of 297

Lights and visibility
110•
The rear fog light is so bright that it can dazzle drivers behind you. You
should use the rear fog light only when visibility is very poor.
•
If you are towing a trailer equipped with a rear fog light on a vehicle with
a factory-fitted towing bracket, the rear fog light on the car will automatically
be switched off.
•
The use of the lighting described here is subject to the relevant statutory
requirements.
•
Depending on weather conditions (very cold or wet), the front and rear
lights and the indicators may be temporarily misted. This has no influence on
the life expectancy of the lighting system . The lights will soon demist when
they are switched on.
Automatic lighting*Activation
– Rotate the switch to the position “Auto”, this indication will light up. Deactivation
– Turn the light switch to 0.
Automatic lighting
If automatic headlight control is switched on, dipped headlights are automat-
ically switched on by a light-sensitive sensor if you drive into a tunnel, for
example.
The motorway function switches on the dipped headlights when the vehicle
is driven at over 140 km/h for a few sec
onds and it switches the lights off
when the vehicle is driven at less than 65 km/h for a few minutes.
The rain sensor switches on the dipped headlights when the windscreen
wipers have been operating continuously for a few seconds and it switches
the lights off when the continuous or intermittent wipe is switched off for
some minutes ⇒page 123.
When the automatic dipped light control is connected but the dipped lights
are off, the warning lamp
lights up on the light control ⇒fig. 73 . If the
automatic control switches on the dipped lights, the instrument and control
lighting is also switched on.
WARNING
•
If automatic headlight control is switched on, the headlights will not be
switched on in fog or heavy rain. Therefore, the dipped beam must be
switched on manually.Note
•
For those vehicles with the automatic headlight system, when the key is
removed from the ignition, the acoustic signal will only sound if the light
control is in the position
or if the vehicle is not fitted with the coming
home function.
Fig. 73 Automatic
lighting
AlteaXL_EN.book Seite 110 M ontag, 2. Februar 2009 12:26 12
Page 112 of 297

Lights and visibility111
Safety First
Operating instructions
Practical tips
Te c h n i c a l D a t a
•
If the daylight driving automatic light function is switched on, the fog
lights or rear fog light cannot be switched on in addition.
•
The use of the lighting described here is subject to the relevant statutory
requirements.
•
Do not put stickers on the windscreen in front of the sensor. This may
cause disruptions or faults in the automatic lighting system.
•
To avoid damage to the tail lights, the lights mounted on the tailgate go
off when the tailgate is opened (according to country).
Daytime lights*
The daytime light reduces the risk of accidents by increasing
the visibility of the vehicle. The daytime running lights are
enabled automatically when the ignition is switched on. It is
automatically switched off when the side lights are turned on.Daytime lights (halogen lamps)
18)
The daytime lights increase road safety in vehicles fitted with halogen lamps.
These include the dipped, side and registration plate lights.
The daytime lights are switched on each time the ignition is turned on if the
light setting is in position 0 or
. Depending upon the model, a control
lamp
on the light control switch or the lighting up of the instrument panel
will indicate that the daytime lighting is on.
It is not possible for the driver to switch the daytime lights on or off. Please
contact a qualified workshop if you wish to deactivate the lights. Daytime lights (bi-xenon lamps)
The daytime lights increase road safety in vehicles fitted with bi-xenon lamps.
The lights are built-in separately to the headlights and are switched on each
time the ignition is turned on if the light setting is in position
0 or
.
Automatic control of the dipped lig ht in combination with the daytime
lighting (bi-xenon headlamps)
If the dipped light control and the daytime lighting are activated at the same
time, the dipped lights and the instrument panel lighting will automatically
come on as required (e.g. on entering a tunnel) and the daytime lights will go
off. When the automatic dipped light control switches off the dipped lights
(e.g. on coming out of the tunnel), the daytime lights come back on.
Activating/deactivating the daytime lights*
In vehicles with daytime lights* combined with bi-xenon headlamps, these
lights may be activated or deactivated with the indicator and main beam
lever. In vehicles with daytime lights combined with halogen lamps, this func-
tion can only be activated or deactivated in a specialist workshop.
Deactivating daytime lights (bi-xenon lamps)
With the ignition switched off, move the indicator and main beam lever
upwards and back (left indicator and headlamp flash).
Switch on the ignition for 3 seconds. The daytime lights are deactivated and
can not be switched on.
Activating daytime lights (bi-xenon lamps)
With the ignition switched off, move the indicator and main beam lever
upwards and back (left indicator and headlamp flash).
Switch on the ignition for 3 seconds. The daytime lights are activated and can
be switched on.
18)It is only available in some countries or as an optional extra
AlteaXL_EN.book Seite 111 M ontag, 2. Februar 2009 12:26 12
Page 115 of 297
Lights and visibility
114A fault in the system is indicated via the flashing of the control lamp
on the
instrument panel. At the same time, a text message with information or
instructions to perform necessary oper ations may appear on the instrument
panel display. Take the vehicle to a qualified workshop and have the fault
repaired.
If the control lamp
lights up on the instrument panel but all the lamps are
operating correctly ⇒page 253, there may still be a fault in the dynamic
curve lighting system (AFS). Take the vehicle to a qualified workshop and
have the fault repaired.
WARNING
If the “automatic dipped light control” is switched on, the dipped head-
lights will not be switched on in fog. They should be switched on manually
using the light switch. The driver is personally responsible for the correct
use of lights in all situations. “Autom atic headlight control” is merely a
system to support the driver. Where necessary, switch on the lights manu-
ally using the light switch.Turning light* When the indicator is switched on to turn or on very tight bends, the right or
left fog lamp automatically comes on to function as a turning light. The
turning light only operates if the dipped lights are on.
WARNING
If the “automatic dipped light control” is switched on, the dipped head-
lights will not be switched on in fog. They should be switched on manually
using the light switch. The driver is personally responsible for the correct
use of lights in all situations. “Automatic headlight control” is merely a
system to support the dr iver. Where necessary, switch on the lights manu-
ally using the light switch.Hazard warning lights
The hazard warning lights are used to draw the attention of
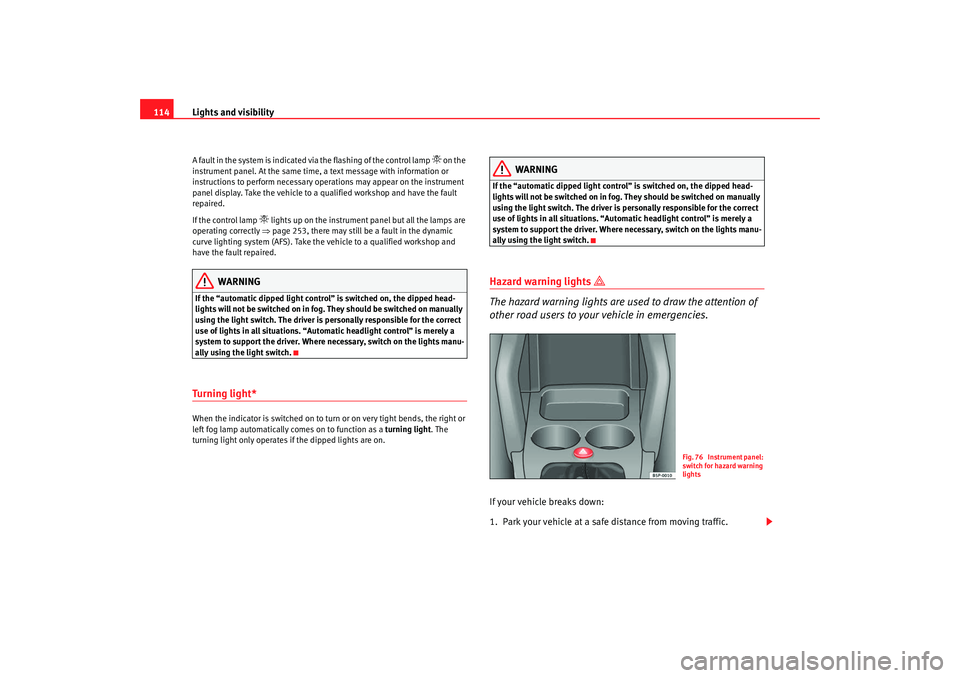
other road users to your vehicle in emergencies.
If your vehicle breaks down:
1. Park your vehicle at a safe distance from moving traffic.
Fig. 76 Instrument panel:
switch for hazard warning
lights
AlteaXL_EN.book Seite 114 M ontag, 2. Februar 2009 12:26 12
Page 159 of 297
Heating, Ventilation and Air conditioning
158
Button – Manual air recirculation mode.
Button – Rear window heating. The heating will be switched off auto-
matically approximately 20 minutes after switching on. However, it may
be turned off by pushing the button. Th e button lights up yellow and the
symbol appears in the display.
Button – Automatic temperature, ventilation and air distribution
control ⇒page 159
button - Dual zone synchroniser
Button – Switches the 2C-Climatronic on and off ⇒page 160
Blower control ⇒page 160
button – Switches heating, ventilation and air-conditioning system
onWARNING
For road safety all windows must be clear of ice, snow, and condensation.
This is essential to ensure good visibility. Please familiarise yourself with
the correct operation of the heating and ventilation system, including the
anti-fog/defrost functions for the windscreens.
Note
Please observe the general notes ⇒page 161.
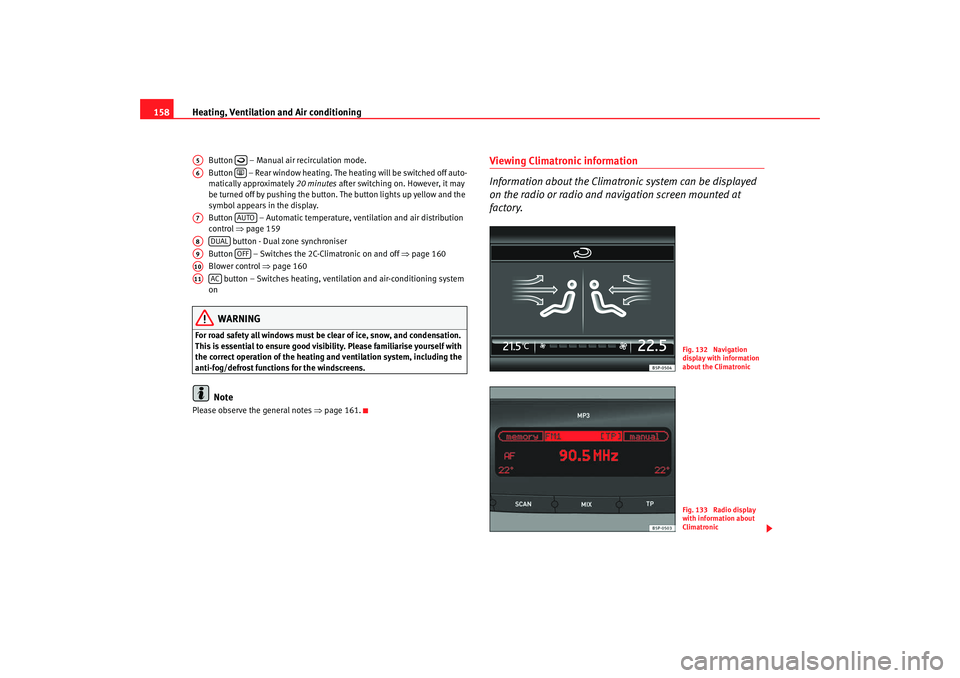
Viewing Climatronic information
Information about the Climatronic system can be displayed
on the radio or radio and na vigation screen mounted at
factory.
A5
A6
A7
AUTO
A8
DUAL
A9
OFF
A10A11
AC
Fig. 132 Navigation
display with information
about the ClimatronicFig. 133 Radio display
with information about
Climatronic
AlteaXL_EN.book Seite 158 M ontag, 2. Februar 2009 12:26 12
Page 253 of 297
If and when
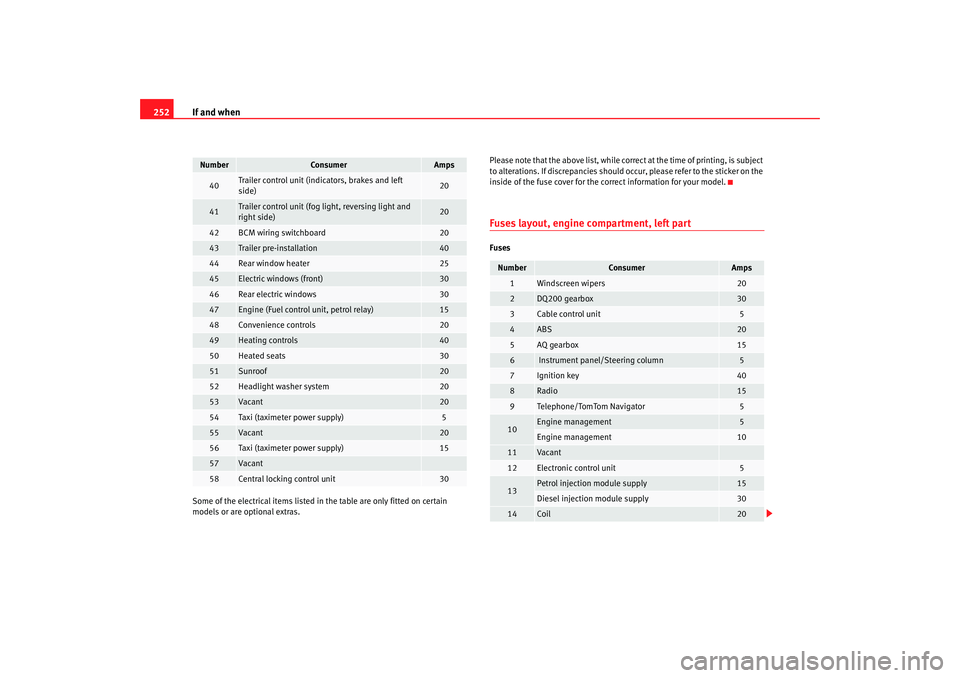
252Some of the electrical items listed in the table are only fitted on certain
models or are optional extras. Please note that the above list, while correct at the time of printing, is subject
to alterations. If discrepancies should
occur, please refer to the sticker on the
inside of the fuse cover for the correct information for your model.
Fuses layout, engine compartment, left partFuses
40
Trailer control unit (indicators, brakes and left
side)
20
41
Trailer control unit (fog light, reversing light and
right side)
20
42
BCM wiring switchboard
20
43
Trailer pre-installation
40
44
Rear window heater
25
45
Electric windows (front)
30
46
Rear electric windows
30
47
Engine (Fuel control unit, petrol relay)
15
48
Convenience controls
20
49
Heating controls
40
50
Heated seats
30
51
Sunroof
20
52
Headlight washer system
20
53
Vacant
20
54
Taxi (taximeter power supply)
5
55
Vacant
20
56
Taxi (taximeter power supply)
15
57
Vacant
58
Central locking control unit
30
Number
Consumer
Amps
Number
Consumer
Amps
1
Windscreen wipers
20
2
DQ200 gearbox
30
3
Cable control unit
5
4
ABS
20
5
AQ gearbox
15
6
Instrument panel/Steering column
5
7
Ignition key
40
8
Radio
15
9
Telephone/TomTom Navigator
5
10
Engine management
5
Engine management
10
11
Va ca n t
12
Electronic control unit
5
13
Petrol injection module supply
15
Diesel injection module supply
30
14
Coil
20
AlteaXL_EN.book Seite 252 M ontag, 2. Februar 2009 12:26 12
Page 255 of 297
If and when
254Fog lights
Fog lights - H3
Fixed rear light
Stop/Position - P21W
25)
Indicator - P21W
Rear tailgate light unit
Fog light (driver's side) - P21W
Reverse (passenger's side) - P21W
Position - W5W
Side indicator
Side indicator - W5W
Registration plate light
Registration plate light - C5W
Note
•
Depending on weather conditions (cold or wet), the front lights, the fog
lights, the rear lights and the indicato rs may be temporarily misted. This has
no influence on the life expectancy of the lighting system. By switching on the
lights, the area through which the beam of light is projected will quickly be
demisted. However, the edges may continue to be misted.
•
Please check at regular intervals that all lighting (especially the exterior
lighting) on your vehicle is functioning pr operly. This is not only in the interest
of your own safety, but also in that of all other road users.
•
Due to the difficulty in accessing the lamps, any replacement work should
be done by a SEAT dealer. However, the following is a description of how to
change the lamps except for the fog lights* and interior lamps.
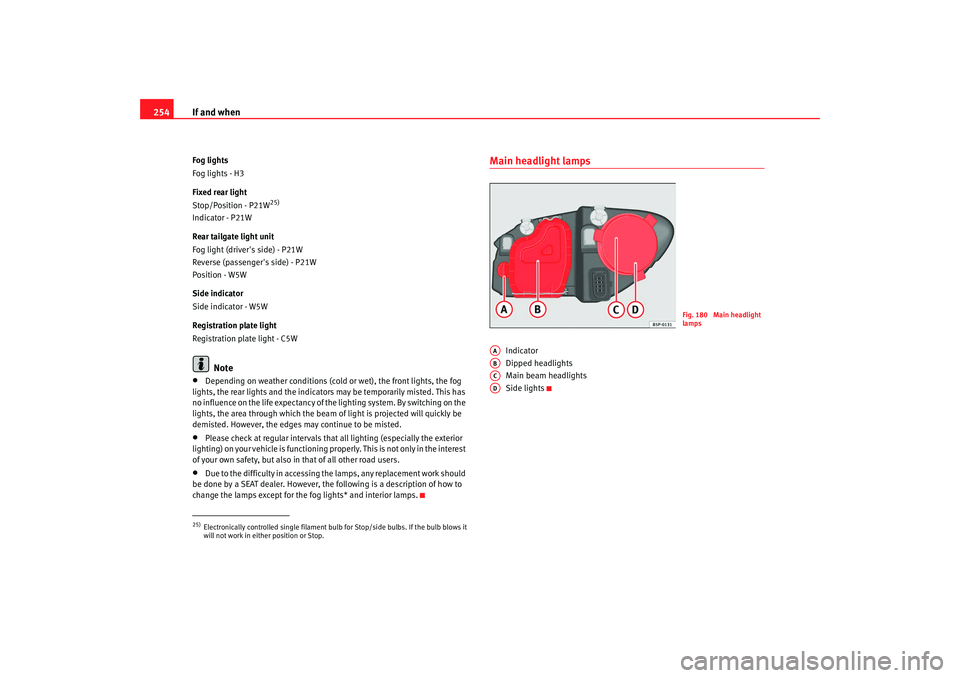
Main headlight lamps
Indicator
Dipped headlights
Main beam headlights
Side lights
25)Electronically controlled single filament bulb for Stop/side bulbs. If the bulb blows it
will not work in either position or Stop.
Fig. 180 Main headlight
lamps
AAABACAD
AlteaXL_EN.book Seite 254 M ontag, 2. Februar 2009 12:26 12