Program Seat Altea XL 2010 User Guide
[x] Cancel search | Manufacturer: SEAT, Model Year: 2010, Model line: Altea XL, Model: Seat Altea XL 2010Pages: 312, PDF Size: 8.41 MB
Page 181 of 312
Driving179
Safety First
Operating instructions
Practical tips
Technical Data
the full power of the engine. This programme is not recommended for use on
the motorway or in the city.
Selecting the manual programme (tiptronic)
This programme allows driving similar to a manual gearbox.
This programme may be accessed using the selector lever or from the
steering wheel controls when this option is fitted
⇒page 181.
Selector lever locking
The selector lever lock prevents gears from being engaged
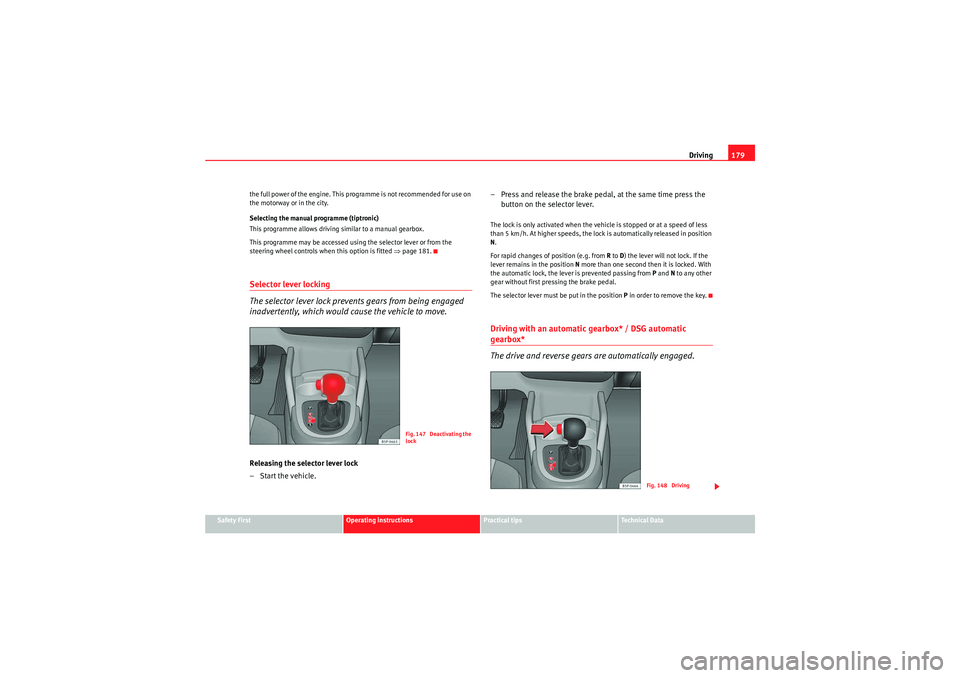
inadvertently, which would cause the vehicle to move.Releasing the selector lever lock
– Start the vehicle. – Press and release the brake pedal, at the same time press the
button on the selector lever.
The lock is only activated when the vehicle is stopped or at a speed of less
than 5 km/h. At higher speeds, the lock is automatically released in position
N.
For rapid changes of position (e.g. from R to D) the lever will not lock. If the
lever remains in the position N more than one second then it is locked. With
the automatic lock, the lever is prevented passing from P and N to any other
gear without first pressing the brake pedal.
The selector lever must be put in the position P in order to remove the key.Driving with an automatic gearbox* / DSG automatic gearbox*
The drive and reverse gears are automatically engaged.
Fig. 147 Deactivating the
lock
Fig. 148 Driving
AlteaXL_EN.book Seite 179 Dienstag, 1. September 2009 10:37 10
Page 182 of 312
Driving
180
Driving
– Press and hold the foot brake.
– Press the button on the selector lever knob (on the left) ⇒page 179, fig. 148.
– Select a gear for driving ( R, D or S).
– Release the button and wait a few seconds for the gear to engage, a light jerk will be felt.
– Release the brake and accelerate.
Short stop
– Hold the vehicle stationary with the brake pressed down (for example at traffic lights). The selector lever does not need to be
put into the positions P or N for this.
– Do not press the accelerator.
Parking the vehicle
– Press the foot brake and hold to bring the vehicle to a stop.
– Apply the handbrake firmly.
– Press in the button on the selector lever knob, move the lever to the position P and release the button.
Driving slowly
– Move the selector lever to the position D and press to the right to
put the lever into Tiptronic mode.
– Press the gear lever towards (-) to select a lower gear. Hill stop
– Hold the vehicle, in all cases, using the foot brake to prevent
rolling back.
– Do not try to slow the vehicle using another forward gear (engine braking).
Descending gradients
– With the gear engaged, release the brake and accelerate.
The steeper the gradient the lower the gear must be for effective engine
braking. For example, if 3rd gear is used on a very steep gradient, the engine
braking is insufficient and vehicle accelerates. So that the engine speed does
not become excessive, the gearbox changes to the next highest gear. Depress
the brake pedal and move the selector lever to the Tiptronic gate to return to
3rd gear.
WARNING
•The driver should never leave the vehicle while the engine is running or
with any gear selected. If for any reason you must leave the vehicle with the
engine running, apply the handbrake and move the selector lever to posi-
tion P.•When the engine is running and the positions D, S or R are selected, it
is necessary to hold the vehicle with the foot brake because the vehicle will
creep at a low speed.•Never accelerate while changing the position of the selector lever (risk
of an accident).•The selector lever must never be moved into the positions R or P while
moving (risk of an accident).•Before descending a steep gradient, reduce speed and use the Tiptronic
programme to select a lower gear.
AlteaXL_EN.book Seite 180 Dienstag, 1. September 2009 10:37 10
Page 183 of 312
Driving181
Safety First
Operating instructions
Practical tips
Technical Data
•If you must stop on a hill, always hold the vehicle using the footbrake
to avoid rolling back.•The footbrake must not be held for a long period of time, not even
lightly; continuous braking will cause overheating of the brakes and a
reduction or even a loss of braking power and a significant increase in
braking distances.•Never allow the vehicle to coast down a gradient with the selector lever
in positions N or D, even when the engine is not running. For descents, the
use of the Tiptronic programme is recommended to keep the speed
reduced.Caution
•Never use the automatic gearbox to hold the vehicle stationary on a hill,
even for short periods, as this may overheat the gearbox and cause damage.
Apply the handbrake or depress the foot brake to hold the vehicle in position.•If the vehicle is allowed to roll with the engine stopped but the selector in
position N then the gearbox may be damaged because it will not be
lubricated.
Changing gear with the Tiptronic gear system*
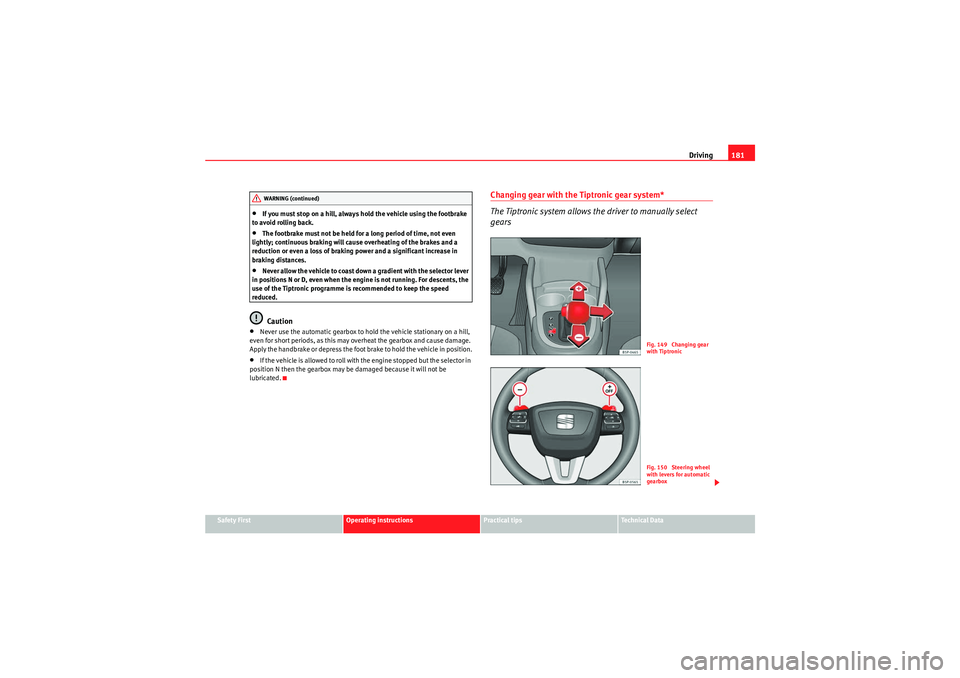
The Tiptronic system allows the driver to manually select
gears
WARNING (continued)
Fig. 149 Changing gear
with TiptronicFig. 150 Steering wheel
with levers for automatic
gearbox
AlteaXL_EN.book Seite 181 Dienstag, 1. September 2009 10:37 10
Page 184 of 312
Driving
182
General information about driving in Tiptronic mode
Changing gear with the gear stick
– Put the lever in position D and press towards the right to enter
the Tiptronic gate ⇒page 181, fig. 149 .
– Press the gear lever forwards ⇒page 181, fig. 149 to select
a higher gear.
–Press the gear lever back ⇒ page 181, fig. 149 to select a
lower gear.
Changing gear with the steering wheel levers
– Press the right paddle lever ( +OFF) towards the steering
wheel to change up ⇒page 181, fig. 150 .
– Press the left paddle towards the steering wheel to change down ⇒page 181, fig. 150 .Using the levers on the steering wheel, you can access manual driving mode
regardless of the driving mode pre-selected.
General information about driving in Tiptronic mode
When accelerating, the automatic gearbox / direct shift gearbox goes into a
higher gear a little before it reaches the maximum permitted revolutions.
If a lower gear is selected, the automatic gearbox / direct shift gearbox does
not change down until the point is reached where the engine could no longer
overrev.
If the “Tiptronic” is selected whilst the vehicle is in motion and the automatic
gearbox / direct shift gearbox is in 3rd gear in selector lever position D, the
“Tiptronic” will then also be in 3rd gear. Changing gears in the normal or sport programme using the steering wheel
paddle levers
If the paddle levers ⇒
page 181, fig. 150 are used in the normal or sport
programme, the system switches temporarily to “Tiptronic” mode. To exit
“Tiptronic” mode again, press the right paddle lever towards the
steering wheel for approximately one second. You will also leave “Tiptronic”
mode if the paddle levers are not moved for a certain time.
Note
•The gearbox controls on the steering wheel can operate with the gear stick
in any position and with the vehicle in motion.Kickdown feature
The kickdown feature is designed to give maximum accelera-
tion.If you press the accelerator down thoroughly, the gearbox automatically
changes down, depending on speed and engine speed, into a lower gear to
take full advantage of the maximum acceleration of the vehicle.
The gearbox does not change gear until the engine reaches the maximum
determined engine speed for the gear.
WARNING
You could lose control of the vehicle if you accelerate on slippery road
surfaces. Risk of serious injury.•Be particularly careful when using the kickdown features on slippery
road surfaces. With fast acceleration, the vehicle could lose traction and
skid.
A+
A–A+
A–
+ OFF
AlteaXL_EN.book Seite 182 Dienstag, 1. September 2009 10:37 10
Page 197 of 312
Intelligent technology195
Safety First
Operating instructions
Practical tips
Technical Data
•With compact temporary spare wheel.•When using the snow chains.•When driving in deep snow or on loose surfaces•When the vehicle is bogged-down, to free it by “rocking.”
The TCS should be switched on again afterwards as soon as possible.WARNING
•It must be remembered that TCS cannot defy the laws of physics. This
should be kept in mind, particularly on slippery and wet roads and when
towing a trailer.•Always adapt your driving style to suit the condition of the roads and
the traffic situation. Do not let the extra safety afforded by TCS tempt you
into taking any risks when driving, this can cause accidents.Caution
•In order to ensure that TCS function correctly, all four wheels must be
fitted with the same tyres. Any differences in the rolling radius of the tyres can
cause the system to reduce engine power when this is not desired.•Modifications to the vehicle (e.g. to the engine, the brake system, running
gear or any components affecting the wheels and tyres) could affect the effi-
ciency of the ABS and TCS.XDS*
Driveshaft differentialWhen taking a bend, the driveshaft differential mechanism allows the outer
wheel to turn at a higher speed than the inner wheel. In this way, the wheel
which is turning faster (outer wheel) receives less drive torque than the inner
wheel. This may mean that in certain situations the torque provided to the inner wheel is too high, causing the wheels to spin. On the other hand, the
outer wheel receives a lower drive torque than it could transmit. This causes
an overall loss of lateral grip on the front shaft, resulting in understeering or
“lengthening” of the path.
The XDS system is able, using the ESP sensors and signals, to detect and
correct this effect.
The XDS, via the ESP, brakes the inner wheel thus counteracting the excess
drive torque in this wheel. This means that the path requested by the driver
is more precise,
The XDS system operates in combination with the ESP and is always active,
even when the traction control, TCS, is disconnected.
Electronic stabilisation programme (ESP)*General notes
The electronic stabilisation programme increases the
vehicle's stability on the road.The electronic stabilisation programme helps to reduce the danger of skid-
ding.
The electronic stabilisation programme (ESP) consists of
ABS, EDL, TCS and
Steering manoeuvre recommendations.
Electronic Stabilising Program (ESP)*
ESP reduces the danger of skidding by braking the wheels individually.
The system uses the steering wheel angle and road speed to calculate the
changes of direction desired by the driver, and constantly compares them
with the actual behaviour of the vehicle. If the desired course is not being
AlteaXL_EN.book Seite 195 Dienstag, 1. September 2009 10:37 10
Page 208 of 312
Trailer towing
206•Find out whether special regulations apply to towing a trailer in your
country.Ball coupling of towing bracket*Depending on the model version, the spherical head on the trailer hook may
be stored in the tool box.
The ball coupling is provided with instructions on fitting and removing the
ball coupling of the towing bracket.
WARNING
The towing bracket ball coupling must be stored securely in the luggage
compartment to prevent them being flung through the vehicle and causing
injury.
Note
•By law, the ball coupling must be re moved if a trailer is not being towed
and it obscures the number plate.Driving tipsDriving with a trailer always requires extra care.Weight distribution
The weight distribution of a loaded trailer with an unladen vehicle is very
unfavourable. However, if this cannot be avoided, drive extra slowly to allow
for the unbalanced weight distribution. Speed
The stability of the vehicle and trailer is reduced with increasing speed. For
this reason, it is advisable not to drive at the maximum permissible speed in
an unfavourable road, weather or wind conditions. This applies especially
when driving downhill.
You should always reduce speed immediately if the trailer shows the slightest
sign of
snaking . Never try to stop the “snaking” by increasing speed.
Always brake in due course. If the trailer has an overrun brake, apply the
brakes gently at first and then, firmly. This will prevent the jerking that can be
caused by the trailer wheels locking. Select a low gear in due course before
going down a steep downhill. This enables you to use the engine braking to
slow down the vehicle.
Reheating
At very high temperatures and during prolonged ascents, driving in a low gear
and high engine speed, always monitor the temperature indicator for the
coolant ⇒page 55.
Electronic Stabilisation Program*
The ESP* system makes it easier to stabilise the trailer in case it skids or
swings.
AlteaXL_EN.book Seite 206 Dienstag, 1. September 2009 10:37 10
Page 227 of 312
Checking and refilling levels225
Safety First
Operating instructions
Practical tips
Technical Data
The safety of the LPG system guarantees operation without risk. The following
safety measures have been adopted:
•The LPG tank has a solenoid valve which closes automatically when the
engine is switched off (ignition off) or when running on petrol.•A solenoid type main valve disconnects the supply of gas to the engine
compartment when the engine is switched off or running on petrol.•A safety valve in the LPG tank with pipes to the outside prevents the gas
from entering the vehicle compartment.•All anchorage points and materials have been designed to ensure the
maximum possible levels of safety.
The condition of the LPG system should be checked regularly to guarantee
safe driving conditions ⇒ . These checks are included in the Maintenance
Programme.WARNING
•If there is a smell of gas or a suspected leak, stop the vehicle immedi-
ately and switch off the ignition. Open the doors to ventilate the vehicle. Do
not carry on driving! Take the vehicle to a qualified workshop and have the
fault repaired.•Immediately extinguish any cigarettes and remove from the vehicle any
objects which might produce a spark or cause a fire, and switch off imme-
diately if gas is smelt or a leak is detected.•LGP tanks are subject to pressure and must be checked regularly. The
owner of the vehicle must check that these services are performed
correctly.•When parking the vehicle in a closed area (for example in a garage),
make sure that there is adequate ventilation, either natural or mechanical,
to neutralise the LPG in the event of a leak.
PetrolPetrol types
The correct petrol types are listed on a sticker inside the fuel
tank flap.Only unleaded petrol, corresponding to the standard DIN EN 228, may be
used for vehicles with catalytic converters (EN = “European Standard”).
Fuel types are differentiated by the octane rating, e.g: 91, 95, 98 RON (RON
= “Regulation Octane Number, unit for determining the knock resistance of
petrol”). You may use petrol with a higher octane number than the one recom-
mended for your engine. However, this has no advantage in terms of fuel
consumption and engine power.
The appropriate type of fuel for your vehicle is specified in your engine tech-
nical table. Section “Technical Data”.
Caution
•Petrol that follows EN 228 may be mixed with small quantities of ethanol.
However, the so-called “bioethanol fuels” available at commercial establish-
ments with reference E50 or E85, which contain a high percentage of ethanol,
may not be used, as they will damage the fuel system.•Even one tankful of leaded fuel would permanently impair the efficiency
of the catalytic converter.•High engine speed and full throttle can damage the engine when using
petrol with an octane rating lower than the correct grade for the engine.For the sake of the environment
Just one full tank of leaded fuel would seriously impair the efficiency of the
catalytic converter.
AlteaXL_EN.book Seite 225 Dienstag, 1. September 2009 10:37 10
Page 235 of 312
Checking and refilling levels233
Safety First
Operating instructions
Practical tips
Technical Data
– To avoid over-filling with engine oil, you should top-up using
small quantities, wait a while and check the oil level before
adding any more oil.
– As soon as the oil level is in area , carefully close the cap.The position of the oil filler opening is shown in the corresponding engine
compartment diagram ⇒page 287.
Engine oil specification ⇒page 230.
WARNING
Oil is highly inflammable! Ensure that no oil comes into contact with hot
engine components when topping up.
Caution
If the oil level is above the area do not start the engine. This could result
in damage to the engine and catalytic converter. Contact a qualified work-
shop.
For the sake of the environment
The oil level must never be above area . Otherwise oil can be drawn in
through the crankcase breather and escape into the atmosphere via the
exhaust system.
Changing engine oil
The engine oil must be changed at the intervals given in the
service schedule.We recommend that you have the engine oil changed by an Authorised
Service Centre.
The oil change intervals are shown in the Maintenance Programme ⇒.
WARNING
Only change the oil yourself if you have the specialist knowledge required!•Before opening the bonnet, read and observe the warnings
⇒ page 227, “Safety instructions on working in the engine compartment”.•Wait for the engine to cool down. Hot oil may cause burn injuries.•Wear eye protection to avoid injuries caused by splashes of oil.•When removing the oil drain plug with your fingers, keep your arm hori-
zontal to help prevent oil from running down your arm.•Wash your skin thoroughly if it comes into contact with engine oil.•Engine oil is poisonous! Used oil must be stored in a safe place out of
the reach of children until it is disposed of.Caution
No additives should be used with engine oil. This could result in engine
damage. Any damage caused by the use of such additives would not be
covered by the factory warranty.
For the sake of the environment
•Because of the disposal problems, the necessary special tools and
specialist knowledge required, we recommend that you have the engine oil
and filter changed by an Authorised Service Centre.
AB
AA
AA
AlteaXL_EN.book Seite 233 Dienstag, 1. September 2009 10:37 10
Page 242 of 312
Checking and refilling levels
240Brake fluidChecking the brake fluid level
The brake fluid is checked at the intervals given in the service
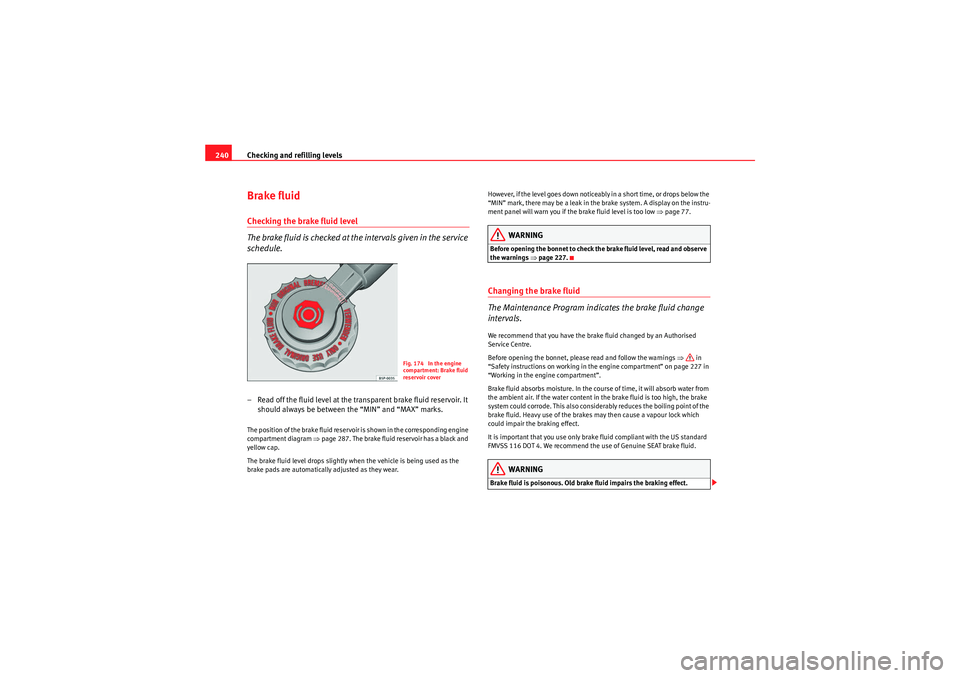
schedule.– Read off the fluid level at the transparent brake fluid reservoir. It
should always be between the “MIN” and “MAX” marks.The position of the brake fluid reservoir is shown in the corresponding engine
compartment diagram ⇒page 287. The brake fluid reservoir has a black and
yellow cap.
The brake fluid level drops slightly when the vehicle is being used as the
brake pads are automatically adjusted as they wear. However, if the level goes down noticeably in a short time, or drops below the
“MIN” mark, there may be a leak in the brake system. A display on the instru-
ment panel will warn you if the brake fluid level is too low
⇒page 77.
WARNING
Before opening the bonnet to check the brake fluid level, read and observe
the warnings ⇒page 227.Changing the brake fluid
The Maintenance Program indicates the brake fluid change
intervals.We recommend that you have the brake fluid changed by an Authorised
Service Centre.
Before opening the bonnet, please read and follow the warnings ⇒ in
“Safety instructions on working in the engine compartment” on page 227 in
“Working in the engine compartment”.
Brake fluid absorbs moisture. In the course of time, it will absorb water from
the ambient air. If the water content in the brake fluid is too high, the brake
system could corrode. This also considerably reduces the boiling point of the
brake fluid. Heavy use of the brakes may then cause a vapour lock which
could impair the braking effect.
It is important that you use only brake fluid compliant with the US standard
FMVSS 116 DOT 4. We recommend the use of Genuine SEAT brake fluid.
WARNING
Brake fluid is poisonous. Old brake fluid impairs the braking effect.
Fig. 174 In the engine
compartment: Brake fluid
reservoir cover
AlteaXL_EN.book Seite 240 Dienstag, 1. September 2009 10:37 10
Page 243 of 312
Checking and refilling levels241
Safety First
Operating instructions
Practical tips
Technical Data
•Before opening the bonnet to check the brake fluid level, read and
observe the warnings ⇒page 227.•Brake fluid should be stored in the closed original container in a safe
place out of reach of children. There is a toxic risk.•Complete the brake fluid change according to the Maintenance
Program. Heavy use of the brakes may cause a vapour lock if the brake fluid
is left in the system for too long. This would seriously affect the efficiency
of the brakes and the safety of the vehicle. This may cause an accident.Caution
Brake fluid could damage the paintwork. Wipe off any brake fluid from the
paintwork immediately.
For the sake of the environment
Brake fluid must be drained and disposed of in the proper manner observing
environmental regulations.
BatteryWarnings on handling the battery
WARNING
Always be aware of the danger of injury and chemical burns as well as the
risk of accident or fire when working on the battery and the electrical
system:•Wear eye protection. Protect your eyes, skin and clothing from acid and
particles containing lead.•Battery acid is very corrosive and caustic. Wear protective gloves and
eye protection. Do not tilt the batteries. This could spill acid through the
vents. Rinse battery acid from eyes immediately for several minutes with
clear water. Then seek medical care immediately. Neutralize any acid
splashes on the skin or clothing with a soapy solution, and rinse off with
plenty of water. If acid is swallowed by mistake, consult a doctor immedi-
ately.•Fires, sparks, naked lights and smoking are prohibited. When handling
cables and electrical equipment, avoid causing sparks and electrostatic
WARNING (continued)
Wear eye protection
Battery acid is very corrosive and caustic. Wear protective
gloves and eye protection!
Fires, sparks, naked lights and smoking are prohibited!
A highly explosive mixture of gases is released when the
battery is under charge.
Keep children away from acid and batteries!
AlteaXL_EN.book Seite 241 Dienstag, 1. September 2009 10:37 10