lights Seat Altea XL 2012 Workshop Manual
[x] Cancel search | Manufacturer: SEAT, Model Year: 2012, Model line: Altea XL, Model: Seat Altea XL 2012Pages: 315, PDF Size: 4.51 MB
Page 241 of 315
239
Checking and refilling levels
WARNING
Any work carried out in the engine compartment or on the engine must
be carried out cautiously.
● When working in the engine compartment, always observe the safety
warnings ⇒ page 230.
● When the engine is warm or hot, the cooling system is pressurised!
Do not unscrew the cap on the expansion tank when the engine is hot.
This is a burn injury risk.
CAUTION
● When mixed with other additives the colour of G12 will change to brown.
If this occurs you should have the coolant changed immediately. Failure to
do so will result in engine damage!
● If a lot of coolant fluid has been lost, wait for the engine to cool down
before putting in cold coolant. This avoids damaging the engine. Large cool-
ant losses are an indication of leaks in the cooling system. See a special-
ised workshop immediately and have the cooling system checked. Other-
wise, there is a risk of engine damage. Washer fluid and windscreen wiper blades
Topping up washer fluid
The water for cleaning the windscreen should always be
mixed with washer fluid.
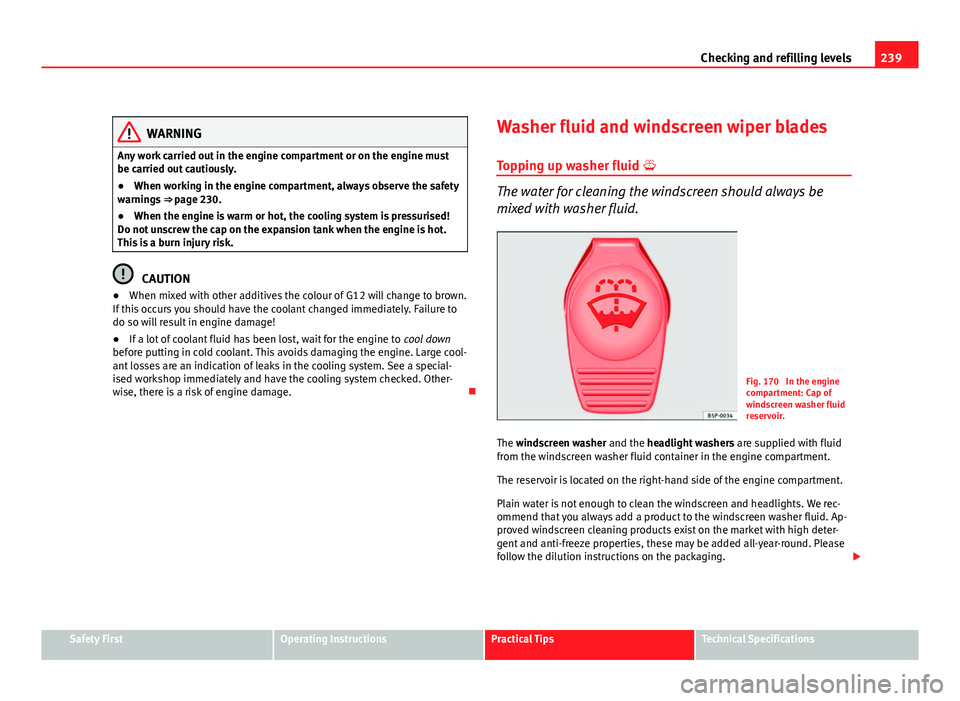
Fig. 170 In the engine
compartment: Cap of
windscreen washer fluid
reservoir.
The windscreen washer and the headlight washers are supplied with fluid
from the windscreen washer fluid container in the engine compartment.
The reservoir is located on the right-hand side of the engine compartment.
Plain water is not enough to clean the windscreen and headlights. We rec-
ommend that you always add a product to the windscreen washer fluid. Ap-
proved windscreen cleaning products exist on the market with high deter-
gent and anti-freeze properties, these may be added all-year-round. Please
follow the dilution instructions on the packaging.
Safety FirstOperating InstructionsPractical TipsTechnical Specifications
Page 259 of 315
257
If and when
How to use the temporary spare wheel
Should you ever have a punctured tyre, the temporary spare wheel is only
intended for temporary use until you can reach a workshop. The standard-
size road wheel should be replaced as soon as possible.
Please note the following restrictions when using the temporary spare
wheel. This spare wheel has been specially designed for your vehicle, thus,
it cannot be changed with the spare wheel from another vehicle.
No other type of tyre (normal summer or winter tyre) may be fitted on the
compact temporary spare wheel rim.
Snow chains
For technical reasons, snow chains must not be used on the compact tem-
porary spare wheel.
If you have a puncture on one of the front wheels when using snow chains,
fit the compact temporary spare in place of one of the rear wheels. You can
then attach the snow chains to the wheel taken from the rear and use this
wheel to replace the punctured front wheel.
WARNING
● The tyre pressures must be checked and corrected as soon as possi-
ble. The emergency tyre pressure for dimensions 125/70R16 125/70R18
135/90R16 is 4.2 bar; for all other tyre dimensions please refer to the la-
bel on the fuel cap. Failure to do so could result in an accident.
● Do not drive faster than 80 km/h. Higher speeds can cause an acci-
dent.
● Avoid heavy acceleration, hard braking and fast cornering. Risk of ac-
cident.
● Never use two or more compact spare tyres at the same time, risk of
accident.
● No other type of tyre (normal summer or winter tyre) may be fitted on
the compact temporary spare wheel rim.
Tyre repair kit
The tyre repair kit (for vehicles not including a spare wheel)
is stored under the floor panel in the luggage compartment.
In the event of a punctured tyre, your vehicle is equipped with the Tyre Mo-
bility System.
The tyre repair kit consists of a container with sealing compound to repair
the puncture and a compressor to generate the required tyre pressure. The
kit will reliably seal punctures up to a size of about 4 mm caused by the
penetration of a foreign body into the tyre.
Note
● Seek professional assistance if the repair of a tyre puncture is not possi-
ble with the sealing compound.
Wheel change Preparation work
What you must do before changing a wheel.
– If you have a flat tyre or puncture, park the vehicle as far away
from the flow of traffic as possible. Choose a location that is as
level as possible.
– All passengers should leave the vehicle. They should wait in a
safe area (for instance behind the roadside crash barrier).
– Switch off the engine. Switch on the hazard warning lights.
– Apply the handbrake firmly.
Safety FirstOperating InstructionsPractical TipsTechnical Specifications
Page 260 of 315
258If and when
–Engage the first gear , or put the selector lever to position P for
those vehicles with an automatic gearbox.
– If you are towing a trailer, unhitch it from your vehicle.
– Take the vehicle tools and the spare wheel out of the luggage
compartment.
WARNING
Put the hazard warning lights on and place the warning triangle in posi-
tion. This is for your own safety and also warns other road users.
CAUTION
If you have to change the tyre on a gradient, block the wheel opposite the
wheel being changed by placing a stone or similar object under it to prevent
the vehicle from rolling away.
Note
Please observe legal requirements when doing so.
Changing a wheel
Change the wheel as described below
– Pull off the hub cap. Also see ⇒ page 259.
– Slacken the wheel bolts.
– Raise the car with the jack at the corresponding point.
– Remove the wheel and then mount the spare wheel –
Lower the vehicle.
– Tighten the wheel bolts firmly with the box spanner.
– Replace the hub cap.
After changing a wheel
After changing the wheel there are still tasks to complete. – Put the tools and jack back in the luggage compartment.
– Place the wheel with the defective tyre in the luggage compart-
ment and secure it.
– Check the tyre pressure of the newly fitted tyre as soon as pos-
sible.
– Have the tightening torque of the wheel bolts checked as soon
as possible with a torque wrench. The prescribed torque must
be 120 Nm.
Note
● If you notice that the wheel bolts are corroded and difficult to turn when
changing a wheel, they must be replaced before having the wheel bolt tor-
que checked.
● For safety reasons, drive at moderate speeds until the wheel bolt tight-
ening torque has been checked.
Page 266 of 315
264If and when
You will also find instructions for operating the compressor.
WARNING
● Do not attempt to repair a puncture with the sealing compound if the
tyre has been damaged by driving the vehicle after the tyre has lost its
air.
● Always observe warnings and follow instructions concerning com-
pressor and sealing compound carefully.
● Do not drive faster than 80 km/h, avoid heavy acceleration, hard
braking and fast cornering.
● Tyres which have been repaired with sealing compound are only suit-
able for temporary use over a short period. Therefore, please drive care-
fully to the next available specialised workshop.
For the sake of the environment
If you have to dispose of a sealant can, go to a specialised waste service or
to a SEAT Technical Service, where the product can be recycled in an appro-
priate waste container.
Note
● If sealant should leak out, leave it to dry. This way you can pull it off like
a piece of foil.
● Observe the expiry date stated on the sealing compound can. Have the
sealing compound exchanged by a specialised workshop.
● Seek professional assistance if the repair of a tyre puncture is not possi-
ble with the sealing compound. Preparation work
Certain steps must be taken before repairing a tyre.
–
If you have a flat tyre or puncture, park the vehicle as far away
from the flow of traffic as possible.
– Apply the handbrake firmly.
– Engage first gear , or put the selector lever to position P.
– All passengers should leave the vehicle. They should wait in a
safe area (for instance behind the roadside crash barrier).
– Check whether a repair is possible using the Tyre Mobility Sys-
tem “General information and safety notes.”
– Unscrew inflation cap from the affected wheel.
– Take the tyre repair kit out of the luggage compartment.
WARNING
Put the hazard warning lights on and place the warning triangle in posi-
tion. This is for your own safety and also warns other road users.
CAUTION
Take special care if you have to repair a tyre on a slope.
Note
Please observe legal requirements when doing so.
Page 270 of 315
268If and when
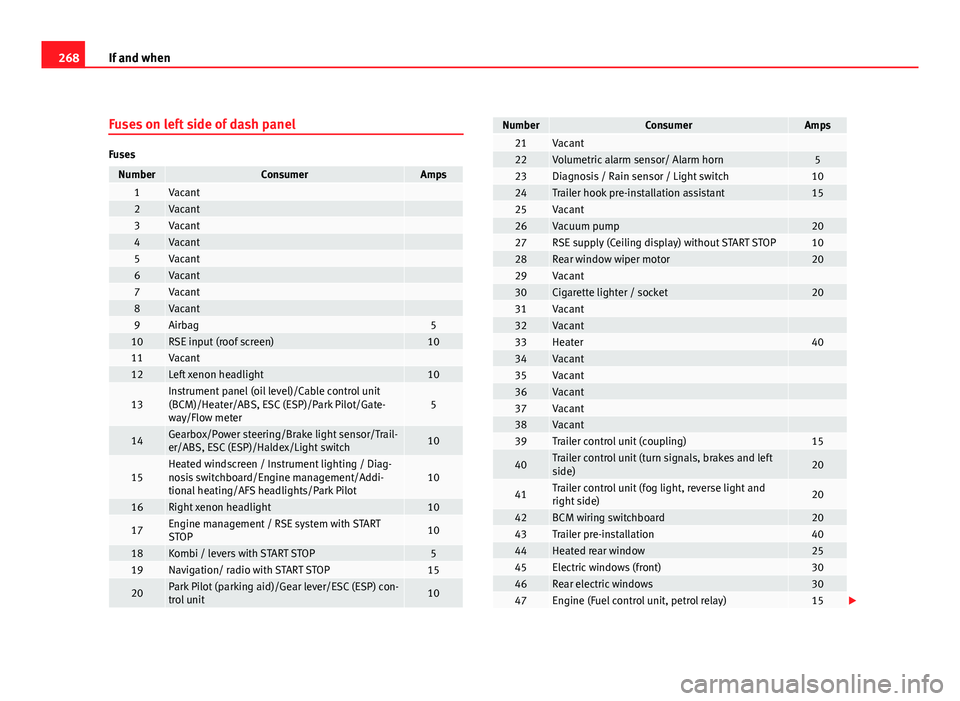
Fuses on left side of dash panel
Fuses
NumberConsumerAmps1Vacant 2Vacant 3Vacant 4Vacant 5Vacant 6Vacant 7Vacant 8Vacant 9Airbag510RSE input (roof screen)1011Vacant 12Left xenon headlight10
13Instrument panel (oil level)/Cable control unit
(BCM)/Heater/ABS, ESC (ESP)/Park Pilot/Gate-
way/Flow meter5
14Gearbox/Power steering/Brake light sensor/Trail-
er/ABS, ESC (ESP)/Haldex/Light switch10
15Heated windscreen / Instrument lighting / Diag-
nosis switchboard/Engine management/Addi-
tional heating/AFS headlights/Park Pilot10
16Right xenon headlight10
17Engine management / RSE system with START
STOP10
18Kombi / levers with START STOP519Navigation/ radio with START STOP15
20Park Pilot (parking aid)/Gear lever/ESC (ESP) con-
trol unit10
NumberConsumerAmps21Vacant 22Volumetric alarm sensor/ Alarm horn523Diagnosis / Rain sensor / Light switch1024Trailer hook pre-installation assistant1525Vacant 26Vacuum pump2027RSE supply (Ceiling display) without START STOP1028Rear window wiper motor2029Vacant 30Cigarette lighter / socket2031Vacant 32Vacant 33Heater4034Vacant 35Vacant 36Vacant 37Vacant 38Vacant 39Trailer control unit (coupling)15
40Trailer control unit (turn signals, brakes and left
side)20
41Trailer control unit (fog light, reverse light and
right side)20
42BCM wiring switchboard2043Trailer pre-installation4044Heated rear window2545Electric windows (front)3046Rear electric windows3047Engine (Fuel control unit, petrol relay)15
Page 272 of 315
270If and when
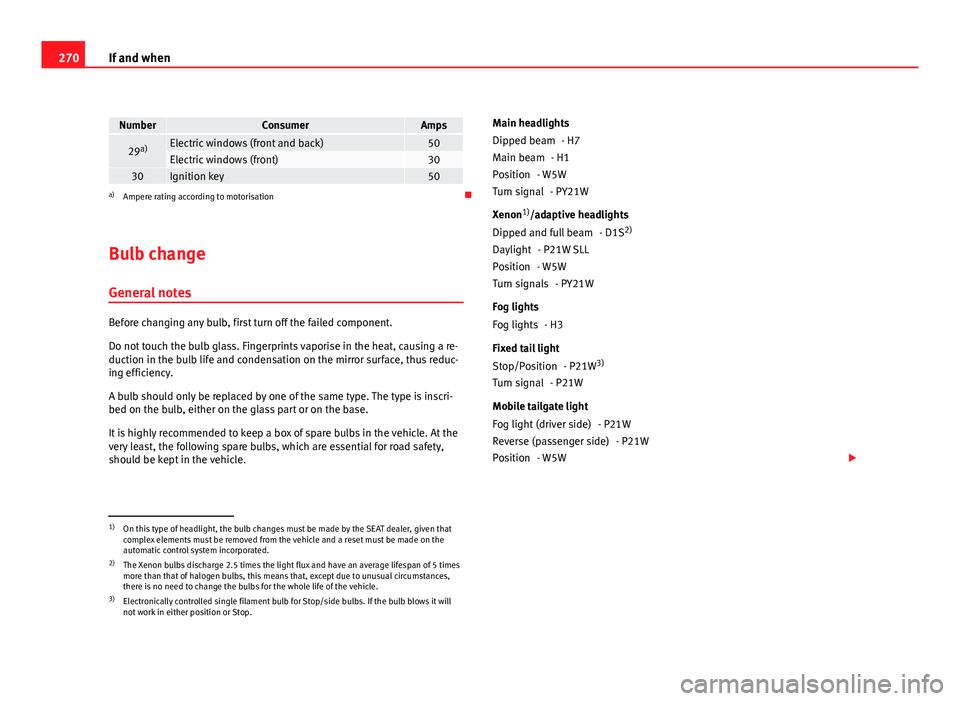
NumberConsumerAmps
29a)Electric windows (front and back)50Electric windows (front)3030Ignition key50a)
Ampere rating according to motorisation
Bulb change General notes
Before changing any bulb, first turn off the failed component.
Do not touch the bulb glass. Fingerprints vaporise in the heat, causing a re-
duction in the bulb life and condensation on the mirror surface, thus reduc-
ing efficiency.
A bulb should only be replaced by one of the same type. The type is inscri-
bed on the bulb, either on the glass part or on the base.
It is highly recommended to keep a box of spare bulbs in the vehicle. At the
very least, the following spare bulbs, which are essential for road safety,
should be kept in the vehicle. Main headlights
- H7
- H1
- W5W - PY21W
Xenon 1)
/adaptive headlights
- D1S2)
- P21W SLL
- W5W - PY21W
Fog lights - H3
Fixed tail light - P21W3)
- P21W
Mobile tailgate light - P21W- P21W
- W5W
Dipped beam
Main beam
Position
Turn signal
Dipped and full beam
Daylight
Position
Turn signals
Fog lights
Stop/Position
Turn signal
Fog light (driver side)
Reverse (passenger side)
Position
1)
On this type of headlight, the bulb changes must be made by the SEAT dealer, given that
complex elements must be removed from the vehicle and a reset must be made on the
automatic control system incorporated.
2) The Xenon bulbs discharge 2.5 times the light flux and have an average lifespan of 5 times
more than that of halogen bulbs, this means that, except due to unusual circumstances,
there is no need to change the bulbs for the whole life of the vehicle.
3) Electronically controlled single filament bulb for Stop/side bulbs. If the bulb blows it will
not work in either position or Stop.
Page 273 of 315
271
If and when
Side turn signal - W5W
Number plate light - C5W
Note
● Depending on weather conditions (cold or wet), the front lights, the fog
lights, the tail lights and the turn signals may be temporarily misted. This
has no influence on the useful life of the lighting system. By switching on
the lights, the area through which the beam of light is projected will quickly
be demisted. However, the edges may continue to be misted.
● Please check at regular intervals that all lighting (especially the exterior
lighting) on your vehicle is functioning properly. This is not only in the inter-
est of your own safety, but also that of all other road users.
● Due to the difficulty in accessing some of the bulbs, any replacement
work should be done by a SEAT dealer. However, the following is a descrip-
tion of how to change the lamps except for the fog lights* and interior
lamps.
Side turn signal
Number plate light
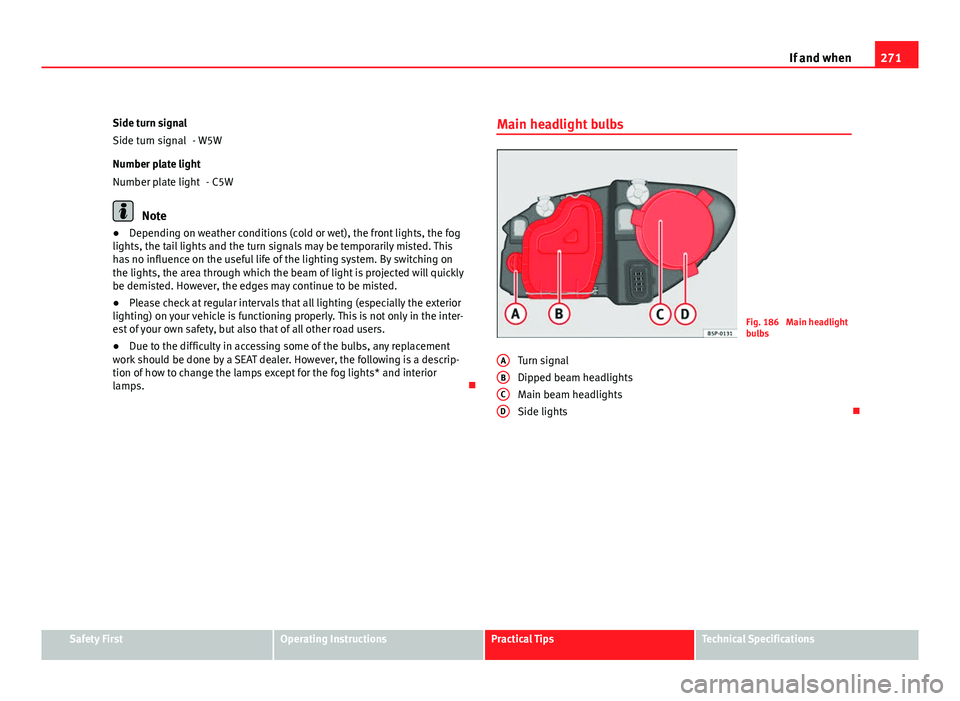
Main headlight bulbs
Fig. 186 Main headlight
bulbs
Turn signal
Dipped beam headlights
Main beam headlights
Side lights
A
BCD
Safety FirstOperating InstructionsPractical TipsTechnical Specifications
Page 274 of 315
272If and when
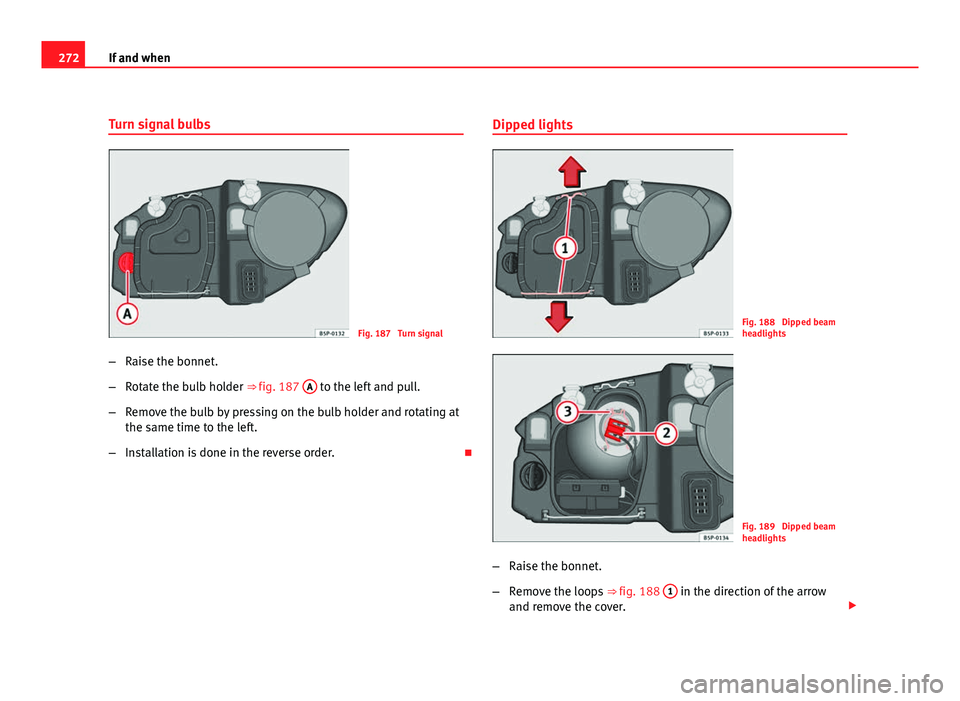
Turn signal bulbs
Fig. 187 Turn signal
– Raise the bonnet.
– Rotate the bulb holder ⇒ fig. 187 A
to the left and pull.
– Remove the bulb by pressing on the bulb holder and rotating at
the same time to the left.
– Installation is done in the reverse order. Dipped lights
Fig. 188 Dipped beam
headlights
Fig. 189 Dipped beam
headlights
– Raise the bonnet.
– Remove the loops ⇒ fig. 188 1
in the direction of the arrow
and remove the cover.
Page 275 of 315
273
If and when
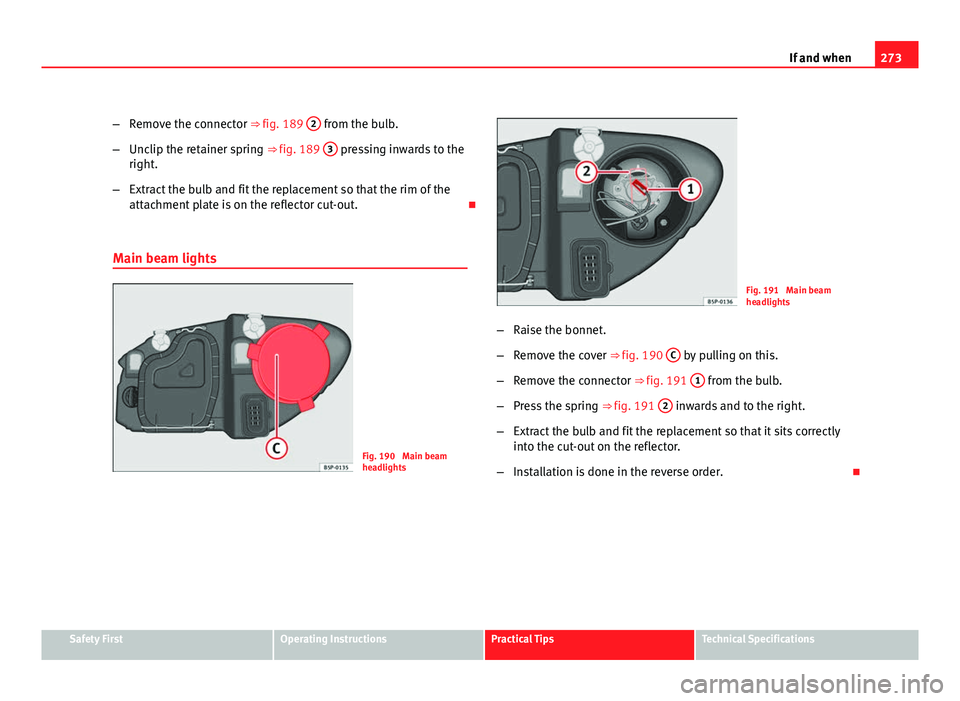
– Remove the connector ⇒ fig. 189 2
from the bulb.
– Unclip the retainer spring ⇒ fig. 189 3
pressing inwards to the
right.
– Extract the bulb and fit the replacement so that the rim of the
attachment plate is on the reflector cut-out.
Main beam lights
Fig. 190 Main beam
headlights
Fig. 191 Main beam
headlights
– Raise the bonnet.
– Remove the cover ⇒ fig. 190 C
by pulling on this.
– Remove the connector ⇒ fig. 191 1
from the bulb.
– Press the spring ⇒ fig. 191 2
inwards and to the right.
– Extract the bulb and fit the replacement so that it sits correctly
into the cut-out on the reflector.
– Installation is done in the reverse order.
Safety FirstOperating InstructionsPractical TipsTechnical Specifications
Page 276 of 315
274If and when
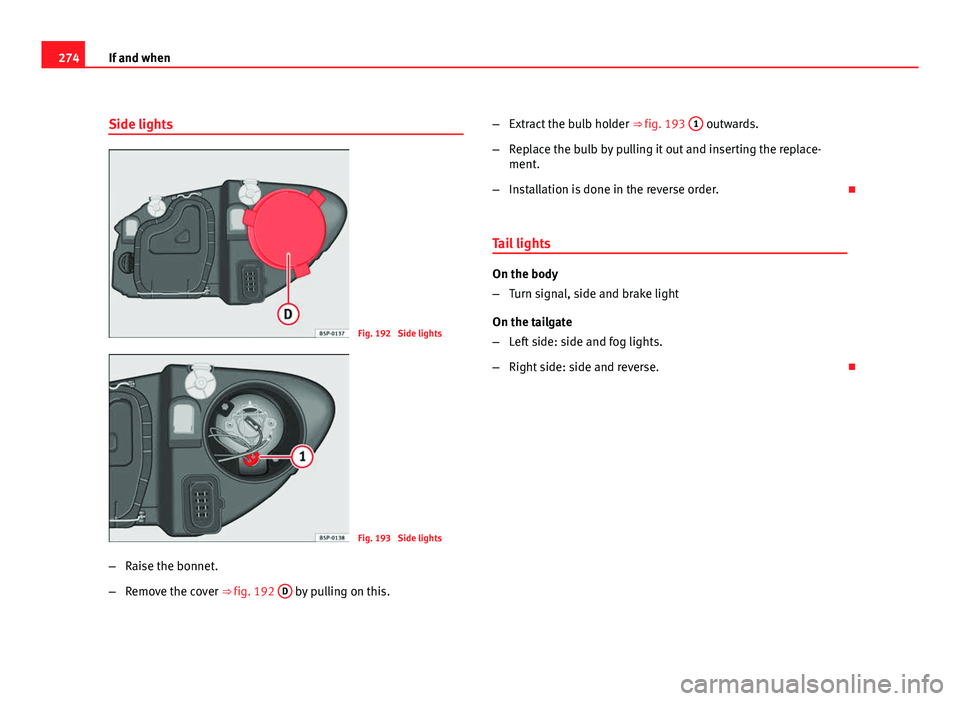
Side lights
Fig. 192 Side lights
Fig. 193 Side lights
– Raise the bonnet.
– Remove the cover ⇒ fig. 192 D
by pulling on this. –
Extract the bulb holder ⇒ fig. 193 1
outwards.
– Replace the bulb by pulling it out and inserting the replace-
ment.
– Installation is done in the reverse order.
Tail lights
On the body
– Turn signal, side and brake light
On the tailgate
– Left side: side and fog lights.
– Right side: side and reverse.