technical specifications Seat Altea XL 2013 Owner's Manual
[x] Cancel search | Manufacturer: SEAT, Model Year: 2013, Model line: Altea XL, Model: Seat Altea XL 2013Pages: 317, PDF Size: 4.69 MB
Page 279 of 317
277
If and when
Side lights
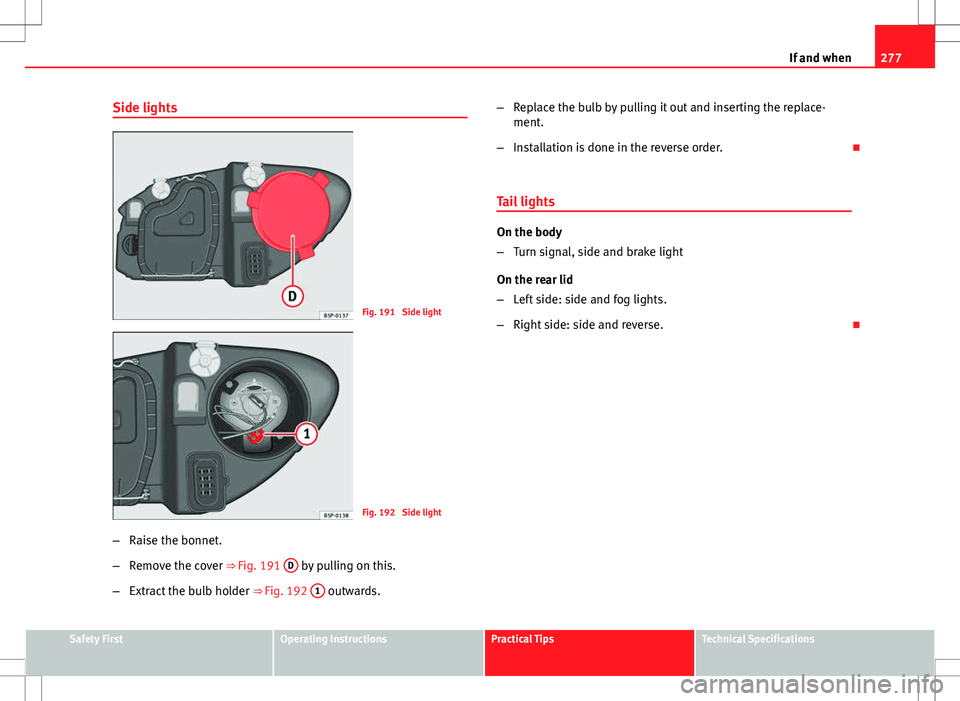
Fig. 191 Side light
Fig. 192 Side light
– Raise the bonnet.
– Remove the cover ⇒ Fig. 191 D
by pulling on this.
– Extract the bulb holder ⇒ Fig. 192 1
outwards. –
Replace the bulb by pulling it out and inserting the replace-
ment.
– Installation is done in the reverse order.
Tail lights
On the body
– Turn signal, side and brake light
On the rear lid
– Left side: side and fog lights.
– Right side: side and reverse.
Safety FirstOperating InstructionsPractical TipsTechnical Specifications
Page 281 of 317
279
If and when
Position light, fog light and reverse light on the rear lid
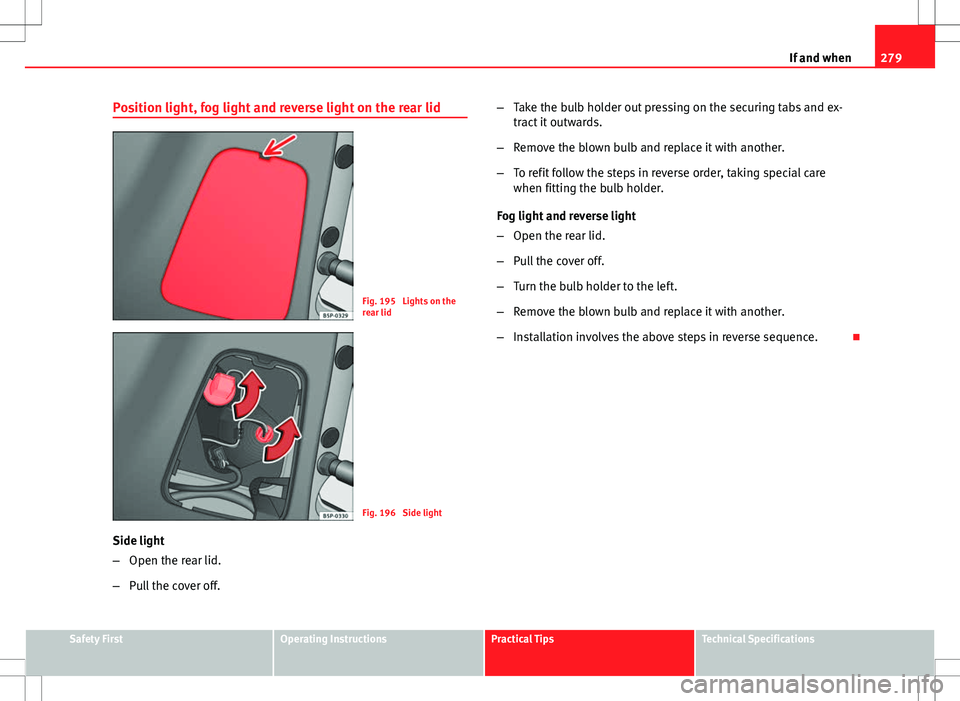
Fig. 195 Lights on the
rear lid
Fig. 196 Side light
Side light
– Open the rear lid.
– Pull the cover off. –
Take the bulb holder out pressing on the securing tabs and ex-
tract it outwards.
– Remove the blown bulb and replace it with another.
– To refit follow the steps in reverse order, taking special care
when fitting the bulb holder.
Fog light and reverse light
– Open the rear lid.
– Pull the cover off.
– Turn the bulb holder to the left.
– Remove the blown bulb and replace it with another.
– Installation involves the above steps in reverse sequence.
Safety FirstOperating InstructionsPractical TipsTechnical Specifications
Page 283 of 317
281
If and when
– Press the bulb sideways and remove it from the housing
⇒ Fig. 199.
Registration light
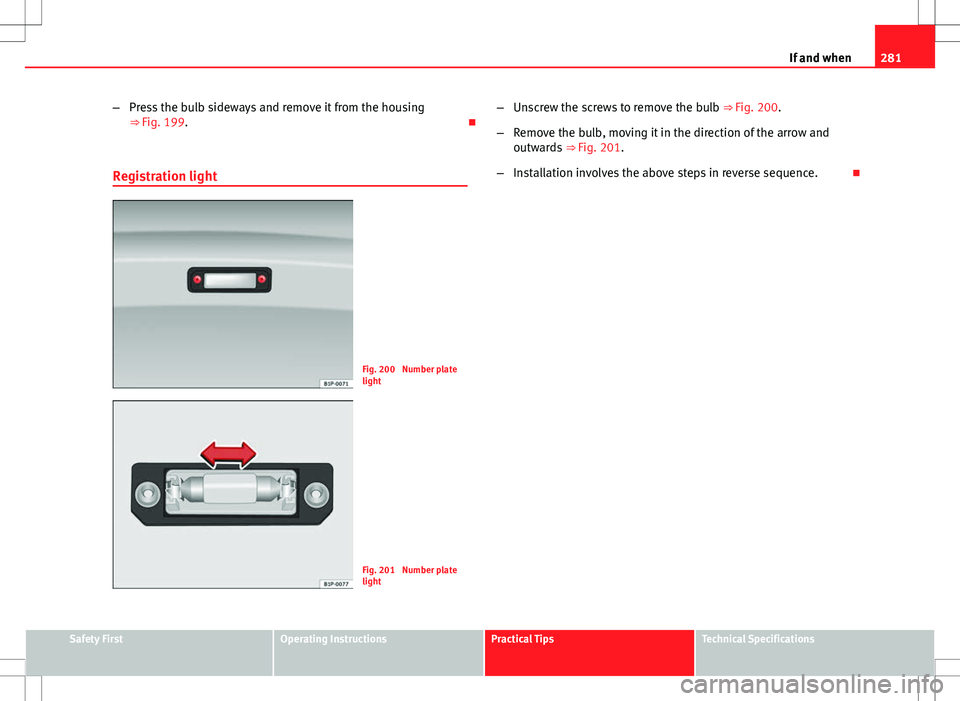
Fig. 200 Number plate
light
Fig. 201 Number plate
light –
Unscrew the screws to remove the bulb ⇒ Fig. 200.
– Remove the bulb, moving it in the direction of the arrow and
outwards ⇒ Fig. 201.
– Installation involves the above steps in reverse sequence.
Safety FirstOperating InstructionsPractical TipsTechnical Specifications
Page 285 of 317
283
If and when
How to jump start: description
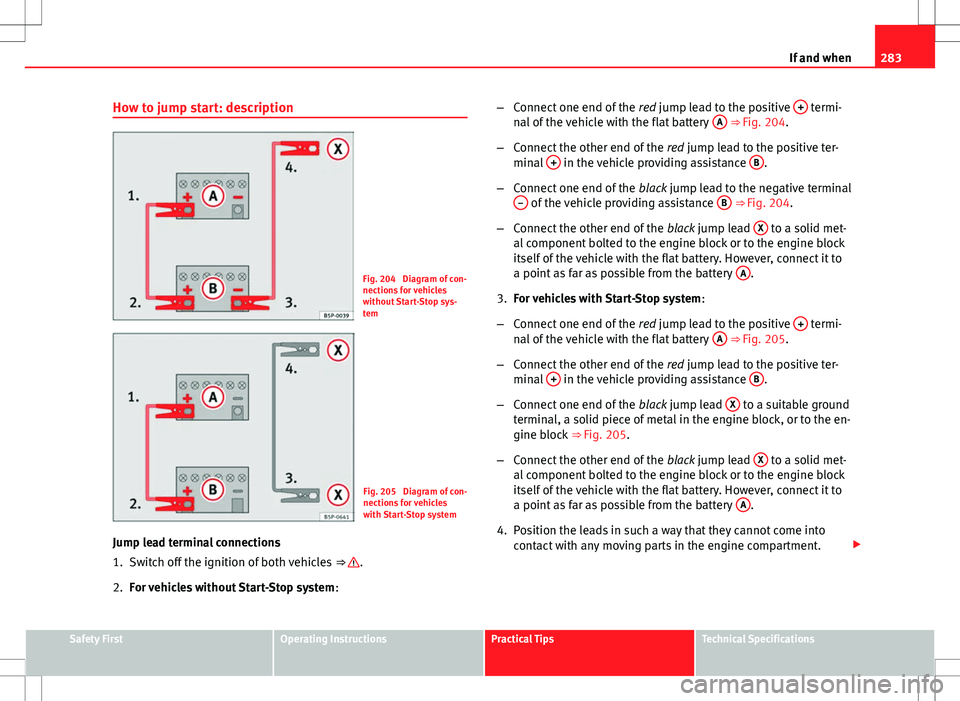
Fig. 204 Diagram of con-
nections for vehicles
without Start-Stop sys-
tem
Fig. 205 Diagram of con-
nections for vehicles
with Start-Stop system
Jump lead terminal connections
1. Switch off the ignition of both vehicles ⇒
.
2. For vehicles without Start-Stop system :–
Connect one end of the red jump lead to the positive +
termi-
nal of the vehicle with the flat battery A ⇒ Fig. 204.
– Connect the other end of the red jump lead to the positive ter-
minal +
in the vehicle providing assistance B.
– Connect one end of the black jump lead to the negative terminal
–
of the vehicle providing assistance B ⇒ Fig. 204.
– Connect the other end of the black jump lead X
to a solid met-
al component bolted to the engine block or to the engine block
itself of the vehicle with the flat battery. However, connect it to
a point as far as possible from the battery A
.
3. For vehicles with Start-Stop system :
– Connect one end of the red jump lead to the positive +
termi-
nal of the vehicle with the flat battery A ⇒ Fig. 205.
– Connect the other end of the red jump lead to the positive ter-
minal +
in the vehicle providing assistance B.
– Connect one end of the black jump lead X
to a suitable ground
terminal, a solid piece of metal in the engine block, or to the en-
gine block ⇒ Fig. 205.
– Connect the other end of the black jump lead X
to a solid met-
al component bolted to the engine block or to the engine block
itself of the vehicle with the flat battery. However, connect it to
a point as far as possible from the battery A
.
4. Position the leads in such a way that they cannot come into contact with any moving parts in the engine compartment.
Safety FirstOperating InstructionsPractical TipsTechnical Specifications
Page 287 of 317
285
If and when
Towing and tow-starting
Tow-starting
The use of jump leads is preferable to tow-starting.
We recommend that you do not tow-start your vehicle. Jump-start-
ing is preferable ⇒ page 282.
However, if your vehicle has to be tow-started:
– Engage the 2nd or the 3rd gear.
– Keep the clutch pressed down.
– Switch the ignition on.
– Once both vehicles are moving, release the clutch.
– As soon as the engine starts, press the clutch and move the
gear lever into neutral. This helps to prevent driving into the
towing vehicle.
WARNING
The risk of accidents is high when tow-starting. The vehicle being towed
can easily collide with the towing vehicle.
CAUTION
When tow-starting, fuel could enter the catalytic converter and damage it. General notes
Please observe the following points if you use a tow rope:
Notes for the driver of the towing vehicle
–
Drive slowly at first until the tow rope is taut. Then accelerate
gradually.
– Begin and change gears cautiously. If you are driving an auto-
matic vehicle, accelerate gently.
– Remember that the brake servo and power steering are not
working in the vehicle you are towing. Brake sooner than nor-
mal and pressing the pedal gently.
Notes for the driver of the towed vehicle
– Ensure that the tow rope remains taut at all times when towing.
Tow rope or tow bar
It is easier and safer to tow a vehicle with a tow bar. You should only use a
tow rope if you do not have a tow bar.
A tow rope should be slightly elastic to reduce the loading on both vehicles.
It is advisable to use a tow rope made of synthetic fibre or similarly elastic
material.
Attach the tow rope or the tow bar only to the towline anchorages provided
or a towing bracket.
Driving style
Towing requires some experience, especially when using a tow rope. Both
drivers should be familiar with the technique required for towing. Inexper-
ienced drivers should not attempt to tow.
Safety FirstOperating InstructionsPractical TipsTechnical Specifications
Page 289 of 317
287
If and when
Towline anchorages
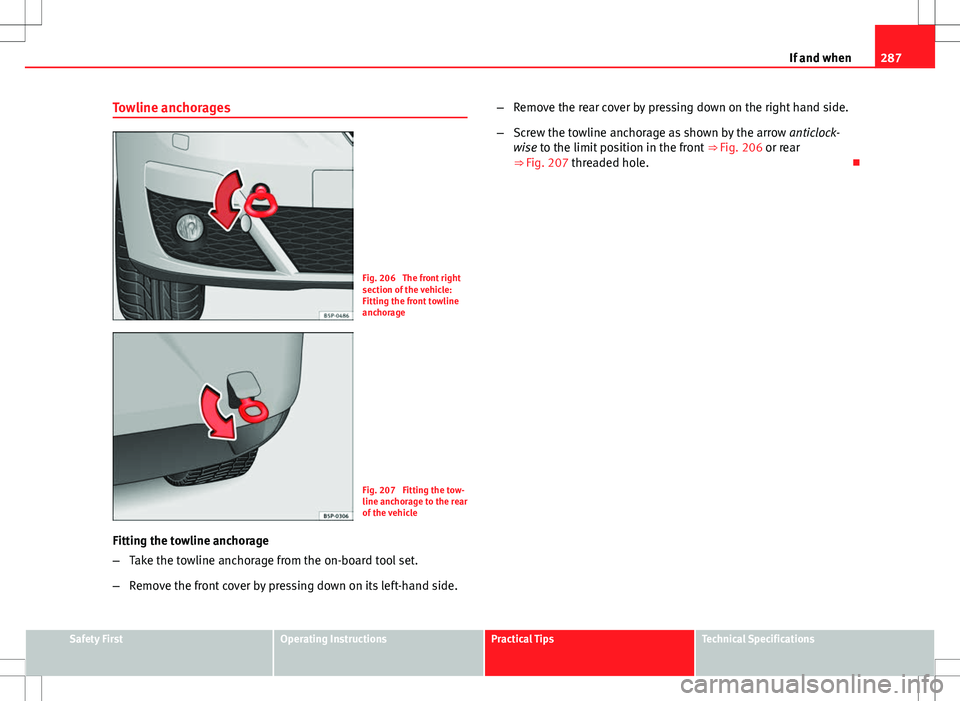
Fig. 206 The front right
section of the vehicle:
Fitting the front towline
anchorage
Fig. 207 Fitting the tow-
line anchorage to the rear
of the vehicle
Fitting the towline anchorage
– Take the towline anchorage from the on-board tool set.
– Remove the front cover by pressing down on its left-hand side. –
Remove the rear cover by pressing down on the right hand side.
– Screw the towline anchorage as shown by the arrow anticlock-
wise to the limit position in the front ⇒ Fig. 206 or rear
⇒ Fig. 207 threaded hole.
Safety FirstOperating InstructionsPractical TipsTechnical Specifications
Page 290 of 317
288Description of specifications
Technical Specifications
Description of specifications
Important information
Important
The information in your vehicle's official documents always
take precedence over the information in the current instruc-
tion manual. All technical specifications provided in this documentation are valid for the
standard model in Spain. The vehicle data card included in the Inspection
and Maintenance Plan in the vehicle documentation shows which engine is
installed in the vehicle.
The figures may be different depending whether additional equipment is fit-
ted, for different models, for special vehicles and for other countries.
Abbreviations used in the Technical Specifications section
Abbrevia- tionMeaning
kWKilowatt, engine power measurement.
PSPferdestärke (horsepower), formerly used to denote engine
power.
rpmRevolutions per minute - engine speed.NmNewton metres, unit of engine torque.l/100 kmFuel consumption in litres per 100 km.g/kmCarbon dioxide emissions in grams per km travelled.CO2Carbon dioxide
Abbrevia-
tionMeaning
CNCetane number, indication of the diesel combustion power.
RONResearch octane number, indication of the knock resistance
of petrol.
Page 291 of 317
289
Description of specifications
Vehicle identification data
The most important information is given on the identifica-
tion plate and the vehicle data sticker.
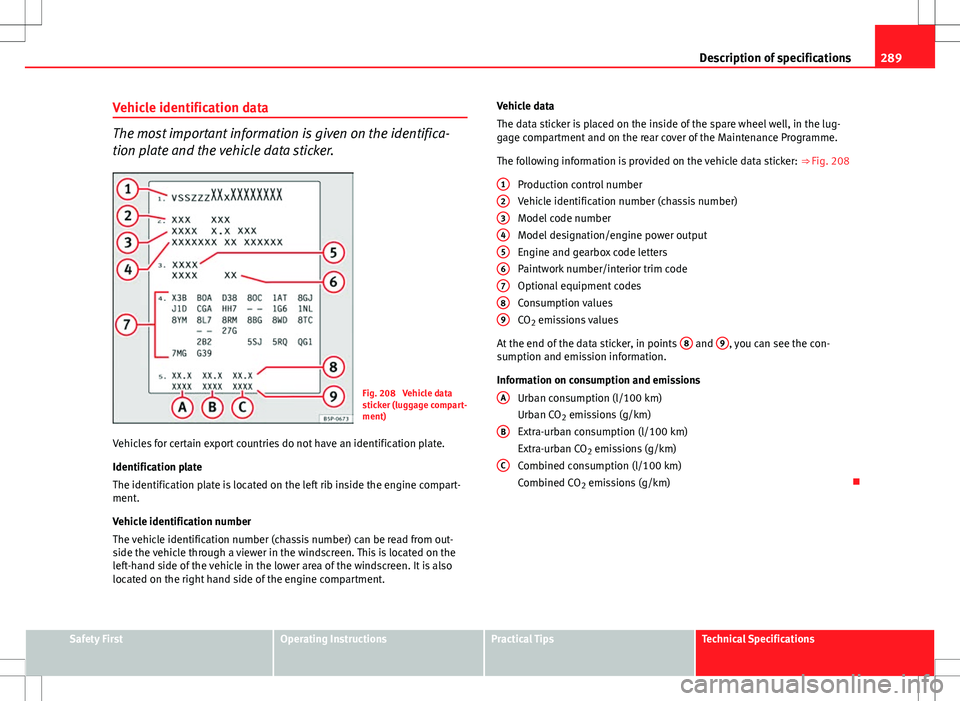
Fig. 208 Vehicle data
sticker (luggage compart-
ment)
Vehicles for certain export countries do not have an identification plate.
Identification plate
The identification plate is located on the left rib inside the engine compart-
ment.
Vehicle identification number
The vehicle identification number (chassis number) can be read from out-
side the vehicle through a viewer in the windscreen. This is located on the
left-hand side of the vehicle in the lower area of the windscreen. It is also
located on the right hand side of the engine compartment. Vehicle data
The data sticker is placed on the inside of the spare wheel well, in the lug-
gage compartment and on the rear cover of the Maintenance Programme.
The following information is provided on the vehicle data sticker:
⇒ Fig. 208
Production control number
Vehicle identification number (chassis number)
Model code number
Model designation/engine power output
Engine and gearbox code letters
Paintwork number/interior trim code
Optional equipment codes
Consumption values
CO 2 emissions values
At the end of the data sticker, in points 8
and 9, you can see the con-
sumption and emission information.
Information on consumption and emissions
Urban consumption (l/100 km)
Urban CO 2 emissions (g/km)
Extra-urban consumption (l/100 km)
Extra-urban CO 2 emissions (g/km)
Combined consumption (l/100 km)
Combined CO 2 emissions (g/km)
1
23456789
A
B
C
Safety FirstOperating InstructionsPractical TipsTechnical Specifications
Page 293 of 317
291
Description of specifications
Drawbar loads
The maximum permitted drawbar load on the ball joint of the towing bracket
must not exceed 75 kg.
In the interest of road safety, we recommend that you always tow approach-
ing the maximum drawbar load. The response of the trailer on the road will
be poor if the drawbar load is too small.
If the maximum permissible drawbar load cannot be met (e.g. with small,
empty and light-weight single axle trailers or tandem axle trailers with a
wheelbase of less than 1 metre), a minimum of 4% of the actual trailer
weight is legally required for the drawbar load.
WARNING
● For safety reasons, do not exceed the 80 km/h (50 mph) limit. This is
also valid in countries where higher speeds are permitted.
● Never exceed the maximum trailer weights or the drawbar load. If the
permissible axle load or the permissible total weight is exceeded, the
driving characteristics of the vehicle may change, leading to accidents,
injuries and damage to the vehicle.
Safety FirstOperating InstructionsPractical TipsTechnical Specifications
Page 294 of 317
292Technical specifications
Technical specifications
Checking fluid levels
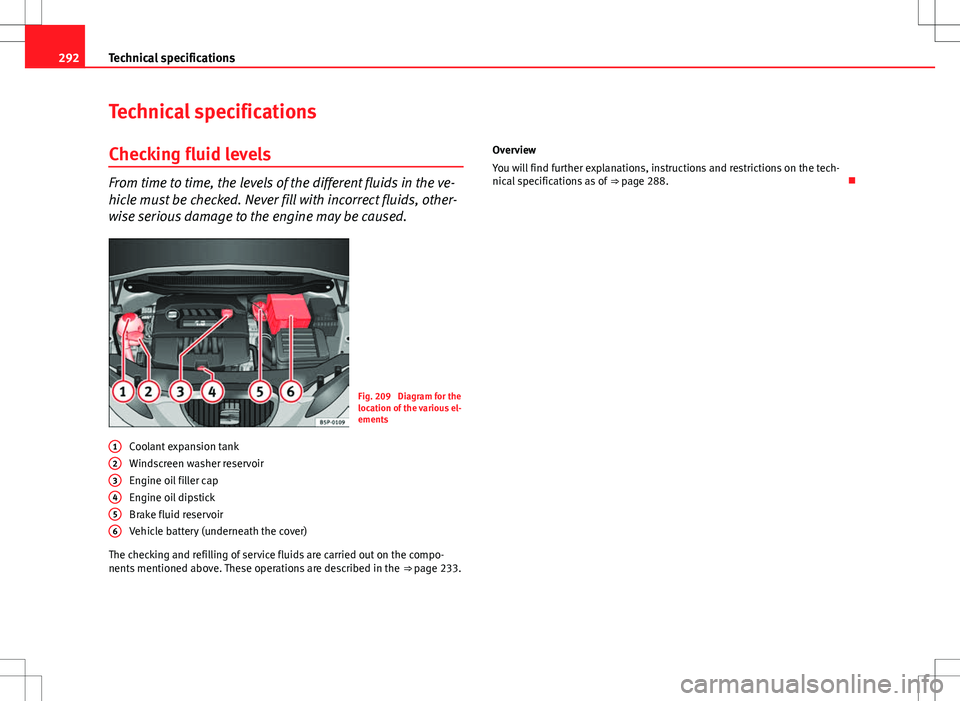
From time to time, the levels of the different fluids in the ve-
hicle must be checked. Never fill with incorrect fluids, other-
wise serious damage to the engine may be caused.
Fig. 209 Diagram for the
location of the various el-
ements
Coolant expansion tank
Windscreen washer reservoir
Engine oil filler cap
Engine oil dipstick
Brake fluid reservoir
Vehicle battery (underneath the cover)
The checking and refilling of service fluids are carried out on the compo-
nents mentioned above. These operations are described in the ⇒ page 233.
1
23456
Overview
You will find further explanations, instructions and restrictions on the tech-
nical specifications as of
⇒ page 288.