check Seat Altea XL 2013 Manual PDF
[x] Cancel search | Manufacturer: SEAT, Model Year: 2013, Model line: Altea XL, Model: Seat Altea XL 2013Pages: 317, PDF Size: 4.69 MB
Page 255 of 317
253
Wheels and tyres
Wear indicators
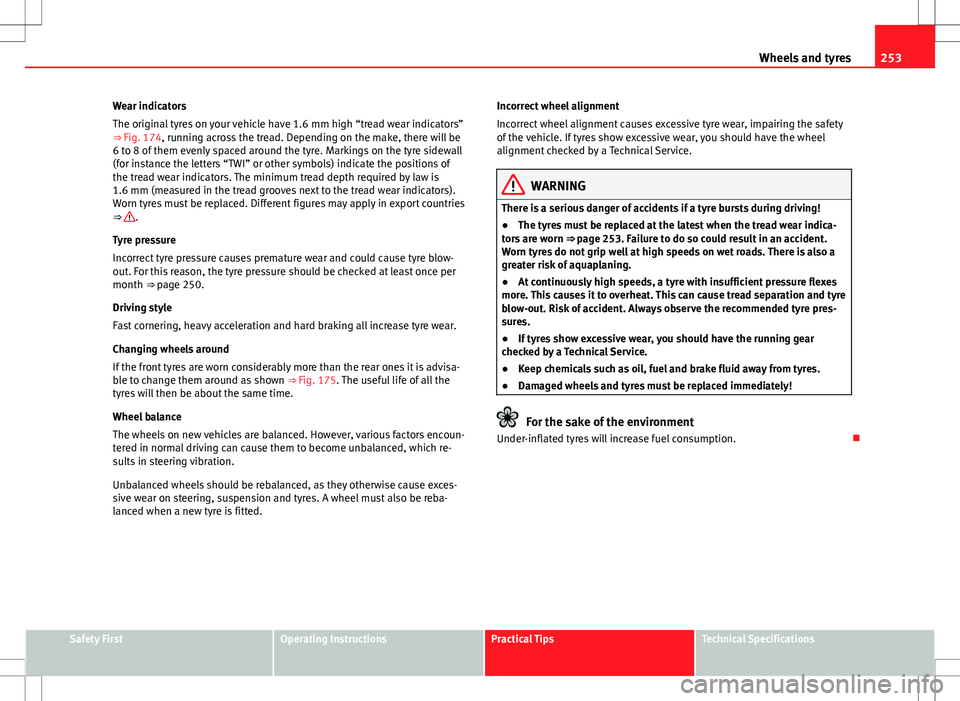
The original tyres on your vehicle have 1.6 mm high “tread wear indicators”
⇒ Fig. 174, running across the tread. Depending on the make, there will be
6 to 8 of them evenly spaced around the tyre. Markings on the tyre sidewall
(for instance the letters “TWI” or other symbols) indicate the positions of
the tread wear indicators. The minimum tread depth required by law is
1.6 mm (measured in the tread grooves next to the tread wear indicators).
Worn tyres must be replaced. Different figures may apply in export countries
⇒
.
Tyre pressure
Incorrect tyre pressure causes premature wear and could cause tyre blow-
out. For this reason, the tyre pressure should be checked at least once per
month ⇒ page 250.
Driving style
Fast cornering, heavy acceleration and hard braking all increase tyre wear.
Changing wheels around
If the front tyres are worn considerably more than the rear ones it is advisa-
ble to change them around as shown ⇒ Fig. 175. The useful life of all the
tyres will then be about the same time.
Wheel balance
The wheels on new vehicles are balanced. However, various factors encoun-
tered in normal driving can cause them to become unbalanced, which re-
sults in steering vibration.
Unbalanced wheels should be rebalanced, as they otherwise cause exces-
sive wear on steering, suspension and tyres. A wheel must also be reba-
lanced when a new tyre is fitted. Incorrect wheel alignment
Incorrect wheel alignment causes excessive tyre wear, impairing the safety
of the vehicle. If tyres show excessive wear, you should have the wheel
alignment checked by a Technical Service.
WARNING
There is a serious danger of accidents if a tyre bursts during driving!
● The tyres must be replaced at the latest when the tread wear indica-
tors are worn ⇒ page 253. Failure to do so could result in an accident.
Worn tyres do not grip well at high speeds on wet roads. There is also a
greater risk of aquaplaning.
● At continuously high speeds, a tyre with insufficient pressure flexes
more. This causes it to overheat. This can cause tread separation and tyre
blow-out. Risk of accident. Always observe the recommended tyre pres-
sures.
● If tyres show excessive wear, you should have the running gear
checked by a Technical Service.
● Keep chemicals such as oil, fuel and brake fluid away from tyres.
● Damaged wheels and tyres must be replaced immediately!
For the sake of the environment
Under-inflated tyres will increase fuel consumption.
Safety FirstOperating InstructionsPractical TipsTechnical Specifications
Page 256 of 317
254Wheels and tyres
Run-flat tyres
Run-flat tyres allow you to continue driving even with a
punctured tyre, in the majority of cases.
In vehicles that are factory-fitted with run-flat tyres 1)
the loss of tyre
pressure is indicated on the instrument panel.
Driving with run-flat tyres (emergency running)
– Leave the ESC/ASR on (Electronic Stability Control), or switch it
on ⇒ page 196.
– Continue driving carefully and slowly (80 km/h (50 mph) maxi-
mum).
– Avoid sudden manoeuvres and sharp turns.
– Avoid driving over obstacles (for example kerbs) or potholes.
– Pay attention if the ESC/ASR activates often, if smoke comes
from the tyres or there is a smell of rubber, the vehicle vibrates
or there are clattering noises. If any of these occur, stop the ve-
hicle.
The run-flat tyres have a tag on the side of the tyre, with the description:
“DSST”, “Eufonia”, “RFT”, “ROF”, “RSC”, “SSR” or “ZP”.
The sides of this type of tyre are reinforced. When the tyres lose air they are
supported on the sides (emergency driving).
The loss of pressure in the tyre is shown on the instrument panel. You can
then drive a maximum of 80 km (50 miles) and if the circumstances are fa-
vourable (for example, low load), even more. The damaged tyre should be changed as soon as possible. The rim should
be checked in a specialised workshop to detect possible damage and re-
place it if necessary. We recommend you contact Technical Service. If more
than one tyre is being used under emergency conditions, this reduces the
distance which can be travelled.
Starting driving in emergency conditions
When loss in tyre pressure is displayed on the instrument panel, this means
that at least one tyre is being driven in emergency conditions
⇒
.
End of emergency operation
Do not drive on if:
● smoke is coming from one of the tyres,
● there is a smell of rubber,
● the vehicle vibrates,
● there is a rattling noise.
When is it no longer possible to continue driving even using run-flat tyres?
● If one of the tyres has been severely damaged in an accident, etc. If a
tyre has been badly damaged there is a risk that parts of the tread can be
thrown off and cause damage to the fuel lines, brake pipes or fuel filler.
● It is also advisable to stop driving if severe vibrations occur, or if the
wheel starts overheating and gives off smoke.
1)
Depending upon version and country.
Page 258 of 317
256Wheels and tyres
WARNING
● We recommend that you use only wheels and tyres which have been
approved by SEAT for your model. Failure to do so could impair vehicle
handling. Risk of accident.
● Avoid running the vehicle on tyres that are more than 6 years old. If
you have no alternative, you should drive slowly and with extra care at all
times.
● Never use old tyres or those with an unknown history of use.
● If wheel trims are retrofitted, you must ensure that the flow of air to
the brakes is not restricted. This could cause the brake system to over-
heat.
● All four wheels must be fitted with radial tyres of the same type, size
(rolling circumference) and the same tread pattern.
For the sake of the environment
Old tyres must be disposed of according to the laws in the country con-
cerned.
Note
● For technical reasons, it is not generally possible to use the wheels from
other vehicles. This can also apply to wheels of the same model. The use of
wheels or tyres which have not been approved by SEAT for use with your
model may invalidate the vehicle's type approval for use on public roads.
● If the spare tyre is not the same as the tyres that are mounted on the
vehicle (e.g. winter tyres) you should only use the spare tyre for a short peri-
od of time and drive with extra care. Refit the normal road wheel as soon as
possible. Wheel bolts
Wheel bolts must be tightened to the correct torque.
The design of wheel bolts is matched to the rims. If different wheel rims are
fitted, the correct wheel bolts with the right length and correctly shaped
bolt heads must be used. This ensures that wheels are fitted securely and
that the brake system functions correctly.
In certain circumstances, you should not use wheel bolts from a different
vehicle, even if it is the same model ⇒ page 224.
After the wheels have been changed, the tightening torque of the wheel
bolts should be checked as soon as possible with a torque wrench ⇒
.
The tightening torque for steel and alloy wheels is 120 Nm.
WARNING
If the wheel bolts are not tightened correctly, the wheel could become
loose while driving. Risk of accident.
● The wheel bolts must be clean and turn easily. Never apply grease or
oil to them.
● Use only wheel bolts which belong to the wheel.
● If the tightening torque of the wheel bolts is too low, they could loos-
en whilst the vehicle is in motion. Risk of accident! If the tightening tor-
que is too high, the wheel bolts and threads can be damaged.
CAUTION
The prescribed tightening torque for wheel bolts for steel and alloy wheels
is 120 Nm.
Page 262 of 317
260If and when
How to use the temporary spare wheel
Should you ever have a punctured tyre, the temporary spare wheel is only
intended for temporary use until you can reach a workshop. The standard-
size road wheel should be replaced as soon as possible.
Please note the following restrictions when using the temporary spare
wheel. This temporary spare wheel has been specially designed for your ve-
hicle, thus, it cannot be changed with the temporary spare wheel from an-
other vehicle.
No other type of tyre (normal summer or winter tyre) may be fitted on the
compact temporary spare wheel rim.
Snow chains
For technical reasons, snow chains must not be used on the compact tem-
porary spare wheel.
If you have a puncture on one of the front wheels when using snow chains,
fit the compact temporary spare wheel in place of one of the rear wheels.
You can then attach the snow chains to the wheel taken from the rear and
use this wheel to replace the punctured front wheel.
WARNING
● The tyre pressures must be checked and corrected as soon as possi-
ble after fitting the temporary spare wheel. The temporary spare wheel
pressure for dimensions 125/70R16 125/70R18 135/90R16 is 4.2 bar;
for all other tyre dimensions please refer to the label on the fuel cap. Fail-
ure to do so could result in an accident.
● Do not drive faster than 80 km/h (50 mph). Higher speeds can cause
an accident.
● Avoid heavy acceleration, hard braking and fast cornering. Risk of ac-
cident.
WARNING (Continued)
● Never use more than one temporary spare wheel at the same time,
risk of accident.
● No other type of tyre (normal summer or winter tyre) may be fitted on
the compact temporary spare wheel rim.
Tyre repair kit
The tyre repair kit (for vehicles not including a temporary
spare wheel) is stored under the floor panel in the luggage
compartment. In the event of a punctured tyre, your vehicle is equipped with the Tyre Mo-
bility System tyre repair kit.
The tyre repair kit consists of a container with sealing product to repair the
puncture and a compressor to generate the required tyre pressure. The kit
will reliably seal punctures up to a size of about 4 mm caused by the pene-
tration of a foreign body into the tyre.
Note
● Seek professional assistance if the repair of a tyre puncture is not possi-
ble with the sealing product.
Page 264 of 317
262If and when
–Place the wheel with the defective tyre in the luggage compart-
ment and secure it.
– Check the tyre pressure of the newly fitted tyre as soon as pos-
sible.
– Have the tightening torque of the wheel bolts checked as soon
as possible with a torque wrench. The prescribed torque must
be 120 Nm.
Note
● If you notice that the wheel bolts are corroded and difficult to turn when
changing a wheel, they must be replaced before having the wheel bolt tight-
ening torque checked.
● For safety reasons, drive at moderate speeds until the wheel bolt tight-
ening torque has been checked. Wheel trims
The wheel trims must be removed to gain access to the
wheel bolts.
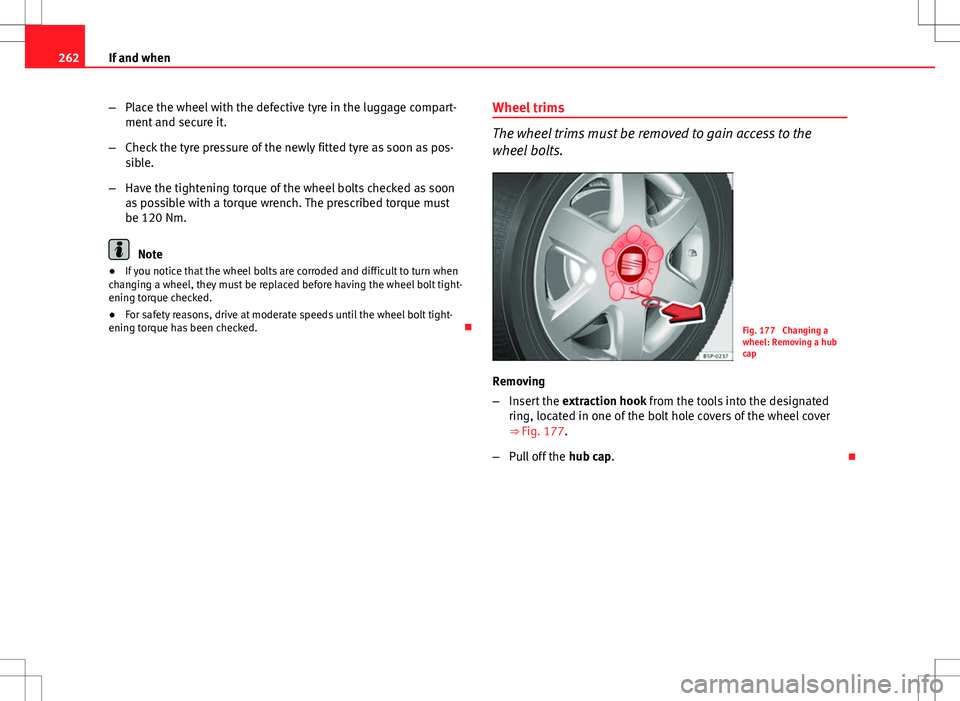
Fig. 177 Changing a
wheel: Removing a hub
cap
Removing
– Insert the extraction hook from the tools into the designated
ring, located in one of the bolt hole covers of the wheel cover
⇒ Fig. 177.
– Pull off the hub cap.
Page 269 of 317
267
If and when
You will also find instructions for operating the compressor.
WARNING
● Do not attempt to repair a puncture with the sealing product if the
tyre has been damaged by driving the vehicle after the tyre has lost its
air.
● Always observe warnings and follow instructions concerning com-
pressor and sealing compound carefully.
● Do not drive faster than 80 km/h (50 mph), avoid heavy acceleration,
hard braking and fast cornering.
● Tyres which have been repaired with sealing compound are only suit-
able for temporary use over a short period. Therefore, please drive care-
fully to the next available specialised workshop.
For the sake of the environment
If you have to dispose of a sealant can, go to a specialised waste service or
to a SEAT Technical Service, where the product can be recycled in an appro-
priate waste container.
Note
● If sealing product should leak out, leave it to dry. This way you can pull it
off like a piece of foil.
● Observe the expiry date stated on the sealing compound can. Have the
sealing compound exchanged by a specialised workshop.
● Seek professional assistance if the repair of a tyre puncture is not possi-
ble with the sealing product. Preparation work
Certain steps must be taken before repairing a tyre.
–
If you have a flat tyre or puncture, park the vehicle as far away
from the flow of traffic as possible.
– Apply the handbrake firmly.
– Engage first gear , or put the selector lever to position P.
– All occupants should leave the vehicle. They should wait in a
safe area (for instance behind the roadside crash barrier).
– Check whether a repair is possible using the Tyre Mobility Sys-
tem “General information and safety notes.”
– Unscrew inflation cap from the affected wheel.
– Take the tyre repair kit out of the luggage compartment.
WARNING
Put the hazard warning lights on and place the warning triangle in posi-
tion. This is for your own safety and also warns other road users.
CAUTION
Take special care if you have to repair a tyre on a slope.
Note
Please observe legal requirements when doing so.
Safety FirstOperating InstructionsPractical TipsTechnical Specifications
Page 272 of 317
270If and when
The electric windows are protected by circuit breakers. These reset automat-
ically after a few seconds when the overload (caused for example by frozen
windows) has been corrected.
Fuses colour code
ColourAmpsLight brown5Red10Blue15Yellow20Natural (white)25Green30Orange40Red50White80Blue100Grey150Violet200
WARNING
Never “repair” damaged fuses and never replace them with fuses with a
higher rating. Failure to comply could result in fire. This could also cause
damage to other parts of the electrical system.
Note
● If a newly replaced fuse blows again after a short time, the electrical sys-
tem must be checked by a specialised workshop as soon as possible.
● If you replace a fuse with higher-rating fuse, you could cause damage to
another location in the electrical system. ●
Always keep some spare fuses in the vehicle. These are available from
SEAT Official Services.
● In addition to the fuses listed in the following tables, there are other
fuses which must be replaced by the Technical Service Workshop.
Page 276 of 317
274If and when
Side turn signal - W5W
Number plate light - C5W
Note
● Depending on weather conditions (cold or wet), the front lights, the fog
lights, the tail lights and the turn signals may be temporarily misted. This
has no influence on the useful life of the lighting system. By switching on
the lights, the area through which the beam of light is projected will quickly
be demisted. However, the edges may continue to be misted.
● Please check at regular intervals that all lighting (especially the exterior
lighting) on your vehicle is functioning properly. This is not only in the inter-
est of your own safety, but also that of all other road users.
● Due to the difficulty in accessing some of the bulbs, any replacement
work should be done by a Technical Service. However, the following is a de-
scription of how to change the lamps except for the fog lights* and interior
lamps.
Side turn signal
Number plate light
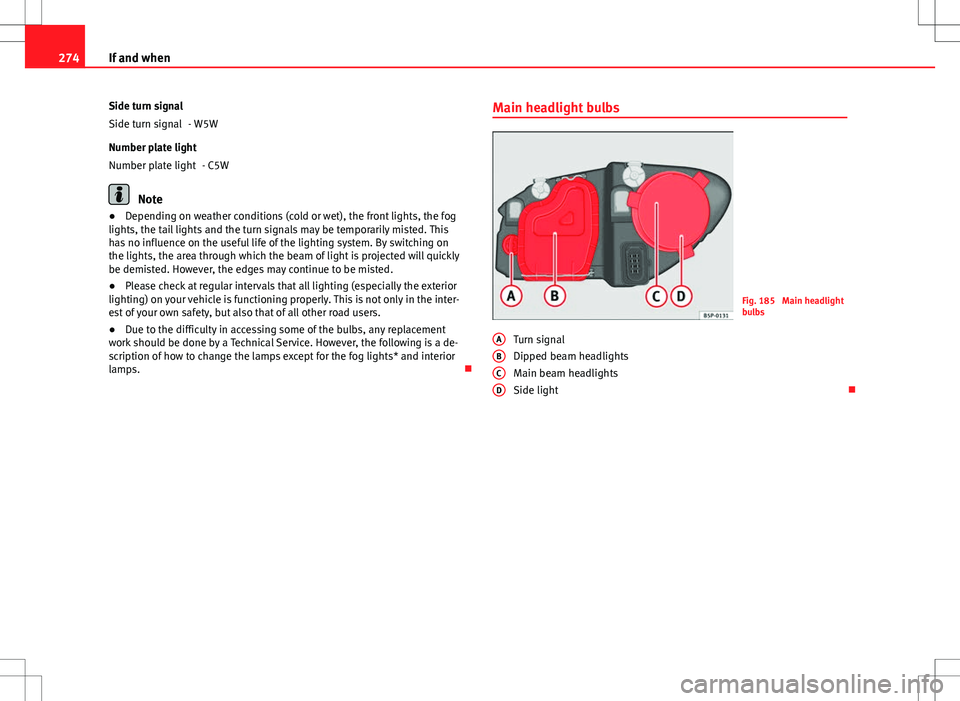
Main headlight bulbs
Fig. 185 Main headlight
bulbs
Turn signal
Dipped beam headlights
Main beam headlights
Side light
A
BCD
Page 294 of 317
292Technical specifications
Technical specifications
Checking fluid levels
From time to time, the levels of the different fluids in the ve-
hicle must be checked. Never fill with incorrect fluids, other-
wise serious damage to the engine may be caused.
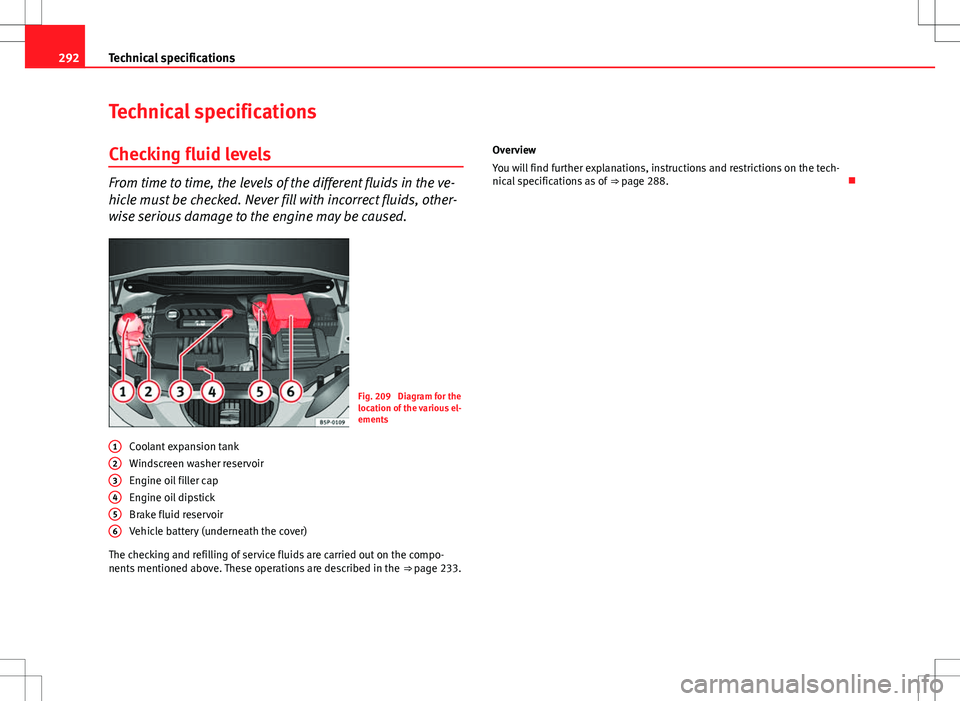
Fig. 209 Diagram for the
location of the various el-
ements
Coolant expansion tank
Windscreen washer reservoir
Engine oil filler cap
Engine oil dipstick
Brake fluid reservoir
Vehicle battery (underneath the cover)
The checking and refilling of service fluids are carried out on the compo-
nents mentioned above. These operations are described in the ⇒ page 233.
1
23456
Overview
You will find further explanations, instructions and restrictions on the tech-
nical specifications as of
⇒ page 288.
Page 308 of 317
C
Car care Exterior . . . . . . . . . . . . . . . . . . . . . . . . . . . . 213
Catalytic converter . . . . . . . . . . . . . . . . . . . . . . 203
CCS . . . . . . . . . . . . . . . . . . . . . . . . . . . . . . . . . . 190
CD changer . . . . . . . . . . . . . . . . . . . . . . . . . . . . 141
Central lock button Locking . . . . . . . . . . . . . . . . . . . . . . . . . . . . . 99
Unlocking . . . . . . . . . . . . . . . . . . . . . . . . . . . 99
Central locking . . . . . . . . . . . . . . . . . . . . . . . . . . 97 Automatic speed dependent locking andunlocking system* . . . . . . . . . . . . . . . . . . 99
Emergency unlocking system . . . . . . . . . . . 99
Locking system for involuntary unlocking . 99
Selective unlocking system* . . . . . . . . . . . . 98
Unlocking system* . . . . . . . . . . . . . . . . . . . . 99
Centre armrest . . . . . . . . . . . . . . . . . . . . . . . . . 141
Cetane number . . . . . . . . . . . . . . . . . . . . . . . . . 232
Changing gear see Manual gearbox . . . . . . . . . . . . . . . . . . 179
Changing gear in tiptronic mode . . . . . . . . . . 183
Changing the bulbs Main headlight bulbs . . . . . . . . . . . . . . . . . 274
Tail lights . . . . . . . . . . . . . . . . . . . . . . . . . . 277
Changing the main headlight bulbs Main beam lights . . . . . . . . . . . . . . . . . . . . 276
Side lights . . . . . . . . . . . . . . . . . . . . . . . . . . 277
Turn signal bulbs . . . . . . . . . . . . . . . . . . . . 275
Changing the main headlight lamps dipped lights . . . . . . . . . . . . . . . . . . . . . . . 275 Changing the tail light bulbs
Position light, fog light and tail light on therear lid . . . . . . . . . . . . . . . . . . . . . . . . . . . 279
Changing the tail lights Luggage compartment lights . . . . . . . . . . 280
Turn signal, side and brake lights on thebody . . . . . . . . . . . . . . . . . . . . . . . . . . . . . 278
Changing windscreen wiper blades . . . . . . . . 243
Chassis number . . . . . . . . . . . . . . . . . . . . . . . . 289
Checking . . . . . . . . . . . . . . . . . . . . . . . . . . . . . . 248
Checking battery electrolyte level . . . . . . . . . . 248
Checking engine oil level . . . . . . . . . . . . . . . . . 238
Checklist Seat upholstery . . . . . . . . . . . . . . . . . . . . . 219
Child safety . . . . . . . . . . . . . . . . . . . . . . . . . . . . . 46
Child seat Categorisation in groups . . . . . . . . . . . . . . . 48
Group 1 . . . . . . . . . . . . . . . . . . . . . . . . . . . . . 49
Group 2 . . . . . . . . . . . . . . . . . . . . . . . . . . . . . 49
Group 3 . . . . . . . . . . . . . . . . . . . . . . . . . . . . . 49
Groups 0 and 0+ . . . . . . . . . . . . . . . . . . . . . . 48
Safety notes . . . . . . . . . . . . . . . . . . . . . . . . . 46
Securing . . . . . . . . . . . . . . . . . . . . . . . . . . . . 51
Child seats . . . . . . . . . . . . . . . . . . . . . . . . . . . . . 48 ISOFIX system . . . . . . . . . . . . . . . . . . . . . . . . 52
on the front passenger seat . . . . . . . . . . . . . 31
Top Tether system . . . . . . . . . . . . . . . . . . . . 52
Cigarette lighter* . . . . . . . . . . . . . . . . . . . . . . . 150
Cleaning alloy wheel rims . . . . . . . . . . . . . . . . 217
Cleaning chrome . . . . . . . . . . . . . . . . . . . . . . . 216
Cleaning engine compartment . . . . . . . . . . . . 218
Cleaning steel wheel rims . . . . . . . . . . . . . . . . 217 Cleaning windows . . . . . . . . . . . . . . . . . . . . . . 215
Climatic* . . . . . . . . . . . . . . . . . . . . . . . . . . . . . . 159
Climatronic
General notes . . . . . . . . . . . . . . . . . . . . . . . 167
Clock . . . . . . . . . . . . . . . . . . . . . . . . . . . . . . . . . . 59
Clothes hook . . . . . . . . . . . . . . . . . . . . . . . . . . 144
Cockpit . . . . . . . . . . . . . . . . . . . . . . . . . . . . . . . . 55
Coming/leaving home function . . . . . . . . . . . . 118
Compartment for on-board documentation . . 141
control lamp . . . . . . . . . . . . . . . . . . . . . . . . . . . . 32
Control lamps . . . . . . . . . . . . . . . . . . . . . . . . . . . 77
Control lighting . . . . . . . . . . . . . . . . . . . . . . . . . . 55
Controls electric windows . . . . . . . . . . . . . . . . . . . . . 110
Exterior mirrors . . . . . . . . . . . . . . . . . . . . . . 132
Sliding/tilting sunroof . . . . . . . . . . . . . . . . 112
Convenience closing Sliding/tilting sunroof . . . . . . . . . . . . . . . . 113
Windows . . . . . . . . . . . . . . . . . . . . . . . . . . . 112
Convenience opening Windows . . . . . . . . . . . . . . . . . . . . . . . . . . . 112
Coolant . . . . . . . . . . . . . . . . . . . . . . . . . . . 240, 241 control lamp . . . . . . . . . . . . . . . . . . . . . . . . . 66
Coolant level . . . . . . . . . . . . . . . . . . . . . . . . . . . 241 control lamp . . . . . . . . . . . . . . . . . . . . . . . . . 82
Coolant loss . . . . . . . . . . . . . . . . . . . . . . . . . . . 241
Coolant temperature control lamp . . . . . . . . . . . . . . . . . . . . . . . . . 82
Gauge . . . . . . . . . . . . . . . . . . . . . . . . . . . . . . 58
Safety instructions . . . . . . . . . . . . . . . . . . . . 82
Correct adjustment of front seat head re- straints . . . . . . . . . . . . . . . . . . . . . . . . . . . . . . . 13
306 Index