radio Seat Altea XL 2014 User Guide
[x] Cancel search | Manufacturer: SEAT, Model Year: 2014, Model line: Altea XL, Model: Seat Altea XL 2014Pages: 321, PDF Size: 4.52 MB
Page 106 of 321
104Opening and closing
Radio frequency remote control
Locking and unlocking the vehicle
The radio frequency remote control key is used to lock and
unlock the vehicle from a distance.
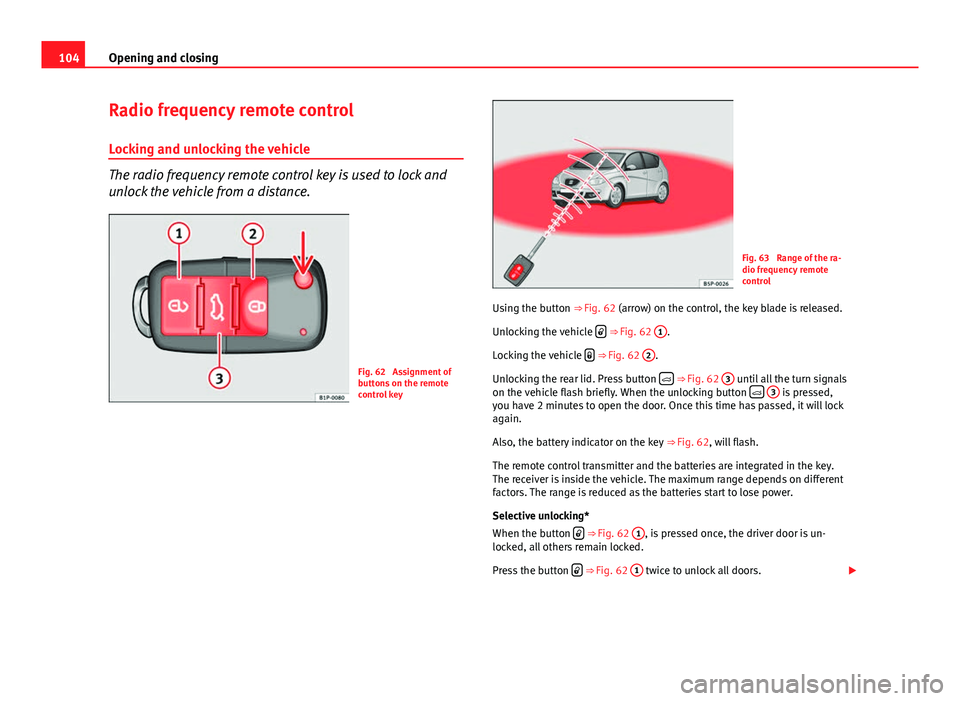
Fig. 62 Assignment of
buttons on the remote
control key
Fig. 63 Range of the ra-
dio frequency remote
control
Using the button ⇒ Fig. 62 (arrow) on the control, the key blade is released.
Unlocking the vehicle
⇒ Fig. 62 1.
Locking the vehicle
⇒ Fig. 62 2.
Unlocking the rear lid. Press button
⇒ Fig. 62 3 until all the turn signals
on the vehicle flash briefly. When the unlocking button
3 is pressed,
you have 2 minutes to open the door. Once this time has passed, it will lock
again.
Also, the battery indicator on the key ⇒ Fig. 62, will flash.
The remote control transmitter and the batteries are integrated in the key.
The receiver is inside the vehicle. The maximum range depends on different
factors. The range is reduced as the batteries start to lose power.
Selective unlocking*
When the button
⇒ Fig. 62 1, is pressed once, the driver door is un-
locked, all others remain locked.
Press the button
⇒ Fig. 62 1 twice to unlock all doors.
Page 107 of 321
105
Opening and closing
WARNING
● An improper use of the key can cause serious injuries.
● Never leave children or disabled persons in the vehicle. In case of
emergency, they may not be able to leave the vehicle or manage on their
own.
● Never forget the keys inside the vehicle. Otherwise, this could result
in serious injuries, accidents or even the theft of your vehicle. Always
take the key with you when you leave the vehicle.
● An uncontrolled use of the key could start the engine or activate any
electric equipment (e.g. electric windows), causing risk of accident. The
vehicle can be locked when using the remote control key. This could com-
plicate the aid in case of emergency.
Note
● The radio frequency remote control can be programmed by means of
pressing the unlocking button once; as a result, only the driver door will un-
lock. When the button is pressed once more, all doors and the rear lid will
be unlocked.
● The radio frequency remote control functions only when you are in range
⇒ Fig. 63 (red area).
● If the vehicle is unlocked using the
1 button, it will lock again auto-
matically if any of the doors or the rear lid are not opened within 30 sec-
onds after unlocking it. This function prevents the vehicle from remaining
unlocked if the unlock button is pressed by mistake.
● If the vehicle cannot be opened and closed using the radio frequency re-
mote control, the remote control key will have to be re-synchronised
⇒ page 105. Changing the battery
If the battery indicator does not flash when the buttons are pushed, the bat-
tery must be replaced.
CAUTION
The use of inappropriate batteries may damage the radio frequency remote
control. For this reason, always replace the dead battery with another of the
same size and power.
For the sake of the environment
Used batteries must be disposed of at an appropriate waste facility or
through an authorised service, given that their components can affect the
environment.
Synchronising the remote control key
If it is not possible to unlock or lock the door with the remote
control, it should be re-synchronised.
– Press the
⇒ Fig. 62 button on the remote control.
– Then close the vehicle using the key bit within one minute.
It is possible that the vehicle could no longer be opened and closed with
the remote control if the button
is repeatedly pressed outside of the ef-
fective range of the radio frequency remote control. The remote control key
will have to be resynchronised.
Spare remote control keys are available in your Technical Service, where
they must be matched to the locking system.
Up to four remote control keys can be used.
Safety FirstOperating instructionsPractical TipsTechnical Specifications
Page 108 of 321
106Opening and closing
Anti-theft alarm system*
Description of anti-theft alarm system*
The anti-theft alarm triggers if unauthorised movements are
detected around the vehicle.
The anti-theft alarm makes it more difficult to break into the vehicle or steal
it. Audible and visible alarms are triggered if the vehicle is opened using
the key, or if unauthorised access to the vehicle is forced.
The anti-theft alarm system is automatically switched on when locking the
vehicle. The system is then primed.
When does the system trigger an alarm?
The system triggers an alarm if the following unauthorised actions are car-
ried out when the vehicle is locked:
● Opening the vehicle mechanically using the key and with the ignition off
● Opening a door
● Opening the bonnet
● Opening the rear lid
● Switching on the ignition
● Movements in the vehicle interior
● Undue manipulation of the alarm
● Battery handling
The acoustic signals sound and the turn signals flash for approx. 30 sec-
onds. This may be repeated up to 10 times depending on the country.
Opening the doors mechanically (emergency opening)
If the radio frequency remote control function fails, you will have to use the
key to unlock the vehicle. This is done as follows: ●
Unfold the key by pressing the button shown by the (arrow).
● Use the lock on the driver door to unlock the vehicle. The anti-theft
alarm system remains active, but an alarm is not triggered immediately.
● Switch on the ignition within 15 seconds. When the ignition is switched
on, the electronic immobiliser recognises a valid vehicle key and deacti-
vates the anti-theft alarm system. If you do not switch on the ignition within
15 seconds, the alarm is triggered (in certain markets, such as the Nether-
lands, there is no 15 second waiting time and the alarm is activated imme-
diately after opening the door).
Opening all the doors in manual mode
In vehicles without alarm, when opening the driver door manually all the
doors are opened.
How to switch the alarm off
When the vehicle is unlocked via the unlocking button of the radio frequen-
cy remote control or when the key is inserted in the ignition lock.
Note
● If, after the audible warning goes off, another monitored area is ac-
cessed (e.g. the rear lid is opened after a door has been opened), the alarm
is triggered again.
● Vehicle monitoring remains active even if the battery is disconnected or
not working for any reason.
● The alarm is triggered immediately if one of the battery cables is discon-
nected while the alarm system is active.
Page 154 of 321
152Seats and storage
Electrical accessories may be connected to the 12 volt power socket in the
front centre console ⇒ Fig. 117 and in the luggage compartment*. The ap-
pliances connected to each power point must not exceed a power rating of
120 Watt.
WARNING
The power sockets and the connected accessories will only operate when
the ignition is on or when the engine is running. Improper use of the
sockets or electrical accessories can lead to serious injuries or cause a
fire. To avoid the risk of injury, never leave children alone inside the vehi-
cle.
Note
● The use of electrical appliances with the engine switched off will cause a
battery discharge.
● Before using any electrical accessories, see the instructions in
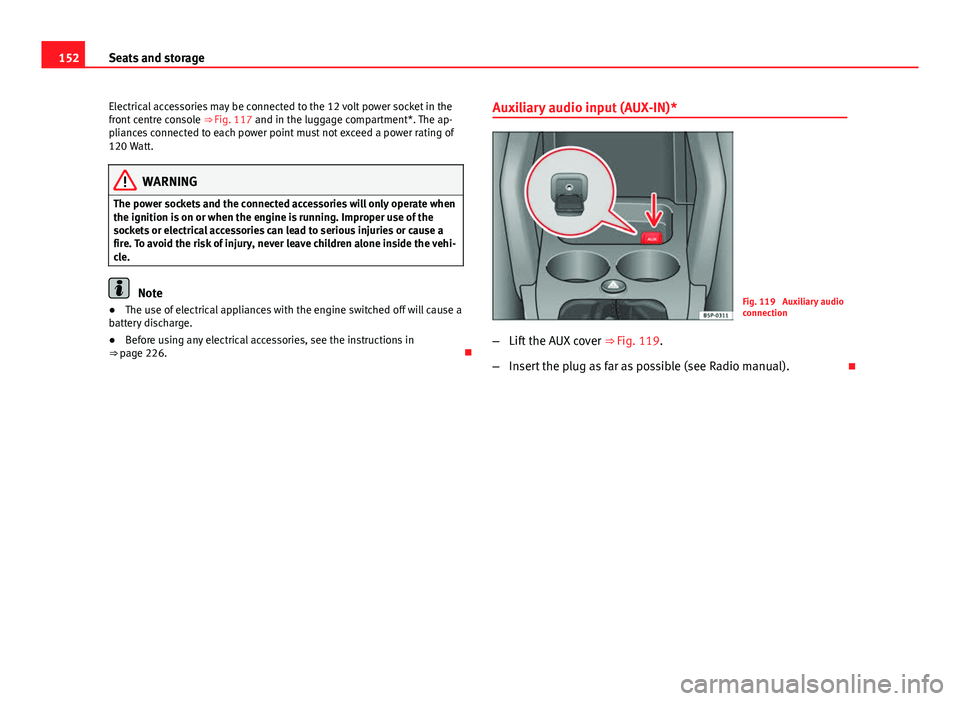
⇒ page 226. Auxiliary audio input (AUX-IN)*Fig. 119 Auxiliary audio
connection
– Lift the AUX cover ⇒ Fig. 119.
– Insert the plug as far as possible (see Radio manual).
Page 155 of 321
153
Seats and storage
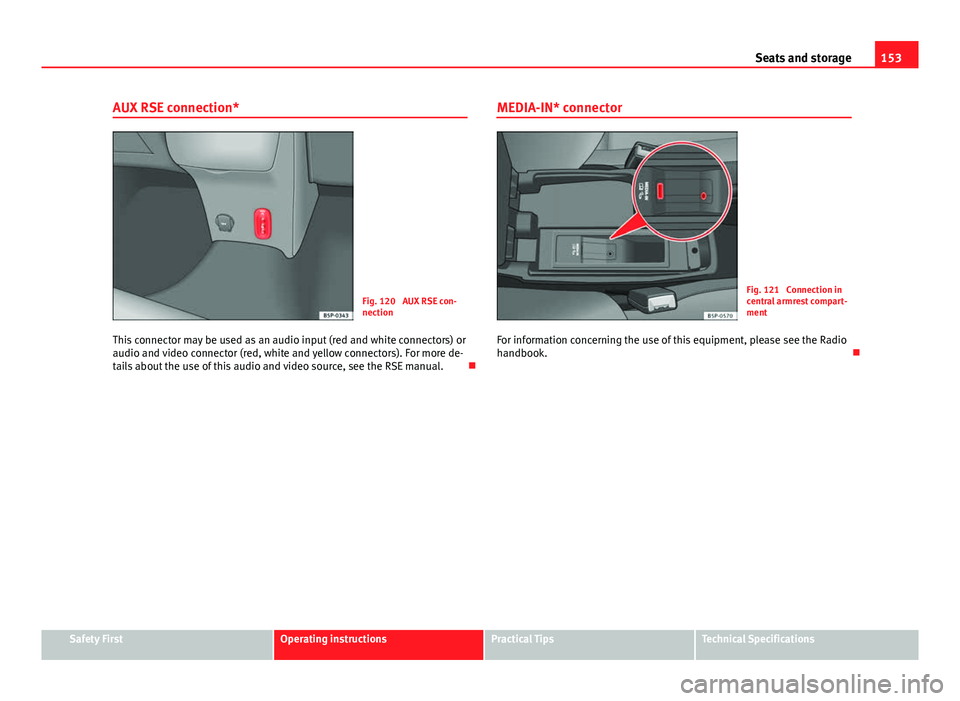
AUX RSE connection*
Fig. 120 AUX RSE con-
nection
This connector may be used as an audio input (red and white connectors) or
audio and video connector (red, white and yellow connectors). For more de-
tails about the use of this audio and video source, see the RSE manual. MEDIA-IN* connectorFig. 121 Connection in
central armrest compart-
ment
For information concerning the use of this equipment, please see the Radio
handbook.
Safety FirstOperating instructionsPractical TipsTechnical Specifications
Page 167 of 321
165
Air conditioning
– The functions will be switched on when its buttons are pressed.
When these functions are activated, they are indicated on the
radio display. In addition, all these functions are lit with LEDs.
Press the button again to switch off the function.
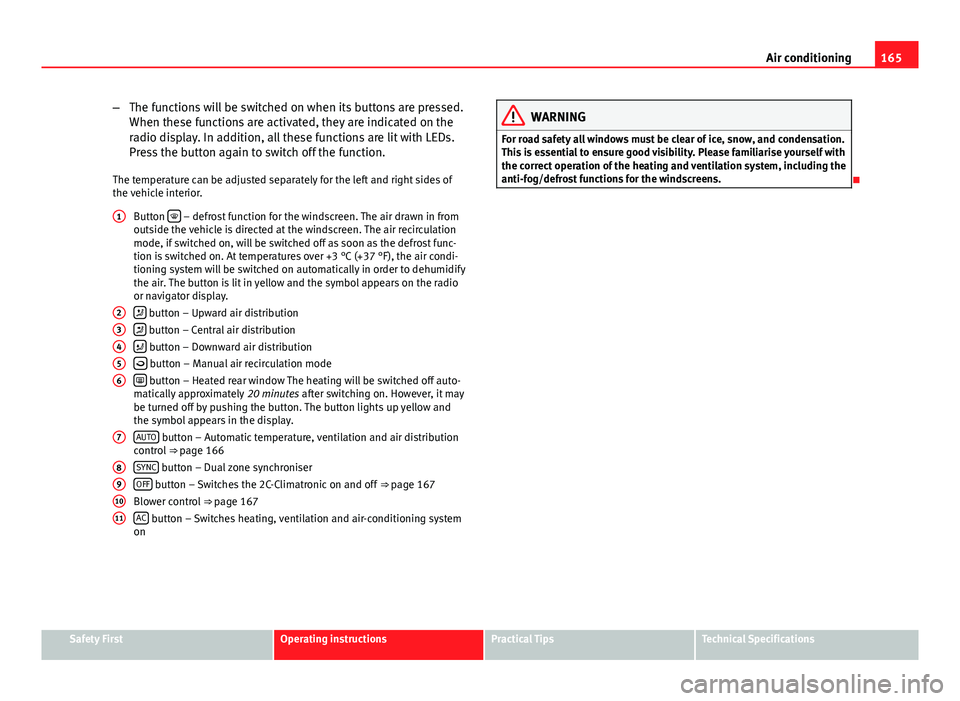
The temperature can be adjusted separately for the left and right sides of
the vehicle interior. Button
– defrost function for the windscreen. The air drawn in from
outside the vehicle is directed at the windscreen. The air recirculation
mode, if switched on, will be switched off as soon as the defrost func-
tion is switched on. At temperatures over +3 °C (+37 °F), the air condi-
tioning system will be switched on automatically in order to dehumidify
the air. The button is lit in yellow and the symbol appears on the radio
or navigator display.
button – Upward air distribution
button – Central air distribution
button – Downward air distribution
button – Manual air recirculation mode
button – Heated rear window The heating will be switched off auto-
matically approximately 20 minutes after switching on. However, it may
be turned off by pushing the button. The button lights up yellow and
the symbol appears in the display.
AUTO
button – Automatic temperature, ventilation and air distribution
control ⇒ page 166
SYNC
button – Dual zone synchroniser
OFF button – Switches the 2C-Climatronic on and off ⇒ page 167
Blower control ⇒ page 167
AC
button – Switches heating, ventilation and air-conditioning system
on
1
23456
7
891011
WARNING
For road safety all windows must be clear of ice, snow, and condensation.
This is essential to ensure good visibility. Please familiarise yourself with
the correct operation of the heating and ventilation system, including the
anti-fog/defrost functions for the windscreens.
Safety FirstOperating instructionsPractical TipsTechnical Specifications
Page 168 of 321
166Air conditioning
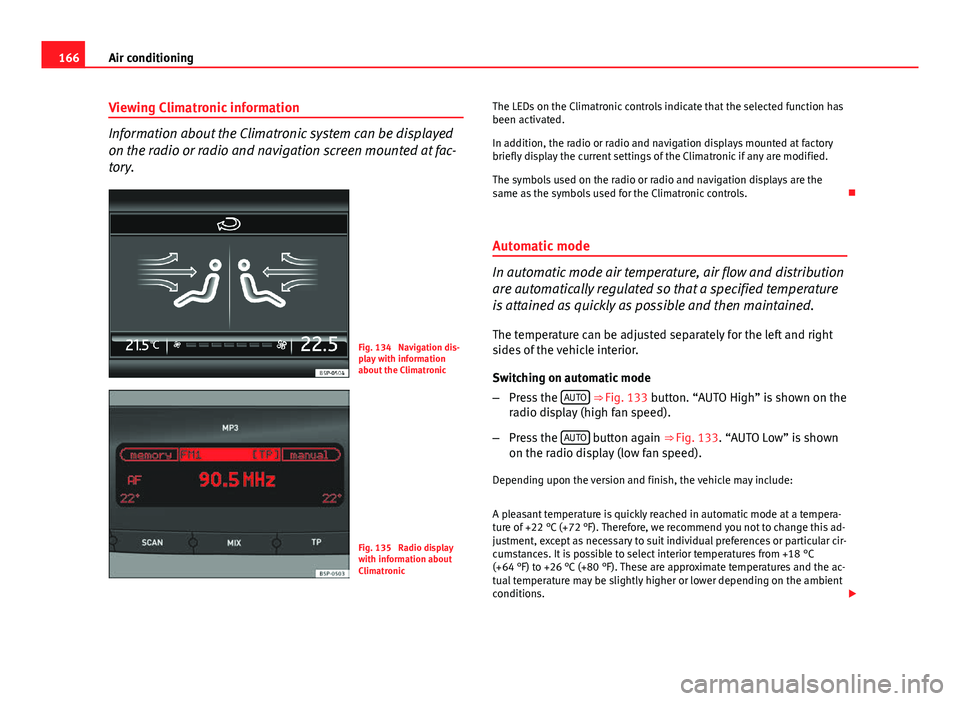
Viewing Climatronic information
Information about the Climatronic system can be displayed
on the radio or radio and navigation screen mounted at fac-
tory.
Fig. 134 Navigation dis-
play with information
about the Climatronic
Fig. 135 Radio display
with information about
Climatronic The LEDs on the Climatronic controls indicate that the selected function has
been activated.
In addition, the radio or radio and navigation displays mounted at factory
briefly display the current settings of the Climatronic if any are modified.
The symbols used on the radio or radio and navigation displays are the
same as the symbols used for the Climatronic controls.
Automatic mode
In automatic mode air temperature, air flow and distribution
are automatically regulated so that a specified temperature
is attained as quickly as possible and then maintained. The temperature can be adjusted separately for the left and right
sides of the vehicle interior.
Switching on automatic mode
– Press the AUTO
⇒
Fig. 133 button. “AUTO High” is shown on the
radio display (high fan speed).
– Press the AUTO
button again ⇒ Fig. 133. “AUTO Low” is shown
on the radio display (low fan speed).
Depending upon the version and finish, the vehicle may include:
A pleasant temperature is quickly reached in automatic mode at a tempera-
ture of +22 °C (+72 °F). Therefore, we recommend you not to change this ad-
justment, except as necessary to suit individual preferences or particular cir-
cumstances. It is possible to select interior temperatures from +18 °C
(+64 °F) to +26 °C (+80 °F). These are approximate temperatures and the ac-
tual temperature may be slightly higher or lower depending on the ambient
conditions.
Page 170 of 321
168Air conditioning
Switching on manual mode
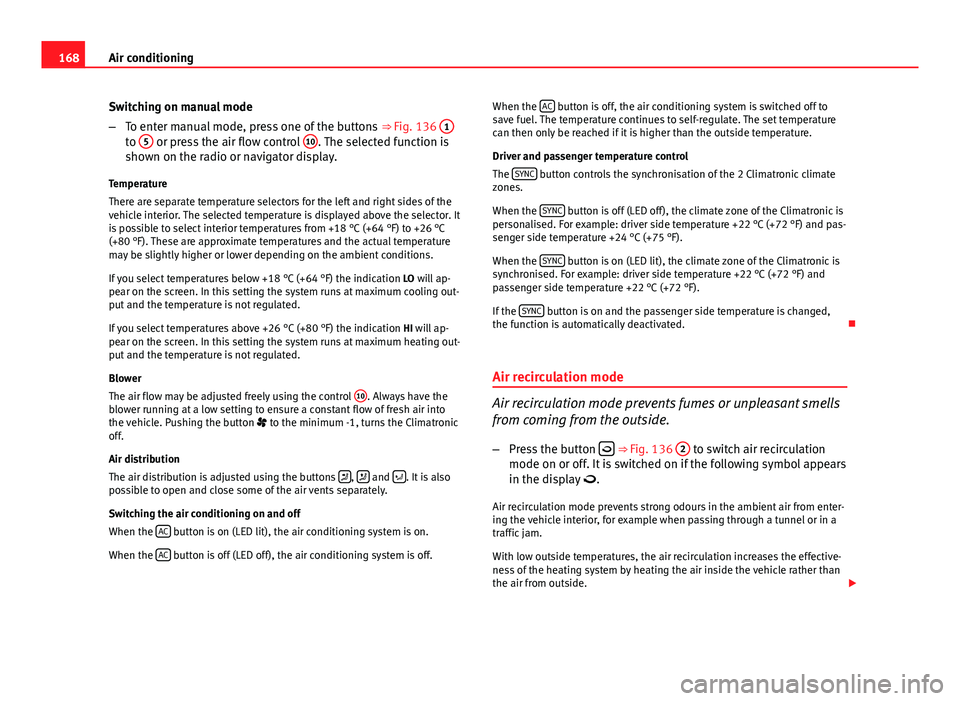
–To enter manual mode, press one of the buttons ⇒ Fig. 136 1
to 5 or press the air flow control 10. The selected function is
shown on the radio or navigator display.
Temperature
There are separate temperature selectors for the left and right sides of the
vehicle interior. The selected temperature is displayed above the selector. It
is possible to select interior temperatures from +18 °C (+64 °F) to +26 °C
(+80 °F). These are approximate temperatures and the actual temperature
may be slightly higher or lower depending on the ambient conditions.
If you select temperatures below +18 °C (+64 °F) the indication LO will ap-
pear on the screen. In this setting the system runs at maximum cooling out-
put and the temperature is not regulated.
If you select temperatures above +26 °C (+80 °F) the indication HI will ap-
pear on the screen. In this setting the system runs at maximum heating out-
put and the temperature is not regulated.
Blower
The air flow may be adjusted freely using the control 10
. Always have the
blower running at a low setting to ensure a constant flow of fresh air into
the vehicle. Pushing the button to the minimum -1, turns the Climatronic
off.
Air distribution
The air distribution is adjusted using the buttons
, and . It is also
possible to open and close some of the air vents separately.
Switching the air conditioning on and off
When the AC
button is on (LED lit), the air conditioning system is on.
When the AC
button is off (LED off), the air conditioning system is off. When the
AC
button is off, the air conditioning system is switched off to
save fuel. The temperature continues to self-regulate. The set temperature
can then only be reached if it is higher than the outside temperature.
Driver and passenger temperature control
The SYNC
button controls the synchronisation of the 2 Climatronic climate
zones.
When the SYNC
button is off (LED off), the climate zone of the Climatronic is
personalised. For example: driver side temperature +22 °C (+72 °F) and pas-
senger side temperature +24 °C (+75 °F).
When the SYNC
button is on (LED lit), the climate zone of the Climatronic is
synchronised. For example: driver side temperature +22 °C (+72 °F) and
passenger side temperature +22 °C (+72 °F).
If the SYNC
button is on and the passenger side temperature is changed,
the function is automatically deactivated.
Air recirculation mode
Air recirculation mode prevents fumes or unpleasant smells
from coming from the outside. – Press the button
⇒ Fig. 136
2 to switch air recirculation
mode on or off. It is switched on if the following symbol appears
in the display .
Air recirculation mode prevents strong odours in the ambient air from enter-
ing the vehicle interior, for example when passing through a tunnel or in a
traffic jam.
With low outside temperatures, the air recirculation increases the effective-
ness of the heating system by heating the air inside the vehicle rather than
the air from outside.
Page 193 of 321
191
Driving
CAUTION
Please note that low obstacles detected by the system may no longer be
registered by the sensors as the vehicle moves closer, so the system will not
give any further warning. Certain kinds of obstacles (such as wire fences,
chains, thin painted posts or trailer draw bars, etc) may not always be de-
tected by the system, so take care not to damage the vehicle in such cases.
Note
Please refer to the notes on towing ⇒ page 192.
SEAT Parking System Plus*: Description
The Parking System Plus is an acoustic and optical parking
aid.
Sensors are located in the front and rear bumpers. When the sensors detect
an obstacle, you are alerted by audible and optical warnings. The measur-
ing range of the sensors starts at approximately:
FrontSide0.90Centre1.20
RearSide0.60Centre1.60
The audible warnings sound with increasing frequency as you approach the
obstacle. When the vehicle is less than 0.30 m away from the obstacle, the
warning tone will sound continuously. Stop moving immediately!
The volume of the warning beeps will be gradually reduced after about four
seconds if the vehicle remains at a constant distance from a detected obsta-
cle (it does not affect the permanent audible warning). Activating/Deactivating
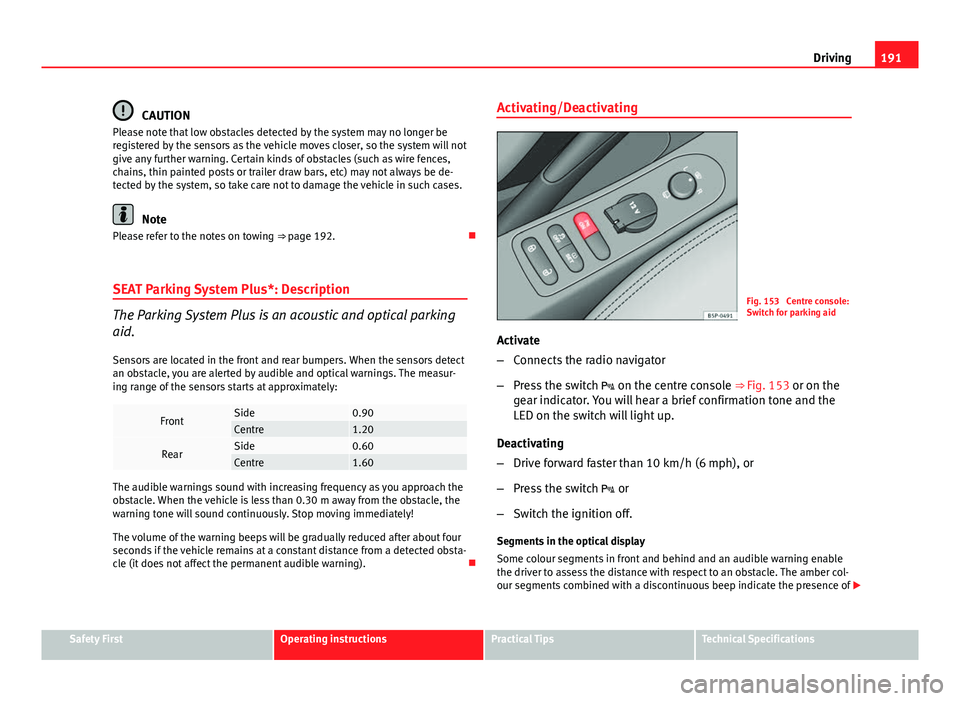
Fig. 153 Centre console:
Switch for parking aid
Activate
– Connects the radio navigator
– Press the switch on the centre console ⇒ Fig. 153 or on the
gear indicator. You will hear a brief confirmation tone and the
LED on the switch will light up.
Deactivating
– Drive forward faster than 10 km/h (6 mph), or
– Press the switch or
– Switch the ignition off.
Segments in the optical display
Some colour segments in front and behind and an audible warning enable
the driver to assess the distance with respect to an obstacle. The amber col-
our segments combined with a discontinuous beep indicate the presence of
Safety FirstOperating instructionsPractical TipsTechnical Specifications
Page 217 of 321
215
Vehicle maintenance and cleaning
Care of the vehicle exterior Automatic car wash tunnel
The vehicle can normally be washed without problem in an
automatic car wash.
The vehicle paintwork is so durable that the vehicle can normally be washed
without problems in an automatic car wash tunnel. However, the paintwork
wear depends to a large extent on the kind of the car wash tunnel, the
brushes used, its water filtering and the type of cleaning and preservative
products.
Before going through a vehicle wash, be sure to take the usual precautions
such as closing the windows and sunroof.
If the vehicle has special accessories such as spoilers or a roof rack or two-
way radio aerial, etc., it is advisable to consult the car wash tunnel operator.
After washing, the brakes could take some time to respond as the brake
discs and pads could be wet, or even frozen in winter. Dry the brakes by
braking several times.
WARNING
Water, ice and salt on the brake system can reduce braking effectiveness.
Risk of accident.
CAUTION
If an automatic car wash tunnel is used, before entering the tunnel, put the
aerial down parallel to the roof and do not tighten to avoid damage. Washing by hand
Vehicle washing
–
First soften the dirt and rinse it off with water.
– Clean your vehicle from top to bottom with a soft sponge, a
glove or a brush. Use very light pressure.
– Rinse the sponge or glove often with clean water.
– Special car shampoo should only be used for very stubborn dirt.
– Leave the wheels, sill panels etc. until last, using a different
sponge or glove.
– Rinse the vehicle thoroughly with water.
– Dry the vehicle surface gently with a chamois leather.
– In cold temperature, dry the rubber seals and their surfaces to
prevent them from freezing. Apply silicone spray to the rubber
seals.
After washing the vehicle
– After washing, avoid sudden and sharp braking. Dry the brakes
by braking several times ⇒ page 204, Braking capacity and
braking distance.
Safety FirstOperating instructionsPractical TipsTechnical Specifications