engine oil Seat Altea XL 2014 Owner's Guide
[x] Cancel search | Manufacturer: SEAT, Model Year: 2014, Model line: Altea XL, Model: Seat Altea XL 2014Pages: 321, PDF Size: 4.52 MB
Page 242 of 321
240Checking and refilling levels
Checking the engine oil level
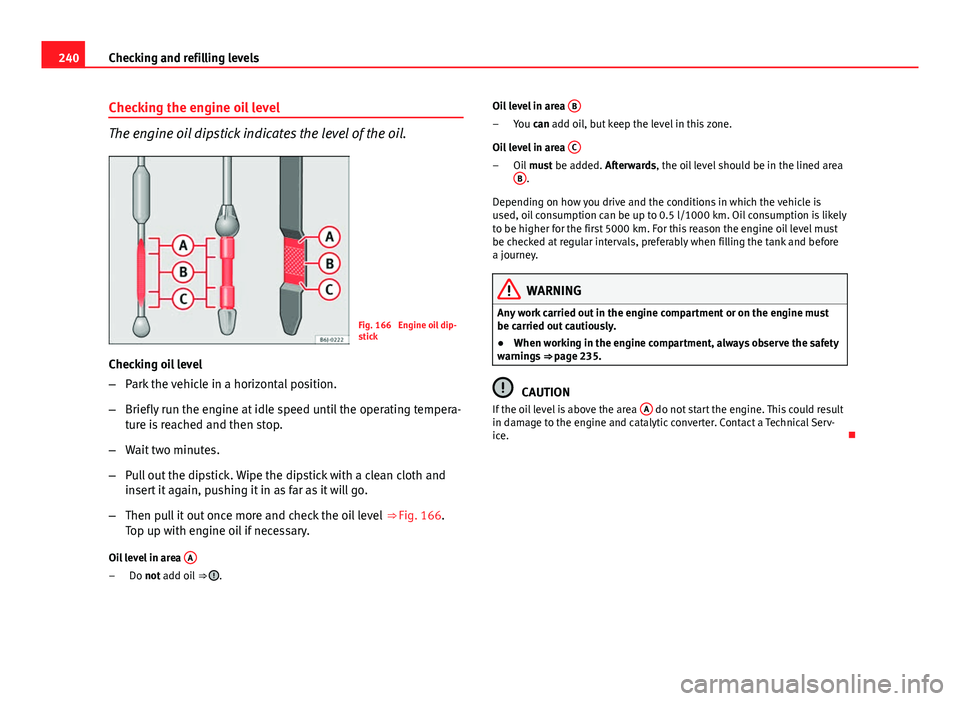
The engine oil dipstick indicates the level of the oil.
Fig. 166 Engine oil dip-
stick
Checking oil level
– Park the vehicle in a horizontal position.
– Briefly run the engine at idle speed until the operating tempera-
ture is reached and then stop.
– Wait two minutes.
– Pull out the dipstick. Wipe the dipstick with a clean cloth and
insert it again, pushing it in as far as it will go.
– Then pull it out once more and check the oil level ⇒ Fig. 166.
Top up with engine oil if necessary.
Oil level in area A
Do not add oil
⇒ .
– Oil level in area
B
You can add oil, but keep the level in this zone.
Oil level in area C
Oil
must be added. Afterwards, the oil level should be in the lined area
B.
Depending on how you drive and the conditions in which the vehicle is
used, oil consumption can be up to 0.5 l/1000 km. Oil consumption is likely
to be higher for the first 5000 km. For this reason the engine oil level must
be checked at regular intervals, preferably when filling the tank and before
a journey.
WARNING
Any work carried out in the engine compartment or on the engine must
be carried out cautiously.
● When working in the engine compartment, always observe the safety
warnings ⇒ page 235.
CAUTION
If the oil level is above the area A do not start the engine. This could result
in damage to the engine and catalytic converter. Contact a Technical Serv-
ice.
–
–
Page 243 of 321
241
Checking and refilling levels
Topping up engine oil
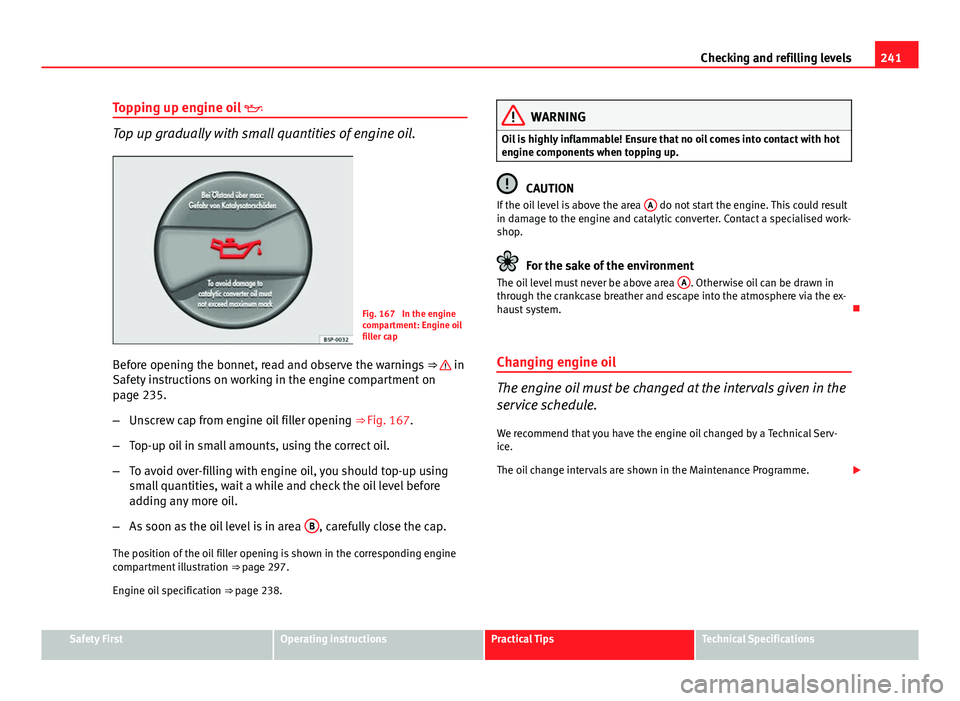
Top up gradually with small quantities of engine oil.
Fig. 167 In the engine
compartment: Engine oil
filler cap
Before opening the bonnet, read and observe the warnings ⇒
in
Safety instructions on working in the engine compartment on
page 235.
– Unscrew cap from engine oil filler opening ⇒ Fig. 167.
– Top-up oil in small amounts, using the correct oil.
– To avoid over-filling with engine oil, you should top-up using
small quantities, wait a while and check the oil level before
adding any more oil.
– As soon as the oil level is in area B
, carefully close the cap.
The position of the oil filler opening is shown in the corresponding engine
compartment illustration ⇒ page 297.
Engine oil specification ⇒ page 238.
WARNING
Oil is highly inflammable! Ensure that no oil comes into contact with hot
engine components when topping up.
CAUTION
If the oil level is above the area A do not start the engine. This could result
in damage to the engine and catalytic converter. Contact a specialised work-
shop.
For the sake of the environment
The oil level must never be above area A. Otherwise oil can be drawn in
through the crankcase breather and escape into the atmosphere via the ex-
haust system.
Changing engine oil
The engine oil must be changed at the intervals given in the
service schedule. We recommend that you have the engine oil changed by a Technical Serv-
ice.
The oil change intervals are shown in the Maintenance Programme.
Safety FirstOperating instructionsPractical TipsTechnical Specifications
Page 244 of 321
242Checking and refilling levels
WARNING
Only change the engine oil yourself if you have the specialist knowledge
required!
● Before opening the bonnet, read and observe the warnings
⇒ page 235, Safety instructions on working in the engine compartment.
● Wait for the engine to cool down. Hot oil may cause burn injuries.
● Wear eye protection to avoid injuries, such as acid burns, caused by
splashes of oil.
● When removing the oil drain plug with your fingers, keep your arm
horizontal to help prevent oil from running down your arm.
● Wash your skin thoroughly if it comes into contact with engine oil.
● Engine oil is poisonous! Used oil must be stored in a safe place out of
the reach of children.
CAUTION
No additives should be used with engine oil. This could result in engine
damage. Any damage caused by the use of such additives would not be
covered by the factory warranty.
For the sake of the environment
● Because of the disposal problems, the necessary special tools and spe-
cialist knowledge required, we recommend that you have the engine oil and
filter changed by a Technical Service.
● Never pour oil down drains or into the ground.
● Use a suitable container when draining the used oil. It must be large
enough to hold all the engine oil. Coolant
Engine coolant specifications
The engine cooling system is supplied from the factory with a specially trea-
ted mixture of water and, at least, 40 % of the additive G 13 (TLVW 774 J).
The engine coolant additive is recognisable by its purple colour. This mix-
ture of water and additive gives the necessary frost protection down to
-25°C (-13 F) and protects the light alloy parts of the cooling system against
corrosion. It also prevents scaling and considerably raises the boiling point
of the coolant.
To protect the engine cooling system, the percentage of additive must al-
ways be at least 40 %, even in warm climates where anti-freeze protection is
not required.
If greater frost protection is required in very cold climates, the proportion of
additive can be increased. However, the percentage of additive should not
exceed 60 %, as this would reduce the frost protection and, in turn, de-
crease the cooling capacity.
When the coolant is topped up, use a mixture of distilled water and, at
least, 40 % of the G 13 or G 12 plus-plus (TL-VW 774 G) additive (both are
purple) to obtain an optimum anticorrosion protection ⇒
. The mixture of
G 13 with G 12 plus (TL-VW 774 F), G 12 (red) or G 11 (green-blue) engine
coolants will significantly reduce the anticorrosion protection and should,
therefore be avoided ⇒
.
Page 251 of 321
249
Checking and refilling levels
Brake fluid Checking the brake fluid level
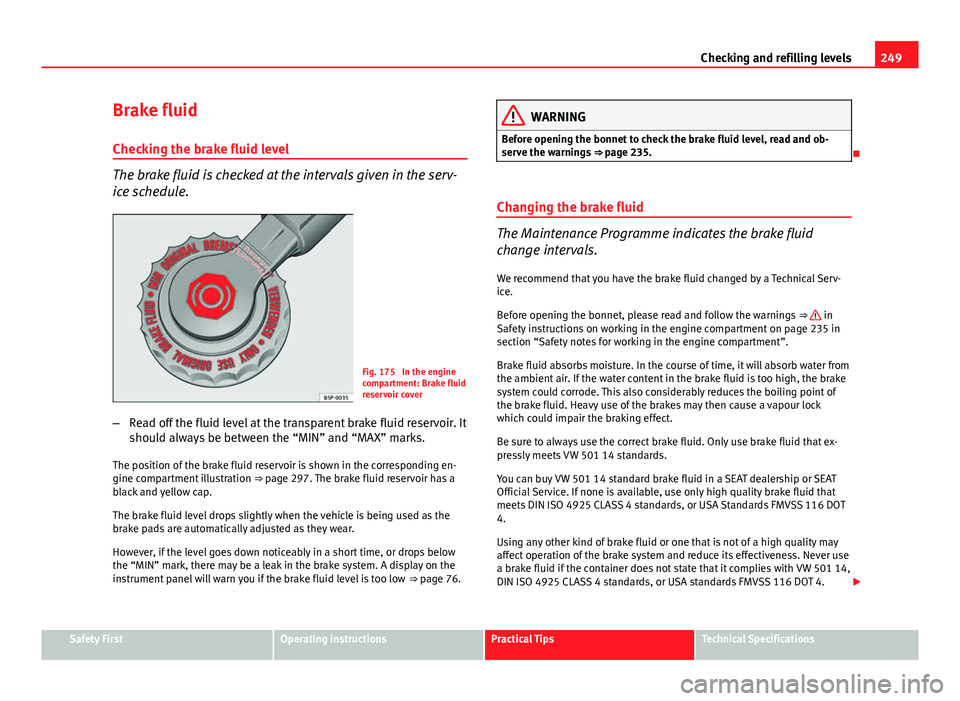
The brake fluid is checked at the intervals given in the serv-
ice schedule.
Fig. 175 In the engine
compartment: Brake fluid
reservoir cover
– Read off the fluid level at the transparent brake fluid reservoir. It
should always be between the “MIN” and “MAX” marks.
The position of the brake fluid reservoir is shown in the corresponding en-
gine compartment illustration ⇒ page 297. The brake fluid reservoir has a
black and yellow cap.
The brake fluid level drops slightly when the vehicle is being used as the
brake pads are automatically adjusted as they wear.
However, if the level goes down noticeably in a short time, or drops below
the “MIN” mark, there may be a leak in the brake system. A display on the
instrument panel will warn you if the brake fluid level is too low ⇒ page 76.
WARNING
Before opening the bonnet to check the brake fluid level, read and ob-
serve the warnings ⇒ page 235.
Changing the brake fluid
The Maintenance Programme indicates the brake fluid
change intervals. We recommend that you have the brake fluid changed by a Technical Serv-
ice.
Before opening the bonnet, please read and follow the warnings ⇒
in
Safety instructions on working in the engine compartment on page 235 in
section “Safety notes for working in the engine compartment”.
Brake fluid absorbs moisture. In the course of time, it will absorb water from
the ambient air. If the water content in the brake fluid is too high, the brake
system could corrode. This also considerably reduces the boiling point of
the brake fluid. Heavy use of the brakes may then cause a vapour lock
which could impair the braking effect.
Be sure to always use the correct brake fluid. Only use brake fluid that ex-
pressly meets VW 501 14 standards.
You can buy VW 501 14 standard brake fluid in a SEAT dealership or SEAT
Official Service. If none is available, use only high quality brake fluid that
meets DIN ISO 4925 CLASS 4 standards, or USA Standards FMVSS 116 DOT
4.
Using any other kind of brake fluid or one that is not of a high quality may
affect operation of the brake system and reduce its effectiveness. Never use
a brake fluid if the container does not state that it complies with VW 501 14,
DIN ISO 4925 CLASS 4 standards, or USA standards FMVSS 116 DOT 4.
Safety FirstOperating instructionsPractical TipsTechnical Specifications
Page 299 of 321
297
Technical specifications
Technical specifications
Checking fluid levels
From time to time, the levels of the different fluids in the ve-
hicle must be checked. Never fill with incorrect fluids, other-
wise serious damage to the engine may be caused.
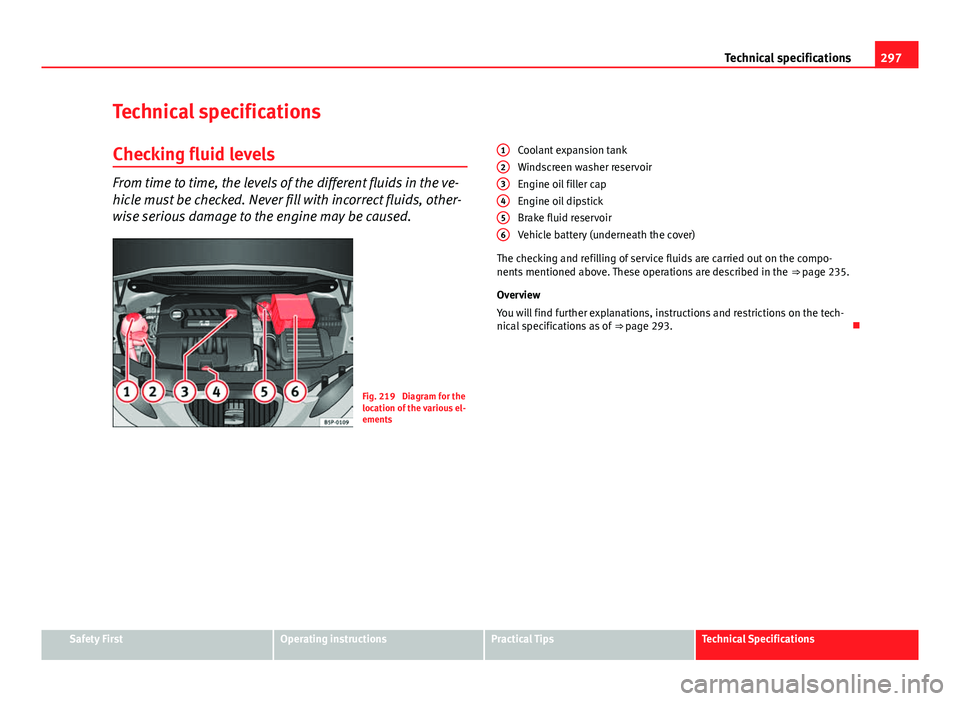
Fig. 219 Diagram for the
location of the various el-
ements Coolant expansion tank
Windscreen washer reservoir
Engine oil filler cap
Engine oil dipstick
Brake fluid reservoir
Vehicle battery (underneath the cover)
The checking and refilling of service fluids are carried out on the compo-
nents mentioned above. These operations are described in the ⇒ page 235.
Overview
You will find further explanations, instructions and restrictions on the tech-
nical specifications as of ⇒ page 293.
1
23456
Safety FirstOperating instructionsPractical TipsTechnical Specifications
Page 312 of 321
C
Car care Exterior . . . . . . . . . . . . . . . . . . . . . . . . . . . . 215
Catalytic converter . . . . . . . . . . . . . . . . . . . . . . 205
CCS . . . . . . . . . . . . . . . . . . . . . . . . . . . . . . . . . . 193
CD changer . . . . . . . . . . . . . . . . . . . . . . . . . . . . 141
Central lock button Locking . . . . . . . . . . . . . . . . . . . . . . . . . . . . . 99
Unlocking . . . . . . . . . . . . . . . . . . . . . . . . . . . 99
Central locking . . . . . . . . . . . . . . . . . . . . . . . . . . 96 Automatic locking system for involuntaryunlocking . . . . . . . . . . . . . . . . . . . . . . . . . . 98
Automatic speed-dependent locking and unlocking system . . . . . . . . . . . . . . . . . . . 98
Emergency unlocking system . . . . . . . . . . . 98
Selective unlocking system . . . . . . . . . . . . . 97
Unlocking system . . . . . . . . . . . . . . . . . . . . . 98
Centre armrest . . . . . . . . . . . . . . . . . . . . . . . . . 141
Cetane number . . . . . . . . . . . . . . . . . . . . . . . . . 234
Changing gear see Manual gearbox . . . . . . . . . . . . . . . . . . 182
Changing gear in tiptronic mode . . . . . . . . . . 186
Changing the bulbs Main headlight bulbs . . . . . . . . . . . . . . . . . 276
Changing the main headlight bulbs Main beam lights . . . . . . . . . . . . . . . . . . . . 278
Side lights . . . . . . . . . . . . . . . . . . . . . . . . . . 279
Turn signal bulbs . . . . . . . . . . . . . . . . . . . . 276
Changing the main headlight lamps dipped lights . . . . . . . . . . . . . . . . . . . . . . . 277 Changing the tail light bulbs
Position light, fog light and tail light on therear lid . . . . . . . . . . . . . . . . . . . . . . . . . . . 283
Changing the tail lights Luggage compartment lights . . . . . . . . . . 284
Rear fog light . . . . . . . . . . . . . . . . . . . . . . . 281
Reverse light . . . . . . . . . . . . . . . . . . . . . . . . 281
Side lights . . . . . . . . . . . . . . . . . . . . . . . . . . 280
Turn signal light . . . . . . . . . . . . . . . . . . . . . 281
Turn signal, side and brake lights on thebody . . . . . . . . . . . . . . . . . . . . . . . . . . . . . 282
Changing windscreen wiper blades . . . . . . . . 245
Chassis number . . . . . . . . . . . . . . . . . . . . . . . . 294
Checking . . . . . . . . . . . . . . . . . . . . . . . . . . . . . . 251
Checking battery electrolyte level . . . . . . . . . . 251
Checking engine oil level . . . . . . . . . . . . . . . . . 240
Checklist Seat upholstery . . . . . . . . . . . . . . . . . . . . . 221
Child safety . . . . . . . . . . . . . . . . . . . . . . . . . . . . . 46
Child seat Categorisation in groups . . . . . . . . . . . . . . . 48
Group 1 . . . . . . . . . . . . . . . . . . . . . . . . . . . . . 49
Group 2 . . . . . . . . . . . . . . . . . . . . . . . . . . . . . 49
Group 3 . . . . . . . . . . . . . . . . . . . . . . . . . . . . . 49
Groups 0 and 0+ . . . . . . . . . . . . . . . . . . . . . . 48
Safety notes . . . . . . . . . . . . . . . . . . . . . . . . . 46
Securing . . . . . . . . . . . . . . . . . . . . . . . . . . . . 51
Child seats . . . . . . . . . . . . . . . . . . . . . . . . . . . . . 48 ISOFIX system . . . . . . . . . . . . . . . . . . . . . . . . 52
on the front passenger seat . . . . . . . . . . . . . 31
Top Tether system . . . . . . . . . . . . . . . . . . . . 52
Cigarette lighter . . . . . . . . . . . . . . . . . . . . . . . . 151
Cleaning alloy wheel rims . . . . . . . . . . . . . . . . 219 Cleaning chrome . . . . . . . . . . . . . . . . . . . . . . . 218
Cleaning engine compartment . . . . . . . . . . . . 220
Cleaning steel wheel rims . . . . . . . . . . . . . . . . 219
Cleaning windows . . . . . . . . . . . . . . . . . . . . . . 217
Climatic . . . . . . . . . . . . . . . . . . . . . . . . . . . . . . . 161
Climatronic
General notes . . . . . . . . . . . . . . . . . . . . . . . 169
Clock . . . . . . . . . . . . . . . . . . . . . . . . . . . . . . . . . . 59
Clothes hook . . . . . . . . . . . . . . . . . . . . . . . . . . 145
Cockpit . . . . . . . . . . . . . . . . . . . . . . . . . . . . . . . . 55
Coming/leaving home function . . . . . . . . . . . . 118
Compartment for on-board documentation . . 141
control lamp . . . . . . . . . . . . . . . . . . . . . . . . . . . . 32
Control lamps . . . . . . . . . . . . . . . . . . . . . . . . . . . 76
Control lighting . . . . . . . . . . . . . . . . . . . . . . . . . . 55
Controls electric windows . . . . . . . . . . . . . . . . . . . . . 110
Exterior mirrors . . . . . . . . . . . . . . . . . . . . . . 132
Sliding/tilting sunroof . . . . . . . . . . . . . . . . 112
Convenience closing Sliding/tilting sunroof . . . . . . . . . . . . . . . . 113
Windows . . . . . . . . . . . . . . . . . . . . . . . . . . . 112
Convenience opening Windows . . . . . . . . . . . . . . . . . . . . . . . . . . . 112
Coolant . . . . . . . . . . . . . . . . . . . . . . . . . . . 242, 243 control lamp . . . . . . . . . . . . . . . . . . . . . . . . . 66
Coolant level . . . . . . . . . . . . . . . . . . . . . . . . . . . 243 Control lamp . . . . . . . . . . . . . . . . . . . . . . . . . 81
Coolant loss . . . . . . . . . . . . . . . . . . . . . . . . . . . 243
Coolant temperature control lamp . . . . . . . . . . . . . . . . . . . . . . . . . 81
Control lamp . . . . . . . . . . . . . . . . . . . . . . . . . 81
310 Index
Page 314 of 321
EngineRunning in . . . . . . . . . . . . . . . . . . . . . . . . . 204
Engine compartment Working in the engine compartment . . . . 235
Engine coolant . . . . . . . . . . . . . . . . . . . . . . . . . 242 G 12 plus-plus . . . . . . . . . . . . . . . . . . . . . . 242
G 13 . . . . . . . . . . . . . . . . . . . . . . . . . . . . . . . 242
Specifications . . . . . . . . . . . . . . . . . . . . . . . 242
Engine fault Control lamp . . . . . . . . . . . . . . . . . . . . . . . . . 82
Engine management control lamp . . . . . . . . . . . . . . . . . . . . . . . . . 82
Engine oil . . . . . . . . . . . . . . . . . . . . . . . . . . . . . 238 Changing . . . . . . . . . . . . . . . . . . . . . . . . . . 241
Checking engine oil level . . . . . . . . . . . . . . 240
Oil properties . . . . . . . . . . . . . . . . . . . . . . . 239
Specifications . . . . . . . . . . . . . . . . . . . . . . . 238
Topping up . . . . . . . . . . . . . . . . . . . . . . . . . 241
Engine oil dipstick . . . . . . . . . . . . . . . . . . . . . . 240
Engine oil pressure control lamp . . . . . . . . . . . . . . . . . . . . . . 66, 86
Environment . . . . . . . . . . . . . . . . . . . . . . . . . . . 206 Environmental friendliness . . . . . . . . . . . . 208
Environmentally friendly driving . . . . . . . . . . . 206
Environmental tip Avoiding pollution . . . . . . . . . . . . . . . . . . . 229
ESC . . . . . . . . . . . . . . . . . . . . . . . . . . 88, 172, 198 see also Electronic Stability Control . . . . . 172
Example of menu use Program a speed limit warning . . . . . . . . . . 69
To activate and deactivate the speed limitwarning . . . . . . . . . . . . . . . . . . . . . . . . . . . 69 Example of the use of the menus
Open the Configuration menu with the MFIlever . . . . . . . . . . . . . . . . . . . . . . . . . . . . . . 68
Open the Configuration menu with the steering wheel controls . . . . . . . . . . . . . . 69
Examples of menu use Open the main menu . . . . . . . . . . . . . . . . . . 68
Open the winter tyres menu . . . . . . . . . . . . 69
To close the winter tyres menu . . . . . . . . . . 69
Exhaust gas purification system . . . . . . . . . . . 205
Exterior mirrors . . . . . . . . . . . . . . . . . . . . . . . . . 217
F
Fastening rings . . . . . . . . . . . . . . . . . . . . . . . . . . 18
Fire extinguisher . . . . . . . . . . . . . . . . . . . . . . . . 154
First-aid kit . . . . . . . . . . . . . . . . . . . . . . . . . . . . 154
Flexible service interval display . . . . . . . . . . . . 62
Floor mats . . . . . . . . . . . . . . . . . . . . . . . . . . . . . . 16
Fog lights . . . . . . . . . . . . . . . . . . . . . . . . . . . . . 115
Fog lights with cornering function . . . . . . . . . 120
Folding table . . . . . . . . . . . . . . . . . . . . . . . . . . . 142
Folding the seat backrests down . . . . . . . . . . 140
Front airbags . . . . . . . . . . . . . . . . . . . . . . . . . . . 34 Description . . . . . . . . . . . . . . . . . . . . . . . . . . 34
Operation . . . . . . . . . . . . . . . . . . . . . . . . . . . 35
Safety notes . . . . . . . . . . . . . . . . . . . . . . . . . 37
Front drinks holders . . . . . . . . . . . . . . . . . . . . . 146
Front interior light type 1 Switching light off . . . . . . . . . . . . . . . . . . . 123
Switching light on . . . . . . . . . . . . . . . . . . . 123 Front interior light type 2
Switching light off . . . . . . . . . . . . . . . . . . . 124
Switching light on . . . . . . . . . . . . . . . . . . . 124
Front passenger airbag deactivation . . . . . . . . 44
Front reading lights . . . . . . . . . . . . . . . . . . . . . 125
Front seat adjustment Lumbar support . . . . . . . . . . . . . . . . . . . . . 137
Fuel Diesel . . . . . . . . . . . . . . . . . . . . . . . . . . . . . 234
Petrol . . . . . . . . . . . . . . . . . . . . . . . . . . . . . . 233
fuel consumption . . . . . . . . . . . . . . . . . . . . . . . 206
Fuel consumption . . . . . . . . . . . . . . . . . . . . . . . 294
Fuel level Indicator . . . . . . . . . . . . . . . . . . . . . . . . . . . . 58
Fuel reserve . . . . . . . . . . . . . . . . . . . . . . . . . . . . 80 Warning message . . . . . . . . . . . . . . . . . . . . . 67
Fuel tank see Fuel reserve . . . . . . . . . . . . . . . . . . . . . . 80
Fuel Tank Opening the fuel tank flap . . . . . . . . . . . . . 228
Fuel: save . . . . . . . . . . . . . . . . . . . . . . . . . . . . . 206
Fuses . . . . . . . . . . . . . . . . . . . . . . . . . . . . . . . . . 272 Fuse box . . . . . . . . . . . . . . . . . . . . . . . . . . . 273
Identifying blown fuses . . . . . . . . . . . . . . . 274
Identifying by colours . . . . . . . . . . . . . . . . 273
Preparation before replacing . . . . . . . . . . . 274
Replacement . . . . . . . . . . . . . . . . . . . . . . . . 274
G
Gear shift pattern . . . . . . . . . . . . . . . . . . . . . . . 182
General overview of the engine compartment 297
312 Index