check Seat Arona 2018 User Guide
[x] Cancel search | Manufacturer: SEAT, Model Year: 2018, Model line: Arona, Model: Seat Arona 2018Pages: 316, PDF Size: 6.77 MB
Page 71 of 316
The essentials
the wheel condition and hub mounting surfa-
c e
s.
These surfaces must be clean before fit-
ting the wheel.
Wheel bolt tightening torque
The prescribed tightening torque for wheel
bolts for steel and alloy wheels is 120 Nm.
After changing a wheel, have the tightening
torque checked immediately with a torque
wrench that is working perfectly.
Before checking tightening torque, have any
rusty wheel bolts that are difficult to screw re-
placed and clean the wheel hub threads.
Never apply grease or oil to wheel bolts or to
the wheel hub threads. Even if the bolts have
been tightened to the prescribed torque, they
could come loose while driving. WARNING
If the wheel bolts are not properly tightened,
they c ou
ld come loose while driving and
cause an accident, serious injury and loss of
vehicle control.
● Use only wheel bolts which correspond to
the rim in question.
● Nev
er use different wheel bolts.
● Wheel bolts and threads should be clean,
free of oi
l and grease, and it should be possi-
ble to screw them easily.
● To loosen and tighten wheel bolts, only use
the wheel wrenc
h that came with the car from
the factory. ●
Loo sen the wheel
bolts only about one turn
before raising the vehicle with the jack.
● Never apply grease or oil to wheel bolts or
to the wheel hub thr
eads. Even if the bolts
have been tightened to the prescribed tor-
que, they could come loose while driving.
● Never loosen the screwed joints of wheel
rims with bo
lted ring trims.
● If wheel bolts are tightened below the pre-
scribed t
orque, the bolts and rims could come
loose while driving. If tightening torque is too
high, the wheel bolts or threads can be dam-
aged. CAUTION
When removing/fitting the wheel, the rim
ma y
hit and damage the brake disc. For this
reason, please take care and get a second
person to assist you. Tyres with compulsory direction of ro-
t
ation A directional tread pattern can be identified
b
y
the arr
ows on the sidewall that point in
the direction of rotation. Always observe the
direction of rotation indicated when fitting
the wheel to guarantee optimum properties
of this type of tyres with regard to grip,
noises, wear and aquaplaning.
If it is absolutely necessary to fit the spare
tyre* against the direction of rotation, drive with care as this means the tyre does not of-
fer optimum drivin
g properties. This is of par-
ticular importance when the road surface is
wet.
To return to directional tread tires, replace
the punctured tyre as soon as possible and
restore the obligatory direction of rotation of
all tyres.
Subsequent work ●
Alloy wheels: rep
l
ace the wheel bolt caps.
● Plate wheels: repl
ace the wheel hubcap.
● Return all tools to their proper storing loca-
tion.
● If the replaced wheel does not fit in the
spar
e wheel housing, store it safely in the
luggage compartment ›››
page 158.
● Check the tyre pressure of the newly moun-
ted tyr
e as soon as possible.
● In vehicles fitted with a tyre pressure indi-
cator
, adjust the pressure and store it in
memory ›››
page 287.
● Have the tightening torque of the wheel
bolts c
hecked as soon as possible with a tor-
que wrench (it should be 120 Nm). Mean-
while, drive carefully.
● Have the flat tyre replaced as quickly as
pos s
ible. 69
Page 72 of 316
The essentials
Snow chains U se Snow chains should only be used on the
front
wheel
s.
● Check that they are correctly seated after
driving f
or a few yards; correct the position if
necessary, in accordance with the manufac-
turer's fitting instructions.
● Keep your speed below 50 km/h (30 mph).
● If there is a danger of being trapped de-
spit e h
aving mounted the chains, it is best to
disable the driving wheels (ASR) in the ESC
››› page 181.
Snow chains will improve braking ability as
well as traction in winter conditions.
For technical reasons snow chains may only
be used with the following wheel rim/tyre
combination.
195/60 R16Chains with links of maximum 13.5
mm Remove wheel covers and any integral trim
rin
g bef
or
e fitting snow chains.
Remove the chains when roads are free of
snow. Driving characteristics worsen, and the
wheels become damaged quickly and may
even be rendered unusable. WARNING
Snow chains should be correctly tightened in
acc or
dance with the manufacturer's instruc-
tions. This will prevent the chains coming in-
to contact with the wheel housing. Emergency towing of the vehi-
cl
e
T
owing Fig. 85
Right side of the front bumper: Tow-
in g rin
g. Fig. 86
Right side of the rear bumper: Towing
ring. Towline anchorages
Att
ac
h the b
ar or rope to the towline ancho-
rages.
The towline anchorages are located under
the floor panel in the luggage compartment,
next to the vehicle tools ››› page 65.
Screw the towline anchorage into the screw
connection ››› Fig. 85 o ››› Fig. 86 and tighten
it with the wheel brace.
Tow rope or tow bar
It is easier and safer for the vehicle to be tow-
ed using a tow bar. You should only use a
tow-rope if you do not have a tow-bar.
A tow rope should be slightly elastic to re-
duce the loading on both vehicles. It is advis-
able to use a tow rope made of synthetic fi-
bre or similarly elastic material. 70
Page 77 of 316
Safe driving
Safety
Saf e driv
in
g
Safety first! This chapter contains important information,
tips, s
ug
gestions and warnings that you
should read and consider for both your own
safety and for your passengers' safety. WARNING
● This m
anual contains important informa-
tion about the operation of the vehicle, both
for the driver and the passengers. The other
sections of the on-board documentation also
contain further information that you should
be aware of for your own safety and for the
safety of your passengers.
● Ensure that the on-board documentation is
kept in the
vehicle at all times. This is espe-
cially important when lending or selling the
vehicle to another person. Advice about driving
B ef or
e setting off For your own safety and the safety of your
p
a
s
sengers, always note the following points
before every trip: –
Make s
ure that the vehicle's lights and turn
signals are working properly.
– Check tyre pressure.
– Ensure that all windows provide a clear and
good v
iew of the surroundings.
– Ensure that all luggage is correctly secured
›››
page 158.
– Make sure that no objects can interfere
with the pedal
s.
– Adjust front seat, head restraint and mir-
rors
properly according to your size.
– Ensure that the passenger in the central
rear se
at always has the head restraint in
the correct position for use.
– Instruct passengers to adjust the head re-
straints
according to their height.
– Protect children with appropriate child
seats and pr
operly applied seat belts
››› page 92.
– Assume the correct sitting position. Instruct
your pa
ssengers also to assume a proper
sitting position ››› page 76.
– Fasten your seat belt securely. Instruct your
pas
sengers also to fasten their seat belts
properly ››› page 81. What affects driving safety? As a driver, you are responsible for yourself
and y
our p
assengers. When your concentra-
tion or driving safety is affected by any cir-
cumstance, you endanger yourself as well as
others on the road ››› , for this reason:
– Always pay attention to traffic and do not
get di
stracted by passengers or telephone
calls.
– Never drive when your driving ability is im-
paired (e.
g. by medication, alcohol, drugs).
– Observe traffic laws and speed limits.
– Always reduce your speed as appropriate
for r o
ad, traffic and weather conditions.
– When travelling long distances, take
break
s regularly - at least every two hours.
– If possible, avoid driving when you are tired
or stre
ssed. WARNING
When driving safety is impaired during a trip,
the risk of
injury and accidents increases. Safety equipment
Never put your safety or the safety of your
p
a
s
sengers in danger. In the event of an acci-
dent, the safety equipment may reduce the »
75
Technical data
Advice
Operation
Emergencies
Safety
Page 85 of 316
Seat belts
●
The slot in the se
at belt buckle must not be
blocked with paper or other objects, as this
can prevent the latch plate from engaging se-
curely.
● Never use seat belt clips, fastening rings or
simil
ar items to alter the position of the belt
webbing.
● Frayed or torn seat belts or damage to the
connections, belt
retractors or parts of the
buckle could cause severe injuries in the
event of an accident. Therefore, you must
check the condition of all seat belts at regular
intervals.
● Seat belts which have been worn in an acci-
dent and hav
e been stretched must be re-
placed by a specialised workshop. Renewal
may be necessary even if there is no apparent
damage. The belt anchorage should also be
checked.
● Do not attempt to repair a damaged seat
belt y
ourself. The seat belts must not be re-
moved or modified in any way.
● The belts must be kept clean, otherwise the
retract
ors may not work properly. Head-on collisions and the laws of
ph
y
s
ics Fig. 99
A driver not wearing a seat belt is
thr o
wn f
orward violently. Fig. 100
The unbelted passenger in the rear
se at
i
s thrown forward violently, hitting the
driver who is wearing a seat belt. It is easy to explain how the laws of physics
w
ork
in the c
ase of a head-on collision: when
a vehicle starts moving, a type of energy called “kinetic energy” is created both in the
pas
sengers and inside the vehicle.
The amount of “kinetic energy” depends on
the speed of the vehicle and on the weight of
the vehicle and of its passengers. The higher
the speed and the greater the weight, the
more energy there is to be “absorbed” in an
accident.
The most significant factor, however, is the
speed of the vehicle. If the speed doubles
from 25 km/h (15 mph) to 50 km/h
(30 mph), for example, the corresponding ki-
netic energy is multiplied by four.
Because the vehicle occupants in our exam-
ple are not restrained by seat belts, in the
event of crashing against a wall, all of the oc-
cupants' kinetic energy will be absorbed
solely by said impact.
Even at speeds of 30 km/h (19 mph) to
50 km/h (30 mph), the forces acting on bod-
ies in a collision can easily exceed one tonne
(1000 kg). At greater speed these forces are
even higher.
Vehicle occupants not wearing seat belts are
not “attached” to the vehicle. In a head-on
collision, they will move forward at the same
speed their vehicle was travelling just before
the impact. This example applies not only to
head-on collisions, but to all accidents and
collisions. »
83
Technical data
Advice
Operation
Emergencies
Safety
Page 89 of 316
Airbag system
travel on the rear seat. Never transport
chi
l
dren in the vehicle if they are not restrain-
ed or the restraint system is not appropriate
for their age, size or weight.
● If you are not wearing a seat belt, or if you
lean f
orward or to the side while travelling or
assume an incorrect sitting position, there is
a substantially increased risk of injury. This
increased risk of injury will be further in-
creased if you are struck by an inflating air-
bag.
● To reduce the risk of injury from an inflating
airbag, alw
ays wear the seat belt properly.
● Always adjust the front seats properly. Description of airbag system
Read the additional information carefully
› ›
›
page 20.
The airbag system is not a substitute for the
seat belts. The airbag system offers addition-
al protection for the driver and passenger in
combination with the seat belts.
The airbag system mainly comprises (as per
vehicle equipment): ● an electronic control and monitoring sys-
tem (contr
ol unit)
● frontal airbags for driver and passenger,
● side airbags,
● curtain airbags, ●
a contro
l lamp on the dash panel
››› page 91.
● key-operated switch for front passenger air-
bag,
● a contr
ol lamp for disabling/enabling the
front p
assenger airbag.
The airbag system operation is monitored
electronically. The airbag control lamp will il-
luminate for a few seconds every time the ig-
nition is switched on (self-diagnosis).
There is a fault in the system if the control
lamp :
● does not light up when the ignition is
switc
hed on ››› page 91,
● turns off after 4 seconds after the ignition
is sw
itched on,
● turns off and then lights up again after the
ignition is sw
itched on,
● illuminates or flashes while the vehicle is
movin
g.
The airbag system is not triggered if:
● the ignition is switched off
● there is a minor frontal collision
● there is a minor side collision
● there is a rear-end collision
● the vehicle turns over. WARNING
● The seat belt
s and airbags can only provide
maximum protection if the occupants are
seated correctly ››› page 76, Correct position
of the vehicle occupants .
● If a fault has occurred in the airbag system,
have the sy
stem checked immediately by a
specialised workshop. Otherwise, during a
frontal collision the system might not trigger
correctly or may fail to trigger at all. Airbag activation
The airbags deploy extremely rapidly, within
thou
s
andths
of a second, to provide addi-
tional protection in the event of an accident.
A fine dust may develop when the airbag de-
ploys. This is normal and it is not an indica-
tion of fire in the vehicle.
The airbag system is only ready to function
when the ignition is on.
In special accidents instances, several air-
bags may activate at the same time.
In the event of minor head-on and side colli-
sions, rear-end collisions, overturning or roll-
over of the vehicle, airbags do not activate.
Activation factors
The conditions that lead to the airbag system
activating in each situation cannot be gener-
alised. Some factors play an important role, »
87
Technical data
Advice
Operation
Emergencies
Safety
Page 91 of 316
Airbag system
in your vehicle. Because the airbag deploys
from the s
ide of
the backrest, the use of con-
ventional seat covers would obstruct the side
airbag, seriously reducing the airbag's effec-
tiveness.
● Any damage to the original seat upholstery
or around the se
ams of the side airbag units
must be repaired immediately by a special-
ised workshop.
● The airbags provide protection for just one
accident; r
eplace them once they have de-
ployed.
● Any work on the side airbag system or re-
mova
l and installation of the airbag compo-
nents for other repairs (such as removal of
the front seat) should only be performed by a
specialised workshop. Otherwise, faults may
occur during the airbag system operation.
● Do not attempt to modify components of
the airbag sys
tem in any way.
● The side and head airbags are managed
through sensor
s located in the interior of the
front doors. To ensure the correct operation of
the side and curtain (head) airbags neither
the doors nor the door panels should be
modified in any way (e.g. fitting loudspeak-
ers). If the front door is damaged, the airbag
system may not work correctly. All work car-
ried out on the front door must be done in a
specialised workshop.
● In a side-on collision the side airbags will
not work
if the sensors do not correctly meas-
ure the pressure increase on the interior of
the doors, due to air escaping through the areas with holes or openings in the door pan-
el.
● Nev er driv
e if the interior door panels have
been remov
ed or if the panels have not been
correctly fitted.
● Never drive the vehicle if the loudspeakers
in the door panels
have been removed, un-
less the holes left by the loudspeakers have
been closed properly.
● Always check that the openings are closed
or cov
ered if additional loudspeakers or other
equipment are fitted inside the door panels.
● Any work carried out to the doors should be
made in an authori
sed specialised workshop. Head-protection airbags*
Read the additional information carefully
› ›
›
page 23. WARNING
● In order f or the he
ad-protection airbags to
provide their maximum protection, the pre-
scribed sitting position must always be main-
tained with seat belts fastened while travel-
ling.
● For safety reasons, the curtain airbag must
be disab
led in those vehicles fitted with a
screen dividing the interior of the vehicle.
See your technical service to make this ad-
justment. ●
There mu s
t be no other persons, animals or
objects between the occupants of the outer
seats and the deployment space of the head-
protection airbags so that the head-protec-
tion airbag can deploy completely without re-
striction and provide the greatest possible
protection. Therefore, sun blinds which have
not been expressly approved for use in your
vehicle may not be attached to the side win-
dows
● The built-in coat hooks should be used only
for lightweight
clothing. Do not leave any
heavy or sharp-edged objects in the pockets.
Please, do not hang the clothes on coat hang-
ers.
● The airbags provide protection for just one
accident; r
eplace them once they have de-
ployed.
● Any work on the head-protection airbag
syst
em or removal and installation of the air-
bag components for other repairs (such as re-
moval of the roof lining) should only be per-
formed by a specialised workshop. Other-
wise, faults may occur during the airbag sys-
tem operation.
● Do not attempt to modify components of
the airbag sys
tem in any way.
● The side and head airbags are managed
through sensor
s located in the interior of the
front doors. To ensure the correct operation of
the side and curtain airbags neither the
doors nor the door panels should be modified
in any way (e.g. fitting loudspeakers). If the
front door is damaged, the airbag system
may not work correctly. All work carried out » 89
Technical data
Advice
Operation
Emergencies
Safety
Page 92 of 316
Safety
on the front door must be done in a special-
ised w
ork
shop. Deactivating airbags
Activ ation and de
activation of front
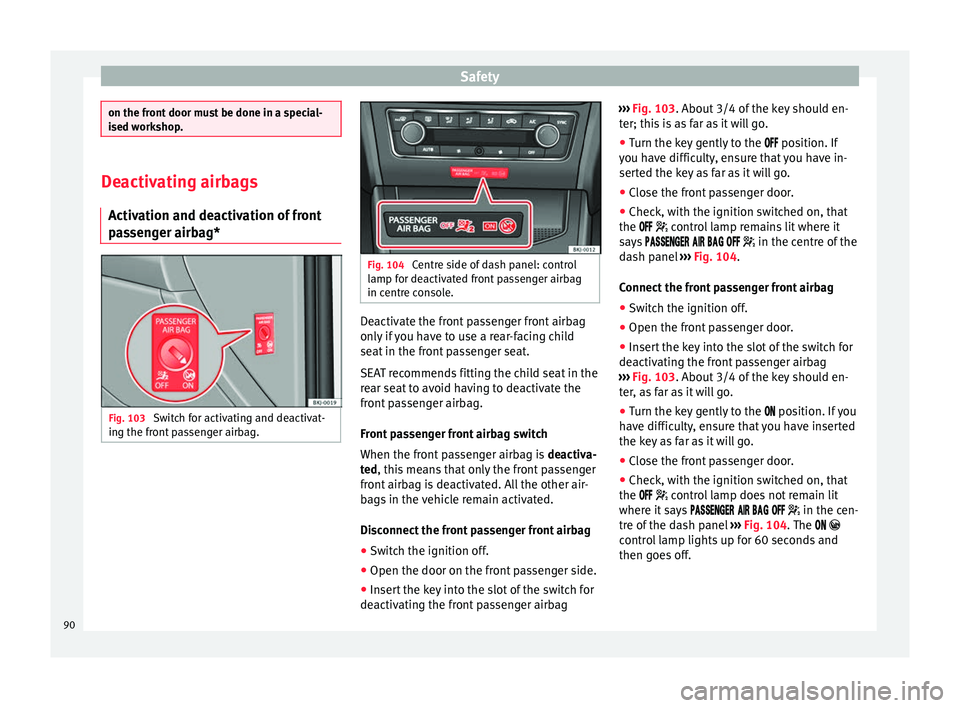
passenger airbag* Fig. 103
Switch for activating and deactivat-
in g the fr
ont
passenger airbag. Fig. 104
Centre side of dash panel: control
lamp f or de
activated front passenger airbag
in centre console. Deactivate the front passenger front airbag
on
ly
if
you have to use a rear-facing child
seat in the front passenger seat.
SEAT recommends fitting the child seat in the
rear seat to avoid having to deactivate the
front passenger airbag.
Front passenger front airbag switch
When the front passenger airbag is deactiva-
ted, this means that only the front passenger
front airbag is deactivated. All the other air-
bags in the vehicle remain activated.
Disconnect the front passenger front airbag
● Switch the ignition off.
● Open the door on the front passenger side.
● Insert the key into the slot of the switch for
deactivatin
g the front passenger airbag ›››
Fig. 103. About 3/4 of the k
ey should en-
ter; this is as far as it will go.
● Turn the key gently to the position. If
y
ou have difficulty, ensure that you have in-
serted the key as far as it will go.
● Close the front passenger door.
● Check, with the ignition switched on, that
the contro
l lamp remains lit where it
says in the centre of the
dash panel ››› Fig. 104.
Connect the front passenger front airbag ● Switch the ignition off.
● Open the front passenger door.
● Insert the key into the slot of the switch for
deactivatin
g the front passenger airbag
››› Fig. 103. About 3/4 of the key should en-
ter, as far as it will go.
● Turn the key gently to the position. If
you
have difficulty, ensure that you have inserted
the key as far as it will go.
● Close the front passenger door.
● Check, with the ignition switched on, that
the contro
l lamp does not remain lit
where it says in the cen-
tre of the dash panel ››› Fig. 104. The
control lamp lights up for 60 seconds and
then goes off.
90
Page 93 of 316
Airbag system
WARNING
● The driver of the
vehicle is responsible for
disabling or switching on the airbag.
● Always switch off the ignition before disa-
bling the fr
ont passenger airbag! Failure to do
so could result in a fault in the airbag deacti-
vation system.
● Never leave the key in the airbag disabling
switc
h as it could get damaged or enable or
disable the airbag during driving.
● If for any reason an airbag is deactivated,
reactiv
ate it as soon as possible so that it can
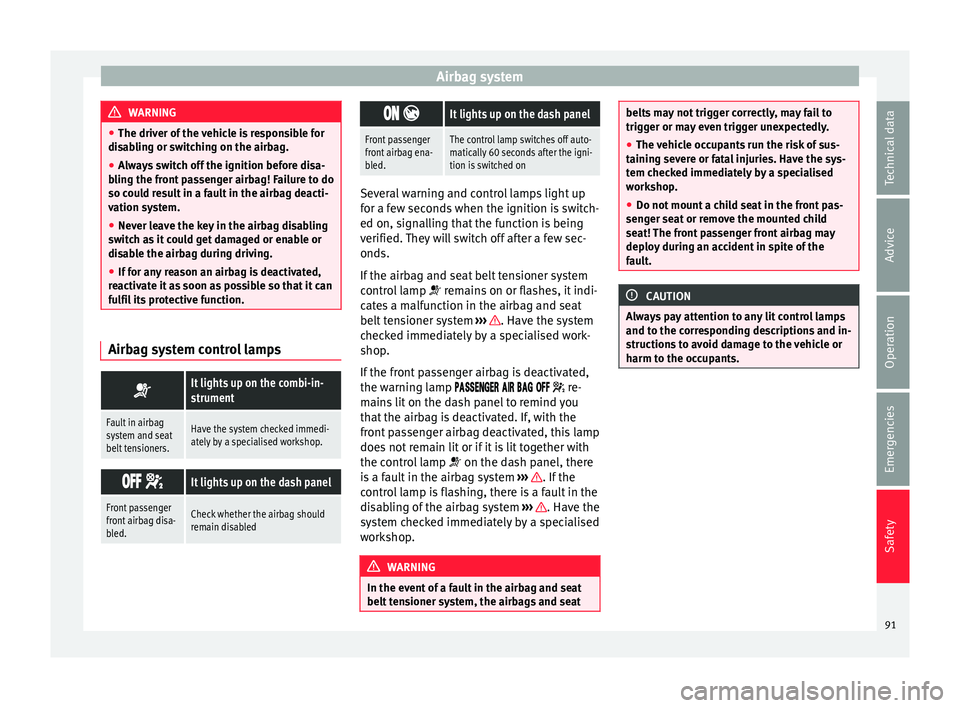
fulfil its protective function. Airbag system control lamps
It lights up on the combi-in-
strument
Fault in airbag
system and seat
belt tensioners.Have the system checked immedi-
ately by a specialised workshop.
It lights up on the dash panel
Front passenger
front airbag disa-
bled.Check whether the airbag should
remain disabled
It lights up on the dash panel
Front passenger
front airbag ena-
bled.The control lamp switches off auto-
matically 60 seconds after the igni-
tion is switched on
Several warning and control lamps light up
for a f
ew sec
onds when the ignition is switch-
ed on, signalling that the function is being
verified. They will switch off after a few sec-
onds.
If the airbag and seat belt tensioner system
control lamp remains on or flashes, it indi-
cates a malfunction in the airbag and seat
belt tensioner system ››› . Have the system
c hec
k
ed immediately by a specialised work-
shop.
If the front passenger airbag is deactivated,
the warning lamp re-
mains lit on the dash panel to remind you
that the airbag is deactivated. If, with the
front passenger airbag deactivated, this lamp
does not remain lit or if it is lit together with
the control lamp on the dash panel, there
is a fault in the airbag system ››› . If the
c ontr
o
l lamp is flashing, there is a fault in the
disabling of the airbag system ››› . Have the
sy s
t
em checked immediately by a specialised
workshop. WARNING
In the event of a fault in the airbag and seat
belt t en
sioner system, the airbags and seat belts may not trigger correctly, may fail to
trigg
er or m
ay even trigger unexpectedly.
● The vehicle occupants run the risk of sus-
taining sev
ere or fatal injuries. Have the sys-
tem checked immediately by a specialised
workshop.
● Do not mount a child seat in the front pas-
senger se
at or remove the mounted child
seat! The front passenger front airbag may
deploy during an accident in spite of the
fault. CAUTION
Always pay attention to any lit control lamps
and to the c orr
esponding descriptions and in-
structions to avoid damage to the vehicle or
harm to the occupants. 91
Technical data
Advice
Operation
Emergencies
Safety
Page 99 of 316
Self-help
Emergencies
Self -help
Emer g
ency equipment
Emergency warning triangle* The use of reflective warning triangles is
ob
lig
atory in emergencies in some countries.
As are the first aid kit and a set of spare light
bulbs.
The warning triangle is under the storage
compartment which is located under the lug-
gage compartment floor. Note
● The warnin g tri
angle is not part of the vehi-
cle's standard equipment.
● The warning triangle should meet legal re-
quirements. First-aid kit and fire extinguisher*
The first-aid kit can go in the storage com-
p
ar
tment
which is located under the luggage
compartment floor.
The fire extinguisher* is attached to the lug-
gage compartment carpet with Velcro. Note
● The firs t
-aid kit and the fire extinguisher
are not part of the vehicle's standard equip-
ment.
● The first aid kit must comply with legal re-
quirements.
● O
bserve the expiry date of the contents of
the first
aid kit. After it has expired you
should purchase a new one.
● The fire extinguisher must comply with le-
gal
requirements.
● Ensure that the fire extinguisher is fully
function
al. The fire extinguisher should,
therefore, be checked regularly. The sticker
on the fire extinguisher will inform you of the
next date for checking.
● Before acquiring accessories and emergen-
cy equipment see the in
structions in “Acces-
sories and spares” ››› page 259. Vehicle tools
Read the additional information carefully
› ›
›
page 65
Depending on the equipment, the tools and
anti-puncture kit* are stored under the floor
panel in the luggage compartment.
The tool kit includes:
● Adapter for anti-theft wheel bolts*
● Towline anchorage ●
Box s
panner for wheel bolts*
● Jack*
● Wire hook for pulling off the wheel cov-
ers* / wheel bo
lt cap clip.
Some of the items listed are only provided in
certain model versions, or are optional ex-
tras. WARNING
● The fact or
y-supplied jack is only designed
for changing wheels on this model. On no ac-
count attempt to use it for lifting heavier ve-
hicles or other loads. Risk of injury.
● Use the jack only on a firm, level ground.
● Never start the engine when the vehicle is
on the jack. Ri
sk of accident.
● If work is to be carried out underneath the
vehicl
e, this must be secured by suitable
means. Otherwise, there is a risk of injury. Note
The jack does not generally require any main-
ten anc
e. If required, it should be greased us-
ing universal type grease. 97
Technical data
Advice
Operation
Emergencies
Safety
Page 100 of 316
Emergencies
Tyre repair TM S
(T
yre Mobility System)* Read the additional information carefully
›› ›
page 64
The Anti-puncture kit* (Tyre Mobility System)
will reliably seal punctures caused by the
penetration of a foreign body of up to about
4 mm in diameter. Do not remove foreign ob-
jects, e.g. screws or nails, from the tyre.
After inserting the sealant residue in the tyre,
you must again check the tyre pressure about
10 minutes after starting the engine.
You should only use the tyre mobility set if
the vehicle is parked in a safe place, you are
familiar with the procedure and you have the
necessary tyre mobility set! Otherwise, you
should seek professional assistance.
Do not use the tyre sealant in the following
cases:
● If the wheel rim has been damaged.
● In outside temperatures below -20°C (-4°F).
● In the event of cuts or perforations in the
tyr e gr
eater than 4 mm.
● If you have been driving with very low pres-
sure or a c
ompletely flat tyre.
● If the sealant bottle has passed its use by
date. WARNING
Using the tyre mobility system can be dan-
ger ou
s, especially when filling the tyre at the
roadside. Please observe the following rules
to minimise the risk of injury:
● Stop the vehicle safely as soon as possible.
Park it
at a safe distance from surrounding
traffic to fill the tyre.
● Ensure the ground on which you park is flat
and solid.
● Al
l passengers and particularly children
must
keep a safe distance from the work area.
● Turn on the hazard warning lights to warn
other roa
d users.
● Use the tyre mobility system only if you are
famili
ar with the necessary procedures. Oth-
erwise, you should seek professional assis-
tance.
● The tyre mobility set is intended for tempo-
rary
emergency use only until you can reach
the nearest specialised workshop.
● Replace the repaired tyre with the tyre mo-
bility
set as soon as possible.
● The sealant is a health hazard and must be
cle
aned immediately if it comes into contact
with the skin.
● Always keep the tyre mobility set out of the
reac
h of small children.
● Never use a jack, even if it has been ap-
prov
ed for your vehicle.
● Always stop the engine, apply the hand-
brake l
ever firmly and engage gear if using a manual gearbox, in order to reduce the risk of
vehic
l
e involuntary movement. WARNING
A tyre filled with sealant does not have the
s ame per f
ormance properties as a conven-
tional tyre.
● Never drive faster than 80 km/h (50 mph).
● Avoid heavy acceleration, hard braking and
fas
t cornering.
● Drive for only 10 minutes at a maximum
speed of 80
km/h (50 mph) and then check
the tyre. For the sake of the environment
Dispose of used or expired sealant observing
any l
egal requirements. Note
● A new bottle of se
alant can be purchased at
SEAT dealerships.
● Take into account the separate instruction
manual
of the tyre mobility set* manufactur-
er. 98