child seat Seat Arona 2018 Owner's Guide
[x] Cancel search | Manufacturer: SEAT, Model Year: 2018, Model line: Arona, Model: Seat Arona 2018Pages: 316, PDF Size: 6.77 MB
Page 97 of 316
Transporting children safely
● Aut om
atic
three-point seat belt . Whenever
possible, it is preferable to attach the child
seats with the ISOFIX system rather than at-
taching them with an automatic three-point
seat belt ›››
page 25.
Additional attachment:
● Top Tether : The Top Tether belt is guided
ov
er the back of the rear seat and attached to
an anchor point with a hook. Anchor points
are located at the back of the rear seat back-
rest on the boot side ›››
page 30
. The
rings for retaining the Top Tether belt are
marked with an anchor symbol.
● Support bracket : Some chi
ld seats rest on
the floor of the vehicle with a support brack-
et. The support bracket prevents the child
seat from tipping forward in the event of im-
pact. Child seats fitted with a support bracket
should only be used in the passenger seat
and side rear seats ››› . For the assembly of
thi s
type of
seat you should also consult the
list of approved vehicles for this assembly,
available in the instructions for child restraint
systems.
Recommended systems for attaching child
seats
SEAT recommends attaching child seats as
follows: ●
Baby
carriers or child seats in the opposite
direction of travel: ISOFIX and support brack-
et or iSize.
● Child seats in the direction of travel: ISO-
FIX and T
op Tether. WARNING
Incorrect use of the support bracket can
cau se seriou
s or fatal injury.
● Make sure the support bracket is correctly
and safely
installed. 95
Technical data
Advice
Operation
Emergencies
Safety
Page 100 of 316
Emergencies
Tyre repair TM S
(T
yre Mobility System)* Read the additional information carefully
›› ›
page 64
The Anti-puncture kit* (Tyre Mobility System)
will reliably seal punctures caused by the
penetration of a foreign body of up to about
4 mm in diameter. Do not remove foreign ob-
jects, e.g. screws or nails, from the tyre.
After inserting the sealant residue in the tyre,
you must again check the tyre pressure about
10 minutes after starting the engine.
You should only use the tyre mobility set if
the vehicle is parked in a safe place, you are
familiar with the procedure and you have the
necessary tyre mobility set! Otherwise, you
should seek professional assistance.
Do not use the tyre sealant in the following
cases:
● If the wheel rim has been damaged.
● In outside temperatures below -20°C (-4°F).
● In the event of cuts or perforations in the
tyr e gr
eater than 4 mm.
● If you have been driving with very low pres-
sure or a c
ompletely flat tyre.
● If the sealant bottle has passed its use by
date. WARNING
Using the tyre mobility system can be dan-
ger ou
s, especially when filling the tyre at the
roadside. Please observe the following rules
to minimise the risk of injury:
● Stop the vehicle safely as soon as possible.
Park it
at a safe distance from surrounding
traffic to fill the tyre.
● Ensure the ground on which you park is flat
and solid.
● Al
l passengers and particularly children
must
keep a safe distance from the work area.
● Turn on the hazard warning lights to warn
other roa
d users.
● Use the tyre mobility system only if you are
famili
ar with the necessary procedures. Oth-
erwise, you should seek professional assis-
tance.
● The tyre mobility set is intended for tempo-
rary
emergency use only until you can reach
the nearest specialised workshop.
● Replace the repaired tyre with the tyre mo-
bility
set as soon as possible.
● The sealant is a health hazard and must be
cle
aned immediately if it comes into contact
with the skin.
● Always keep the tyre mobility set out of the
reac
h of small children.
● Never use a jack, even if it has been ap-
prov
ed for your vehicle.
● Always stop the engine, apply the hand-
brake l
ever firmly and engage gear if using a manual gearbox, in order to reduce the risk of
vehic
l
e involuntary movement. WARNING
A tyre filled with sealant does not have the
s ame per f
ormance properties as a conven-
tional tyre.
● Never drive faster than 80 km/h (50 mph).
● Avoid heavy acceleration, hard braking and
fas
t cornering.
● Drive for only 10 minutes at a maximum
speed of 80
km/h (50 mph) and then check
the tyre. For the sake of the environment
Dispose of used or expired sealant observing
any l
egal requirements. Note
● A new bottle of se
alant can be purchased at
SEAT dealerships.
● Take into account the separate instruction
manual
of the tyre mobility set* manufactur-
er. 98
Page 155 of 316
Seats and head restraints
Note
● When fitting the he a
d restraints again, in-
sert the tubes as far as possible into the
guides without pressing the button. Adjustment of the rear head restraints
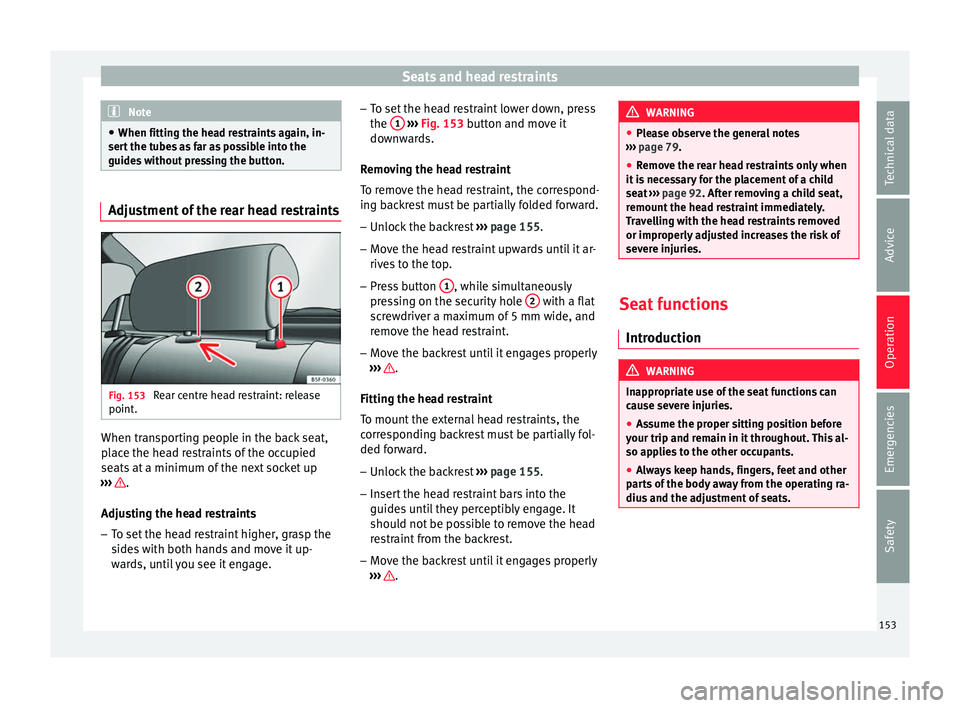
Fig. 153
Rear centre head restraint: release
point . When transporting people in the back seat,
p
l
ac
e the head restraints of the occupied
seats at a minimum of the next socket up
››› .
Adju s
tin
g the head restraints
– To set the head restraint higher, grasp the
sides
with both hands and move it up-
wards, until you see it engage. –
To set the he
ad restraint lower down, press
the 1
› ››
Fig. 153
b utton and move it
downwards.
Removing the head restraint
To remove the head restraint, the correspond-
ing backrest must be partially folded forward. – Unlock the backrest ›››
page 155.
– Move the head restraint upwards until it ar-
rives
to the top.
– Press button 1 , while simultaneously
pr e
s
sing on the security hole 2 with a flat
s c
r
ewdriver a maximum of 5 mm wide, and
remove the head restraint.
– Move the backrest until it engages properly
›››
.
Fittin g the he
a
d restraint
To mount the external head restraints, the
corresponding backrest must be partially fol-
ded forward.
– Unlock the backrest ›››
page 155.
– Insert the head restraint bars into the
guides u
ntil they perceptibly engage. It
should not be possible to remove the head
restraint from the backrest.
– Move the backrest until it engages properly
›››
. WARNING
● Ple a
se observe the general notes
››› page 79.
● Remove the rear head restraints only when
it is
necessary for the placement of a child
seat ››› page 92. After removing a child seat,
remount the head restraint immediately.
Travelling with the head restraints removed
or improperly adjusted increases the risk of
severe injuries. Seat functions
Intr oduction WARNING
Inappropriate use of the seat functions can
cau se sev
ere injuries.
● Assume the proper sitting position before
your trip and rem
ain in it throughout. This al-
so applies to the other occupants.
● Always keep hands, fingers, feet and other
part
s of the body away from the operating ra-
dius and the adjustment of seats. 153
Technical data
Advice
Operation
Emergencies
Safety
Page 156 of 316
Operation
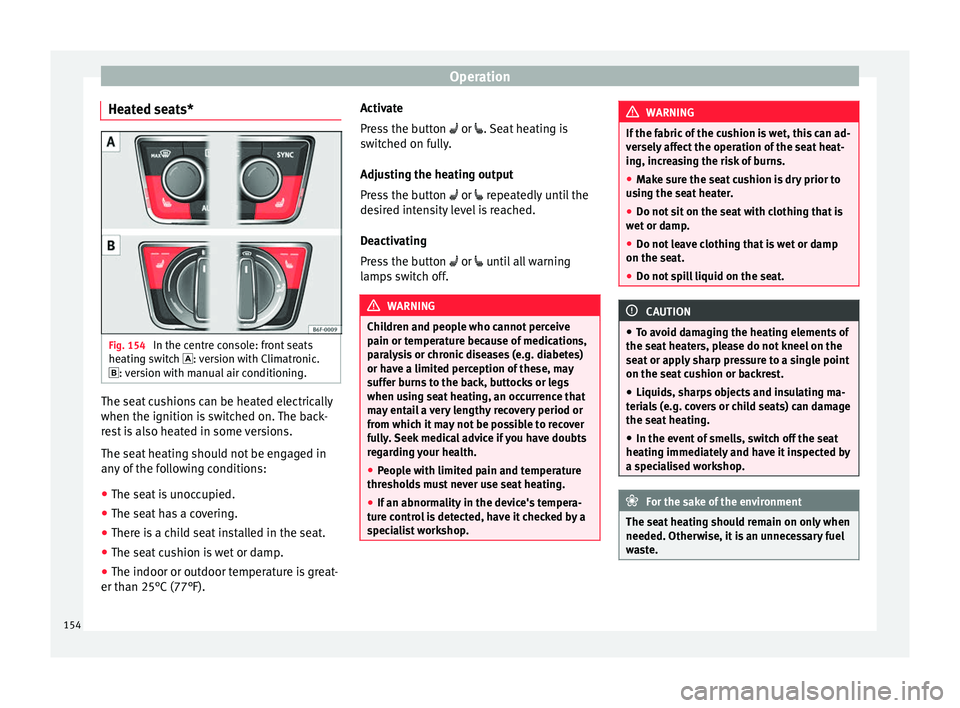
Heated seats* Fig. 154
In the centre console: front seats
he atin
g sw
itch : version with Climatronic.
: version with manual air conditioning. The seat cushions can be heated electrically
when the ignition i
s
sw
itched on. The back-
rest is also heated in some versions.
The seat heating should not be engaged in
any of the following conditions:
● The seat is unoccupied.
● The seat has a covering.
● There is a child seat installed in the seat.
● The seat cushion is wet or damp.
● The indoor or outdoor temperature is great-
er than 25°C (77°F). A
ctivate
Pres
s the button or . Seat heating is
switched on fully.
Adjusting the heating output
Press the button or repeatedly until the
desired intensity level is reached.
Deactivating
Press the button or until all warning
lamps switch off. WARNING
Children and people who cannot perceive
pain or t emper
ature because of medications,
paralysis or chronic diseases (e.g. diabetes)
or have a limited perception of these, may
suffer burns to the back, buttocks or legs
when using seat heating, an occurrence that
may entail a very lengthy recovery period or
from which it may not be possible to recover
fully. Seek medical advice if you have doubts
regarding your health.
● People with limited pain and temperature
thresho
lds must never use seat heating.
● If an abnormality in the device's tempera-
ture c
ontrol is detected, have it checked by a
specialist workshop. WARNING
If the fabric of the cushion is wet, this can ad-
ver sely
affect the operation of the seat heat-
ing, increasing the risk of burns.
● Make sure the seat cushion is dry prior to
usin
g the seat heater.
● Do not sit on the seat with clothing that is
wet or d
amp.
● Do not leave clothing that is wet or damp
on the seat.
● Do not
spill liquid on the seat. CAUTION
● To av oid d
amaging the heating elements of
the seat heaters, please do not kneel on the
seat or apply sharp pressure to a single point
on the seat cushion or backrest.
● Liquids, sharps objects and insulating ma-
teria
ls (e.g. covers or child seats) can damage
the seat heating.
● In the event of smells, switch off the seat
heating immedi
ately and have it inspected by
a specialised workshop. For the sake of the environment
The seat heating should remain on only when
needed. Otherw i
se, it is an unnecessary fuel
waste. 154
Page 162 of 316
Operation
Fitting
● Insert the cover horizontally so that the “re-
c e
s
s” fits onto the axis of the supports
››› Fig. 166 and press down until it engages.
● Hook the loops ›››
Fig. 165 B to the rear
lid. WARNING
Do not place heavy or hard objects on the
re ar shelf
, because they will endanger the ve-
hicle occupants in case of sudden braking. CAUTION
● Bef or
e closing the rear lid, ensure that the
rear shelf is correctly fitted.
● An overloaded luggage compartment could
mean that
the rear shelf is not correctly seat-
ed and it may be bent or damaged.
● If the luggage compartment is overloaded,
remov
e the tray. Note
● Ens ur
e that, when placing items of clothing
on the luggage compartment cover, rear visi-
bility is not reduced. Fastening rings*
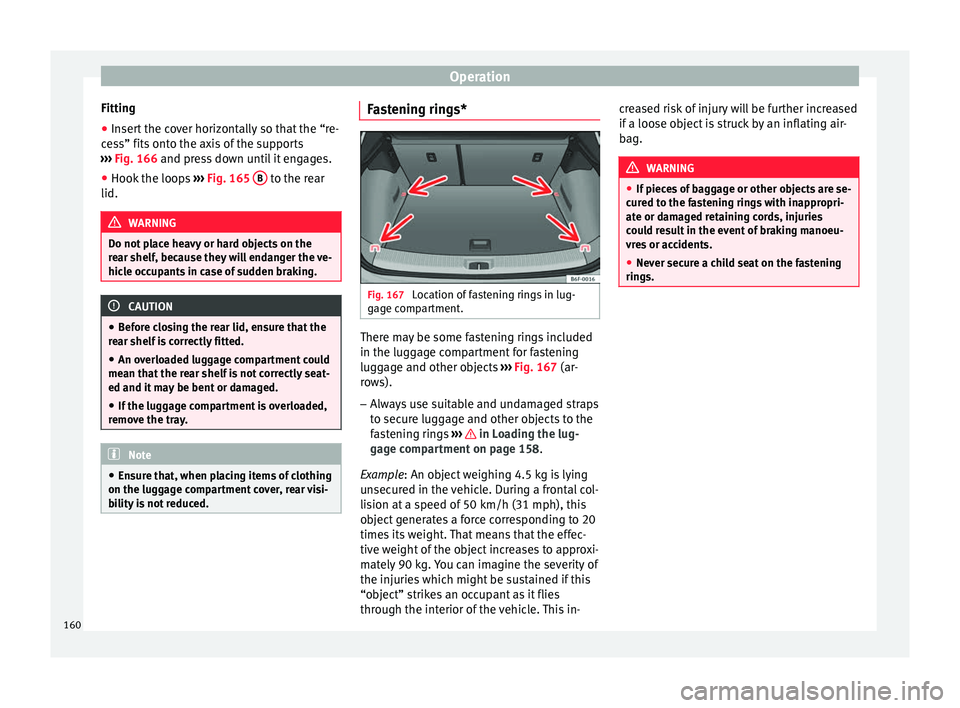
Fig. 167
Location of fastening rings in lug-
g ag
e c
ompartment. There may be some fastening rings included
in the lug
g
ag
e compartment for fastening
luggage and other objects ››› Fig. 167 (ar-
rows).
– Always use suitable and undamaged straps
to secur
e luggage and other objects to the
fastening rings ››› in Loading the lug-
g ag
e c
ompartment on page 158.
Example: An object weighing 4.5 kg is lying
unsecured in the vehicle. During a frontal col-
lision at a speed of 50 km/h (31 mph), this
object generates a force corresponding to 20
times its weight. That means that the effec-
tive weight of the object increases to approxi-
mately 90 kg. You can imagine the severity of
the injuries which might be sustained if this
“object” strikes an occupant as it flies
through the interior of the vehicle. This in- creased risk of injury will be further increased
if a loose o
bject is struck by an inflating air-
bag. WARNING
● If piec e
s of baggage or other objects are se-
cured to the fastening rings with inappropri-
ate or damaged retaining cords, injuries
could result in the event of braking manoeu-
vres or accidents.
● Never secure a child seat on the fastening
rings. 160
Page 235 of 316
Driver assistance systems
compromise safety. The system is not a re-
pl
ac
ement for driver awareness.
● Any accidental movement of the vehicle
coul
d result in serious injury.
● Adapt your speed and driving style at all
times t
o suit visibility, weather, road and traf-
fic conditions.
● Certain surfaces of objects and garments
do not refl
ect the ultrasound sensors' sig-
nals. The system cannot detect, at least cor-
rectly, these objects or people wearing such
clothes.
● Ultrasound sensor signals may be affected
by e
xternal sound sources. In certain circum-
stances this may prevent them from detect-
ing people or objects.
● The ultrasound sensors have blind spots in
which ob
stacles and people are not regis-
tered.
● Monitor the area around the vehicle at all
times, sinc
e the ultrasound sensors do not
detect small children, animals or certain ob-
jects in all situations. WARNING
Quick turns of the steering wheel when park-
ing or e x
iting a parking space with Park As-
sist can cause serious injury.
● Do not hold the steering wheel during ma-
noeuvre
s to park or exit a parking space until
the system requests it. Doing so disables the
system during the manoeuvre, resulting in
the parking being cancelled. CAUTION
● In cer t
ain circumstances, the ultrasonic
sensors do not detect objects such as trailer
tongues, bars, fences, posts or thin trees, or
an open (or opening) rear lid, which could
damage the vehicle.
● Retrofitting of certain accessories to the ve-
hicle, s
uch as a bicycle rack, may interfere
with the operation of the Park Assist system
and cause damage.
● The Park Assist system uses as a reference
parked
vehicles, curbs and other objects.
Make sure that the tyres and wheels are not
damaged while parking. If necessary, oppor-
tunely interrupt the parking manoeuvre to
avoid damaging the vehicle.
● The ultrasound sensors on the bumper may
be damag
ed or shifted in the event of a colli-
sion, for example, when entering or exiting a
parking space.
● If you use high-pressure or vapour equip-
ment to c
lean the ultrasound sensors, do not
apply it directly unless very briefly and al-
ways from a distance of more than 10 cm.
● A registration plate or plate holder on the
front w
ith larger than the space for the regis-
tration plate, or a registration plate that is
curved or warped can cause:
–false detections,
– loss of sensor visibility.
– cancellation of the parking manoeuvre or
defective parking. ●
If one of the u
ltrasonic sensors is damaged,
the area corresponding to that group of sen-
sors (front or rear) is deactivated and cannot
be activated until the fault is corrected. How-
ever, you can still use the sensors of the oth-
er bumper as per usual. If there is a fault in
the system, consult a specialist workshop.
SEAT recommends visiting a SEAT dealership
for this. Note
● In or der t o guar
antee good system opera-
tion, keep the ultrasound sensors of the
bumper clean, free of snow or ice, and do not
cover them with adhesives or other objects.
● Certain sources of noise, such as rough as-
phalt
or paving stones and the noise of other
vehicles can induce the Park Assist system or
ParkPilot to give erroneous warnings.
● In order to become familiar with the system
and its f
unctions, SEAT recommends that you
practice operating the Park Assist system in
an area where there is not too much traffic or
in a car park. 233
Technical data
Advice
Operation
Emergencies
Safety
Page 274 of 316
Advice
Fill with a refill bottle
On ly
u
se AdBlue ®
that complies with ISO
22241-1. Only use original containers.
● Open the tank cover ›››
Fig. 236.
● Unscrew the tank cap by turning it in an an-
ti-clock
wise direction.
● Please observe the manufacturer's instruc-
tions, indicat
ed on the refill bottle.
● Check the expiry date.
● Remove the cap of the refill bottle.
● Insert the neck of the bottle in the tank fill-
er neck
vertically and screw the bottle on by
hand, by turning it in a clockwise direction.
● Press the refill bottle in the direction of the
fill
er neck and hold it in this position.
● Wait until the contents of the refill bottle
have been pour
ed into the AdBlue ®
tank. Do
not compress or break the bottle!
● Turn the bottle in a counter-clockwise direc-
tion and gently p
ull it upwards ››› .
● The AdBlue ®
tank
i
s full when no more liq-
uid comes out of the bottle.
● Screw on the tank cap in a clockwise direc-
tion until
it is tightly closed.
● Close the fuel tank flap.
Operations
before driving
● After refilling the tank, only sw
itch on the
ignition. ●
Leav
e the ignition on for at least 30 sec-
onds for the system to detect the fluid load.
● Make sure you wait for at least 30 seconds
before s
tarting the engine!
Refilling the dispenser with AdBlue
Valid for vehicles with selective catalytic re-
duction.
● Open the tank cap.
● Turn the SCR tank cap anti-clockwise
›››
Fig. 236.
● Add AdBlue until the nozzle stops for the
first
time.
● Close the SCR tube by turning it clockwise
until
you hear a click. WARNING
AdBlue ®
shoul d on
ly be stored in the original
container, which should be tightly closed and
kept in a safe place.
● Never keep AdBlue ®
in empty food c
ontain-
ers, bottles or other similar containers. Other
people may confuse it for other products.
● Keep AdBlue ®
out of the r
each of children. CAUTION
● When refi l
ling, the nozzle grip should be
aligned downward. Otherwise the nozzle will
not connect automatically. ●
Do not tr y
to add any more additive after
the nozzle has stopped for the first time. The
AdBlue tank could overflow and AdBlue could
spill out.
● Only use AdBlue ®
that c
omplies with ISO
22241-1. Only use original containers.
● Never mix AdBlue ®
with wat
er, fuel or addi-
tives. Any type of damage caused by such a
mixture will not be covered by the warranty.
● Never pour AdBlue ®
into the fuel
tank. This
could result in engine damage.
● Do not carry the refill bottle inside the vehi-
cle. If
there is a leak (due to temperature
changes or damage to the bottle), the
AdBlue ®
may damage the vehicle. For the sake of the environment
Dispose of the refill bottle in an environment-
friendly m anner
. Note
You can buy refill bottles that are adequate
for AdBlue ®
u se at
SEAT dealerships.272
Page 275 of 316
Checking and refilling levels
Working in the engine compart-
ment Saf ety
not
es for work in the engine
compartment Read the additional information carefully
›› ›
page 17
Before starting any work on the engine or in
the engine compartment:
1. Switch off the engine and remove the key from the ignition.
2. Ap
ply the handbrake.
3. Move the gear lever to neutral or the selec- tor lev
er to position P.
4. Wait for the engine to cool down.
5. Keep children away from the vehicle.
6. Raise the bonnet ›››
page 274.
You should not do any work in the engine
compartment unless you know exactly how to
carry out the jobs and have the correct tools!
Have the work carried out by a specialised
workshop if you are uncertain.
All service fluids and consumables, e.g. cool-
ant, engine oil, spark plugs and batteries,
are under constant development. SEAT pro-
vides a constant flow of information to Tech-
nical Services concerning modifications. For
this reason, we recommend you have service fluids and consumables replaced by a Techni-
cal
Service. Please observe the relevant in-
structions ››› page 259. The engine compart-
ment of the vehicle is a hazardous area ››› .
WARNING
All work on the engine or in the engine com-
par tment, e.
g. checking and refilling fluids,
involves the danger of injury and burns, acci-
dents and even fire.
● Never open the bonnet if you see steam,
smoke or coo
lant escaping from the engine
compartment. Otherwise, there is a risk of
sustaining burns. Wait until no more steam or
coolant is emitted, then allow the engine to
cool before carefully opening the bonnet.
● Switch off the engine and remove the key
from the ignition.
● App
ly the handbrake and move the gear
lever t
o neutral or selector lever to position P.
● Keep children away from the vehicle.
● Never touch hot engine parts. There is a
risk of
burns.
● Never spill liquids on a hot engine or on a
hot exh
aust gas system. This is a fire hazard.
● Avoid causing short-circuits in the electri-
cal
system, particularly at the points where
the jump leads are attached ›››
page 72.
The battery could explode.
● Never touch the radiator fan. It is tempera-
ture c
ontrolled and could start automatically,
even when the engine has been switched off
and the key removed from the ignition! ●
Never c o
ver the engine with additional in-
sulating materials such as a blanket. Risk of
fire!
● Do not unscrew the cap on the coolant ex-
pans
ion tank when the engine is hot. If the
coolant is hot, the cooling system will be
pressurised!
● Protect face, hands and arms by covering
the cap with a l
arge, thick cloth to protect
against escaping coolant and steam.
● Always make sure you have not left any ob-
jects, s
uch as cleaning cloths or tools, in the
engine compartment.
● If you have to work underneath the vehicle,
you mus
t use suitable stands additionally to
support the vehicle, there is a risk of acci-
dent!. A hydraulic jack is insufficient for se-
curing the vehicle and there is a risk of injury.
● If any work has to be performed when the
engine is
started or with the engine running,
there is an additional, potentially fatal, safety
risk from the rotating parts, such as the drive
belts, alternator, radiator fan, etc., and from
the high-voltage ignition system. You should
also observe the following:
– Never touch the electrical wiring of the
ignition system.
– Ensure that jewellery, loose clothing and
long hair do not get trapped in rotating
engine parts. Danger of death. Before
starting any work remove jewellery, tie
back and cover hair, and wear tight-fit-
ting clothes. » 273
Technical data
Advice
Operation
Emergencies
Safety
Page 282 of 316
Advice
CAUTION
The original additives should never be mixed
with c oo
lants which are not approved by
SEAT. Otherwise, you run the risk of causing
severe damage to the engine and the engine
cooling system.
● If the fluid in the expansion tank is not pur-
ple b
ut is, for example, brown, this indicates
that the G13 additive has been mixed with an
inadequate coolant. The coolant must be
changed as soon as possible if this is the
case! This could result in serious faults and
engine damage. For the sake of the environment
Coolants and additives can contaminate the
env ir
onment. If any fluids are spilled, they
should be collected and correctly disposed
of, with respect to the environment. Brake fluid
Chec k
in
g the brake fluid levelRead the additional information carefully
› ›
›
page 60
The position of the brake fluid reservoir is
shown in the corresponding engine compart-
ment image ›››
page 275. The brake fluid res-
ervoir has a black and yellow cap. The brake fluid level drops slightly when the
vehicl
e is being used as the brake pads are
automatically adjusted as they wear.
However, if the level goes down noticeably in
a short time, or drops below the “MIN” mark,
there may be a leak in the brake system. A
display on the instrument panel will warn you
if the brake fluid level is too low ››› page 121. WARNING
Before opening the bonnet to check the brake
fluid lev el, r
ead and observe the warnings
››› page 273. Changing the brake fluid
The Maintenance Programme indicates brake
fluid c
h
an
ge intervals.
We recommend that you have the brake fluid
changed by a Technical Service.
Before opening the bonnet, please read and
follow the warnings ››› in Safety notes for
w ork
in the en
gine compartment on
page 273 in section “Safety notes for work-
ing in the engine compartment”.
In the course of time, brake fluid becomes
hygroscopic and absorbs water from the am-
bient air. If the water content in the brake flu-
id is too high, the brake system could cor-
rode. This also considerably reduces the boil-
ing point of the brake fluid. Heavy use of the brakes may then cause a vapour lock which
coul
d impair the braking effect.
Be sure to always use the correct brake fluid.
Only use brake fluid that expressly meets the
VW 501 14 standard.
You can buy VW 501 14 standard brake fluid
in a SEAT dealership or a SEAT Official Serv-
ice. If none is available, use only high-quality
brake fluid that meets DIN ISO 4925 CLASS 4
standards, or USA Standards FMVSS 116 DOT
4.
Using any other kind of brake fluid or one
that is not of a high quality may affect opera-
tion of the brake system and reduce its effec-
tiveness. Never use a brake fluid if the con-
tainer does not state that it complies with VW
501 14, DIN ISO 4925 CLASS 4 standards, or
USA standards FMVSS 116 DOT 4. WARNING
Brake fluid is poisonous. Old brake fluid im-
pair s
the braking effect.
● Before opening the bonnet to check the
brake fluid l
evel, read and observe the warn-
ings ››› page 273.
● Brake fluid should be stored in the closed
original
container in a safe place out of reach
of children. There is a toxic risk.
● Perform the brake fluid change according to
the Mainten
ance Programme. Heavy use of
the brakes may cause a vapour lock if the
brake fluid is left in the brake system for too 280
Page 283 of 316
Checking and refilling levels
long. This would seriously affect the effec-
tivene
s
s of the brakes and the safety of the
vehicle. This may cause an accident. CAUTION
Brake fluid damages the vehicle paintwork.
W ipe off an
y brake fluid from the paintwork
immediately. For the sake of the environment
The brake pads and brake fluid must be col-
lect ed and di
sposed of according the applica-
ble regulations. The SEAT Technical Service
network has the necessary equipment and
qualified personnel for collecting and dispos-
ing of this waste material. Windscreen washer reservoir
Chec k
in
g and topping up the wind-
screen washer reservoir water Read the additional information carefully
› ›
›
page 60
The windscreen washer is supplied with liq-
uid from the windscreen washer reservoir in
the engine compartment. It has a capacity of
approximately 3 litres.
The tank is in the engine compartment. Plain water is not enough to clean the wind-
scr
een and headlights. We recommend that
you always add a product to the windscreen
washer fluid. Approved windscreen cleaning
products exist on the market with high deter-
gent and anti-freeze properties, these may be
added all-year-round. Please follow the dilu-
tion instructions on the packaging. WARNING
Any work carried out in the engine compart-
ment or on the en gine mu
st be carried out
cautiously.
● When working in the engine compartment,
alwa
ys observe the safety warnings
››› page 273. CAUTION
● Never p ut
radiator anti-freeze or other addi-
tives into the windscreen washer fluid.
● Always use approved windscreen cleansing
products
diluted as per instructions. If you
use other washer fluids or soap solutions,
the tiny holes in the fan-shaped nozzles
could become blocked. Vehicle battery
S ymbo
l
s and warnings on handling
the battery Read the additional information carefully
›› ›
page 60
Wear eye protection
Battery acid is extremely corrosive. Wear protec-
tive gloves and eye protection!
Fires, sparks, open flames and smoking are pro-
hibited!
A highly explosive mixture of gases is released
when the battery is under charge.
Keep children away from acid and batteries!
WARNING
Always be aware of the danger of injury and
chemic a
l burns as well as the risk of accident
or fire when working on the battery and the
electrical system:
● Wear eye protection. Protect your eyes,
skin and clothin
g from acid and particles con-
taining lead.
● Battery acid is extremely corrosive. Wear
protectiv
e gloves and eye protection. Do not
tilt the batteries. This could spill acid through
the vents.
● Rinse battery acid from eyes immediately
for sever
al minutes with clear water. Then » 281
Technical data
Advice
Operation
Emergencies
Safety