door lock Seat Arona 2018 Owner's Manual
[x] Cancel search | Manufacturer: SEAT, Model Year: 2018, Model line: Arona, Model: Seat Arona 2018Pages: 316, PDF Size: 6.77 MB
Page 17 of 316
The essentials
How it works
Openin g and c
lo
sing
Related video Fig. 1
Opening and clos-
ing Doors
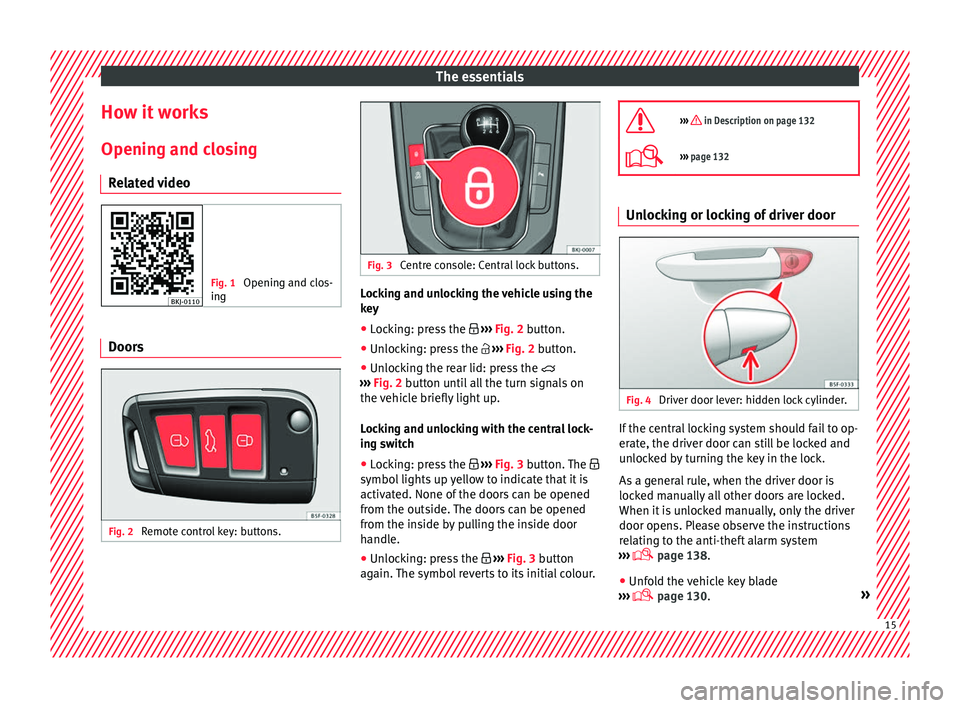
Fig. 2
Remote control key: buttons. Fig. 3
Centre console: Central lock buttons. Locking and unlocking the vehicle using the
k
ey
● Loc
king: press the ›››
Fig. 2 button.
● Unlocking: press the ›››
Fig. 2 button.
● Unlocking the rear lid: press the
›››
Fig. 2 button until all the turn signals on
the vehicle briefly light up.
Locking and unlocking with the central lock-
ing switch
● Locking: press the ›››
Fig. 3 button. The
symbol lights up yellow to indicate that it is
activated. None of the doors can be opened
from the outside. The doors can be opened
from the inside by pulling the inside door
handle.
● Unlocking: press the ›››
Fig. 3 button
again. The symbol reverts to its initial colour.
››› in Description on page 132
›››
page 132 Unlocking or locking of driver door
Fig. 4
Driver door lever: hidden lock cylinder. If the central locking system should fail to op-
er
at
e, the driv
er door can still be locked and
unlocked by turning the key in the lock.
As a general rule, when the driver door is
locked manually all other doors are locked.
When it is unlocked manually, only the driver
door opens. Please observe the instructions
relating to the anti-theft alarm system
››› page 138.
● Unfold the vehicle key blade
›› ›
page 130. » 15
Page 18 of 316
The essentials
● Inser
t
the key shaft into the lower opening
in the cover on the driver door handle
››› Fig. 4 (arrow) then remove the cover up-
wards.
● Insert the key blade into the lock cylinder
to un
lock or lock the vehicle.
Special Characteristics
● The anti-theft alarm will remain active when
vehicl
es are unlocked. However, the alarm
will not be triggered ›››
page 138.
● After the driver door is opened, you have
15 seconds
to switch on the ignition. Once
this time has elapsed, the alarm is triggered.
● Switch the ignition on. The electronic im-
mobi
lizer recognises a valid vehicle key and
deactivates the anti-theft alarm system. Note
The anti-theft alarm is not activated when the
vehic l
e is locked manually using the key
shaft ›››
page 138. Emergency locking of doors without
door cylinder
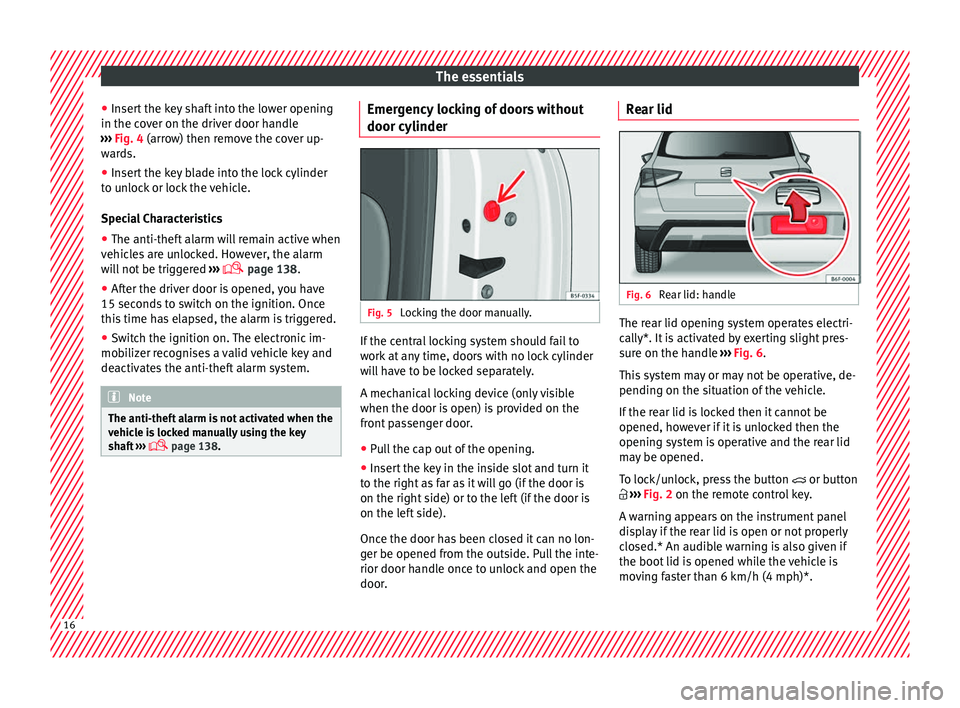
Fig. 5
Locking the door manually. If the central locking system should fail to
w
ork
at
any time, doors with no lock cylinder
will have to be locked separately.
A mechanical locking device (only visible
when the door is open) is provided on the
front passenger door.
● Pull the cap out of the opening.
● Insert the key in the inside slot and turn it
to the right a
s far as it will go (if the door is
on the right side) or to the left (if the door is
on the left side).
Once the door has been closed it can no lon-
ger be opened from the outside. Pull the inte-
rior door handle once to unlock and open the
door. Rear lid
Fig. 6
Rear lid: handle The rear lid opening system operates electri-
c
al
ly*. It
is activated by exerting slight pres-
sure on the handle ››› Fig. 6.
This system may or may not be operative, de-
pending on the situation of the vehicle.
If the rear lid is locked then it cannot be
opened, however if it is unlocked then the
opening system is operative and the rear lid
may be opened.
To lock/unlock, press the button or button
››› Fig. 2 on the remote control key.
A warning appears on the instrument panel
display if the rear lid is open or not properly
closed.* An audible warning is also given if
the boot lid is opened while the vehicle is
moving faster than 6 km/h (4 mph)*. 16
Page 19 of 316
The essentials
● Openin g the r
e
ar lid: exert slight pressure
on the handle ››› Fig. 6. The rear lid opens au-
tomatically.
● Closing the rear lid: hold it by one of the
handle
s on the interior lining and close it by
pushing gently.
››› in Opening and closing on
page 141
››› page 17 Unlocking the rear lid manually
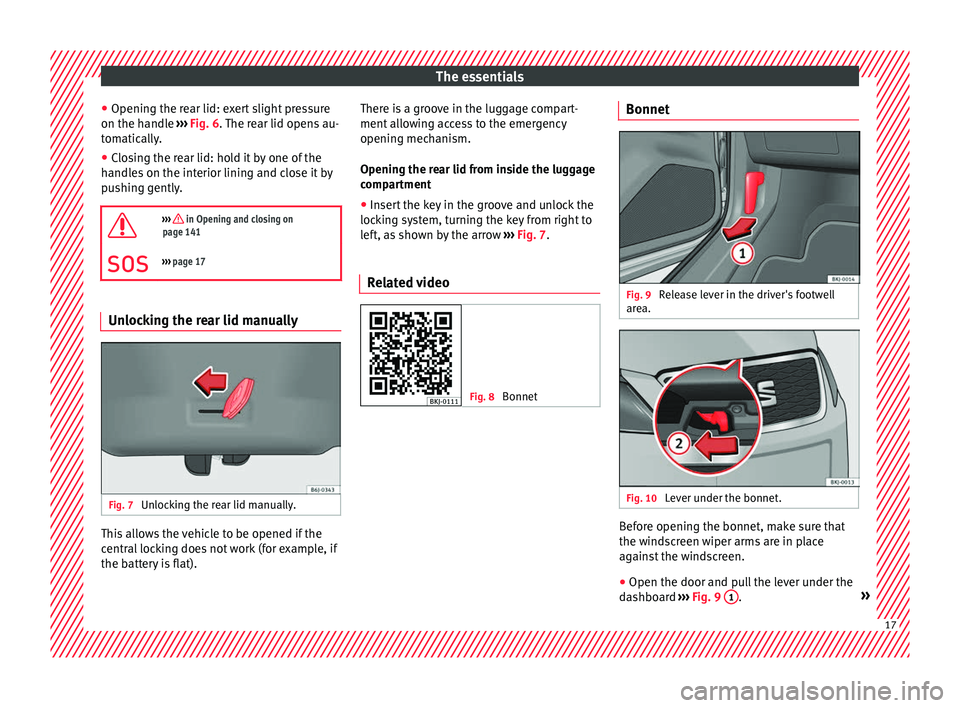
Fig. 7
Unlocking the rear lid manually. This allows the vehicle to be opened if the
c
entr
al
locking does not work (for example, if
the battery is flat). There is a groove in the luggage compart-
ment allo
wing access to the emergency
opening mechanism.
Opening the rear lid from inside the luggage
compartment
● Insert the key in the groove and unlock the
lockin
g system, turning the key from right to
left, as shown by the arrow ››› Fig. 7.
Related video Fig. 8
Bonnet Bonnet
Fig. 9
Release lever in the driver's footwell
ar e
a. Fig. 10
Lever under the bonnet. Before opening the bonnet, make sure that
the w
ind
s
creen wiper arms are in place
against the windscreen.
● Open the door and pull the lever under the
dashbo
ard ››› Fig. 9 1 .
» 17
Page 22 of 316
The essentials
Seat belt tensioners During a collision, the seat belts on the front
seats
ar
e retracted automatically.
The tensioner can be triggered only once.
››› in Maintenance and disposal of belt
tensioners on page 86
››› page 85 Adjusting the exterior mirrors
Fig. 17
Detail of the driver door: control for
the e xt
erior mirr
or. Adjusting the exterior mirrors: Turn the knob
t
o the c
orr
esponding position:
Turning the knob to the desired posi-
tion, adjust the mirrors on the driver
L/R side (L, left) and the passenger side (R,
right) to the direction de
sired.
Folding in mirrors.
››› in Electric exterior mirrors* on
page 151
››› page 151 Adjusting the steering wheel
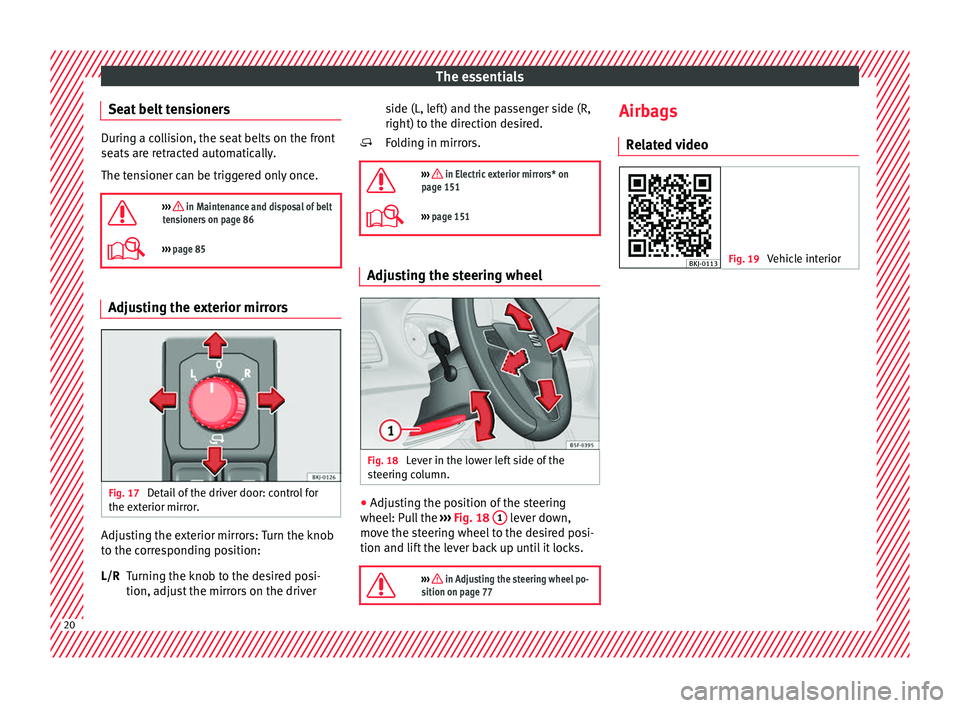
Fig. 18
Lever in the lower left side of the
s t
eerin
g column. ●
Adjusting the position of the steering
wheel: P ul
l the ››› Fig. 18 1 lever down,
mo v
e the s
teering wheel to the desired posi-
tion and lift the lever back up until it locks.
››› in Adjusting the steering wheel po-
sition on page 77
Airbags
R el
at
ed video Fig. 19
Vehicle interior20
Page 35 of 316
The essentials
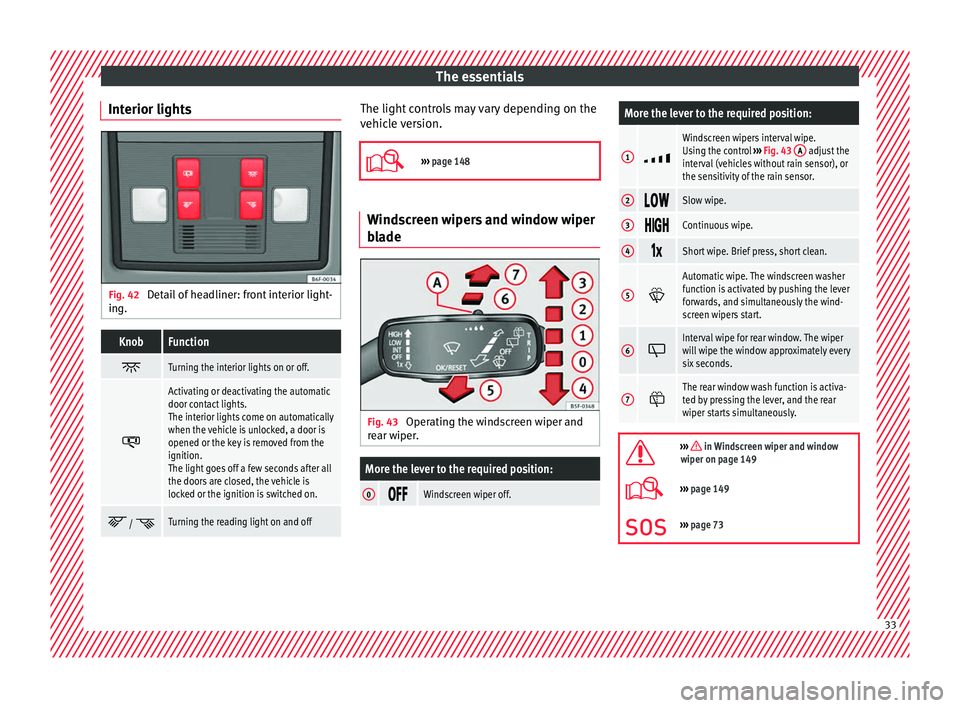
Interior lights Fig. 42
Detail of headliner: front interior light-
in g.KnobFunction
Turning the interior lights on or off.
Activating or deactivating the automatic
door contact lights.
The interior lights come on automatically
when the vehicle is unlocked, a door is
opened or the key is removed from the
ignition.
The light goes off a few seconds after all
the doors are closed, the vehicle is
locked or the ignition is switched on.
/ Turning the reading light on and off The light controls may vary depending on the
v
ehic
l
e version.
››› page 148 Windscreen wipers and window wiper
bla
de Fig. 43
Operating the windscreen wiper and
r e
ar w
iper.
More the lever to the required position:
0 Windscreen wiper off.
More the lever to the required position:
1
Windscreen wipers interval wipe.
Using the control
››› Fig. 43 A adjust the
interval (vehicles without rain sensor), or
the sensitivity of the rain sensor.
2 Slow wipe.
3
Continuous wipe.
4
Short wipe. Brief press, short clean.
5
Automatic wipe. The windscreen washer
function is activated by pushing the lever
forwards, and simultaneously the wind-
screen wipers start.
6
Interval wipe for rear window. The wiper
will wipe the window approximately every
six seconds.
7
The rear window wash function is activa-
ted by pressing the lever, and the rear
wiper starts simultaneously.
››› in Windscreen wiper and window
wiper on page 149
››› page 149
››› page 73 33
Page 37 of 316
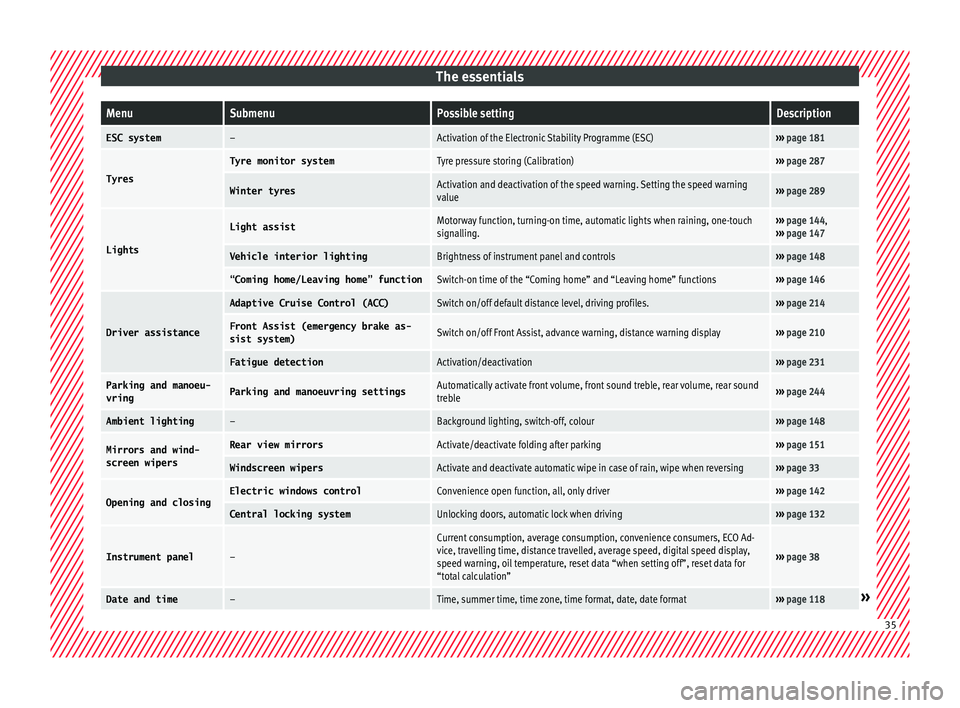
The essentialsMenuSubmenuPossible settingDescription
ESC system–Activation of the Electronic Stability Programme (ESC)›››
page 181
Tyres
Tyre monitor systemTyre pressure storing (Calibration)››› page 287
Winter tyresActivation and deactivation of the speed warning. Setting the speed warning
value››› page 289
Lights
Light assistMotorway function, turning-on time, automatic lights when raining, one-touch
signalling.››› page 144,
››› page 147
Vehicle interior lightingBrightness of instrument panel and controls››› page 148
“Coming home/Leaving home” functionSwitch-on time of the “Coming home” and “Leaving home” functions››› page 146
Driver assistance
Adaptive Cruise Control (ACC)Switch on/off default distance level, driving profiles.››› page 214
Front Assist (emergency brake as-
sist system)Switch on/off Front Assist, advance warning, distance warning display››› page 210
Fatigue detectionActivation/deactivation››› page 231
Parking and manoeu-
vringParking and manoeuvring settingsAutomatically activate front volume, front sound treble, rear volume, rear sound
treble››› page 244
Ambient lighting–Background lighting, switch-off, colour››› page 148
Mirrors and wind-
screen wipersRear view mirrorsActivate/deactivate folding after parking››› page 151
Windscreen wipersActivate and deactivate automatic wipe in case of rain, wipe when reversing››› page 33
Opening and closingElectric windows controlConvenience open function, all, only driver››› page 142
Central locking systemUnlocking doors, automatic lock when driving››› page 132
Instrument panel–
Current consumption, average consumption, convenience consumers, ECO Ad-
vice, travelling time, distance travelled, average speed, digital speed display,
speed warning, oil temperature, reset data “when setting off”, reset data for
“total calculation”
››› page 38
Date and time–Time, summer time, time zone, time format, date, date format››› page 118» 35
Page 50 of 316
The essentials
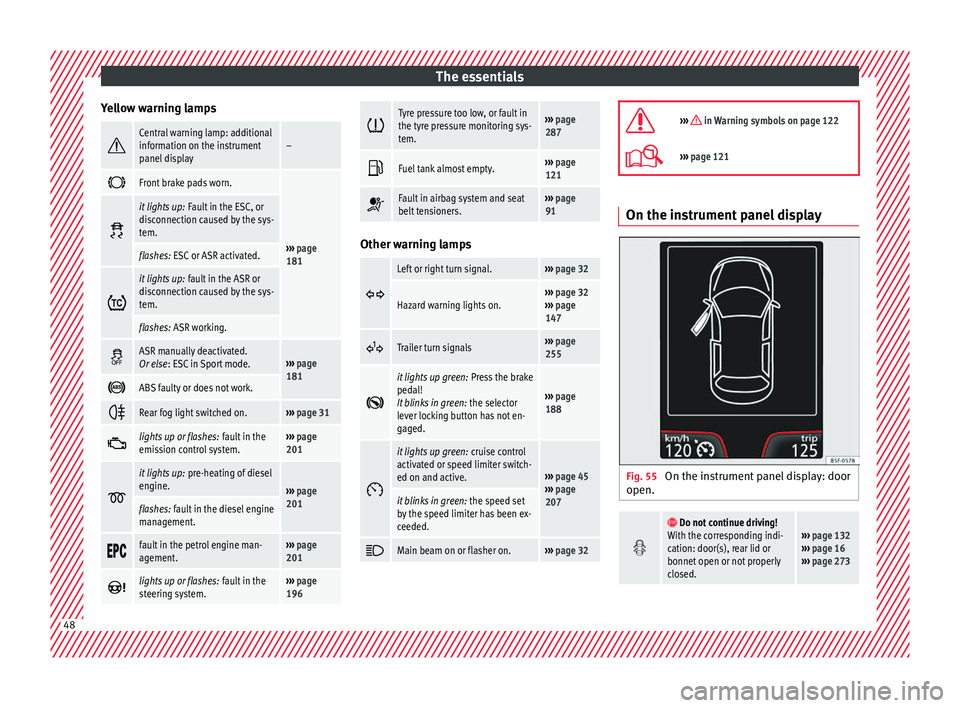
Yellow warning lamps Central warning lamp: additional
information on the instrument
panel display–
Front brake pads worn.
›››
page
181
it lights up:
Fault in the ESC, or
disconnection caused by the sys-
tem.
flashes: ESC or ASR activated.
it lights up:
fault in the ASR or
disconnection caused by the sys-
tem.
flashes: ASR working.
ASR manually deactivated.
Or else
: ESC in Sport mode.››› page
181
ABS faulty or does not work.
Rear fog light switched on.›››
page 31
lights up or flashes:
fault in the
emission control system.››› page
201
it lights up:
pre-heating of diesel
engine.
››› page
201
flashes: fault in the diesel engine
management.
fault in the petrol engine man-
agement.›››
page
201
lights up or flashes:
fault in the
steering system.››› page
196
Tyre pressure too low, or fault in
the tyre pressure monitoring sys-
tem.›››
page
287
Fuel tank almost empty.›››
page
121
Fault in airbag system and seat
belt tensioners.›››
page
91 Other warning lamps
Left or right turn signal.›››
page 32
Hazard warning lights on.››› page 32
››› page
147
Trailer turn signals›››
page
255
it lights up green:
Press the brake
pedal!
It blinks in green: the selector
lever locking button has not en-
gaged.
››› page
188
it lights up green:
cruise control
activated or speed limiter switch-
ed on and active.
››› page 45
››› page
207
it blinks in green: the speed set
by the speed limiter has been ex-
ceeded.
Main beam on or flasher on.›››
page 32
››› in Warning symbols on page 122
›››
page 121 On the instrument panel display
Fig. 55
On the instrument panel display: door
open.
Do not continue driving!
With the corresponding indi-
cation: door(s), rear lid or
bonnet open or not properly
closed.››› page 132
››› page 16
››› page 273 48
Page 90 of 316
Safety
such as the properties of the object the vehi-
c l
e hits
(hard/soft), angle of impact, vehicle
speed, etc.
Deceleration trajectory is key for airbag acti-
vation.
The control unit analyses the collision trajec-
tory and activates the respective restraint
system.
If the deceleration rate is below the prede-
fined reference value in the control unit the
airbags will not be triggered, even though
the accident may cause extensive damage to
the car.
The following airbags are triggered in seri-
ous head-on collisions:
● Driver airbag.
● Front passenger front airbag
The fol
lowing airbags are triggered in seri-
ous side-on collisions:
● Front side airbag on the side of the acci-
dent.
● Cur
tain (head) airbag on the side of the ac-
cident.
In an ac
cident with airbag activation:
● the interior lights switch on (if the interior
light swit
ch is in the courtesy light position);
● the hazard warning lights switch on; ●
all door
s are unlocked;
● the fuel supply to the engine is cut.
Safety instructions about air-
bags Fr
ont airbags Read the additional information carefully
›› ›
page 21. WARNING
● The seat belt
s and airbags can only provide
maximum protection if the occupants are
seated correctly ››› page 76, Correct position
of the vehicle occupants .
● The deployment space between the front
pas
sengers and the airbags must not in any
case be occupied by other passenger, pets
and objects.
● The airbags provide protection for just one
accident; r
eplace them once they have de-
ployed.
● It is also important not to attach any ob-
jects
such as cup holders or telephone
mountings to the surfaces covering the air-
bag units.
● Do not attempt to modify components of
the airbag sys
tem in any way. Side airbags*
Read the additional information carefully
›› ›
page 22. WARNING
● If y
ou do not wear a seat belt, if you lean
forward, or are not seated correctly while the
vehicle is in motion, you are at a greater risk
of injury if the side airbag system is triggered
in an accident.
● In order for the side airbags to provide their
maximum pr
otection, the prescribed sitting
position must always be maintained with
seat belts fastened while travelling.
● Occupants of the outer seats must never
carry
any objects or pets in the deployment
space between them and the airbags, or al-
low children or other passengers to travel in
this position. It is also important not to at-
tach any accessories (such as cup holders) to
the doors. This would impair the protection
offered by the side airbags.
● The built-in coat hooks should be used only
for lightweight
clothing. Do not leave any
heavy or sharp-edged objects in the pockets.
● Great forces, such as hard blows or kicks,
must
not be exerted upon the backrest bol-
ster because the system may be damaged. In
this case, the side airbags would not be trig-
gered.
● Under no circumstances should protective
cov
ers be fitted over seats with side airbags
unless the covers have been approved for use 88
Page 95 of 316
Transporting children safely
●
Never in s
tall a child seat facing backwards
on the front passenger seat unless the front
passenger front airbag has been disabled.
Risk of potentially fatal injuries to the child!
However, if it is necessary, in exceptional ca-
ses, to transport a child in the front passen-
ger seat, the front passenger front airbag
must always be disabled ››› page 90, Activa-
tion and deactivation of front passenger air-
bag*. If the passenger seat has a height ad-
justment option, move it to the highest, most
upright position. If it is a fixed seat, it should
be moved to the rearmost position possible.
● For those vehicles that do not include a key
lock sw
itch to deactivate the airbag, the vehi-
cle must be taken to a technical service. Do
not forget to reconnect the airbag when an
adult wants to sit in the front passenger seat.
● All vehicle occupants, especially children,
must
assume the proper sitting position and
be properly belted in while travelling.
● Never hold children or babies on your lap,
this c
an result in potentially fatal injuries to
the child!
● Never allow a child to be transported in a
vehicl
e without being properly secured, or to
stand up or kneel on a seat while travelling.
In an accident, the child could be flung
through the vehicle, causing possibly fatal in-
juries to themselves and to the other vehicle
occupants.
● If children assume an improper sitting posi-
tion when the vehic
le is moving, they expose
themselves to greater risk of injury in the
event of a sudden braking manoeuvre or in an accident. This is particularly important if the
chi
l
d is travelling on the front passenger seat
and the airbag system is triggered in an acci-
dent; as this could cause serious injury or
even death.
● A suitable child seat can protect your child!
● Never leave a child alone in the child seat
or inside the
vehicle because depending on
the season, very high temperatures may be
reached inside a parked vehicle, which could
be fatal.
● Children who are less than 1.5 metres tall
must
not wear a normal seat belt without a
child seat, as this could cause injuries to the
abdominal and neck areas during a sudden
braking manoeuvre or in an accident.
● Do not allow the seat belt to become twis-
ted and the seat
belt should be properly in
place ››› page 81.
● Only one child may occupy a child seat
›››
page 93, Child seats.
● When a child seat is mounted in the rear
seats, the door c
hild-proof lock should be ac-
tivated ››› page 138. Child seats
Saf ety
in
structions Read the additional information carefully
› ›
›
page 23. WARNING
When travelling, children must be secured in
the v ehic
le with a restraint system suitable
for age, weight and size.
● Read and always observe information and
warning
s concerning the use of child seats
››› page 92. WARNING
The retaining rings are designed only for use
with “ISOFIX” and T op
Tether* system child
seats.
● Never secure other child seats that do not
have the “ISOFIX” or T
op Tether* system, or
retaining belts or objects to the fastening
rings - this can result in potentially fatal inju-
ries to the child.
● Ensure that the child seat is secured cor-
rectly u
sing the “ISOFIX” and Top Tether* se-
curing rings. WARNING
An undue installation of the safety seat will
incr e
ase the risk of injury in the event of a
crash.
● Never tie the retainer strap to a hook in the
luggag
e compartment.
● Never secure or tie luggage or other items
to the low
er anchorages (ISOFIX) or the upper
ones (Top Tether). 93
Technical data
Advice
Operation
Emergencies
Safety
Page 107 of 316
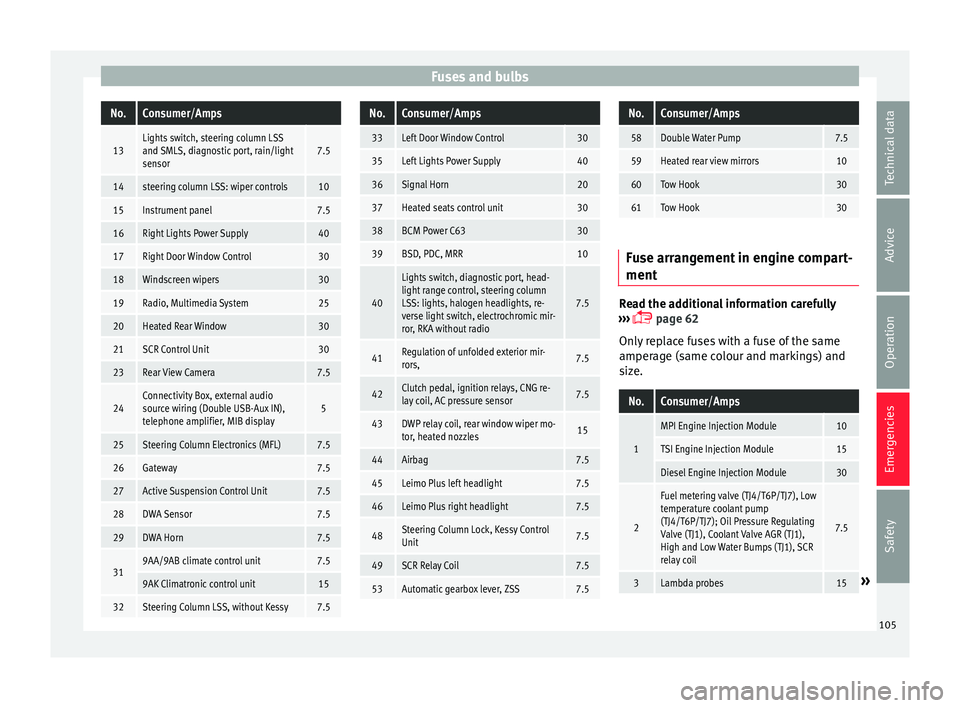
Fuses and bulbsNo.Consumer/Amps
13Lights switch, steering column LSS
and SMLS, diagnostic port, rain/light
sensor7.5
14steering column LSS: wiper controls10
15Instrument panel7.5
16Right Lights Power Supply40
17Right Door Window Control30
18Windscreen wipers30
19Radio, Multimedia System25
20Heated Rear Window30
21SCR Control Unit30
23Rear View Camera7.5
24Connectivity Box, external audio
source wiring (Double USB-Aux IN),
telephone amplifier, MIB display5
25Steering Column Electronics (MFL)7.5
26Gateway7.5
27Active Suspension Control Unit7.5
28DWA Sensor7.5
29DWA Horn7.5
319AA/9AB climate control unit7.5
9AK Climatronic control unit15
32Steering Column LSS, without Kessy7.5
No.Consumer/Amps
33Left Door Window Control30
35Left Lights Power Supply40
36Signal Horn20
37Heated seats control unit30
38BCM Power C6330
39BSD, PDC, MRR10
40
Lights switch, diagnostic port, head-
light range control, steering column
LSS: lights, halogen headlights, re-
verse light switch, electrochromic mir-
ror, RKA without radio
7.5
41Regulation of unfolded exterior mir-
rors,7.5
42Clutch pedal, ignition relays, CNG re-
lay coil, AC pressure sensor7.5
43DWP relay coil, rear window wiper mo-
tor, heated nozzles15
44Airbag7.5
45Leimo Plus left headlight7.5
46Leimo Plus right headlight7.5
48Steering Column Lock, Kessy Control
Unit7.5
49SCR Relay Coil7.5
53Automatic gearbox lever, ZSS7.5
No.Consumer/Amps
58Double Water Pump7.5
59Heated rear view mirrors10
60Tow Hook30
61Tow Hook30
Fuse arrangement in engine compart-
ment
Read the additional information carefully
› ›
›
page 62
Only replace fuses with a fuse of the same
amperage (same colour and markings) and
size.
No.Consumer/Amps
1
MPI Engine Injection Module10
TSI Engine Injection Module15
Diesel Engine Injection Module30
2
Fuel metering valve (TJ4/T6P/TJ7), Low
temperature coolant pump
(TJ4/T6P/TJ7); Oil Pressure Regulating
Valve (TJ1), Coolant Valve AGR (TJ1),
High and Low Water Bumps (TJ1), SCR
relay coil
7.5
3Lambda probes15» 105
Technical data
Advice
Operation
Emergencies
Safety