ESP Seat Ateca 2016 Workshop Manual
[x] Cancel search | Manufacturer: SEAT, Model Year: 2016, Model line: Ateca, Model: Seat Ateca 2016Pages: 328, PDF Size: 6.32 MB
Page 160 of 328
OperationFunc-
tion
buttonFunction
OFFSwitch off and switch on the Climatronic.
SETUP
The air conditioning settings submenu is
opened. It is possible to make the following
adjustments:
Function button Air conditioning profile.
: to ad-
just the level of the fan in AUTO mode. You
can choose between low, medium and
high.
Function button Automatic air recirculation
to
switch on and off automatic air recircula-
tion ››› page 160.
BACK
function button to close the sub-
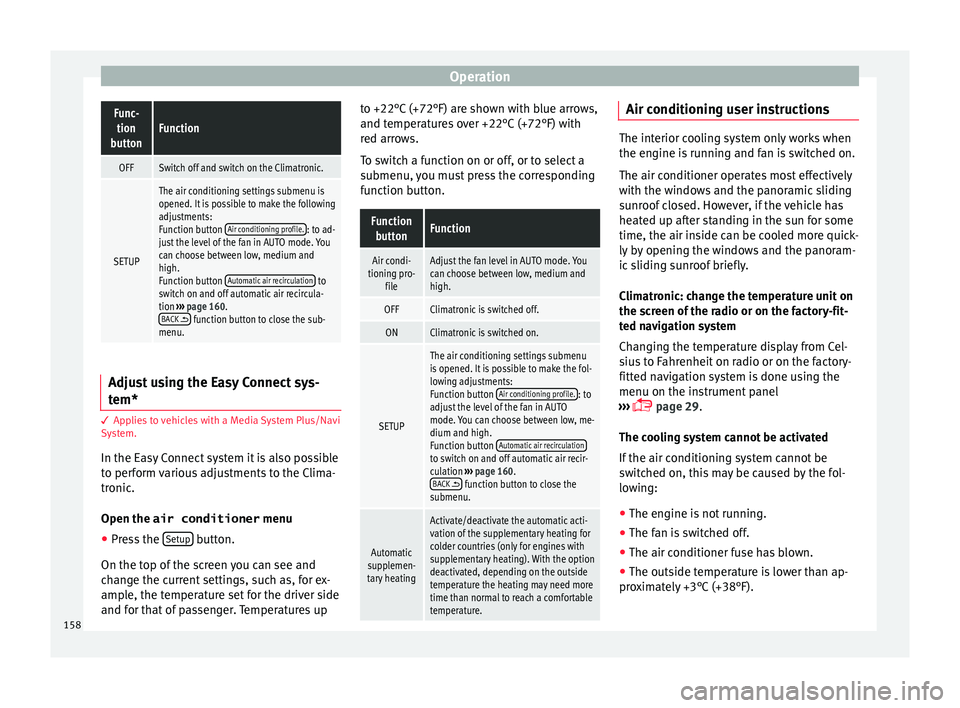
menu. Adjust using the Easy Connect sys-
t
em* 3 Ap
p
lies to vehicles with a Media System Plus/Navi
System.
In the Easy Connect system it is also possible
to perform various adjustments to the Clima-
tronic.
Open the air conditioner menu
● Press the Set
up button.
On the t op of
the screen you can see and
change the current settings, such as, for ex-
ample, the temperature set for the driver side
and for that of passenger. Temperatures up to +22°C (+72°F) are shown with blue arrows,
and temper
atures over +22°C (+72°F) with
red arrows.
To switch a function on or off, or to select a
submenu, you must press the corresponding
function button.
Function buttonFunction
Air condi-
tioning pro- fileAdjust the fan level in AUTO mode. You
can choose between low, medium and
high.
OFFClimatronic is switched off.
ONClimatronic is switched on.
SETUP
The air conditioning settings submenu
is opened. It is possible to make the fol-
lowing adjustments:
Function button Air conditioning profile.
: to
adjust the level of the fan in AUTO
mode. You can choose between low, me-
dium and high.
Function button Automatic air recirculation
to switch on and off automatic air recir-
culation
››› page 160.
BACK
function button to close the
submenu.
Automatic
supplemen-
tary heating
Activate/deactivate the automatic acti-
vation of the supplementary heating for
colder countries (only for engines with
supplementary heating). With the option
deactivated, depending on the outside
temperature the heating may need more
time than normal to reach a comfortable
temperature. Air conditioning user instructions
The interior cooling system only works when
the en
gine i
s running and fan is switched on.
The air conditioner operates most effectively
with the windows and the panoramic sliding
sunroof closed. However, if the vehicle has
heated up after standing in the sun for some
time, the air inside can be cooled more quick-
ly by opening the windows and the panoram-
ic sliding sunroof briefly.
Climatronic: change the temperature unit on
the screen of the radio or on the factory-fit-
ted navigation system
Changing the temperature display from Cel-
sius to Fahrenheit on radio or on the factory-
fitted navigation system is done using the
menu on the instrument panel
››› page 29.
The cooling system cannot be activated
If the air conditioning system cannot be
switched on, this may be caused by the fol-
lowing: ● The engine is not running.
● The fan is switched off.
● The air conditioner fuse has blown.
● The outside temperature is lower than ap-
pr o
ximately +3°C (+38°F).
158
Page 161 of 328
Air conditioning
● The air c onditioner c
ompressor has been
temporarily switched off because the engine
coolant temperature is too high.
● Another fault in the vehicle. Have the air
conditioner c
hecked by a specialised work-
shop. Special Characteristics
If the humidity
and temperature outside the
vehicle are high, condensation can drip off
the evaporator in the cooling system and
form a pool underneath the vehicle. This is
normal and does not indicate a leak! Note
After starting the engine, any residual humid-
ity in the air c
onditioner could mist over the
windscreen. Switch on the defrost function as
soon as possible to clear the windscreen of
condensation. Air outlets
Fig. 161
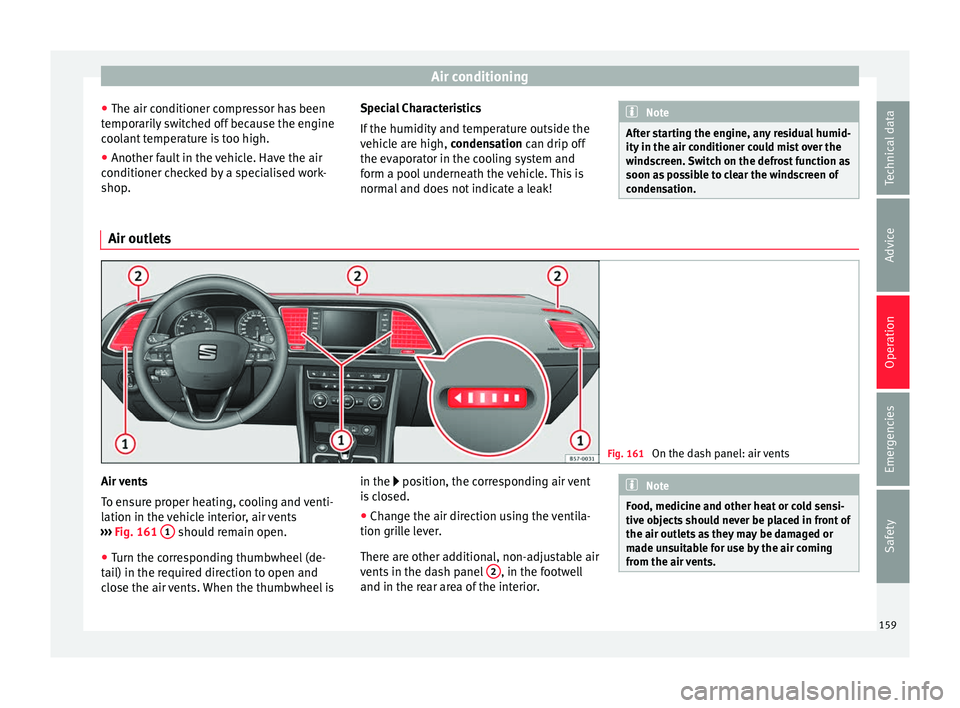
On the dash panel: air vents Air vents
T
o en
sure proper heating, cooling and venti-
lation in the vehicle interior, air vents
››› Fig. 161 1 should remain open.
● Turn the corresponding thumbwheel (de-
t ai
l) in the required direction to open and
close the air vents. When the thumbwheel is in the position, the corresponding air vent
i
s closed.
● Change the air direction using the ventila-
tion gril
le lever.
There are other additional, non-adjustable air
vents in the dash panel 2 , in the footwell
and in the r e
ar area of the interior. Note
Food, medicine and other heat or cold sensi-
tiv e o
bjects should never be placed in front of
the air outlets as they may be damaged or
made unsuitable for use by the air coming
from the air vents. 159
Technical data
Advice
Operation
Emergencies
Safety
Page 164 of 328
OperationSwitching the auxiliary heater off:
Automatically once the programmed departure
time has arrived or after the programmed oper-
ating time has elapsed
››› page 163.
Automatically when the control lamp (fuel
level indicator) ››› page 276 lights up.
Automatically when the 12-volt battery charge
is too low ››› page 289. Special feature
Onc
e sw
itched off, the auxiliary heater will
continue to operate for a short period of time
in order to burn the fuel remaining in the sys-
tem and also to expel the exhaust fumes.
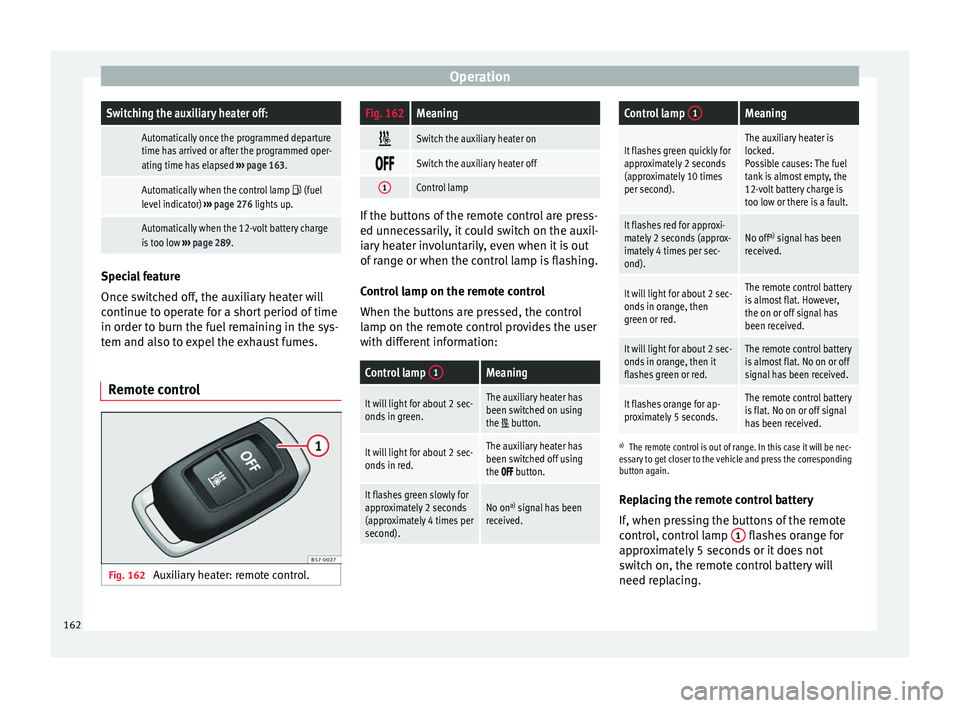
Remote control Fig. 162
Auxiliary heater: remote control.
Fig. 162Meaning
Switch the auxiliary heater on
Switch the auxiliary heater off
1Control lamp
If the buttons of the remote control are press-
ed u
nnec
essarily, it could switch on the auxil-
iary heater involuntarily, even when it is out
of range or when the control lamp is flashing.
Control lamp on the remote control
When the buttons are pressed, the control
lamp on the remote control provides the user
with different information:
Control lamp 1Meaning
It will light for about 2 sec-
onds in green.The auxiliary heater has
been switched on using
the
button.
It will light for about 2 sec-
onds in red.The auxiliary heater has
been switched off using
the
button.
It flashes green slowly for
approximately 2 seconds
(approximately 4 times per
second).No on a)
signal has been
received.
Control lamp 1Meaning
It flashes green quickly for
approximately 2 seconds
(approximately 10 times
per second).The auxiliary heater is
locked.
Possible causes: The fuel
tank is almost empty, the
12-volt battery charge is
too low or there is a fault.
It flashes red for approxi-
mately 2 seconds (approx-
imately 4 times per sec-
ond).No off a)
signal has been
received.
It will light for about 2 sec-
onds in orange, then
green or red.The remote control battery
is almost flat. However,
the on or off signal has
been received.
It will light for about 2 sec-
onds in orange, then it
flashes green or red.The remote control battery
is almost flat. No on or off
signal has been received.
It flashes orange for ap-
proximately 5 seconds.The remote control battery
is flat. No on or off signal
has been received.
a) The remote control is out of range. In this case it will be nec-
essary to get closer to the vehicle and press the corresponding
button again.
Replacing the remote control battery
If, when pressing the buttons of the remote
control, control lamp 1 flashes orange for
ap pr
oximately 5 seconds or it does not
switch on, the remote control battery will
need replacing.
162
Page 165 of 328
Air conditioning
The battery is located beneath a cover on the
b ac
k of the remote control.
● To open the cover, lift it slightly at the bot-
tom and s
lide it down.
● Remove the old battery.
● Insert the new battery. When doing so, take
into ac
count the polarity and use batteries of
the same type ››› .
● Replace the battery cover by inserting the
t ab
s at the top and pressing the bottom.
Range
The receiver is inside the vehicle. The remote
control, when fitted with new batteries, has a
range of several hundred metres. Obstacles
between the remote control and the vehicle,
bad weather conditions and discharged bat-
teries can considerably reduce the range of
the remote control. CAUTION
● The r a
dio frequency remote control con-
tains electronic components. Therefore, avoid
getting it wet and exposing it to knocks or di-
rect sunlight.
● The use of inappropriate batteries may
dam
age the radio frequency remote control.
For this reason, always replace the used bat-
tery with another of the same voltage, size
and specifications. For the sake of the environment
● Ple
ase dispose of your used batteries cor-
rectly and with respect for the environment.
● The remote control battery may contain
perc
hlorate. Observe the legal provisions re-
garding disposal.
● Care should be taken so as not to operate
the remot
e control unintentionally so as to
prevent the auxiliary heater being switched
on accidentally. Programming the auxiliary heater
Before pr
ogramming it, check that the vehi-
c
le's date and time are set correctly ››› .
The aux i
liary heater is programmed in the
Auxiliary heater menu of the infotain-
ment system.
Open the Auxiliary heater menu.
● Press the button in the C
limatronic
control panel.
● Press the fu
nction button.
Function button: function
Switch off: The auxiliary heater is immediately switched
off.
Function button: function
Heat, Ventilate: Set to heat or ventilate the vehicle interi-
or when the auxiliary heater is switched on. By pressing
the function button
, you can select the desired
mode.
Set: Opens the Auxiliary heater menu.
Departure time 1, Departure time 2, Departure time 3:
Three different departure times (hh.mm) may be
programmed. If the auxiliary heater should only
be switched on a certain day of the week, this can
also be selected.
Duration: The duration determines the operating
time of the auxiliary heater when switched on us-
ing the fast heating button
on the air condi-
tioning controls. The duration is also used to cal-
culate the departure time for the manual air con-
ditioner. It can be set between 10 and 60 mi-
nutes at 10-minute intervals.
This returns to the main menu.
The programmed departure time determines
the ap
pr
oximate time it should take to reach
the temperature set in the vehicle. The start
of the heating operation is determined auto-
matically depending on the outside tempera-
ture.
Checking the programming
When a departure time is activated and the
ignition is switched off the control lamp of
the fast heating button lights up for approx-
imately 10 seconds. »
163
Technical data
Advice
Operation
Emergencies
Safety
Page 174 of 328
Operation
Information on the brakes New brake pads
F
or the fir
st 400 km (250 miles), new brake
pads have not yet reached their maximum
braking capacity, and need to be “run in”
first. However, you can compensate for the
slightly reduced braking effect by applying
more pressure on the brake pedal. Avoid
overloading the brakes while running them
in.
Wear
The rate of wear on the brake pads depends
a great deal on how you drive and the condi-
tions in which the vehicle is operated. This is
a particular problem in urban traffic and
short stretches, or with very sporty driving.
Depending on the speed, the braking force
and the environmental conditions (for exam-
ple, the temperature, air humidity, etc.)
noises may be produced on braking.
Wet roads or road salt
In certain situations (for example, on driving
through flooded areas, in severe downpours
or after washing the vehicle) the braking ac-
tion could be delayed if the discs and pads
are damp, or frozen in winter. In this case the
brakes should be “dried” by pressing the
brake pedal several times. At high speed and with the windscreen wip-
er
s
activated, the brake pads will briefly
touch the brake discs. This takes place, al-
though unnoticeable to the driver, at regular
intervals to improve the response time of the
brakes when they are wet.
The effectiveness of the brakes can also be
temporarily reduced if the vehicle is driven
for some distance without using the brakes
when there is a lot of salt on the road in win-
ter. The layer of salt that accumulates on the
discs and pads can be removed by gently ap-
plying the brakes a few times.
Corrosion
There may be a tendency for corrosion to
form on the discs and dirt to build up on the
brake pads if the vehicle is used infrequently
or the brakes are not used very often.
If the brakes are not used frequently, or if
rust has formed on the disks, it is advisable
to clean off the pads and disks by braking
firmly a few times at a moderately high speed
››› .
F au
lt in the brake system
If the brake pedal travel should ever increase
suddenly, this may mean that one of the two
brake circuits has failed. Drive immediately
to the nearest specialised workshop and
have the fault repaired. Drive there slowly
and remember that you will have to apply more pressure on the brake pedal and allow
for lon
ger stopping distances.
Low brake fluid level
Malfunctions can occur in the brake system if
the brake fluid level is too low. The brake flu-
id level is monitored electronically.
Brake servo
The brake servo increases the pressure you
apply to the brake pedal. It works only when
the engine is running. WARNING
● Ap p
ly the brakes heavily to clean the brake
system only in a suitable traffic situation. Do
not put other road users in danger: there is
risk of causing an accident.
● Ensure the vehicle does not move while in
neutra
l, when the engine is stopped. Failure
to follow this instruction could result in an
accident.
● If the brake fluid loses its viscosity and is
sub
jected to heavy use, vapour bubbles can
form in the brake system. This reduces the ef-
ficiency of the brakes. CAUTION
● Nev er l
et the brakes “drag” by leaving your
foot on the pedal when it is not necessary to
brake. This overheats the brakes, resulting in
longer stopping distances and greater wear. 172
Page 176 of 328
Operation
situations the torque delivered to the inner
wheel i
s too high, causing the wheels to
spin. On the other hand, the outer wheel is
receiving a lower drive torque than it could
transmit. This causes an overall loss of lateral
grip on the front axle, resulting in understeer
or “lengthening” of the trajectory.
The XDS system can detect and correct this
effect via the sensors and signals of the ESC.
Via the ESC, the XDS will brake the inside
wheel and counter the excess driving torque
of that wheel. This means that the driver's
desired trajectory is much more precise.
The XDS system works in combination with
the ESC and is always active, even when ASR
traction control is disconnected, or the ESC in
Sport mode or disconnected.
Multi-collision brake
In an accident, the multi-collision brake can
help the driver by braking to avoid the risk of
skidding during the accident, which could
lead to further collisions.
The multi-collision brake works for front, side
or rear accidents, when the airbag control
unit records its activation level and the acci-
dent takes place at a speed of over 10 km/h
(6 mph). The ESC automatically brakes the
vehicle, as long as the accident has not dam-
aged the ESC, the brake hydraulics or the on-
board network The following actions control automatic brak-
ing durin
g the accident:
● When the driver presses the accelerator,
the autom
atic braking does not take place.
● When the braking pressure through press-
ing the br
ake pedal is greater than the sys-
tem’s braking pressure the vehicle will brake
automatically.
● Multi-collision braking will not be available
if E
SC is malfunctioning. WARNING
● The E SC, ABS, ASR, ED
S and the electronic
torque control system cannot exceed the lim-
its imposed by the laws of physics. Always
bear this in mind, especially on wet or slip-
pery roads. If you notice the systems cutting
in, you should reduce your speed immediate-
ly to suit the road and traffic conditions. Do
not be encouraged to take risks by the pres-
ence of more safety systems. If you do, an ac-
cident may occur.
● Please remember that the accident risk al-
wa
ys increases if you drive fast, especially in
corners or on a slippery road, or if you follow
too close behind the vehicle in front of you.
The ESC, ABS, brake assist, EDS and the elec-
tronic torque control system cannot prevent
accidents: risk of accidents!
● Accelerate with caution on slippery surfa-
ce
s (for example, icy or snow-covered). De-
spite the control systems, the driven wheels could spin, affecting the stability of the vehi-
c
l
e: risk of accident! Note
● The ABS and ASR w
ill only operate correctly
if the four wheels have identical tyres. Any
differences in the rolling radius of the tyres
can cause the system to reduce engine power
when this is not desired.
● The regulating processes of the systems
can m
ake noises when they intervene.
● If the warning lamp lights
up, or alter-
natively, there could be a fault ››› page 106. Switching on/off the ESC and ASR
The ESC is switched on automatically when
the en
gine i
s started, and only works when
the engine is running and includes the ABS,
EDS and ASR systems.
The ASR function should only be switched off
in situations in which traction is insufficient,
including:
● When driving in deep snow or on surfaces
that
are not very firm.
● To “free” the vehicle if it gets stuck.
Then swit
ch the ASR function back on.
174
Page 181 of 328
Driving
Note
● If the sel
ector lever lock does not engage,
there is a fault. The transmission is interrup-
ted to prevent the vehicle from accidentally
moving. Follow the procedure below in order
for the selector lever lock to engage again:
–With a 6-speed gearbox: press the brake
pedal and release it again.
– With a 7-speed gearbox: press the brake
pedal. Move the selector lever to posi-
tion P or N and subsequently engage a
gear.
● Despite a gear being engaged, the vehicle
does
not move forwards or back. Proceed to
the next mode:
– When the vehicle does not move in the
required direction, the system may not
have the gear range correctly engaged.
Press the brake pedal and engage the
gear range again.
– If the vehicle still does not move in the
required direction, there is a system mal-
function. Seek specialist assistance and
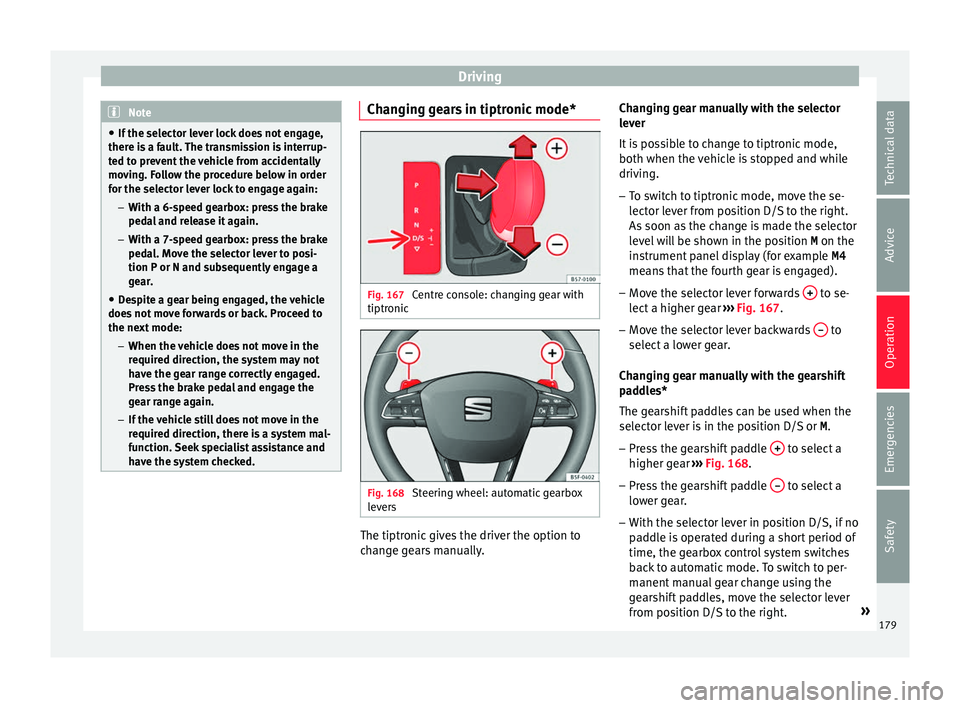
have the system checked. Changing gears in tiptronic mode*
Fig. 167
Centre console: changing gear with
tiptr onic Fig. 168
Steering wheel: automatic gearbox
l ev
ers The tiptronic gives the driver the option to
c
h
ange gears manually. Changing gear manually with the selector
lev
er
It is possible to change to tiptronic mode,
both when the vehicle is stopped and while
driving.
– To switch to tiptronic mode, move the se-
lect
or lever from position D/S to the right.
As soon as the change is made the selector
level will be shown in the position M on the
instrument panel display (for example M4
means that the fourth gear is engaged).
– Move the selector lever forwards + to se-
l ect
a higher gear ››› Fig. 167.
– Move the selector lever backwards – to
sel ect
a lower gear.
Changing gear manually with the gearshift
paddles*
The gearshift paddles can be used when the
selector lever is in the position D/S or M.
– Press the gearshift paddle + to select a
higher g e
ar ››› Fig. 168.
– Press the gearshift paddle – to select a
lo w
er gear.
– With the selector lever in position D/S, if no
pa
ddle is operated during a short period of
time, the gearbox control system switches
back to automatic mode. To switch to per-
manent manual gear change using the
gearshift paddles, move the selector lever
from position D/S to the right. »
179
Technical data
Advice
Operation
Emergencies
Safety
Page 183 of 328
Driving
damage the automatic gearbox. Apply the
h
andbr
ake firmly or press the brake pedal in
order to prevent the vehicle from rolling back.
● If you allow the car to roll with the selector
lev
er in position N with the engine switched
off, the automatic gearbox will be damaged
as it will not be lubricated.
● In certain driving situations or traffic condi-
tions, s
uch as frequently starting, prolonged
“creeping” of the vehicle or traffic jams with
continuous stoppages, the gearbox could
overheat causing damage! If the warning
lamp lights up, stop the vehicle as soon as
possible and wait for the gearbox to cool
››› page 183. Kick-down feature
The kick-down feature allows maximum ac-
c
el
eration to be reached.
When the accelerator pedal is pressed right
down past the point of resistance at full throt-
tle, the gearbox will shift down to a lower
gear, depending on road speed and engine
speed. The upshift to the next higher gear is
delayed until the engine reaches maximum
rpm. WARNING
Please note that if the road surface is slip-
per y
or wet, the kick-down feature could
cause the driving wheels to spin, which could
result in skidding. Launch control programme
3
Valid for vehicles: with Launch-Control/6-Speed
D
SG with diesel engines superior to 125 kW and pet-
rol engines superior to 140 kW.
The Launch control programme enables maxi-
mum acceleration.
Important: the engine must have reached op-
erating temperature and the steering wheel
must not be turned.
The engine speed for launch-control is differ-
ent on petrol and diesel engines. To use the
launch-control you must disconnect the anti-
slip regulation (ASR) through the Easy Con-
nect system menu ›››
page 108. The warning
lamp will stay switched on or will flash
slowly depending on whether or not the vehi-
cle has a driver information system*.
On vehicles with the driver information sys-
tem, the ESC lamp lights up permanently and
the corresponding text message Stabilitycontrol deactivated
(tempor
ary) ap-
pears on the instrument panel to indicate the
deactivation status.
– When the engine is running, switch off the
traction c
ontrol (ASR) 1)
.
– Turn the selector lever to the position “S”
or tiptronic, or el
se select the sport driv-
ing mode from the SEAT Drive Profile*
››› page 225.
– Press the brake pedal firmly with your left
foot
and hold it down for at least one sec-
ond.
– With your right foot, press the accelerator
down t
o the full throttle or kick-down posi-
tion. The engine speed will stabilise at
about 3,200 rpm (petrol engine) or about
2,000 rpm (diesel engine).
– Take your left foot off the brake pedal. WARNING
● Alw
ays adapt your driving style to the traf-
fic conditions.
● Only use the launch control programme
when ro
ad and traffic conditions permit, and
make sure your manner of driving and accel-
erating the vehicle does not inconvenience or
endanger other road users. »1)
Vehicles without driver information system: the
w arnin
g lamp flashes slowly/Vehicles with driver in-
formation system: the warning lamp stays on. 181
Technical data
Advice
Operation
Emergencies
Safety
Page 186 of 328
Operation
Gearbox: press the brake and
engage a gear again.
If the f
ault was caused by a gearbox with a
high temperature, this driver message will be
displayed when the gearbox has cooled
again.
Run-in and economical driving Ru
nning-in the engine A new vehicle should be run in over a dis-
t
anc
e of 1500 km (1000 miles). For the first
1,000 km the engine speed should not ex-
ceed 2/3 of the maximum permissible engine
speed. In doing so, do not accelerate at full
throttle and do not drive with a trailer! From
1000 to 1500 km (600 to 1000 miles) you
can gradually increase the engine rpm and
road speed.
During its first few hours of running, the in-
ternal friction in the engine is greater than
later on when all the moving parts have bed-
ded down.
How the vehicle is driven for the first 1,500
km influences the future engine perform-
ance. Subsequently, also drive at a moderate
rate, especially when the engine is still cold:
this will lead to less engine wear and tear
and will prolong its useful life. You should also avoid driving with the engine
speed t
oo low. Change down to a lower gear
when the engine no longer runs “smoothly”.
If the engine revs too much, cut fuel injection
to protect the engine.
Environmental compatibility Environmental protection is a top priority in
the de
s
ign, choice of materials and manufac-
ture of your new SEAT.
Constructive measures to encourage recy-
cling
● Joints and connections designed for easy
di sm
antling
● Modular construction to facilitate disman-
tling
● Inc
reased use of single-grade materials.
● Plastic parts and elastomers are marked in
acc
ordance with ISO 1043, ISO 11469 and
ISO 1629.
Choice of materials
● Use of recycled materials.
● Use of compatible plastics in the same part
if its
components are not easily separated.
● Use of recycled materials and/or materials
originatin
g from renewable sources. ●
Reduction of
volatile components, includ-
ing odour, in plastic materials.
● Use of CFC-free coolants.
Ban on he
avy metals, with the exceptions
dictated by law (Annex II of ELV Directive
2000/53/EC): cadmium, lead, mercury, hexa-
valent chromium.
Manufacturing methods
● Reduction of the quantity of thinner in the
prot
ective wax for cavities.
● Use of plastic film as protection during ve-
hicl
e transport.
● Use of solvent-free adhesives.
● Use of CFC-free coolants in cooling sys-
tems.
● R
ecycling and energy recovery from resi-
dues
(RDF).
● Improvement in the quality of waste water.
● Use of systems for the recovery of residual
heat
(thermal recovery, enthalpy wheels,
etc.).
● The use of water-soluble paints.
184
Page 187 of 328
Driving
Economical and environmentally-
friendly driv
ingFuel consumption, environmental pollution
and w
e
ar to the engine, brakes and tyres de-
pends largely on driving style. Fuel consump-
tion can be reduced by 10-15% with an eco-
nomical driving style and proper anticipation
of traffic conditions. The following section
gives you some tips on lessening the impact
on the environment and reducing your oper-
ating costs at the same time.
Active cylinder management (ACT ®
)*display
Depending on vehicle equipment, the active
cylinder management (ACT ®
) may automati-
cally deactivate some of the engine cylinders
if the driving situation does not require too
much power. When it is switched off, no fuel
is injected into these cylinders, hence total
fuel consumption may be reduced. The num-
ber of active cylinders can be seen on the in-
strument panel display ›››
page 30.
Foresight when driving
Acceleration causes the vehicle to consume
more fuel. If you think ahead when driving,
you will need to brake less and thus acceler-
ate less. Wherever possible, let the car roll
slowly to a stop, with a gear engaged (for in-
stance when you can see that the next traffic
lights are red). This takes advantage of the
engine braking effect, reducing wear on the brakes and tyres. Emissions and fuel con-
s
umption w
ill drop to zero due to the overrun
fuel cut-off.
Changing gear to save energy
An effective way of saving is to change in ad-
vance to a higher gear. Running the engine at
high rpm in the lower gears uses an unneces-
sary amount of fuel.
Manual gearbox : shift up from first to second
gear as soon as possible. In any case, we rec-
ommend that you change to a higher gear
upon reaching 2,000 rpm. Choosing the right
gear enables fuel savings. Select the highest
possible gear appropriate for the driving sit-
uation (the engine should continue function-
ing with cyclical regularity).
Automatic gearbox : accelerate gradually and
without reaching the “kick-down” position.
Avoid driving at high speed
Avoid travelling at top speed, whenever pos-
sible. Fuel consumption, emission of harmful
gases and noise pollution multiply dispropor-
tionately as speed is increased. Driving at
moderate speeds will help to save fuel.
Reduce idling time
In vehicles with the Start-Stop system idling
is automatically reduced. In vehicles without
the Start-Stop system it is worth switching off
the engine, for example, at level crossings and at traffic lights that remain red for long
periods
of time. When an engine has reached
operating temperature, and depending on
the cylinder capacity, keeping it switched off
for a minimum of about 5 seconds already
saves more than the amount of fuel necessa-
ry for restarting.
The engine takes a long time to warm up
when it is idling. Mechanical wear and pollu-
tant emissions are also especially high dur-
ing this initial warm-up phase. It is therefore
best to drive off immediately after starting
the engine. Avoid running the engine at high
speed.
Regular maintenance
Regular servicing helps in saving fuel even
before the engine is started. A well-serviced
engine gives you the benefit of improved fuel
efficiency as well as maximum reliability and
an enhanced resale value. A badly serviced
engine can consume up to 10% more fuel
than necessary.
Avoid short journeys
The engine and catalytic converter need to
reach their optimal operating temperature in
order to minimise fuel consumption and
emissions.
A cold engine consumes a disproportionate
amount of fuel. The engine reaches its work-
ing temperature after about four kilometres »
185
Technical data
Advice
Operation
Emergencies
Safety