Seat Ateca 2018 Owner's Manual
Manufacturer: SEAT, Model Year: 2018, Model line: Ateca, Model: Seat Ateca 2018Pages: 348, PDF Size: 7.32 MB
Page 271 of 348
Driver assistance systems
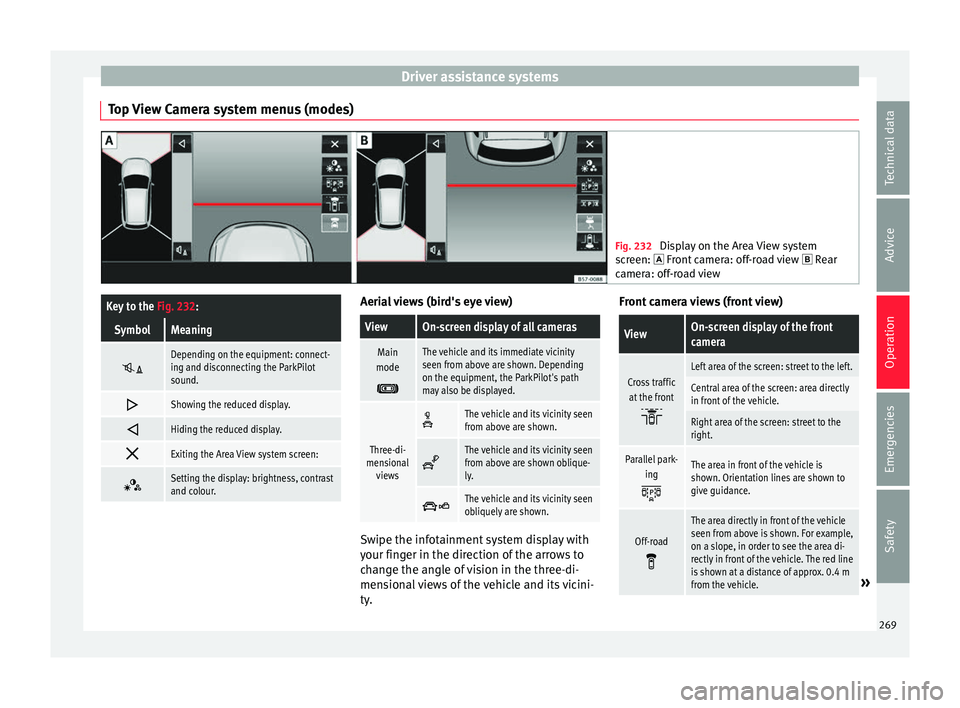
Top View Camera system menus (modes) Fig. 232
Display on the Area View system
sc r
een: Front camera: off-road view Rear
camera: off-road view
Key to the Fig. 232:
SymbolMeaning
Depending on the equipment: connect-
ing and disconnecting the ParkPilot
sound.
Showing the reduced display.
Hiding the reduced display.
Exiting the Area View system screen:
Setting the display: brightness, contrast
and colour. Aerial views (bird's eye view)
ViewOn-screen display of all cameras
Main
mode
The vehicle and its immediate vicinity
seen from above are shown. Depending
on the equipment, the ParkPilot's path
may also be displayed.
Three-di-
mensional views
The vehicle and its vicinity seen
from above are shown.
The vehicle and its vicinity seen
from above are shown oblique-
ly.
The vehicle and its vicinity seen
obliquely are shown.
Swipe the infotainment system display with
y
our fin
g
er in the direction of the arrows to
change the angle of vision in the three-di-
mensional views of the vehicle and its vicini-
ty. Front camera views (front view)
ViewOn-screen display of the front
camera
Cross traffic
at the front
Left area of the screen: street to the left.
Central area of the screen: area directly
in front of the vehicle.
Right area of the screen: street to the
right.
Parallel park- ing
The area in front of the vehicle is
shown. Orientation lines are shown to
give guidance.
Off-road
The area directly in front of the vehicle
seen from above is shown. For example,
on a slope, in order to see the area di-
rectly in front of the vehicle. The red line
is shown at a distance of approx. 0.4 m
from the vehicle.
» 269
Technical data
Advice
Operation
Emergencies
Safety
Page 272 of 348
Operation
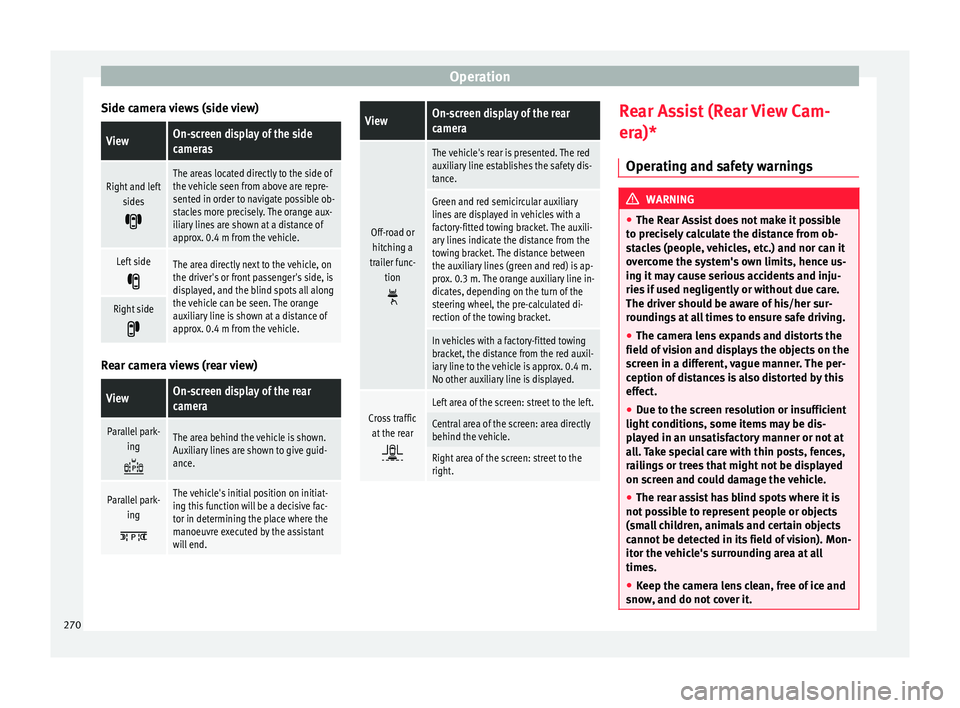
Side camera views (side view)ViewOn-screen display of the side
cameras
Right and left sides
The areas located directly to the side of
the vehicle seen from above are repre-
sented in order to navigate possible ob-
stacles more precisely. The orange aux-
iliary lines are shown at a distance of
approx. 0.4 m from the vehicle.
Left side
The area directly next to the vehicle, on
the driver's or front passenger's side, is
displayed, and the blind spots all along
the vehicle can be seen. The orange
auxiliary line is shown at a distance of
approx. 0.4 m from the vehicle.
Right side
Rear camera views (rear view)
ViewOn-screen display of the rear
camera
Parallel park-
ing
The area behind the vehicle is shown.
Auxiliary lines are shown to give guid-
ance.
Parallel park-ing
The vehicle's initial position on initiat-
ing this function will be a decisive fac-
tor in determining the place where the
manoeuvre executed by the assistant
will end.
ViewOn-screen display of the rear
camera
Off-road orhitching a
trailer func- tion
The vehicle's rear is presented. The red
auxiliary line establishes the safety dis-
tance.
Green and red semicircular auxiliary
lines are displayed in vehicles with a
factory-fitted towing bracket. The auxili-
ary lines indicate the distance from the
towing bracket. The distance between
the auxiliary lines (green and red) is ap-
prox. 0.3 m. The orange auxiliary line in-
dicates, depending on the turn of the
steering wheel, the pre-calculated di-
rection of the towing bracket.
In vehicles with a factory-fitted towing
bracket, the distance from the red auxil-
iary line to the vehicle is approx. 0.4 m.
No other auxiliary line is displayed.
Cross trafficat the rear
Left area of the screen: street to the left.
Central area of the screen: area directly
behind the vehicle.
Right area of the screen: street to the
right. Rear Assist (Rear View Cam-
er
a)*
Oper atin
g and safety warnings WARNING
● The Re ar As
sist does not make it possible
to precisely calculate the distance from ob-
stacles (people, vehicles, etc.) and nor can it
overcome the system's own limits, hence us-
ing it may cause serious accidents and inju-
ries if used negligently or without due care.
The driver should be aware of his/her sur-
roundings at all times to ensure safe driving.
● The camera lens expands and distorts the
field of
vision and displays the objects on the
screen in a different, vague manner. The per-
ception of distances is also distorted by this
effect.
● Due to the screen resolution or insufficient
light condition
s, some items may be dis-
played in an unsatisfactory manner or not at
all. Take special care with thin posts, fences,
railings or trees that might not be displayed
on screen and could damage the vehicle.
● The rear assist has blind spots where it is
not pos
sible to represent people or objects
(small children, animals and certain objects
cannot be detected in its field of vision). Mon-
itor the vehicle's surrounding area at all
times.
● Keep the camera lens clean, free of ice and
snow
, and do not cover it.270
Page 273 of 348
Driver assistance systems
●
The sys t
em is not a replacement for driver
awareness. Supervise the parking operation
at all times, as well as the vehicle's surround-
ing area. Adapt your speed and driving style
at all times to suit visibility, weather, road
and traffic conditions.
● Do not be distracted from the traffic by
looking at
the screen.
● The images on the rear assist screen are
only tw
o-dimensional. Due to a lack of spatial
depth, protruding parts or holes in the road,
for example, are more difficult to detect or
may not be seen at all.
● Vehicle load modifies the representation of
the orientation lines
displayed. The width
represented by the lines diminishes with ve-
hicle load. Pay special attention to the vehi-
cle's surroundings when the inside of the ve-
hicle of the luggage compartment is carrying
a heavy load.
● In the following situations, the objects or
other vehic
les shown in the navigation sys-
tem display appear to be further away or
closer than they really are: Pay special atten-
tion:
– On moving from a horizontal plane to a
slope.
– On moving from a slope to a horizontal
plane.
– If the vehicle is heavily loaded at the
rear.
– When the vehicle approaches objects
that are not on the ground surface or are
jutting out from it. These objects may al- so be outside the camera's angle of vi-
sion when r
ev
ersing. Note
● It is
important to take great care and pay
special attention if you are not yet familiar
with the system.
● Rear assist will not be available if the vehi-
cle's
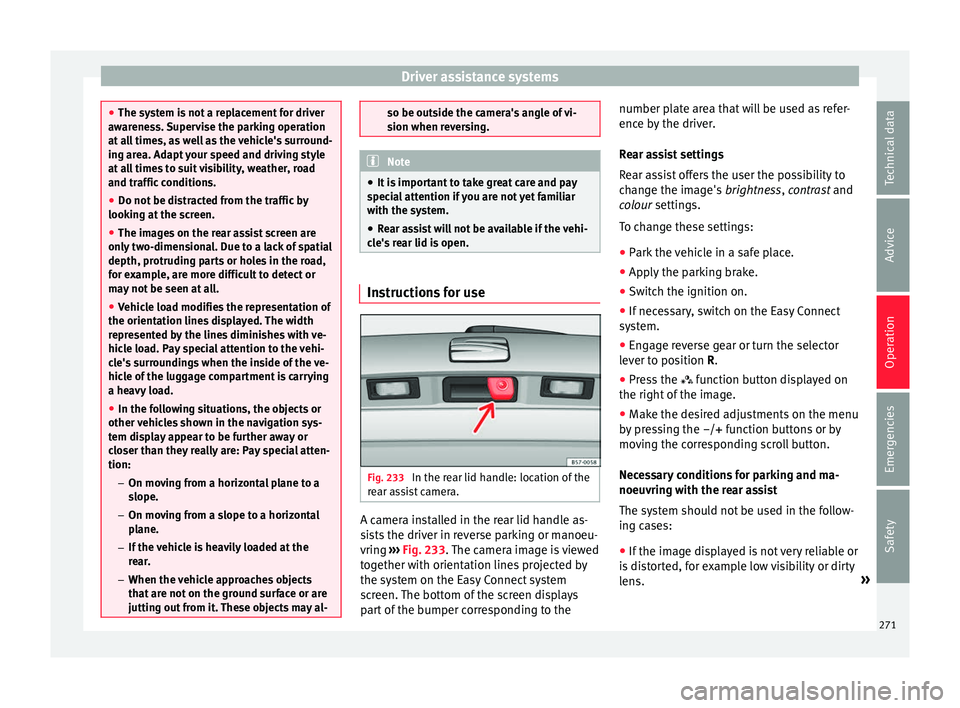
rear lid is open. Instructions for use
Fig. 233
In the rear lid handle: location of the
r e
ar a
ssist camera. A camera installed in the rear lid handle as-
s
i
s
ts the driver in reverse parking or manoeu-
vring ››› Fig. 233. The camera image is viewed
together with orientation lines projected by
the system on the Easy Connect system
screen. The bottom of the screen displays
part of the bumper corresponding to the number plate area that will be used as refer-
ence by
the driver.
Rear assist settings
Rear assist offers the user the possibility to
change the image's brightness, contrast and
colour settings.
To change these settings:
● Park the vehicle in a safe place.
● Apply the parking brake.
● Switch the ignition on.
● If necessary, switch on the Easy Connect
syst
em.
● Engage reverse gear or turn the selector
lever t
o position R.
● Press the function b
utton displayed on
the right of the image.
● Make the desired adjustments on the menu
by pr
essing the –/+ function buttons or by
moving the corresponding scroll button.
Necessary conditions for parking and ma-
noeuvring with the rear assist
The system should not be used in the follow-
ing cases:
● If the image displayed is not very reliable or
is di
storted, for example low visibility or dirty
lens. »
271
Technical data
Advice
Operation
Emergencies
Safety
Page 274 of 348
Operation
● If the ar
e
a behind the vehicle is not dis-
played very clearly or is incomplete.
● If the vehicle is heavily loaded at the rear.
● If the position and installation angle of the
camera h
ave been changed, e.g. after a rear-
end collision. Have the system checked by a
specialised workshop.
Familiarising yourself with the system
To familiarise yourself with the system, the
orientation lines and their function, SEAT rec-
ommends practising parking and manoeu-
vring with the rear assist in a place without
too much traffic or in a car park when there
are good weather and visibility conditions.
Cleaning the camera lens
Keep the camera lens clean and clear of snow
and ice:
● Moisten the lens using a normal alcohol-
based gl
ass cleaning product and clean the
lens with a dry cloth.
● Remove snow using a small brush.
● Use de-icing spray to remove any ice. CAUTION
● Never u se abr
asive cleaning products to
clean the camera lens.
● Do not use hot or warm water to remove ice
or snow fr
om the camera lens. Doing so could
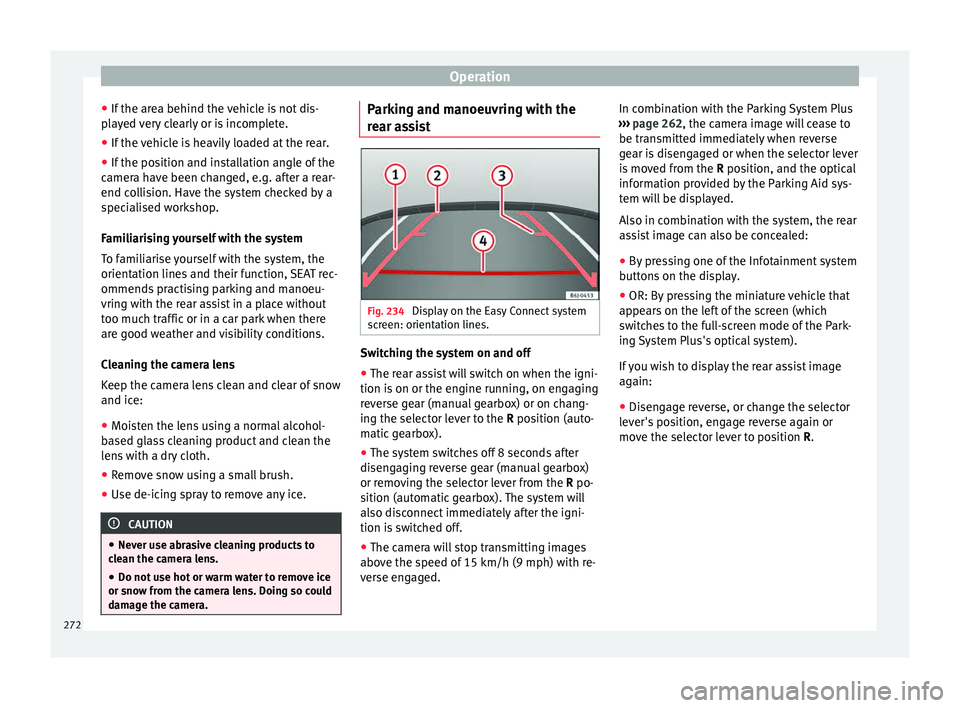
damage the camera. Parking and manoeuvring with the
r
e
ar a
ssist Fig. 234
Display on the Easy Connect system
s c
r
een: orientation lines. Switching the system on and off
●
The rear assist will switch on when the igni-
tion i s
on or the en
gine running, on engaging
reverse gear (manual gearbox) or on chang-
ing the selector lever to the R position (auto-
matic gearbox).
● The system switches off 8 seconds after
diseng
aging reverse gear (manual gearbox)
or removing the selector lever from the R po-
sition (automatic gearbox). The system will
also disconnect immediately after the igni-
tion is switched off.
● The camera will stop transmitting images
above the s
peed of 15 km/h (9 mph) with re-
verse engaged. In combination with the Parking System Plus
›››
page 262, the camera image will cease to
be transmitted immediately when reverse
gear is disengaged or when the selector lever
is moved from the R position, and the optical
information provided by the Parking Aid sys-
tem will be displayed.
Also in combination with the system, the rear
assist image can also be concealed:
● By pressing one of the Infotainment system
button
s on the display.
● OR: By pressing the miniature vehicle that
appear
s on the left of the screen (which
switches to the full-screen mode of the Park-
ing System Plus's optical system).
If you wish to display the rear assist image
again:
● Disengage reverse, or change the selector
lever's
position, engage reverse again or
move the selector lever to position R.
272
Page 275 of 348
Towing bracket device*
● OR: Pr e
s
s the RVC function button 1)
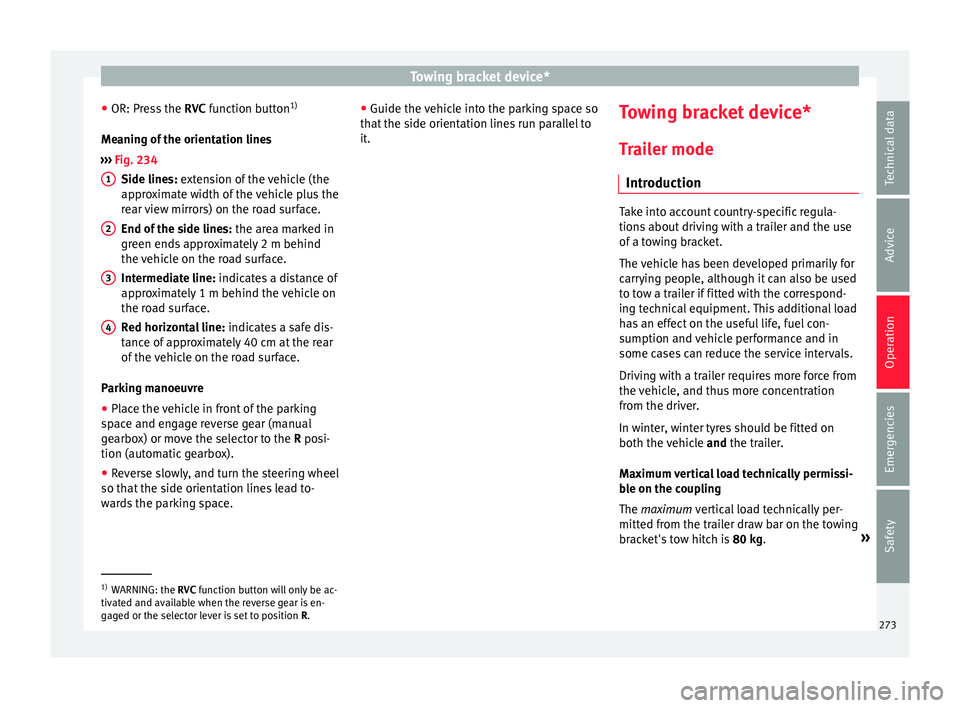
Meaning of the orientation lines
››› Fig. 234
Side lines: extension of the vehicle (the
approximate width of the vehicle plus the
rear view mirrors) on the road surface.
End of the side lines: the area marked in
green ends approximately 2 m behind
the vehicle on the road surface.
Intermediate line: indicates a distance of
approximately 1 m behind the vehicle on
the road surface.
Red horizontal line: indicates a safe dis-
tance of approximately 40 cm at the rear
of the vehicle on the road surface.
Parking manoeuvre ● Place the vehicle in front of the parking
spac
e and engage reverse gear (manual
gearbox) or move the selector to the R posi-
tion (automatic gearbox).
● Reverse slowly, and turn the steering wheel
so that the s
ide orientation lines lead to-
wards the parking space. 1 2
3
4 ●
Guide the v
ehic
le into the parking space so
that the side orientation lines run parallel to
it. Towing bracket device*
T r
ai
ler mode
Introduction Take into account country-specific regula-
tions
about
driving with a trailer and the use
of a towing bracket.
The vehicle has been developed primarily for
carrying people, although it can also be used
to tow a trailer if fitted with the correspond-
ing technical equipment. This additional load
has an effect on the useful life, fuel con-
sumption and vehicle performance and in
some cases can reduce the service intervals.
Driving with a trailer requires more force from
the vehicle, and thus more concentration
from the driver.
In winter, winter tyres should be fitted on
both the vehicle and the trailer.
Maximum vertical load technically permissi-
ble on the coupling
The maximum vertical load technically per-
mitted from the trailer draw bar on the towing
bracket's tow hitch is 80 kg. »1)
WARNING: the RVC function b
utton will only be ac-
tivated and available when the reverse gear is en-
gaged or the selector lever is set to position R.
273
Technical data
Advice
Operation
Emergencies
Safety
Page 276 of 348
Operation
Vehicles with the Start-Stop system
If the
v
ehicle has a factory-fitted towing
bracket or one that is retrofitted by SEAT, the
Start-Stop system operates as normal. No
special characteristics need to be taken into
account.
If the system does not recognise the trailer or
the trailer bracket has not been retrofitted by
SEAT, the Start-Stop system must be discon-
nected by pressing the corresponding button
in the lower part of the centre console before
driving with the trailer, and it should remain
off for the rest of the journey ››› .
V ehic
l
es with driving profile selection
If you are going to be towing a trailer, the use
of the Eco driving profile is not recommen-
ded. You are advised to select another of the
available driving profiles before beginning to
drive with a trailer. WARNING
Never use the trailer to transport people,
sinc e it
would put their life in danger and is
also prohibited. WARNING
Undue use of the towing bracket may cause
injury and ac
cidents.
● Only use the towing bracket if it is in a per-
fect s
tate of repair and is properly secured. ●
Never modif y
or repair the towing bracket
in any way.
● In order to reduce the danger of injury in
the event of
rear-end collisions and to avoid
injury to pedestrians and cyclists when park-
ing the vehicle, cover or remove the tow hitch
when you are not using a trailer.
● Never fit a towing bracket “with weight dis-
tribution” or “loa
d compensation”. The vehi-
cle has not been designed for this type of
towing bracket. The towing bracket could fail
and the trailer could be released from the ve-
hicle. WARNING
Driving with a trailer and transporting heavy
or lar g
e objects can affect driving properties
and even cause an accident.
● Always secure the load properly using belts
or strap
s that are suitable and in good condi-
tion.
● Adapt your speed and driving style at all
times t
o suit visibility, weather, road and traf-
fic conditions.
● Trailers with a high centre of gravity are
more likely
to overturn than those with a low
one.
● Avoid sudden braking and manoeuvres.
● Take great care when overtaking.
● Reduce speed immediately if you notice
that the tr
ailer is swaying, however slightly. ●
Never driv e at
more than 80 km/h (50 mph)
when towing a trailer (or at more than
100 km/h (60 mph) in exceptional circum-
stances). This also applies in countries where
driving at higher speeds is permitted. Take
into account the speed limit for vehicles with
trailers in the corresponding country, as it
could be less than the speed limit for vehi-
cles without a trailer.
● Never attempt to “straighten” the towing
vehicl
e and trailer while accelerating. WARNING
If the towing bracket has been retrofitted by a
non-S EA
T workshop, the Start-Stop system
must be disconnected manually whenever
driving with a trailer. Otherwise the brake
system could be damaged and could conse-
quently cause a serious accident or injury.
● Always disconnect the Start-Stop system
manual
ly when using a towing bracket that
has not been fitted by a SEAT workshop. Note
● Bef or
e hitching or unhitching a trailer, al-
ways deactivate the anti-theft alarm
››› page 125. Otherwise, the tilt sensor could
cause the alarm to go off.
● Do not drive with a trailer for the engine's
first
1000 km ››› page 201.
● SEAT recommends that, if possible, the tow
hitch be di
sassembled or covered when it is274
Page 277 of 348

Towing bracket device*
not going to be used. In the event of a rear-
end co
l
lision, the damage to the vehicle
could be greater if the bracket is fitted.
● Some retrofitted towing brackets cover the
rear t
owing eye. In these cases, the towing
eye should not be used for tow-starting or for
towing other vehicles. For this reason, if the
vehicle has been retrofitted with a towing
bracket, always keep the tow hitch in the ve-
hicle when you disassemble it. Control lamp
Lamp on button lights up
The tow hitch is not securely locked in position.
Check that the towing bracket is locked
››› page 276. Some warning and control lamps will light up
briefly
when the ignition i
s
switched on to
check certain functions. They will switch off
after a few seconds. WARNING
If the warning lamps and the corresponding
mes s
ages are ignored when they light up, the
vehicle may stall in traffic and cause acci-
dents and severe injuries.
● Never ignore the warning lamps or messag-
es.
● Stop the
vehicle at the next opportunity
and in a safe p
lace. CAUTION
Failure to heed the control lamps and corre-
spondin g t
ext messages when they light up
may result in damage to the vehicle. Technical requirements
Vehicles that are
factor
y-equipped with a
towing bracket fulfil all the technical and le-
gal requirements for driving with a trailer.
If the vehicle is retrofitted with a towing
bracket, only a bracket that is authorised for
the maximum authorised load of the trailer
that is to be towed may be fitted. The towing
bracket must be suitable for the vehicle and
the trailer and must be properly secured to
the vehicle's chassis. Only use a towing
bracket that has been authorised by SEAT for
this vehicle. Always check and take into ac-
count the towing bracket manufacturer's in-
structions. Never fit a towing bracket “with
weight distribution” or “load compensation”.
Towing bracket fitted on the bumper
Never fit a towing bracket to the bumper or to
the area where the bumper is mounted. The
towing bracket should not impair the bum-
per's function. Do not make modifications or
repairs to the exhaust system or the brake
system. Make regular checks to ensure that
the towing bracket is secure. Engine cooling system
Drivin
g w
ith a trailer increases the load on
the engine and cooling system. The cooling
system should have sufficient coolant and be
prepared for the additional effort involved in
driving with a trailer.
Trailer brakes
If the trailer has its own brake system, please
take the relevant legal requirements into ac-
count. Never connect the trailer's brake sys-
tem to the vehicle's brake system.
Tow rope
Always use a cable between the vehicle and
the trailer ››› page 278.
Trailer rear lights
The trailer's rear lights should comply with
the statutory safety regulations ››› page 278.
Never connect the trailer's rear lights directly
to the vehicle's electric system. If you are not
sure that the trailer's electrical connection is
correct, have it checked by a specialised
workshop. SEAT recommends visiting a SEAT
dealership for this.
Exterior mirrors
If you cannot see the area behind the trailer
with the exterior mirrors of the towing vehi-
cle, additional mirrors will have to be instal-
led in accordance with the regulations of the »
275
Technical data
Advice
Operation
Emergencies
Safety
Page 278 of 348
Operation
country in question. The exterior mirrors
shou l
d be a
djusted before you start driving
and must provide a sufficient field of vision
at the rear.
Trailer maximum electricity consumption
ConsumersEurope, Asia, Africa, South America and
Central AmericaAustralia
Brake lights (total)84 Watts108 Watts
Turn signal (on each
side)42 Watts54 Watts
Side lights (on each
side)50 Watts100 Watts
Reverse lights (in
total)42 Watts54 Watts
Rear fog light42 Watts54 Watts
Never exceed the values indicated! WARNING
If the towing bracket is wrongly fitted or is
not the right one, the tr
ailer could become
detached from the vehicle and cause serious
injury. CAUTION
● If the r e
ar lights of the trailer are not cor-
rectly connected, the vehicle's electronic sys-
tem may be damaged.
● If the trailer absorbs excessive electric cur-
rent, the v
ehicle's electronic system may be
damaged.
● Never connect the trailer's electric system
directly t
o the electrical connections of the
tail lights or any other power sources. Only
use the connections intended for providing
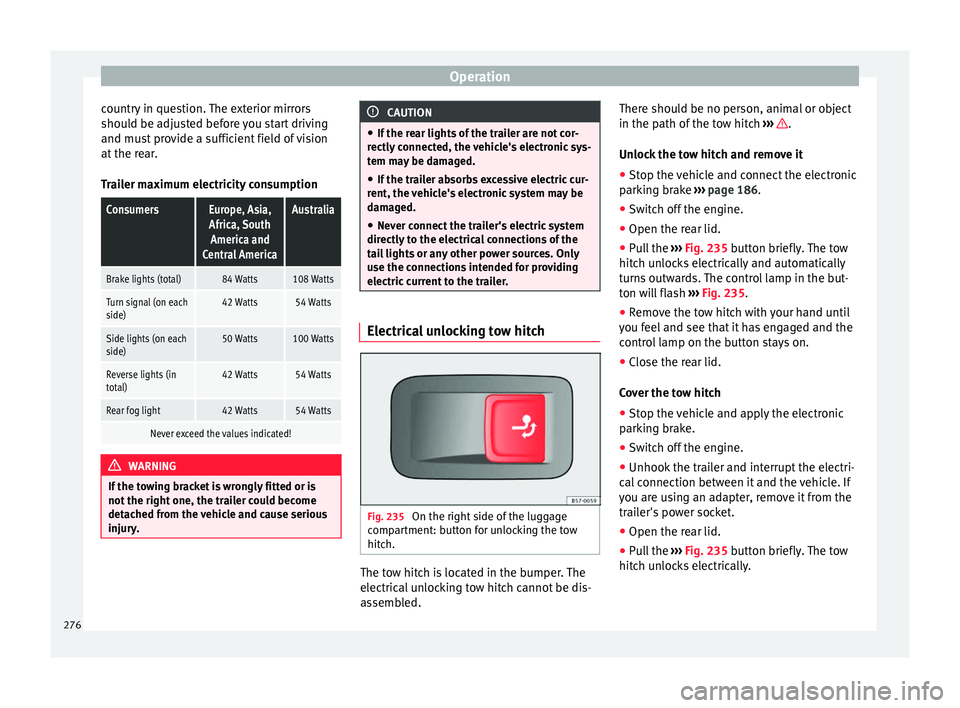
electric current to the trailer. Electrical unlocking tow hitch
Fig. 235
On the right side of the luggage
c omp
ar
tment: button for unlocking the tow
hitch. The tow hitch is located in the bumper. The
el
ectric al
unlocking tow hitch cannot be dis-
assembled. There should be no person, animal or object
in the path of the t
ow hitch ››› .
Un loc
k
the tow hitch and remove it
● Stop the vehicle and connect the electronic
parkin
g brake ››› page 186.
● Switch off the engine.
● Open the rear lid.
● Pull the ››› Fig. 235 b
utton briefly. The tow
hitch unlocks electrically and automatically
turns outwards. The control lamp in the but-
ton will flash ››› Fig. 235.
● Remove the tow hitch with your hand until
you feel
and see that it has engaged and the
control lamp on the button stays on.
● Close the rear lid.
Cov
er the tow hitch
● Stop the vehicle and apply the electronic
parkin
g brake.
● Switch off the engine.
● Unhook the trailer and interrupt the electri-
cal c
onnection between it and the vehicle. If
you are using an adapter, remove it from the
trailer's power socket.
● Open the rear lid.
● Pull the ››› Fig. 235
button briefly. The tow
hitch unlocks electrically.
276
Page 279 of 348
Towing bracket device*
● Turn the t
o
w hitch under the bumper with
your hand until you feel and see that it en-
gages and the control lamp on the ››› Fig. 235
button stays on.
● Close the rear lid.
Meanin
g of control lamp
● If the warning light of the button ›››
Fig. 235
is flashing , this means that the tow hitch has
not been attached properly or is damaged
››› .
● If the warning lamp st
a
ys on with the rear
lid open, the tow hitch is correctly in place
both when engaged and when covered.
● The control lamp of the button will go off
appro
x. 1 minute after closing the rear lid. WARNING
Undue use of the towing bracket may cause
injury and ac
cidents.
● Only use the tow hitch if it is properly en-
gaged.
● A
lways ensure that no person, animal or
obj
ect is to be found in the path of the tow
hitch.
● Never use a tool or instrument while the
tow hit
ch is moving.
● Never press the ›››
Fig. 235 button when
there is a trailer hooked to the vehicle or
when a carrier system or other accessories
are mounted on the tow hitch. ●
If the t o
w hitch is not attached properly, do
not use it. Instead, go to a specialised work-
shop and have the towing bracket checked.
● If you detect any fault in the electrical sys-
tem or in the to
wing bracket, contact a speci-
alised workshop and ask them to check it.
● If the ball has a diameter of less than 49
mm at any
one point, do not use the towing
bracket under any circumstances. CAUTION
If you clean the vehicle with high-pressure or
s te
am devices, do not point the jet directly
towards the retractable tow hitch or the trail-
er power socket, as this may damage the
joints or remove the grease necessary for lu-
brication. Note
At extremely low temperatures, the tow hitch
ma y
be impossible to use. In this case, place
the vehicle in a warmer location (for example,
a garage). Fitting a bicycle carrier on the retract-
ab
le t
ow hitch The maximum allowed weight of the carrier
sy
s
t
em, including the load, is 75 kg. The car-
rier system should not protrude more than
700 mm backwards from the spherical head.
Only carrier systems on which up to 3 bikes can be mounted are allowed. Heavier bicy-
cle
s must be mounted as close to the vehicle
as possible (tow hitch). WARNING
The incorrect use of the tow hitch with a bicy-
cl e r
ack mounted on the tow hitch can cause
accidents and injury.
● Never exceed the maximum weight or the
limits indic
ated above.
● The bicycle rack may not be mounted to the
neck of
the hitch below the ball because, due
to the shape of the neck and depending on
the rack model, the rack could be incorrectly
mounted on the vehicle.
● Always read and take the manufacturer as-
sembly in
structions into account. CAUTION
If the maximum weight and limits indicated
abov e ar
e exceeded, the vehicle may suffer
considerable damage.
● Never exceed the values indicated! Note
SEAT recommends removing, as far as possi-
bl e, a
ll removable parts of the bicycles before
setting off. These parts include, for example,
baskets and saddlebags, child seats or bat-
teries. This improves aerodynamics and the
centre of gravity of the rack system. 277
Technical data
Advice
Operation
Emergencies
Safety
Page 280 of 348

Operation
Hooking up and connecting a trailer Fig. 236
Schematic diagram: assignment of
the pins of the trailer's power socket.
Key to the Fig. 236:
PinMeaning
1Left turn signal
2Rear fog light
3Earth for pins 1, 2, 4, 5, 6, 7 and 8
4Right turn signal
5Rear light, right
6Brake lights
7Rear light, left
8Reverse lights
9Permanent live
10Live charge cable
11Earth for pin 10
Key to the Fig. 236:
PinMeaning
12Unassigned
13Earth for pin 9 Trailer power socket
The v
ehic
le is fitted with a 13-pole power
socket for the electrical connection between
the trailer and the vehicle. With the engine
running, electrical devices on the trailer re-
ceive power from the electrical connection
(pin 9 and pin 10 of the trailer power socket).
If the system detects that a trailer has been
connected electrically, the electrical equip-
ment on the trailer will receive voltage
through this connection (pins 9 and 10). Pin
9 has a permanent live. This powers, for ex-
ample, the trailer's interior lighting. Electrical
devices such as a fridge in a caravan only re-
ceive electrical power if the engine is running
(through pin 10).
To avoid overloading the electrical system,
you cannot connect the ground wires of pin
3, pin 11 or pin 13.
If the trailer has a 7-contact connector , you
will need to use an adapter cable. In this case
the function corresponding to pin 10 will not
be available. Tow rope
The to
w r
ope must always be securely fixed
to the towing vehicle and loose enough so
that the vehicle can handle turns smoothly.
However, make sure that the cable does not
rub on the ground while driving.
Trailer rear lights
Always check the trailer's rear lights to en-
sure they are working correctly and that they
comply with the relevant safety regulations.
Make sure that the maximum permissible
power that can be absorbed by the trailer is
not exceeded ››› page 276.
Connection to the anti-theft system
The trailer is included in the anti-theft system
if the following conditions are met: ● If the vehicle is factory-equipped with an
anti-theft al
arm and towing bracket.
● If the trailer is electrically connected to the
tow
ing vehicle through the trailer power
socket.
● If the electrical systems of the vehicle and
trail
er are in perfect condition and have no
faults or damage.
● If the vehicle is locked with the key and the
anti-theft al
arm is activated.
When the vehicle is locked, the alarm is trig-
gered if the electrical connection with the
trailer is cut off.
278