tow Seat Cordoba 2008 Workshop Manual
[x] Cancel search | Manufacturer: SEAT, Model Year: 2008, Model line: Cordoba, Model: Seat Cordoba 2008Pages: 258, PDF Size: 7.87 MB
Page 221 of 258
If and when219
Safety First
Operating instructions
Tips and Maintenance
Te c h n i c a l D a t a
– Remove plastic cover ⇒page 218, fig. 153 , insert finger in
opening and pull in the direction of the arrow.
–Press the tabs ⇒ page 218, fig. 154 of the lamp holder and
remove lampholder.
– Turn bigger lamp 1/4 turn to left. For the small lamp, rotate and extract the lamp holder and pull on the lamp.
– Remove lamp and replace.
– Fit the bigger lamp, pressing inwards and turn 1/4 turn to the right. Place the smaller lamp in casing and press.
– Carefully fit the lampholder in the casing and press until a “clic” is heard.
– Next replace the cover and press down.
NoteMake sure that when assembling all seals and rubbers are correctly fitted.
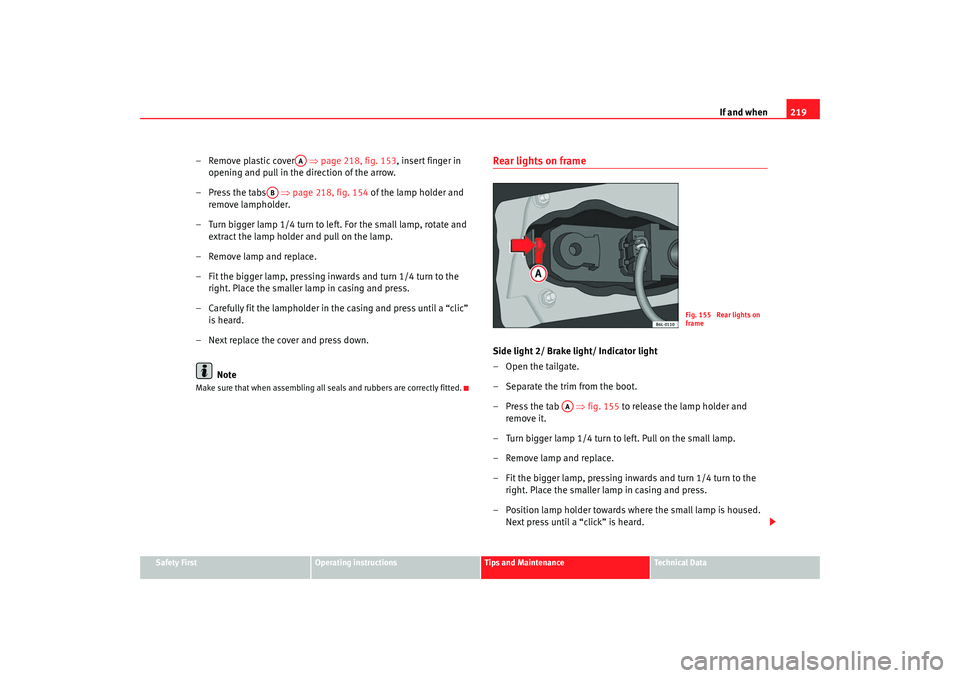
Rear lights on frameSide light 2/ Brake light/ Indicator light
–Open the tailgate.
– Separate the trim from the boot.
– Press the tab ⇒fig. 155 to release the lamp holder and
remove it.
– Turn bigger lamp 1/4 turn to left. Pull on the small lamp.
– Remove lamp and replace.
– Fit the bigger lamp, pressing inwards and turn 1/4 turn to the right. Place the smaller lamp in casing and press.
– Position lamp holder towards where the small lamp is housed. Next pre ss u
ntil a “cli ck” is heard.
AA
AB
Fig. 155 Rear lights on
frame
AA
COR_ING_0707 Seite 219 Mittwoch, 1. August 2007 6:25 18
Page 223 of 258
If and when221
Safety First
Operating instructions
Tips and Maintenance
Te c h n i c a l D a t a
–Replace the bulb.
– Insert the light on the connector side, first underneath then push
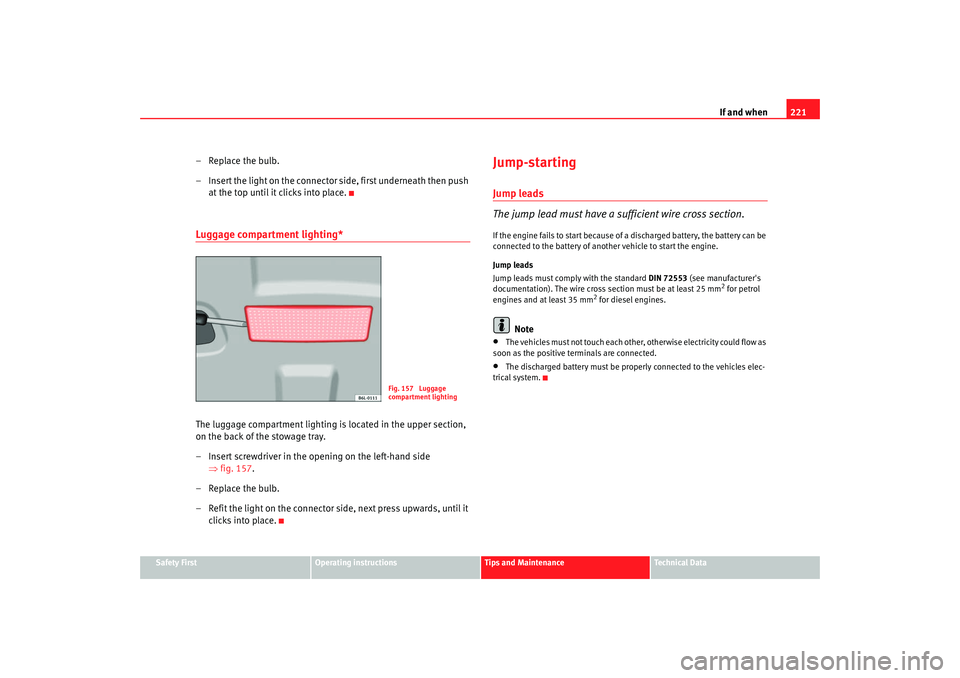
at the top until it clicks into place.Luggage compartment lighting*The luggage compartment lighting is located in the upper section,
on the back of the stowage tray.
– Insert screwdriver in the opening on the left-hand side ⇒fig. 157 .
–Replace the bulb.
– Refit the light on the connector side, next press upwards, until it clicks into place.
Jump-startingJump leads
The jump lead must have a sufficient wire cross section.If the engine fails to start because of a discharged battery, the battery can be
connected to the battery of another vehicle to start the engine.
Jump leads
Jump leads must comply with the standard DIN 72553 (see manufacturer's
documentation). The wire cross section must be at least 25 mm
2 for petrol
engines and at least 35 mm
2 for diesel engines.
Note
•
The vehicles must not touch each othe r, otherwise electricity could flow as
soon as the positive terminals are connected.
•
The discharged battery must be properly connected to the vehicles elec-
trical system.
Fig. 157 Luggage
compartment lighting
COR_ING_0707 Seite 221 Mittwoch, 1. August 2007 6:25 18
Page 226 of 258

If and when
224To w i n g a n d t o w - s t a r t i n gTo w - s t a r t i n g *
The use of jump leads is preferable to tow-starting.We recommend that you do not t o w - s t a r t yo u r v e h i c l e . J u m p - s ta r t i n g
is preferable ⇒page 221.
However, if your vehicle has to be tow-started:
– Engage the 2
nd or the 3
rd gear.
– Keep the clutch pressed down.
– Switch on the ignition.
– Once both vehicles are moving, release the clutch.
– As soon as the engine starts, press the clutch and move the gear lever into neutral. This helps to prevent driving into the towing
vehicle.
WARNING
The risk of accidents is high when tow-starting. The vehicle being towed
can easily collide with the towing vehicle.
Caution
When tow-starting, fuel could enter the catalytic converter and damage it.
Towing eyesPlease observe the following points if you use a tow-rope:
Notes for the driver of the towing vehicle
– Drive slowly at first until the tow-rope is taut. Then accelerate gradually.
– Begin and change gears cautiously. If you are driving an auto- matic vehicle, accelerate gently.
– Remember that the brake servo and power steering are not working in the vehicle you are towing. Brake earlier than you
would normally, but with a more gentle pressure on the brake.
Notes for the driver of the towed vehicle
– Ensure that the tow-rope remains taut at all times when towing.
Fig. 159 Towing eye at
the front of the vehicle
COR_ING_0707 Seite 224 Mittwoch, 1. August 2007 6:25 18
Page 227 of 258
If and when225
Safety First
Operating instructions
Tips and Maintenance
Te c h n i c a l D a t a
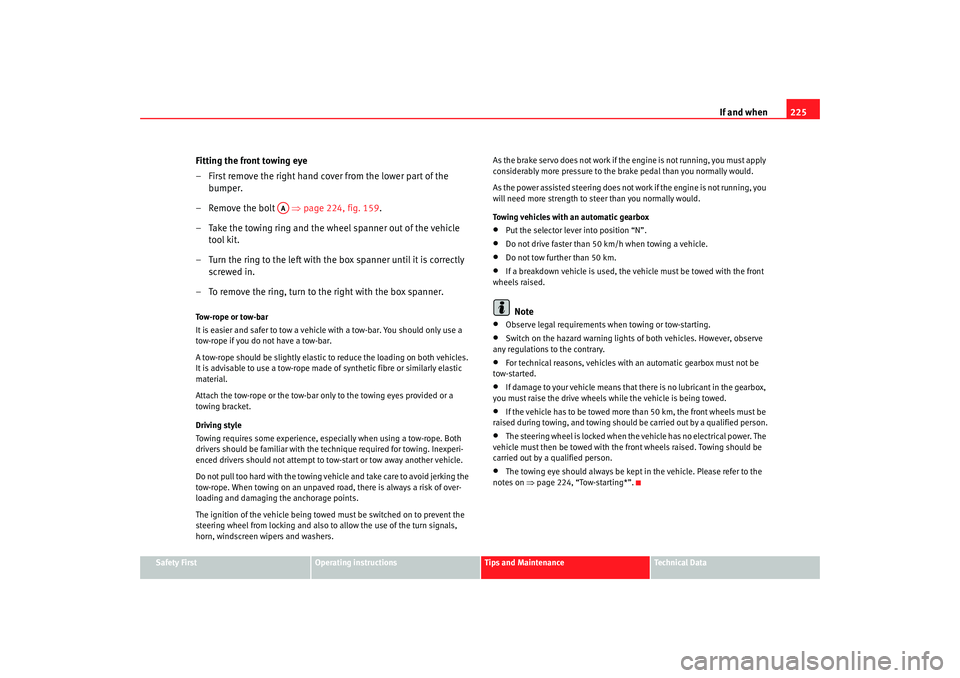
Fitting the front towing eye
– First remove the right hand co ver from the lower part of the
bumper.
– Remove the bolt ⇒page 224, fig. 159 .
– Take the towing ring and the wheel spanner out of the vehicle tool kit.
– Turn the ring to the left with the box spanner until it is correctly screwed in.
– To remove the ring, turn to the right with the box spanner.Tow-rope or tow-bar
It is easier and safer to tow a vehicle with a tow-bar. You should only use a
tow-rope if you do not have a tow-bar.
A tow-rope should be slight ly elastic to reduce the loading on both vehicles.
It is advisable to use a tow-rope made of synthetic fibre or similarly elastic
material.
Attach the tow-rope or the tow-bar only to the towing eyes provided or a
towing bracket.
Driving style
Towing requires some experience, espec ially when using a tow-rope. Both
drivers should be famili ar with the technique required for towing. Inexperi-
enced drivers should not attempt to tow-start or tow away another vehicle.
Do not pull too hard with the towing vehi cle and take care to avoid jerking the
tow-rope. When towing on an unpaved road, there is always a risk of over-
loading and damaging the anchorage points.
The ignition of the vehicle being towed must be switched on to prevent the
steering wheel from locking and also to allow the use of the turn signals,
horn, windscreen wipers and washers. As the brake servo does not work if th
e engine is not running, you must apply
considerably more pressure to the brake pedal than you normally would.
As the power assisted steering does not work if the engine is not running, you
will need more strength to steer than you normally would.
Towing vehicles with an automatic gearbox
•
Put the selector lever into position “N”.
•
Do not drive faster than 50 km/h when towing a vehicle.
•
Do not tow further than 50 km.
•
If a breakdown vehicle is used, the vehicle must be towed with the front
wheels raised.Note
•
Observe legal requirements when towing or tow-starting.
•
Switch on the hazard warning lights of both vehicles. However, observe
any regulations to the contrary.
•
For technical reasons, vehicles with an automatic gearbox must not be
tow-started.
•
If damage to your vehicle means that there is no lubricant in the gearbox,
you must raise the drive wheels while the vehicle is being towed.
•
If the vehicle has to be towed more than 50 km, the front wheels must be
raised during towing, and towing should be carried out by a qualified person.
•
The steering wheel is locked when the vehicle has no electrical power. The
vehicle must then be towed with the front wheels raised. Towing should be
carried out by a qualified person.
•
The towing eye should always be kept in the vehicle. Please refer to the
notes on ⇒page 224, “Tow-starting*”.
AA
COR_ING_0707 Seite 225 Mittwoch, 1. August 2007 6:25 18
Page 228 of 258

If and when
226Rear towline anchorageAt the rear, on the right below the rear bumper is a towline point.
COR_ING_0707 Seite 226 Mittwoch, 1. August 2007 6:25 18
Page 232 of 258
General notes on the technical data
230WeightsKerb weight refers to the basic model with a fuel tank filled to 90% capacity
and without optional extras. The figure quoted includes 75 kg to allow for the
weight of the driver.
For special versions and optional equipment fittings or for the addition of
accessories, the weight of the vehicle will increase ⇒.
WARNING
•
Please note that the centre of gravity may shift when transporting
heavy objects; this may affect the vehi cle's handling and lead to an acci-
dent. Always adjust your speed and dr iving style to suit road conditions
and requirements.
•
Never exceed the gross axle weight rating or the gross vehicle weight
rating. If the allowed axle load or the allowed total weight is exceeded, the
driving characteristics of the vehicle may change, leading to accidents,
injuries and damage to the vehicle.
To w i n g a t r a i l e rTrailer weightsTrailer weights
The trailer weights and drawbar loads approved are selected in intensive
trials according to precisely defined criteria. The approved trailer weights are
valid for vehicles in the EU for maximum speeds of 80 km/h (in certain
circumstances up to 100 km/h). The figu res may be different in other coun-
tries. All data in the official vehicl e documents take precedence over these
data ⇒ . Drawbar load
The
maximum permitted weight exerted by the trailer drawbar on the ball joint
of the towing bracket must not exceed 75 kg.
In the interest of road safety, we recommend that you always tow
approaching the maximum drawbar load. The response of the trailer on the
road will be poor if th e drawbar load is too small.
If the maximum permissible drawbar load cannot be met (e.g. with small,
empty and light-weight single axle trailers or tandem axle trailers with an axle
base of less than 1 metre), at least 4% of the actual trailer weight is a legal
stipulation for a drawbar load.
WARNING
•
For safety reasons, you should not drive at speeds above 80 km/h when
towing a trailer. This also applies to countries where higher speeds are
permitted.
•
Never exceed the maximum trailer weights or the draw bar loading. If
the permissible axle load or the perm issible total weight is exceeded, the
driving characteristics of the vehicle may change, leading to accidents,
injuries and damage to the vehicle.
WheelsTyre pressure, snow chains, wheel boltsTyre pressures
The sticker with the tyre pressure values can be found on the inside of the
tank flap. The tyre pressure values given there are for cold tyres. The slightly
raised pressures of warm tyres must not be reduced ⇒.
COR_ING_0707 Seite 230 Mittwoch, 1. August 2007 6:25 18
Page 254 of 258

Index
252Repairs
Airbags . . . . . . . . . . . . . . . . . . . . . . . . . . . . . . 29
Replacement keys . . . . . . . . . . . . . . . . . . . . . . . . 77
Replacing lamps fog lights . . . . . . . . . . . . . . . . . . . . . . . . . . . 217
Rev counter . . . . . . . . . . . . . . . . . . . . . . . . . . . . . 53
Reverse gear Manual gearbox . . . . . . . . . . . . . . . . . . . . . 133
RME fuel (biodiesel) . . . . . . . . . . . . . . . . . . . . . 174
Roll-back function Sliding/tilting roof . . . . . . . . . . . . . . . . . . . . 88
Windows . . . . . . . . . . . . . . . . . . . . . . . . . . . . 86
Roof aerial* . . . . . . . . . . . . . . . . . . . . . . . . . . . . 168
Roof carrier* . . . . . . . . . . . . . . . . . . . . . . . . . . . . 115
Rubber seals . . . . . . . . . . . . . . . . . . . . . . . . . . . 162
Running in Brake pads . . . . . . . . . . . . . . . . . . . . . . . . . . 147
Engine . . . . . . . . . . . . . . . . . . . . . . . . . . . . . 147
Tyres . . . . . . . . . . . . . . . . . . . . . . . . . . . . . . . 147
Running in tyres . . . . . . . . . . . . . . . . . . . . . . . . 147SSafe driving . . . . . . . . . . . . . . . . . . . . . . . . . . . . . . 7
Safety . . . . . . . . . . . . . . . . . . . . . . . . . . . . . . . . . . . 8
Safety equipment . . . . . . . . . . . . . . . . . . . . . . . . . 7
Safety instructions Coolant temperature . . . . . . . . . . . . . . . . . . . 64
Safety notes Belt tension devices . . . . . . . . . . . . . . . . . . . 25
Curtain airbags . . . . . . . . . . . . . . . . . . . . . . . 38 Disabling front passenger airbag . . . . . . . . 41
Front airbags . . . . . . . . . . . . . . . . . . . . . . . . . 33
Side airbags . . . . . . . . . . . . . . . . . . . . . . . . . 36
Using child seats . . . . . . . . . . . . . . . . . . . . . . 43
Using seat belts . . . . . . . . . . . . . . . . . . . . . . 20
Safety system- safe . . . . . . . . . . . . . . . . . . . . . . . 71
Seals . . . . . . . . . . . . . . . . . . . . . . . . . . . . . . . . . 162
Seat adjustment . . . . . . . . . . . . . . . . . . . . 102, 105
Seat belt position Pregnant women . . . . . . . . . . . . . . . . . . . . . . 23
Seat belts . . . . . . . . . . . . . . . . . . . . . . . . . . . . 22
Seat belt release . . . . . . . . . . . . . . . . . . . . . . . . . 24
Seat belt warning lamp . . . . . . . . . . . . . . . . . . . . 16
Seat belts . . . . . . . . . . . . . . . . . . . . . . . . . . . . . . . 16 adjustment . . . . . . . . . . . . . . . . . . . . . . . . . . 21
Incorrectly fastened . . . . . . . . . . . . . . . . . . . 25
Not worn . . . . . . . . . . . . . . . . . . . . . . . . . . . . 19
Safety notes . . . . . . . . . . . . . . . . . . . . . . . . . . 20
Warning lamp . . . . . . . . . . . . . . . . . . . . . . . . 16
Seat belts protect . . . . . . . . . . . . . . . . . . . . . . . . 20
Seat heating . . . . . . . . . . . . . . . . . . . . . . . . . . . 106
Seats . . . . . . . . . . . . . . . . . . . . . . . . . . . . . . . . . . 16
Selective opening* . . . . . . . . . . . . . . . . . . . . . . . 72
Semiautomatic air conditioning controls . . . . . . . . . . . . . . . . . . . . . . . . . . . . 119
Shoes . . . . . . . . . . . . . . . . . . . . . . . . . . . . . . . . . . 14
Side airbags . . . . . . . . . . . . . . . . . . . . . . . . . . . . 33 Description . . . . . . . . . . . . . . . . . . . . . . . . . . 33
Function . . . . . . . . . . . . . . . . . . . . . . . . . . . . . 35
Safety notes . . . . . . . . . . . . . . . . . . . . . . . . . . 36
Side lights . . . . . . . . . . . . . . . . . . . . . . . . . . . . . . 89 Sitting position
Driver . . . . . . . . . . . . . . . . . . . . . . . . . . . . . . . . 9
Front passenger . . . . . . . . . . . . . . . . . . . . . . 10
Incorrect sitting position . . . . . . . . . . . . . . . 13
Passengers . . . . . . . . . . . . . . . . . . . . . . . . . . 11
Sitting position, occupants . . . . . . . . . . . . . . . . . 9
Sliding/tilting roof . . . . . . . . . . . . . . . . . . . . . . . 87
Snow chains . . . . . . . . . . . . . . . . . . . . . . . 195, 231
Soot accumulation in the diesel engine particulate
filter *
Indicator . . . . . . . . . . . . . . . . . . . . . . . . . . . . 66
Spare wheel . . . . . . . . . . . . . . . . . . . . . . . . . . . . 196
Speedometer . . . . . . . . . . . . . . . . . . . . . . . . . . . . 54
Starting Petrol engines . . . . . . . . . . . . . . . . . . . 131
Starting the engine . . . . . . . . . . . . . . . . . . 130, 131 After the fuel tank has been run dry . . . . . 132
Steam cleaners . . . . . . . . . . . . . . . . . . . . . . . . . 160
Steering . . . . . . . . . . . . . . . . . . . . . . . . . . . . . . . 127 Steering lock . . . . . . . . . . . . . . . . . . . . . . . . 129
Steering wheel controls . . . . . . . . . . . . . . . . . . . 68
Steering wheel height adjustment . . . . . . . . . 127
Stowage front right seats . . . . . . . . . . . . . . . . . . . . . . 109
Stowage compartment Front passenger side . . . . . . . . . . . . . . . . . 108
Sun visors . . . . . . . . . . . . . . . . . . . . . . . . . . . . . . 95
Sunroof . . . . . . . . . . . . . . . . . . . . . . . . . . . . . . . . 87
Sunroof blind Sliding/tilting roof . . . . . . . . . . . . . . . . . . . . 87
COR_ING_0707 Seite 252 Mittwoch, 1. August 2007 6:25 18
Page 255 of 258

Index253
Switch
Hazard warning lights . . . . . . . . . . . . . . . . . . 91
Rear window heating . . . . . . . . . . . . . . . . . . . 90
Switches Electric windows . . . . . . . . . . . . . . . . . . . . . . 84
Sliding/tilting roof . . . . . . . . . . . . . . . . . . . . . 87
Switching off the engine . . . . . . . . . . . . . . . . . . 132TTailgate . . . . . . . . . . . . . . . . . . . . . . . . . . . . . . . . . 83
Tank fuel level . . . . . . . . . . . . . . . . . . . . . . . . . . . . . 54
reserve indicator . . . . . . . . . . . . . . . . . . . . . . 54
tank capacity . . . . . . . . . . . . . . . . . . . . . . . . . 54
TCS . . . . . . . . . . . . . . . . . . . . . . . . . . . . . . . . . . . 144
TCS (Traction control system) Warning lamp . . . . . . . . . . . . . . . . . . . . . . . . . 66
The danger of not using the seat belt . . . . . . . . 19
Tightening torque of wheel bolts . . . . . . . . . . . 231
Tools . . . . . . . . . . . . . . . . . . . . . . . . . . . . . . . . . . 196
Towing . . . . . . . . . . . . . . . . . . . . . . . . . . . . . . . . 224
Towing a trailer . . . . . . . . . . . . . . . . . . . . 154, 230
Towing bracket . . . . . . . . . . . . . . . . . . . . . . . . . . 155
Towing bracket, fitting . . . . . . . . . . . . . . . . . . . 170
Towing eye . . . . . . . . . . . . . . . . . . . . . . . . . . . . . 224
Tow-starting . . . . . . . . . . . . . . . . . . . . . . . . . . . . 224
Traction control system warning lamp . . . . . . . . . . . . . . . . . . . . . . . . . 66 Trailer turn signals
Indicator lamps . . . . . . . . . . . . . . . . . . . . . . . 67
Warning lamp . . . . . . . . . . . . . . . . . . . . . . . . . 93
Trailer weights . . . . . . . . . . . . . . . . . . . . . . . . . . 230
Trips, checklist . . . . . . . . . . . . . . . . . . . . . . . . . . . . 8
Turn signals . . . . . . . . . . . . . . . . . . . . . . . . . . . . . 92 Warning lamp . . . . . . . . . . . . . . . . . . . . . . 63, 93
Two-way radio . . . . . . . . . . . . . . . . . . . . . . . . . . 168
Type plate . . . . . . . . . . . . . . . . . . . . . . . . . . . . . . 228
Tyre Mobility-System (Tyre repair kit) . . . 197, 203
Tyre pressure . . . . . . . . . . . . . . . . . . . . . . . . . . . 191
Tyre pressures . . . . . . . . . . . . . . . . . . . . . . . . . . 230
Tyre repair kit . . . . . . . . . . . . . . . . . . . . . . 197, 203
Tyres and wheels Dimensions . . . . . . . . . . . . . . . . . . . . . . . . . 193
Tyres service life . . . . . . . . . . . . . . . . . . . . . . . . 192
Tyres tread depth . . . . . . . . . . . . . . . . . . . . . . . . 192
Tyres with directional tread pattern . . . . . . . . . 191
UUnderbody sealant . . . . . . . . . . . . . . . . . . . . . . 163
USB* connection . . . . . . . . . . . . . . . . . . . . . . . . 113VVehicle battery . . . . . . . . . . . . . . . . . . . . . . . . . . 188
Vehicle data . . . . . . . . . . . . . . . . . . . . . . . . . . . . 228
Vehicle identification data . . . . . . . . . . . . . . . . 228
Vehicle identification number . . . . . . . . . . . . . 228
Vehicle interior heating or cooling system . . . 120 Vehicle paint
Car care products . . . . . . . . . . . . . . . . . . . . 158
Vehicle tools Storage . . . . . . . . . . . . . . . . . . . . . . . . . . . . . 196
Vehicle wallet storage . . . . . . . . . . . . . . . . . . . . 108
Ventilation . . . . . . . . . . . . . . . . . . . . . . . . . . . . . 117
Ventilation slits . . . . . . . . . . . . . . . . . . . . . . . . . . 15
Volumetric sensor* Activation . . . . . . . . . . . . . . . . . . . . . . . . . . . . 81
Deactivation . . . . . . . . . . . . . . . . . . . . . . . . . . 81
WWarning lamp . . . . . . . . . . . . . . . . . . . . . . . . . . . 28
Warning lamps . . . . . . . . . . . . . . . . . . . . . . . . . . . 60
Warning triangles . . . . . . . . . . . . . . . . . . . . . . . 113
Washer fluid . . . . . . . . . . . . . . . . . . . . . . . . . . . . 185
Washing by hand . . . . . . . . . . . . . . . . . . . . . . . . 159
Washing the vehicle . . . . . . . . . . . . . . . . . . . . . 159
Washing with high pressure cleaners . . . . . . . 160
Water in the windscreen washer tank . . . . . . . 185
Wear indicators . . . . . . . . . . . . . . . . . . . . . . . . . 192
Wheel bolts . . . . . . . . . . . . . . . . . . . . . . . 200, 231Torque . . . . . . . . . . . . . . . . . . . . . . . . . . . . . 194
Wheel change . . . . . . . . . . . . . . . . . . . . . . . . . . 197
Wheel trims . . . . . . . . . . . . . . . . . . . . . . . . . . . . 199
Wheels . . . . . . . . . . . . . . . . . . . . . . . . . . . 190, 230
Why assume the correct sitting position? . . . . . 27
Why should head restraints be correctly adjusted? 12
COR_ING_0707 Seite 253 Mittwoch, 1. August 2007 6:25 18