wiper Seat Exeo 2011 User Guide
[x] Cancel search | Manufacturer: SEAT, Model Year: 2011, Model line: Exeo, Model: Seat Exeo 2011Pages: 313, PDF Size: 5.02 MB
Page 190 of 313
188Intelligent technology
Brakes
General notes
New brake pads
New brake pads do not provide optimal performance during the first 200
km; first they must be “run in”. However, the reduced braking capacity may
be compensated by pressing on the brake pedal a little harder. Avoid over-
loading the brakes during run-in.
Wear
The rate of wear on the brake pads depends a great deal on how you drive
and the conditions in which the vehicle is operated. Negative factors are, for
instance, city traffic, frequent short trips or hard driving with abrupt starts
and stops.
Wet roads or road salt
In certain conditions, such as in heavy rain, or after washing the vehicle or
driving through water, the full braking effect can be delayed by moisture (or
in winter by ice) on the discs and brake pads. In this case the brakes should
be dried by pressing the brake pedal several times.
When the speed is over 80 km/h and the windscreen wipers are on, the
brake system moves the pads towards the brake discs for a few seconds.
This occurs - without the driver knowing - at regular intervals and allows a
faster response from the brakes when driving on wet roads.
The effectiveness of the brakes can also be temporarily reduced if the vehi-
cle is driven for some distance without using the brakes when there is a lot
of salt on the road in winter. In this case, the layer of salt on the brake discs
and pads has to wear off before braking.
Corrosion
There may be a tendency for corrosion to form on the discs and dirt to build
up on the brake pads if the vehicle is used infrequently or the brakes are
not used very often. If the brakes are not used frequently, or if rust has formed on the disks, it is
advisable to clean off the pads and disks by braking firmly a few times at a
moderately high speed
⇒
.
Faults in the brake system
If the brake pedal travel should ever increase suddenly, this may mean that
one of the two brake circuits has failed. Drive immediately to the nearest
specialised workshop and have the fault repaired. Drive there slowly and re-
member that you will have to apply more pressure on the brake pedal and
allow for longer stopping distances.
Low brake fluid level
Malfunctions can occur in the brake system if the brake fluid level is too
low. The brake fluid level is monitored electronically.
WARNING
When applying the brakes to clean off deposits on the pads and discs,
select a clear, dry road. Be sure not to inconvenience or endanger other
road users. Risk of accident.
CAUTION
● Never let the brakes “drag” by leaving your foot on the pedal when it is
not necessary to brake. This overheats the brakes, resulting in longer stop-
ping distances and greater wear.
● Before driving down a long, steep gradient, it is advisable to reduce
speed and change to a lower gear (or move the gear lever to a lower gear
position if your vehicle has automatic transmission). This makes use of en-
gine braking and prolongs the service life of the brakes. If you still have to
use the brakes, it is better to brake firmly at intervals than to apply the
brakes continuously.
Page 211 of 313

209
Vehicle maintenance and cleaning
Polishing the paintwork
Polishing brings back gloss to the paintwork. Polishing is only necessary if the paint has lost its shine, and the gloss can-
not be brought back by applying wax. Polishing products can be purchased
in your Authorised Service Centre.
The vehicle must be waxed after polishing if the polish used does not con-
tain wax compounds to seal the paint ⇒ page 208, Vehicle paint mainte-
nance.
CAUTION
To prevent damage to the paintwork:
● Do not use polishes and hard wax on painted parts with a matte finish
or on plastic parts.
● Do not polish your vehicle in a sandy or dusty environment.
Caring for plastic parts
Solvents damage plastic parts.
If normal washing fails to clean plastic parts, clean them with approved sol-
vent-free plastic cleaning and care products.
CAUTION
● The use of liquid air freshener directly over the air vents of the vehicle
may damage the plastic parts if the liquid is accidentally spilled.
● Cleaning products which contain solvents will damage the material. Cleaning windows and exterior mirrors
Cleaning windows
–
Moisten the windows with commercially available, alcohol
based glass cleaner.
– Dry the windows with a clean chamois leather or a lint-free
cloth.
Removing snow
– Use a small brush to remove snow from the windows and mir-
rors.
Removing ice
– Use a de-icer spray.
Use a clean cloth or chamois leather to dry the windows. The chamois leath-
ers used on painted surfaces are not suitable to clean windows because
they are soiled with wax deposits which could smear the windows.
If possible, use a de-icing spray to remove ice. If you use an ice scraper,
push it in one direction only without swinging it.
Use window cleaner or a silicone remover to clean rubber, oil, grease and
silicone deposits off.
Wax deposits can be removed with a special cleaner available in your Au-
thorised Service Centre. Wax deposits on the windscreen could cause the
wiper blades to judder. Adding a window cleaner that dissolves wax to the
windscreen washer fluid prevents wiper blades from juddering, but wax de-
posits are not removed.
Safety FirstOperating InstructionsPractical TipsTechnical Specifications
Page 212 of 313

210Vehicle maintenance and cleaning
CAUTION
● Never use warm or hot water to remove snow and ice from windows and
mirrors. This could cause the glass to crack!
● The heating element for the rear window is located on the inner side of
the window. To prevent damage, do not put stickers on the heating ele-
ments inside the window.
Cleaning windscreen wiper blades
Clean wiper blades improve visibility.
1. Use a soft cloth to remove dust and dirt from the windscreen wiper blades.
2. Use window cleaner to clean the windscreen wiper blades. Use a sponge or a cloth to remove stubborn dirt.
Rubber seals maintenance
If rubber seals are well looked after, they will not freeze so
quickly. 1. Use a soft cloth to remove dust and dirt from the rubber seals.
2. Apply a specialist care product to the rubber seals.
The rubber strips on the doors, windows, bonnet and tailgate will remain
pliable and last longer if they are treated with a suitable care product (for
example silicone spray). Caring for rubber seals will also prevent premature ageing and leaks. The
doors will be easier to open. If rubber seals are well looked after, they will
not freeze so quickly in winter.
Door lock cylinders
The door lock cylinders can freeze up in winter.
To de-ice the lock cylinders you should only use spray with lubricating and
anti-corrosive properties.
Cleaning chrome parts
1. Clean chrome parts with a damp cloth.
2. Polish chrome parts with a soft, dry cloth. If this does not provide satisfying results, use a specialist chrome cleaning
product. Chrome cleaning products will remove stains from the surface.
CAUTION
To prevent scratching chrome surfaces:
● Never use an abrasive cleaning product on chrome.
● Do not clean or polish chrome parts in a sandy or dusty environment.
Steel wheel rims
– Clean steel wheel rims regularly using a separate sponge.
Page 223 of 313

221
Checking and refilling levels
Opening the bonnet
Fig. 165 Release catch
under the bonnet
Before opening the bonnet make sure that the windscreen wiper
arms are not lifted away from the glass. Otherwise the paint may
be damaged.
– Lift the bonnet slightly ⇒
.
– Press the release catch under the bonnet upwards ⇒ fig. 165.
This will release the arrester hook under the bonnet.
– Open the bonnet.
The bonnet is held in position by a gas-filled strut.
WARNING
Never open the bonnet if you see steam or drips of coolant being re-
leased from the engine compartment. Failure to comply could result in
burns. Wait until no steam or coolant can be seen before opening the
bonnet.
Work in the engine compartment
Extra caution is necessary when working on components in
the engine compartment.
Always be aware of the danger of injury and scalding as well as the risk of
accident or even fire when working in the engine compartment (e.g. when
checking and refilling fluids). Always observe the warnings listed below
and follow all general safety precautions. The engine compartment of the
vehicle is a potentially hazardous area ⇒
WARNING
● Switch the engine off.
● Remove the ignition key.
● Apply the handbrake firmly.
● If your vehicle is equipped with a manual gearbox, place the gear lev-
er in neutral. If you are driving an automatic vehicle, place the selector
lever in position P.
● Wait for the engine to cool down.
● Children should not be allowed to approach the engine compartment.
● Never spill liquids used for vehicle operation on the engine compart-
ment, as these may catch fire (e.g. coolant).
● Take care not to cause short circuits in the electrical system, especial-
ly when working on the battery.
● Never touch the radiator fan while the engine is hot, as the fan could
start up suddenly.
● Never open the expansion tank when the engine is hot. The cooling
system is under pressure.
● Protect face, hands and arms from any hot steam or hot coolant fluid
released by covering the cap with a large, thick rag when opening the ex-
pansion tank.
Safety FirstOperating InstructionsPractical TipsTechnical Specifications
Page 230 of 313

228Checking and refilling levels
Radiator fan
The radiator fan can start running spontaneously.
The auxiliary fan can continue to run for as long as 10 minutes after stop-
ping the engine, even after the ignition is switched off. It may also start run-
ning suddenly ⇒
after some while if
● Stored heat raises the coolant temperature, or
● The hot engine compartment is additionally heated up by the sun.
WARNING
When working in the engine compartment be aware that the radiator fan
may start running suddenly, leading to the risk of injury.
Washer fluid and windscreen wiper blades
Windscreen washer system
Plain water is not sufficient for the windscreen washer sys-
tem.
Fig. 169 In the engine
compartment: Cap of
windscreen washer fluid
reservoir.
The container for the windscreen washer contains the cleaning fluid for the
windscreen and the headlight washer system*. The container is located in
the engine compartment (front left). The filler cap is marked with the symbol
⇒ fig. 169.
The capacity of the container is listed in ⇒ page 290.
Plain water on its own is not enough to clean the glass properly. It is there-
fore advisable to add a suitable washer fluid additive (with wax solvent) to
the water. A washer fluid with freeze-resistant additive should be used in
winter.
Page 231 of 313

229
Checking and refilling levels
CAUTION
● Never put radiator antifreeze or other additives into the windscreen
washer fluid.
● Never use washer fluid which contains paint thinners or solvents as it
can damage the paintwork.
Changing windscreen wiper blades
If the windscreen wiper blades are in perfect condition, you
will benefit from an improved visibility. Damaged wiper
blades should be replaced immediately.
Fig. 170 Removing the
wiper blade
Fig. 171 Fitting the wip-
er blade
Removing the wiper blade
– Lift the wiper arm away from the windscreen.
– Slide the retainer catch on the wiper blade in the direction indi-
cated ⇒ fig. 170 A
. Hold onto the wiper blade at the same
time.
– Pull the wiper blade B
out of its mounting on the wiper arm.
Fitting the wiper blade
– Slide back the retainer catch on the new wiper blade. The
mounting on the wiper blade should now be visible.
– Fit the new wiper blade into the mounting on the wiper arm
⇒ fig. 171 C
.
– Slide the retainer catch on the wiper blade in direction D
so
that it clicks into place on the wiper arm.
– Fold the wiper arm back down onto the glass.
Safety FirstOperating InstructionsPractical TipsTechnical Specifications
Page 232 of 313
230Checking and refilling levels
If the windscreen wipers smear , they should be replaced if they are dam-
aged, or cleaned if they are soiled.
If this does not produce the desired results, the setting angle of the wind-
screen wiper arms might be incorrect. They should be checked by a special-
ised workshop and corrected if necessary.
WARNING
Do not drive unless you have good visibility through all windows!
● The ignition must not be switched on while the front wiper arms are
in a raised position. The wipers would return to their park position and
damage the paintwork on the bonnet.
● To prevent smearing on the windscreen, the wiper blades should be
cleaned regularly using a window cleaner solution. If the wiper blades
are very dirty (e.g. insects etc.), they should be cleaned using a sponge
or cloth. Failure to do so could result in an accident.
● For safety reasons, the wiper blades should be changed once or twice
a year.
CAUTION
● Damaged or dirty windscreen wipers could scratch the windscreen.
● Never use fuel, nail varnish remover, paint thinner or similar products to
clean the windows. This could damage the windscreen wiper blades.
● Never move the windscreen wiper or windscreen wiper arm manually.
This could cause damage.
● Do not pull the windscreen wipers forward unless they are in the service
position. Otherwise the bonnet could be damaged. Brake fluid
Checking the brake fluid level
The brake fluid level can be checked visually.
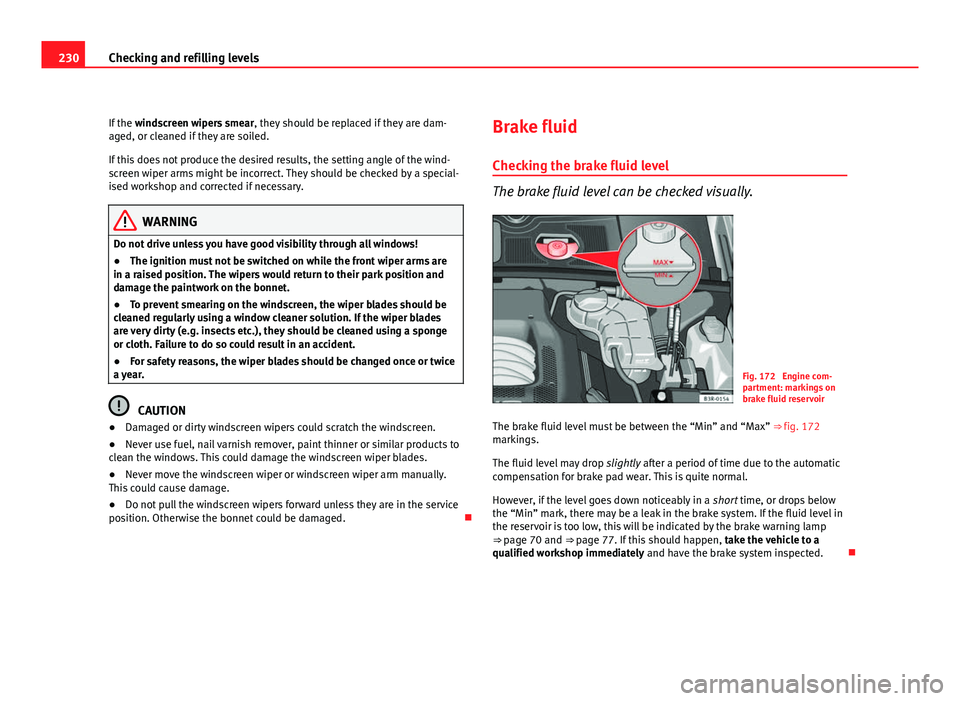
Fig. 172 Engine com-
partment: markings on
brake fluid reservoir
The brake fluid level must be between the “Min” and “Max” ⇒ fig. 172
markings.
The fluid level may drop slightly after a period of time due to the automatic
compensation for brake pad wear. This is quite normal.
However, if the level goes down noticeably in a short time, or drops below
the “Min” mark, there may be a leak in the brake system. If the fluid level in
the reservoir is too low, this will be indicated by the brake warning lamp
⇒ page 70 and ⇒ page 77. If this should happen, take the vehicle to a
qualified workshop immediately and have the brake system inspected.
Page 259 of 313
257
If and when
Fuse assignment
This list shows the fuses which can be replaced relatively
easily by the owner.
No.ConsumerAmps1Air conditioner102Footwell lamps53Heated washer jets54Radiator fan55Parking aid, automatic gearbox106Air conditioner (air purity sensor), pressure sensor5
7Electronic Stability Programme (ESP), brake light
switch, clutch pedal switch, steering angle sensor10
8Telephone59Vacant 10Adaptive headlights right5
11Airbag and disconnection of the front passenger air-
bag5
12Diagnostic socket1013Steering column unit1014Brake lights1015Instrument panel1016Vacant 17Tyre pressure control, rain/light sensor1018Adaptive headlights left519Vacant 20Vacant 21Vacant 22Driver door / front passenger door1523Rear doors15
No.ConsumerAmps24Central electrics unit for convenience equipment2025Heater blower3026Rear window heater3027Power socket for trailer (control unit)3028Fuel pump, auxiliary pump for diesel2029Vacant 30Sliding/tilting sunroof20
31Diagnosis connection, automatic anti-dazzle interior
mirror, reverse light, automatic gearbox15
32Towing socket1533Lighter2034Lambda probe heater1035Luggage compartment power socket*2036Wiper system30
37Pump for windscreen washer and headlight washer
system30
38Luggage compartment illumination, alarm1539Radio, Amplifier2040Horn2541230 volt socket3042Electronic Stability Programme (ESP)2543Engine management1544Seat heating35
Some of the electrical items listed in the table are only fitted on certain
models or are optional extras.
The electric windows and electric seat adjusters are protected by circuit
breakers. These reset automatically after a few seconds when the overload
(caused for example by frozen windows) has been corrected.
Safety FirstOperating InstructionsPractical TipsTechnical Specifications
Page 286 of 313
284If and when
Do not pull too hard with the towing vehicle and take care to avoid jerking
the tow-rope. When towing on an unpaved road, there is always a risk of
overloading and damaging the anchorage points.
The ignition of the vehicle being towed must be switched on to prevent the
steering wheel from locking and also to allow the use of the turn signals,
horn, windscreen wipers and washers.
As the brake servo does not work if the engine is not running, you must ap-
ply considerably more pressure to the brake pedal than you normally would.
As the power assisted steering does not work if the engine is not running,
you will need more strength to steer than you normally would.
Towing vehicles with an automatic gearbox
● Put the selector lever into position “N”.
● Do not drive faster than 50 km/h.
● Do not tow further than 50 km.
● If a breakdown vehicle is used, the vehicle must be towed with the front
wheels raised.
Note
● Observe legal requirements when towing or tow-starting.
● Switch on the hazard warning lights of both vehicles. However, observe
any regulations to the contrary.
● For technical reasons, vehicles with an automatic gearbox must not be
tow-started.
● If damage to your vehicle means that there is no lubricant in the gear-
box, you must raise the drive wheels while the vehicle is being towed.
● If the vehicle has to be towed more than 50 km, the front wheels should
be raised during towing, and towing should be carried out by a qualified
person. ●
The steering wheel is locked when the vehicle has no electrical power.
The vehicle must then be towed with the front wheels raised. Towing should
be carried out by a qualified person.
● The towing eye should always be kept in the vehicle. Please refer to the
notes ⇒ page 283, Tow-starting.
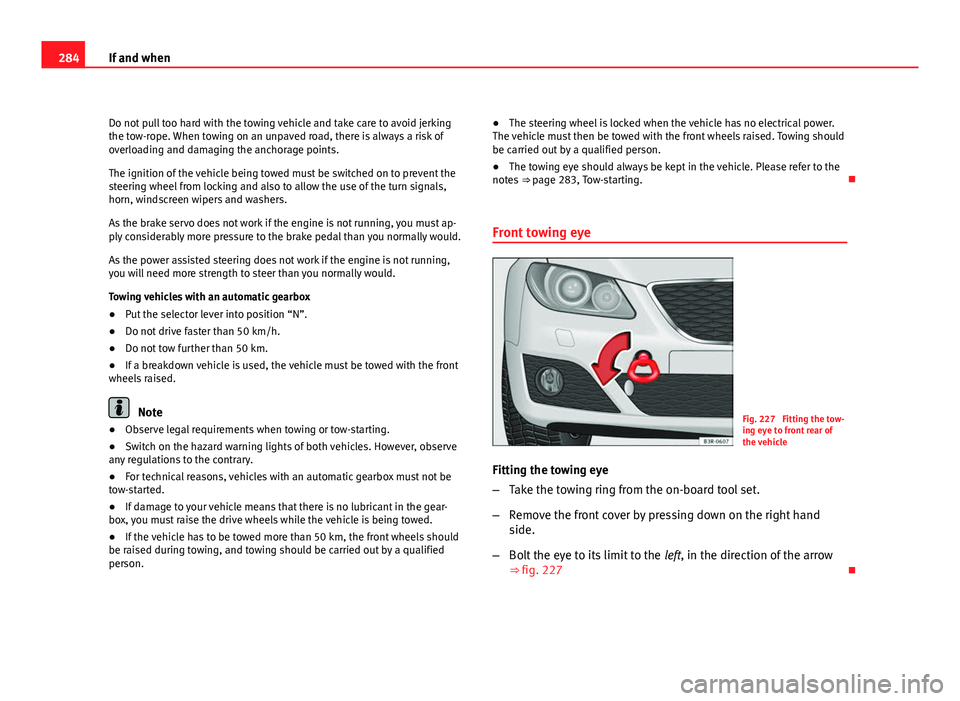
Front towing eyeFig. 227 Fitting the tow-
ing eye to front rear of
the vehicle
Fitting the towing eye
– Take the towing ring from the on-board tool set.
– Remove the front cover by pressing down on the right hand
side.
– Bolt the eye to its limit to the left, in the direction of the arrow
⇒ fig. 227
Page 304 of 313

Bonnet . . . . . . . . . . . . . . . . . . . . . . . . . . . . . . . 220Closing . . . . . . . . . . . . . . . . . . . . . . . . . . . . 222
Opening . . . . . . . . . . . . . . . . . . . . . . . . . . . 221
Releasing . . . . . . . . . . . . . . . . . . . . . . . . . . 220
Brake light Failure control . . . . . . . . . . . . . . . . . . . . . . . . 80
Brake pads . . . . . . . . . . . . . . . . . . . . . . . . . . . . 191
Brakes . . . . . . . . . . . . . . . . . . . . . . . . . . . . . . . . 191 Brake assist system . . . . . . . . . . . . . . . . . . 186
Brake fluid . . . . . . . . . . . . . . . . . . . . . . . . . 230
Worn brake pads . . . . . . . . . . . . . . . . . . . . . 81
Brake servo . . . . . . . . . . . . . . . . . . . . . . . . . . . . 191
Brake system Brakes . . . . . . . . . . . . . . . . . . . . . . . . . . . . . 188
Brake servo . . . . . . . . . . . . . . . . . . . . . . . . . 188
Malfunction . . . . . . . . . . . . . . . . . . . . . . . . . 77
Braking distance . . . . . . . . . . . . . . . . . . . . . . . 191
Bulb change general notes . . . . . . . . . . . . . . . . . . . . . . . 258
C
Car care Exterior . . . . . . . . . . . . . . . . . . . . . . . . . . . . 207
Catalytic converter . . . . . . . . . . . . . . . . . . . . . . 192
CCS . . . . . . . . . . . . . . . . . . . . . . . . . . . . . . . . . . 173
Central locking . . . . . . . . . . . . . . . . . . . . . . . . . . 99 Manual locking . . . . . . . . . . . . . . . . . . . . . . 102
Sunroof: opening and closing . . . . . . . . . . 112
Central locking system Anti-theft security system . . . . . . . . . . . . . 100
Locking . . . . . . . . . . . . . . . . . . . . . . . . . . . . 100 Locking and unlocking the vehicle from in-
side . . . . . . . . . . . . . . . . . . . . . . . . . . . . . 101
Opening and closing the windows . . . . . . 110
Security central locking . . . . . . . . . . . . . . . 101
Switch on the driver door . . . . . . . . . . . . . . 101
Tailgate . . . . . . . . . . . . . . . . . . . . . . . . . . . . 103
Unlocking . . . . . . . . . . . . . . . . . . . . . . . . . . . 99
Cetane number . . . . . . . . . . . . . . . . . . . . . . . . . 219
Changing tail light bulbs . . . . . . . . . . . . . . . . . 269
Changing the main headlight bulb Main headlight . . . . . . . . . . . . . . . . . . . . . . 262
Changing the main headlight bulbs Dipped beam headlight . . . . . . . . . . . . . . . 263
Changing the tail lights Luggage compartment lights . . . . . . . . . . 278
Changing windscreen wiper blades . . . . . . . . 229
Chassis number . . . . . . . . . . . . . . . . . . . . . . . . 287
Childproof lock Rear doors . . . . . . . . . . . . . . . . . . . . . . . . . . 104
Child safety . . . . . . . . . . . . . . . . . . . . . . . . . . . . . 46
Child safety seat ISOFIX system . . . . . . . . . . . . . . . . . . . . . . . . 52
Child seat . . . . . . . . . . . . . . . . . . . . . . . . . . . . . . 48 Categorisation in groups . . . . . . . . . . . . . . . 48
Group 1 . . . . . . . . . . . . . . . . . . . . . . . . . . . . . 49
Group 2 . . . . . . . . . . . . . . . . . . . . . . . . . . . . . 49
Group 3 . . . . . . . . . . . . . . . . . . . . . . . . . . . . . 49
Groups 0 and 0+ . . . . . . . . . . . . . . . . . . . . . . 48
Safety notes . . . . . . . . . . . . . . . . . . . . . . . . . 46
Securing . . . . . . . . . . . . . . . . . . . . . . . . . . . . 51
Child seats on the front passenger seat . . . . . . . . . . . . . 29 Cigarette lighter . . . . . . . . . . . . . . . . . . . . . . . . 148
Cleaning alloy wheel rims . . . . . . . . . . . . . . . . 211
Cleaning chrome . . . . . . . . . . . . . . . . . . . . . . . 210
Cleaning engine compartment . . . . . . . . . . . . 212
Cleaning steel wheel rims . . . . . . . . . . . . . . . . 210
Cleaning windows . . . . . . . . . . . . . . . . . . . . . . 209
Clock, setting . . . . . . . . . . . . . . . . . . . . . . . . . . . 61
Cloth seat covers cleaning . . . . . . . . . . . . . . . . 213
Coat hooks . . . . . . . . . . . . . . . . . . . . . . . . . . . . 153
Cockpit . . . . . . . . . . . . . . . . . . . . . . . . . . . . . . . . 57
Overview . . . . . . . . . . . . . . . . . . . . . . . . . . . . 57
Compartments . . . . . . . . . . . . . . . . . . . . . . . . . 152 In the door trim . . . . . . . . . . . . . . . . . . . . . . 153
In the front seats . . . . . . . . . . . . . . . . . . . . 154
Coolant Checking the level . . . . . . . . . . . . . . . . . . . 226
Coolant fluid Antifreeze . . . . . . . . . . . . . . . . . . . . . . . . . . 225
Coolant fluid additive . . . . . . . . . . . . . . . . . 225
Topping up . . . . . . . . . . . . . . . . . . . . . . . . . 227
Cooling system Coolant temperature gauge . . . . . . . . . . . . . 60
Malfunction . . . . . . . . . . . . . . . . . . . . . . . . . 78
Correct adjustment of front seat head re- straints . . . . . . . . . . . . . . . . . . . . . . . . . . . . . . . 13
Correct adjustment of rear seat head restraints In-use and non-use positions . . . . . . . . . . . 14
Correct sitting position Front passenger . . . . . . . . . . . . . . . . . . . . . . 12
Incorrect sitting position . . . . . . . . . . . . . . . 14
302 Index