driver seat adjustment Seat Exeo 2013 Owner's manual
[x] Cancel search | Manufacturer: SEAT, Model Year: 2013, Model line: Exeo, Model: Seat Exeo 2013Pages: 319, PDF Size: 4.81 MB
Page 5 of 319
Table of Contents
Manual structure . . . . . . . . . . . . . . . . . . . . 5
Content . . . . . . . . . . . . . . . . . . . . . . . . . . . . . . . . 6
Safety First . . . . . . . . . . . . . . . . . . . . . . . . . . . . 7
Safe driving . . . . . . . . . . . . . . . . . . . . . . . . . . . . . . . 7
Brief introduction . . . . . . . . . . . . . . . . . . . . . . . . . 7
Proper sitting position for occupants . . . . . . . . . 10
Pedal area . . . . . . . . . . . . . . . . . . . . . . . . . . . . . . . 16
Storing objects . . . . . . . . . . . . . . . . . . . . . . . . . . . 16
Seat belts . . . . . . . . . . . . . . . . . . . . . . . . . . . . . . . . . 18
Brief introduction . . . . . . . . . . . . . . . . . . . . . . . . . 18
Why wear seat belts? . . . . . . . . . . . . . . . . . . . . . . 19
Seat belts . . . . . . . . . . . . . . . . . . . . . . . . . . . . . . . 23
Seat belt tensioners . . . . . . . . . . . . . . . . . . . . . . . 27
Airbag system . . . . . . . . . . . . . . . . . . . . . . . . . . . . . 28
Brief introduction . . . . . . . . . . . . . . . . . . . . . . . . . 28
Front airbags . . . . . . . . . . . . . . . . . . . . . . . . . . . . . 32
Knee airbag* . . . . . . . . . . . . . . . . . . . . . . . . . . . . . 35
Side airbags* . . . . . . . . . . . . . . . . . . . . . . . . . . . . 38
Curtain airbags . . . . . . . . . . . . . . . . . . . . . . . . . . . 41
Deactivating airbags . . . . . . . . . . . . . . . . . . . . . . . 44
Child safety . . . . . . . . . . . . . . . . . . . . . . . . . . . . . . . 46
Brief introduction . . . . . . . . . . . . . . . . . . . . . . . . . 46
Child seats . . . . . . . . . . . . . . . . . . . . . . . . . . . . . . . 48
Securing child seats . . . . . . . . . . . . . . . . . . . . . . . 51 Operating instructions
. . . . . . . . . . . . . 57
Cockpit . . . . . . . . . . . . . . . . . . . . . . . . . . . . . . . . . . . 57
Overview . . . . . . . . . . . . . . . . . . . . . . . . . . . . . . . . 57
Instruments . . . . . . . . . . . . . . . . . . . . . . . . . . . . . . 59
Warning and indicator lamps . . . . . . . . . . . . . . . . 65
Driver information system . . . . . . . . . . . . . . . . . . 72
Auto-check system . . . . . . . . . . . . . . . . . . . . . . . . 76
Speed warning* . . . . . . . . . . . . . . . . . . . . . . . . 83
Onboard computer . . . . . . . . . . . . . . . . . . . . . . . . 86
Menu display . . . . . . . . . . . . . . . . . . . . . . . . . . . . . 89
Tyre pressure monitoring* . . . . . . . . . . . . . . . . . . 90
Steering wheel controls . . . . . . . . . . . . . . . . . . . . 92
Multifunction steering wheel* . . . . . . . . . . . . . . . 92
Opening and closing . . . . . . . . . . . . . . . . . . . . . . 97
Remote control keys . . . . . . . . . . . . . . . . . . . . . . . 97
Central locking system . . . . . . . . . . . . . . . . . . . . . 99
Rear lid . . . . . . . . . . . . . . . . . . . . . . . . . . . . . . . . . . 104
Childproof lock . . . . . . . . . . . . . . . . . . . . . . . . . . . 105
Remote control key . . . . . . . . . . . . . . . . . . . . . . . . 105
Anti-theft alarm system* . . . . . . . . . . . . . . . . . . . 107
Electric windows . . . . . . . . . . . . . . . . . . . . . . . . . . 109
Sliding/tilting sunroof* . . . . . . . . . . . . . . . . . . . . 112
Lights and visibility . . . . . . . . . . . . . . . . . . . . . . . . 115
Lights . . . . . . . . . . . . . . . . . . . . . . . . . . . . . . . . . . . 115
Interior lights . . . . . . . . . . . . . . . . . . . . . . . . . . . . . 123
Visibility . . . . . . . . . . . . . . . . . . . . . . . . . . . . . . . . . 126
Windscreen wipers . . . . . . . . . . . . . . . . . . . . . . . . 128
Rear vision mirrors . . . . . . . . . . . . . . . . . . . . . . . . 130
Seats and storage . . . . . . . . . . . . . . . . . . . . . . . . . 133
Manual adjustment of the front seats . . . . . . . . . 133
Electric adjustment of front seats* . . . . . . . . . . . 135
Lumbar support* . . . . . . . . . . . . . . . . . . . . . . . . . . 136
Driver seat memory* . . . . . . . . . . . . . . . . . . . . . . . 137 Head restraints . . . . . . . . . . . . . . . . . . . . . . . . . . . 139
Armrests . . . . . . . . . . . . . . . . . . . . . . . . . . . . . . . . 141
Luggage compartment . . . . . . . . . . . . . . . . . . . . . 142
Roof rack . . . . . . . . . . . . . . . . . . . . . . . . . . . . . . . . 145
Drink holder . . . . . . . . . . . . . . . . . . . . . . . . . . . . . . 146
Ashtray*, cigarette lighter* and electric sockets* . .147
Compartments . . . . . . . . . . . . . . . . . . . . . . . . . . . . 152
Air conditioning . . . . . . . . . . . . . . . . . . . . . . . . . . . 155
2C-Climatronic . . . . . . . . . . . . . . . . . . . . . . . . . . . . 155
Driving . . . . . . . . . . . . . . . . . . . . . . . . . . . . . . . . . . . . 165
Steering . . . . . . . . . . . . . . . . . . . . . . . . . . . . . . . . . 165
Safety . . . . . . . . . . . . . . . . . . . . . . . . . . . . . . . . . . . 165
Ignition lock . . . . . . . . . . . . . . . . . . . . . . . . . . . . . . 166
Starting and stopping the engine . . . . . . . . . . . . 167
Start-Stop function* . . . . . . . . . . . . . . . . . . . . . . . 169
Handbrake . . . . . . . . . . . . . . . . . . . . . . . . . . . . . . . 172
Parking aid acoustic system . . . . . . . . . . . . . . . . . 174
Cruise speed* (Cruise control system) . . . . . . . . 176
Manual gearbox . . . . . . . . . . . . . . . . . . . . . . . . . . 179
Automatic gearbox* . . . . . . . . . . . . . . . . . . . . . . . 180
Practical Tips . . . . . . . . . . . . . . . . . . . . . . . . . 188
Intelligent technology . . . . . . . . . . . . . . . . . . . . . 188
Electronic Stability Control (ESC) . . . . . . . . . . . . . 188
Brakes . . . . . . . . . . . . . . . . . . . . . . . . . . . . . . . . . . 192
Power steering . . . . . . . . . . . . . . . . . . . . . . . . . . . 193
Servotronic* . . . . . . . . . . . . . . . . . . . . . . . . . . . . . 193
Driving and the environment . . . . . . . . . . . . . . . 194
Running-in . . . . . . . . . . . . . . . . . . . . . . . . . . . . . . . 194
Exhaust gas purification system . . . . . . . . . . . . . 195
Economical and environmentally friendly driving 196
Driving abroad . . . . . . . . . . . . . . . . . . . . . . . . . . . . 198
3
Table of Contents
Page 8 of 319
6Content
Content
This manual is structured to provide the information you need in an organ-
ised way. The content of this Manual is divided into sections which belong
to chapters (e.g. “Air conditioning”). The entire manual is divided into five
large parts which are:
1. Safety First Information about the vehicle equipment relating to passive safety such as
seat belts, airbags, seats, etc.
2. Operating instructions
Information about the distribution of controls in the driver position of your
vehicle, about the seat adjustment possibilities, about how to create a suit-
able climate in the vehicle interior, etc.
3. Practical Tips Advice relating to the driving, caring and maintenance of your vehicle and
certain problems you can solve yourself.
4. Technical specifications
Figures, values and the dimensions of your vehicle.
5. Alphabetic index
At the end of this manual there is a detailed alphabetical index, this will
help you to quickly find the information you require.
Page 12 of 319
10Safe driving
Proper sitting position for occupants
Correct sitting position for driver
The correct sitting position for the driver is important for
safe and relaxed driving.
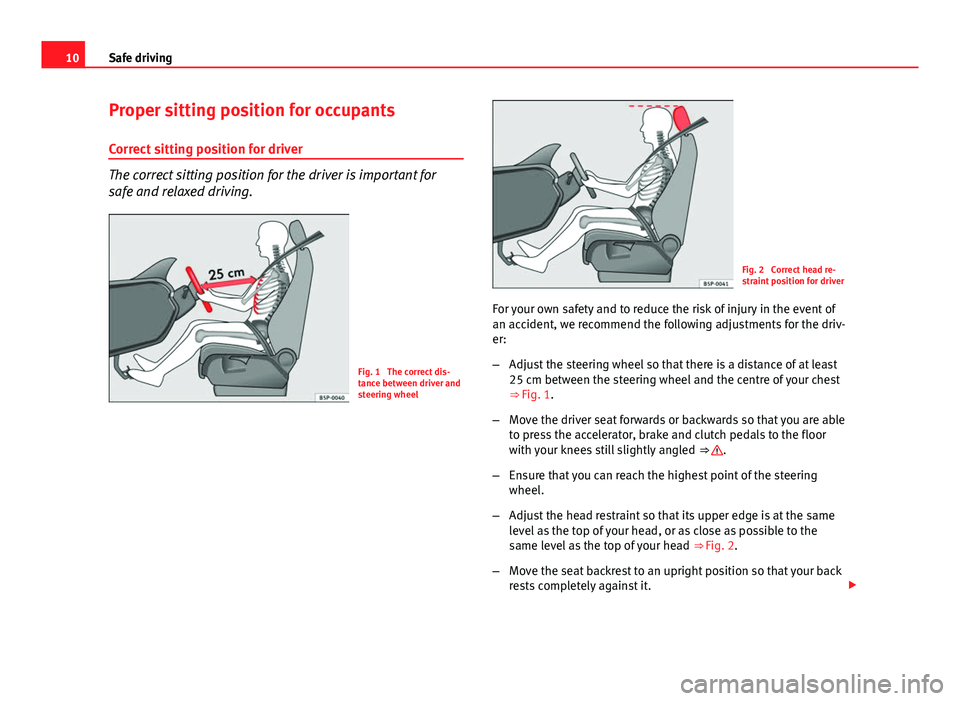
Fig. 1 The correct dis-
tance between driver and
steering wheel
Fig. 2 Correct head re-
straint position for driver
For your own safety and to reduce the risk of injury in the event of
an accident, we recommend the following adjustments for the driv-
er:
– Adjust the steering wheel so that there is a distance of at least
25 cm between the steering wheel and the centre of your chest
⇒ Fig. 1.
– Move the driver seat forwards or backwards so that you are able
to press the accelerator, brake and clutch pedals to the floor
with your knees still slightly angled ⇒
.
– Ensure that you can reach the highest point of the steering
wheel.
– Adjust the head restraint so that its upper edge is at the same
level as the top of your head, or as close as possible to the
same level as the top of your head ⇒ Fig. 2.
– Move the seat backrest to an upright position so that your back
rests completely against it.
Page 13 of 319
11
Safe driving
– Fasten your seat belt securely ⇒ page 18.
– Keep both feet in the footwell so that you have the vehicle un-
der control at all times.
Adjustment of the driver seat ⇒ page 133.
WARNING
● An incorrect sitting position of the driver can lead to severe injuries.
● Adjust the driver seat so that there is at least 25 cm distance between
the centre of the chest and the centre of the steering wheel ⇒ Fig. 1. If
you are sitting closer than 25 cm, the airbag system cannot protect you
properly.
● If your physical constitution prevents you from maintaining the mini-
mum distance of 25 cm, contact a specialised workshop. The workshop
will help you decide if special specific modifications are necessary.
● When driving, always hold the steering wheel with both hands on the
outside of the ring at the 9 o'clock and 3 o'clock positions. This reduces
the risk of injury when the driver airbag is triggered.
● Never hold the steering wheel at the 12 o'clock position, or in any
other manner (e.g. in the centre of the steering wheel). In such cases, if
the airbag is triggered, you may sustain injuries to the arms, hands and
head.
● To reduce the risk of injury to the driver during sudden braking ma-
noeuvres or an accident, never drive with the backrest tilted far back! The
airbag system and seat belts can only provide optimal protection when
the backrest is in an upright position and the driver is wearing his or her
seat belt correctly. The further the seat backrests are tilted to the rear,
the greater the risk of injury due to incorrect positioning of the belt web
or to the incorrect sitting position!
● Adjust the head restraint properly to achieve optimal protection.
Correct sitting position for front passenger
The front passenger must sit at least 25 cm away from the
dash panel so that the airbag can provide the greatest pos-
sible protection in the event that it is triggered.
For your own safety and to reduce the risk of injury in the event of
an accident, we recommend the following adjustments for the front
passenger:
– Move the front passenger seat back as far as possible ⇒
.
– Move the seat backrest to an upright position so that your back
rests completely against it.
– Adjust the head restraint so that its upper edge is at the same
level as the top of your head, or as close as possible to the
same level as the top of your head ⇒ page 13.
– Always keep both feet in the footwell in front of the front pas-
senger seat.
– Fasten your seat belt securely ⇒ page 18.
It is possible to deactivate the front passenger airbag in exceptional circum-
stances ⇒ page 24.
Adjusting the front passenger seat ⇒ page 133.
Safety FirstOperating instructionsPractical TipsTechnical Specifications
Page 28 of 319
26Seat belts
–Guide the belt back by hand so that it rolls up easily and the
trim is not damaged.
WARNING
Never unbuckle a seat belt while the vehicle is in motion. If you do, you
increase the risk of sustaining severe or fatal injuries.
Seat belt height adjustment
Seat belt height adjusters can be used to adjust the height
of the shoulder area of the seat belt.
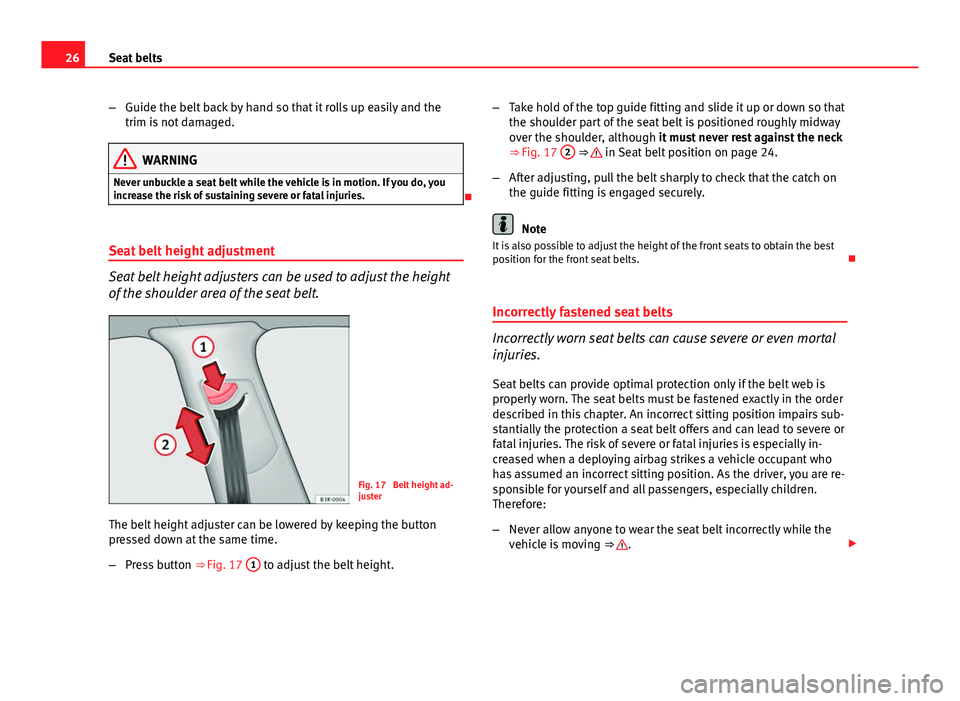
Fig. 17 Belt height ad-
juster
The belt height adjuster can be lowered by keeping the button
pressed down at the same time.
– Press button ⇒
Fig. 17 1
to adjust the belt height. –
Take hold of the top guide fitting and slide it up or down so that
the shoulder part of the seat belt is positioned roughly midway
over the shoulder, although it must never rest against the neck
⇒ Fig. 17 2
⇒ in Seat belt position on page 24.
– After adjusting, pull the belt sharply to check that the catch on
the guide fitting is engaged securely.
Note
It is also possible to adjust the height of the front seats to obtain the best
position for the front seat belts.
Incorrectly fastened seat belts
Incorrectly worn seat belts can cause severe or even mortal
injuries. Seat belts can provide optimal protection only if the belt web is
properly worn. The seat belts must be fastened exactly in the order
described in this chapter. An incorrect sitting position impairs sub-
stantially the protection a seat belt offers and can lead to severe or
fatal injuries. The risk of severe or fatal injuries is especially in-
creased when a deploying airbag strikes a vehicle occupant who
has assumed an incorrect sitting position. As the driver, you are re-
sponsible for yourself and all passengers, especially children.
Therefore:
– Never allow anyone to wear the seat belt incorrectly while the
vehicle is moving ⇒
.
Page 134 of 319
132Lights and visibility
Retracting both exterior mirrors
–Turn the knob to position A
.
It is advisable to fold the exterior mirrors, for example when parking or when
driving through narrow spaces.
Heated mirrors
The mirrors are heated (depending on the outside temperature) when the
heated rear window ⇒ page 126 is switched on.
The exterior mirror heating is not activated at temperatures above approxi-
mately 20 °C.
Memory for exterior mirrors*
In vehicles with memory function for the driver seat, the setting of the exte-
rior mirrors is automatically stored together with the seat position
⇒ page 137.
Tilting function for exterior mirror on the passenger side* (only if equipped
with memory for exterior mirrors)
When reverse gear is engaged, the mirror surface tilts slightly downwards,
provided the mirror control is switched to the exterior mirror on the passen-
ger side (knob in position R
⇒ Fig. 103). This provides a better view of the
kerb when parking.
The mirror returns to its original position as soon as reverse gear is disen-
gaged and the vehicle is driven forwards at a speed above 15 km/h, or
when the mirror control is turned to position L
or to the neutral position
0.
CAUTION
● Rear view convex or aspheric* mirrors increase the field of vision, al-
though objects appear smaller and further away in the mirrors. Therefore,
you should not rely on these mirrors for judging the distance of vehicles be-
hind.
● If one of the mirror housings is knocked out of position (e.g. when park-
ing), the mirrors must first be fully retracted with the electric control. Do not
readjust the mirror housing by hand, as this will interfere with the mirror ad-
juster function.
Note
If the electrical adjustment ever fails to operate, the mirrors can be adjusted
by hand by lightly pressing the edge of the mirror glass.
Page 135 of 319
133
Seats and storage
Seats and storage Manual adjustment of the front seats
Seat adjuster controls
There are several seat adjustment functions for your conven-
ience
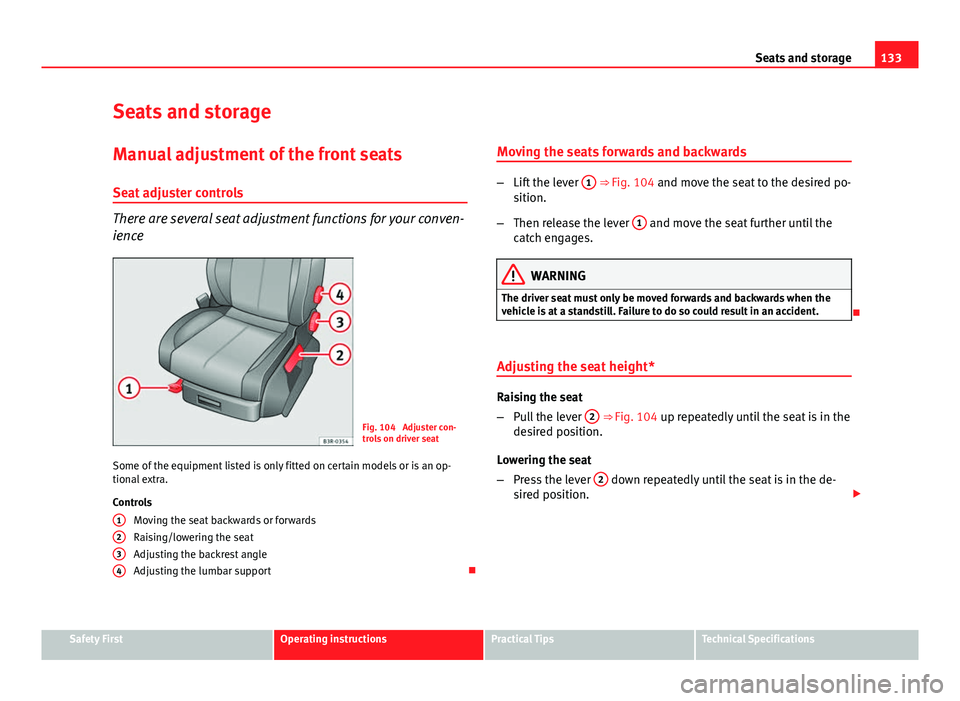
Fig. 104 Adjuster con-
trols on driver seat
Some of the equipment listed is only fitted on certain models or is an op-
tional extra.
Controls Moving the seat backwards or forwards
Raising/lowering the seat
Adjusting the backrest angle
Adjusting the lumbar support
1
234
Moving the seats forwards and backwards
–
Lift the lever 1 ⇒ Fig. 104 and move the seat to the desired po-
sition.
– Then release the lever 1
and move the seat further until the
catch engages.
WARNING
The driver seat must only be moved forwards and backwards when the
vehicle is at a standstill. Failure to do so could result in an accident.
Adjusting the seat height*
Raising the seat
– Pull the lever 2
⇒ Fig. 104 up repeatedly until the seat is in the
desired position.
Lowering the seat
– Press the lever 2
down repeatedly until the seat is in the de-
sired position.
Safety FirstOperating instructionsPractical TipsTechnical Specifications
Page 136 of 319
134Seats and storage
WARNING
● The height of the driver seat must not be adjusted while driving. Fail-
ure to do so could result in an accident.
● Be careful when adjusting the seat height. Injuries can be caused if
the seat height is adjusted without due care and attention.
Adjusting the backrest angle
– Lean forwards to take your weight off the backrest.
– Turn the adjuster wheel 3
⇒ Fig. 104 to set the angle of the
backrest as required.
WARNING
The front seat backrests must not be reclined for driving. Otherwise, seat
belts and the airbag system might not protect as they should, with the
subsequent danger of injury.
Adjusting lumbar support*
– Do not exert any pressure on the backrest and turn adjuster
wheel 4 ⇒ Fig. 104 to adjust lumbar support.
As you make the adjustments, the curvature of the cushioned area of the
lumbar region becomes more or less acute. In this way, it adapts to the nat-
ural curvature of the spine.
Page 139 of 319
137
Seats and storage
– Press the rear part of the adjuster switch to decrease the con-
tour of the lumbar support.
Adjusting the height
– Press the top part of the adjuster switch to move the contour
upwards.
– Press the bottom part of the adjuster switch to move the con-
tour down.
The lumbar support provides effective support for the natural curvature of
the spine to give a more relaxed seating position, especially on long jour-
neys. Driver seat memory*
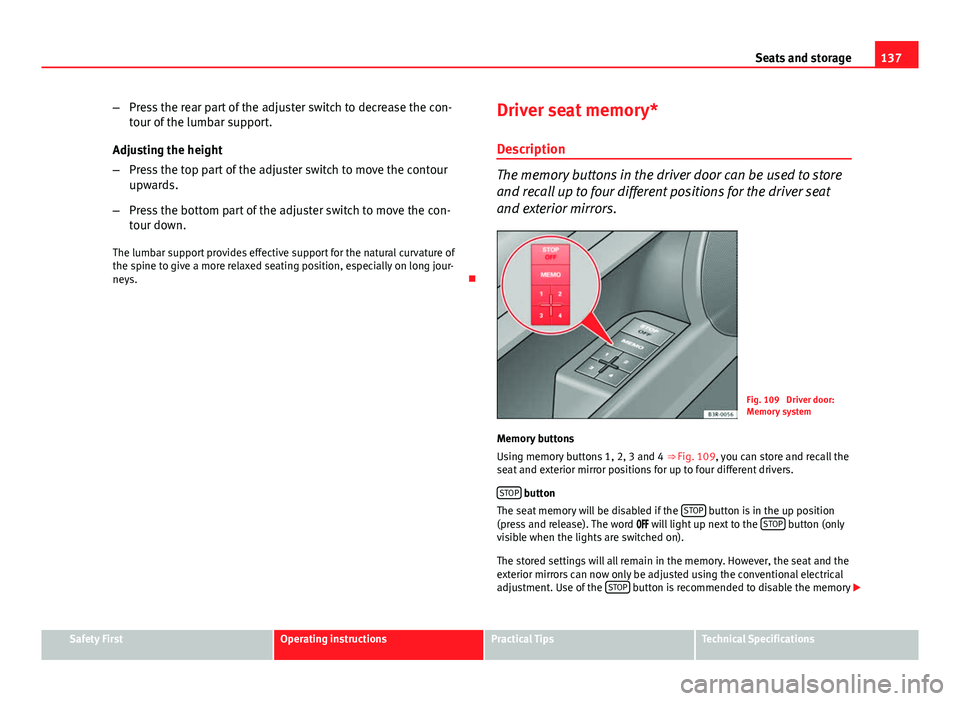
Description
The memory buttons in the driver door can be used to store
and recall up to four different positions for the driver seat
and exterior mirrors.
Fig. 109 Driver door:
Memory system
Memory buttons
Using memory buttons 1, 2, 3 and 4 ⇒ Fig. 109, you can store and recall the
seat and exterior mirror positions for up to four different drivers.
STOP
button
The seat memory will be disabled if the STOP button is in the up position
(press and release). The word will light up next to the STOP button (only
visible when the lights are switched on).
The stored settings will all remain in the memory. However, the seat and the
exterior mirrors can now only be adjusted using the conventional electrical
adjustment. Use of the STOP
button is recommended to disable the memory
Safety FirstOperating instructionsPractical TipsTechnical Specifications
Page 140 of 319
138Seats and storage
system when the vehicle is being driven temporarily by a different driver
whose settings do not need to be stored in the memory.
Note
You can also use the remote control to call up the stored settings
⇒ page 139.
Storing settings
The STOP button must be in its down position (pressed in) before
you can store the desired settings.
– Adjust the driver seat as required ⇒ page 135.
– Adjust both exterior mirrors ⇒ page 131.
– Press and hold the MEMO
button. At the same time, press one
of the memory buttons for at least a second.
– Release both buttons. The setting is now stored on the selected
memory button.
Any new setting selected automatically cancels the existing setting stored
on the memory button. It is best to begin with memory button No. 1 for the
first driver and then assign the other memory buttons to each subsequent
driver.
The seat and mirror positions are stored when the vehicle is locked with the
remote control and are assigned to the remote control key. The exterior mir-
rors adjust automatically to the previous position when you unlock the vehi-
cle; the driver seat adjusts automatically when you open the driver door.
However, this does not delete the settings stored in memory buttons 1 to 4.
These settings can be enabled at any time. Activating settings
Stored settings can be recalled using either the memory but-
tons or the remote control (remote control key).
Using the memory buttons
– If the driver door is open, press the desired memory button
briefly.
– If the driver door is closed, press and hold down the appropri-
ate memory button until the seat and exterior mirrors reach
their programmed positions.
Using the remote control
– Unlock the vehicle using the remote control and open the driver
door within the next ten minutes.
The seat adjustment will have to be called up using the memory buttons if
the driver door is not opened within 10 minutes after unlocking the vehicle
with the remote control.
WARNING
● For safety reasons, the seat must only be adjusted when the vehicle
is at a standstill. Failure to do so could result in an accident.
● In an emergency, the memory function can be stopped at any time by
pressing the STOP button or by briefly pressing any of the memory but-
tons.