tow bar Seat Exeo ST 2009 Owner's manual
[x] Cancel search | Manufacturer: SEAT, Model Year: 2009, Model line: Exeo ST, Model: Seat Exeo ST 2009Pages: 316, PDF Size: 8.83 MB
Page 5 of 316
Contents3
ContentsManual structure
. . . . . . . . . . . . . . . . . . . .
Content
. . . . . . . . . . . . . . . . . . . . . . . . . . . . . . . .
Safety First
. . . . . . . . . . . . . . . . . . . . . . . . . . .
Safe driving
. . . . . . . . . . . . . . . . . . . . . . . . . . . . . .
Brief introduction . . . . . . . . . . . . . . . . . . . . . . . .
Proper sitting position for occupants . . . . . . . . .
Pedal area . . . . . . . . . . . . . . . . . . . . . . . . . . . . . .
Stowing luggage . . . . . . . . . . . . . . . . . . . . . . . . .
Seat belts
. . . . . . . . . . . . . . . . . . . . . . . . . . . . . . . .
Brief introduction . . . . . . . . . . . . . . . . . . . . . . . .
Why wear seat belts? . . . . . . . . . . . . . . . . . . . . . .
Seat belts . . . . . . . . . . . . . . . . . . . . . . . . . . . . . . .
Belt tension devices . . . . . . . . . . . . . . . . . . . . . .
Airbag system
. . . . . . . . . . . . . . . . . . . . . . . . . . . .
Brief introduction . . . . . . . . . . . . . . . . . . . . . . . .
Front airbags . . . . . . . . . . . . . . . . . . . . . . . . . . . .
Knee airbag* . . . . . . . . . . . . . . . . . . . . . . . . . . . .
Side airbags* . . . . . . . . . . . . . . . . . . . . . . . . . . . .
Curtain airbags . . . . . . . . . . . . . . . . . . . . . . . . . .
Deactivating airbags* . . . . . . . . . . . . . . . . . . . . .
Child safety
. . . . . . . . . . . . . . . . . . . . . . . . . . . . . .
Brief introduction . . . . . . . . . . . . . . . . . . . . . . . .
Child seats . . . . . . . . . . . . . . . . . . . . . . . . . . . . . .
Securing child seats . . . . . . . . . . . . . . . . . . . . . .
Controls and equipment
. . . . . . . . . . .
Cockpit
. . . . . . . . . . . . . . . . . . . . . . . . . . . . . . . . . . .
Overview . . . . . . . . . . . . . . . . . . . . . . . . . . . . . . .
Instruments . . . . . . . . . . . . . . . . . . . . . . . . . . . . .
Warning and indicator lamps . . . . . . . . . . . . . . .
Driver information system . . . . . . . . . . . . . . . . . .
Auto-check system . . . . . . . . . . . . . . . . . . . . . . .
Speed warning . . . . . . . . . . . . . . . . . . . . . . . .
On-board computer . . . . . . . . . . . . . . . . . . . . . . .
Menu display . . . . . . . . . . . . . . . . . . . . . . . . . . . .
Tyre pressure monitoring . . . . . . . . . . . . . . . . . .
Steering wheel controls
. . . . . . . . . . . . . . . . . . .
The multi-function steering wheel . . . . . . . . . . .
Unlocking and locking
. . . . . . . . . . . . . . . . . . . .
Remote control keys . . . . . . . . . . . . . . . . . . . . . .
Central locking . . . . . . . . . . . . . . . . . . . . . . . . . . .
Tailgate . . . . . . . . . . . . . . . . . . . . . . . . . . . . . . . . .
Childproof locks . . . . . . . . . . . . . . . . . . . . . . . . . .
Remote control key . . . . . . . . . . . . . . . . . . . . . . .
Anti-theft alarm system* . . . . . . . . . . . . . . . . . . .
Electric windows . . . . . . . . . . . . . . . . . . . . . . . . .
Sun roof / deflector* . . . . . . . . . . . . . . . . . . . . . .
Lights and visibility
. . . . . . . . . . . . . . . . . . . . . . .
Lights . . . . . . . . . . . . . . . . . . . . . . . . . . . . . . . . . .
Interior lights . . . . . . . . . . . . . . . . . . . . . . . . . . . .
Visibility . . . . . . . . . . . . . . . . . . . . . . . . . . . . . . . .
Windscreen wipers . . . . . . . . . . . . . . . . . . . . . . .
Rear-view mirrors . . . . . . . . . . . . . . . . . . . . . . . . .
Seats and stowage
. . . . . . . . . . . . . . . . . . . . . . .
Manual adjustment of the front seats . . . . . . . .
Electric adjustment of front seats* . . . . . . . . . . .
Lumbar support* . . . . . . . . . . . . . . . . . . . . . . . . . Memory for driver's seat* . . . . . . . . . . . . . . . . . .
Head restraints . . . . . . . . . . . . . . . . . . . . . . . . . .
Armrests . . . . . . . . . . . . . . . . . . . . . . . . . . . . . . . .
Luggage compartment . . . . . . . . . . . . . . . . . . . .
Roof carrier / roof rails* . . . . . . . . . . . . . . . . . . .
Drink holders . . . . . . . . . . . . . . . . . . . . . . . . . . . .
Ashtray*, cigarette lighter* and power points . .
Compartments . . . . . . . . . . . . . . . . . . . . . . . . . . .
Heating, Ventilation and Air conditioning
. .
2C-Climatronic . . . . . . . . . . . . . . . . . . . . . . . . . . .
Driving
. . . . . . . . . . . . . . . . . . . . . . . . . . . . . . . . . . .
Address . . . . . . . . . . . . . . . . . . . . . . . . . . . . . . . .
Safety . . . . . . . . . . . . . . . . . . . . . . . . . . . . . . . . . .
Ignition lock . . . . . . . . . . . . . . . . . . . . . . . . . . . . .
Starting and stopping the engine . . . . . . . . . . .
Handbrake . . . . . . . . . . . . . . . . . . . . . . . . . . . . . .
Parking aid acoustic system . . . . . . . . . . . . . . . .
Cruise control (GRA) . . . . . . . . . . . . . . . . . . . . . .
Manual gearbox . . . . . . . . . . . . . . . . . . . . . . . . . .
Automatic gearbox* . . . . . . . . . . . . . . . . . . . . . .
Practical tips
. . . . . . . . . . . . . . . . . . . . . . . . .
Intelligent technology
. . . . . . . . . . . . . . . . . . . . .
Electronic stabilisation programme (ESP) . . . . .
Brakes . . . . . . . . . . . . . . . . . . . . . . . . . . . . . . . . .
Power steering . . . . . . . . . . . . . . . . . . . . . . . . . . .
Servotronic . . . . . . . . . . . . . . . . . . . . . . . . . . . . . .
Driving and the environment
. . . . . . . . . . . . . .
Running-in . . . . . . . . . . . . . . . . . . . . . . . . . . . . . .
Exhaust gas purification system . . . . . . . . . . . . .
5
6
7
7
7
10
15
16
18
18
19
22
26
28
28
31
34
37
41
44
46
46
48
51 57
57
57
59
65
71
75
82
85
87
89
91
91
96
96
98
103
104
105
107
109
112
116
116
124
127
128
131
134
134
136
137 138
140
142
143
151
153
154
156
160
160
170
170
170
171
172
174
175
178
181
181
189
189
189
192
194
194
195
195
196
ExeoST_EN.book Seite 3 Donnerstag, 3. September 2009 12:24 12
Page 136 of 316
Seats and stowage
134Seats and stowageManual adjustment of the front seatsSeat adjuster controls
There are several seat adjustment functions for your conven-
ienceS o m e o f t h e e q u i p m e n t l is t e d is o n l y f i t t e d o n ce r ta i n m o d e l s o r is a n o p t i o na l
extra.
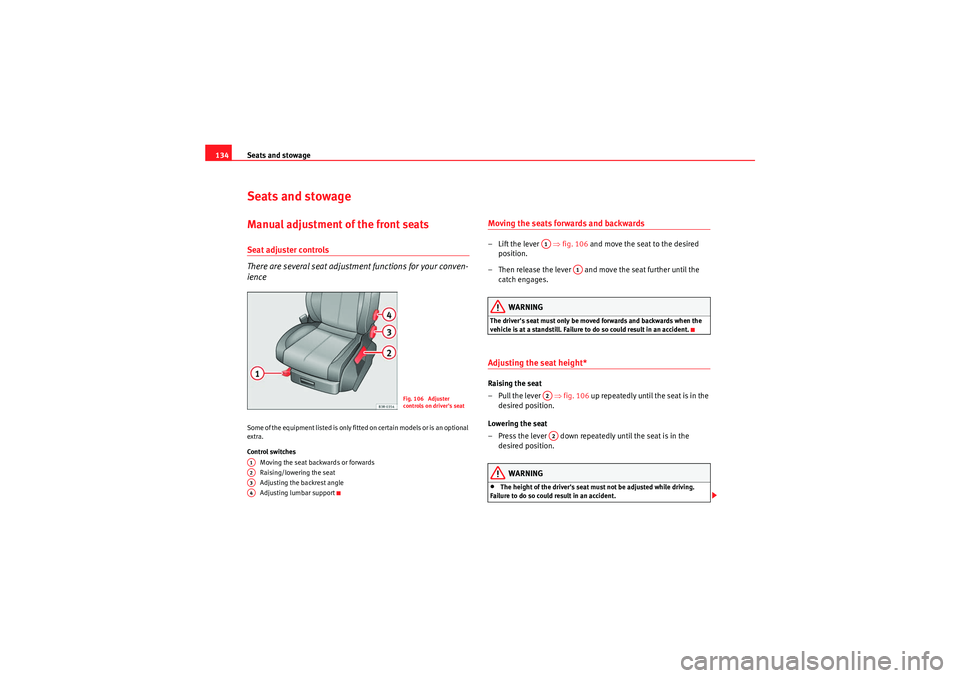
Control switches
Moving the seat backwards or forwards
Raising/lowering the seat
Adjusting the backrest angle
Adjusting lumbar support
Moving the seats forwards and backwards– Lift the lever ⇒fig. 106 and move the seat to the desired
position.
– Then release the lever and move the seat further until the catch engages.
WARNING
The driver's seat must only be moved forwards and backwards when the
vehicle is at a standstill. Failure to do so could result in an accident.Adjusting the seat height*Raising the seat
– Pull the lever ⇒ fig. 106 up repeatedly until the seat is in the
desired position.
Lowering the seat
– Press the lever down repeatedly until the seat is in the desired position.
WARNING
•The height of the driver's seat must not be adjusted while driving.
Failure to do so could result in an accident.
Fig. 106 Adjuster
controls on driver's seat
A1A2A3A4
A1
A1
A2A2
ExeoST_EN.book Seite 134 Donnerstag, 3. September 2009 12:24 12
Page 137 of 316

Seats and stowage135
Safety First
Controls and equipment
Practical tips
Technical Data
•Be careful when adjusting the seat height. Injuries can be caused if the
height is adjusted without due care and attention.
Adjusting the backrest angle– Lean forwards to take your weight off the backrest.
– Turn the adjuster wheel ⇒ page 134, fig. 106 to set the angle
of the backrest as required.
WARNING
The front backrests must not be reclined for driving. Otherwise, safety
belts and the airbag system might not protect as they should, with the
subsequent danger of injury.Adjusting lumbar support*– Do not exert any pressure on the backrest and turn adjuster wheel ⇒page 134, fig. 106 to adjust lumbar support.As you make the adjustments, the curvature of the cushioned area of the
lumbar region becomes more or less acute. In this way, it adapts to the
natural curvature of the spine.
WARNING (continued)
A3
A4
ExeoST_EN.book Seite 135 Donnerstag, 3. September 2009 12:24 12
Page 139 of 316
Seats and stowage137
Safety First
Controls and equipment
Practical tips
Technical Data
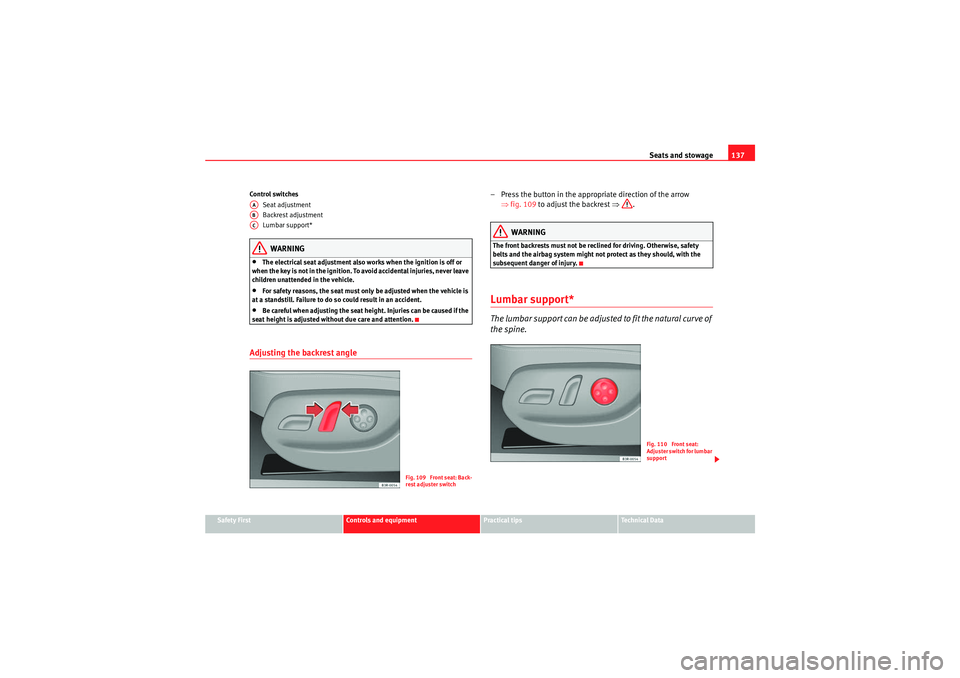
Control switches
Seat adjustment
Backrest adjustment
Lumbar support*
WARNING
•The electrical seat adjustment also works when the ignition is off or
when the key is not in the ignition. To avoid accidental injuries, never leave
children unattended in the vehicle.•For safety reasons, the seat must only be adjusted when the vehicle is
at a standstill. Failure to do so could result in an accident.•Be careful when adjusting the seat height. Injuries can be caused if the
seat height is adjusted without due care and attention.
Adjusting the backrest angle
– Press the button in the appr opriate direction of the arrow
⇒ fig. 109 to adjust the backrest ⇒.
WARNING
The front backrests must not be reclined for driving. Otherwise, safety
belts and the airbag system might not protect as they should, with the
subsequent danger of injury.Lumbar support*The lumbar support can be adjusted to fit the natural curve of
the spine.
AAABAC
Fig. 109 Front seat: Back-
rest adjuster switch
Fig. 110 Front seat:
Adjuster switch for lumbar
support
ExeoST_EN.book Seite 137 Donnerstag, 3. September 2009 12:24 12
Page 140 of 316
Seats and stowage
138
Adjusting the contour of lumbar support
– Press the front part of the adjuster switch ⇒page 137, fig. 110
to increase the contour of the lumbar support.
– Press the rear part of the adjuster switch to decrease the contour of the lumbar support.
Adjusting the height of lumbar support
– Press the top part of the adjuster switch to move the lumbar support upwards.
– Press the bottom part of the adjuster switch to move the lumbar support down.The lumbar support provides effective support for the natural curvature of the
spine to give a more relaxed seating position, especially on long journeys.
Memory for driver's seat*Description
The recall buttons in the driver's door can be used to store
and recall up to four different positions for the driver's seat
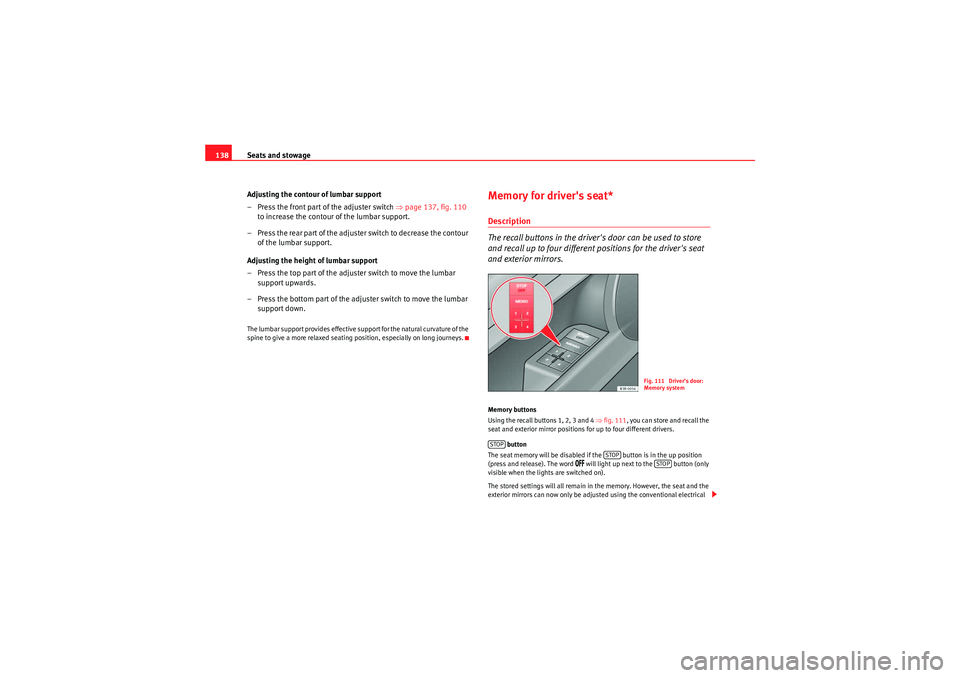
and exterior mirrors.Memory buttons
Using the recall buttons 1, 2, 3 and 4 ⇒fig. 111, you can store and recall the
seat and exterior mirror positions for up to four different drivers.
button
The seat memory will be disabled if the button is in the up position
(press and release). The word
will light up next to the button (only
visible when the lights are switched on).
The stored settings will all remain in the memory. However, the seat and the
exterior mirrors can now only be adjusted using the conventional electrical
Fig. 111 Driver's door:
Memory system
STOP
STOP
STOP
ExeoST_EN.book Seite 138 Donnerstag, 3. September 2009 12:24 12
Page 147 of 316
Seats and stowage145
Safety First
Controls and equipment
Practical tips
Technical Data
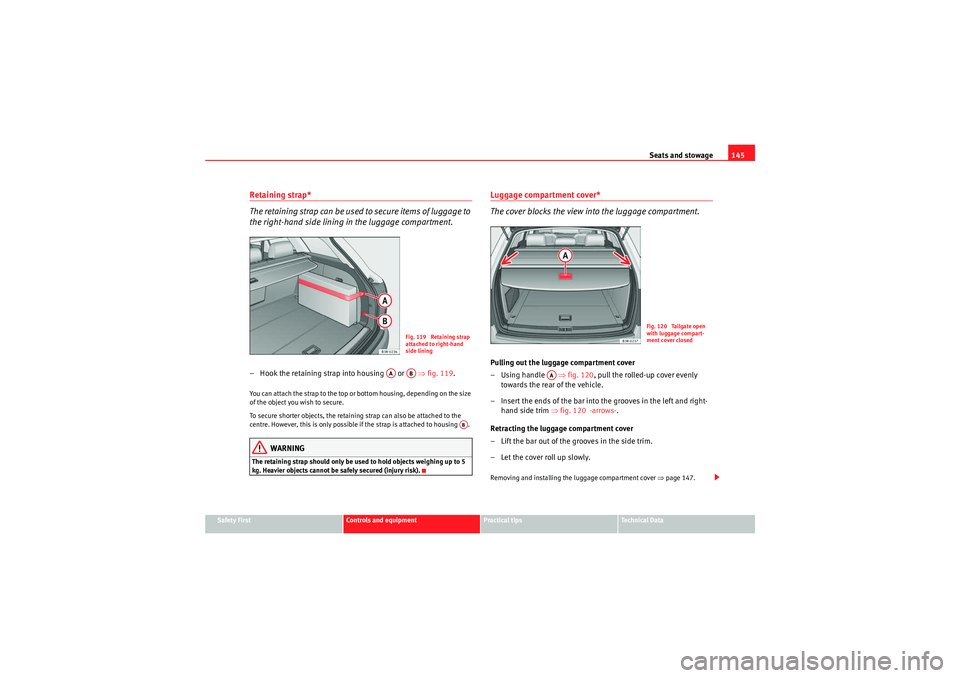
Retaining strap*
The retaining strap can be used to secure items of luggage to
the right-hand side lining in the luggage compartment.– Hook the retaining strap into housing or ⇒fig. 119 .You can attach the strap to the top or bottom housing, depending on the size
of the object you wish to secure.
To secure shorter objects, the retaining strap can also be attached to the
centre. However, this is only possible if the strap is attached to housing .
WARNING
The retaining strap should only be used to hold objects weighing up to 5
kg. Heavier objects cannot be safely secured (injury risk).
Luggage compartment cover*
The cover blocks the view into the luggage compartment.Pulling out the luggage compartment cover
–Using handle ⇒fig. 120 , pull the rolled-up cover evenly
towards the rear of the vehicle.
– Insert the ends of the bar into the grooves in the left and right- hand side trim ⇒fig. 120 -arrows-.
Retracting the luggage compartment cover
– Lift the bar out of the grooves in the side trim.
– Let the cover roll up slowly.Removing and installing the luggage compartment cover ⇒page 147.
Fig. 119 Retaining strap
attached to right-hand
side lining
AA
AB
AB
Fig. 120 Tailgate open
with luggage compart-
ment cover closed
AA
ExeoST_EN.book Seite 145 Donnerstag, 3. September 2009 12:24 12
Page 148 of 316
Seats and stowage
146
WARNING
The luggage compartment cover should not be used as a storage shelf.
Articles placed on this cover could cause injury to vehicle occupants in an
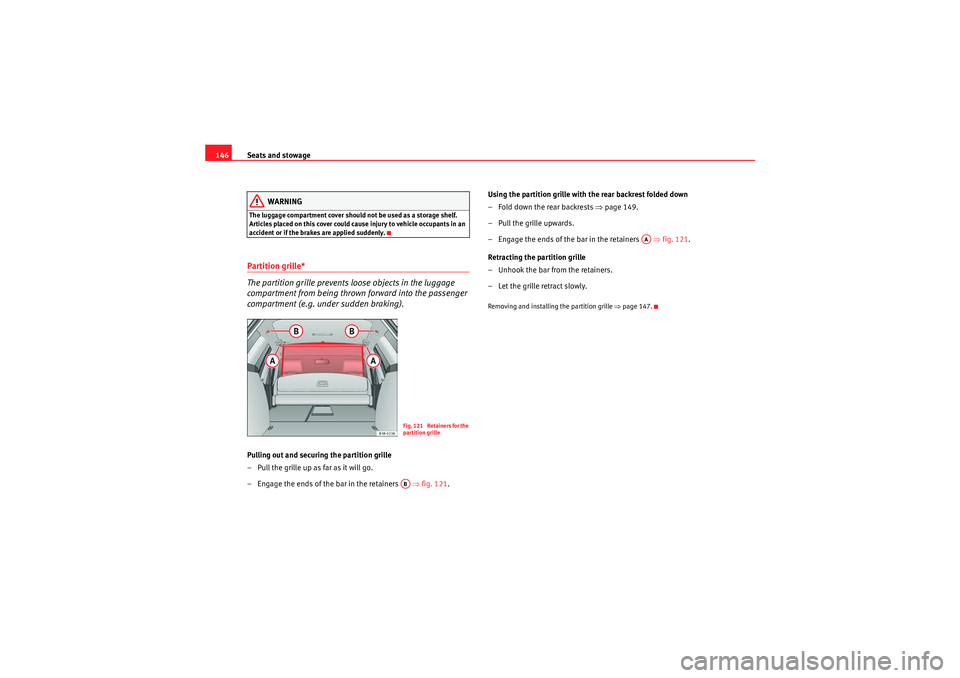
accident or if the brakes are applied suddenly.Partition grille*
The partition grille prevents loose objects in the luggage
compartment from being thrown forward into the passenger
compartment (e.g. under sudden braking).Pulling out and securing the partition grille
– Pull the grille up as far as it will go.
– Engage the ends of the bar in the retainers ⇒ fig. 121. Using the partition grille with the rear backrest folded down
– Fold down the rear backrests
⇒page 149.
– Pull the grille upwards.
– Engage the ends of the bar in the retainers ⇒fig. 121.
Retracting the partition grille
– Unhook the bar from the retainers.
– Let the grille retract slowly.
Removing and installing the partition grille ⇒page 147.
Fig. 121 Retainers for the
partition grilleAB
AA
ExeoST_EN.book Seite 146 Donnerstag, 3. September 2009 12:24 12
Page 153 of 316
Seats and stowage151
Safety First
Controls and equipment
Practical tips
Technical Data
Loading
–Open the tailgate.
– Press the release catch for the ski bag cover ⇒page 150,
fig. 128 -arrow- and swivel the cover downwards.
– Pull down the centre rear armrest.
– From the passenger compartment, press down the release catch for the ski bag cover and pull out the cover.
– Pull out and unfold the ski bag.
– The long items can now be loaded through the luggage compart- ment into the ski bag ⇒.
Securing
– Insert the fastening belt ⇒page 150, fig. 129 of the ski bag
into the centre seat belt buckle .
– Pull the free end of belt to tighten.
Storing
– Close the cover of the load-through hatch in the luggage compartment.
– Carefully fold away the ski bag.
– Close the inside cover of the load-through hatch from the passenger compartment.
WARNING
The ski bag must be secured in place with the fastening belt after it has
been loaded.
Note
Do not fold away the ski bag after use if it is still damp.Roof carrier / roof rails*Description
Additional luggage can be carried on the roof carrier.Note the following points if you intend to carry loads on the roof:•We recommend using the cross bars from the of SEAT Genuine Accesso-
ries range.•These cross bars form the basic elements of a complete roof carrier
system. For safety reasons, however, the corresponding additional fastenings
must be fitted to carry luggage, bicycles, surfboards, skis and boats. All the
components of this system are available from Authorised Service Centres.Caution
Any damage to the vehicle caused by the use of other types of roof rack or
incorrect installation will not be covered by the factory warranty. The roof
carrier system must therefore be installed exactly according to the instruc-
tions provided.
AA
AB
AC
ExeoST_EN.book Seite 151 Donnerstag, 3. September 2009 12:24 12
Page 154 of 316
Seats and stowage
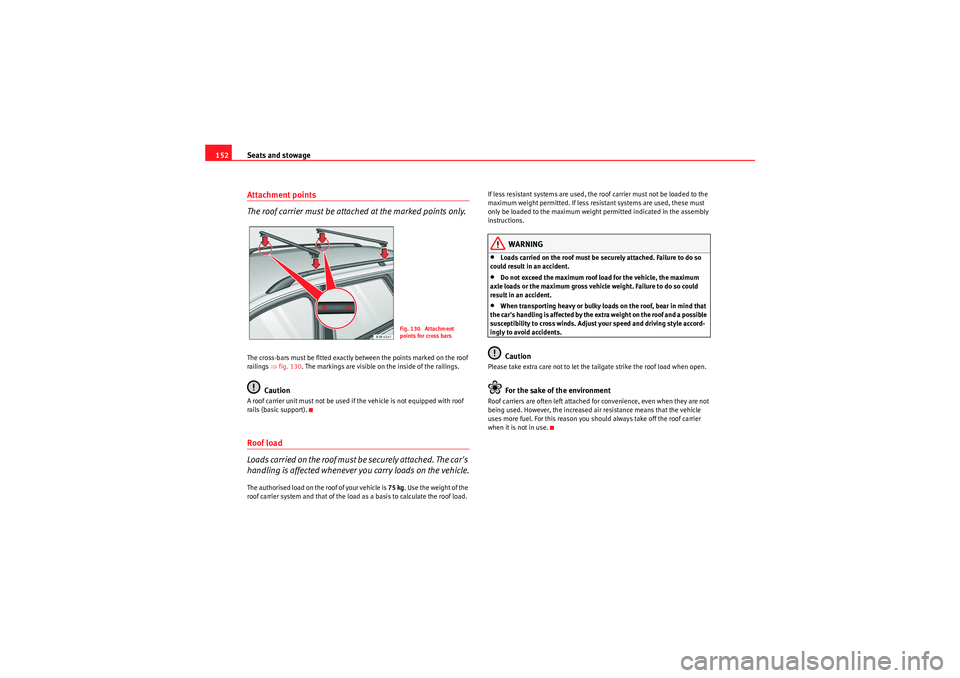
152Attachment points
The roof carrier must be attached at the marked points only.The cross-bars must be fitted exactly between the points marked on the roof
railings ⇒fig. 130 . The markings are visible on the inside of the railings.
Caution
A roof carrier unit must not be used if the vehicle is not equipped with roof
rails (basic support).Roof load
Loads carried on the roof must be securely attached. The car's
handling is affected whenever you carry loads on the vehicle.The authorised load on the roof of your vehicle is 75 kg. Use the weight of the
roof carrier system and that of the load as a basis to calculate the roof load. If less resistant systems are used, the roof carrier must not be loaded to the
maximum weight permitted. If less resistant systems are used, these must
only be loaded to the maximum weight permitted indicated in the assembly
instructions.
WARNING
•Loads carried on the roof must be securely attached. Failure to do so
could result in an accident.•Do not exceed the maximum roof load for the vehicle, the maximum
axle loads or the maximum gross vehicle weight. Failure to do so could
result in an accident.•When transporting heavy or bulky loads on the roof, bear in mind that
t h e ca r ' s ha n d l i ng is a f fe c te d by t h e e x t ra w e i g h t o n t h e ro o f a n d a p os s ibl e
susceptibility to cross winds. Adjust your speed and driving style accord-
ingly to avoid accidents.Caution
Please take extra care not to let the tailgate strike the roof load when open.
For the sake of the environment
Roof carriers are often left attached for convenience, even when they are not
being used. However, the increased air resistance means that the vehicle
uses more fuel. For this reason you should always take off the roof carrier
when it is not in use.
Fig. 130 Attachment
points for cross bars
ExeoST_EN.book Seite 152 Donnerstag, 3. September 2009 12:24 12
Page 178 of 316
Driving
176SEAT parking system*
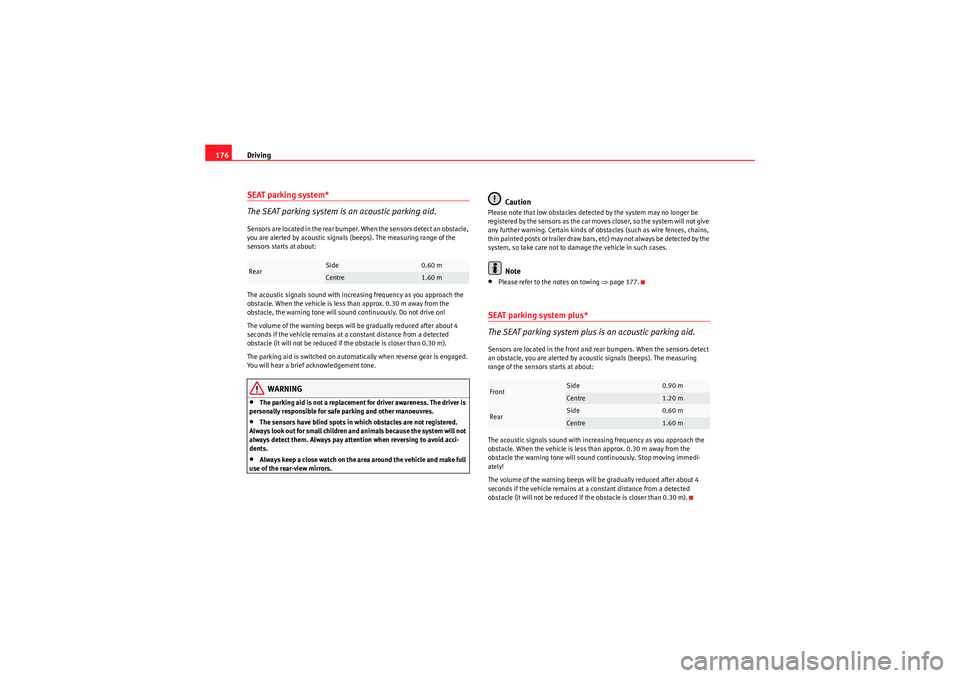
The SEAT parking system is an acoustic parking aid.Sensors are located in the rear bumper. When the sensors detect an obstacle,
you are alerted by acoustic signals (beeps). The measuring range of the
sensors starts at about:
The acoustic signals sound with increasing frequency as you approach the
obstacle. When the vehicle is less than approx. 0.30 m away from the
obstacle, the warning tone will sound continuously. Do not drive on!
The volume of the warning beeps will be gradually reduced after about 4
seconds if the vehicle remains at a constant distance from a detected
obstacle (it will not be reduced if the obstacle is closer than 0.30 m).
The parking aid is switched on automatically when reverse gear is engaged.
You will hear a brief acknowledgement tone.
WARNING
•The parking aid is not a replacement for driver awareness. The driver is
personally responsible for safe parking and other manoeuvres.•The sensors have blind spots in which obstacles are not registered.
Always look out for small children and animals because the system will not
always detect them. Always pay attention when reversing to avoid acci-
dents.•Always keep a close watch on the area around the vehicle and make full
use of the rear-view mirrors.
Caution
Please note that low obstacles detected by the system may no longer be
registered by the sensors as the car moves closer, so the system will not give
any further warning. Certain kinds of obstacles (such as wire fences, chains,
thin painted posts or trailer draw bars, etc) may not always be detected by the
system, so take care not to damage the vehicle in such cases.
Note
•Please refer to the notes on towing ⇒page 177.SEAT parking system plus*
The SEAT parking system plus is an acoustic parking aid.Sensors are located in the front and rear bumpers. When the sensors detect
an obstacle, you are alerted by acoustic signals (beeps). The measuring
range of the sensors starts at about:
The acoustic signals sound with increasing frequency as you approach the
obstacle. When the vehicle is less than approx. 0.30 m away from the
obstacle the warning tone will sound continuously. Stop moving immedi-
ately!
The volume of the warning beeps will be gradually reduced after about 4
seconds if the vehicle remains at a constant distance from a detected
obstacle (it will not be reduced if the obstacle is closer than 0.30 m).
Rear
Side
0.60 m
Centre
1.60 m
Front
Side
0.90 m
Centre
1.20 m
Rear
Side
0.60 m
Centre
1.60 m
ExeoST_EN.book Seite 176 Donnerstag, 3. September 2009 12:24 12