park Seat Exeo ST 2010 User Guide
[x] Cancel search | Manufacturer: SEAT, Model Year: 2010, Model line: Exeo ST, Model: Seat Exeo ST 2010Pages: 325, PDF Size: 9.34 MB
Page 180 of 325

Driving
178SEAT Parking System*
SEAT Parking System is an acoustic parking aid.Sensors are located in the rear bumper. When the sensors detect an obstacle,
you are alerted by acoustic signals. The measuring range of the sensors starts
at approximately:
The acoustic signals sound with increasing frequency as you approach the
obstacle. When the vehicle is less than 0.30 m away from the obstacle, the
warning tone will sound continuously. Do not drive on!
The volume of the warning beeps will be gradually reduced after about 4
seconds if the vehicle remains at a constant distance from a detected
obstacle (it does not affect the permanent acoustic signal).
The parking aid is switched on automatically when reverse gear is engaged.
You will hear a brief confirmation tone.
WARNING
•The parking aid is not a replacement for driver awareness. The driver is
personally responsible for safe parking and other manoeuvres.•The sensors have blind spots in which obstacles are not registered.
Always look out for small children and animals because the system will not
always detect them. Always pay attention when reversing to avoid acci-
dents.•Always keep a close eye on the area around the vehicle and make full
use of the rear view mirrors.
Caution
Please note that low obstacles detected by the system may no longer be
registered by the sensors as the vehicle moves closer, so the system will not
give any further warning. Certain kinds of obstacles (such as wire fences,
chains, thin painted posts or trailer draw bars, etc) may not always be
detected by the system, so take care not to damage the vehicle in such cases.
Note
•Please refer to the notes on towing ⇒page 179.SEAT Parking System Plus*
SEAT Parking System Plus is an acoustic parking aid.Sensors are located in the front and rear bumpers. When the sensors detect
an obstacle, you are alerted by acoustic signals. The measuring range of the
sensors starts at approximately:
The acoustic signals sound with increasing frequency as you approach the
obstacle. When the vehicle is less than 0.30 m from the obstacle the warning
tone will sound continuously. Stop moving immediately!
The volume of the warning beeps will be gradually reduced after about 4
seconds if the vehicle remains at a constant distance from a detected
obstacle (it does not affect the permanent acoustic signal).
Rear
Side
0.60 m
Centre
1.60 m
Front
Side
0.90 m
Centre
1.20 m
Rear
Side
0.60 m
Centre
1.60 m
ExeoST_EN.book Seite 178 Freitag, 3. September 2010 11:41 11
Page 181 of 325

Driving179
Safety First
Operating Instructions
Practical Tips
Technical Specifications
Activating/DeactivatingActivating
– Engage reverse gear or
– Press the button
on the centre console ⇒fig. 150 or on the
gear selector gate. You will hear a brief confirmation tone and the
LED on the switch will light up.
Deactivating
– Drive forward faster than 10 km/h, or
–Press the
button or
– Switch off the ignition or
– Disengage the reverse gear.
WARNING
•The parking aid is not a replacement for driver awareness. The driver is
personally responsible for safe parking and other manoeuvres.•The sensors have blind spots in which obstacles are not registered.
Always look out for small children and animals because the system will not
always detect them. Always pay attention when reversing to avoid acci-
dents.•Always keep a close eye on the area around the vehicle and make full
use of the rear view mirrors.Caution
Please note that low obstacles detected by the system may no longer be
registered by the sensors as the vehicle moves closer, so the system will not
give any further warning. Certain kinds of obstacles (such as wire fences,
chains, thin painted posts or trailer draw bars, etc) may not always be
detected by the system, so take care not to damage the vehicle in such cases.
Note
•Please refer to the notes on towing ⇒page 179.•There is a slight delay in the picture display.To w i n g b r a c k e t *In towing mode, the rear parking aid sensors are not enabled when you select
reverse gear or press the switch
. This function may not be guaranteed on
towing brackets that are not factory fitted. This results in the following restric-
tions:
Fig. 150 Centre console:
switch for parking aid
ExeoST_EN.book Seite 179 Freitag, 3. September 2010 11:41 11
Page 182 of 325
Driving
180SEAT Parking System*
There is no distance warning.
SEAT Parking System Plus*
There is no rear distance warning. The system will still give a warning when
obstacles are detected while driving forward.Fault messages*If you hear a long beep for a few seconds and the LED on the
button* starts
flashing when you switch on the parking aid, a system fault has occurred.
Please have the fault corrected by a Dealer or qualified workshop.
Note
If the fault is not corrected before you switch off the ignition, it will only be
indicated by the flashing LED on the switch
* the next time you switch on
the parking aid.
Cruise control*Introduction
The cruise control system allows you to maintain a constant
speed.Using this system, any speed over 30 km/h can be kept constant, as long as
the engine power allows it. This is subject to power output and braking ability
of the engine. This helps to reduce fatigue, especially on long journeys. The indicator lamp
on the instrument panel lights up when the cruise
control system is operating.
WARNING
For safety reasons, the cruise control system should not be used in dense
traffic or poor road conditions (with ice, slippery surfaces, loose grit or
gravel), as this could cause an accident.
Caution
In vehicles with a manual gearbox: do not go into neutral if the device is
enabled without previously releasing the clutch, as the engine will increase
its revs and, under certain conditions, could break down.
Note
The cruise control cannot maintain a constant speed when travelling down
steep hills. The vehicle tends to accelerate under its own weight. Change
down to a lower gear or use the foot brake to slow the vehicle.
ExeoST_EN.book Seite 180 Freitag, 3. September 2010 11:41 11
Page 186 of 325

Driving
184If desired, you can also select the gears manually (tiptronic mode)
⇒ page 189.
Please note that in vehicles with a multitronic® gearbox, torque is trans-
mitted via a multi-plate clutch, and not via a torque converter as on conven-
tional automatics. This means that the vehicle will not “creep” as much as
conventional automatics when the engine is idling if you stop temporarily
with the selector lever in position D, S or R.
Vehicles with tiptronic gearbox
The vehicle is equipped with an electronically controlled 7-speed automatic
gearbox. The gearbox changes up and down automatically .
If desired, you can also select the gears manually (tiptronic mode)
⇒ page 189.Driving instructions
The gears are changed automatically.
Starting the vehicle
–Press and hold the brake pedal.
– Press and hold the interlock button (the button on the selector
lever handle), move the selector lever to the desired position, for
instance D, and release the interlock button.
– Wait for the gearbox to engage the gear (a slight movement can be felt).
– Release the brake and press the accelerator ⇒.
Stopping briefly
– Apply the foot brake to hold the vehicle when stationary (for instance at traffic lights).
– To prevent the vehicle from rolling away, apply the parking brake before moving off on steep gradients ⇒.
– As soon as you accelerate as normal, the parking brake will auto- matically be released and the vehicle will start moving.
Parking the vehicle
–Press and hold the brake pedal ⇒.
– Apply the parking brake.
– Press and hold the interlock button, move the selector lever to P and release the interlock button.The engine can only be started when the selector lever is at P or N.
On level ground it is sufficient to move the selector lever to P. On slopes, first
engage the parking brake and then put the selection lever into the P position.
Fig. 154 Detailed view of
the centre console:
Selector lever with lock
button
ExeoST_EN.book Seite 184 Freitag, 3. September 2010 11:41 11
Page 187 of 325

Driving185
Safety First
Operating Instructions
Practical Tips
Technical Specifications
This avoids overloading the locking mechanism and it will be easier to move
the selector lever from position P.
Vehicles with multitronic® gearbox: Your vehicle is equipped with the
hill
hold assist function which makes it easier to start off on a slope. The system
is activated when you press and hold the brake pedal for a few seconds.
When you release the brake pedal the braking force will be maintained for a
short moment in order to prevent the vehicle rolling back when you drive
away.
WARNING
•While you are selecting a gear and the vehicle is stopped with the
engine running, do not accelerate. Failure to do so could result in an acci-
dent.•Please note that some power will still be transmitted when you stop
temporarily with the selector lever in position D, S or R. Therefore, when
stopping you will need to press the brake with the force required to hold
the vehicle still. Failure to do so could result in an accident.•N e v e r m ov e t h e s e l e c t o r l e v e r t o R o r P w h e n d r i v i n g , a s t h i s co u l d ca u s e
an accident.•Vehicles with multitronic® gearbox: Please note that some power will
still be transmitted when you stop temporarily with the selector lever in
position D, S or R. Therefore, when stopping you will need to press the
brake with the force required to hold the vehicle still. Failure to do so could
result in an accident.
Selector lever positions
This section covers all th e selector lever positions.The current selector lever position is shown on the instrument panel display.
P - parking lock
This locks the driving wheels mechanically. The parking brake should only be
used when the vehicle is already stopped ⇒ .
The interlock button (the button on the selector lever handle) must be
pressed in and the brake pedal must be depressed before moving the
selector lever either in or out of position P. This is only possible when the igni-
tion is on.
R - Reverse gear
When reverse gear is engaged the gearbox automatically selects the lowest
gear ratio.
The reverse gear may be engaged only when the vehicle is stationary and the
engine is idling ⇒.
Fig. 155 Display:
Selector lever positions
ExeoST_EN.book Seite 185 Freitag, 3. September 2010 11:41 11
Page 188 of 325
Driving
186To move the selector lever to position R, press in the interlock button and at
the same time press the brake pedal. Depending on the model, one or two
reverse lights will come on in selector lever position R (when ignition is
switched on).
N - Neutral (idling)
In this position the gearbox is in neutral ⇒.
D - Drive (forward)
In this position, the gearbox selects the optimal transmission ratio
depending on the engine load, speed and the dynamic gear regulation
programme (DRP).
Press the brake pedal when moving the selector lever from N to D if the
vehicle is stationary or at speeds below 5 km/h ⇒.
Under certain circumstances (e.g. when driving in mountains or towing a
trailer or caravan) it can be advantageous to switch temporarily to tiptronic
mode ⇒page 189, so that the gear ratios can be selected manually to suit
the driving conditions.
S - Sport position
To drive in sports mode, select the position S. The engine power reserve is
used to its maximum. When accelerating the gear shifts will be noticeable.
Press the brake pedal when moving the selector lever from N to S if the
vehicle is stationary or at speeds below 5 km/h ⇒.
WARNING
•Never move the selector lever to R or P when driving. Failure to do so
could result in an accident.•In selector position D or S the vehicle must always be held with the foot
brake when the engine is running. This is because an automatic gearbox
still transmits power even at idling speed, and the vehicle tends to “creep”.
The throttle must on no account be opened inadvertently (for instance by hand from the engine compartment) when a gear is engaged with the
vehicle stationary. The vehicle could otherwise start moving immediately
(in some cases even if the parking brake is engaged) and possibly cause an
accident.
•To avoid accidents, apply the parking brake and put the selector lever
in position P before opening the bonnet and working on the vehicle with
the engine running. Please observe the important safety warnings
⇒ page 229, “Work in the engine compartment”.Note
•Applies to vehicles with tiptronic gearbox:•If the lever is moved accidentally to N when driving, release the acceler-
ator and let the engine speed drop to idling before selecting D or S again.•For the sake of fuel economy (and the environment), the gearbox ratios on
some models are designed so that maximum speed is only obtained when
the gear lever is in position S.WARNING (continued)
ExeoST_EN.book Seite 186 Freitag, 3. September 2010 11:41 11
Page 198 of 325

Intelligent technology
196Power steeringPower steering makes it easier to turn the steering wheel
when the engine is running.Power steering assists the driver by reducing the force needed to turn the
steering wheel.
Power steering does not work if the engine is off. In this case the steering
wheel requires much more force to turn.
If the steering is held at its turning limit when the vehicle is stationary, this
will place an excessive load on the power steering system. Turning the
steering wheel to its limit places a load on the system, which causes noise. It
will also reduce the idling speed of the engine.
Caution
When the engine is running, do not turn the steering wheel to its limit for
more than 15 seconds. Otherwise, there is a risk of damaging the power
steering.
Note
•If the power steering should fail at any time or the engine is switched off
(for instance when being towed), the vehicle can still be steered. However,
more effort will be required to turn the steering wheel.•If the system is leaking or malfunctioning, please take the vehicle to a
qualified workshop as soon as possible.•The power steering system requires a special hydraulic fluid. The fluid
reservoir is located at the front of the engine compartment on the left
⇒ page 301. The correct fluid level in the reservoir is important for the power
steering to function properly. The hydraulic fluid level is checked at the
Inspection Service.
Servotronic*The servotronic system electronically adjusts the power
assisted steering.In vehicles equipped with servotronic power steering the degree of power
assistance ⇒page 196 is adjusted electronically according to road speed.
If a fault should occur in the servotronic system, the power steering will still
operate. The degree of power assistance will, however, no longer adapt to
different speeds. If the electronic regulating system is not working properly,
this is most noticeable when turning the steering wheel at low speeds (for
instance when parking), as more effort will be required than usual. The fault
should be corrected by a qualified workshop as soon as possible.
ExeoST_EN.book Seite 196 Freitag, 3. September 2010 11:41 11
Page 200 of 325
Driving and the environment
198change down into a lower gear or range (depending on the type of trans-
mission). This makes use of engine braking and relieves the brakes.•Never let the brakes “drag” by applying light pressure. Continuous
braking will cause the brakes to overheat and the braking distance will
increase. Apply and then release the brakes alternately.•Never let the vehicle run with the engine switched off. The braking
distance is increased considerably when the brake servo is not active.•If the brake fluid loses its viscosity and is subjected to heavy use,
vapour bubbles can form in the brake system. This reduces the efficiency of
the brakes.•Non-standard or damaged front spoilers could restrict the airflow to the
brakes and cause them to overheat. Before purchasing accessories please
observe the relevant instructions ⇒page 223, “Technical modifications”.•If a brake circuit fails, the braking distance will be increased consider-
ably. Contact a qualified workshop immediately and avoid unnecessary
journeys.
Exhaust gas purification systemCatalytic converter*To maintain the useful life of the catalytic converter
– Use only unleaded petrol with petrol engines, as lead damages the catalytic converter.
– Do not let the fuel get too low in the tank. – For engine oil changes, do not replenish with too much engine oil
⇒page 232.
– Never tow the vehicle to start it, use jump leads if necessary ⇒page 291.
If you notice misfiring, uneven running or loss of power when the vehicle is
moving, reduce speed immediately and have the vehicle inspected at the
nearest qualified workshop. In general, the exhaust gas warning lamp will
light up when any of the described symptoms occur ⇒page 66. If this
happens, unburnt fuel can enter the exhaust system and escape into the envi-
ronment. The catalytic converter can also be damaged by overheating.
WARNING
The catalytic converter reaches very high temperatures! There is a risk of
fire.•Never park where the catalytic converter could come into contact with
dry grass or flammable materials under the vehicle.•Do not apply additional underseal or anti-corrosion coatings to the
exhaust pipes, catalytic converter or the heat shields on the exhaust
system. These materials could catch fire when the vehicle is being driven.Caution
Never run the fuel tank completely dry because the irregularity of the fuel
supply may cause ignition problems. This allows unburnt fuel to enter the
exhaust system, which could cause overheating and damage the catalytic
converter.
For the sake of the environment
Even when the emission control system is working perfectly, there may be a
smell of sulphur from the exhaust gas under some conditions. This depends
WARNING (continued)
ExeoST_EN.book Seite 198 Freitag, 3. September 2010 11:41 11
Page 234 of 325
Checking and refilling levels
232Engine oil additives
No type of additive should be mixed with the engine oil. The deterioration
caused by these additives is not covered by the warranty.
Note
Before a long trip, we recommend finding an engine oil that conforms to the
corresponding VW specifications and keeping it in the vehicle. This way, the
correct engine oil will always be available for a top-up if needed.Checking the oil level
Checking oil level
– Park the vehicle in a horizontal position.
– Briefly run the engine at idle speed until the service temperature
is reached and stop.
– Wait two minutes.
– Pull out the dipstick. Wipe the dipstick with a clean cloth and insert it again, pushing it in as far as it will go.
– Then pull it out once more and check the oil level ⇒page 232,
fig. 177 . If the oil level is too low, add more engine oil
⇒ page 233.
Oil level in area
–Do not top up oil.
Oil level in area
–Oil can be topped up. After topping up the oil level should be in
area .
Oil level in area
–Oil must be topped up. After topping up the oil level should be in
area .Depending on how you drive and the conditions in which the vehicle is used,
oil consumption can be up to 0.5 l/1000 km. Oil consumption is likely to be
higher for the first 5000 km. Therefore, the engine oil level must be checked
at regular intervals, preferably when filling the tank and before a journey.
Oils for LongLife service intervals *
Engine type
Specification
Petrol
VW 504 00
Diesel
VW 507 00
Fig. 177 Markings on oil
dipstick
AaAb
Aa
Ac
Aa
ExeoST_EN.book Seite 232 Freitag, 3. September 2010 11:41 11
Page 240 of 325
Checking and refilling levels
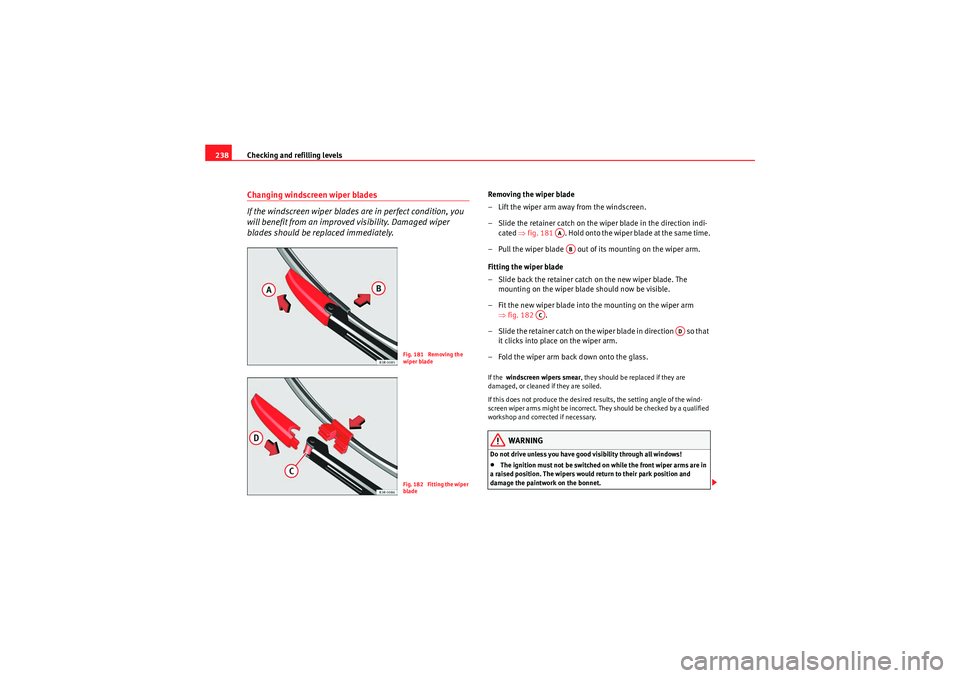
238Changing windscreen wiper blades
If the windscreen wiper blades are in perfect condition, you
will benefit from an improved visibility. Damaged wiper
blades should be replaced immediately.
Removing the wiper blade
– Lift the wiper arm away from the windscreen.
– Slide the retainer catch on the wiper blade in the direction indi-
cated ⇒fig. 181 . Hold onto the wiper blade at the same time.
– Pull the wiper blade out of its mounting on the wiper arm.
Fitting the wiper blade
– Slide back the retainer catch on the new wiper blade. The mounting on the wiper blade should now be visible.
– Fit the new wiper blade into the mounting on the wiper arm ⇒fig. 182 .
– Slide the retainer catch on the wi per blade in direction so that
it clicks into place on the wiper arm.
– Fold the wiper arm back down onto the glass.If the windscreen wipers smear , they should be replaced if they are
damaged, or cleaned if they are soiled.
If this does not produce the desired results, the setting angle of the wind-
screen wiper arms might be incorrect. They should be checked by a qualified
workshop and corrected if necessary.
WARNING
Do not drive unless you have good visibility through all windows!•The ignition must not be switched on while the front wiper arms are in
a raised position. The wipers would return to their park position and
damage the paintwork on the bonnet.
Fig. 181 Removing the
wiper bladeFig. 182 Fitting the wiper
blade
AAAB
AC
AD
ExeoST_EN.book Seite 238 Freitag, 3. September 2010 11:41 11