lock Seat Exeo ST 2010 Manual PDF
[x] Cancel search | Manufacturer: SEAT, Model Year: 2010, Model line: Exeo ST, Model: Seat Exeo ST 2010Pages: 325, PDF Size: 9.34 MB
Page 220 of 325
Vehicle maintenance and cleaning
218screen washer fluid prevents wiper blades from juddering, but wax deposits
are not removed.
Caution
•Never use warm or hot water to remove snow and ice from windows and
mirrors. This could cause the glass to crack!•The heating element for the rear window is located on the inner side of the
window. To prevent damage, do not put stickers on the heating elements
inside the window.Cleaning windscreen wiper bladesClean wiper blades are essential to provide clear vision.
1. Use a soft cloth to remove dust and dirt from the windscreen wiper blades.
2. Use window cleaner to clean the windscreen wiper blades. Use a sponge or a cloth to remove stubborn dirt.Rubber seals maintenance
If rubber seals are well looked after, they will not freeze so
quickly.1. Use a soft cloth to remove dust and dirt from the rubber seals.
2. Apply a specialist care product to the rubber seals.
The rubber strips on the doors, windows, bonnet and tailgate will remain
pliable and last longer if they are treated with a suitable care product (for
example silicone spray).
Caring for rubber seals will also prevent premature ageing and leaks. The
doors will be easier to open. If rubber seals are well looked after, they will not
freeze so quickly in winter.Door lock cylinders
The door lock cylinders can freeze up in winter.To de-ice the lock cylinders you should only use spray with lubricating and
anti-corrosive properties.Cleaning chrome parts1. Clean chrome parts with a damp cloth.
2. Polish chrome parts with a soft, dry cloth.If this does not provide satisfying results, use a specialist chrome cleaning
product . Chrome cleaning products will remove stains from the surface.
Caution
To prevent scratching chrome surfaces:•Never use an abrasive cleaning product on chrome.•Do not clean or polish chrome parts in a sandy or dusty environment.
ExeoST_EN.book Seite 218 Freitag, 3. September 2010 11:41 11
Page 227 of 325
Checking and refilling levels225
Safety First
Operating Instructions
Practical Tips
Technical Specifications
Checking and refilling levelsRefuellingThe tank flap is released manually. The tank holds approxi-
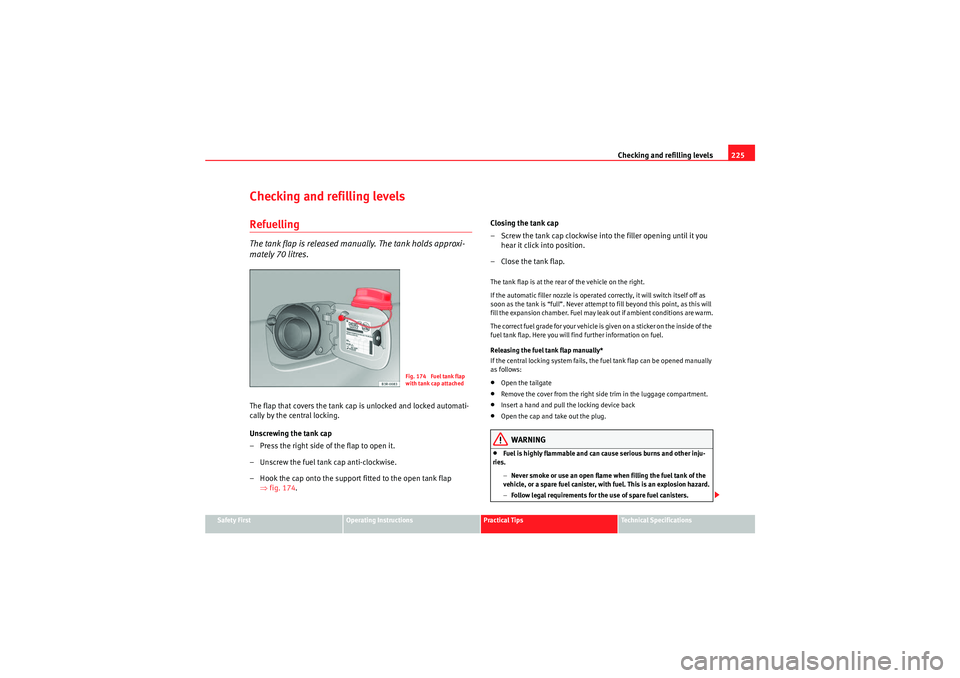
mately 70 litres.The flap that covers the tank cap is unlocked and locked automati-
cally by the central locking.
Unscrewing the tank cap
– Press the right side of the flap to open it.
– Unscrew the fuel tank cap anti-clockwise.
– Hook the cap onto the support fitted to the open tank flap
⇒fig. 174 . Closing the tank cap
– Screw the tank cap clockwise into the filler opening until it you
hear it click into position.
– Close the tank flap.
The tank flap is at the rear of the vehicle on the right.
If the automatic filler nozzle is operated correctly, it will switch itself off as
soon as the tank is “full”. Never attempt to fill beyond this point, as this will
fill the expansion chamber. Fuel may leak out if ambient conditions are warm.
The correct fuel grade for your vehicle is given on a sticker on the inside of the
fuel tank flap. Here you will find further information on fuel.
Releasing the fuel tank flap manually*
If the central locking system fails, the fuel tank flap can be opened manually
as follows:•Open the tailgate•Remove the cover from the right side trim in the luggage compartment.•Insert a hand and pull the locking device back•Open the cap and take out the plug.WARNING
•Fuel is highly flammable and can cause serious burns and other inju-
ries.
−Never smoke or use an open flame when filling the fuel tank of the
vehicle, or a spare fuel canister, with fuel. This is an explosion hazard.
− Follow legal requirements for the use of spare fuel canisters.
Fig. 174 Fuel tank flap
with tank cap attached
ExeoST_EN.book Seite 225 Freitag, 3. September 2010 11:41 11
Page 230 of 325
Checking and refilling levels
228Filter pre-heater
Your vehicle is fitted with a fuel filter glow plug system, making it well
equipped for operation in winter. This ensures that the fuel system remains
operational to approx. -24 °C, provided you use winter-grade diesel which is
safe to -15 °C.
However, if the fuel has waxed to such an extent that the engine will not start
at temperatures of under -24 °C, simply place the vehicle in a warm place for
a while.
Caution
Do not mix fuel additives (thinners or similar products) with diesel fuel.
BonnetReleasing the bonnet
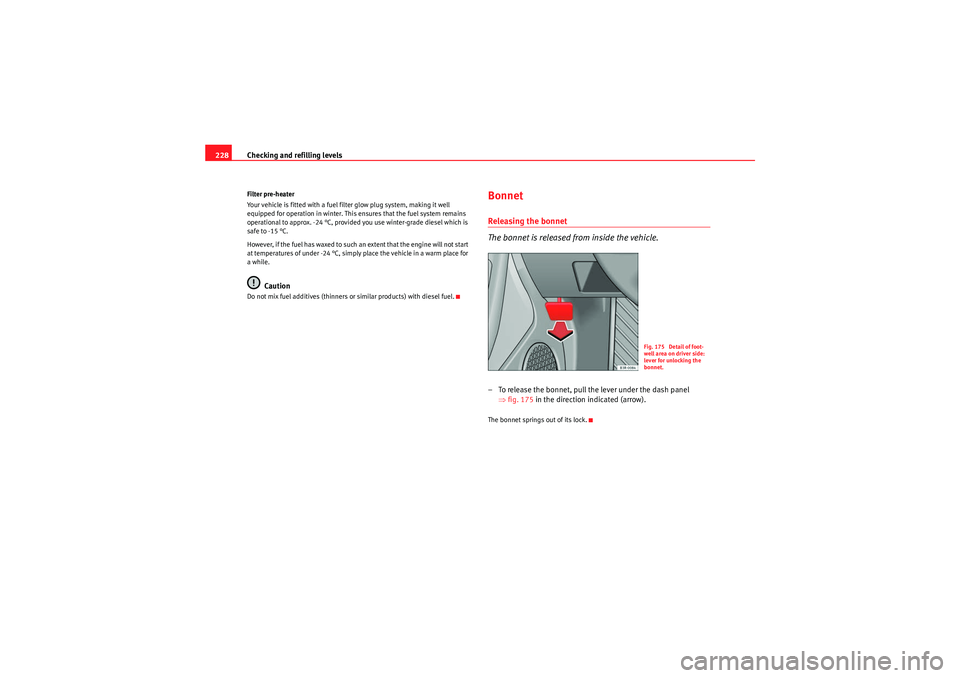
The bonnet is released from inside the vehicle.– To release the bonnet, pull the lever under the dash panel
⇒fig. 175 in the direction indicated (arrow).The bonnet springs out of its lock.
Fig. 175 Detail of foot-
well area on driver side:
lever for unlocking the
bonnet.
ExeoST_EN.book Seite 228 Freitag, 3. September 2010 11:41 11
Page 232 of 325
Checking and refilling levels
230•Never touch the radiator fan while the engine is hot, as the fan could
start up suddenly.•Never open the expansion tank when the engine is hot. The cooling
system is under pressure.•Protect face, hands and arms from any hot steam or hot coolant fluid
released by covering the cap with a large, thick rag when opening the
expansion tank.•If any tests have to be performed with the engine running, there is an
added safety risk from the rotating parts (e.g. drive belts, alternator, radi-
ator fan, etc.) and from the high-voltage ignition system.•Observe the following additional warnings if work on the fuel system or
the electrical system is necessary:
−Always disconnect the battery.
− Do not smoke.
− Never work near open flames.
− Always keep an approved fire extinguisher immediately available.Caution
When topping up fluids, make sure the correct fluid is put into the correct
filler opening. This can otherwise cause serious malfunctions or engine
damage.
For the sake of the environment
Inspect the ground underneath your vehicle regularly so that any leaks are
detected at an early stage. If you find spots of oil or other fluids, have your
vehicle inspected at the workshop.
Note
On right-hand drive vehicles some of the reservoirs mentioned below are
located on the other side of the engine compartment.Closing the bonnet– To close the bonnet, push it down until it overcomes the spring
pressure.
– Let the bonnet engage in the locking part. Do not force it ⇒ .
WARNING
•For safety reasons the bonnet must always be completely closed when
the vehicle is moving. After closing it always check that it is properly
secured. The bonnet must be flush with the adjacent body panels.•Should you notice that the bonnet is not safely secured when the
vehicle is moving, stop the vehicle immediately and close the bonnet.
Failure to do so could result in an accident.
Engine oilGeneral notesThe engine comes with a special, high quality, multi grade oil that can be
used in all seasons of the year except for those regions affected by extreme
cold.
WARNING (continued)
ExeoST_EN.book Seite 230 Freitag, 3. September 2010 11:41 11
Page 237 of 325

Checking and refilling levels235
Safety First
Operating Instructions
Practical Tips
Technical Specifications
The coolant level should be checked with the engine switched off.
The coolant level is monitored by a warning lamp on the instrument panel
display
⇒page 78. However, we recommend that it should be checked occa-
sionally.
Coolant fluid loss
Any loss of coolant fluid normally indicates a leak in the cooling system. In
this case the cooling system should be inspected by a qualified workshop
without delay. It is not sufficient merely to top up the coolant fluid.
If there are no leaks in the system, a loss of coolant fluid can only occur if the
coolant boils and is forced out of the system as a result of overheating.
Caution
Radiator sealants must not be added to the coolant fluid. Such additives
could seriously impair the function of the cooling system.Topping up the coolant fluid
Be careful when topping up with coolant fluid.– Switch the engine off.
– Wait for the engine to cool down.
– Cover the cap on the expansion tank ⇒fig. 179 with a cloth, and
carefully unscrew the cap anti-clockwise ⇒.
– Add coolant fluid.
– Screw on the cap tightly.
Make sure that the coolant fluid meets the required specifications
⇒page 233, “Coolant fluid”. Do not use a different type of antifreeze if
G12++ antifreeze is not available. In this case, use only water and bring the
antifreeze concentration back up to the correct level as soon as possible.
Always top up with new coolant fluid.
Do not fill above the “max” mark. Excess coolant fluid is forced out of the
system through the valve in the filler cap when the engine gets hot.
If a lot of coolant fluid has been lost, wait for the engine to cool down before
putting in cold coolant. Failure to do so could result in serious engine
damage.
WARNING
•The cooling system is under pressure. Do not unscrew the cap on the
expansion tank when the engine is hot. Failure to comply could result in
burns.•The antifreeze and coolant fluid can be a health hazard. Therefore, the
antifreeze should be stored in the original container in a safe place out of
reach of children. Failure to comply could result in poisoning.For the sake of the environment
Drained off coolant should not be used again. Drain off the used coolant into
a suitable container and dispose of it in the proper manner (observe environ-
mental regulations).
ExeoST_EN.book Seite 235 Freitag, 3. September 2010 11:41 11
Page 245 of 325

Checking and refilling levels243
Safety First
Operating Instructions
Practical Tips
Technical Specifications
•A highly explosive mixture of gases is released when the battery is
under charge. The batteries should be charged in a well-ventilated room
only.•Keep children away from acid and batteries.•Before working on the electrical system, you must switch off the
engine, the ignition and all consumers. The negative cable on the battery
must be disconnected. When a light bulb is changed, you need only switch
off the light.•Deactivate the anti-theft alarm by unlocking the vehicle before you
disconnect the battery! The alarm will otherwise be triggered.•When disconnecting the battery from the vehicle electrical system,
disconnect first the negative cable and then the positive cable.•Switch off all electrical consumers before reconnecting the battery.
Reconnect first the positive cable and then the negative cable. Never
reverse the polarity of the connections. This could cause an electrical fire.•Never charge a frozen battery, or one which has thawed. This could
result in explosions and chemical burns. Always replace a battery which
has frozen. A flat battery can freeze at temperatures around 0 °C.•Ensure that the vent hose is always connected to the battery.•Never use a defective battery. This could cause an explosion. Replace a
damaged battery immediately.Caution
•Never disconnect the battery if the ignition is switched on or if the engine
is running. This could damage the electrical system or electronic compo-
nents.•Do not expose the battery to direct sunlight over a long period of time, as
the intense ultraviolet radiation can damage the battery housing.•If the vehicle is left standing in cold conditions for a long period, protect
the battery from frost. If it freezes it will be damaged.
Charging the battery
A fully-charged battery is important for reliable starting.–Note the warnings ⇒ in “Important safety warnings for
handling a vehicle battery” on page 242 and ⇒.
– Switch off the ignition and all electrical equipment.
– Only if fast-charging: both battery cables must be disconnected (first the negative cable, then the positive cable).
– Connect the charger cables to the battery terminals, noting the colour code (red = positive; black or brown = negative).
– Now connect the battery charger to the power socket and switch on.
– After charging the battery: switch off the battery charger and disconnect the power point cable.
– Finally disconnect the charger cables from the battery.
– If necessary, reconnect both battery cables to the battery (first the positive cable, then the negative cable).When charging with a low current (for instance with a small battery charger)
the battery does not normally have to be disconnected. However, both
battery cables must be disconnected before fast-charging the battery with a
high current. However, always follow the instructions given by the manufac-
turer of the battery charger.
The fast-charging procedure for a battery is dangerous ⇒ in “Important
safety warnings for handling a vehicle battery” on page 242, as it requires a
special charger and the corresponding level of knowledge. We therefore
recommend that this work should only be performed by a qualified workshop.
WARNING (continued)
ExeoST_EN.book Seite 243 Freitag, 3. September 2010 11:41 11
Page 258 of 325

If and when
256Spare steel rim wheel
The spare steel rim wheel is carried in the wheel well under
the floor panel in the luggage compartment. It is only
intended for temporary use over short distances.Taking out the spare wheel
–Turn the plastic knob ⇒fig. 192 anti-clockwise.
– Take out the spare wheel.
Securing the defective wheel in the spare wheel well
– Place wheel in spare wheel well in the luggage compartment.
– Secure the wheel by turning plastic knob clockwise.
– Replace the floor panel before closing the tailgate.
Your vehicle can be factory-equipped with a spare steel wheel. The spare
wheel does not usually meet the same performance standards as the wheels
fitted on the vehicle because of the wheel/tyre dimensions, rubber composi-
tion, tread pattern, etc. Therefore, note the following restrictions:•The spare steel wheel is designed only for your vehicle model. Do not
attempt to mount the wheel on any vehicle but your own.•Your vehicle will have different driving characteristics when the spare
steel rim wheel is mounted ⇒ .•The spare wheel is only intended for temporary use after having a flat tyre.
Replace the spare wheel with a normal wheel that has the proper tyre dimen-
sions as soon as possible.•If the size of the spare steel rim wheel is different to that of the other
wheels, it is unlikely that snow chains suitable for the other wheels will fit it.WARNING
•After mounting the spare steel rim wheel, the tyre pressure must be
checked and corrected as soon as possible. The tyre pressure must corre-
spond to the vehicle load (consult the table containing the inflation pres-
sures). Otherwise there is danger of causing an accident. Use the highest
tyre pressure as indicated in the table.•Do not drive faster than 80 km/h, as higher speeds can cause an acci-
dent.•Avoid heavy acceleration, hard braking and fast cornering, as this could
cause an accident.
Fig. 192 Spare steel rim
wheel
ExeoST_EN.book Seite 256 Freitag, 3. September 2010 11:41 11
Page 259 of 325

If and when257
Safety First
Operating Instructions
Practical Tips
Technical Specifications
Changing a wheelPreparation work
What you must do before changing a wheel.– If you have a flat tyre or puncture, park the vehicle as far away
from the flow of traffic as possible. Choose a location that is as
level as possible.
–All passengers should leave the vehicle. They should wait in a
safe place (e.g. behind the roadside crash barrier).
–Apply the handbrake firmly.
– Engage 1st gear .
– When towing a trailer: Unhitch the trailer from your vehicle.
– Take the tools and the spare wheel ⇒ page 254 out of the
luggage compartment.
WARNING
If you have a puncture in heavy traffic, switch on the hazard warning lights
and place the warning triangle in a visible location. This is for your own
safety and also warns other road users.
Caution
If you have to change the tyre on a gradient, block the wheel opposite the
wheel being changed by placing a stone or similar object under it to prevent
the vehicle from rolling away.
Note
Please observe legal requirements when doing so.Changing a wheel
Change the wheel as described below.– Remove the wheel cover.
–Loosen the wheel bolts ⇒page 258.
– Raise the vehicle with the jack ⇒page 259.
– Ta k e o f f the wheel with the flat tyre and then put on the spare
wheel ⇒page 260.
– Lower the vehicle.
– Tighten the wheel bolts firmly in diagonal sequence with the box
spanner ⇒page 258.
– Replace the cover.After changing a wheel
After changing the wheel, there are still tasks to complete.– Place the wheel with the defective tyre in the spare wheel well
and secure it.
– Put the tools and jack back in the luggage compartment.
ExeoST_EN.book Seite 257 Freitag, 3. September 2010 11:41 11
Page 260 of 325
If and when
258
–The inflation pressure of the newly fitted spare tyre must be
checked as soon as possible.
–Have the tightening torque of the wheel bolts checked as soon
as possible with a torque wrench. It must be 120 Nm (always
when cold)
–Have the flat tyre replaced as quickly as possible.
Note•If you notice that the wheel bolts are rusty and difficult to turn when
changing a wheel, they must be replaced before having the tightening torque
checked.•For your safety, drive at moderate speeds until the wheel bolt tightening
torque has been checked.
Loosening and tightening the wheel bolts
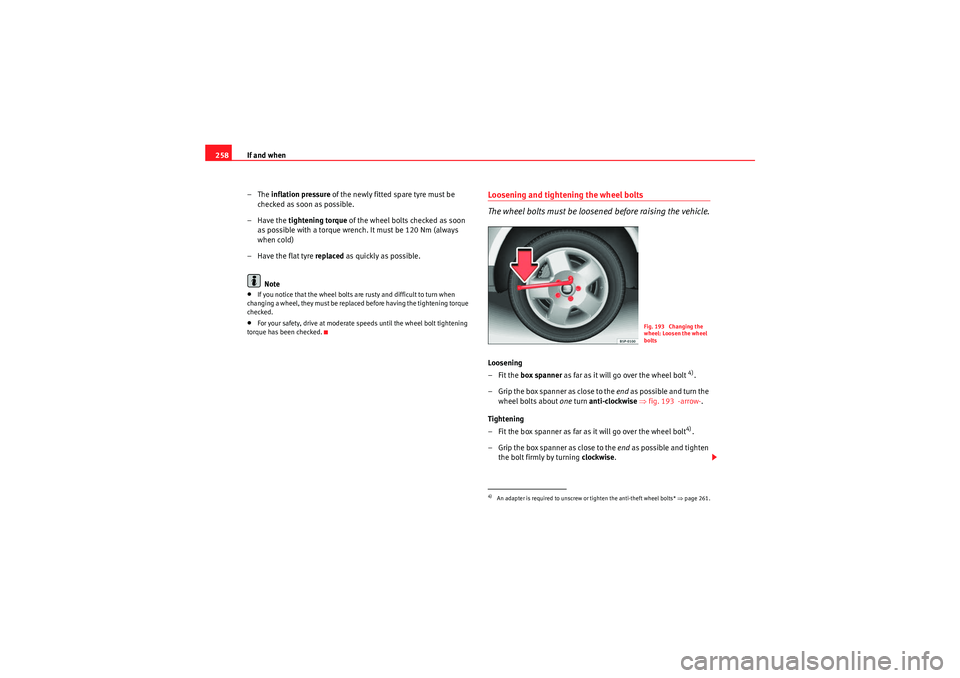
The wheel bolts must be loosened before raising the vehicle.Loosening
–Fit the box spanner as far as it will go over the wheel bolt
4).
– Grip the box spanner as close to the end as po ssible an d turn t he
wheel bolts about one turn anti-clockwise ⇒ fig. 193 -arrow- .
Tightening
– Fit the box spanner as far as it will go over the wheel bolt4).
– Grip the box spanner as close to the end as possible and tighten
the bolt firmly by turning clockwise.
4)An adapter is required to unscrew or tighten the anti-theft wheel bolts* ⇒page 261.
Fig. 193 Changing the
wheel: Loosen the wheel
bolts
ExeoST_EN.book Seite 258 Freitag, 3. September 2010 11:41 11
Page 272 of 325
If and when
270Changing the turn signal bulb
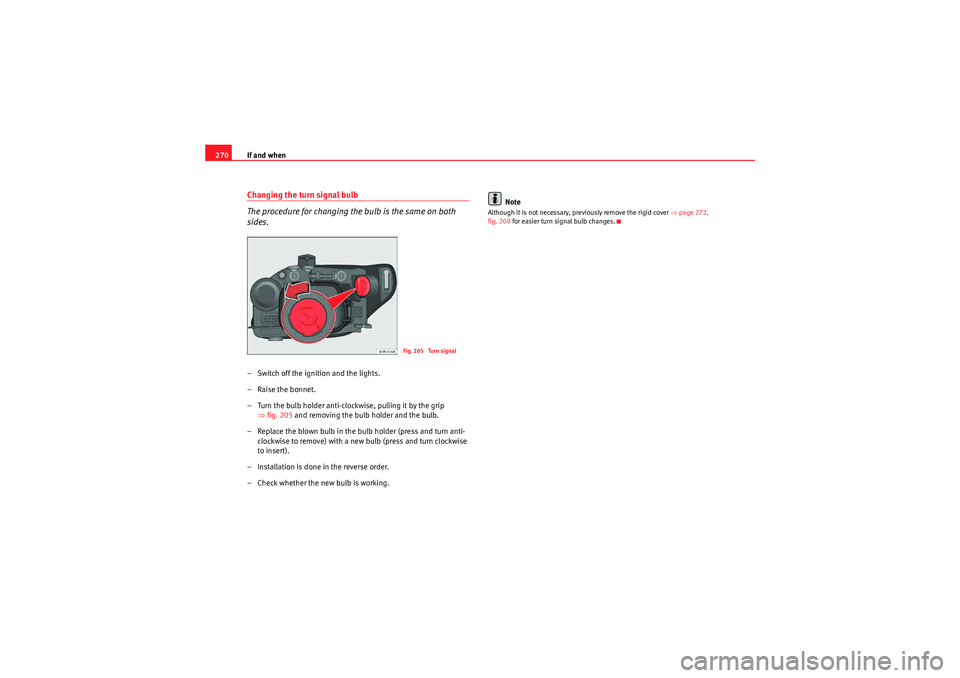
The procedure for changing the bulb is the same on both
sides.– Switch off the ignition and the lights.
– Raise the bonnet.
– Turn the bulb holder anti-clockwise, pulling it by the grip
⇒fig. 205 and removing the bulb holder and the bulb.
– Replace the blown bulb in the bulb holder (press and turn anti- clockwise to remove) with a new bulb (press and turn clockwise
to insert).
– Installation is done in the reverse order.
– Check whether the new bulb is working. Note
Although it is not necessary, previously remove the rigid cover
⇒page 272,
fig. 208 for easier turn signal bulb changes.
Fig. 205 Turn signal
ExeoST_EN.book Seite 270 Freitag, 3. September 2010 11:41 11