audio Seat Exeo ST 2012 ADAGIO
[x] Cancel search | Manufacturer: SEAT, Model Year: 2012, Model line: Exeo ST, Model: Seat Exeo ST 2012Pages: 45, PDF Size: 1.55 MB
Page 3 of 45
Contents
2ContentsGeneral information
. . . . . . . . . . . . . . . .
Introduction
. . . . . . . . . . . . . . . . . . . . . . . . . .
Overview
. . . . . . . . . . . . . . . . . . . . . . . . . . . . . .
Control Panel
. . . . . . . . . . . . . . . . . . . . . . . . . . . . .
Control Panel
. . . . . . . . . . . . . . . . . . . . . . . . . . . . .
Notes on traffic safety
. . . . . . . . . . . . . . . . . . . . .
Cleaning and care
. . . . . . . . . . . . . . . . . . . . . . . .
Handling: General information
. .
Switching on and off
. . . . . . . . . . . . . . . . . . . . . .
Adjusting the volume
. . . . . . . . . . . . . . . . . . . . .
Display
. . . . . . . . . . . . . . . . . . . . . . . . . . . . . . . . . . .
Enabling/disabling the time
. . . . . . . . . . . . . .
SEEK
. . . . . . . . . . . . . . . . . . . . . . . . . . . . . . . . . . . . .
Adjusting the sound
. . . . . . . . . . . . . . . . . . . . . .
Radio
. . . . . . . . . . . . . . . . . . . . . . . . . . . . . . . . . .
Setting the bandwidth
. . . . . . . . . . . . . . . . . . . .
Tuning a station
. . . . . . . . . . . . . . . . . . . . . . . . . .
Storing stations
. . . . . . . . . . . . . . . . . . . . . . . . . .
Selecting a stored station
. . . . . . . . . . . . . . . . .
Alternative frequencies
. . . . . . . . . . . . . . . . . . .
Regional stations
. . . . . . . . . . . . . . . . . . . . . . . . .
Traffic Programme (TP)
. . . . . . . . . . . . . . . . . . . .
Drives
. . . . . . . . . . . . . . . . . . . . . . . . . . . . . . . . .
CD player
. . . . . . . . . . . . . . . . . . . . . . . . . . . . . . . .
Handling CDs
. . . . . . . . . . . . . . . . . . . . . . . . . . . .
iPod interface*
. . . . . . . . . . . . . . . . . . . . . . . . . . .
USB port*
. . . . . . . . . . . . . . . . . . . . . . . . . . . . . . . .
Aux-in connection
. . . . . . . . . . . . . . . . . . . . . . . .
CD
. . . . . . . . . . . . . . . . . . . . . . . . . . . . . . . . . . . . . .
Selecting CD Mode
. . . . . . . . . . . . . . . . . . . . . . .
Selecting an MP3 directory ("browse")
. . . . .
Selecting a track
. . . . . . . . . . . . . . . . . . . . . . . . . .
Fast forwards/Rewind
. . . . . . . . . . . . . . . . . . . . .
Shuffle mode ("mix")
. . . . . . . . . . . . . . . . . . . . .
Shuffle mode (MIX)
. . . . . . . . . . . . . . . . . . . . . . .
Playing all tracks on the CD briefly ("scan")
External audio source (AUX)
. . . . . . . . . . . . . . .
Mobile phone interface
. . . . . . . . . . . .
Introduction
. . . . . . . . . . . . . . . . . . . . . . . . . . . . . .
Installation
. . . . . . . . . . . . . . . . . . . . . . . . . . . . . . .
Speech dialogue system
. . . . . . . . . . . . . . . . . .
The multi-function steering
wheel
. . . . . . . . . . . . . . . . . . . . . . . . . . . . . . . . . .
Introduction
. . . . . . . . . . . . . . . . . . . . . . . . . . . . . .
Radio mode
. . . . . . . . . . . . . . . . . . . . . . . . . . . . . .
CD mode
. . . . . . . . . . . . . . . . . . . . . . . . . . . . . . . . .
Tele ph one mo d e
. . . . . . . . . . . . . . . . . . . . . . . . .
Index
. . . . . . . . . . . . . . . . . . . . . . . . . . . . . . . . . .
3
4
5
5
6
7
7
8
8
8
8
9
9
9
11
11
11
12
12
12 13
13
14
14
15
17
19
22
24
24
24
25
25
25
26
26
26
27
27
28
31
39
39
40
40
40
42
Radio Adagio_EN.book Seite 2 Montag, 14. September 2009 10:50 10
Page 5 of 45
Introduction
4IntroductionImportant Information. Traffic safetyTravelling on today's roads requires the driver's full attention at all times.
Only operate the radio and its various functions when the traffic situation
really permits this.
WARNING
•Before starting the trip, you should familiarise yourself with the
different radio functions.•High audio volume may represent a danger to you and to others.•Adjust the volume in a way that you can distinguish surrounding noise,
for example, horns and sirens, etc.•Radio settings should be made when the car is stopped or by a
passenger.Note
Separate the radio navigation card and keep it in a safe place, but never
within the vehicle. If the radio is lost with the code, go to a SEAT Dealer, who
will help you.
Radio Adagio_EN.book Seite 4 Montag, 14. September 2009 10:50 10
Page 9 of 45
Handling: General information
8Handling: General informationSwitching on and off– Briefly press the ON/OFF button to switch the sound system on.
You will then hear the audio source last used.
– Press and hold the ON/OFF button to switch the sound system off.The sound system will come on automatically when the ignition is switched
on . It will also automatically switch off when the ignition key is removed.
If the sound system is switched on manually while the ignition key is
removed, it will remain on for about 60 minutes.
If the sound system was switched off manually, it will not come on again auto-
matically when the ignition is switched on.Adjusting the volumeIncreasing and reducing the volume
– Turn the ON/OFF button clockwise or anti-clockwise.
Mute function
– Briefly press the ON/OFF knob. The volume for the enabled audio source will then be switched off. A crossed-out loudspeaker
symbol will appear in the display. Any CD media drives enabled
will stop (pause function). – To restore the volume, briefly press the ON/OFF button or
– Turn the ON/OFF button clockwise.
When you switch on the system, excessive volume levels are reduced auto-
matically to a preset level ⇒
page 10.DisplayA screensaver is displayed if the sound system is not used for
around 30 seconds.The screensaver depends on the audio source selected. When screensaver is
disabled when the sound system is in use. The screensaver is not disabled
when adjusting the volume or using the mute function.
Fig. 3 Screensaver
(example: in CD mode)
Radio Adagio_EN.book Seite 8 Montag, 14. September 2009 10:50 10
Page 15 of 45

Drives
14DrivesCD playerGeneral informationThe sound system has an internal CD player. You can load standard audio CDs
or MP3 CDs into the CD player.
Use the CD function to play back a CD already loaded in the player
⇒ page 24. To switch between the CD player and external CD changer*, press
the button several times ⇒page 24.
For important notes regarding the use of the different storage media, please
refer to ⇒page 15.
MP3 files must meet the following specifications:
Different information can be stored on an MP3 CD. The following information
appears on the display:
•File name of the MP3 file currently playing ( FILE).•Directory on the MP3 CD containing the track that is currently playing. The
top level is given the name ROOT (FOLDER )•Name of the ALBUM•Name of the ARTIST•CD TITLE . Titles that are too long are displayed with “...”. To see the full
title, press the button assigned to the title.
To switch between the above categories, press the INFO
4) or the
5)
control button several times.
The display will show NOT AVAILABLE for a few seconds if no information is
stored on the MP3 CD for one of the categories.
Format
MPEG-1 Layer 3
Standard
ISO 9660 Level 2
File system
Joliet (single session and multisession)
Bit rates
64 - 256 kbits/s, variable speed
Number of files
Max. 512 files per medium, max. 255 files per directory
Number of direc-
tories
Max. 255 directories with max. 8 subdirectories
ID3 tags
Version 1, 2.3 and 2.4, max. 32 characters
Supported media
CD-ROM, CD-R, CD-RW with a capacity of 650 MB and
700 MB
CD
4)Valid for European market5)Valid for American market
INFO
Radio Adagio_EN.book Seite 14 Montag, 14. September 2009 10:50 10
Page 18 of 45

Drives17
iPod interface*General notes
The iPod interface can be used to connect an iPod to your in-
car entertainment system and allows you to play audio files
directly over the car's sound system.The iPod interface is located in your vehicle's glove box. It is compatible with
3rd generation or higher iPod
6) devices (made from about 2003 onwards),
with the exception of the iPod Shuffle.
The iPod is controlled using the CD function ⇒page 24.
•The sound system orders (first numerically and then alphabetically) the
playlists with the tracks stored in the iPod and then assigns them in the
sequence CD 1 to CD 5. For easier playing of these playlists through the
vehicle's sound system, we recommend you create five playlists (e.g. 1.... to
5....) in your iPod.•If you select CD 6, all the tracks on the iPod will be played even if they are
stored in different playlists. If you select an artist, a track, an album or a
podcast before connecting the iPod, your selection will be kept until you
change CD.
Information stored on the iPod, such as artist, track, album and genre, or the
name of a playlist, does not appear on the sound system display.Caution
Very high or very low temperatures (a common occurrence in a vehicle's inte-
rior) can cause damage to the iPod and/or impair its performance.•Please do not leave your iPod in the vehicle in case of extreme tempera-
tures.
Note
Please refer to the iPod operating instructions for important information on
how to use your iPod.Choosing the adapter
The iPod interface is supplied with a choice of adapters for
connecting your iPod.iPods come in different sizes. Therefore, you will need to match the iPod inter-
face ⇒fig. 9 to your iPod using one of the adapters supplied. You will
need two adapters for certain iPod models (touch, 5G (video), classic).
The iPod interface is supplied with the following adapters:
1. Narrow adapters of different heights for inserting into the central slot
below the bay .
6)iPod is a registered trademark of Apple Computer Inc.
Fig. 9 iPod interface with
slots for adapters
A1A2
Radio Adagio_EN.book Seite 17 Montag, 14. September 2009 10:50 10
Page 21 of 45

Drives
20
NotePlease refer to the manufacturer's operating instructions for important infor-
mation on how to use your memory stick or MP3 player.Connecting a memory stick / MP3 player
For problem-free operation, use only approved memory sticks
and MP3 players.– Switch on your vehicle's sound system.
–Enable radio mode.
–Plug the memory stick into the USB port ⇒fig. 10 (arrow), or
– Connect the MP3 player to a standard USB extension cable and
plug the extension cable into the USB port ⇒ .– Before you remove the memory device, switch the audio source
for the sound system back to radio.
It may take several seconds for the USB port to detect the memory device.
The MP3 player is switched off automatically when you switch off the sound
system or the ignition. The USB port stores the position of the last track you
were playing. If you do not alter the contents of your memory device, the
music will be continued at the point where you stopped playing.
MP3 players and USB sticks which are not explicitly approved must have
“CERTIFIED USB
TM” or “CERTIFIED HIGH SPEED USB
TM” status.
Approved MP3 players
Fig. 10 USB port in glove
box
Manufacturer
Model
Memory
Cebop
Run XL
1,024 MB
Commodore
mpet II
256 MB
Grundig
MP 500
256 MB
iPod
Shuffle
512 MB
iPod
Shuffle
1 GB
Mambox
Colour
256 MB
Maxfield
MaxRobot
512 MB
Philips
SA 177
512 MB
Time
DPA-20 FL+
128 MB
Trekstor
Musik Stick 100
256 MB
Trekstor
21617, i.Beat
512 MB
Radio Adagio_EN.book Seite 20 Montag, 14. September 2009 10:50 10
Page 24 of 45

Drives23
– Connect the portable player to a 3.5 mm jack plug and plug the extension cable into the Aux-in socket.
– Before you remove the memory device, switch the audio source for the sound system back to radio.
To start the portable player, press the button several times until the EXT.
SOURCE ("external source") message appears on the display ⇒page 26.
After the player has been detected successfully, the display will show
External audio source is active .
You can select the audio files using the controls on the portable player.
The volume can be adjusted using the sound system in your vehicle, the
multi-function steering wheel* or the portable player.
WARNING
Today's driving conditions require your full attention. As the driver, you
bear the responsibility for road safety. Never operate a portable player
while driving, as this could result in an accident.
Note
•We recommend setting the output level of the portable player to about
70 percent of maximum. Before adjusting the volume using the sound system
in your vehicle, you should first use the volume adjuster of the portable
player.•Using a portable player with the engine switched off will drain the
battery.
CD
Radio Adagio_EN.book Seite 23 Montag, 14. September 2009 10:50 10
Page 25 of 45
CD
24CDSelecting CD ModeImportant: A CD must have been inserted in the CD player
⇒ page 14.
– Press the button.The following information appears in the display:•Duration•CD track
7)
•Number of the track on the CD•Name of the directory/ album
7)
Selecting an MP3 directory ("browse")
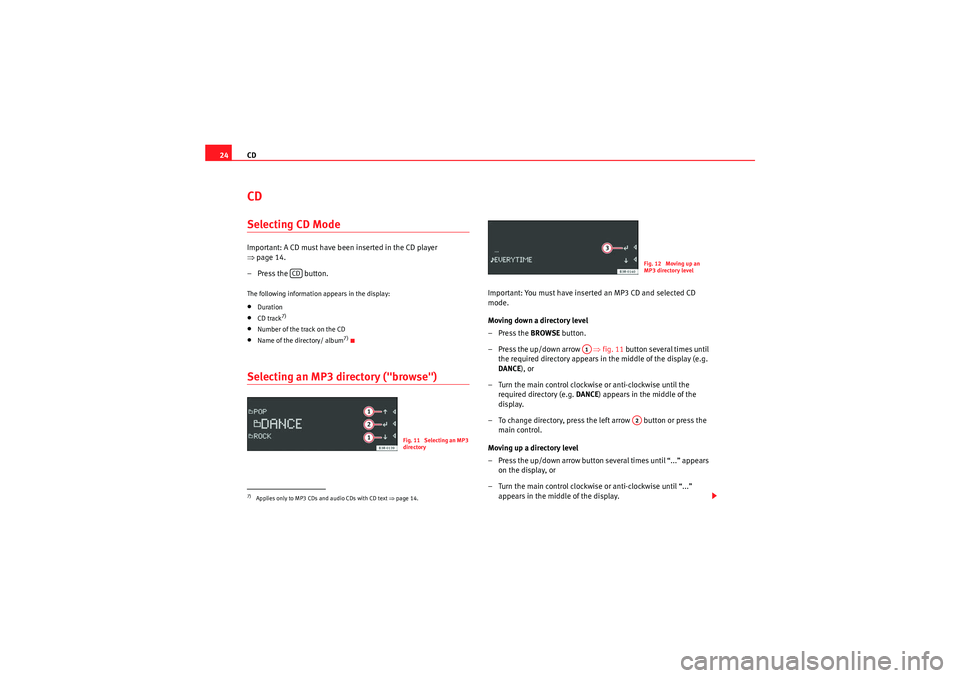
Important: You must have inserted an MP3 CD and selected CD
mode.
Moving down a directory level
–Press the BROWSE button.
– Press the up/down arrow ⇒fig. 11 button several times until
the required directory appears in the middle of the display (e.g.
DANCE ), or
– Turn the main control clockwise or anti-clockwise until the required directory (e.g. DANCE) appears in the middle of the
display.
– To change directory, press the left arrow button or press the main control.
Moving up a directory level
– Press the up/down arrow button several times until “...” appears on the display, or
– Turn the main control clockwise or anti-clockwise until “...” appears in the middle of the display.
7)Applies only to MP3 CDs and audio CDs with CD text ⇒page 14.
CD
Fig. 11 Selecting an MP3
directory
Fig. 12 Moving up an
MP3 directory level
A1
A2
Radio Adagio_EN.book Seite 24 Montag, 14. September 2009 10:50 10
Page 27 of 45
CD
26Applies to the market: AmericanShuffle mode (MIX)When this option is selected, al l the tracks on a CD or in a
folder are played in random order– Press the function button. CD MIX appears on the display.
– To switch on shuffle mode, press the FOLDER or CD control
button.
– To switch off shuffle mode, press the OFF control button.
– Press the function button to exit the menu.Applies to the market: EuropeanPlaying all tracks on the CD briefly ("scan")The "scan" function plays each of the tracks on a CD for a few
seconds.– Press the control knob. SCAN CD appears on the display and the
tracks on the CD are played for a few seconds.
– Press the main control to listen to the track currently playing in full.
NoteIf you switch on the "scan" function while the "titelmix" function is enabled,
the latter will be disabled.
External audio source (AUX)D a ta fro m an e xte rn al a u d i o s o u rce ca n b e p l ayed b a ck o n t h e
sound system.Important:
– An external audio source must have been connected to the sound system beforehand by your Dealer or specialist retailer.
Press the the button several times until EXT. SOURCE
appears on the display.
NoteThe external audio source is operated from the connected device itself.
MIXMIX
CD
Radio Adagio_EN.book Seite 26 Montag, 14. September 2009 10:50 10
Page 30 of 45

Mobile phone interface29
Inserting/Removing the mobile phoneImportant: The mobile phone adapter must be fitted ⇒page 28. Inserting
– Place the mobile phone in the phone adapter
⇒fig. 14 .
– Press the mobile phone into the adapter until it locks into place. The mobile phone will be connected up to the mobile phone
aerial and the battery will be charged.
Removal
– Press the release button ⇒fig. 15 .
– Lift the mobile phone out.
Should you insert the mobile phone into the adapter or remove it during a
call, the audio output or the connection may be interrupted. Removing the
phone from the adapter during a telephone conversation can also cause the
connection to be interrupted.
WARNING
Always make sure that the mobile phone is properly engaged. In the event
of an accident, a mobile phone that is not securely fitted could be flung out
of the adapter unit and injure the driver or passengers.
Caution
The mobile phone could possibly be damaged if it is not properly inserted in
the adapter and falls out when driving.
Note
•The use of mobile phones in the vehicle can generate electromagnetic
fields.
−Therefore, you should always operate mobile phones with an external
aerial. It is also valid for the use of mobiles using Bluetooth technology.
Fig. 14 Inserting the
mobile phone into the
phone adapterFig. 15 Removing the
mobile phone from the
phone adapter
AA
Radio Adagio_EN.book Seite 29 Montag, 14. September 2009 10:50 10