audio Seat Exeo ST 2012 MEDIA SYSTEM E
[x] Cancel search | Manufacturer: SEAT, Model Year: 2012, Model line: Exeo ST, Model: Seat Exeo ST 2012Pages: 167, PDF Size: 5.48 MB
Page 15 of 167
Handling: General information
14
Making a call
–Use the left thumbwheel ⇒page 12, fig. 11 to scroll up and
down through the phone book.
– Press the left thumbwheel . The number is dialled and the audio system is muted automatically.
Answering or ending calls
– Press the left thumbwheel ⇒page 12, fig. 11 .
Rejecting a call
– Press and hold the left thumbwheel ⇒page 12, fig. 11 .
Replacing a call
– If a second call is received (call waiting), briefly press the left thumbwheel ⇒page 12, fig. 11 . The current call will be
ended and you will be connected with the second caller.The following telephone status messages appear on the display in the instru-
ment panel: Phone numbers can be stored in different categories in the mobile phone
directory. These categories are displayed as follows:
P Private phone number
W Work phone number
M Mobile phone number
Scroll the left thumbwheel downwards to scroll down the list of stored names
from
A to Z . Scroll the left thumbwheel upwards to scroll up the list of stored
names from Z to A. If you "flick" the left thumbwheel you can jump to the next
letter of the alphabet.
Note
The information shown on the instrument panel display depends on the type
of mobile phone used.
Please wait...
The SIM card memory is being scanned.
SIM CARD
There is no SIM card in the mobile phone.
PIN CODE
The PIN code has not yet been entered.
NO SERVICE
No network connection
CALL
A call is active or incoming. If the caller's telephone
number is available, the display will alternately
give the caller's number and the message CALL .
LINE ENGAGED
Number dialled is engaged.
AAAAAA
AA
AA
TELEPHONE OFF
The telephone is switched off.
CALLING
The connection is being established.
NO ENTRIES
The phone book has no entries.
media_systemE_EN.book Seite 14 Montag, 21. September 2009 1:48 13
Page 16 of 167
Display15
Operating
RADIO, MEDIA (audiovisual
systems)
NAME, TEL
NAV, INFO
CAR, SETUP
DisplayDisplay orientationDescription
The main menu or the submenus appear on the display when
a function button is pressed.
When you press one of the function selector buttons ⇒page 9 the display
will show the main menu for that function, or one of its submenus
⇒ page 11, “History function”. The centre of the display contains the options
you can select for the function.
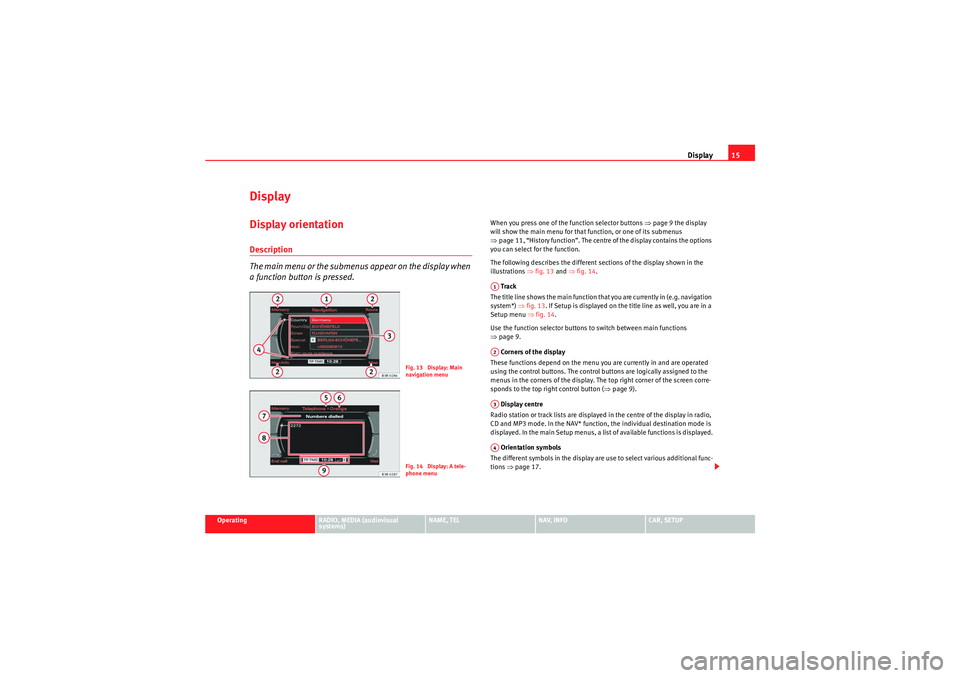
The following describes the different sections of the display shown in the
illustrations ⇒fig. 13 and ⇒fig. 14 .
Track
The title line shows the main function that you are currently in (e.g. navigation
system*) ⇒fig. 13 . If Setup is displayed on the title line as well, you are in a
Setup menu ⇒ fig. 14.
Use the function selector buttons to switch between main functions
⇒ page 9.
Corners of the display
These functions depend on the menu you are currently in and are operated
using the control buttons. The control buttons are logically assigned to the
menus in the corners of the display. The top right corner of the screen corre-
sponds to the top right control button ( ⇒page 9).
Display centre
Radio station or track lists are displayed in the centre of the display in radio,
CD and MP3 mode. In the NAV* function, the individual destination mode is
displayed. In the main Setup menus, a list of available functions is displayed.
Orientation symbols
The different symbols in the display are use to select various additional func-
tions ⇒page 17.
Fig. 13 Display: Main
navigation menuFig. 14 Display: A tele-
phone menu
A1A2A3A4
media_systemE_EN.book Seite 15 Montag, 21. September 2009 1:48 13
Page 17 of 167
Display
16 Roaming symbol*
If your vehicle is equipped with a mobile phone installation* and is not using
your home network, the roaming symbol will also appear in the title line.
Mobile network service provider*
If your vehicle is equipped with a mobile phone installation*, the name of the
mobile network service provider your phone is using will appear in the title
line.
The name of the mobile network service provider as it appears in the display
may be different from the name that appears in the phone display.
Subtitle
The subtitle shows detailed information about the selected menu option,
such as Numbers dialled ⇒ page 15, fig. 14.
Submenu display centre
In the centre of the display, the available options in the particular menu are
listed or notes are displayed.
Status line
In the status line ⇒ page 16 you can find the current status of the traffic
programme reception ⇒ page 42, traffic messaging channel (TMC) recep-
tion* ⇒page 145, mute status of current audio source, the time and tele-
phone* information ⇒page 68.
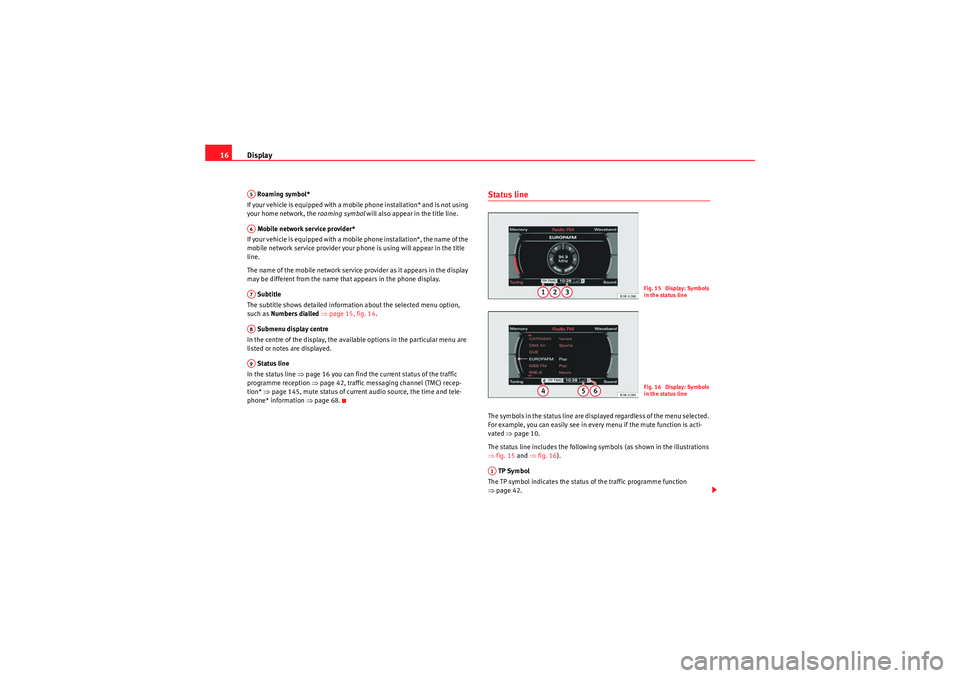
Status lineThe symbols in the status line are displayed regardless of the menu selected.
For example, you can easily see in every menu if the mute function is acti-
vated ⇒page 10.
The status line includes the following symbols (as shown in the illustrations
⇒ fig. 15 and ⇒fig. 16 ).
TP Symbol
The TP symbol indicates the status of the traffic programme function
⇒ page 42.
A5A6A7A8A9
Fig. 15 Display: Symbols
in the status lineFig. 16 Display: Symbols
in the status line
A1
media_systemE_EN.book Seite 16 Montag, 21. September 2009 1:48 13
Page 18 of 167
Display17
Operating
RADIO, MEDIA (audiovisual
systems)
NAME, TEL
NAV, INFO
CAR, SETUP
TMC symbol*
The TMC symbol indicates the reception status of traffic messages for specific
routes or road types ⇒page 145.
Time
Displays the set or received time ⇒page 155.
Mute symbol
The mute symbol will appear if the volume for the current audio source has
been switched off ⇒page 10.
Signal strength
The telephone* reception signal is indicated by vertical bars. The more
shaded bars displayed, the greater the signal.
Under certain circumstances, the symbols SIM, PIN or PUK can appear in
place of the signal strength bars.
If SIM is displayed, you must insert your SIM card into the slot to be able to
use the phone.
If PIN is displayed, you must enter the PIN code ⇒page 73 for the SIM card
being used.
If PUK is displayed, you must enter the PUK code into the mobile phone.
Bluetooth Symbol*
The Bluetooth symbol appears on the display when a mobile phone is
connected to the navigation system through the Bluetooth* connection
⇒ page 71.
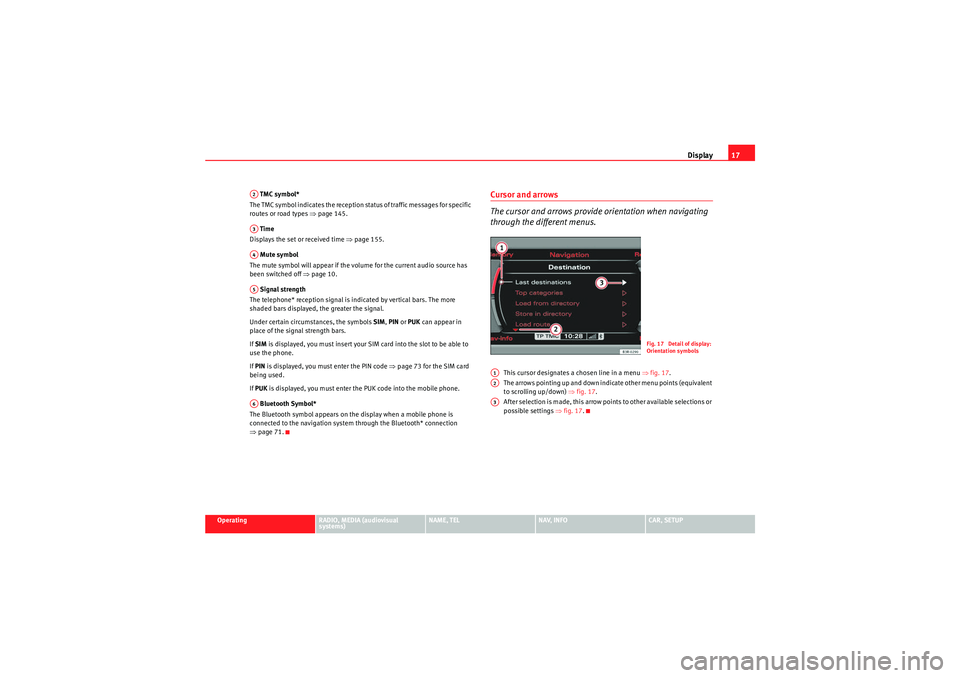
Cursor and arrows
The cursor and arrows provide orientation when navigating
through the different menus.
This cursor designates a chosen line in a menu ⇒fig. 17 .
The arrows pointing up and down indicate other menu points (equivalent
to scrolling up/down) ⇒fig. 17 .
After selection is made, this arrow points to other available selections or
possible settings ⇒fig. 17 .
A2A3A4A5A6
Fig. 17 Detail of display:
Orientation symbols
A1A2A3
media_systemE_EN.book Seite 17 Montag, 21. September 2009 1:48 13
Page 20 of 167
Display19
Operating
RADIO, MEDIA (audiovisual
systems)
NAME, TEL
NAV, INFO
CAR, SETUP
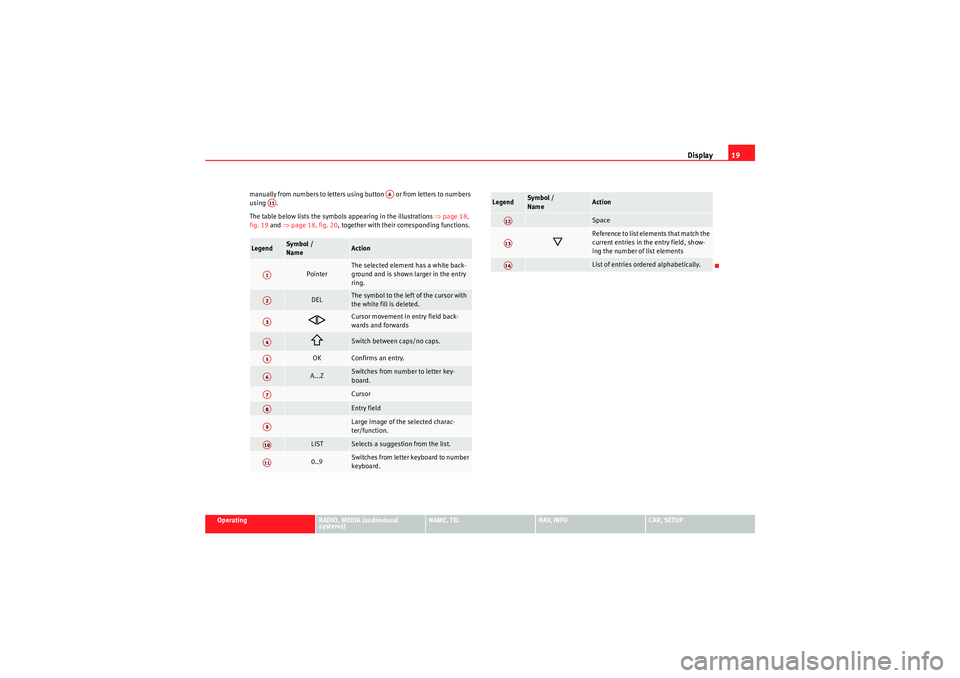
manually from numbers to letters using button or from letters to numbers
using .
The table below lists the symbols appearing in the illustrations
⇒page 18,
fig. 19 and ⇒page 18, fig. 20 , together with their corresponding functions.
Legend
Sym bol /
Name
Action
Pointer
The selected element has a white back-
ground and is shown larger in the entry
ring.
DEL
The symbol to the left of the cursor with
the white fill is deleted.
Cursor movement in entry field back-
wards and forwards
Switch between caps/no caps.
OK
Confirms an entry.
A...Z
Switches from number to letter key-
board.CursorEntry fieldLarge image of the selected charac-
ter/function.
LIST
Selects a suggestion from the list.
0..9
Switches from letter keyboard to number
keyboard.
A6
A11A1A2A3A4A5A6A7A8A9A10A11
Space
Reference to list elements that match the
current entries in the entry field, show-
ing the number of list elementsList of entries ordered alphabetically.
Legend
Symbol /
Name
Action
A12A13A14
media_systemE_EN.book Seite 19 Montag, 21. September 2009 1:48 13
Page 22 of 167
Display21
Operating
RADIO, MEDIA (audiovisual
systems)
NAME, TEL
NAV, INFO
CAR, SETUP
Control wheelOperating the control wheel
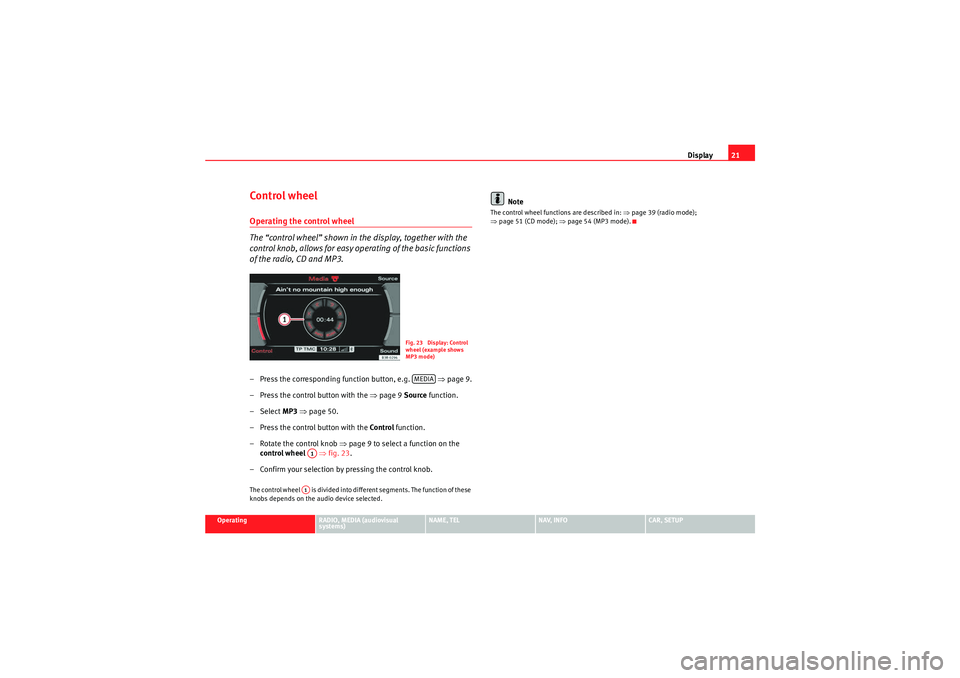
The “control wheel” shown in the display, together with the
control knob, allows for easy operating of the basic functions
of the radio, CD and MP3.– Press the corresponding function button, e.g. ⇒page 9.
– Press the control button with the ⇒page 9 Source function.
–Select MP3 ⇒ page 50.
– Press the control button with the Control function.
– Rotate the control knob ⇒ page 9 to select a function on the
control wheel ⇒fig. 23 .
– Confirm your selection by pressing the control knob.The control wheel is divided into different segments. The function of these
knobs depends on the audio device selected.
Note
The control wheel functions are described in: ⇒page 39 (radio mode);
⇒ page 51 (CD mode); ⇒page 54 (MP3 mode).
Fig. 23 Display: Control
wheel (example shows
MP3 mode)MEDIA
A1A1
media_systemE_EN.book Seite 21 Montag, 21. September 2009 1:48 13
Page 23 of 167

Drives
22DrivesSystem drivesGeneral observations
The navigation DVD, audio CDs, MP3 CDs and memory cards
in SD or MMC format can be loaded into the system drives.– Press the button to open and close the display ⇒page 23,
fig. 25 .The following drives are located behind the display:
Navigation DVD drive ⇒ fig. 24
Two MP3 card readers for SD or MMC memory cards ⇒fig. 24 The navigation DVD drive can read and play the navigation DVD compatible
with the equipment, audio CDs and MP3 CDs.
An audio CD inserted into the drive is played using the CD function
⇒
page 51. An MP3 CD or SD/MMC memory card inserted into the drive is
played using the MP3 function ⇒ page 54.
MP3 files must meet the following specifications:
We recommend a bit rate of at least 160 kbit/s for compressing MP3 files.
Fig. 24 Display open:
DVD drives and MP3
memory cards
A1A2
Type of media
MP3 CDs
Memory cards
Format
MPEG-1 Layer 3
Standard
ISO 9660 Level 2
FAT
or FAT32 process
File system
Joliet or Rockridge (single
session and multisession) file system
File name
Max. 64 characters
Bit rates
32 - 320 kbits/s, variable speed
Number of files
Max. 400 files per medium, max. 255 directories with max. 8 directory levels
ID3 tags
Version 1 and 2, max. 64 characters
Supported
media
CD-ROM, CD-R, CD-RW with a capacity of 650 MB and 700 MB
SD or MMC card with a
capacity of up to 32 GB
a)
a)The two MP3 memory card drives have been tested for use with many products cur-
rently available on the market. However, there may be some memory cards which are
not supported.Playlists
m3u format, file extension “m3u”
media_systemE_EN.book Seite 22 Montag, 21. September 2009 1:48 13
Page 24 of 167
Drives23
Operating
RADIO, MEDIA (audiovisual
systems)
NAME, TEL
NAV, INFO
CAR, SETUP
The playing time indication may differ from the actual time in MP3 files with
a variable bit rate.
As a rule, the MP3 music files are copyright-protected under the applicable
international and national laws. In some countries it is not allowed to make
copies, not even for personal use, without prior authorisation by the rightful
owners.
Please make inquiries into and observe the applicable copyright laws.
These restrictions do not
apply if you are the rightful owner of these rights
(e.g. in the case of your own compositions or recordings) or if the rightful
owner has given you permission to use these rights.
Note
•Please observe the notes for handling CDs ⇒page 26.•An MP3 CD is a CD-ROM on which you can store MP3 files.•In view of the variety of CD-Rs and CD-RWs and the difference in memory
capacities, the quality of the MP3 function may vary in the case of some
memory media.•When you insert the DVD for the first time, new software for the navigation
system will automatically be installed. It will then no longer be possible to use
older DVDs.
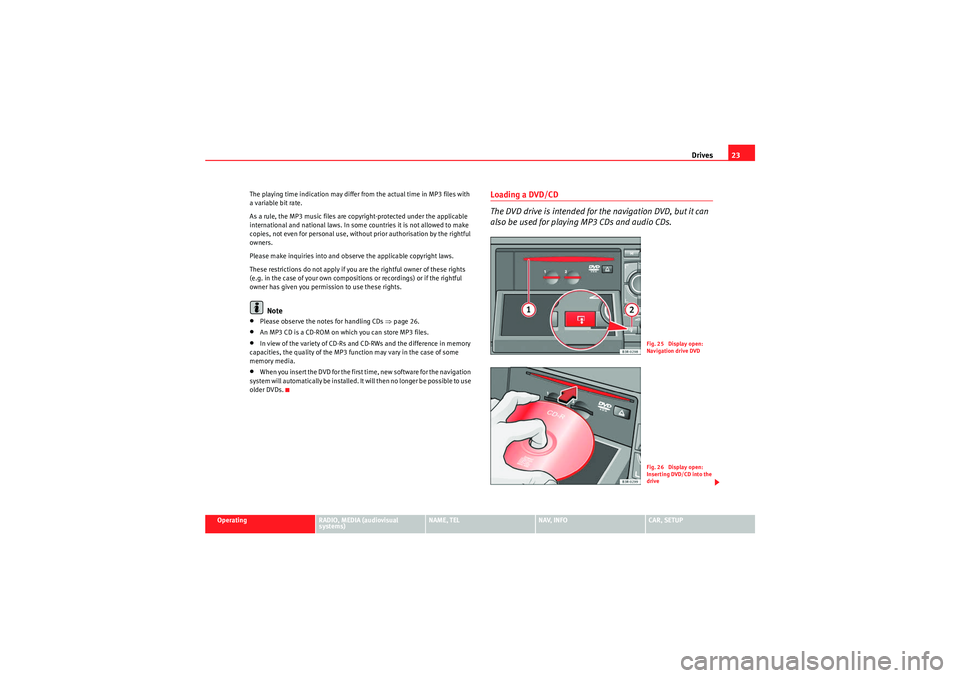
Loading a DVD/CD
The DVD drive is intended for the navigation DVD, but it can
also be used for playing MP3 CDs and audio CDs.
Fig. 25 Display open:
Navigation drive DVDFig. 26 Display open:
Inserting DVD/CD into the
drive
media_systemE_EN.book Seite 23 Montag, 21. September 2009 1:48 13
Page 25 of 167

Drives
24
Do not use any force when inserting the navigation DVD, MP3 CD or
audio CD into the drive. It will be drawn into the slot automatically.
– Press the button ⇒page 23, fig. 25 to open the display.
– C heck to make su re there is n o navigation DVD, MP3 C D or audio CD already in the drive.
– Hold the navigation DVD, MP3 CD or audio CD by the hole in the centre and the outer edge ⇒ page 23, fig. 26.
– Guide the navigation DVD, MP3 CD or audio CD straight (label side up) into the drive ⇒page 23, fig. 25 . The DVD/CD will be
pulled in automatically.Use the CD function ⇒page 51 for operating audio CDs (CD-A) inserted in
this drive. For MP3 CDs, use the MP3 function ⇒page 54.
If you insert an MP3 CD and do not play it immediately, the ID3 tags will load
in the background. If you start playing the MP3 CD immediately, the ID3 tag
for the current track will be displayed.
When you have inserted the navigation DVD into the drive, you can use the
navigation functions and the system will display the TMC traffic reports.
If the message Please check navigation DVD appears in the MMI display, the
Navigation function cannot be used. For possible causes, refer to ⇒page 26.
If Navigation being initialised... Please wait. is displayed on the display, the
navigation system is loading (start phase). You can use the system once the
message disappears and a navigation menu is displayed.
Note
•Please observe the notes for handling CDs ⇒page 26.
•In view of the variety of CD-Rs and CD-RWs and the difference in memory
capacities, the quality of the MP3 function may vary in the case of some
memory media.•When you insert the navigation DVD for the first time, new software for the
navigation system will automatically be installed. It will then no longer be
possible to use older navigation DVDs.Ejecting a DVD/CD– Press the button ⇒ fig. 27 to open the display.
– When the display is fully open, press the Eject button ⇒fig. 27 .
NotePlease observe the notes for handling CDs ⇒page 26.
A2A1
Fig. 27 Display open:
Ejecting navigation DVD
A2
A1
media_systemE_EN.book Seite 24 Montag, 21. September 2009 1:48 13
Page 26 of 167
Drives25
Operating
RADIO, MEDIA (audiovisual
systems)
NAME, TEL
NAV, INFO
CAR, SETUP
Loading a memory card
The navigation system is equipped with two MP3 memory
card readers.
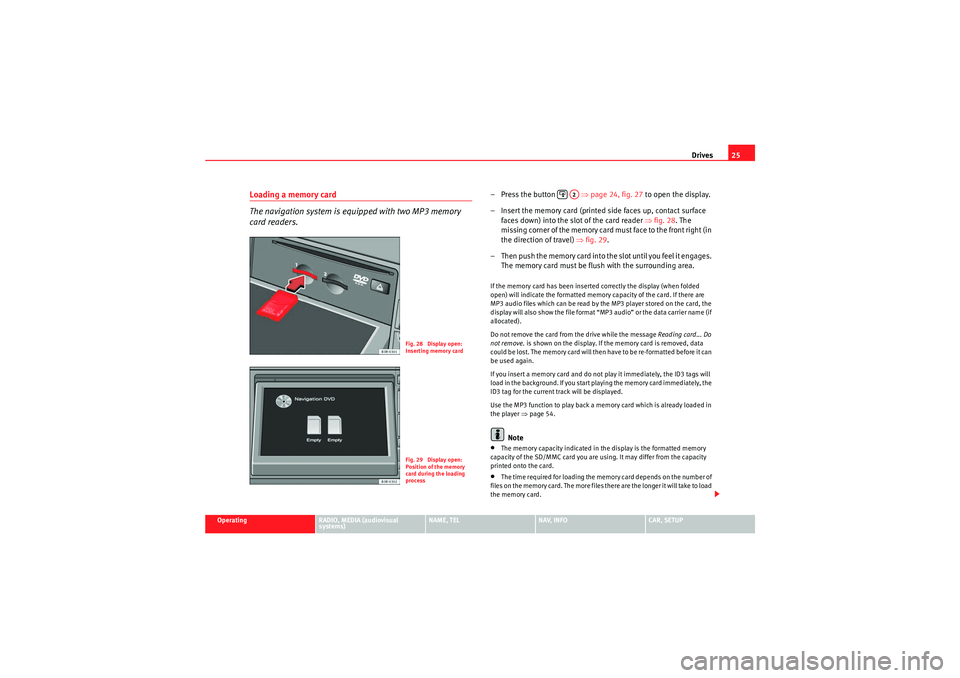
– Press the button ⇒page 24, fig. 27 to open the display.
– Insert the memory card (printed side faces up, contact surface faces down) into the slot of the card reader ⇒fig. 28. The
missing corner of the memory card must face to the front right (in
the direction of travel) ⇒fig. 29 .
– T h e n p u s h t h e m e m o r y c a r d i n t o t h e s l o t u n t i l y o u f e e l i t e n g a g e s . The memory card must be flush with the surrounding area.If the memory card has been inserted correctly the display (when folded
open) will indicate the formatted memory capacity of the card. If there are
MP3 audio files which can be read by the MP3 player stored on the card, the
display will also show the file format “MP3 audio” or the data carrier name (if
allocated).
Do not remove the card from the drive while the message Reading card... Do
not remove. is shown on the display. If the memory card is removed, data
could be lost. The memory card will then have to be re-formatted before it can
be used again.
If you insert a memory card and do not play it immediately, the ID3 tags will
load in the background. If you start playing the memory card immediately, the
ID3 tag for the current track will be displayed.
Use the MP3 function to play back a memory card which is already loaded in
the player ⇒ page 54.
Note
•The memory capacity indicated in the display is the formatted memory
capacity of the SD/MMC card you are using. It may differ from the capacity
printed onto the card.•The time required for loading the memory card depends on the number of
files on the memory card. The more files there are the longer it will take to load
the memory card.
Fig. 28 Display open:
Inserting memory cardFig. 29 Display open:
Position of the memory
card during the loading
process
A2
media_systemE_EN.book Seite 25 Montag, 21. September 2009 1:48 13