window Seat Ibiza 2017 Owner's manual Edition 11.17
[x] Cancel search | Manufacturer: SEAT, Model Year: 2017, Model line: Ibiza, Model: Seat Ibiza 2017Pages: 312, PDF Size: 6.51 MB
Page 7 of 312
Table of Contents
Table of Contents
The e s
senti
als . . . . . . . . . . . . . . . . . . . . . . . . 7
Exterior view . . . . . . . . . . . . . . . . . . . . . . . . . . . . 7
Exterior view . . . . . . . . . . . . . . . . . . . . . . . . . . . . 8
Driver-side general instrument panel (left-
hand drive) . . . . . . . . . . . . . . . . . . . . . . . . . . . . .
9
Driver-side general instrument panel (right-
hand drive) . . . . . . . . . . . . . . . . . . . . . . . . . . . . .
10
Centre console . . . . . . . . . . . . . . . . . . . . . . . . . . 11
Passenger-side general instrument panel (left-
hand drive) . . . . . . . . . . . . . . . . . . . . . . . . . . . . .
12
Passenger-side general instrument panel
(right-hand driv
e) . . . . . . . . . . . . . . . . . . . . . . . . 13
Interior view . . . . . . . . . . . . . . . . . . . . . . . . . . . . 14
How it works . . . . . . . . . . . . . . . . . . . . . . . . . . . . 15
Opening and closing . . . . . . . . . . . . . . . . . . . . . 15
Before driving . . . . . . . . . . . . . . . . . . . . . . . . . . . 19
Airbags . . . . . . . . . . . . . . . . . . . . . . . . . . . . . . . . 21
Child seats . . . . . . . . . . . . . . . . . . . . . . . . . . . . . 23
Starting the vehicle . . . . . . . . . . . . . . . . . . . . . . 31
Lights and visibility . . . . . . . . . . . . . . . . . . . . . . 31
Easy Connect . . . . . . . . . . . . . . . . . . . . . . . . . . . 34
Driver information System . . . . . . . . . . . . . . . . . 37
Status display . . . . . . . . . . . . . . . . . . . . . . . . . . . 40
Cruise control . . . . . . . . . . . . . . . . . . . . . . . . . . . 45
Warning lamps . . . . . . . . . . . . . . . . . . . . . . . . . . 47
Gearbox lever . . . . . . . . . . . . . . . . . . . . . . . . . . . 50
Air conditioning . . . . . . . . . . . . . . . . . . . . . . . . . 51
Fluid Level control . . . . . . . . . . . . . . . . . . . . . . . 57
Emergencies . . . . . . . . . . . . . . . . . . . . . . . . . . . . 62
Fuses . . . . . . . . . . . . . . . . . . . . . . . . . . . . . . . . . . 62
Bulbs . . . . . . . . . . . . . . . . . . . . . . . . . . . . . . . . . . 63
Action in the event of a puncture . . . . . . . . . . . 63
Changing a wheel . . . . . . . . . . . . . . . . . . . . . . . 65
Snow chains . . . . . . . . . . . . . . . . . . . . . . . . . . . . 70
Emergency towing of the vehicle . . . . . . . . . . . 70 How to jump start . . . . . . . . . . . . . . . . . . . . . . . . 71
Changing the windscreen wiper blades . . . . . . 73
Safety . . . . . . . . . . . . . . . . . . . . . . . . . . . . . . . . 75
Safe driving . . . . . . . . . . . . . . . . . . . . . . . . . . . . 75
Safety first! . . . . . . . . . . . . . . . . . . . . . . . . . . . . . 75
Advice about driving . . . . . . . . . . . . . . . . . . . . . 75
Correct position of the vehicle occupants . . . . 76
Pedal area . . . . . . . . . . . . . . . . . . . . . . . . . . . . . . 80
Seat belts . . . . . . . . . . . . . . . . . . . . . . . . . . . . . . 81
Why wear a seat belt . . . . . . . . . . . . . . . . . . . . . 81
How to properly adjust your seatbelt . . . . . . . . 84
Seat belt tensioners* . . . . . . . . . . . . . . . . . . . . . 85
Airbag system . . . . . . . . . . . . . . . . . . . . . . . . . . 86
Brief introduction . . . . . . . . . . . . . . . . . . . . . . . . 86
Airbag safety instructions . . . . . . . . . . . . . . . . . 88
Deactivating airbags . . . . . . . . . . . . . . . . . . . . . 90
Transporting children safely . . . . . . . . . . . . . . . 92
Child safety . . . . . . . . . . . . . . . . . . . . . . . . . . . . . 92
Child seats . . . . . . . . . . . . . . . . . . . . . . . . . . . . . 93
Event Data Recorder . . . . . . . . . . . . . . . . . . . . . . 96
Description and operation . . . . . . . . . . . . . . . . . 96
Emergencies . . . . . . . . . . . . . . . . . . . . . . . . . . 97
Self-help . . . . . . . . . . . . . . . . . . . . . . . . . . . . . . . 97
Emergency equipment . . . . . . . . . . . . . . . . . . . . 97
Tyre repair . . . . . . . . . . . . . . . . . . . . . . . . . . . . . . 98
Changing the windscreen wiper blades . . . . . . 100
Towing or tow-starting . . . . . . . . . . . . . . . . . . . . 100
Fuses and bulbs . . . . . . . . . . . . . . . . . . . . . . . . . 104
Fuses . . . . . . . . . . . . . . . . . . . . . . . . . . . . . . . . . . 104
Changing bulbs . . . . . . . . . . . . . . . . . . . . . . . . . 106
Halogen headlights. . . . . . . . . . . . . . . . . . . . . . 107
Changing the fog light bulbs . . . . . . . . . . . . . . . 109
Changing the tail light bulbs . . . . . . . . . . . . . . . 109
Changing the interior bulbs . . . . . . . . . . . . . . . . 111 Operation
. . . . . . . . . . . . . . . . . . . . . . . . . . . . . 115
Controls and displays . . . . . . . . . . . . . . . . . . . . 115
General instrument panel . . . . . . . . . . . . . . . . . 114
Instruments and warning/control lamps . . . . . 117
Instruments . . . . . . . . . . . . . . . . . . . . . . . . . . . . 117
Warning and control lamps . . . . . . . . . . . . . . . . 122
Introduction to the Easy Connect system* . . . . 123
System settings (CAR)* . . . . . . . . . . . . . . . . . . . 123
Communications and multimedia . . . . . . . . . . . 124
Steering wheel controls* . . . . . . . . . . . . . . . . . . 124
Multimedia . . . . . . . . . . . . . . . . . . . . . . . . . . . . . 129
Opening and closing . . . . . . . . . . . . . . . . . . . . . 130
Keys . . . . . . . . . . . . . . . . . . . . . . . . . . . . . . . . . . . 130
Central locking system . . . . . . . . . . . . . . . . . . . . 132
Anti-theft alarm* . . . . . . . . . . . . . . . . . . . . . . . . 138
Rear lid . . . . . . . . . . . . . . . . . . . . . . . . . . . . . . . . 141
Controls for the windows . . . . . . . . . . . . . . . . . . 141
Sunroof* . . . . . . . . . . . . . . . . . . . . . . . . . . . . . . . 144
Lights and visibility . . . . . . . . . . . . . . . . . . . . . . 146
Lights . . . . . . . . . . . . . . . . . . . . . . . . . . . . . . . . . 146
Interior lights . . . . . . . . . . . . . . . . . . . . . . . . . . . 150
Visibility . . . . . . . . . . . . . . . . . . . . . . . . . . . . . . . 151
Windscreen wiper and rear window wiper sys-
tems . . . . . . . . . . . . . . . . . . . . . . . . . . . . . . . . . . 152 R
ear view mirrors . . . . . . . . . . . . . . . . . . . . . . . . 152
Seats and head restraints . . . . . . . . . . . . . . . . . 154
Adjusting the seat and head restraints . . . . . . 154
Seat functions . . . . . . . . . . . . . . . . . . . . . . . . . . 156
Transport and practical equipment . . . . . . . . . 158
Practical equipment . . . . . . . . . . . . . . . . . . . . . . 158
Luggage compartment . . . . . . . . . . . . . . . . . . . . 160
Roof carrier* . . . . . . . . . . . . . . . . . . . . . . . . . . . . 164
Air conditioning . . . . . . . . . . . . . . . . . . . . . . . . . 166
Heating, ventilation and cooling . . . . . . . . . . . . 166
Heating and fresh air . . . . . . . . . . . . . . . . . . . . . 169
Manual air conditioning* . . . . . . . . . . . . . . . . . . 171
Climatronic* . . . . . . . . . . . . . . . . . . . . . . . . . . . . 173
5
Page 20 of 312
The essentials
● To lif
t
the bonnet, press towards the left on
the lever located under the bonnet, in the
centre ››› Fig. 10 2 . The arrester hooks are
r el
e
ased.
● Release the bonnet stay and secure it in
the fixtur
e designed for this in the bonnet.
››› in Safety notes for work in the en-
gine compartment on page 263
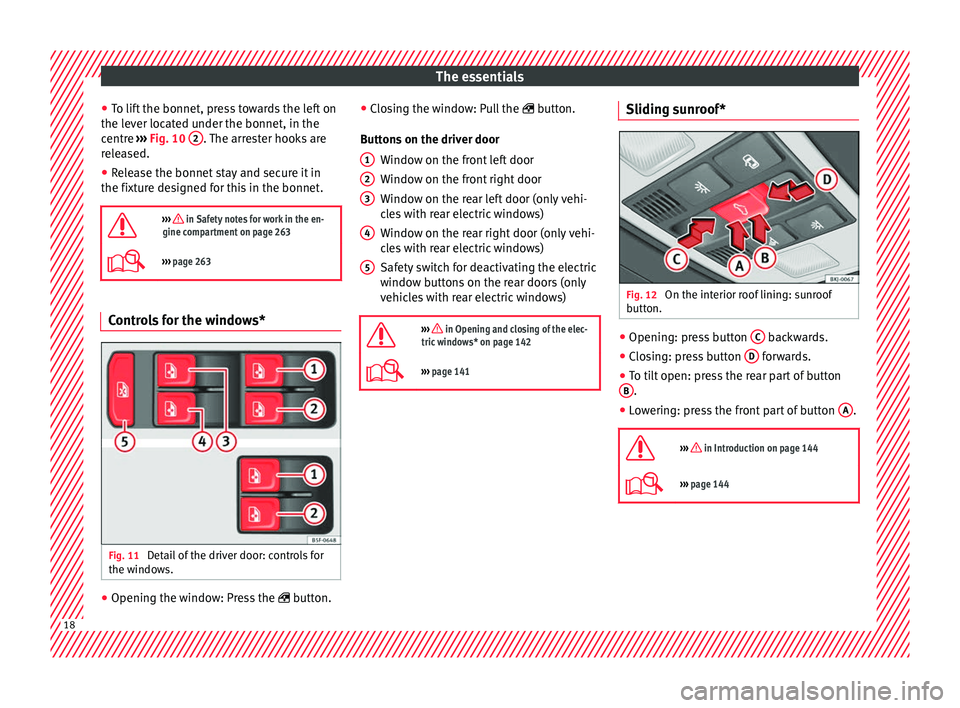
››› page 263 Controls for the windows*
Fig. 11
Detail of the driver door: controls for
the w indo
w
s. ●
Opening the window: Press the butt
on. ●
C
los
ing the window: Pull the button.
Buttons on the driver door Window on the front left door
Window on the front right door
Window on the rear left door (only vehi-
cles with rear electric windows)
Window on the rear right door (only vehi-
cles with rear electric windows)
Safety switch for deactivating the electric
window buttons on the rear doors (only
vehicles with rear electric windows)
››› in Opening and closing of the elec-
tric windows* on page 142
››› page 141 1
2
3
4
5 Sliding sunroof*
Fig. 12
On the interior roof lining: sunroof
b utt
on. ●
Opening: press button C backwards.
● Closing: press button D forwards.
● To tilt open: press the rear part of button
B .
● Lowering: press the front part of button A .
››› in Introduction on page 144
››› page 144 18
Page 35 of 312
The essentials
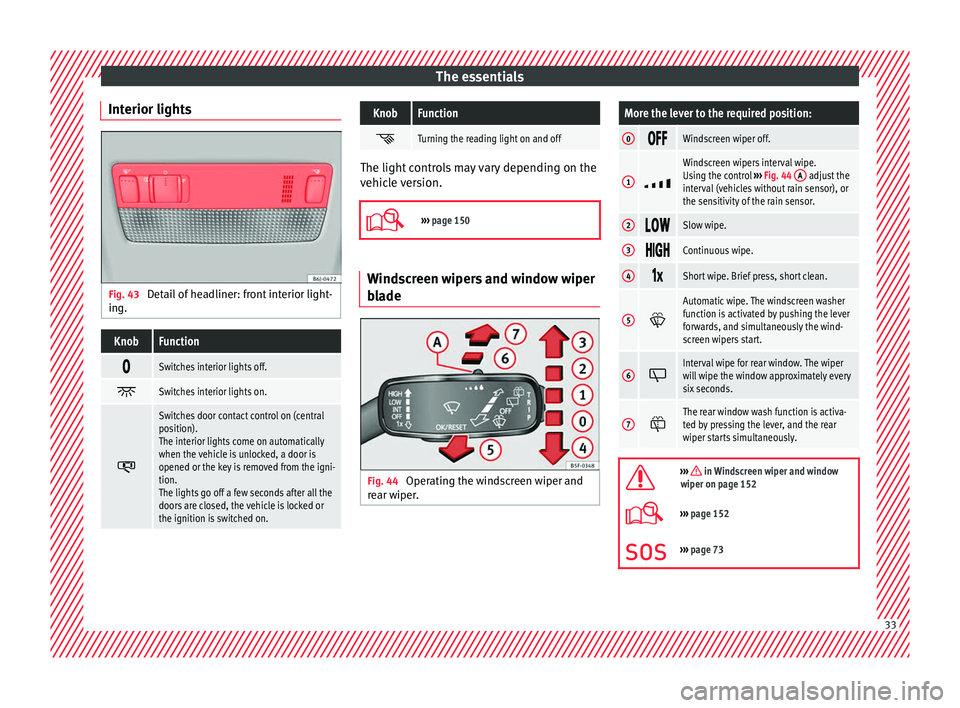
Interior lights Fig. 43
Detail of headliner: front interior light-
in g.KnobFunction
Switches interior lights off.
Switches interior lights on.
Switches door contact control on (central
position).
The interior lights come on automatically
when the vehicle is unlocked, a door is
opened or the key is removed from the igni-
tion.
The lights go off a few seconds after all the
doors are closed, the vehicle is locked or
the ignition is switched on.
KnobFunction
Turning the reading light on and off
The light controls may vary depending on the
vehic
l
e version.
››› page 150 Windscreen wipers and window wiper
bl
a
de Fig. 44
Operating the windscreen wiper and
r e
ar w
iper.
More the lever to the required position:
0 Windscreen wiper off.
1
Windscreen wipers interval wipe.
Using the control
››› Fig. 44 A adjust the
interval (vehicles without rain sensor), or
the sensitivity of the rain sensor.
2 Slow wipe.
3
Continuous wipe.
4
Short wipe. Brief press, short clean.
5
Automatic wipe. The windscreen washer
function is activated by pushing the lever
forwards, and simultaneously the wind-
screen wipers start.
6
Interval wipe for rear window. The wiper
will wipe the window approximately every
six seconds.
7
The rear window wash function is activa-
ted by pressing the lever, and the rear
wiper starts simultaneously.
››› in Windscreen wiper and window
wiper on page 152
››› page 152
››› page 73 33
Page 37 of 312
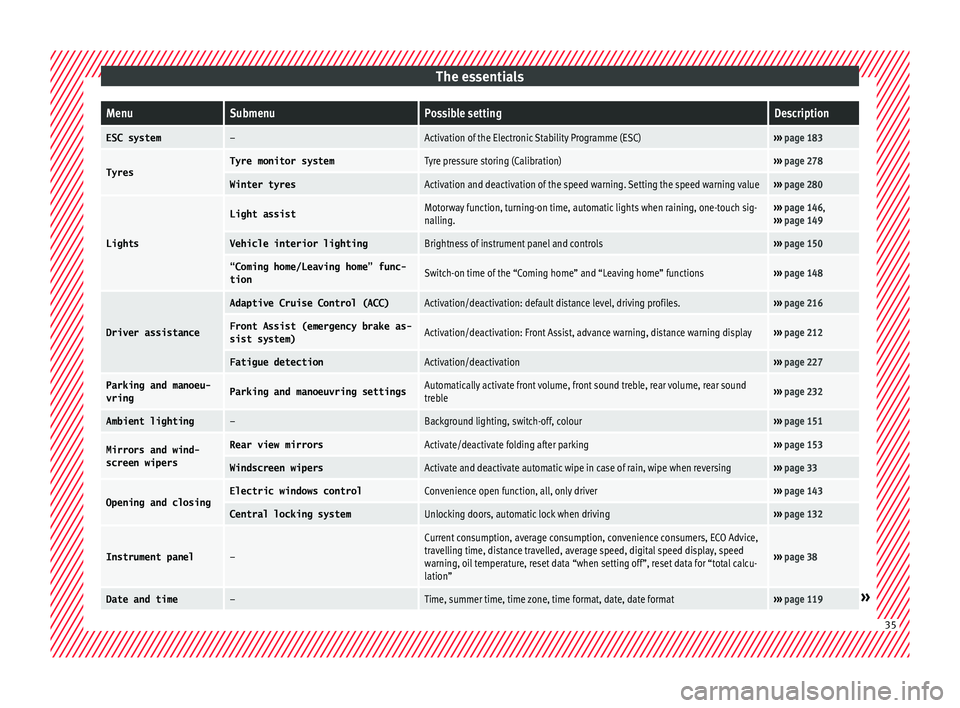
The essentialsMenuSubmenuPossible settingDescription
ESC system–Activation of the Electronic Stability Programme (ESC)›››
page 183
TyresTyre monitor systemTyre pressure storing (Calibration)››› page 278
Winter tyresActivation and deactivation of the speed warning. Setting the speed warning value››› page 280
Lights
Light assistMotorway function, turning-on time, automatic lights when raining, one-touch sig-
nalling.››› page 146,
››› page 149
Vehicle interior lightingBrightness of instrument panel and controls››› page 150
“Coming home/Leaving home” func-
tionSwitch-on time of the “Coming home” and “Leaving home” functions››› page 148
Driver assistance
Adaptive Cruise Control (ACC)Activation/deactivation: default distance level, driving profiles.››› page 216
Front Assist (emergency brake as-
sist system)Activation/deactivation: Front Assist, advance warning, distance warning display››› page 212
Fatigue detectionActivation/deactivation››› page 227
Parking and manoeu-
vringParking and manoeuvring settingsAutomatically activate front volume, front sound treble, rear volume, rear sound
treble››› page 232
Ambient lighting–Background lighting, switch-off, colour››› page 151
Mirrors and wind-
screen wipersRear view mirrorsActivate/deactivate folding after parking››› page 153
Windscreen wipersActivate and deactivate automatic wipe in case of rain, wipe when reversing››› page 33
Opening and closingElectric windows controlConvenience open function, all, only driver››› page 143
Central locking systemUnlocking doors, automatic lock when driving››› page 132
Instrument panel–
Current consumption, average consumption, convenience consumers, ECO Advice,
travelling time, distance travelled, average speed, digital speed display, speed
warning, oil temperature, reset data “when setting off”, reset data for “total calcu-
lation”
››› page 38
Date and time–Time, summer time, time zone, time format, date, date format››› page 119» 35
Page 55 of 312
The essentials
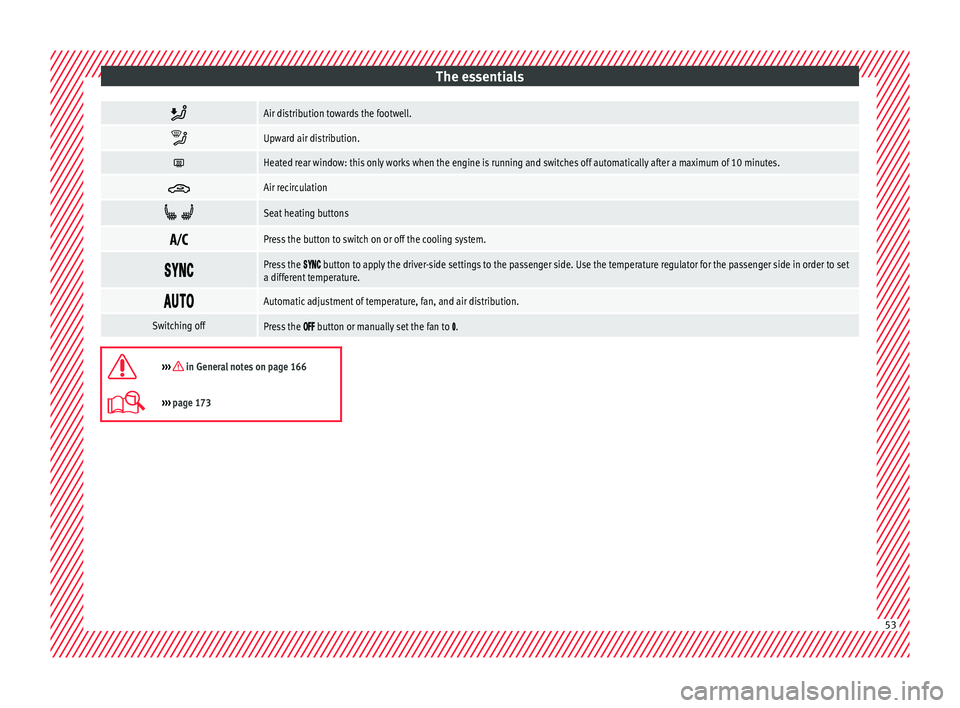
Air distribution towards the footwell.
Upward air distribution.
Heated rear window: this only works when the engine is running and switches off automatically after a maximum of 10 minutes.
Air recirculation
Seat heating buttons
Press the button to switch on or off the cooling system.
Press the button to apply the driver-side settings to the passenger side. Use the temperature regulator for the passenger side in order to set
a different temperature.
Automatic adjustment of temperature, fan, and air distribution.
Switching offPress the button or manually set the fan to .
››› in General notes on page 166
›››
page 173 53
Page 56 of 312
The essentials
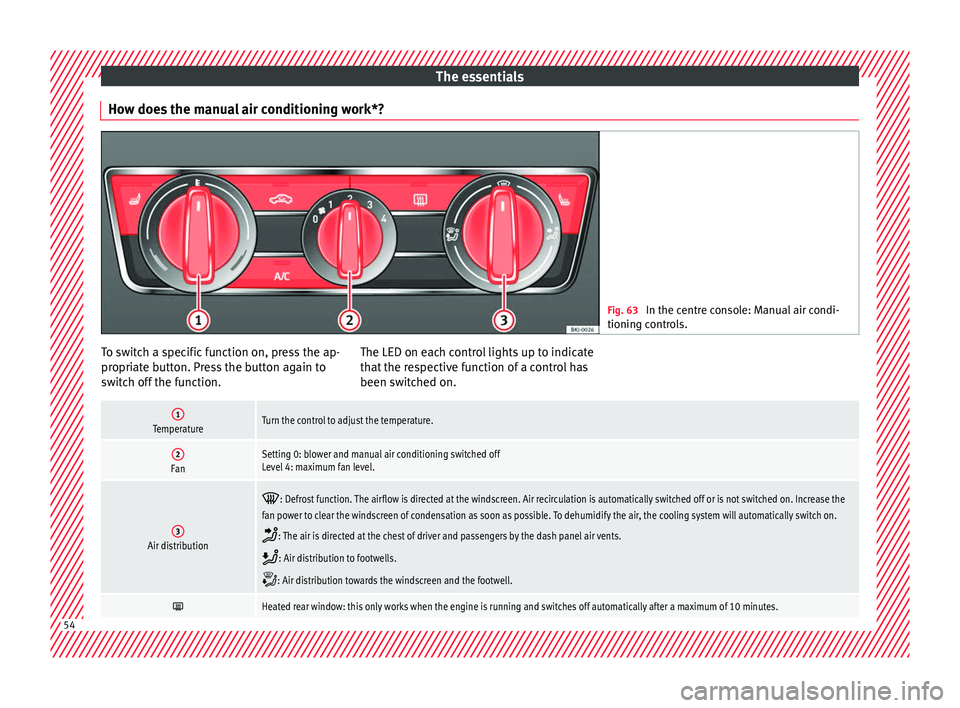
How does the manual air conditioning work*? Fig. 63
In the centre console: Manual air condi-
tioning c ontr
ols. To switch a specific function on, press the ap-
pr
opri
at
e button. Press the button again to
switch off the function. The LED on each control lights up to indicate
that the r
espective function of a control has
been switched on.
1TemperatureTurn the control to adjust the temperature.
2FanSetting 0: blower and manual air conditioning switched off
Level 4: maximum fan level.
3Air distribution
: Defrost function. The airflow is directed at the windscreen. Air recirculation is automatically switched off or is not switched on. Increase the
fan power to clear the windscreen of condensation as soon as possible. To dehumidify the air, the cooling system will automatically switch on.
: The air is directed at the chest of driver and passengers by the dash panel air vents.
: Air distribution to footwells.
: Air distribution towards the windscreen and the footwell.
Heated rear window: this only works when the engine is running and switches off automatically after a maximum of 10 minutes.
54
Page 58 of 312
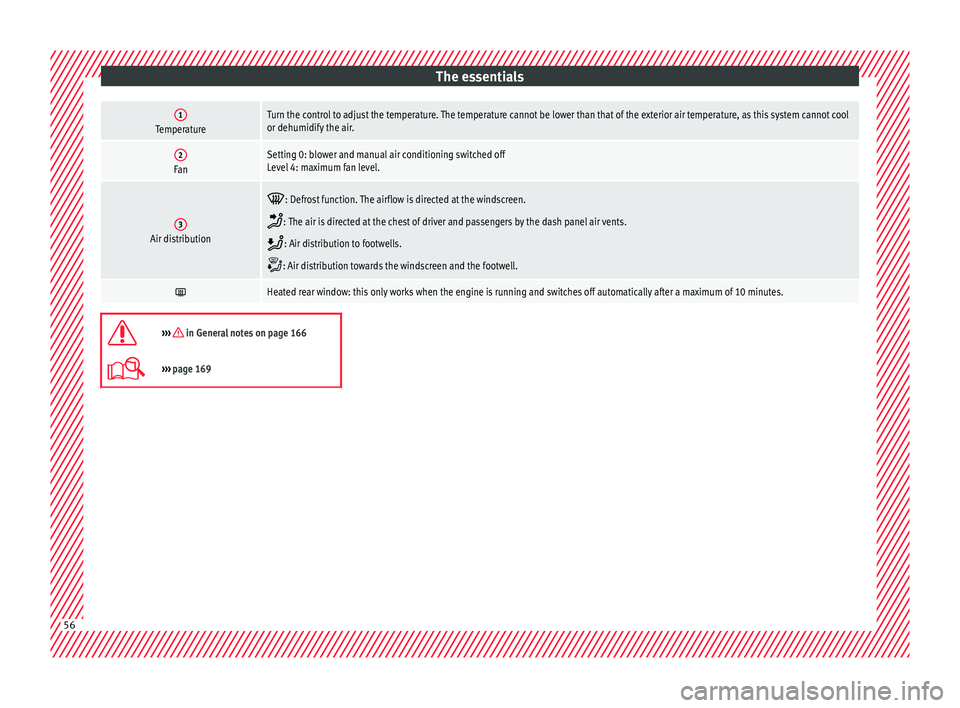
The essentials1TemperatureTurn the control to adjust the temperature. The temperature cannot be lower than that of the exterior air temperature, as this system cannot cool
or dehumidify the air.
2FanSetting 0: blower and manual air conditioning switched off
Level 4: maximum fan level.
3Air distribution
: Defrost function. The airflow is directed at the windscreen.
: The air is directed at the chest of driver and passengers by the dash panel air vents.
: Air distribution to footwells.
: Air distribution towards the windscreen and the footwell.
Heated rear window: this only works when the engine is running and switches off automatically after a maximum of 10 minutes.
››› in General notes on page 166
›››
page 169 56
Page 74 of 312
The essentials
Note
● The v ehic
les must not touch each other,
otherwise electricity could flow as soon as
the positive terminals are connected.
● The discharged battery must be properly
connected t
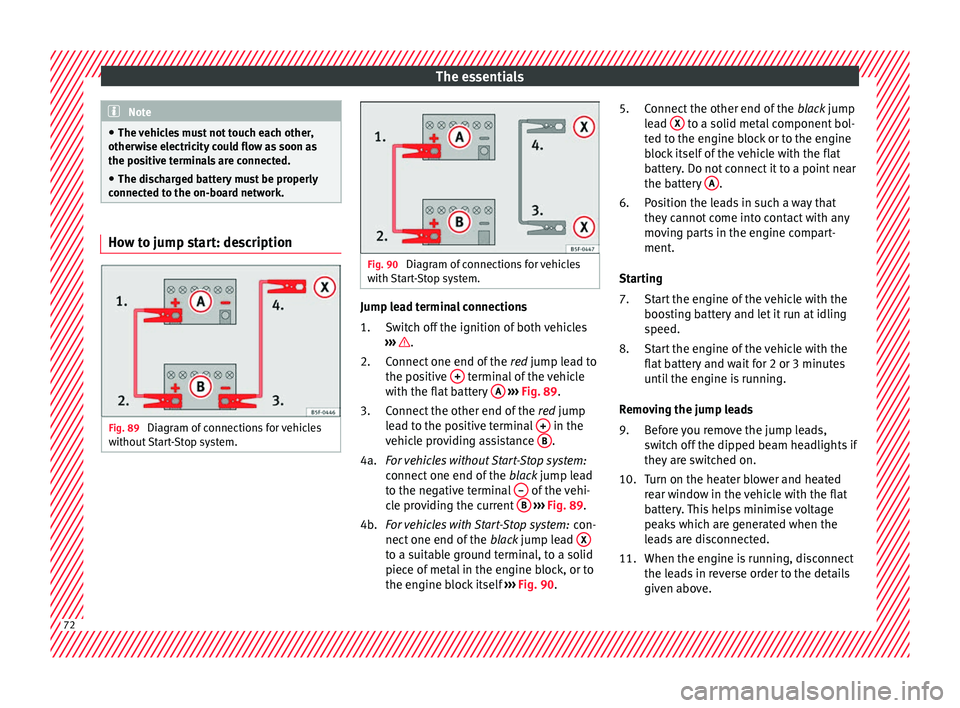
o the on-board network. How to jump start: description
Fig. 89
Diagram of connections for vehicles
w ithout
Start-Stop system. Fig. 90
Diagram of connections for vehicles
with St
art-Stop system. Jump lead terminal connections
Swit
c
h off the ignition of both vehicles
››› .
C onnect
one end of
the red jump lead to
the positive + terminal of the vehicle
w ith the fl
at
battery A
› ›
› Fig. 89 .
Connect the other end of the red jump
lead to the positive terminal + in the
v ehic
l
e providing assistance B .
F or
vehicles without Start-Stop system:
connect one end of the black jump lead
to the negative terminal – of the vehi-
c l
e pr
oviding the current B
› ›
› Fig. 89 .
For vehicles with Start-Stop system: con-
nect one end of the black jump lead X to a suitable ground terminal, to a solid
piec
e of
met
al in the engine block, or to
the engine block itself ››› Fig. 90.
1.
2.
3.
4a.
4b. Connect the other end of the
black
jump
lead X to a solid metal component bol-
t ed t
o the en
gine block or to the engine
block itself of the vehicle with the flat
battery. Do not connect it to a point near
the battery A .
P o
s
ition the leads in such a way that
they cannot come into contact with any
moving parts in the engine compart-
ment.
Starting Start the engine of the vehicle with the
boosting battery and let it run at idling
speed.
Start the engine of the vehicle with the
flat battery and wait for 2 or 3 minutes
until the engine is running.
Removing the jump leads Before you remove the jump leads,
switch off the dipped beam headlights if
they are switched on.
Turn on the heater blower and heated
rear window in the vehicle with the flat
battery. This helps minimise voltage
peaks which are generated when the
leads are disconnected.
When the engine is running, disconnect
the leads in reverse order to the details
given above.
5.
6.
7.
8.
9.
10.
11.
72
Page 76 of 312
The essentials
Do not change the windscreen wipers when
out of
the ser
vice position, as it could cause
paint to flake off the bonnet due to friction
with the windscreen wiper arm.
Service position (for changing wiper blades)
● Ensure that the wiper blades are not frozen.
● Turn the ignition on and off and then (with-
in appro
ximately 9 seconds) push the wind-
screen wiper lever down (short wipe). The
windscreen wipers will move to the service
position ››› Fig. 91.
Removing the wiper blade
● Lift the windscreen wiper arm.
● Press the securing tab down 1
› ›
› Fig. 92
.
● Extract the wiper blade from the wiper arm.
Fitting the wiper b
lade
● Insert the wiper blade onto the windscreen
wiper arm unti
l it clicks into place.
● Place the windscreen wiper arms to their in-
itial po
sition.
● Turn the ignition on, push the windscreen
wiper lev
er down (touch wipe) and then turn
the ignition off.
››› in Changing the windscreen and
rear window wiper blades on page 100
››› page 100 Changing the rear window wiper blade
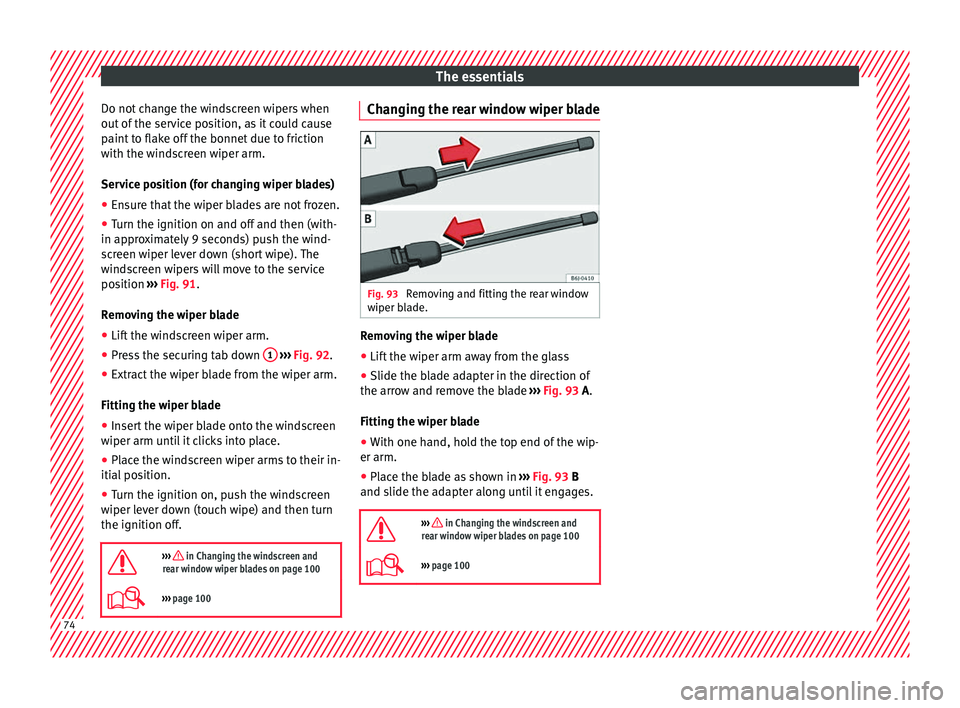
Fig. 93
Removing and fitting the rear window
w iper b
l
ade. Removing the wiper blade
● Lift the wiper arm away from the glass
● Slide the blade adapter in the direction of
the arr o
w and r
emove the blade ››› Fig. 93 A.
Fitting the wiper blade
● With one hand, hold the top end of the wip-
er arm.
● Place the blade as shown in ›››
Fig. 93 B
and slide the adapter along until it engages.
››› in Changing the windscreen and
rear window wiper blades on page 100
››› page 100 74
Page 77 of 312
Safe driving
Safety
Saf e driv
in
g
Safety first! This chapter contains important information,
tips, s
ug
gestions and warnings that you
should read and consider for both your own
safety and for your passengers' safety. WARNING
● This m
anual contains important informa-
tion about the operation of the vehicle, both
for the driver and the passengers. The other
sections of the on-board documentation also
contain further information that you should
be aware of for your own safety and for the
safety of your passengers.
● Ensure that the on-board documentation is
kept in the
vehicle at all times. This is espe-
cially important when lending or selling the
vehicle to another person. Advice about driving
B ef or
e setting off For your own safety and the safety of your
p
a
s
sengers, always note the following points
before every trip: –
Make s
ure that the vehicle's lights and turn
signals are working properly.
– Check tyre pressure.
– Ensure that all windows provide a clear and
good v
iew of the surroundings.
– Ensure that all luggage is correctly secured
›››
page 160.
– Make sure that no objects can interfere
with the pedal
s.
– Adjust front seat, head restraint and mir-
rors
properly according to your size.
– Ensure that the passenger in the central
rear se
at always has the head restraint in
the correct position for use.
– Instruct passengers to adjust the head re-
straints
according to their height.
– Protect children with appropriate child
seats and pr
operly applied seat belts
››› page 92.
– Assume the correct sitting position. Instruct
your pa
ssengers also to assume a proper
sitting position ››› page 76.
– Fasten your seat belt securely. Instruct your
pas
sengers also to fasten their seat belts
properly ››› page 81. What affects driving safety? As a driver, you are responsible for yourself
and y
our p
assengers. When your concentra-
tion or driving safety is affected by any cir-
cumstance, you endanger yourself as well as
others on the road ››› , for this reason:
– Always pay attention to traffic and do not
get di
stracted by passengers or telephone
calls.
– Never drive when your driving ability is im-
paired (e.
g. by medication, alcohol, drugs).
– Observe traffic laws and speed limits.
– Always reduce your speed as appropriate
for r o
ad, traffic and weather conditions.
– When travelling long distances, take
break
s regularly - at least every two hours.
– If possible, avoid driving when you are tired
or stre
ssed. WARNING
When driving safety is impaired during a trip,
the risk of
injury and accidents increases. Safety equipment
Never put your safety or the safety of your
p
a
s
sengers in danger. In the event of an acci-
dent, the safety equipment may reduce the »
75
Technical data
Advice
Operation
Emergencies
Safety