mileage Seat Ibiza 5D 2005 Owner's manual
[x] Cancel search | Manufacturer: SEAT, Model Year: 2005, Model line: Ibiza 5D, Model: Seat Ibiza 5D 2005Pages: 252, PDF Size: 7.56 MB
Page 60 of 252

Cockpit
58Display field for selector lever position*The position of the automatic gearbox selector lever is shown on the display
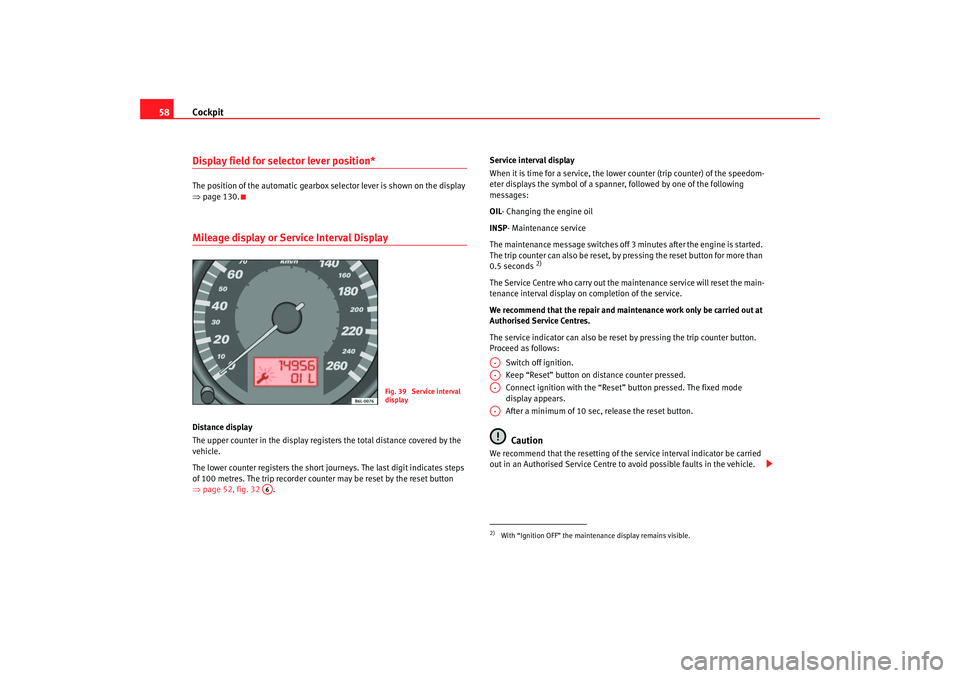
⇒ page 130.Mileage display or Service Interval DisplayDistance display
The upper counter in the display registers the total distance covered by the
vehicle.
The lower counter registers the short journeys. The last digit indicates steps
of 100 metres. The trip recorder counter may be reset by the reset button
⇒ page 52, fig. 32 . Service interval display
When it is time for a service, the lower counter (trip counter) of the speedom-
eter displays the symbol of a spanner, followed by one of the following
messages:
OIL
- Changing the engine oil
INSP- Maintenance service
The maintenance message switches off 3 minutes after the engine is started.
The trip counter can also be reset, by pressing the reset button for more than
0.5 seconds
2)
The Service Centre who carry out the maintenance service will reset the main-
tenance interval display on completion of the service.
We recommend that the repair and main tenance work only be carried out at
Authorised Service Centres.
The service indicator can also be reset by pressing the trip counter button.
Proceed as follows:
Switch off ignition.
Keep “Reset” button on distance counter pressed.
Connect ignition with the “Reset” button pressed. The fixed mode
display appears.
After a minimum of 10 sec, release the reset button.
Caution
We recommend that the resetting of the service interval indicator be carried
out in an Authorised Service Centre to avoid possible faults in the vehicle.
Fig. 39 Service interval
display
A6
2)With “Ignition OFF” the mainte nance display remains visible.A-A-A-A-
ibiza_ingles Seite 58 Mittwoch, 5. Oktober 2005 5:17 17
Page 186 of 252

Checking and refilling levels
184charge. Never short the battery terminals. High-energy sparks can cause
injury.•
A highly explosive mixture of gases is given off when the battery is
under charge. The batteries should be charged in a well-ventilated room
only.
•
Keep children away from acid and batteries.
•
Before working on the electrical system, you must switch off the
engine, the ignition and all consumers. The minus cable on the battery
must be disconnected. When a light bulb is changed, you need only switch
off the light.
•
Deactivate the anti-theft alarm by unlocking the vehicle before you
disconnect the battery! The alarm will otherwise be triggered.
•
When disconnecting the battery from the vehicle electrical system,
disconnect first the negative cable and then the positive cable.
•
Switch off all electrical consumers before reconnecting the battery.
Reconnect first the positive cable and then the negative cable. Never
reverse the polarity of the connections. This could cause an electrical fire.
•
Never charge a frozen battery, or one which has thawed. This could
result in explosions and chemical burns. Always replace a battery which
has frozen. A flat battery can freeze at temperatures around 0
°C.
•
Ensure that the vent hose is always connected to the battery.
•
Never use a defective battery. This may be fatally explosive. Replace a
damaged battery immediately.Caution
•
Never disconnect the battery if the ignition is switched on or if the engine
is running. This could damage the electrical system or electronic compo-
nents.
•
Do not expose the battery to direct sunlight over a long period of time, as
the intense ultraviolet radiation can damage the battery housing.
•
If the vehicle is left standing in cold conditions for a long period, protect
the battery from frost. If it “freezes” it will be damaged.
Checking the electrolyte level
The electrolyte level should be checked regularly in high-
mileage vehicles, in hot countries and in older batteries.– Open the bonnet and open the battery cover at the front ⇒ in
“Safety instructions on working in the engine compartment” on
page 169 ⇒ in “Warnings on handling the battery” on
page 183.
– Check the colour display in the magic eye on the top of the battery.
– If there are air bubbles in the window, tap the window gently until they disperse.The position of the battery is show n in the corresponding engine compart-
ment diagram ⇒page 224.
The round window (“magic eye”) on the top of the battery changes colour,
depending on the charge level and electrolyte level of the battery.
If the colour in the window is colourless or bright yellow, the electrolyte level
of the battery is too low. Have the battery checked by a qualified workshop.
The colours green and black are used by the workshops for diagnostic
purposes.
WARNING (continued)
ibiza_ingles Seite 184 Mittwoch, 5. Oktober 2005 5:17 17
Page 247 of 252

Index245
Luggage compartment cover . . . . . . . . . . . . . . 112MMain beam . . . . . . . . . . . . . . . . . . . . . . . . . . . . . . 91
Main beam headlights
Indicator lamp . . . . . . . . . . . . . . . . . . . . . . . . 64
Main headlight lamps . . . . . . . . . . . . . . . . . . . . 205
Manual gearbox . . . . . . . . . . . . . . . . . . . . . . . . . 129
Manual heating . . . . . . . . . . . . . . . . . . . . . . . . . 114 controls . . . . . . . . . . . . . . . . . . . . . . . . . . . . 113
Manual heating system Defrosting the windscreen . . . . . . . . . . . . . 114
Demisting the windscreen and side windows . .114
MFD . . . . . . . . . . . . . . . . . . . . . . . . . . . . . . . . . . . . 55
Mileage display . . . . . . . . . . . . . . . . . . . . . . . . . . 58
Mirrors Exterior mirrors, electrical . . . . . . . . . . . . . . . 98
Interior mirror . . . . . . . . . . . . . . . . . . . . . . . . . 97
Make-up mirrors . . . . . . . . . . . . . . . . . . . . . . 93
Mobile phone . . . . . . . . . . . . . . . . . . . . . . . . . . . 163
Modifications . . . . . . . . . . . . . . . . . . . . . . . . . . . 162
Multi-function display . . . . . . . . . . . . . . . . . . . . . 55NNumber of seats . . . . . . . . . . . . . . . . . . . . . . . . . . 17OObservations . . . . . . . . . . . . . . . . . . . . . . . . . . . 145 Octane number . . . . . . . . . . . . . . . . . . . . . . . . . 167
Oil . . . . . . . . . . . . . . . . . . . . . . . . . . . . . . . . . . . . 172
Oil change . . . . . . . . . . . . . . . . . . . . . . . . . . . . . 176
Oil properties . . . . . . . . . . . . . . . . . . . . . . . . . . . 173
One-touch opening and closing
Electric windows . . . . . . . . . . . . . . . . . . . . . . 84
Opening and locking . . . . . . . . . . . . . . . . . . . . . . 82
Overview Control lamps . . . . . . . . . . . . . . . . . . . . . . . . . 60
Instrument panel . . . . . . . . . . . . . . . . . . . . . . 51
Instruments . . . . . . . . . . . . . . . . . . . . . . . . . . 52
Warning lamps . . . . . . . . . . . . . . . . . . . . . . . . 60
PPaintworkPolishing . . . . . . . . . . . . . . . . . . . . . . . . . . . 156
Waxing . . . . . . . . . . . . . . . . . . . . . . . . . . . . . 155
Parking . . . . . . . . . . . . . . . . . . . . . . . . . . . . . . . . 134
Parking and dipped/si de lights . . . . . . . . . . . . . 62
Parking lights . . . . . . . . . . . . . . . . . . . . . . . . . . . . 91
Parts . . . . . . . . . . . . . . . . . . . . . . . . . . . . . . . . . . 162
Parts replacement . . . . . . . . . . . . . . . . . . . . . . . 162
Pedals . . . . . . . . . . . . . . . . . . . . . . . . . . . . . . . . . . 14
Petrol . . . . . . . . . . . . . . . . . . . . . . . . . . . . . . . . . 167 Trips to foreign countries . . . . . . . . . . . . . . 145
Petrol additives . . . . . . . . . . . . . . . . . . . . . . . . . 167
Petrol engines, starting . . . . . . . . . . . . . . . . . . . 126
Physical principles of a frontal collision . . . . . . 19
Plastic key tab . . . . . . . . . . . . . . . . . . . . . . . . . . . 75 Plastic parts . . . . . . . . . . . . . . . . . . . . . . . . . . . . 156
Pollen filter . . . . . . . . . . . . . . . . . . . . . . . . . . . . . 121
Pollution filter . . . . . . . . . . . . . . . . . . . . . . . . . . 121
RRadio frequency remote control
Changing the battery . . . . . . . . . . . . . . . . . . . 78
Radio wave remote control . . . . . . . . . . . . . . . . . 77
Rain sensor* . . . . . . . . . . . . . . . . . . . . . . . . . . . . 95
Rear cupholder* . . . . . . . . . . . . . . . . . . . . . . . . . 108
Rear fog lamp indicator lamp . . . . . . . . . . . . . . . . . . . . . . . . 88
Rear seat bench . . . . . . . . . . . . . . . . . . . . . . . . . 105
Rear seats, folding down . . . . . . . . . . . . . . . . . . . . . . . . 105
Rear window heating Heating element wires . . . . . . . . . . . . . . . . 157
Rear window wiper . . . . . . . . . . . . . . . . . . . . . . . 96
Rear-view mirror . . . . . . . . . . . . . . . . . . . . . . . . . . 97
Refuelling . . . . . . . . . . . . . . . . . . . . . . . . . . . . . . 166
Remote control key Buttons . . . . . . . . . . . . . . . . . . . . . . . . . . . . . . 77
Synchronising . . . . . . . . . . . . . . . . . . . . . . . . 78
Removing and fitting the wheel . . . . . . . . . . . . 196
Repairs Airbags . . . . . . . . . . . . . . . . . . . . . . . . . . . . . . 30
Replacement keys . . . . . . . . . . . . . . . . . . . . . . . . 76
Replacing lamps fog lights . . . . . . . . . . . . . . . . . . . . . . . . . . . 210
ibiza_ingles Seite 245 Mittwoch, 5. Oktober 2005 5:17 17