tailgate Seat Ibiza 5D 2006 User Guide
[x] Cancel search | Manufacturer: SEAT, Model Year: 2006, Model line: Ibiza 5D, Model: Seat Ibiza 5D 2006Pages: 268, PDF Size: 8.14 MB
Page 85 of 268
Unlocking and locking83
Safety First
Operating instructions
Tips and Maintenance
Te c h n i c a l D a t a
Buttons in the driver door
Button for window in front left door
Button for window in front right door
Buttons for rear windows* Safety switch for deactivating the electric window buttons in the rear
doors
Button for window in rear right door
Button for window in rear left door
Safety switch
*
Safety switch in the driver door can be used to disable the electric window
buttons in the rear doors.
Safety switch not pushed in: the buttons in the rear doors are enabled.
Safety switch pushed in: the buttons in the rear doors are disabled.
WARNING
•
Incorrect use of the electric windows can result in injury.
•
Never close the tailgate without observing and ensuring it is clear, to do
otherwise could cause serious injury to you and others. Make sure that no
one is in the path of a window.
•
Always take the vehicle key with you when you leave the vehicle.
•
Never leave children or disabled persons in the vehicle, particularly if
they have access to the keys. Unsupervised use of a key could mean that
the engine is started or that electrical equipment is used (e.g. electric
windows). Risk of accident. The door s can be locked using the remote
control key. This could result in people being trapped in the vehicle in an
emergency.
•
The electric windows will work until the key has been removed from the
ignition and one of the front doors has been opened.
•
If necessary, use the safety switch to disable the rear electric windows.
Make sure that they have been disabled.Note
If the window is not able to close becau se it is stiff or because of an obstruc-
tion, the window will automatically open again ⇒ page 84. If this happens,
check why the window could not be closed before attempting to close it
again.One-touch opening and closing*
The one-touch opening and closing function is only possible
on the front doors and can only be activated from the driver's
door.One-touch closing
– Pull up the button for the window briefly to the second position. The window closes fully.
One-touch opening
– Push down the button for the window briefly to the second posi- tion. The window opens fully.
Restoring one-touch opening and closing
– Close all windows.
A1A2A3A4A5
A3
WARNING (continued)
ibiza_angles_0706_DEF Seite 83 Freitag, 1. September 2006 1:18 13
Page 86 of 268
Unlocking and locking
84
– Use the key to lock the vehicle from outside and hold the key in
the lock position for at least one second. The one-touch function
is now ready for operation.The buttons ⇒page 82, fig. 51 and have two levels for opening the
window and two for closing it. This makes it easier to open or close windows
to the desired position.
One-touch closing does not work when the ignition has been switched off,
even if the key is in the ignition.
The automatic open and close function will not work if the battery has been
temporarily disconnected, or if the batter y is flat. The function then has to be
reactivated.
The one-touch function and roll-back fu nction will not work if there is a
malfunction in the electric windows. Contact an Authorised Service Centre.Roll-back function
The windows have a roll-back function. This reduces the risk
of injuries when the windows are closing.•
If a window is obstructed when closing automatically, the window stops
at this point and lowers immediately ⇒.
•
If this happens, check immediately (within 10 seconds) why the window
could not be closed before attempting to close it again. After 10 seconds the
normal automatic function resumes.
•
If the window is still obstructed, the window stops at this point.
•
If there is no obvious reason why the window cannot be closed, try to
close it again within five seconds.
If you wait longer than 5 - 10 seconds, the window will open fully when you
operate one of the buttons. On e-touch closing is reactivated. The one-touch function and roll-back function will not work if there is a
malfunction in the electric windows.
Contact an Authorised Service Centre.
WARNING
•
Incorrect use of the electric windows can result in injury.
•
Always take the key with you when leaving the vehicle, even if you only
intend to be gone for a short time. Please ensure that children are never left
unsupervised in the vehicle.
•
The electric windows will work unti l the key has been removed from the
ignition and one of the front doors has been opened.
•
Never close the tailgate without observing and ensuring it is clear, to do
otherwise could cause serious injury to you and others. Make sure that no
one is in the path of a window.
•
Never allow people to remain in the vehicle when you close the vehicle
from the outside. The windows cannot be opened even in an emergency.Note
The roll-back function is deactivate d if the windows are closed from the
outside of the vehicle using the ignition key for convenience closing
⇒ page 84.Convenience opening and closing* Using the door lock
– Hold the key in the door lock of the driver door in either the
locking or the unlocking position until all windows are either
opened or closed.
– Release the key to interrupt this function.
A1
A2
ibiza_angles_0706_DEF Seite 84 Freitag, 1. September 2006 1:18 13
Page 87 of 268
Unlocking and locking85
Safety First
Operating instructions
Tips and Maintenance
Te c h n i c a l D a t a
Vent wings*
The rear vent wings can be opened and closed manually.Opening
– Pull the release lever ⇒fig. 52 in the direction of the arrow and
push it out at the same time un til the lever engages. The lever
inserts when the deflector is half open or fully open.
Closing
– Pull the release lever in the opposite direction to the arrow and push it back until the lever engages.
WARNING
•
Incorrect use of the vent wings can result in injury!
•
Never close the tailgate without observin g and ensuring it is clear, to do
otherwise could cause serious injury to you and others. Make sure that no
one is in the path of a window.
Sliding/tilting roof*Opening and closing the sliding/tilting roof
The sliding/tilting sunroof is opened and closed using the
rotary button when the ignition is switched on.Closing the sliding/tilting sunroof
– Turn the rotary button to position ⇒fig. 53 ⇒ .
Fig. 52 Release lever for
mechanical vent wing
WARNING (continued)
Fig. 53 Detail of the
sunroof: rotary button for
sliding/tilting sunroof
AA
ibiza_angles_0706_DEF Seite 85 Freitag, 1. September 2006 1:18 13
Page 96 of 268
Lights and visibility
94Glove box light*The light in the glove box on the front passenger side will only light up if the
lights are switched on and the glove box is open.Boot light*The light is activated when the tailgate is open, even when the ignition and
lights are turned off. For this reason ensure that the tailgate is always
closed.
VisibilitySun visorsThe sun visors for the driver and the front passenger can be pulled out of their
mountings in the centre of the vehicle and turned towards the doors
⇒ fig. 64 .
The sun shades are fitted with a courtesy mirror, its cover and a card holder.
Fig. 63 Luggage
compartment light
Fig. 64 Sun visor on the
driver side
ibiza_angles_0706_DEF Seite 94 Freitag, 1. September 2006 1:18 13
Page 216 of 268
If and when
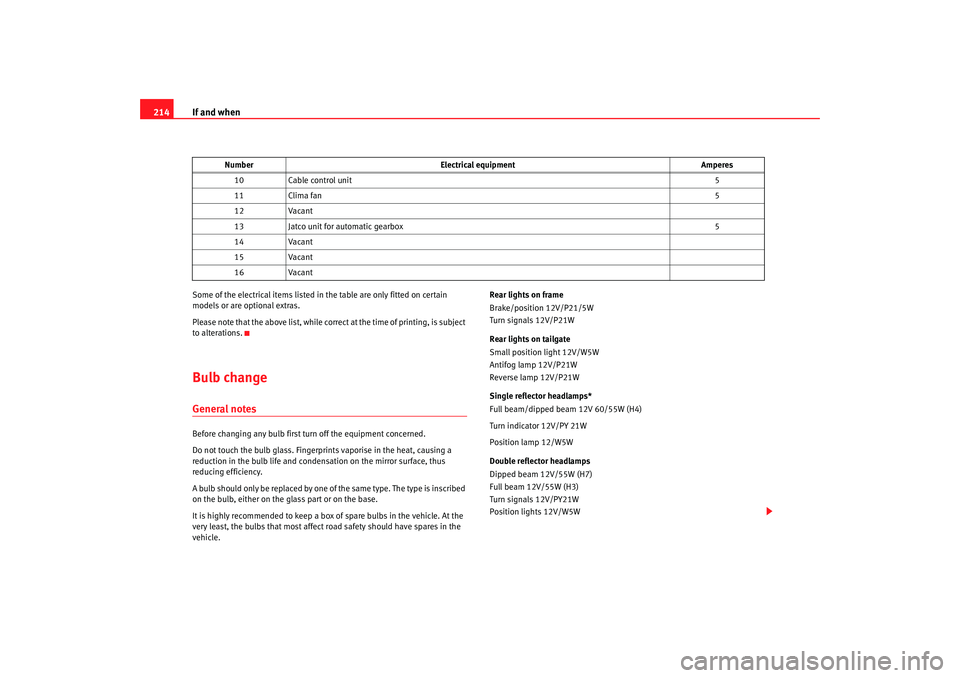
214Some of the electrical items listed in the table are only fitted on certain
models or are optional extras.
Please note that the above list, while corr ect at the time of printing, is subject
to alterations.Bulb changeGeneral notesBefore changing any bulb first turn off the equipment concerned.
Do not touch the bulb glass. Fingerprints vaporise in the heat, causing a
reduction in the bulb life and conden sation on the mirror surface, thus
reducing efficiency.
A bulb should only be replaced by one of the same type. The type is inscribed
on the bulb, either on the glass part or on the base.
It is highly recommended to keep a box of spare bulbs in the vehicle. At the
very least, the bulbs that most affect road safety should have spares in the
vehicle. Rear lights on frame
Brake/position 12V/P21/5W
Turn signals 12V/P21W
Rear lights on tailgate
Small position light 12V/W5W
Antifog lamp 12V/P21W
Reverse lamp 12V/P21W
Single reflector headlamps*
Full beam/dipped beam 12V 60/55W (H4)
Turn indicator 12V/PY 21W
Position lamp 12/W5W
Double reflector headlamps
Dipped beam 12V/55W (H7)
Full beam 12V/55W (H3)
Turn signals 12V/PY21W
Position lights 12V/W5W
10
Cable control unit 5
11 Clima fan 5
12 Vacant
13 Jatco unit for automatic gearbox 5
14 Vacant
15 Vacant
16 Vacant
Number
Electrical equipment Amperes
ibiza_angles_0706_DEF Seite 214 Freitag, 1. September 2006 1:18 13
Page 223 of 268
If and when221
Safety First
Operating instructions
Tips and Maintenance
Te c h n i c a l D a t a
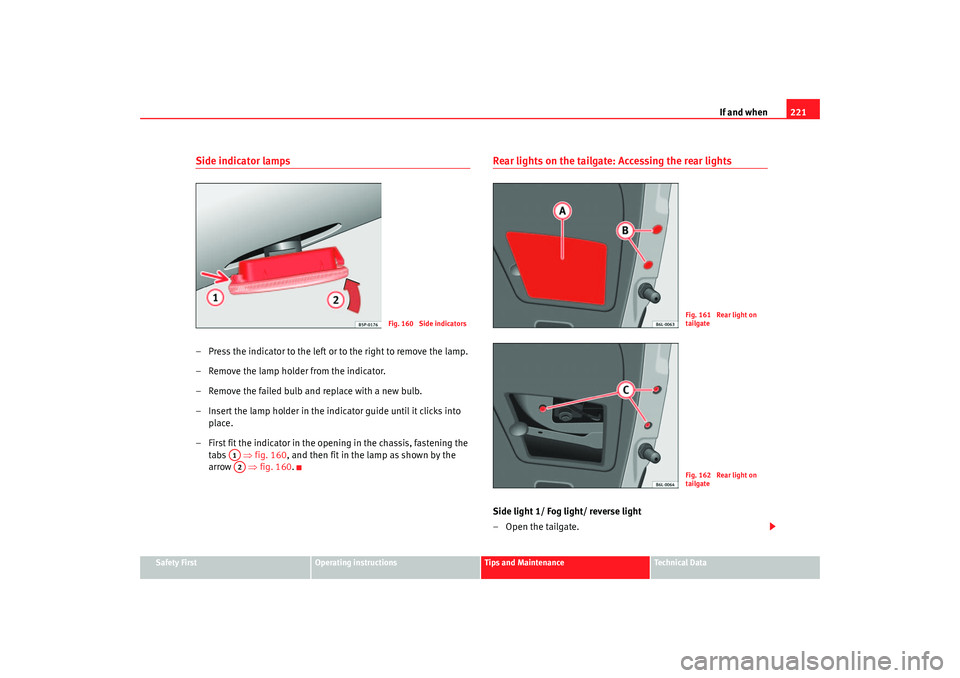
Side indicator lamps– Press the indicator to the left or to the right to remove the lamp.
– Remove the lamp holder from the indicator.
– Remove the failed bulb and replace with a new bulb.
– Insert the lamp holder in the indicator guide until it clicks into
place.
– First fit the indicator in the opening in the chassis, fastening the tabs ⇒fig. 160 , and then fit in the lamp as shown by the
arrow ⇒fig. 160.
Rear lights on the tailgate: Accessing the rear lightsSide light 1/ Fog light/ reverse light
–Open the tailgate.
Fig. 160 Side indicators
A1A2
Fig. 161 Rear light on
tailgateFig. 162 Rear light on
tailgate
ibiza_angles_0706_DEF Seite 221 Freitag, 1. September 2006 1:18 13
Page 224 of 268
If and when
222
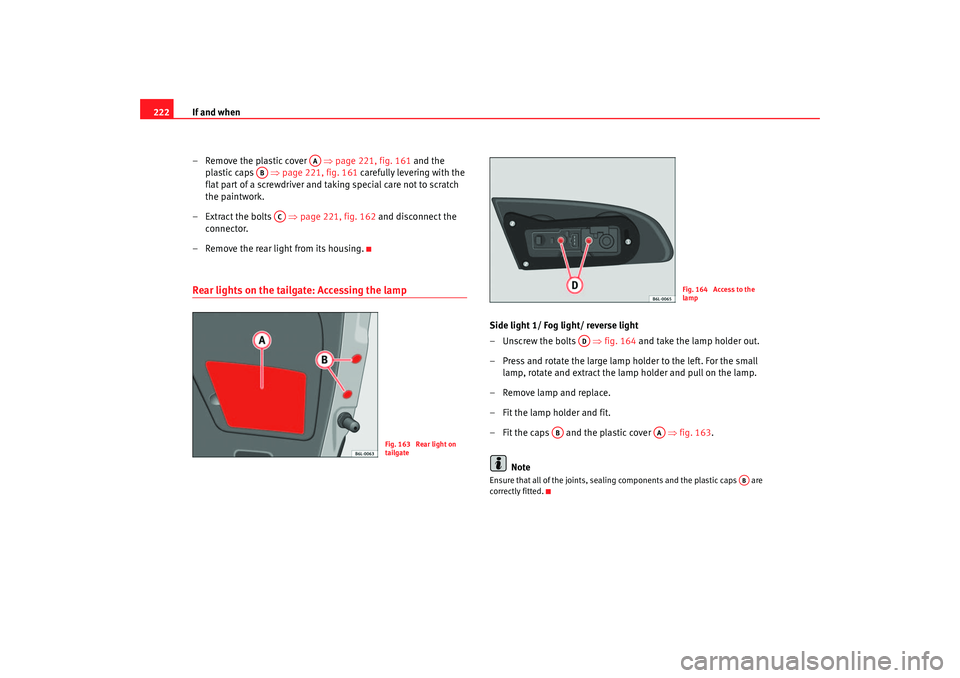
– Remove the plastic cover ⇒page 221, fig. 161 and the
plastic caps ⇒page 221, fig. 161 carefully levering with the
flat part of a screwdriver and taking special care not to scratch
the paintwork.
– Extract the bolts ⇒page 221, fig. 162 and disconnect the
connector.
– Remove the rear light from its housing.Rear lights on the tailgate: Accessing the lamp
Side light 1/ Fog light/ reverse light
– Unscrew the bolts ⇒fig. 164 and take the lamp holder out.
– Press and rotate the large lamp holder to the left. For the small lamp, rotate and extract the lamp holder and pull on the lamp.
– Remove lamp and replace.
– Fit the lamp holder and fit.
– Fit the caps and the plastic cover ⇒fig. 163.
NoteEnsure that all of the joints, sealing components and the plastic caps are
correctly fitted.
AA
AB
AC
Fig. 163 Rear light on
tailgate
Fig. 164 Access to the
lamp
AD
AB
AA
AB
ibiza_angles_0706_DEF Seite 222 Freitag, 1. September 2006 1:18 13
Page 225 of 268
If and when223
Safety First
Operating instructions
Tips and Maintenance
Te c h n i c a l D a t a
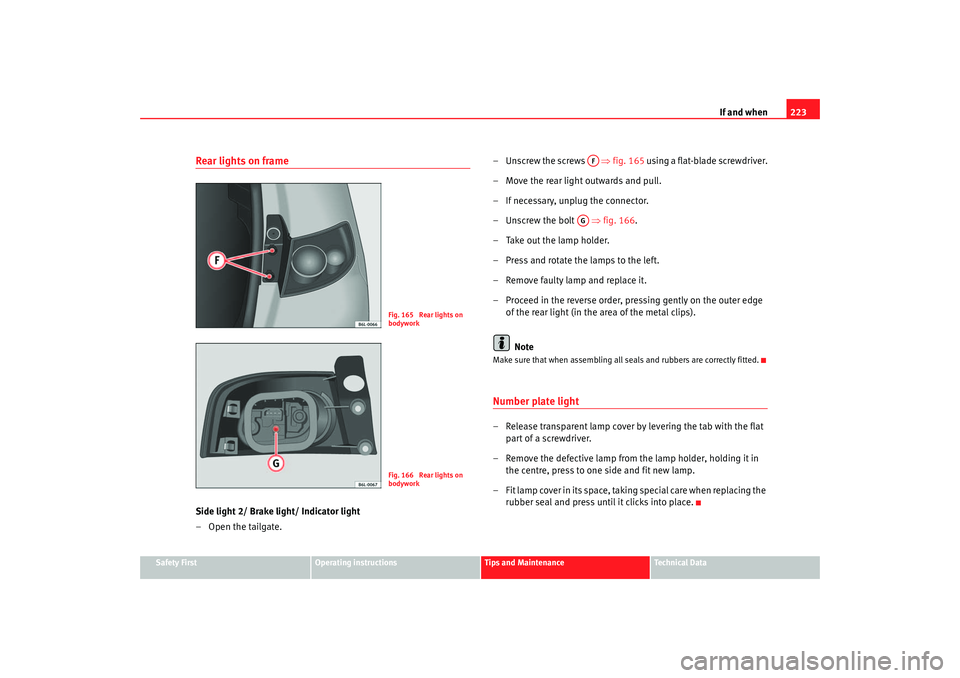
Rear lights on frameSide light 2/ Brake light/ Indicator light
– Open the tailgate. – Unscrew the screws
⇒fig. 165 using a flat-blade screwdriver.
– Move the rear light outwards and pull.
– If necessary, unplug the connector.
– Unscrew the bolt ⇒fig. 166 .
– Take out the lamp holder.
– Press and rotate the lamps to the left.
– Remove faulty lamp and replace it.
– Proceed in the reverse order, pressing gently on the outer edge of the rear light (in the area of the metal clips).
Note
Make sure that when assembling all seals and rubbers are correctly fitted.Number plate light– Release transparent lamp cover by levering the tab with the flat part of a screwdriver.
– Remove the defective lamp from the lamp holder, holding it in the centre, press to one side and fit new lamp.
– Fit lamp cover in its space, taking special care when replacing the rubber seal and press until it clicks into place.
Fig. 165 Rear lights on
bodyworkFig. 166 Rear lights on
bodywork
AF
AG
ibiza_angles_0706_DEF Seite 223 Freitag, 1. September 2006 1:18 13
Page 260 of 268
Index
258Bulb changes
general notes . . . . . . . . . . . . . . . . . . . . . . . 214
Buzzer . . . . . . . . . . . . . . . . . . . . . . . . . . . . . 92, 130CCar care Exterior . . . . . . . . . . . . . . . . . . . . . . . . . . . . . 161
Car care products . . . . . . . . . . . . . . . . . . . . . . . 160
Car phone . . . . . . . . . . . . . . . . . . . . . . . . . . . . . 170
Car washes . . . . . . . . . . . . . . . . . . . . . . . . . . . . 161
Catalytic converter . . . . . . . . . . . . . . . . . . . . . . 150
Central locking . . . . . . . . . . . . . . . . . . . . . . . . . . 68 Automatic speed dependent locking and un-locking system* . . . . . . . . . . . . . . . . . . . . . 70
Emergency unlocking system . . . . . . . . . . . . 71
Locking system for invo luntary unlocking . . 70
Selective unlocking system* . . . . . . . . . . . . 70
Unlocking system* . . . . . . . . . . . . . . . . . . . . 70
Central locking button Central locking . . . . . . . . . . . . . . . . . . . . . . . 71
unlocking . . . . . . . . . . . . . . . . . . . . . . . . . . . . 71
Cetane number . . . . . . . . . . . . . . . . . . . . . . . . . 175
Change lamps dipped headlight lamp . . . . . . . . . . . . . . . . 216
Changing gear See Manual gearbox . . . . . . . . . . . . . . . . . . 134
Changing lamps interior light and reading light . . . . . . . . . . 224
changing lamps rear lights on frame . . . . . . . . . . . . . . . . . . . 223 Changing the lamps
glove box light* . . . . . . . . . . . . . . . . . . . . . . 224
indicator lights . . . . . . . . . . . . . . . . . . . . . . 219
main beam lights . . . . . . . . . . . . . . . . . . . . 217
Main headlight lamps . . . . . . . . . . . . . . . . . 215
number plate light . . . . . . . . . . . . . . . . . . . 223
rear lights on the tailgate: access to the lamp .222
rear lights on the tailgate: access to the rear lights . . . . . . . . . . . . . . . . . . . . . . . . . . . . . 221
side beam lights . . . . . . . . . . . . . . . . . . . . . 218
Side indicator lights . . . . . . . . . . . . . . . . . . 221
Changing windscreen wiper blades . . . . . . . . . 186
Chassis number . . . . . . . . . . . . . . . . . . . . . . . . 234
Checking . . . . . . . . . . . . . . . . . . . . . . . . . . . . . . 191
Checking battery electrolyte level . . . . . . . . . . 191
Checking engine oil level . . . . . . . . . . . . . . . . . 180
Child safety . . . . . . . . . . . . . . . . . . . . . . . . . . . . . 40
Child seat . . . . . . . . . . . . . . . . . . . . . . . . . . . . . . . 42 Categorisation in groups . . . . . . . . . . . . . . . 42
Group 1 . . . . . . . . . . . . . . . . . . . . . . . . . . . . . 43
Group 2 . . . . . . . . . . . . . . . . . . . . . . . . . . . . . 43
Group 3 . . . . . . . . . . . . . . . . . . . . . . . . . . . . . 43
Groups 0 and 0+ . . . . . . . . . . . . . . . . . . . . . . 42
Safety notes . . . . . . . . . . . . . . . . . . . . . . . . . . 41
Securing . . . . . . . . . . . . . . . . . . . . . . . . . . . . . 45
Child seats ISOFIX and Toptether system . . . . . . . . . . . . 46
on the front passenger seat . . . . . . . . . . . . . 26
Cigarette lighter . . . . . . . . . . . . . . . . . . . . . . . . 112
Cleaning alloy wheels . . . . . . . . . . . . . . . . . . . . 165 Cleaning and caring for your vehicle . . . . . . . . 160
Cleaning chrome . . . . . . . . . . . . . . . . . . . . . . . . 164
Cleaning cloth seat covers . . . . . . . . . . . . . . . . 167
Cleaning dash panel . . . . . . . . . . . . . . . . . . . . . 166
Cleaning engine compartment . . . . . . . . . . . . . 166
Cleaning fabric trim . . . . . . . . . . . . . . . . . . . . . 167
Cleaning leather . . . . . . . . . . . . . . . . . . . . . . . . 167
Cleaning plastic parts . . . . . . . . . . . . . . . . . . . . 166
Cleaning seat belts . . . . . . . . . . . . . . . . . . . . . . 168
Cleaning steel wheels . . . . . . . . . . . . . . . . . . . . 164
Cleaning windows . . . . . . . . . . . . . . . . . . . . . . . 163
Cleaning wooden trim . . . . . . . . . . . . . . . . . . . . 167
Climatronic
automatic mode . . . . . . . . . . . . . . . . . . . . . 124
controls . . . . . . . . . . . . . . . . . . . . . . . . . . . . 123
General notes . . . . . . . . . . . . . . . . . . . . . . . 126
manual mode . . . . . . . . . . . . . . . . . . . . . . . 125
Clock . . . . . . . . . . . . . . . . . . . . . . . . . . . . . . . . . . 52
Cockpit . . . . . . . . . . . . . . . . . . . . . . . . . . . . . . . . . 49
Control Light switches . . . . . . . . . . . . . . . . . . . . . . . . 88
wing mirrors . . . . . . . . . . . . . . . . . . . . . . . . 100
Control lamps . . . . . . . . . . . . . . . . . . . . . . . . . . . 58
Control lighting . . . . . . . . . . . . . . . . . . . . . . . . . . 49
Controls Electric windows . . . . . . . . . . . . . . . . . . . . . . 82
Convenience closing Sliding/tilting roof . . . . . . . . . . . . . . . . . . . . 86
Windows . . . . . . . . . . . . . . . . . . . . . . . . . . . . 84
ibiza_angles_0706_DEF Seite 258 Freitag, 1. September 2006 1:18 13
Page 265 of 268
Index263
Switches
Electric windows . . . . . . . . . . . . . . . . . . . . . . 82
Sliding/tilting roof . . . . . . . . . . . . . . . . . . . . . 85
Switching off the engine . . . . . . . . . . . . . . . . . . 133TTailgate . . . . . . . . . . . . . . . . . . . . . . . . . . . . . . . . . 81
Tank fuel level . . . . . . . . . . . . . . . . . . . . . . . . . . . . . 52
reserve indicator . . . . . . . . . . . . . . . . . . . . . . 52
tank capacity . . . . . . . . . . . . . . . . . . . . . . . . . 52
TCS . . . . . . . . . . . . . . . . . . . . . . . . . . . . . . . . . . . 146
TCS (Traction control system) Warning lamp . . . . . . . . . . . . . . . . . . . . . . . . . 64
The danger of not using the seat belt . . . . . . . . 18
Tightening torque of wheel bolts . . . . . . . . . . . 237
Tools . . . . . . . . . . . . . . . . . . . . . . . . . . . . . . . . . . 198
Towing . . . . . . . . . . . . . . . . . . . . . . . . . . . . . . . . 228
Towing a trailer . . . . . . . . . . . . . . . . . . . . 156, 236
Towing bracket . . . . . . . . . . . . . . . . . . . . . . . . . . 157
Towing bracket, fitting . . . . . . . . . . . . . . . . . . . 171
Towing eye . . . . . . . . . . . . . . . . . . . . . . . . . . . . . 228
Tow-starting . . . . . . . . . . . . . . . . . . . . . . . . . . . . 228
Traction control system warning lamp . . . . . . . . . . . . . . . . . . . . . . . . . 64
Trailer turn signals Indicator lamps . . . . . . . . . . . . . . . . . . . . . . . 65
Warning lamp . . . . . . . . . . . . . . . . . . . . . . . . . 92
Trailer weights . . . . . . . . . . . . . . . . . . . . . . . . . . 236
Trips, checklist . . . . . . . . . . . . . . . . . . . . . . . . . . . . 8 Turn signals . . . . . . . . . . . . . . . . . . . . . . . . . . . . . 91
Warning lamp . . . . . . . . . . . . . . . . . . . . . . 61, 92
Two-way radio . . . . . . . . . . . . . . . . . . . . . . . . . . 170
Type plate . . . . . . . . . . . . . . . . . . . . . . . . . . . . . . 234
Tyre Mobility-System (Tyre repair kit) . . . 200, 206
Tyre pressure . . . . . . . . . . . . . . . . . . . . . . . . . . . 193
Tyre pressures . . . . . . . . . . . . . . . . . . . . . . . . . . 236
Tyre repair kit . . . . . . . . . . . . . . . . . . . . . . 200, 206
Tyres and wheels Dimensions . . . . . . . . . . . . . . . . . . . . . . . . . 194
Tyres service life . . . . . . . . . . . . . . . . . . . . . . . . 193
Tyres tread depth . . . . . . . . . . . . . . . . . . . . . . . . 194
Tyres with directional tread pattern . . . . . . . . . 192
UUnderbody sealant . . . . . . . . . . . . . . . . . . . . . . 165
USB* connection . . . . . . . . . . . . . . . . . . . . . . . . 114VVehicle battery . . . . . . . . . . . . . . . . . . . . . . . . . . 190
Vehicle data . . . . . . . . . . . . . . . . . . . . . . . . . . . . 234
Vehicle identification data . . . . . . . . . . . . . . . . 234
Vehicle identification number . . . . . . . . . . . . . 234
Vehicle interior heating or cooling system . . . 121
Vehicle paint Car care products . . . . . . . . . . . . . . . . . . . . . 160
Vehicle tools Storage . . . . . . . . . . . . . . . . . . . . . . . . . . . . . 198
Vehicle wallet storage . . . . . . . . . . . . . . . . . . . . 108 vent wings* . . . . . . . . . . . . . . . . . . . . . . . . . . . . . 85
Ventilation . . . . . . . . . . . . . . . . . . . . . . . . . . . . . 118
Ventilation slits . . . . . . . . . . . . . . . . . . . . . . . . . . 15
Volumetric sensor*
Activation . . . . . . . . . . . . . . . . . . . . . . . . . . . . 79
Deactivation . . . . . . . . . . . . . . . . . . . . . . . . . . 79
WWarning lamp . . . . . . . . . . . . . . . . . . . . . . . . . . . 26
Warning lamps . . . . . . . . . . . . . . . . . . . . . . . . . . . 58
Warning triangle . . . . . . . . . . . . . . . . . . . . . . . . 114
Washer fluid . . . . . . . . . . . . . . . . . . . . . . . . . . . . 185
Washing by hand . . . . . . . . . . . . . . . . . . . . . . . . 161
Washing the vehicle . . . . . . . . . . . . . . . . . . . . . 161
Washing with high pressure cleaners . . . . . . . 162
Water in the windscreen washer tank . . . . . . . 185
Wear indicators . . . . . . . . . . . . . . . . . . . . . . . . . 194
Wheel bolts . . . . . . . . . . . . . . . . . . . . . . . 203, 237Torque . . . . . . . . . . . . . . . . . . . . . . . . . . . . . 195
Wheel change . . . . . . . . . . . . . . . . . . . . . . . . . . 201
Wheel trims . . . . . . . . . . . . . . . . . . . . . . . . . . . . 202
Wheels . . . . . . . . . . . . . . . . . . . . . . . . . . . 192, 236
Why assume the correct sitting position? . . . . . 25
Why should head restraints be correctly adjusted? 12
Why wear seat belts? . . . . . . . . . . . . . . . . . . . 16, 17
Why wear seatbelts? . . . . . . . . . . . . . . . . . . . . . . 25
Windows . . . . . . . . . . . . . . . . . . . . . . . . . . . . . . . . 82
Windscreen . . . . . . . . . . . . . . . . . . . . . . . . . . . . . 98
ibiza_angles_0706_DEF Seite 263 Freitag, 1. September 2006 1:18 13