steering Seat Ibiza 5D 2009 User Guide
[x] Cancel search | Manufacturer: SEAT, Model Year: 2009, Model line: Ibiza 5D, Model: Seat Ibiza 5D 2009Pages: 257, PDF Size: 6.5 MB
Page 59 of 257
Cockpit57
Safety First
Controls and equipment
Practical tips
Technical Data
WARNING
•Failure to observe warning lamps and warning messages can result in
serious personal injuries or damage to your vehicle.•The risk of an accident increases if your vehicle breaks down. Use a
warning triangle to draw the attention of other road users in order to
prevent danger to thirds.
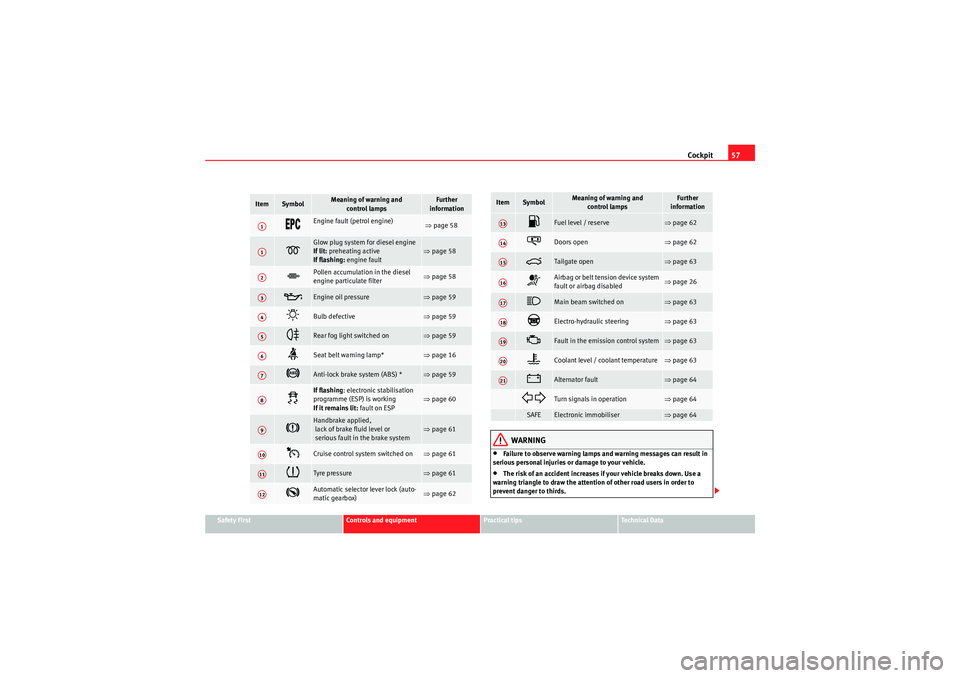
Item
Symbol
Meaning of warning and
control lamps
Further
information
Engine fault (petrol engine)
⇒ page 58
Glow plug system for diesel engine
If lit: preheating active
If flashing: engine fault
⇒page 58
Pollen accumulation in the diesel
engine particulate filter
⇒page 58
Engine oil pressure
⇒page 59
Bulb defective
⇒page 59
Rear fog light switched on
⇒page 59
Seat belt warning lamp*
⇒page 16
Anti-lock brake system (ABS) *
⇒page 59
If flashing : electronic stabilisation
programme (ESP) is working
If it remains lit: fault on ESP
⇒ page 60
Handbrake applied,
lack of brake fluid level or
serious fault in the brake system
⇒page 61
Cruise control system switched on
⇒page 61
Tyre pressure
⇒page 61
Automatic selector lever lock (auto-
matic gearbox)
⇒page 62
A1A1A2A3A4A5A6A7A8A9A10A11A12
Fuel level / reserve
⇒page 62
Doors open
⇒page 62
Tailgate o pe n
⇒page 63
Airbag or belt tension device system
fault or airbag disabled
⇒page 26
Main beam switched on
⇒page 63
Electro-hydraulic steering
⇒page 63
Fault in the emission control system
⇒page 63
Coolant level / coolant temperature
⇒page 63
Alternator fault
⇒page 64
Turn signals in operation
⇒page 64
SAFE
Electronic immobiliser
⇒page 64
Item
Symbol
Meaning of warning and
control lamps
Further
information
A13A14A15A16A17A18A19A20A21
Ibiza_EN.book Seite 57 Montag, 14. September 2009 6:19 18
Page 65 of 257
Cockpit63
Safety First
Controls and equipment
Practical tips
Technical Data
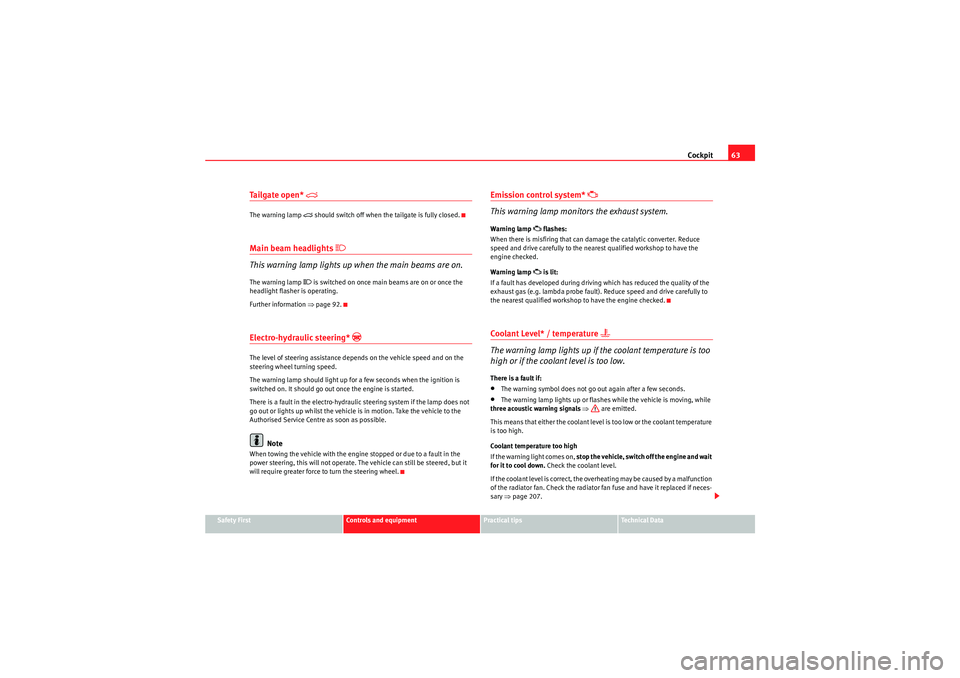
Ta i l g a t e o p e n *
The warning lamp
should switch off when the tailgate is fully closed.
Main beam headlights
This warning lamp lights up when the main beams are on.The warning lamp
is switched on once main beams are on or once the
headlight flasher is operating.
Further information ⇒ page 92.
Electro-hydraulic steering*
The level of steering assistance depends on the vehicle speed and on the
steering wheel turning speed.
The warning lamp should light up for a few seconds when the ignition is
switched on. It should go out once the engine is started.
There is a fault in the electro-hydraulic steering system if the lamp does not
go out or lights up whilst the vehicle is in motion. Take the vehicle to the
Authorised Service Centre as soon as possible.
Note
When towing the vehicle with the engine stopped or due to a fault in the
power steering, this will not operate. The vehicle can still be steered, but it
will require greater force to turn the steering wheel.
Emission control system*
This warning lamp monitors the exhaust system.
Warning lamp
flashes:
When there is misfiring that can damage the catalytic converter. Reduce
speed and drive carefully to the nearest qualified workshop to have the
engine checked.
Warning lamp is lit:
If a fault has developed during driving which has reduced the quality of the
exhaust gas (e.g. lambda probe fault). Reduce speed and drive carefully to
the nearest qualified workshop to have the engine checked.
Coolant Level* / temperature
The warning lamp lights up if the coolant temperature is too
high or if the coolant level is too low.There is a fault if:•The warning symbol does not go out again after a few seconds.•The warning lamp lights up or flashes while the vehicle is moving, while
three acoustic warning signals ⇒ are emitted.
This means that either the coolant level is too low or the coolant temperature
is too high.
Coolant temperature too high
If the warning light comes on, stop the vehicle, switch off the engine and wait
for it to cool down. Check the coolant level.
If the coolant level is correct, the overheating may be caused by a malfunction
of the radiator fan. Check the radiator fan fuse and have it replaced if neces-
sary ⇒page 207.
Ibiza_EN.book Seite 63 Montag, 14. September 2009 6:19 18
Page 68 of 257
Steering column controls*
66Steering column controls*General informationThe column incorporates multifunctional modules from which to control
audio and telephone functions on the vehicle.
There are two versions of the multifunction module:•Audio version, to control the available audio functions from the steering
wheel.•Audio version + Telephone version, to control the available audio func-
tions and the telephone system from the steering wheel.
Both versions can be used to control the Audio system (Radio, CD Audio, CD
MP3).
Ibiza_EN.book Seite 66 Montag, 14. September 2009 6:19 18
Page 69 of 257
Steering column controls*67
Safety First
Controls and equipment
Practical tips
Technical Data
Audio Control
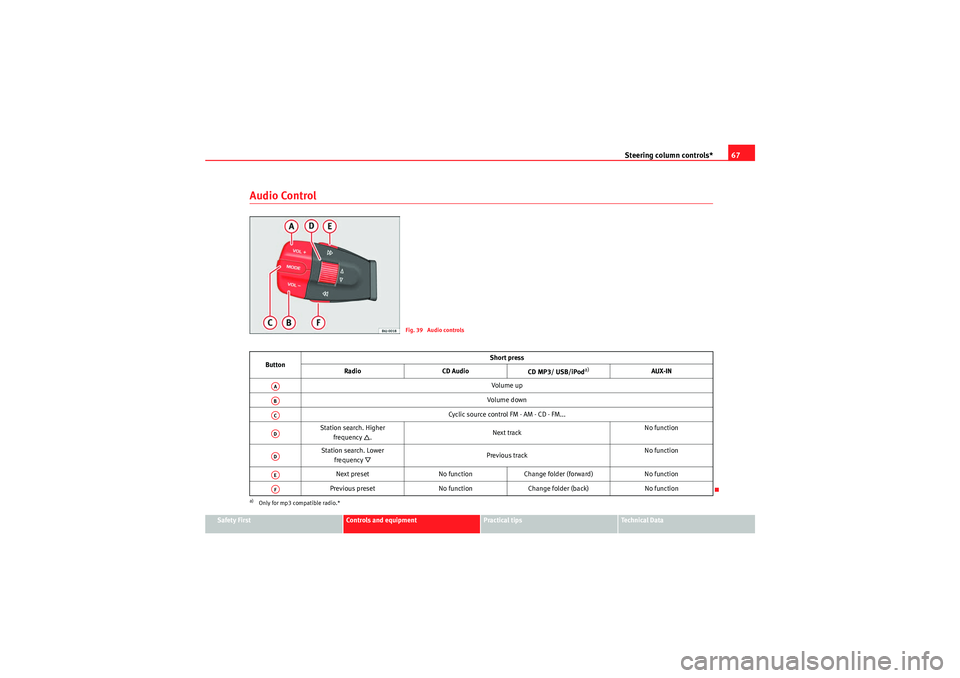
Fig. 39 Audio controls
Button Short press
Radio CD Audio
CD MP3/ USB/iPod
a)
a)Only for mp3 compatible radio.*
AUX-IN
Vol u m e up
Vol um e d own
Cyclic source control FM - AM - CD - FM...
Station search. Higher frequency
. Next track No function
Station search. Lower frequency
Previous track No function
Next preset No functionChange folder (forward) No function
Previous preset No functionChange folder (back) No function
AAABACADADAEAF
Ibiza_EN.book Seite 67 Montag, 14. September 2009 6:19 18
Page 70 of 257
Steering column controls*
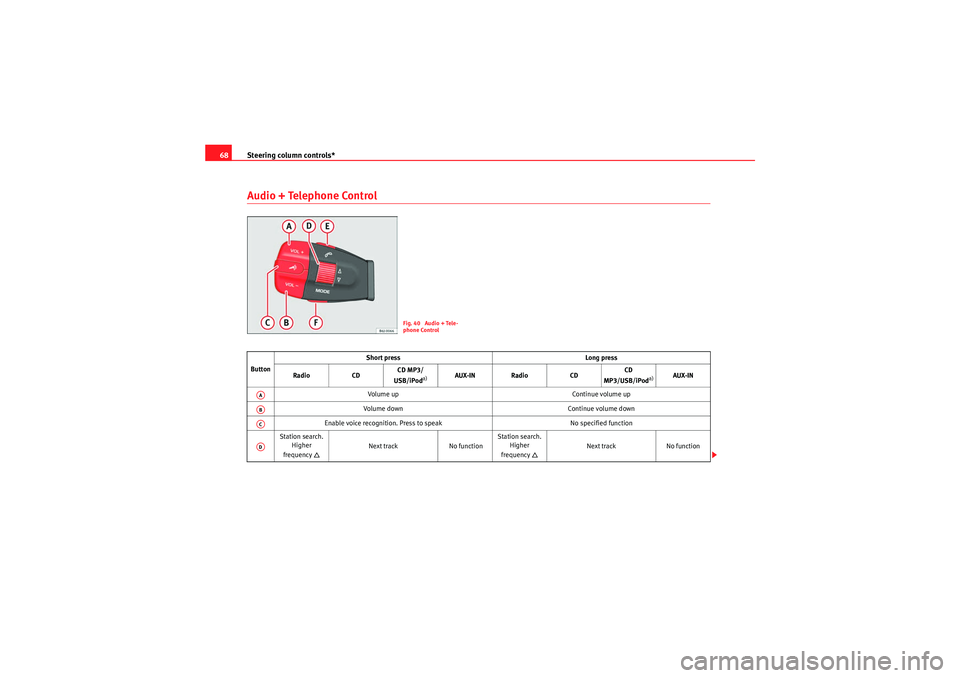
68Audio + Telephone Control
Fig. 40 Audio + Tele-
phone Control
Button Short press
Long press
Radio CDCD MP3/
USB/iPod
a)
AUX-IN Radio CDCD
MP3/USB/iPod
a)
AUX-IN
Volume up Continue volume up
Volume down Continue volume down
Enable voice recognition. Press to speak No specified function
Station search. Higher
frequency
Next track No functionStation search.
Higher
frequency
Next track No function
AAABACAD
Ibiza_EN.book Seite 68 Montag, 14. September 2009 6:19 18
Page 71 of 257
Steering column controls*69
Safety First
Controls and equipment
Practical tips
Technical Data
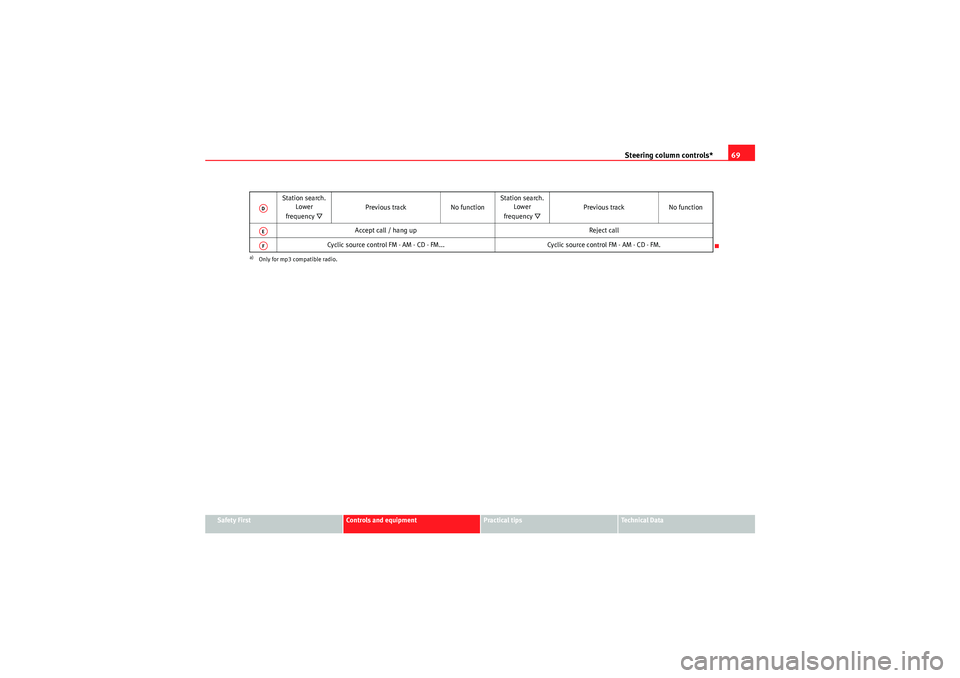
Station search.
Lower
frequency
Previous track No functionStation search.
Lower
frequency
Previous track No function
Accept call / hang up Reject call
Cyclic source control FM - AM - CD - FM... Cyclic source control FM - AM - CD - FM.
a)Only for mp3 compatible radio.ADAEAF
Ibiza_EN.book Seite 69 Montag, 14. September 2009 6:19 18
Page 77 of 257
Unlocking and locking75
Safety First
Controls and equipment
Practical tips
Technical Data
KeysSet of keys
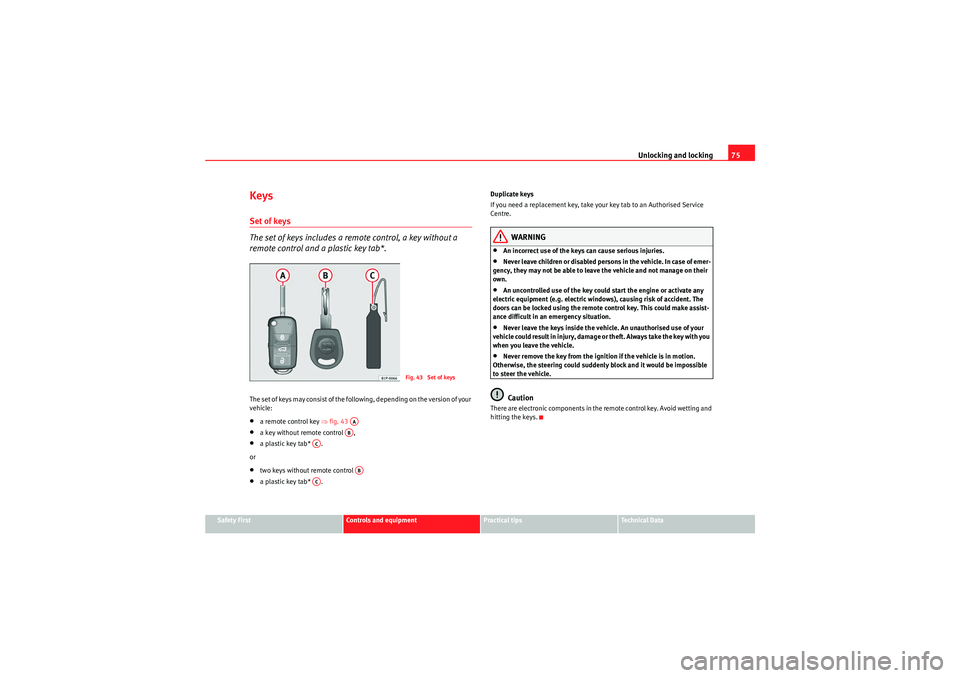
The set of keys includes a remote control, a key without a
remote control and a plastic key tab*.The set of keys may consist of the following, depending on the version of your
vehicle:•a remote control key ⇒fig. 43 •a key without remote control ,•a plastic key tab* .
or•two keys without remote control •a plastic key tab* . Duplicate keys
If you need a replacement key, take your key tab to an Authorised Service
Centre.
WARNING
•An incorrect use of the keys can cause serious injuries.•Never leave children or disabled persons in the vehicle. In case of emer-
gency, they may not be able to leave the vehicle and not manage on their
own.•An uncontrolled use of the key could start the engine or activate any
electric equipment (e.g. electric windows), causing risk of accident. The
doors can be locked using the remote control key. This could make assist-
ance difficult in an emergency situation.•Never leave the keys inside the vehicle. An unauthorised use of your
vehicle could result in injury, damage or theft. Always take the key with you
when you leave the vehicle.•Never remove the key from the ignition if the vehicle is in motion.
Otherwise, the steering could suddenly block and it would be impossible
to steer the vehicle.Caution
There are electronic components in the remote control key. Avoid wetting and
hitting the keys.
Fig. 43 Set of keys
AAAB
AC
AB
AC
Ibiza_EN.book Seite 75 Montag, 14. September 2009 6:19 18
Page 91 of 257
Lights and visibility89
Safety First
Controls and equipment
Practical tips
Technical Data
Adaptive headlights* (for driving through bends)
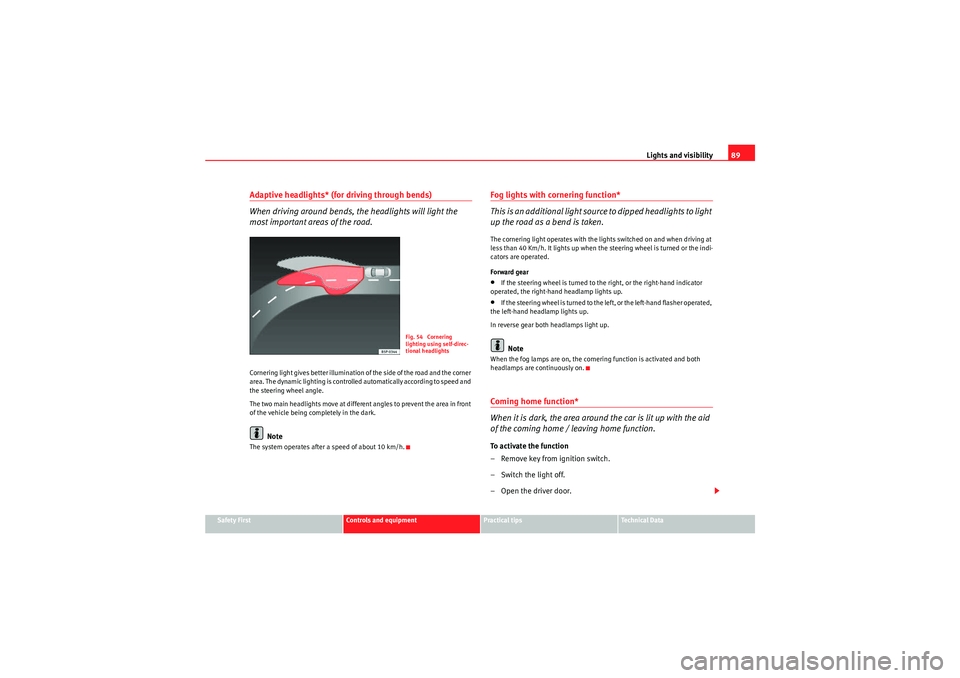
When driving around bends, the headlights will light the
most important areas of the road.Cornering light gives better illumination of the side of the road and the corner
area. The dynamic lighting is controlled automatically according to speed and
the steering wheel angle.
The two main headlights move at different angles to prevent the area in front
of the vehicle being completely in the dark.
Note
The system operates after a speed of about 10 km/h.
Fog lights with cornering function*
This is an additional light source to dipped headlights to light
up the road as a bend is taken.The cornering light operates with the lights switched on and when driving at
less than 40 Km/h. It lights up when the steering wheel is turned or the indi-
cators are operated.
Forward gear•If the steering wheel is turned to the right, or the right-hand indicator
operated, the right-hand headlamp lights up.•If the steering wheel is turned to the left, or the left-hand flasher operated,
the left-hand headlamp lights up.
In reverse gear both headlamps light up.Note
When the fog lamps are on, the cornering function is activated and both
headlamps are continuously on.Coming home function*
When it is dark, the area around the car is lit up with the aid
of the coming home / leaving home function.To activate the function
– Remove key from ignition switch.
– Switch the light off.
– Open the driver door.
Fig. 54 Cornering
lighting using self-direc-
tional headlights
Ibiza_EN.book Seite 89 Montag, 14. September 2009 6:19 18
Page 94 of 257
Lights and visibility
92Indicator and main beam headlight lever
The turn signal and main beam lever also operates the
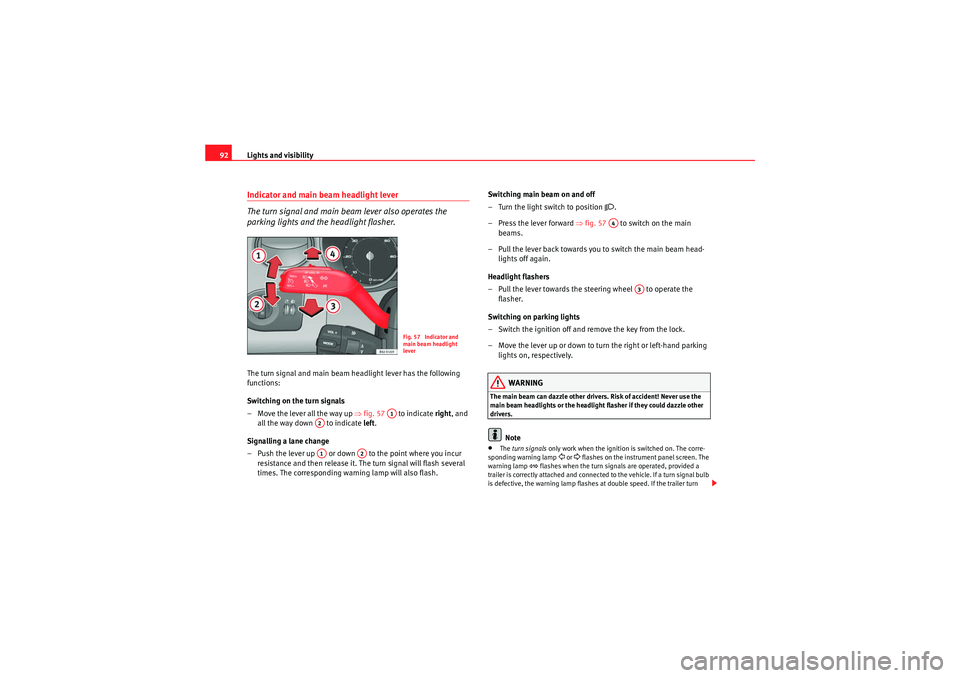
parking lights and the headlight flasher.The turn signal and main beam headlight lever has the following
functions:
Switching on the turn signals
– Move the lever all the way up ⇒fig. 57 to indicate right , and
all the way down to indicate left .
Signalling a lane change
– Push the lever up or down to the point where you incur resistance and then release it. The turn signal will flash several
times. The corresponding warning lamp will also flash. Switching main beam on and off
– Turn the light switch to position
.
–Press the lever forward ⇒fig. 57 to switch on the main
beams.
– Pull the lever back towards you to switch the main beam head- lights off again.
Headlight flashers
– Pull the lever towards the steering wheel to operate the flasher.
Switching on parking lights
– Switch the ignition off and remove the key from the lock.
– Move the lever up or down to turn the right or left-hand parking lights on, respectively.
WARNING
The main beam can dazzle other drivers. Risk of accident! Never use the
main beam headlights or the headlight flasher if they could dazzle other
drivers.
Note
• The turn signals only work when the ignition is switched on. The corre-
sponding warning lamp
or flashes on the instrument panel screen. The
warning lamp
flashes when the turn signals are operated, provided a
trailer is correctly attached and connected to the vehicle. If a turn signal bulb
is defective, the warning lamp flashes at double speed. If the trailer turn
Fig. 57 Indicator and
main beam headlight
lever
A1
A2A1
A2
A4
A3
Ibiza_EN.book Seite 92 Montag, 14. September 2009 6:19 18
Page 97 of 257
Lights and visibility95
Safety First
Controls and equipment
Practical tips
Technical Data
Windscreen washersFront windscreen wipers
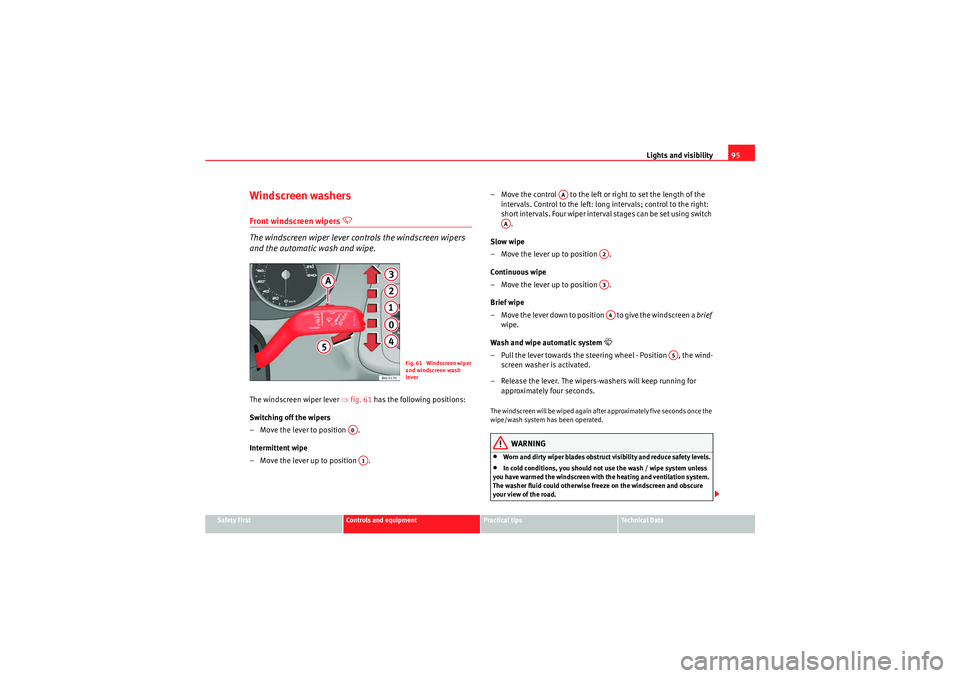
The windscreen wiper lever controls the windscreen wipers
and the automatic wash and wipe.
The windscreen wiper lever ⇒fig. 61 has the following positions:
Switching off the wipers
– Move the lever to position .
Intermittent wipe
– Move the lever up to position . – Move the control to the left or right to set the length of the
intervals. Control to the left: long intervals; control to the right:
short intervals. Four wiper interval stages can be set using switch .
Slow wipe
– Move the lever up to position .
Continuous wipe
– Move the lever up to position .
Brief wipe
– Move the lever down to position to give the windscreen a brief
wipe.
Wash and wipe automatic system
– Pull the lever towards the steering wheel - Position , the wind- screen washer is activated.
– Release the lever. The wipers-washers will keep running for approximately four seconds.The windscreen will be wiped again after approximately five seconds once the
wipe/wash system has been operated.
WARNING
•Worn and dirty wiper blades obstruct visibility and reduce safety levels.•In cold conditions, you should not use the wash / wipe system unless
you have warmed the windscreen with the heating and ventilation system.
The washer fluid could otherwise freeze on the windscreen and obscure
your view of the road.
Fig. 61 Windscreen wiper
and windscreen wash
lever
A0A1
AA
AA
A2A3A4
A5
Ibiza_EN.book Seite 95 Montag, 14. September 2009 6:19 18