brake Seat Ibiza 5D 2011 Workshop Manual
[x] Cancel search | Manufacturer: SEAT, Model Year: 2011, Model line: Ibiza 5D, Model: Seat Ibiza 5D 2011Pages: 278, PDF Size: 3.83 MB
Page 219 of 278
217
If and when
If you have a puncture on one of the front wheels when using snow chains,
fit the compact temporary spare in place of one of the rear wheels. You can
then attach the snow chains to the wheel taken from the rear and use this
wheel to replace the punctured front wheel.
WARNING
● The tyre pressures must be checked and corrected as soon as possi-
ble.
● Do not drive faster than 80 km/h. Higher speeds can cause an acci-
dent.
● Avoid heavy acceleration, hard braking and fast cornering. Risk of ac-
cident.
● Never use two or more compact spare tyres at the same time, risk of
accident.
● No other type of tyre (normal summer or winter tyre) may be fitted on
the compact temporary spare wheel rim.
Tyre repair kit*
The tyre repair kit (for vehicles not including a spare wheel)
is stored under the floor panel in the luggage compartment. In the event of a punctured tyre, your vehicle is equipped with the Tyre Mo-
bility System.
The tyre repair kit consists of a container with sealing compound to repair
the puncture and a compressor to generate the required tyre pressure. The
kit will reliably seal punctures up to a size of about 4 mm caused by the
penetration of a foreign body into the tyre.
Note
● Seek professional assistance if the repair of a tyre puncture is not possi-
ble with the sealing compound.
Wheel change Preparation work
What you must do before changing a wheel.
– If you have a flat tyre or puncture, park the vehicle as far away
from the flow of traffic as possible. Choose a location that is as
level as possible.
– All passengers should leave the vehicle. They should wait in a
safe area (for instance behind the roadside crash barrier).
– Switch the engine off. Switch the hazard warning lights on and
place the warning triangles in position.
– Apply the handbrake firmly.
– Engage the first gear , or put the selector lever to position P for
those vehicles with an automatic gearbox.
– If you are towing a trailer, unhitch it from your vehicle.
– Take the vehicle tools and the spare wheel out of the luggage
compartment.
Safety FirstOperating InstructionsPractical TipsTechnical Specifications
Page 225 of 278
223
If and when
Note
● If sealant should leak out, leave it to dry. This way you can pull it off like
a piece of foil.
● Observe the expiry date stated on the sealing compound can. Have the
sealing compound exchanged by a specialised workshop.
● Seek professional assistance if the repair of a tyre puncture is not possi-
ble with the sealing compound.
What to do first
Certain steps must be taken before repairing a tyre.
– If you have a flat tyre or puncture, park the vehicle as far away
from the flow of traffic as possible.
– Apply the handbrake firmly.
– Engage first gear , or put the selector lever to position P.
– All passengers should leave the vehicle. They should wait in a
safe area (for instance behind the roadside crash barrier).
– Check whether a repair is possible using the Tyre Mobility Sys-
tem “General information and safety notes.”
– Unscrew inflation cap from the affected wheel.
– Take the tyre repair kit out of the luggage compartment.
WARNING
Switch on the hazard warning lights and place the warning triangles in
position. This is for your own safety and also warns other road users.
CAUTION
Take special care if you have to repair a tyre on a slope.
Note
● Please observe legal requirements when doing so.
● Remember to replace the sealing compound as soon as possible.
Tyre repair
The following sections describe the procedures for repairing
a tyre.
Using the sealing compound
– The instructions on the container give detailed information on
how to use the sealing compound.
Inflating the tyre.
– Remove the air compressor and hose from the container.
– Screw the retaining nut onto the valve.
– Plug the compressor cable into a 12 volt power point.
– Turn on compressor and monitor the pressure shown on the
pressure gauge.
Completing the repair
– Remove the compressor hose from the valve.
– Fit the valve cap.
Safety FirstOperating InstructionsPractical TipsTechnical Specifications
Page 227 of 278
225
If and when
Note
● If a newly replaced fuse blows again after a short time, the electrical sys-
tem must be checked by a specialised workshop as soon as possible.
● If you replace a fuse with higher-rating fuse, you could cause damage to
another location in the electrical system.
● Always keep some spare fuses in the vehicle. These are available from
SEAT dealers.
Fuses on left side of dash panel
Fuses
NumberConsumerAmps1Power steering/Engine operation/Flow meter7,5
2
Diagnostics/Heater/Autoclimate/Climatronic/
Electric anti-dazzle mirror/Navigator/Air condi-
tioning pressure switch/ Climate fan/AFS Control
unit/Coming home relay/Soundaktor/CCS
10
3Petrol engine control unit/Diesel engine control
unit/Relay coils/Engine operation/Bi-turbo fuel
control unit5
4ABS-ESP Control unit/RKA Switch/Gateway con-
trol unit/ESP Relay/Rotation sensor10
5Reverse light/Heating nozzles106Instrument panel57Retro fog light/Start-Stop relays7,5
8Paddle levers on steering wheel for automatic
gearbox2
9Headlight lever/Windscreen wiper switch1010BCM Electronic control unit power supply511Airbag control unit5
NumberConsumerAmps12Automatic gearbox/ LPG system1013Exterior mirror control514Left-hand AFS headlights1515Right-hand AFS headlights1516Vacant 17Number plate light518Clean pump7,519Electronic control unit520Indicators/Brake lights1521Lights control, instrument panel522Heated mirrors5
23Engine injection module/ Rain sensor/ Automat-
ic gear lever/ Main petrol relay7,5
24Luggage compartment light, interior light, glove
compartment light10
25Parking aid526Towing hook 27Headlight control528Lambda probe1029Vacuum pump/LPG power supply15, 20 a)
30Engine solenoid coils/Additional heating relay/
Pressure sensor/AKF Valve15
31Petrol engine operation/Glow plugs/Relay coil/
Electric fan/Secondary water pump relay10
32Engine control unit15, 20,
30 b)
33Clutch switch sensor/Additional heating relay
coil/ Servo sensor5
34Fuel control unit / Vacuum pump1535Vacant
Safety FirstOperating InstructionsPractical TipsTechnical Specifications
Page 241 of 278
239
If and when
– Carefully remove the glass, levering it to avoid possible dam-
age.
To replace the bulbs
– Pull the bulbs outwards.
– To remove the central bulb, hold and press to one side.
Assembly
– Proceed in the reverse order, pressing gently on the outer edge
of the side light.
– First fit the glass with the fastening tabs over the frame of the
switch. Next press the front part until the two long tabs click on
the support.
Additional brake light*
Given the difficulty involved in the replacement of this light it should be
done by the Technical Service. Luggage compartment light*
Fig. 166 Luggage com-
partment light
Fig. 167 Luggage com-
partment light
– Extract the tulip shaped fitting by pressing on the inside edge
of this -arrow- using the flat side of a screwdriver ⇒ fig. 166.
Safety FirstOperating InstructionsPractical TipsTechnical Specifications
Page 243 of 278
241
If and when
2. Connect one end of the red jump lead to the positive terminal
⇒ fig. 168 +
or ⇒
fig. 169 + of the vehicle with the flat bat-
tery A.
3. Connect the other end of the red jump lead to the positive ter-
minal +
in the vehicle providing assistance B.
4. On vehicles with no Start-Stop system , connect one end of the
black jump lead to the negative terminal -
in the vehicle pro-
viding assistance B ⇒ fig. 168.
5. On vehicles with the Start-Stop system , connect one end of the
black jump lead X
to a suitable ground terminal, to a solid
metal part bolted to the engine block or to the engine block it-
self ⇒ fig. 169.
6. Connect the other end of the black jump lead X
to a solid met-
al component bolted to the engine block or to the engine block
itself of the vehicle with the flat battery. Do not connect it to a
point near the battery A
.
7. Position the leads in such a way that they cannot come into contact with any moving parts in the engine compartment.
Starting
8. Start the engine of the vehicle with the boosting battery and let it run at idling speed.
9. Start the engine of the vehicle with the flat battery and wait one or two minutes until the engine is running.
Removing the jump leads
10. Before you remove the jump leads, switch off the headlights (if they are switched on). 11. Turn on the heater blower and heated rear window in the vehi-
cle with the flat battery. This helps minimise voltage peaks
which are generated when the leads are disconnected.
12. When the engine is running, disconnect the leads in reverse order to the details given above.
Connect the battery clamps so they have good metal-to-metal contact with
the battery terminals.
If the engine fails to start, switch off the starter after about 10 seconds and
try again after about half a minute.
WARNING
● Please note the safety warnings referring to working in the engine
compartment ⇒ page 194, Working in the engine compartment.
● The battery providing assistance must have the same voltage as the
flat battery (12V) and approximately the same capacity (see imprint on
battery). Failure to comply could result in an explosion.
● Never use jump leads when one of the batteries is frozen. Danger of
explosion! Even after the battery has thawed, battery acid could leak and
cause chemical burns. If a battery freezes, it should be replaced.
● Keep sparks, flames and lighted cigarettes away from batteries, dan-
ger of explosion. Failure to comply could result in an explosion.
● Observe the instructions provided by the manufacturer of the jump
leads.
● Do not connect the negative cable from the other vehicle directly to
the negative terminal of the flat battery. The gas emitted from the battery
could be ignited by sparks. Danger of explosion.
● Do not attach the negative cable from the other vehicle to parts of the
fuel system or to the brake line.
Safety FirstOperating InstructionsPractical TipsTechnical Specifications
Page 245 of 278
243
If and when
Towing and tow-starting
Tow-starting*
The use of jump leads is preferable to tow-starting.
We recommend that you do not tow-start your vehicle. Jump-start-
ing is preferable ⇒ page 240.
However, if your vehicle has to be tow-started:
– Engage the 2nd or the 3rd gear.
– Keep the clutch pressed down.
– Switch the ignition on.
– Once both vehicles are moving, release the clutch.
– As soon as the engine starts, press the clutch and move the
gear lever into neutral. This helps to prevent driving into the
towing vehicle.
WARNING
The risk of accidents is high when tow-starting. The vehicle being towed
can easily collide with the towing vehicle.
CAUTION
When tow-starting, fuel could enter the catalytic converter and damage it. Comments
Please observe the following points if you use a tow-rope:
Notes for the driver of the towing vehicle
–
Drive slowly at first until the tow-rope is taut. Then accelerate
gradually.
– Begin and change gears cautiously. If you are driving an auto-
matic vehicle, accelerate gently.
– Remember that the brake servo and power steering are not
working in the vehicle you are towing. Brake sooner than nor-
mal and pressing the pedal gently.
Notes for the driver of the towed vehicle
– Ensure that the tow-rope remains taut at all times when towing.
Tow-rope or tow-bar
It is easier and safer to tow a vehicle with a tow-bar. You should only use a
tow-rope if you do not have a tow-bar.
A tow-rope should be slightly elastic to reduce the loading on both vehicles.
It is advisable to use a tow-rope made of synthetic fibre or similarly elastic
material.
Attach the tow-rope or the tow-bar only to the towing eyes provided or a
towing bracket.
Driving style
Towing requires some experience, especially when using a tow-rope. Both
drivers should be familiar with the technique required for towing. Inexper-
ienced drivers should not attempt to tow.
Safety FirstOperating InstructionsPractical TipsTechnical Specifications
Page 246 of 278
244If and when
Do not pull too hard with the towing vehicle and take care to avoid jerking
the tow-rope. When towing on an unpaved road, there is always a risk of
overloading and damaging the anchorage points.
The ignition of the vehicle being towed must be switched on to prevent the
steering wheel from locking and also to allow the use of the turn signals,
horn, windscreen wipers and washers.
As the brake servo does not work if the engine is not running, you must ap-
ply considerably more pressure to the brake pedal than you normally would.
As the power assisted steering does not work if the engine is not running,
you will need more strength to steer than you normally would.
Towing vehicles with an automatic gearbox
● Put the selector lever into position “N”.
● Do not drive faster than 50 km/h.
● Do not tow further than 50 km.
● If a breakdown vehicle is used, the vehicle must be towed with the front
wheels raised.
Note
● Observe legal requirements when towing or tow-starting.
● Switch on the hazard warning lights of both vehicles. However, observe
any regulations to the contrary.
● For technical reasons, vehicles with an automatic gearbox must not be
tow-started.
● If damage to your vehicle means that there is no lubricant in the gear-
box, you must raise the drive wheels while the vehicle is being towed.
● If the vehicle has to be towed more than 50 km, the front wheels should
be raised during towing, and towing should be carried out by a qualified
person. ●
The steering wheel is locked when the vehicle has no electrical power.
The vehicle must then be towed with the front wheels raised. Towing should
be carried out by a qualified person.
● The towing eye should always be kept in the vehicle.
Towing eyesFig. 170 Fitting the tow-
ing eye to front rear of
the vehicle
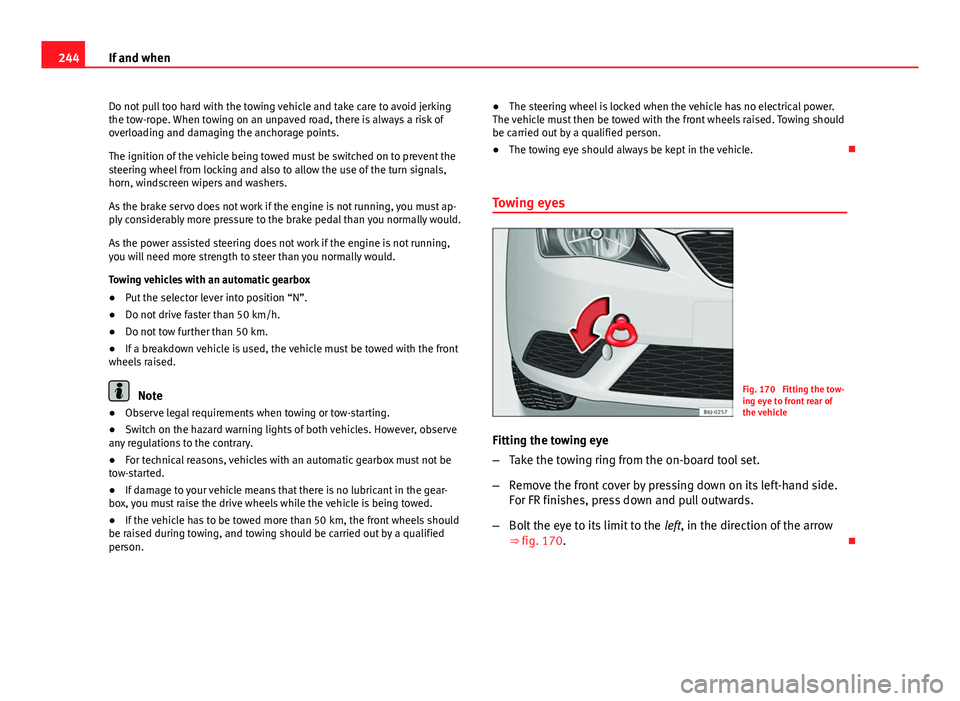
Fitting the towing eye
– Take the towing ring from the on-board tool set.
– Remove the front cover by pressing down on its left-hand side.
For FR finishes, press down and pull outwards.
– Bolt the eye to its limit to the left, in the direction of the arrow
⇒ fig. 170.
Page 252 of 278
250Technical specifications
Technical specifications
Checking fluid levels
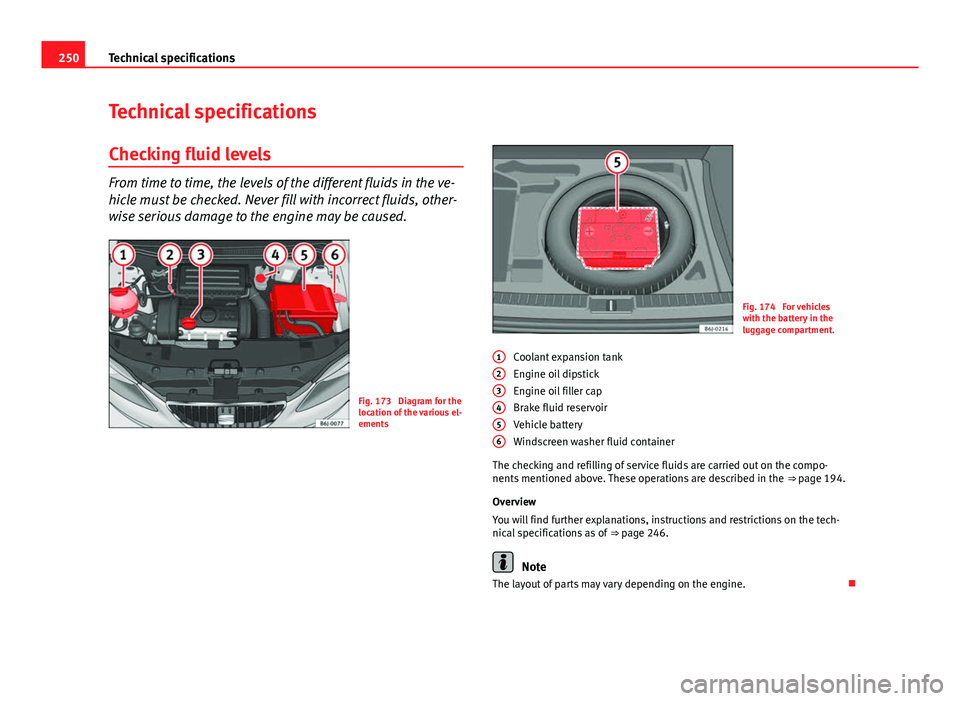
From time to time, the levels of the different fluids in the ve-
hicle must be checked. Never fill with incorrect fluids, other-
wise serious damage to the engine may be caused.
Fig. 173 Diagram for the
location of the various el-
ements
Fig. 174 For vehicles
with the battery in the
luggage compartment.
Coolant expansion tank
Engine oil dipstick
Engine oil filler cap
Brake fluid reservoir
Vehicle battery
Windscreen washer fluid container
The checking and refilling of service fluids are carried out on the compo-
nents mentioned above. These operations are described in the ⇒ page 194.
Overview
You will find further explanations, instructions and restrictions on the tech-
nical specifications as of ⇒ page 246.
Note
The layout of parts may vary depending on the engine.
1
23456
Page 253 of 278
251
Technical specifications
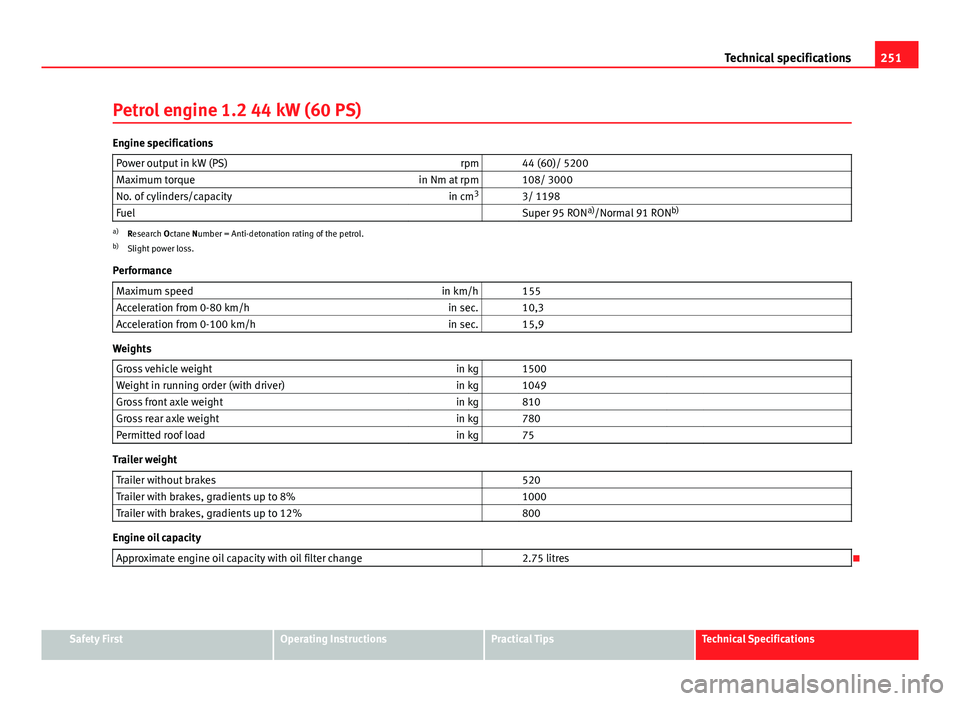
Petrol engine 1.2 44 kW (60 PS)
Engine specifications Power output in kW (PS) rpm 44 (60)/ 5200
Maximum torque in Nm at rpm 108/ 3000
No. of cylinders/capacity in cm3
3/ 1198
Fuel Super 95 RON a)
/Normal 91 RON b)
a)
Research Octane Number = Anti-detonation rating of the petrol.
b) Slight power loss.
Performance Maximum speed in km/h 155
Acceleration from 0-80 km/h in sec. 10,3
Acceleration from 0-100 km/h in sec. 15,9
Weights
Gross vehicle weight in kg 1500
Weight in running order (with driver) in kg 1049
Gross front axle weight in kg 810
Gross rear axle weight in kg 780
Permitted roof load in kg 75
Trailer weight
Trailer without brakes 520
Trailer with brakes, gradients up to 8% 1000
Trailer with brakes, gradients up to 12% 800
Engine oil capacity
Approximate engine oil capacity with oil filter change 2.75 litres
Safety FirstOperating InstructionsPractical TipsTechnical Specifications
Page 254 of 278
252Technical specifications
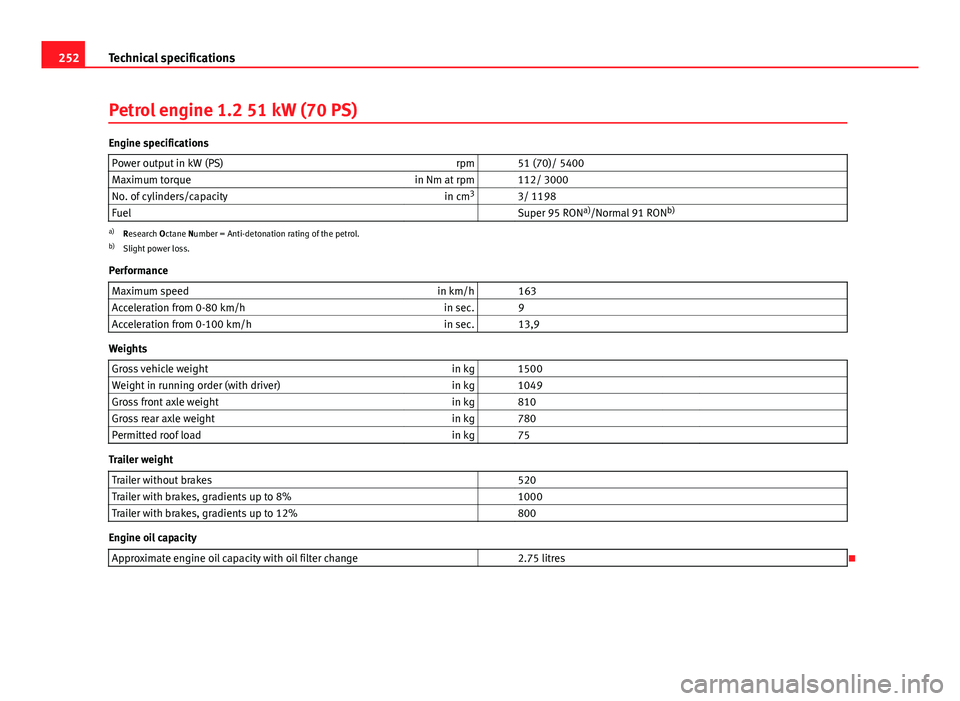
Petrol engine 1.2 51 kW (70 PS)
Engine specifications
Power output in kW (PS) rpm 51 (70)/ 5400
Maximum torque in Nm at rpm 112/ 3000
No. of cylinders/capacity in cm3
3/ 1198
Fuel Super 95 RON a)
/Normal 91 RON b)
a)
Research Octane Number = Anti-detonation rating of the petrol.
b) Slight power loss.
Performance Maximum speed in km/h 163
Acceleration from 0-80 km/h in sec. 9
Acceleration from 0-100 km/h in sec. 13,9
Weights
Gross vehicle weight in kg 1500
Weight in running order (with driver) in kg 1049
Gross front axle weight in kg 810
Gross rear axle weight in kg 780
Permitted roof load in kg 75
Trailer weight
Trailer without brakes 520
Trailer with brakes, gradients up to 8% 1000
Trailer with brakes, gradients up to 12% 800
Engine oil capacity
Approximate engine oil capacity with oil filter change 2.75 litres