technical data Seat Ibiza 5D 2016 Edition 11.16 Repair Manual
[x] Cancel search | Manufacturer: SEAT, Model Year: 2016, Model line: Ibiza 5D, Model: Seat Ibiza 5D 2016Pages: 248, PDF Size: 5.25 MB
Page 175 of 248

Driver assistance systems
Parking aid Gener a
l
informationVarious systems are available to help you
when park
in
g or manoeuvring in tight
spaces, depending on the equipment fitted
on your vehicle.
The rear parking aid is an audible assistant
that warns about obstacles located behind
the vehicle ››› page 174.
During parking, Parking System Plus assists
the driver by visually and audibly warning
them about obstacles detected in front and
behind the vehicle ››› page 174. WARNING
● Alw a
ys pay attention, also when looking
straight ahead, to traffic and the vehicle sur-
roundings. The assistance systems are not a
replacement for driver awareness. When in-
serting or removing the vehicle from a park-
ing space, or when performing similar ma-
noeuvres the driver always assumes the re-
sponsibility.
● Adapt your speed and driving style at all
times t
o suit visibility, weather, road and traf-
fic conditions.
● The ultrasound sensors have blind spots in
which ob
stacles and people are not regis-
tered. Pay special attention to children and
animals. ●
Alw a
ys keep visual control of the vehicle
surroundings: use the mirrors for additional
help. CAUTION
Parking Aid functions may be negatively af-
f ect ed b
y different factors that may lead to
damage to the vehicle or its immediate sur-
rounds:
● Under certain circumstances, the system
does not
detect or display certain objects:
– Objects such as chains, trailer draw bars,
fences, posts and thin trees.
– Objects that are located above the sen-
sors, such as protrusions in a wall.
– Objects with certain surfaces or struc-
tures, such as wire mesh fences or pow-
der snow.
● Certain surfaces of objects and garments
do not refl
ect the ultrasound sensors' sig-
nals. The system cannot detect, at least cor-
rectly, these objects or people wearing such
clothes.
● Ultrasound sensor signals may be affected
by e
xternal sound sources. In certain circum-
stances this may prevent them from detect-
ing people or objects.
● Please note that low obstacles detected by
the syst
em may no longer be registered by
the sensors as the car moves closer, so the
system will not give any further warning. In
certain circumstances, objects such as high kerbs that could damage the bottom of the
vehic
l
e are not detected either.
● If the first warning from the ParkPilot is ig-
nored, the v
ehicle could suffer considerable
damage.
● The knocks or damage on the radiator
grill
e, bumper, wheel arch and vehicle under-
body can adjust the orientation of the sen-
sors. This can affect the parking aid function.
Have the function checked by a specialised
workshop. Note
● In cer t
ain situations, the system can give a
warning even though there is no obstacle in
the detected area, e.g:
–with rough or cobbled floors or ground
with long grass;
– with external ultrasound sources, such as
cleaning vehicles or other vehicles;
– In downpours, intense snow or dense ex-
haust gases;
– if the registration plate (front or rear) is
not properly affixed to the bumper sur-
face;
– or in locations such as the brow of a hill.
● In order to guarantee good system opera-
tion, keep the ultr
asound sensors clean, free
of snow or ice, and do not cover them with
adhesives or other objects.
● If you use high-pressure or vapour equip-
ment to c
lean the ultrasound sensors, apply » 173
Technical data
Advice
Operation
Emergencies
Safety
Page 177 of 248
Driver assistance systems
0.60 m
1.60 m
0.60 m
As
y
ou approach the obstacle, the time inter-
val between the audible warnings will be re-
duced. When you reach around 0.30 m the
warning will be constant: do not continue to
move forward (or backward)!
If you maintain separation from the obstacle,
the volume of the warning begins to reduce
after four seconds (does not affect the tone
of the constant warning).
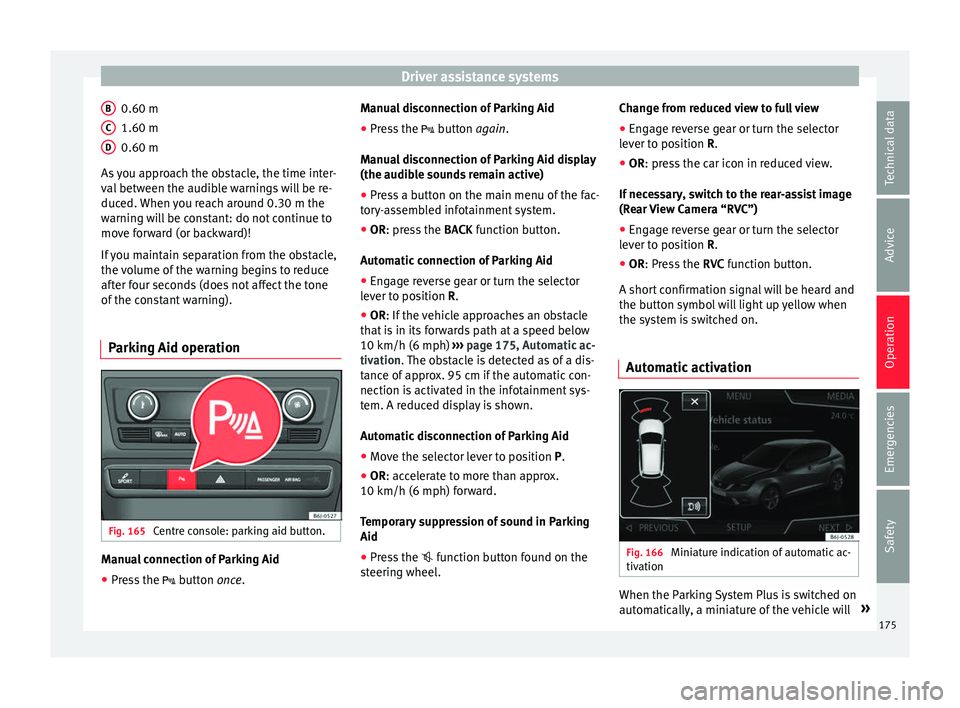
Parking Aid operation Fig. 165
Centre console: parking aid button. Manual connection of Parking Aid
● Press the butt
on
once.
B C
D Manual disconnection of Parking Aid
●
Press the butt
on
again.
Manual disconnection of Parking Aid display
(the audible sounds remain active)
● Press a button on the main menu of the fac-
tory
-assembled infotainment system.
● OR: press the BACK fu
nction button.
Automatic connection of Parking Aid ● Engage reverse gear or turn the selector
lever t
o position R.
● OR: If the vehicle approaches an obstacle
that
is in its forwards path at a speed below
10 km/h (6 mph) ››› page 175, Automatic ac-
tivation. The obstacle is detected as of a dis-
tance of approx. 95 cm if the automatic con-
nection is activated in the infotainment sys-
tem. A reduced display is shown.
Automatic disconnection of Parking Aid
● Move the selector lever to position P.
● OR: accelerate to more than approx.
10 km/h (6 mph) for
ward.
Temporary suppression of sound in Parking
Aid
● Press the function b
utton found on the
steering wheel. Change from reduced view to full view
●
Engage reverse gear or turn the selector
lever t
o position R.
● OR: press the car icon in reduced view.
If nec
essary, switch to the rear-assist image
(Rear View Camera “RVC”)
● Engage reverse gear or turn the selector
lever t
o position R.
● OR: Press the RVC fu
nction button.
A short confirmation signal will be heard and
the button symbol will light up yellow when
the system is switched on.
Automatic activation Fig. 166
Miniature indication of automatic ac-
tiv ation When the Parking System Plus is switched on
aut
om
atic
ally, a miniature of the vehicle will »
175
Technical data
Advice
Operation
Emergencies
Safety
Page 179 of 248

Driver assistance systems
Adjusting the display and audible
w arnin
g
s The settings for the display and audible
warnin
g
s are controlled via the Easy Con-
nect*.
Automatic activation
on – activates the Automatic activa-
tion option ››› page 175.
off – deactivates the Automatic ac-
tivation option ››› page 175.
Front volume*
Volume in the front and rear area.
Front sound settings/sharpness*
Frequency (tone) of the sound in the front
area.
Rear volume*
Volume in the rear area.
Rear sound settings/sharpness*
Frequency (tone) of the sound in the rear
area.
Adjust volume
With the parking aid switched on, the active
audio/video source volume will be reduced
to the intensity of the selected setting. Error messages When the Parking Aid is activated or when it
is
sw
itched on, if a message reporting a Park-
ing aid error is displayed on the instrument
panel, there is a fault in the system.
If the fault doesn't disappear before discon-
necting the ignition, next time that parking
aid is engaged in reverse, it will not be indi-
cated.
Parking System Plus*
If there is a fault in the parking aid system a
message will appear on the instrument panel
indicating the error. In addition the key
LED will blink.
If there is a fault in a sensor, the symbol is
displayed on the Easy Connect display in
front of/behind the vehicle. If a rear sensor is
faulty, only the obstacles in the areas A and
B are displayed
››
›
Fig. 164. If a front sensor
is faulty, only the obstacles in the areas C and
D are displayed.
Hav e the f
au
lt corrected by a specialised
workshop without delay.
Towing bracket In vehicles equipped with a towing bracket
dev
ic
e fr
om the factory, when the trailer is
connected electrically, the Parking Aid rear sensors will not be activated when reverse
gear i
s engaged, when the selector lever is
turned to position R or when the button is
pressed.
Parking System Plus
The distance to possible obstacles at the rear
of the vehicle will not be displayed on the
screen and nor will it be indicated by means
of audible sound signals.
The Easy Connect system screen will only dis-
play objects detected at the front, and the ve-
hicle's trajectory will be hidden.
Rear Assist “Rear View Cam-
era”*
Operatin
g and safety warnings WARNING
● The Re ar As
sist does not make it possible
to precisely calculate the distance from ob-
stacles (people, vehicles, etc.) and nor can it
overcome the system's own limits, hence us-
ing it may cause serious accidents and inju-
ries if used negligently or without due care.
The driver should be aware of his/her sur-
roundings at all times to ensure safe driving.
● The camera lens expands and distorts the
field of
vision and displays the objects on the » 177
Technical data
Advice
Operation
Emergencies
Safety
Page 181 of 248
Driver assistance systems
● Ap p
ly
the parking brake.
● Switch the ignition on.
● If necessary, switch on the Infotainment
syst
em.
● Engage reverse gear or turn the selector
lever t
o position R.
● Press the function b
utton displayed on
the right of the image.
● Make the desired adjustments on the menu
by pr
essing the –/+ function buttons or by
moving the corresponding scroll button.
Necessary conditions for parking and ma-
noeuvring with the rear assist
The system should not be used in the follow-
ing cases:
● If the image displayed is not very reliable or
is di
storted, for example low visibility or dirty
lens.
● If the area behind the vehicle is not dis-
pla
yed very clearly or is incomplete.
● If the vehicle is heavily loaded at the rear.
● If the position and installation angle of the
camera h
ave been changed, e.g. after a rear-
end collision. Have the system checked by a
specialised workshop.
Familiarising yourself with the system
To familiarise yourself with the system, the
orientation lines and their function, SEAT rec- ommends practising parking and manoeu-
vring with the r
ear assist in a place without
too much traffic or in a car park when there
are good weather and visibility conditions.
Cleaning the camera lens
Keep the camera lens clean and clear of snow
and ice:
● Moisten the lens using a normal alcohol-
based gl
ass cleaning product and clean the
lens with a dry cloth.
● Remove snow using a small brush.
● Use de-icing spray to remove any ice. CAUTION
● Never u se abr
asive cleaning products to
clean the camera lens.
● Do not use hot or warm water to remove ice
or snow fr
om the camera lens. Doing so could
damage the camera. Parking and manoeuvring with the
r
e
ar a
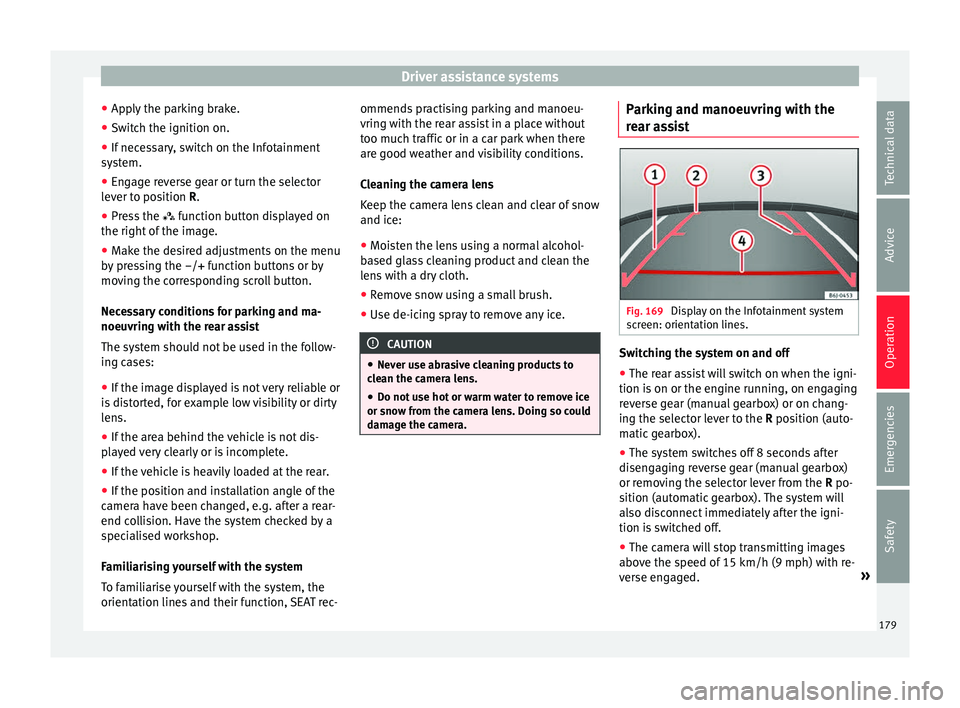
ssist Fig. 169
Display on the Infotainment system
s c
r
een: orientation lines. Switching the system on and off
●
The rear assist will switch on when the igni-
tion i s
on or the en
gine running, on engaging
reverse gear (manual gearbox) or on chang-
ing the selector lever to the R position (auto-
matic gearbox).
● The system switches off 8 seconds after
diseng
aging reverse gear (manual gearbox)
or removing the selector lever from the R po-
sition (automatic gearbox). The system will
also disconnect immediately after the igni-
tion is switched off.
● The camera will stop transmitting images
above the s
peed of 15 km/h (9 mph) with re-
verse engaged. »
179
Technical data
Advice
Operation
Emergencies
Safety
Page 183 of 248
Driver assistance systems
When the cruise control is on and a speed is
pr ogr
ammed, the indic
ator on the instru-
ment panel* is lit.
If the cruise control system is switched off,
the symbol is switched off. The system will
also be switched off fully when the 1st gear
is engaged.*
Switching on the cruise control system
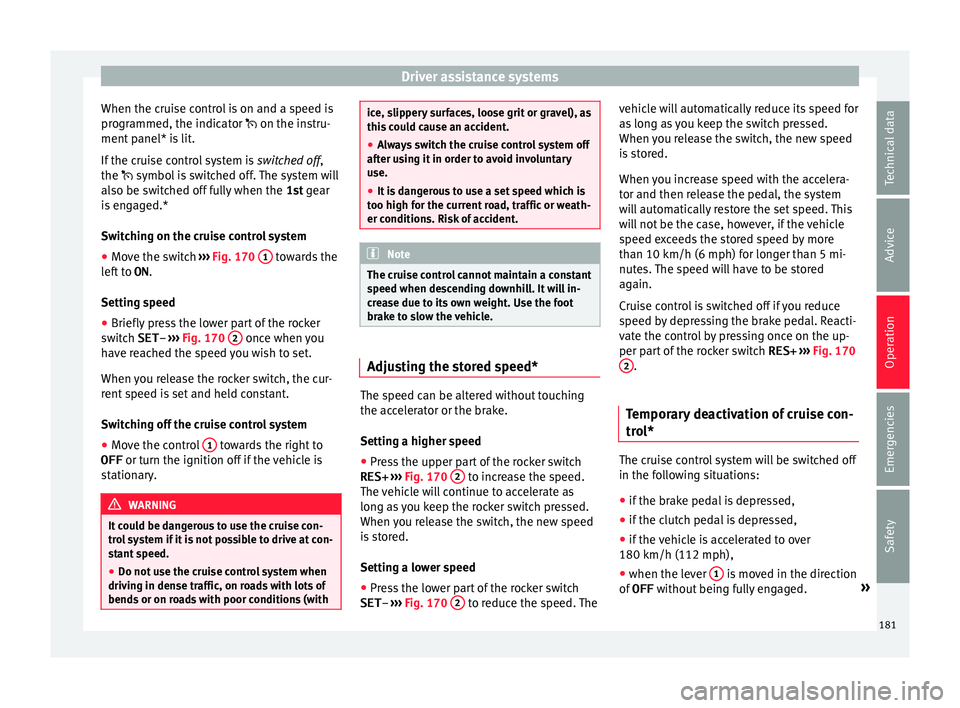
● Move the switch ›››
Fig. 170 1 towards the
l ef
t
to ON.
Setting speed
● Briefly press the lower part of the rocker
switc
h SET– ››› Fig. 170 2 once when you
h av
e r
eached the speed you wish to set.
When you release the rocker switch, the cur-
rent speed is set and held constant.
Switching off the cruise control system
● Move the control 1 towards the right to
OFF or turn the ignition off
if
the vehicle is
stationary. WARNING
It could be dangerous to use the cruise con-
tro l
system if it is not possible to drive at con-
stant speed.
● Do not use the cruise control system when
driving in den
se traffic, on roads with lots of
bends or on roads with poor conditions (with ice, slippery surfaces, loose grit or gravel), as
this
c
ould cause an accident.
● Always switch the cruise control system off
after u
sing it in order to avoid involuntary
use.
● It is dangerous to use a set speed which is
too high for the c
urrent road, traffic or weath-
er conditions. Risk of accident. Note
The cruise control cannot maintain a constant
s peed when de s
cending downhill. It will in-
crease due to its own weight. Use the foot
brake to slow the vehicle. Adjusting the stored speed*
The speed can be altered without touching
the ac
c
el
erator or the brake.
Setting a higher speed
● Press the upper part of the rocker switch
RES+ ›››
Fig. 170 2 to increase the speed.
The v
ehic
le will continue to accelerate as
long as you keep the rocker switch pressed.
When you release the switch, the new speed
is stored.
Setting a lower speed
● Press the lower part of the rocker switch
SET– ›››
Fig. 170 2 to reduce the speed. Thevehicle will automatically reduce its speed for
a
s
lon
g as you keep the switch pressed.
When you release the switch, the new speed
is stored.
When you increase speed with the accelera-
tor and then release the pedal, the system
will automatically restore the set speed. This
will not be the case, however, if the vehicle
speed exceeds the stored speed by more
than 10 km/h (6 mph) for longer than 5 mi-
nutes. The speed will have to be stored
again.
Cruise control is switched off if you reduce
speed by depressing the brake pedal. Reacti-
vate the control by pressing once on the up-
per part of the rocker switch RES+ ››› Fig. 170
2 .
Temporary deactivation of cruise con-
tr o
l* The cruise control system will be switched off
in the f
o
l
lowing situations:
● if the brake pedal is depressed,
● if the clutch pedal is depressed,
● if the vehicle is accelerated to over
180 km/h (112 mph),
● when the lever 1 is moved in the direction
of
OFF w
ithout
being fully engaged. »
181
Technical data
Advice
Operation
Emergencies
Safety
Page 185 of 248
Towing bracket device and trailer
●
Stop the v
ehicle at the next opportunity
and in a safe place. CAUTION
Failure to heed the control lamps and corre-
s pondin g t
ext messages when they light up
may result in damage to the vehicle. Note
If the “SEAT Drive Profile” system presents a
fau lt, the
symbol appears on the instrument
panel, with the message Fault: Damping
setting . Indication on the display and warning
l
amp
There is a fault in the “SEAT Drive Pro-
file” suspension.
See a specialised workshop immediately and have the
“SEAT Drive Profile” suspension checked.
If the yellow warning lamp does not light up again after
the engine is restarted and the vehicle has travelled a
short distance, you do not need to take it to a special-
ised workshop. Some warning and control lamps will light up
briefly
when the ignition i
s
switched on to
check certain functions. They will switch off
after a few seconds. WARNING
If the warning lamps and the corresponding
mes s
ages are ignored when they light up, the
vehicle may stall in traffic and cause acci-
dents and severe injuries.
● Never ignore the warning lamps or messag-
es. WARNING
Changing the “SEAT Drive Profile” settings
whil e the
vehicle is in motion can distract you
from the road and lead to accidents. CAUTION
Failure to heed the control lamps when they
light up and the c orr
esponding messages
may result in damage to the vehicle. Note
If the “SEAT Drive Profile” system does not
work a
s described in this chapter, have it
checked immediately by a specialised work-
shop. Towing bracket device and
tr
ai
l
er
Trailer mode What do you need to bear in mind
when towing a trailer? Your vehicle may be used to tow a trailer
when fitted w
ith the c
orrect equipment.
If the car is supplied with a factory-fitted tow-
ing bracket it will already have the necessary
technical modifications and meet the statuto-
ry requirements for towing a trailer. If you
wish to retrofit a towing bracket, consult
››› page 185.
Connectors
Your vehicle is fitted with a 12-pin connector
for the electrical connection between the
trailer and the vehicle.
If the trailer has a 7-pin plug you will need to
use an adapter cable. It is available at any
Technical Service.
Trailer weight/drawbar load
Never exceed the authorised trailer weight. If
you do not load the trailer up to the maxi-
mum permitted trailer weight, you can then
climb correspondingly steeper slopes. »
183
Technical data
Advice
Operation
Emergencies
Safety
Page 187 of 248
Towing bracket device and trailer
Speed
The s t
ab
ility of the vehicle and trailer is re-
duced with increasing speed. For this reason,
it is advisable not to drive at the maximum
permissible speed in an unfavourable road,
weather or wind conditions. This applies es-
pecially when driving downhill.
You should always reduce speed immediately
if the trailer shows the slightest sign of snak-
ing. Never try to stop the “snaking” by in-
creasing speed.
Always brake in due course. If the trailer has
an overrun brake, apply the brakes gently at
first and then, firmly. This will prevent the
jerking that can be caused by locking of trail-
er wheels. Select a low gear in due course
before going down a steep downhill. This en-
ables you to use the engine braking to slow
down the vehicle.
Reheating
At very high temperatures and during pro-
longed slopes, driving with a low gear and
high engine speed; always monitor whether
the excessive coolant temperature gauge is
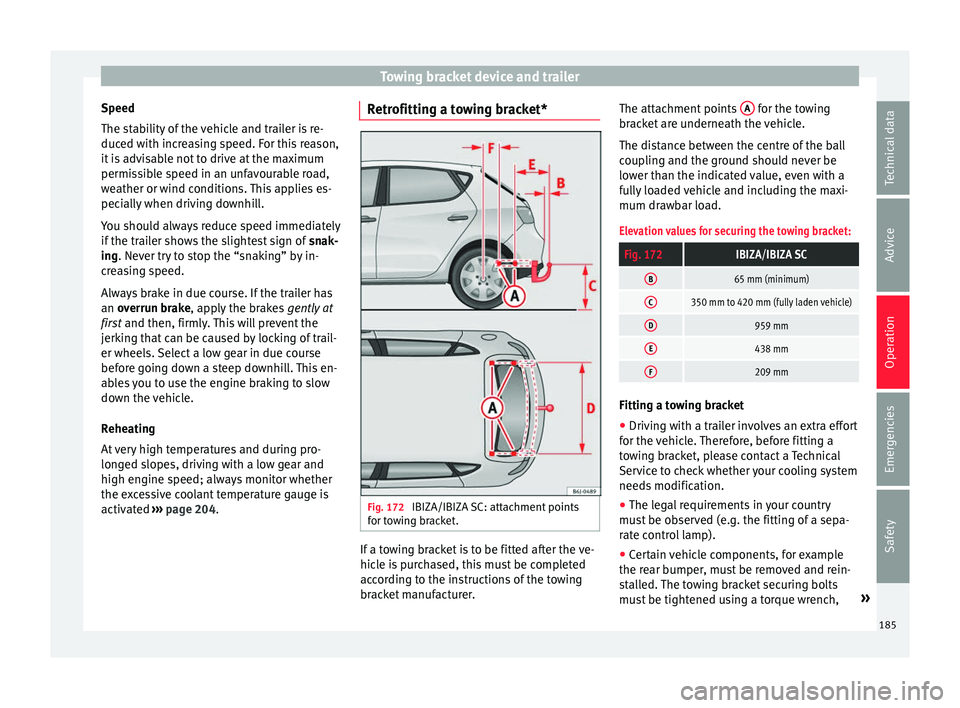
activated ››› page 204. Retrofitting a towing bracket*
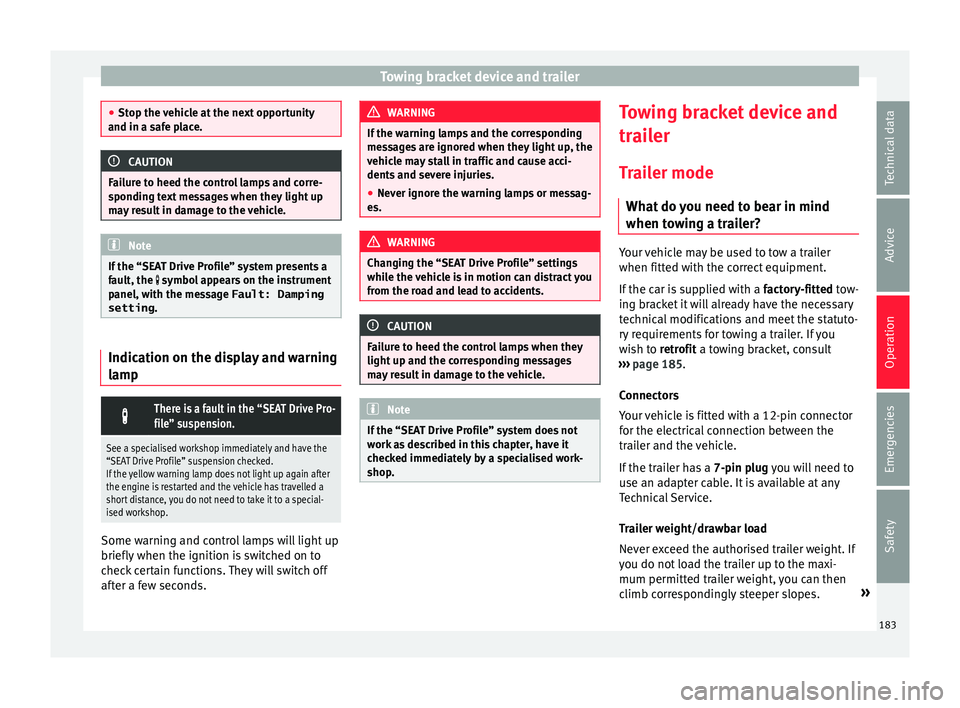
Fig. 172
IBIZA/IBIZA SC: attachment points
f or t
o
wing bracket. If a towing bracket is to be fitted after the ve-
hic
l
e i
s purchased, this must be completed
according to the instructions of the towing
bracket manufacturer. The attachment points
A for the towing
br ac
k
et are underneath the vehicle.
The distance between the centre of the ball
coupling and the ground should never be
lower than the indicated value, even with a
fully loaded vehicle and including the maxi-
mum drawbar load.
Elevation values for securing the towing bracket:
Fig. 172IBIZA/IBIZA SC
B65 mm (minimum)
C350 mm to 420 mm (fully laden vehicle)
D959 mm
E438 mm
F209 mm Fitting a towing bracket
●
Driving with a trailer involves an extra effort
f or the
v
ehicle. Therefore, before fitting a
towing bracket, please contact a Technical
Service to check whether your cooling system
needs modification.
● The legal requirements in your country
must
be observed (e.g. the fitting of a sepa-
rate control lamp).
● Certain vehicle components, for example
the rear b
umper, must be removed and rein-
stalled. The towing bracket securing bolts
must be tightened using a torque wrench, »
185
Technical data
Advice
Operation
Emergencies
Safety
Page 189 of 248
Care and maintenance
Advice
C ar
e and m
aintenance
Accessories and modifications to the vehicle
Accessories, replacement of parts and
modifications Your vehicle is designed to offer a high
s
t
and
ard of active and passive safety.
Before purchasing accessories and parts,
and before making technical changes to your
vehicle, we recommend that you consult your
Technical Service.
SEAT dealerships will be happy to provide
you with the latest information about the
use, legal requirements and recommenda-
tions from the manufacturer regarding acces-
sories and spare parts.
We recommend you use only SEAT Approved
Accessories ®
and SEAT Approved Spare
Parts ®
. This way, SEAT can guarantee that
the product in question is suitable, reliable
and safe. SEAT Technical Services have the
necessary experience and facilities to ensure
that parts are correctly and professionally in-
stalled. Despite a continuous observation of the mar-
ket, S
EAT is not able to assess the reliability,
safety and suitability of parts that SEAT has
not approved . For this reason, SEAT cannot
assume responsibility for any non-genuine
parts used, even if these parts have been ap-
proved by an official testing agency or are
covered by an official approval certificate.
Any retro-fitted equipment which has a direct
impact on the driver's control of the vehicle,
such as a cruise control system or electroni-
cally-controlled suspension, must be ap-
proved by SEAT for use in your vehicle and
bear the e mark (the European Union's au-
thorisation symbol).
If any additional electrical devices are fitted
which do not serve to control the vehicle it-
self, such as refrigerator boxes, laptops or
ventilator fans, they must bear the CE mark
(European Union manufacturer conformity
declaration). WARNING
Accessories, for example telephone holders
or cup ho l
ders, should never be fitted on the
covers, or within the working range, of the
airbags. Otherwise, there is a danger of in-
jury if the airbag is triggered in an accident. Modifications
Modifications must always be carried out ac-
cor
din
g to our specifications. Unauthorised
modifications to the electronic components
or software in the vehicle may cause malfunc-
tions. Due to the way the electronic compo-
nents are linked together in networks, other
indirect systems may be affected by the
faults. This can seriously impair safety, lead
to excessive wear of components, and also
invalidate your vehicle registration docu-
ments.
SEAT Technical Services cannot be held liable
for any damage caused by modifications
and/or work incorrectly performed. For this
reason, we recommend having all work per-
formed by a SEAT Technical Service using
SEAT ®
Original Spare Parts. WARNING
Any type of work or modification performed
incorr ectly
on your vehicle can lead to mal-
functions and can cause accidents. Roof aerial*
The vehicle can be fitted with a foldable* and
anti-thef
t* r
oof
aerial which can be folded
backwards, for example when going through
an automatic car wash. »
187
Technical data
Advice
Operation
Emergencies
Safety
Page 191 of 248
Care and maintenance
Products for vehicle maintenance
C ar
-c
are products are available in your Tech-
nical Services. Keep the product instructions
until you have used them up. WARNING
● Car -c
are products can be toxic. Because of
this, they must always be kept closed in their
original container. Keep them out of the reach
of children. Failure to comply could result in
poisoning.
● Always read and observe the instructions
and warning
s on the package before using
car-care products. Improper use could cause
health problems or damage the vehicle. The
use of certain products may produce noxious
vapours; they should be used in well ventila-
ted areas.
● Never use fuel, turpentine, engine oil, nail
varnish r
emover or other volatile fluids.
These are toxic and highly flammable. Risk of
fire and explosion.
● Before washing your vehicle, or carrying
out any
maintenance, switch the engine off,
apply the handbrake firmly and remove the
key from the ignition. CAUTION
Never attempt to remove dirt, mud or dust if
the sur f
ace of the vehicle is dry. Never use a
dry cloth or sponge for cleaning purposes.
This could damage the paintwork or the win-
dows of your vehicle. Soak dirt, mud or dust
with plenty of water. For the sake of the environment
● When pur c
hasing car care products, try to
select ones that are not harmful to the envi-
ronment.
● The waste from car-care products should
not be dis
posed of with ordinary household
waste. Observe the disposal information on
the package. Care of the vehicle exterior
Autom atic
car wash tunnel The vehicle paintwork is so durable that the
v
ehic
l
e can normally be washed without
problems in an automatic car wash tunnel.
However, the paintwork wear depends to a
large extent on the kind of the car wash tun-
nel, the brushes used, its water filtering and
the type of cleaning and preservative prod-
ucts.
Before going through a car wash, be sure to
take the usual precautions such as closing
the windows and sunroof. There is nothing to
note apart from that.
If the vehicle has special accessories such as
spoilers or a roof rack or two-way radio aerial,
etc., it is advisable to consult the car wash
tunnel operator first. After washing, the brake
s could take some
time to respond as the brake discs and pads
could be wet, or even frozen in winter. “Dry”
the brakes by braking several times. WARNING
Water, ice and salt on the brake system can
reduc e br
aking effectiveness. Risk of acci-
dent. CAUTION
Before putting the vehicle through the car
wa sh, do not
tighten the aerial if it is folded
because it can be damaged. Hand-washing
Vehicle washing
– First soften the dirt and rinse it off with wa-
ter
.
– C
lean your vehicle from top to bottom with
a soft s
ponge, a glove or a brush. Use very
light pressure.
– Rinse the sponge or glove often with clean
water
.
– Special car shampoo should only be used
for v
ery stubborn dirt.
– Leave the wheels, sill panels etc. until last,
usin
g a different sponge or glove. »
189
Technical data
Advice
Operation
Emergencies
Safety
Page 193 of 248
Care and maintenance
Stickers attached by the factory Follow these directions to avoid damaging
the stic
k
ers:
● Do not use high pressure cleaners.
● To remove ice or snow from the stickers do
not use w
indow scrapers or ice scrapers.
● Do not polish the stickers.
● Do not use dirty cloths or sponges.
● Preferably wash using a soft sponge and
soft neutr
al soap.
Sensors and camera lenses ●
Use a small brush to remove snow and a
de-ic er s
pr
ay to remove ice.
● Clean the sensors with a solvent-free prod-
uct and a soft, dr
y cloth.
● Moisten the camera lens using a standard
alcohol-b
ased glass cleaning agent and
clean the lens with a dry cloth. CAUTION
● When y ou c
lean the vehicle with a pressure
washer:
–Stay a suitable distance from the sensors
on the front and rear bumpers.
– Do not clean the camera lenses or sur-
rounding area with the pressure washer. ●
Never u se w
arm or hot water to remove
snow and ice from the reverse camera lens,
as it could crack the lens.
● Never use abrasive cleaning agents on the
lens. Vehicle paint maintenance
Regular waxing protects the paintwork.
You need t
o ap
ply wax to your vehicle if water
does not form small drops and run off the
paintwork when it is clean.
Good quality hard wax products are available
at your Technical Service.
Regular wax applications help to protect the
paintwork from environmental contaminants
››› page 188. It is also effective in protecting
against minor scratches.
Even if a wax solution is used regularly in the
vehicle washing tunnel, it is advisable to pro-
tect the paint with a hard wax coating at least
twice a year.
Polishing the paintwork Polishing is only necessary if the paint has
lo
s
t
its shine, and the gloss cannot be
brought back by applying wax. Polishing
products can be purchased in your Technical
Service. The vehicle must be waxed after polishing if
the polish u
sed does not contain wax com-
pounds to seal the paint ››› page 191, Vehicle
paint maintenance . CAUTION
To prevent damage to the paintwork:
● Do not use polishes and hard wax on pain-
ted p ar
ts with a matt finish or on plastic
parts.
● Do not polish your vehicle in a sandy or
dusty
environment. Caring for plastic parts
If normal washing fails to clean plastic parts,
c
l
e
an them with approved solvent-free plas-
tic cleaning and care products. CAUTION
● The use of li
quid air freshener directly over
the air vents of the vehicle may damage the
plastic parts if the liquid is accidentally spil-
led.
● Cleaning products which contain solvents
wil
l damage the material. 191
Technical data
Advice
Operation
Emergencies
Safety