seats Seat Ibiza SC 2008 Owner's Guide
[x] Cancel search | Manufacturer: SEAT, Model Year: 2008, Model line: Ibiza SC, Model: Seat Ibiza SC 2008Pages: 258, PDF Size: 7.93 MB
Page 46 of 258
Child safety
44
WARNING
•
The shoulder part of th e seat belt must lie approximately on the centre
of the shoulder, never across the neck or the arm. The seat belt must lie
close to the upper part of the body. The lap belt part must lie across the
pelvis, not across the stomach, and always fit closely. Pull the belt tight if
necessary to take up any slack ⇒page 21, “Seat belts”.
•
Read and always observe information and warnings concerning the use
of child seats ⇒ in “Safety notes on using child seats” on page 41.
Ibiza SC_EN.book Seite 44 Dienstag, 8. Juli 2008 5:36 17
Page 47 of 258
Child safety45
Safety First
Operating instructions
Practical tips
Te c h n i c a l D a t a
Securing child seatsWays to secure a child seat
A child seat can be secured differently on th e rear seat and on the front passenger seat.You can secure a child seat to the rear seat or front passenger seat in the
following ways:•
Child seats in groups 0 to 3 can be secured with a seat belt.
•
Child seats for groups 0, 0+ and 1 with the “ISOFIX” system can be
secured, without fastening seat belts, with the “ISOFIX” securing rings
⇒ page 46.
U: Suitable for universal approved rest raining systems for use in this age
category (universal retention systems are those fitted using the adult
seat belt).
UF Suitable for universal forward-facing retention systems approved for use with this age group.
*: Move the passenger seat as far to rear as possible, as high as possible and always deactivate the airbag.
L: Suitable for retention system s using the “ISOFIX” anchors
X Seat position not suitable for children in this age group.
WARNING
•
When travelling, children must be secured in the vehicle with a
restraint system suitable for age, weight and size.
•
Never install a child seat facing backwards (or rear-facing) on the front
passenger seat unless the front passenger airbag has been disabled. This
could cause fatal injuries to the child! However, if it is necessary, in excep-
tional cases, to transport a child in the front passenger seat, the front
passenger airbag must always be disabled ⇒page 38, “Deactivating
airbags*” and move the seat to its h ighest position, in case it has this
adjustment.
•
Read and always observe information and warnings concerning the use
of child seats ⇒ in “Safety notes on using child seats” on page 41.
Category
Weight Seat locations
Front passenger Rear outerRear centre
Group 0 <10 kgU*UU
Group 0+ <13 kgU*UU
Group 1 9-18 kgU*U/L U
Group 2 / 3 15-36 kgXUF UFWARNING (continued)
Ibiza SC_EN.book Seite 45 Dienstag, 8. Juli 2008 5:36 17
Page 48 of 258
Child safety
46Securing child seat with the “ISOFIX” system
The child seat with “ISOFIX” system can be secured quickly,
easily and safely on the rear outer seats using the systemWhen removing or fitting the child seat, please be sure to follow the
manufacturer's instructions.
– Move the seat as far to rear as it will go.
– Press the child seat onto the “ISOFIX” retaining rings until the
child seat can be heard to engage securely. If the child seat is
fitted with any other antirotation system, follow the manufacturer
instructions carefully.
– Pull on both sides of the child se at to ensure that it is secure.Two “ISOFIX” retaining rings are fitted on each rear seat. In some vehicles, the
rings are secured to the seat frame and, in others, they are secured to the rear
floor. The access to “ISOFIX” rings is between the rear back rest and the seat. Child seats with “ISOFIX” mountings are available in your Authorised Service
Centres.
WARNING
•
The retaining rings are designed only to use them with “ISOFIX” child
seats.
•
Never secure child seats without the “ISOFIX” system, retaining belts
or objects to the fastening rings – this c an result in potentially fatal injuries
to the child.
•
Ensure that the child seat is secured correctly by using the “ISOFIX”
anchors.
Fig. 28 ISOFIX securing
rings
Ibiza SC_EN.book Seite 46 Dienstag, 8. Juli 2008 5:36 17
Page 51 of 258

Cockpit49
Safety First
Operating instructions
Practical tips
Te c h n i c a l D a t a
Operating instructionsCockpitOverviewOverview of the instrument panel
This overview will help you to familiarise yourself with the
controls and displays.
Door release lever
Light switch . . . . . . . . . . . . . . . . . . . . . . . . . . . . . . . . . . . . . . . . .
Light dimmer for instrument panel ligh ting* . . . . . . . . . . . . . .
Headlight range control* . . . . . . . . . . . . . . . . . . . . . . . . . . . . . .
Air vent
Turn signal and dipped beam lever and cruise control system*
Instrument panel an d warning lights:
− Instruments . . . . . . . . . . . . . . . . . . . . . . . . . . . . . . . . . . . . . . .
− Indication lamps . . . . . . . . . . . . . . . . . . . . . . . . . . . . . . . . . . .
Horn (works only when the igni tion is on)/ and driver front
airbag* . . . . . . . . . . . . . . . . . . . . . . . . . . . . . . . . . . . . . . . . . . . . .
Steering and starter lock . . . . . . . . . . . . . . . . . . . . . . . . . . . . . .
Windscreen wiper /windscreen wash* lever and handling of the
multi-function display* . . . . . . . . . . . . . . . . . . . . . . . . . . . . . . . .
Radio
Glove box/Stowage compartment . . . . . . . . . . . . . . . . . . . . . . .
Passenger airbag* . . . . . . . . . . . . . . . . . . . . . . . . . . . . . . . . . . . . Switches for:
−
Heating and ventilation . . . . . . . . . . . . . . . . . . . . . . . . . . . . .
− Air conditioning* . . . . . . . . . . . . . . . . . . . . . . . . . . . . . . . . . .
− Climatronic* . . . . . . . . . . . . . . . . . . . . . . . . . . . . . . . . . . . . . .
Cigarette lighter /Power point . . . . . . . . . . . . . . . . . . . . . . . . . .
Drink-holder/Ashtray . . . . . . . . . . . . . . . . . . . . . . . . . . . . . . . . .
Controls on the centre console:
− Hazard warning lights . . . . . . . . . . . . . . . . . . . . . . . . . . . . . .
− Airbag disconnection warni ng light* . . . . . . . . . . . . . . . . . .
− ESP . . . . . . . . . . . . . . . . . . . . . . . . . . . . . . . . . . . . . . . . . . . . .
− Tyre pressure control . . . . . . . . . . . . . . . . . . . . . . . . . . . . . . .
− Rear window heater . . . . . . . . . . . . . . . . . . . . . . . . . . . . . . . .
− Heated seats* . . . . . . . . . . . . . . . . . . . . . . . . . . . . . . . . . . . . .
− Central locking* . . . . . . . . . . . . . . . . . . . . . . . . . . . . . . . . . . .
− AUX connection . . . . . . . . . . . . . . . . . . . . . . . . . . . . . . . . . . .
Handbrake lever . . . . . . . . . . . . . . . . . . . . . . . . . . . . . . . . . . . . .
Automatic / manual gearbox lever * . . . . . . . . . . . . . . . . . . . . .
Housing* for iPod/USB*
Pedals . . . . . . . . . . . . . . . . . . . . . . . . . . . . . . . . . . . . . . . . . . . . .
Steering column control lever* . . . . . . . . . . . . . . . . . . . . . . . . .
Bonnet release lever . . . . . . . . . . . . . . . . . . . . . . . . . . . . . . . . . .
Steering column controls for audio and telephone* . . . . . . . .
Fuse housing . . . . . . . . . . . . . . . . . . . . . . . . . . . . . . . . . . . . . . . .
A1A2
88
A3
89
A4
89
A5A6
93, 144
A7
51
57
A8
26
A9
130
A10
96, 53
A11A12
108
A13
29
A14
117
120
123
A15
111
A16
110
A17
92
27
151 63
91
106 75
113
A18
141
A19
134, 133
A20A21
14
A22
128
A23
183
A24
68
A25
211
Ibiza SC_EN.book Seite 49 Dienstag, 8. Juli 2008 5:36 17
Page 104 of 258
Seats and stowage
102Seats and stowageThe importance of correct seat adjustmentProper seat adjustment optimi ses the level of protection
offered by seat belts and airbags.Your vehicle has five seats, two on the front part and three on the rear part.
Each seat is equipped with a three-point seat belt.
The driver seat and the front passenger seat can be adjusted in many ways to
suit the physical requirements of the vehicle occupants. The correct seat
position is very important for:•
a fast and easy operation of all controls on the instrument panel,
•
a relaxed posture which does not cause drowsiness,
•
a safe driving ⇒ page 7,
•
ensuring that the seat belts and airbag system provide maximum protec-
tion ⇒page 16.
WARNING
•
If the driver and passengers assume improper sitting positions, they
may sustain critical injuries.
•
More people than available seats must never be transported in your
vehicle.
•
Every passenger in the vehicle must properly fasten and wear the seat
belt belonging to his or her seat. Children must be protected with an appro-
priate child restraint system ⇒page 40, “Child safety”.
•
The front seats and all head restraints must always be adjusted to body
size and the seat belt must always be properly adjusted to provide you and
your passengers with optimum protection.
•
Always keep your feet on the foot well when the vehicle is moving;
never rest them on the dash panel, ou t of the window or on the seat. This
is also applied to passengers. An incorrect sitting position exposes you to
an increased risk of injury in case of a sudden braking or an accident. If the
airbag is triggered, you could sustain severe injuries due to an incorrect
sitting position.
•
It is important for the driver and front passenger to keep a distance of
at least 25 cm from the steering wheel or dash panel. Failure to respect the
minimum distance means that the airbag will not protect you. Risk of fatal
injury. The distance between the driver and the steering wheel or between
the front passenger and the dash panel should always be as great as
possible.
•
Adjust the driver or front passenger seat only when the vehicle is
stationary. Otherwise, your seat could move unexpectedly while the
vehicle is moving. This could increase the risk of an accident and therefore,
injury. In addition, while adjusting your seat, you will assume an incorrect
sitting position. Risk of fatal accidents.
•
Special guidelines apply to installing a child seat on the front
passenger seat. When installing a chil d seat, observe the warning note in
the ⇒page 40, “Child safety”.WARNING (continued)
Ibiza SC_EN.book Seite 102 Dienstag, 8. Juli 2008 5:36 17
Page 105 of 258
Seats and stowage103
Safety First
Operating instructions
Practical tips
Te c h n i c a l D a t a
Head restraintsCorrect adjustment of head restraints
Properly adjusted head restraints are an important part of
passengers protection and can reduce the risk of injuries in
most accident situations.
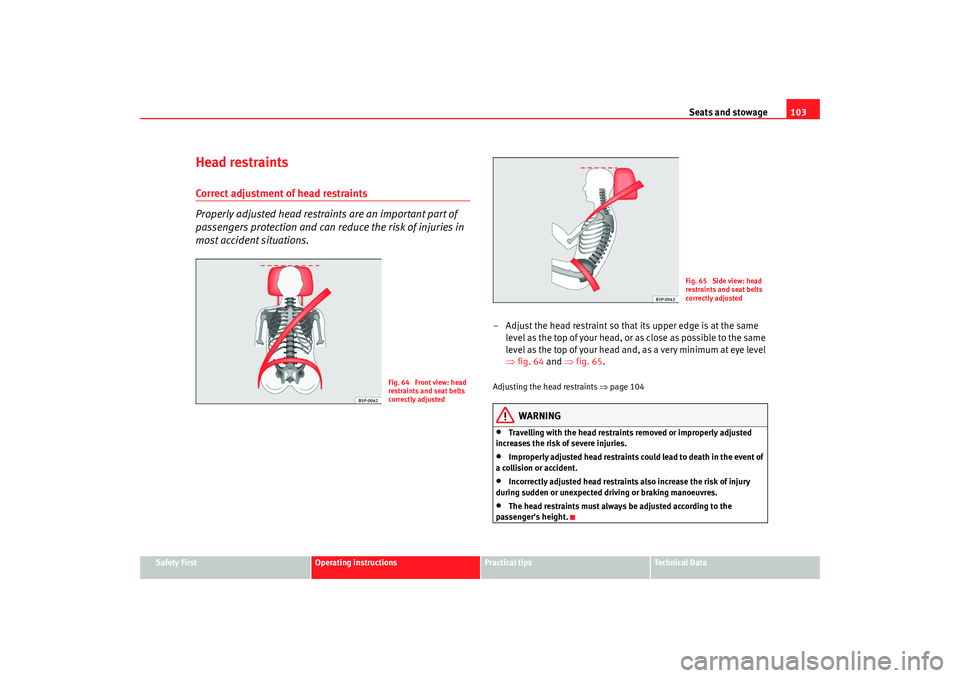
– Adjust the head restraint so that its upper edge is at the same
level as the top of your head, or as close as possible to the same
level as the top of your head and, as a very minimum at eye level
⇒fig. 64 and ⇒ fig. 65.Adjusting the head restraints ⇒page 104
WARNING
•
Travelling with the head restrain ts removed or improperly adjusted
increases the risk of severe injuries.
•
Improperly adjusted head restraints could lead to death in the event of
a collision or accident.
•
Incorrectly adjusted head restraints also increase the risk of injury
during sudden or unexpected driving or braking manoeuvres.
•
The head restraints must always be adjusted according to the
passenger's height.
Fig. 64 Front view: head
restraints and seat belts
correctly adjusted
Fig. 65 Side view: head
restraints and seat belts
correctly adjusted
Ibiza SC_EN.book Seite 103 Dienstag, 8. Juli 2008 5:36 17
Page 106 of 258
Seats and stowage
104Removing or adjust ing head restraints
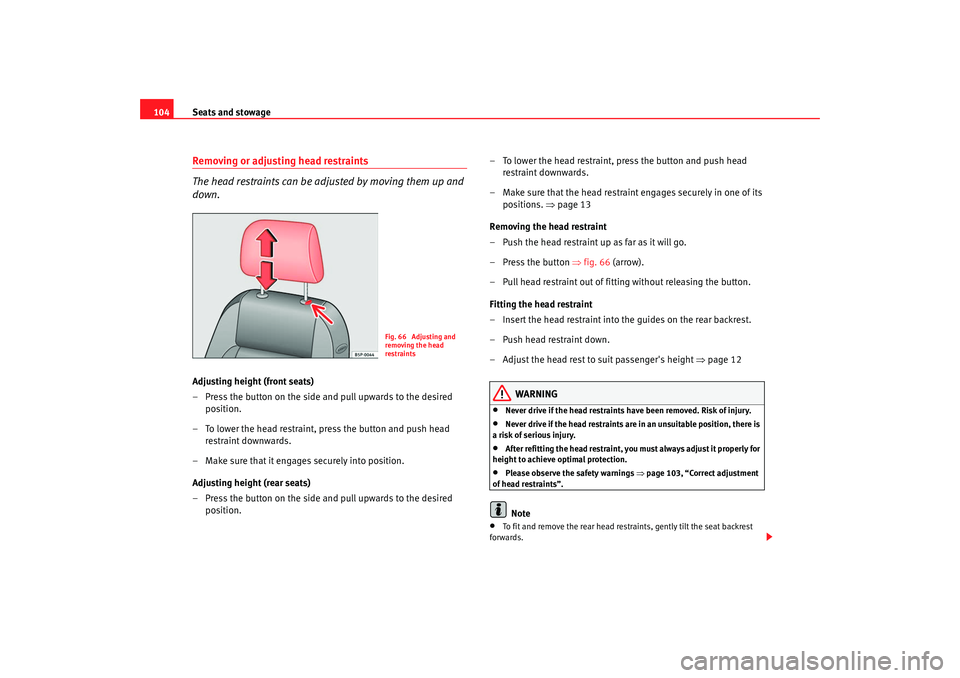
The head restraints can be adjusted by moving them up and
down.Adjusting height (front seats)
– Press the button on the side and pull upwards to the desired position.
– To lower the head restraint, press the button and push head restraint downwards.
– Make sure that it engages securely into position.
Adjusting height (rear seats)
– Press the button on the side and pull upwards to the desired position. – To lower the head restraint, press the button and push head
restraint downwards.
– Make sure that the head restrain t engages securely in one of its
positions. ⇒page 13
Removing the head restraint
– Push the head restraint up as far as it will go.
– Press the button ⇒fig. 66 (arrow).
– Pull head restraint out of fitting without releasing the button.
Fitting the head restraint
– Insert the head restraint into the guides on the rear backrest.
– Push head restraint down.
– Adjust the head rest to suit passenger's height ⇒page 12
WARNING
•
Never drive if the head restraints have been removed. Risk of injury.
•
Never drive if the head restraints are in an unsuitable position, there is
a risk of serious injury.
•
After refitting the head restraint, yo u must always adjust it properly for
height to achieve optimal protection.
•
Please observe the safety warnings ⇒page 103, “Correct adjustment
of head restraints”.Note
•
To fit and remove the rear head restraints, gently tilt the seat backrest
forwards.
Fig. 66 Adjusting and
removing the head
restraints
Ibiza SC_EN.book Seite 104 Dienstag, 8. Juli 2008 5:36 17
Page 107 of 258
Seats and stowage105
Safety First
Operating instructions
Practical tips
Te c h n i c a l D a t a
•
When fitting the head restraints again, insert the tubes as far as possible
into the guides without pressing the button.
Front seatsAdjustment of the front seats
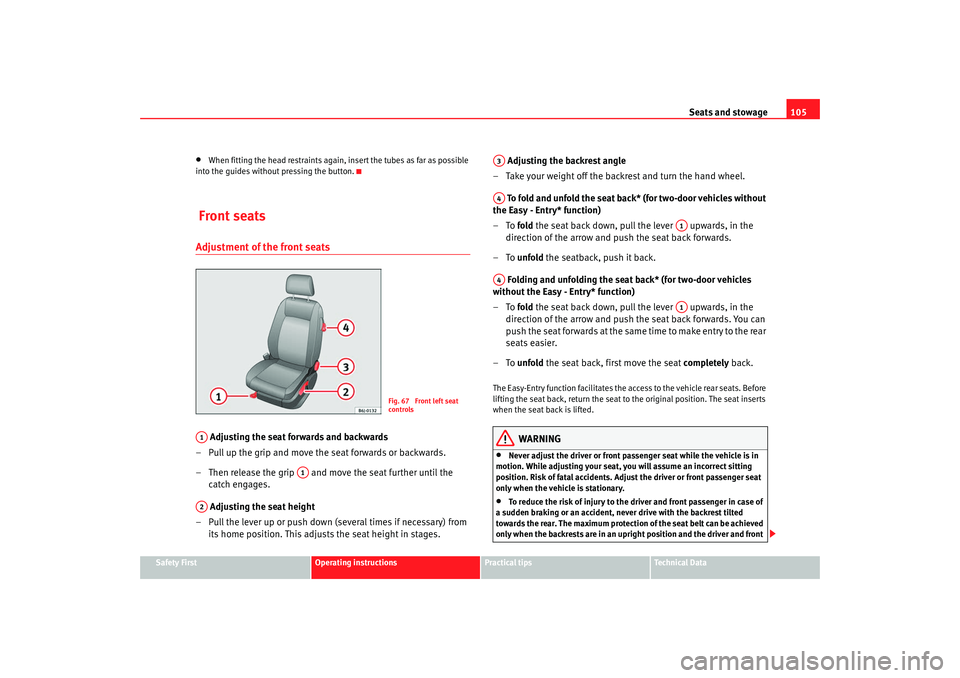
Adjusting the seat forwards and backwards
– Pull up the grip and move the seat forwards or backwards.
– Then release the grip and move the seat further until the catch engages.
Adjusting the seat height
– Pull the lever up or push down (several times if necessary) from its home position. This adjusts the seat height in stages. Adjusting the backrest angle
– Take your weight off the backrest and turn the hand wheel.
To fold and unfold the seat back* (for two-door vehicles without
the Easy - Entry* function)
–To fold the seat back down, pull the lever upwards, in the
direction of the arrow and push the seat back forwards.
–To unfold the seatback, push it back.
Folding and unfolding the seat back* (for two-door vehicles
without the Easy - Entry* function)
–To fold the seat back down, pull the lever upwards, in the
direction of the arrow and push the seat back forwards. You can
push the seat forwards at the same time to make entry to the rear
seats easier.
–To unfold the seat back, first move the seat completely back.
The Easy-Entry function facilitates the access to the vehicle rear seats. Before
lifting the seat back, return the seat to the original position. The seat inserts
when the seat back is lifted.
WARNING
•
Never adjust the driver or front passenger seat while the vehicle is in
motion. While adjusting your seat, you will assume an incorrect sitting
position. Risk of fatal accidents. Adjust the driver or front passenger seat
only when the vehicle is stationary.
•
To reduce the risk of injury to the driver and front passenger in case of
a sudden braking or an accident, never drive with the backrest tilted
towards the rear. The maximum protection of the seat belt can be achieved
only when the backrests are in an upright position and the driver and front
Fig. 67 Front left seat
controls
A1
A1
A2
A3A4
A1
A4
A1
Ibiza SC_EN.book Seite 105 Dienstag, 8. Juli 2008 5:36 17
Page 108 of 258
Seats and stowage
106passenger have properly adjusted their seat belts. The further the back-
rests are tilted to the rear, the greate r the risk of injury due to improper
positioning of the belt web!•
Exercise caution when securing th e seat height into forwards/back-
wards position. Injuries can be caused if the backrest is tilted without due
care and attention.
Heated seats*
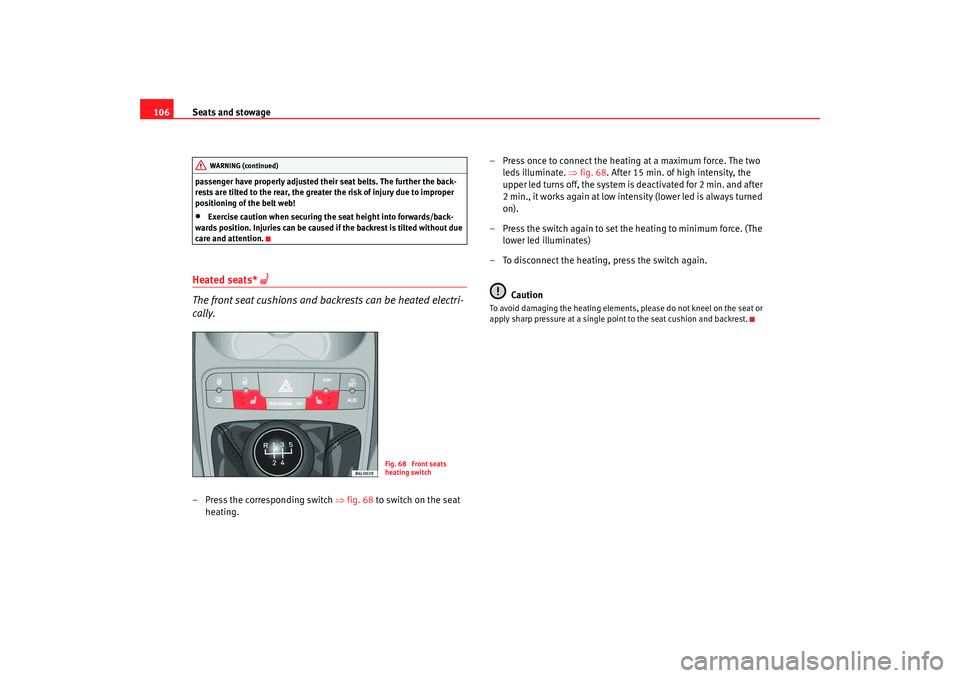
The front seat cushions and backrests can be heated electri-
cally.
– Press the corresponding switch ⇒fig. 68 to switch on the seat
heating. – Press once to connect the heating at a maximum force. The two
leds illuminate. ⇒fig. 68 . After 15 min. of high intensity, the
upper led turns off, the system is deactivated for 2 min. and after
2 min., it works again at low intensity (lower led is always turned
on).
– Press the switch again to set the heating to minimum force. (The lower led illuminates)
– To disconnect the heating, press the switch again.
Caution
To avoid damaging the heating elements, please do not kneel on the seat or
apply sharp pressure at a single point to the seat cushion and backrest.
WARNING (continued)
Fig. 68 Front seats
heating switch
Ibiza SC_EN.book Seite 106 Dienstag, 8. Juli 2008 5:36 17
Page 109 of 258
Seats and stowage107
Safety First
Operating instructions
Practical tips
Te c h n i c a l D a t a
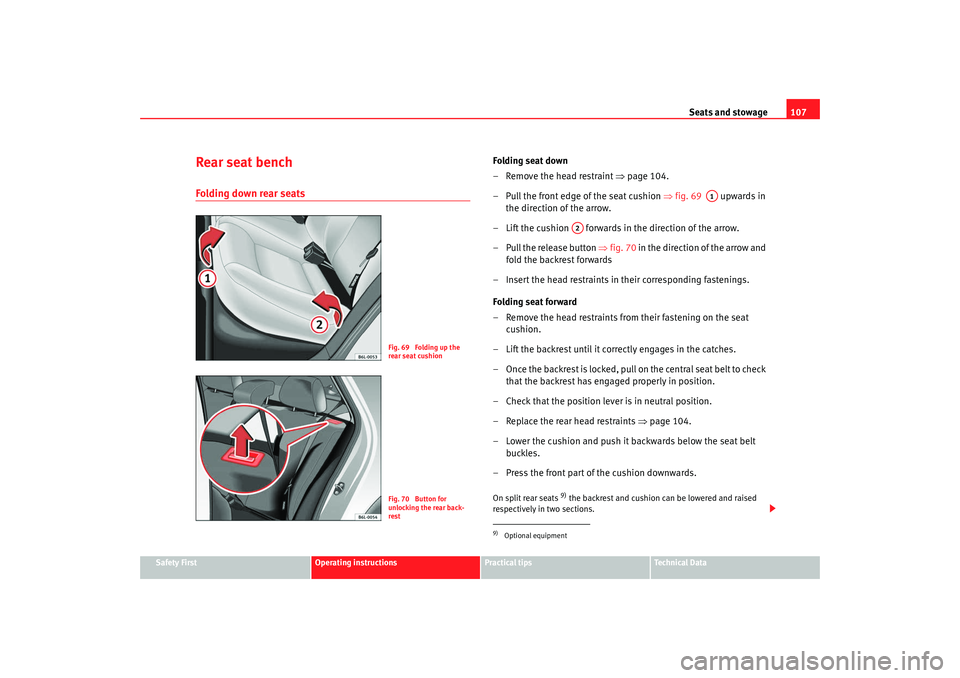
Rear seat benchFolding down rear seats
Folding seat down
– Remove the head restraint ⇒page 104.
– Pull the front edge of the seat cushion ⇒fig. 69 upwards in
the direction of the arrow.
– Lift the cushion forwards in the direction of the arrow.
– Pull the release button ⇒ fig. 70 in the direction of the arrow and
fold the backrest forwards
– Insert the head restraints in their corresponding fastenings.
Folding seat forward
– Remove the head restraints from their fastening on the seat cushion.
– Lift the backrest until it correctly engages in the catches.
– Once the backrest is locked, pull on the central seat belt to check that the backrest has engaged properly in position.
– Check that the position lever is in neutral position.
– Replace the rear head restraints ⇒page 104.
– Lower the cushion and push it backwards below the seat belt buckles.
– Press the front part of the cushion downwards.On split rear seats
9) the backrest and cushion can be lowered and raised
respectively in two sections.
Fig. 69 Folding up the
rear seat cushionFig. 70 Button for
unlocking the rear back-
rest
9)Optional equipment
A1
A2
Ibiza SC_EN.book Seite 107 Dienstag, 8. Juli 2008 5:36 17