mirror Seat Ibiza SC 2012 Owner's manual
[x] Cancel search | Manufacturer: SEAT, Model Year: 2012, Model line: Ibiza SC, Model: Seat Ibiza SC 2012Pages: 280, PDF Size: 3.67 MB
Page 5 of 280
Table of Contents
Manual structure . . . . . . . . . . . . . . . . . . . . 5
Content . . . . . . . . . . . . . . . . . . . . . . . . . . . . . . . . 6
Safety First . . . . . . . . . . . . . . . . . . . . . . . . . . . . 7
Safe driving . . . . . . . . . . . . . . . . . . . . . . . . . . . . . . . 7
Brief introduction . . . . . . . . . . . . . . . . . . . . . . . . . 7
Proper sitting position for occupants . . . . . . . . . 10
Pedal area . . . . . . . . . . . . . . . . . . . . . . . . . . . . . . . 16
Storing objects . . . . . . . . . . . . . . . . . . . . . . . . . . . 16
Seat belts . . . . . . . . . . . . . . . . . . . . . . . . . . . . . . . . . 18
Brief introduction . . . . . . . . . . . . . . . . . . . . . . . . . 18
Why wear seat belts? . . . . . . . . . . . . . . . . . . . . . . 20
Seat belts . . . . . . . . . . . . . . . . . . . . . . . . . . . . . . . 24
Belt tensioners* . . . . . . . . . . . . . . . . . . . . . . . . . . 27
Airbag system . . . . . . . . . . . . . . . . . . . . . . . . . . . . . 29
Brief introduction . . . . . . . . . . . . . . . . . . . . . . . . . 29
Front airbags . . . . . . . . . . . . . . . . . . . . . . . . . . . . . 33
Side airbags . . . . . . . . . . . . . . . . . . . . . . . . . . . . . 37
Deactivating airbags* . . . . . . . . . . . . . . . . . . . . . . 40
Child safety . . . . . . . . . . . . . . . . . . . . . . . . . . . . . . . 42
Brief introduction . . . . . . . . . . . . . . . . . . . . . . . . . 42
Child seats . . . . . . . . . . . . . . . . . . . . . . . . . . . . . . . 44
Securing child seats . . . . . . . . . . . . . . . . . . . . . . . 47
Operating Instructions . . . . . . . . . . . . . 53
Cockpit . . . . . . . . . . . . . . . . . . . . . . . . . . . . . . . . . . . 53
Overview . . . . . . . . . . . . . . . . . . . . . . . . . . . . . . . . 53
Instruments . . . . . . . . . . . . . . . . . . . . . . . . . . . . . . 55 LPG system* . . . . . . . . . . . . . . . . . . . . . . . . . . . . . 56
Digital instrument panel display . . . . . . . . . . . . . 57
Warning lamps . . . . . . . . . . . . . . . . . . . . . . . . . . . 63
Steering column controls* . . . . . . . . . . . . . . . . . 76
General information . . . . . . . . . . . . . . . . . . . . . . . 76
Audio Control . . . . . . . . . . . . . . . . . . . . . . . . . . . . . 77
Audio + Telephone Control . . . . . . . . . . . . . . . . . . 78
Opening and closing . . . . . . . . . . . . . . . . . . . . . . 80
Central locking . . . . . . . . . . . . . . . . . . . . . . . . . . . 80
Keys . . . . . . . . . . . . . . . . . . . . . . . . . . . . . . . . . . . . 84
Radio frequency remote control* . . . . . . . . . . . . . 85
Anti-theft alarm system* . . . . . . . . . . . . . . . . . . . 87
Rear lid . . . . . . . . . . . . . . . . . . . . . . . . . . . . . . . . . . 90
Windows . . . . . . . . . . . . . . . . . . . . . . . . . . . . . . . . 92
Panoramic tilting sunroof* . . . . . . . . . . . . . . . . . . 94
Lights and visibility . . . . . . . . . . . . . . . . . . . . . . . . 97
Lights . . . . . . . . . . . . . . . . . . . . . . . . . . . . . . . . . . . 97
Interior lights . . . . . . . . . . . . . . . . . . . . . . . . . . . . . 104
Visibility . . . . . . . . . . . . . . . . . . . . . . . . . . . . . . . . . 105
Windscreen wipers . . . . . . . . . . . . . . . . . . . . . . . . 106
Rear view mirrors . . . . . . . . . . . . . . . . . . . . . . . . . . 109
Seats and storage compartments . . . . . . . . . . 112
The importance of correct seat adjustment . . . . . 112
Head restraints . . . . . . . . . . . . . . . . . . . . . . . . . . . 113
Front seats . . . . . . . . . . . . . . . . . . . . . . . . . . . . . . . 115
Rear seats . . . . . . . . . . . . . . . . . . . . . . . . . . . . . . . 117
Storage compartment . . . . . . . . . . . . . . . . . . . . . . 119
Ashtrays, cigarette lighter and power socket . . . 122
First-aid kit, warning triangle, fire extinguisher* 124
Luggage compartment . . . . . . . . . . . . . . . . . . . . . 125
Air conditioning . . . . . . . . . . . . . . . . . . . . . . . . . . . 127
Heating . . . . . . . . . . . . . . . . . . . . . . . . . . . . . . . . . 127
Air conditioning* . . . . . . . . . . . . . . . . . . . . . . . . . . 130 Climatronic . . . . . . . . . . . . . . . . . . . . . . . . . . . . . . 133
General notes . . . . . . . . . . . . . . . . . . . . . . . . . . . . 135
Driving . . . . . . . . . . . . . . . . . . . . . . . . . . . . . . . . . . . . 137
Steering . . . . . . . . . . . . . . . . . . . . . . . . . . . . . . . . . 137
Safety . . . . . . . . . . . . . . . . . . . . . . . . . . . . . . . . . . . 138
Ignition lock . . . . . . . . . . . . . . . . . . . . . . . . . . . . . . 138
Starting and stopping the engine . . . . . . . . . . . . 140
Start-Stop function* . . . . . . . . . . . . . . . . . . . . . . . 143
Manual gearbox . . . . . . . . . . . . . . . . . . . . . . . . . . 146
Automatic gearbox* . . . . . . . . . . . . . . . . . . . . . . . 147
Handbrake . . . . . . . . . . . . . . . . . . . . . . . . . . . . . . . 154
Acoustic parking aid system* . . . . . . . . . . . . . . . 156
Cruise speed* (Cruise control system) . . . . . . . . 158
Practical Tips . . . . . . . . . . . . . . . . . . . . . . . . . 162
Intelligent technology . . . . . . . . . . . . . . . . . . . . . 162
Brakes . . . . . . . . . . . . . . . . . . . . . . . . . . . . . . . . . . 162
Anti-lock brake system and traction control ABS 163
Electronic Stability Control (ESC)* . . . . . . . . . . . . 164
Driving and the environment . . . . . . . . . . . . . . . 167
Running-in . . . . . . . . . . . . . . . . . . . . . . . . . . . . . . . 167
Exhaust gas purification system . . . . . . . . . . . . . 168
Economical and environmentally friendly driving 169
Driving abroad . . . . . . . . . . . . . . . . . . . . . . . . . . . . 171
Trailer towing . . . . . . . . . . . . . . . . . . . . . . . . . . . . . 172
Vehicle maintenance and cleaning . . . . . . . . . 174
General notes . . . . . . . . . . . . . . . . . . . . . . . . . . . . 174
Care of the vehicle exterior . . . . . . . . . . . . . . . . . . 175
Vehicle interior maintenance . . . . . . . . . . . . . . . . 180
3
Table of Contents
Page 10 of 280
8Safe driving
you and your passengers can achieve the greatest possible benefit from the
safety equipment fitted. This manual includes important warnings that you
and your passengers should note in order to reduce the risk of injury.
Safety is everyone's business!
Before setting off
The driver is always responsible for the safety of the passen-
gers and the safe operation of the vehicle.
For your own safety and the safety of your passengers, always note
the following points before every trip:
– Make sure that the vehicle's lights and turn signals are working
properly.
– Check tyre pressure.
– Ensure that all windows provide a clear and good view of the
surroundings.
– Ensure that all luggage is correctly secured ⇒ page 16.
– Make sure that no objects can interfere with the pedals.
– Adjust front seat, head restraint and rear vision mirrors properly
according to your size.
– Ensure that the passenger in the central rear seat always has
the head restraint in the correct position for use.
– Instruct passengers to adjust the head restraints according to
their height. –
Protect children with appropriate child seats and properly ap-
plied seat belts ⇒ page 42.
– Assume the correct sitting position. Instruct your passengers al-
so to assume a proper sitting position. ⇒ page 10.
– Fasten your seat belt securely. Instruct your passengers also to
fasten their seat belts properly. ⇒ page 18.
What affects driving safety?
Driving safety is largely determined by your driving style
and the personal behaviour of all vehicle occupants.
As a driver, you are responsible for yourself and your passengers.
When your concentration or driving safety is affected by any cir-
cumstance, you endanger yourself as well as others on the road
⇒
, for this reason:
– Always pay attention to traffic and do not get distracted by pas-
sengers or telephone calls.
– Never drive when your driving ability is impaired (e.g. by medi-
cation, alcohol, drugs).
– Observe traffic laws and speed limits.
– Always reduce your speed as appropriate for road, traffic and
weather conditions.
– When travelling long distances, take breaks regularly - at least
every two hours.
– If possible, avoid driving when you are tired or stressed.
Page 56 of 280
54Cockpit
Fuse housing . . . . . . . . . . . . . . . . . . . . . . . . . . . . . . . . . . . . . . . . . . . . . 224
Control for adjusting electric exterior mirrors* . . . . . . . . . . . . . . .110
Electric window controls* . . . . . . . . . . . . . . . . . . . . . . . . . . . . . . . . . . 92
Note
Some of the items of equipment listed here are fitted only on certain model
versions or are optional extras.
252627
Page 90 of 280
88Opening and closing
Note
● After 28 days, the indicator light will be switched off to prevent the bat-
tery from exhausting if the vehicle has been left parked for a long period of
time. The alarm system remains activated.
● The alarm will trigger again if attempts are made to open another protec-
tion zone.
● The alarm system can be activated or deactivated using the radio fre-
quency remote control. ⇒ page 85.
Vehicle interior monitoring and tow-away protection
system*
Monitoring or control function incorporated in the anti-theft
alarm* which detects unauthorized vehicle entry by means
of ultrasound.
Activation
– It is automatically switched on when the anti-theft alarm is acti-
vated.
Deactivation
– Open the vehicle with the key, either mechanically 1)
or by press-
ing the
button on the remote control.
– Press the button
on the remote control twice. The volumetric
sensor and tilt sensors will be deactivated. The alarm system re-
mains activated. The vehicle interior monitoring and the tow-away protection system are au-
tomatically switched on again next time the vehicle is locked.
The vehicle interior monitoring and tow-away protection sensor (tilt sensor)
are automatically switched on when the anti-theft alarm is switched on. In
order to activate it, all the doors and the rear lid must be closed.
If you wish to switch off the vehicle interior monitoring and the tow-away
protection system, it must be done each time that the vehicle is locked; if
not, they will be automatically switched on.
The vehicle interior monitoring and the tow-away protection system should
be switched off if animals are left inside the locked vehicle (otherwise, their
movements will trigger the alarm) or when, for example, the vehicle is trans-
ported or has to be towed with only one axle on the ground.
False alarms
The interior monitoring only operates correctly if the vehicle is completely
closed. Please observe legal requirements when doing so.
The following cases may cause a false alarm:
●
opened windows (partially or fully)
● panoramic/tilting sunroof open (partially or completely).
● movement of objects inside the vehicle, such as loose papers, items
hanging from the rear vision mirror (air fresheners), etc.
1)
The time period from when the door is opened until the key is inserted in the contact
should not exceed 15 sec., otherwise the alarm will be triggered.
Page 108 of 280
106Lights and visibility
The sun visors for the driver and the front passenger can be pulled out of
their central supports and turned towards the doors in the direction of the
arrow ⇒ Fig. 62. Never pull them downwards.
The driver sun visor has compartments for cards, and the passenger sun vi-
sor has a vanity mirror with a cover*.
Note
Incorrect use of the sun visors (e.g. pulling them downwards once they are
open) may result in broken hinges. This damage is not covered by the vehi-
cle warranty.
Windscreen wipers
Front windscreen wipers
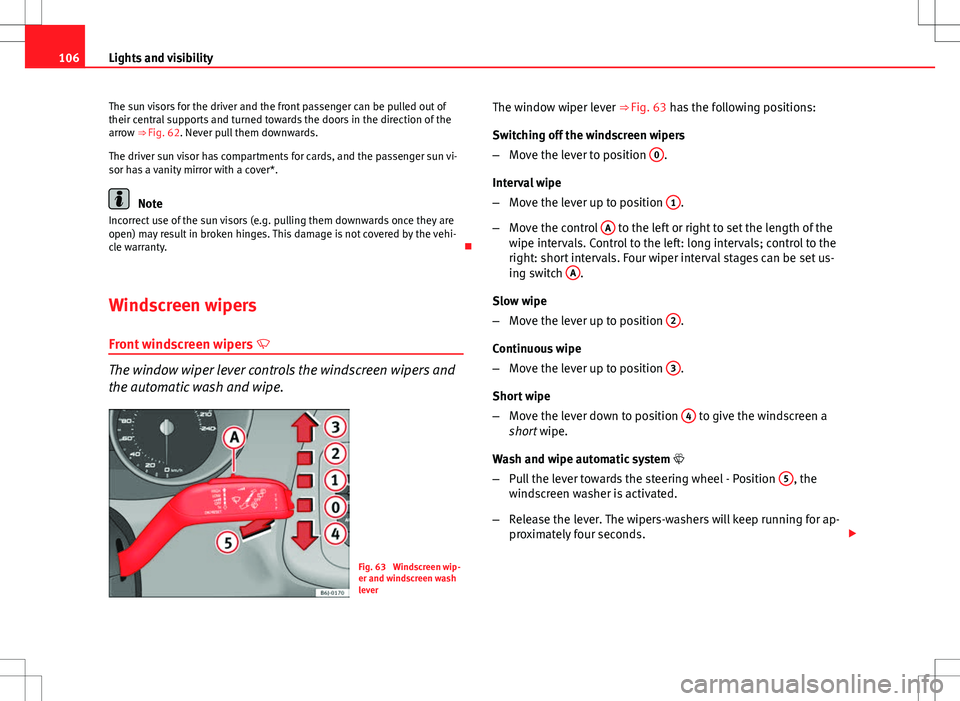
The window wiper lever controls the windscreen wipers and
the automatic wash and wipe.
Fig. 63 Windscreen wip-
er and windscreen wash
leverThe window wiper lever ⇒ Fig. 63 has the following positions:
Switching off the windscreen wipers
–
Move the lever to position 0
.
Interval wipe
– Move the lever up to position 1
.
– Move the control A
to the left or right to set the length of the
wipe intervals. Control to the left: long intervals; control to the
right: short intervals. Four wiper interval stages can be set us-
ing switch A
.
Slow wipe
– Move the lever up to position 2
.
Continuous wipe
– Move the lever up to position 3
.
Short wipe
– Move the lever down to position 4
to give the windscreen a
short wipe.
Wash and wipe automatic system
– Pull the lever towards the steering wheel - Position 5
, the
windscreen washer is activated.
– Release the lever. The wipers-washers will keep running for ap-
proximately four seconds.
Page 111 of 280
109
Lights and visibility
Headlight washer*
The headlight washers clean the headlight lenses. The headlight washers are activated automatically when the windscreen
washer is used and the window wiper lever is pulled towards the steering
wheel for at least 1.5 seconds – provided the dipped beam headlights or
main beams are switched on. Clean off stubborn dirt (insects, etc.) from the
headlights at regular intervals, for instance when filling the fuel tank.
Note
● To ensure that the headlight washers work properly in winter, keep the
nozzle holders in the bumper free of snow and remove any ice with a de-icer
spray.
● To remove water, the windscreen wipers will be activated from time to
time, the headlight washers will be activated every three cycles.
Rear view mirrors
Adjusting the rear view mirrors
Before beginning any journey, adjust the rear view mirrors for correct visibil-
ity. Interior rear vision mirror
It is dangerous to drive if you cannot see clearly through the
rear window.
Manual anti-dazzle function for interior rear vision mirror
In the basic mirror position, the lever at the bottom edge of the rear vision
mirror should be at the front. Pull the lever to the back to select the anti-
dazzle function.
Automatic anti-dazzle interior mirror*
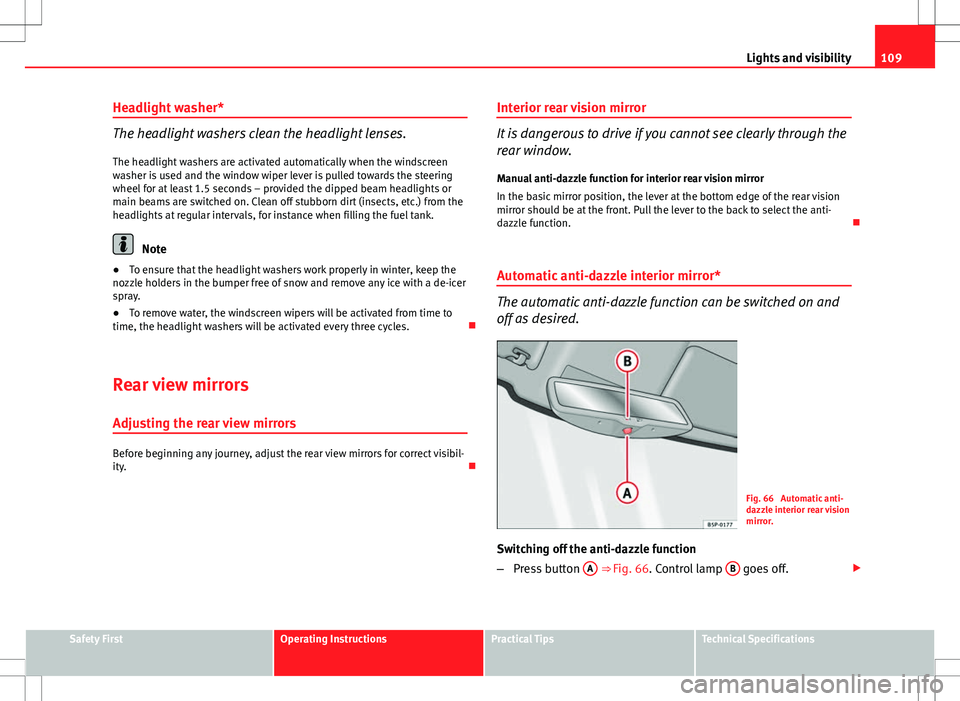
The automatic anti-dazzle function can be switched on and
off as desired.
Fig. 66 Automatic anti-
dazzle interior rear vision
mirror.
Switching off the anti-dazzle function
– Press button A
⇒ Fig. 66. Control lamp B goes off.
Safety FirstOperating InstructionsPractical TipsTechnical Specifications
Page 112 of 280
110Lights and visibility
Switching on the anti-dazzle function
–Press button A
⇒ Fig. 66. Control lamp is lit.
Anti-dazzle function
The anti-dazzle function is activated every time the ignition is switched on.
The green indicator lamp lights up in the rear vision mirror housing.
When the anti-dazzle function is enabled, the interior rear vision mirror will
darken automatically according to the amount of light it receives. The anti-
dazzle function is cancelled if reverse gear is engaged.
Note
● The automatic anti-dazzle function will only work properly if the sun
blind* for the rear window is retracted and there are no other objects pre-
venting light from reaching the rear vision mirror.
● If you have to stick any type of sticker on the windscreen, do not do so in
front of the sensors. Doing so could prevent the anti-dazzle function from
working well or even from working at all.
Folding in the exterior mirrors
The exterior mirrors of the vehicle may be folded in. For this, press the mir-
ror housing towards the vehicle.
Note
Before washing the vehicle with an automatic car wash, fold in the exterior
mirrors to avoid damage. Electric exterior mirrors*
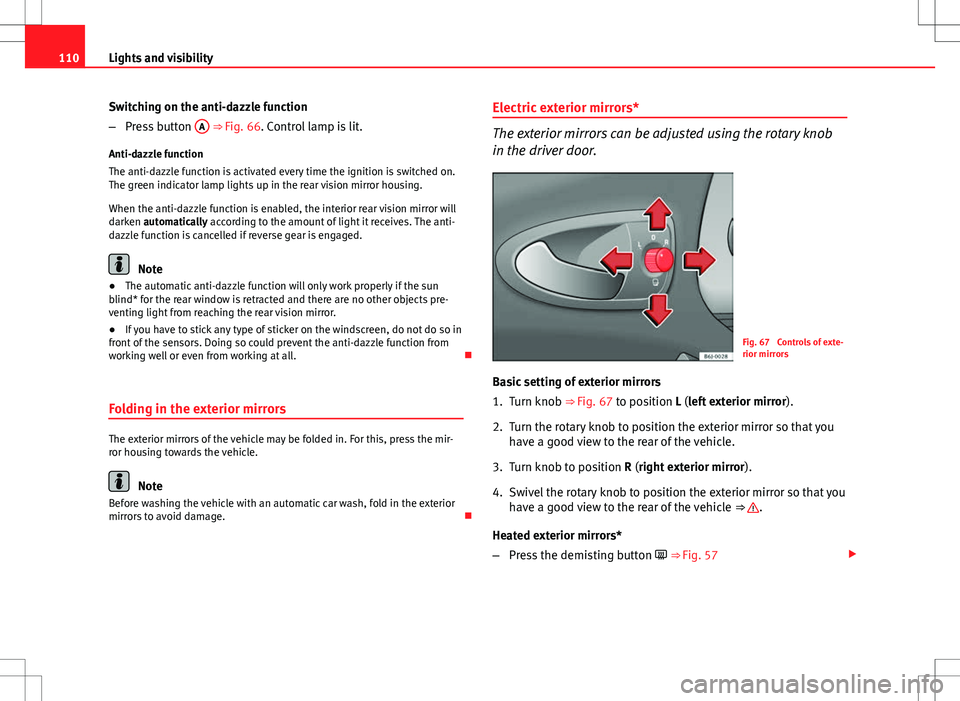
The exterior mirrors can be adjusted using the rotary knob
in the driver door.
Fig. 67 Controls of exte-
rior mirrors
Basic setting of exterior mirrors
1. Turn knob ⇒ Fig. 67 to position L (left exterior mirror ).
2. Turn the rotary knob to position the exterior mirror so that you have a good view to the rear of the vehicle.
3. Turn knob to position R (right exterior mirror ).
4. Swivel the rotary knob to position the exterior mirror so that you have a good view to the rear of the vehicle ⇒
.
Heated exterior mirrors*
– Press the demisting button ⇒ Fig. 57
Page 113 of 280
111
Lights and visibility
– The mirrors demist for some minutes to prevent draining the
battery.
– If necessary, press the button again to repeat the function.
– The exterior mirror heating is not activated with temperatures
above 20°C.
Folding in exterior mirrors*
– Turn the control ⇒ Fig. 67 to position to fold in the exterior
mirrors. You should always fold in the exterior mirrors if you are
driving through an automatic car wash. This will help prevent
damage.
Folding exterior mirrors back out to the extended position*
– Turn the knob to position L or R to fold the exterior mirrors back
out ⇒
.
WARNING
● Convex or aspheric mirrors increase the field of vision however the
objects appear smaller and further away in the mirrors. If you use these
mirrors to estimate the distance to vehicles behind you when changing
lane, you could make a mistake. Risk of accident.
● If possible, use the rear vision mirror to estimate distances to vehi-
cles behind you.
● Make sure that you do not get your finger trapped between the mirror
and the mirror base when folding back the mirrors. Risk of injury!
For the sake of the environment
The exterior mirror heating should be switched off when it is no longer nee-
ded. Otherwise, it is an unnecessary fuel waste.
Note
● If the electrical adjustment ever fails to operate, the mirrors can be ad-
justed by hand by lightly pressing the edge of the mirror glass.
● In vehicles with electric exterior mirrors, the following points should be
observed: if, due to an external force (e.g. a knock while manoeuvring), the
adjustment of the mirror housing is altered, the mirror will have to be com-
pletely folded electrically. Do not readjust the rear vision mirror housing by
hand, as this will interfere with the mirror adjuster function.
● The rear view mirrors can be adjusted separately or simultaneously, as
described before.
● The fold-in function on the exterior mirrors is not active at speeds over
40 km/h (25 mph).
Safety FirstOperating InstructionsPractical TipsTechnical Specifications
Page 159 of 280
157
Driving
To ensure that the system works properly, the sensors must be kept clean
and free of ice and snow.
WARNING
● The sensors have blind spots in which obstacles may not be detected.
● Always look out for small children and animals because the system
will not always detect them. Always pay attention when reversing to
avoid accidents.
● The parking aid is not a replacement for driver awareness. The driver
must take full responsibility for parking and other manoeuvres.
CAUTION
● Please note that low obstacles detected by the system may no longer be
registered by the sensors as the car moves closer, so the system will not
give any further warning. Certain kinds of obstacles (such as wire fences,
chains, thin posts or trailer draw bars, high kerbs or painted railings etc)
may not always be detected by the system, so there is a risk of damaging
the vehicle in such cases.
● In some cases, obstacles with uniform edges and bumps may not be de-
tected immediately by the system due to their geometry. Take special care
of this type of obstacle (corners, rectangular objects, etc.), as they can
cause damage to the vehicle.
● Be especially careful when manoeuvring into a corner between two per-
pendicular walls. Carefully watch the approach of the wall to the side of the
vehicle (using the mirrors).
● The parking aid system does not replace use of the mirrors for manoeu-
vres.
● External ultra-sonic sources (pneumatic drills, construction machinery,
other vehicles with PDC) may interfere with the operation of the system.
● Periodic cleaning of the sensors, take care not to damage or scratch
them. When cleaning with high pressure washers or steam cleaners, the
sensors should be sprayed for only a very short period and from a distance
of more than 10 cm.
Safety FirstOperating InstructionsPractical TipsTechnical Specifications
Page 175 of 280
173
Driving and the environment
Exterior mirrors
Check whether you can see enough of the road behind the trailer with the
standard rear vision mirrors. If this is not the case, you should have addi-
tional exterior mirrors fitted. Both exterior mirrors should be mounted on
hinged extension brackets. Adjust the mirrors to give sufficient vision to the
rear.
WARNING
Never transport people in a trailer. This could result in fatal accidents.
Note
● Towing a trailer places additional demands on the vehicle. We recom-
mend additional services between the normal inspection intervals if the ve-
hicle is used frequently for towing a trailer.
● Find out whether special regulations apply to towing a trailer in your
country.
Ball coupling of towing bracket*
The ball coupling is provided with instructions on fitting and removing the
ball coupling of the towing bracket.
WARNING
The towing bracket ball coupling must be stored securely in the luggage
compartment to prevent them being flung through the vehicle and caus-
ing injury.
Note
● By law, the ball coupling must be removed if a trailer is not being towed
if it obscures the number plate. Driving tips
Driving with a trailer always requires extra care.
Weight distribution
The weight distribution of a loaded trailer with an unladen vehicle is very
unfavourable. However, if this cannot be avoided, drive extra slowly to allow
for the unbalanced weight distribution.
Speed
The stability of the vehicle and trailer is reduced with increasing speed. For
this reason, it is advisable not to drive at the maximum permissible speed
in an unfavourable road, weather or wind conditions. This applies especially
when driving downhill.
You should always reduce speed immediately if the trailer shows the slight-
est sign of snaking. Never try to stop the “snaking” by increasing speed.
Always brake in due course. If the trailer has an overrun brake, apply the
brakes gently at first and then, firmly. This will prevent the jerking that can
be caused by locking of trailer wheels. Select a low gear in due course be-
fore going down a steep downhill. This enables you to use the engine brak-
ing to slow down the vehicle.
Reheating
At very high temperatures and during prolonged slopes, driving in a low
gear and high engine speed, always monitor the coolant temperature gauge
⇒ page 53.
Electronic Stability Control*
The ESC* system helps to stabilise the trailer in case of skidding or rocking.
Safety FirstOperating InstructionsPractical TipsTechnical Specifications