refuelling Seat Ibiza SC 2012 Owner's manual
[x] Cancel search | Manufacturer: SEAT, Model Year: 2012, Model line: Ibiza SC, Model: Seat Ibiza SC 2012Pages: 280, PDF Size: 3.67 MB
Page 6 of 280
Accessories, replacement of parts and
modifications . . . . . . . . . . . . . . . . . . . . . . . . . . . . . 183
Accessories and spare parts . . . . . . . . . . . . . . . . 183
Technical modifications . . . . . . . . . . . . . . . . . . . . 183
Roof aerial* . . . . . . . . . . . . . . . . . . . . . . . . . . . . . . 184
Mobile telephones and two-way radios . . . . . . . . 184
Fitting a towing bracket* . . . . . . . . . . . . . . . . . . . 185
Checking and refilling levels . . . . . . . . . . . . . . . 187
Refuelling . . . . . . . . . . . . . . . . . . . . . . . . . . . . . . . 187
LPG system* . . . . . . . . . . . . . . . . . . . . . . . . . . . . . 189
Petrol . . . . . . . . . . . . . . . . . . . . . . . . . . . . . . . . . . . 192
Diesel . . . . . . . . . . . . . . . . . . . . . . . . . . . . . . . . . . . 192
Working in the engine compartment . . . . . . . . . . 193
Engine oil . . . . . . . . . . . . . . . . . . . . . . . . . . . . . . . . 196
Coolant . . . . . . . . . . . . . . . . . . . . . . . . . . . . . . . . . 200
Washer fluid and windscreen wiper blades . . . . 202
Brake fluid . . . . . . . . . . . . . . . . . . . . . . . . . . . . . . . 206
Vehicle battery . . . . . . . . . . . . . . . . . . . . . . . . . . . 207
Wheels . . . . . . . . . . . . . . . . . . . . . . . . . . . . . . . . . . 209
If and when . . . . . . . . . . . . . . . . . . . . . . . . . . . . . . . 216
Vehicle tools, spare wheel . . . . . . . . . . . . . . . . . . 216
Wheel change . . . . . . . . . . . . . . . . . . . . . . . . . . . . 217
Tyre repair kit (Tyre-Mobility-System)* . . . . . . . . . 222
Fuses . . . . . . . . . . . . . . . . . . . . . . . . . . . . . . . . . . . 224
Bulb change . . . . . . . . . . . . . . . . . . . . . . . . . . . . . 227
Single headlight bulb change . . . . . . . . . . . . . . . 229
Double headlight bulb change . . . . . . . . . . . . . . . 231
Changing the bulbs of AFS headlights . . . . . . . . 235
Changing the fog light bulbs . . . . . . . . . . . . . . . . 236
Changing the rear, side and interior light bulbs . 237
Jump-starting . . . . . . . . . . . . . . . . . . . . . . . . . . . . . 241
Towing and tow-starting . . . . . . . . . . . . . . . . . . . . 244 Technical Specifications
. . . . . . . . . . . 247
Description of specifications . . . . . . . . . . . . . . . 247
Important information . . . . . . . . . . . . . . . . . . . . . 247
Information on fuel consumption . . . . . . . . . . . . 249
Towing a trailer . . . . . . . . . . . . . . . . . . . . . . . . . . . 249
Wheels . . . . . . . . . . . . . . . . . . . . . . . . . . . . . . . . . . 250
Technical specifications . . . . . . . . . . . . . . . . . . . . 251
Checking fluid levels . . . . . . . . . . . . . . . . . . . . . . . 251
Petrol engine 1.2 44 kW (60 PS) . . . . . . . . . . . . . 252
Petrol engine 1.2 51 kW (70 PS) . . . . . . . . . . . . . 253
Petrol engine 1.2 TSI 63 kW (85 PS) . . . . . . . . . . 254
Petrol engine/LPG 1.6 60 kW (81 PS) . . . . . . . . . 255
Petrol engine 1.4 63 kW (85 PS) . . . . . . . . . . . . . 256
Petrol engine 1.2 TSI 77 kW (105 PS) . . . . . . . . . 257
Petrol engine 1.2 TSI 77 kW (105 PS) Start-Stop 258
Petrol engine 1.6 77 kW (105 PS) . . . . . . . . . . . . 259
Petrol engine 1.4 110 kW (150 PS) . . . . . . . . . . . 260
Petrol engine 1.4 132 kW (180 PS) - Cupra . . . . . 261
Diesel engine 1.2 TDI CR 55 kW (75 PS) DPF
Start-Stop Ecomotive . . . . . . . . . . . . . . . . . . . . . . 262
Diesel engine 1.2 TDI CR 55 kW (75 PS) DPF . . . . 263
Diesel engine 1.6 TDI CR 66 kW (90 PS) DPF . . . . 264
Diesel engine 1.6 TDI CR 77 kW (105 PS) with/
without DPF . . . . . . . . . . . . . . . . . . . . . . . . . . . . . . 265
Diesel engine 2.0 TDI CR 105 kW (143 PS) DPF . 266
Dimensions and capacities . . . . . . . . . . . . . . . . . 267
Index . . . . . . . . . . . . . . . . . . . . . . . . . . . . . . . . . . . 269
4Table of Contents
Page 58 of 280
56Cockpit
Rev counter
The rev counter displays the engine speed in revolutions per
minute.
The start of the red zone ⇒ Fig. 30 1
indicates the maximum engine speed
operating at service temperature. However, it is advisable to change up into
a higher gear, move the selector lever to D or lift your foot off the accelerator
before the needle reaches the red zone.
CAUTION
To prevent possible engine malfunctions, the rev counter needle should not
reach the red zone. The start of the red zone on the dial is different for some
engine versions.
For the sake of the environment
Changing up into higher gears sooner, following the recommended gear in-
dications ⇒ Fig. 33 will help you to reduce fuel consumption, emissions and
also engine noise.
Speedometer
The speedometer is equipped with a digital odometer and a trip recorder, in
addition to a service intervals display.
During the running-in period, the instructions shown on ⇒ page 167
should be followed. LPG system*
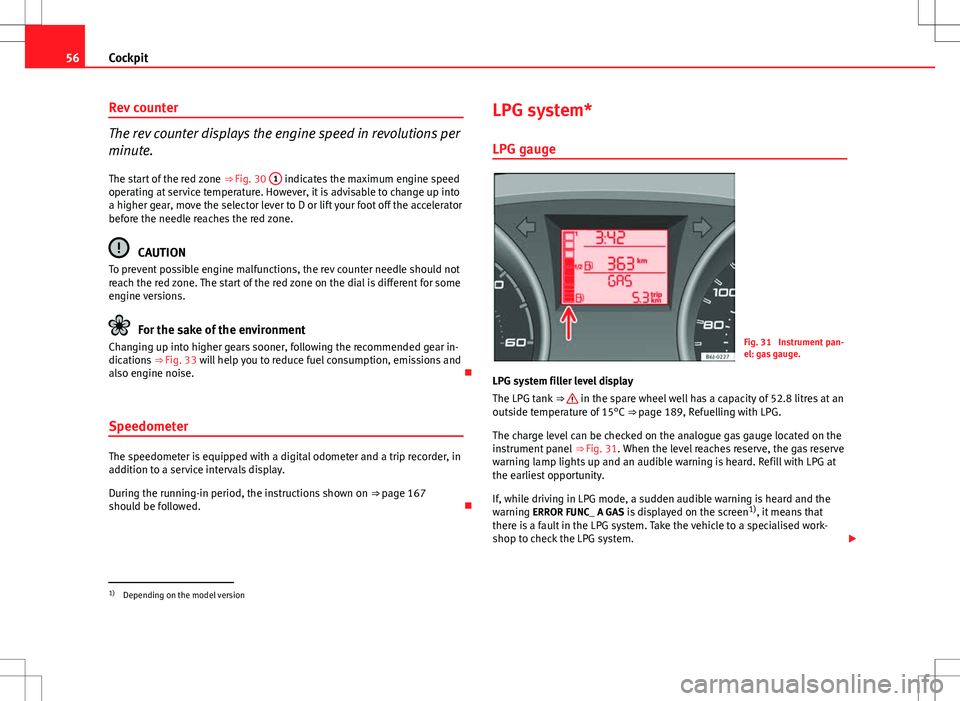
LPG gauge
Fig. 31 Instrument pan-
el: gas gauge.
LPG system filler level display
The LPG tank ⇒
in the spare wheel well has a capacity of 52.8 litres at an
outside temperature of 15°C ⇒ page 189, Refuelling with LPG.
The charge level can be checked on the analogue gas gauge located on the
instrument panel ⇒ Fig. 31. When the level reaches reserve, the gas reserve
warning lamp lights up and an audible warning is heard. Refill with LPG at
the earliest opportunity.
If, while driving in LPG mode, a sudden audible warning is heard and the
warning ERROR FUNC_ A GAS is displayed on the screen 1)
, it means that
there is a fault in the LPG system. Take the vehicle to a specialised work-
shop to check the LPG system.
1)
Depending on the model version
Page 143 of 280
141
Driving
Starting diesel engines
The engine can only be started using a genuine SEAT key
with its correct code. – Move the gearbox lever to the neutral position and depress the
clutch pedal thoroughly and hold it in this position for the start-
er to turn the engine on.
– Turn the ignition key to the starting position.
– Turn the ignition key to position ⇒ Fig. 98 2
. The warning lamp
will light for engine pre-heating.
– When the lamp turns off, turn the ignition key to position 3
to
start the engine. Do not press the accelerator.
– Let go of the ignition key as soon as the engine starts, the start-
er motor must not be allowed to run on with the engine.
When starting a very cold engine, it may be a little noisy for the first few sec-
onds until oil pressure has built up in the hydraulic valve compensators.
This is quite normal, and no cause for concern.
If there are problems starting the engine, see the ⇒ page 241.
Glow plug system for the diesel engine
To avoid unnecessary discharging of the battery, do not use any other major
electrical equipment while the glow plugs are pre-heating.
Start the engine as soon as the glow plug warning lamp goes out.
Starting the diesel engine after the fuel tank has been completely run dry
If the fuel tank has been completely run dry, it may take longer than normal
(up to one minute) to start a diesel engine after refuelling. This is because
the fuel system must eliminate air first.
WARNING
● Never start or run the engine in unventilated or closed rooms. The ex-
haust gases contain carbon monoxide, an odourless and colourless poi-
sonous gas. Risk of fatal accidents. Carbon monoxide can cause loss of
consciousness. It can also result in death.
● Never leave the vehicle unattended if the engine is running.
● Never use “cold start sprays”, they could explode or cause the engine
to run at high revs. Risk of injury.
CAUTION
● When the engine is cold, you should avoid high engine speeds, driving
at full throttle and over-loading the engine. Risk of engine damage.
● The vehicle should not be pushed or towed more than 50 metres to start
the engine. Unburnt fuel could enter the catalytic converter and damage it.
● Before attempting to push-start or tow a vehicle in order to start it, you
should first try to start it using the battery of another vehicle. Note and fol-
low the instructions in ⇒ page 241, Jump-starting.
For the sake of the environment
Do not warm-up the engine by running the engine with the vehicle station-
ary. You should drive off as soon as you start the engine. This helps the en-
gine reach operating temperature faster and reduces emissions.
Switching off the engine
– Stop the vehicle.
– Turn the ignition key to position ⇒ Fig. 98 1
.
After switching the engine off, the radiator fan may run on for up to 10 mi-
nutes. It is also possible that the fan turns itself on once more if the coolant
Safety FirstOperating InstructionsPractical TipsTechnical Specifications
Page 144 of 280
142Driving
temperature increases due to the heat accumulated in the engine compart-
ment or due to its prolonged exposure to solar radiation.
WARNING
● Never switch the engine off until the vehicle is completely stationary.
● The brake servo works only when the engine is running. With the en-
gine switched off, more strength is needed to brake. As normal brake op-
eration cannot be performed, risk of accidents and serious injury may ex-
ist.
● The steering lock can be immediately blocked once the key is re-
moved from the ignition. The vehicle cannot be steered. Risk of accident.
CAUTION
When the engine has been running under a heavy load for a long period,
heat can accumulate in the engine compartment and cause engine damage.
For this reason, you should idle the engine for approx. 2 minutes before you
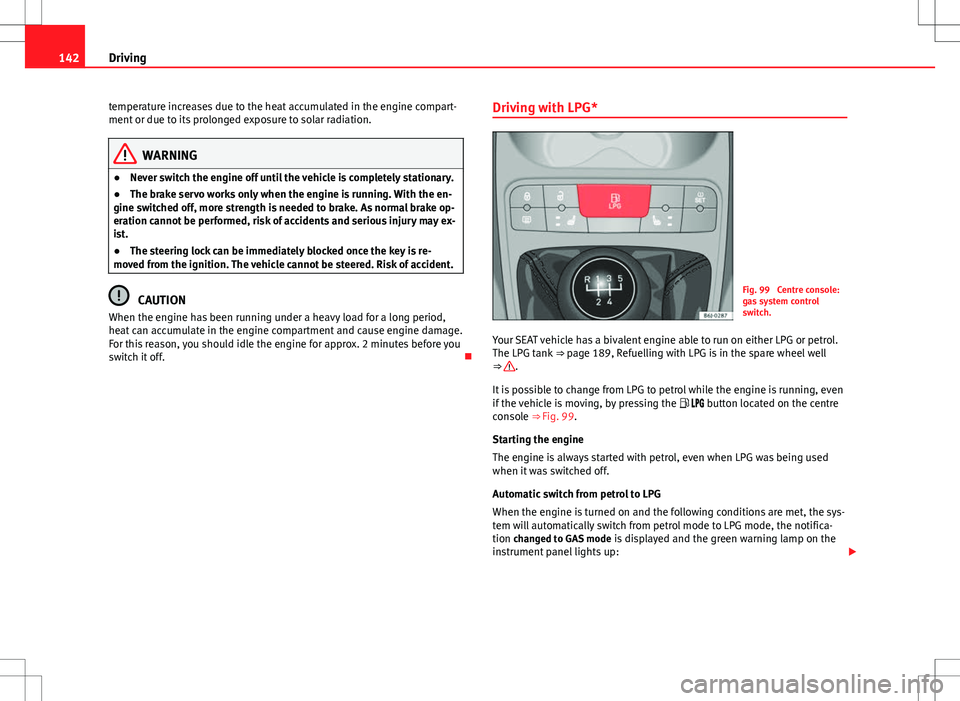
switch it off. Driving with LPG*Fig. 99 Centre console:
gas system control
switch.
Your SEAT vehicle has a bivalent engine able to run on either LPG or petrol.
The LPG tank ⇒ page 189, Refuelling with LPG is in the spare wheel well
⇒
.
It is possible to change from LPG to petrol while the engine is running, even
if the vehicle is moving, by pressing the button located on the centre
console ⇒ Fig. 99.
Starting the engine
The engine is always started with petrol, even when LPG was being used
when it was switched off.
Automatic switch from petrol to LPG
When the engine is turned on and the following conditions are met, the sys-
tem will automatically switch from petrol mode to LPG mode, the notifica-
tion changed to GAS mode is displayed and the green warning lamp on the
instrument panel lights up:
Page 173 of 280
171
Driving and the environment
Note
● If you vehicle has Start-Stop, it is not recommended to switch this func-
tion off.
● It is recommended to close the windows when driving at more than
60 km/h (40 mph)
● Do not drive with your foot resting on the clutch pedal, as the pressure
can make the plate spin, more fuel will be used and it can burn the clutch
plate lining, causing a serious fault.
● Do not hold the vehicle on a hill with the clutch, use the foot brake or
hand brake, using the latter to start. The fuel consumption will be lower and
you will prevent the clutch plate from being damaged.
● On descents, use the engine brake, changing to the gear that is more
suitable for the slope. The fuel consumption will be lower and the brakes
will not suffer.
Environmental friendliness
Environmental protection is a top priority in the design, choice of materials
and production of your new SEAT.
Design measures for economical recycling
● Joints and connections designed for easy dismantling
● Modular construction to facilitate dismantling
● Increased use of single-grade materials
● Plastic parts and elastomers are marked in accordance with ISO 1043,
ISO 11469 and ISO 1629
Choice of materials
● Nearly all materials used can be recycled
● Similar types of plastics grouped together for easy recycling
● Recycled materials used in manufacture ●
Reduction of volatile compounds in plastics
● CFC-free refrigerant in air conditioner
Compliance with prohibited materials regulation : cadmium, lead, mercury,
chrome VI.
Manufacturing methods
● Use of recycled material for manufacturing plastic parts
● Solvent-free cavity sealing
● Solvent-free wax for protecting the vehicles in transit
● Solvent-free adhesives
● No CFCs used in production
● Surplus materials used extensively for energy conversion and building
materials
● Overall water consumption reduced
● Heat recovery systems
● The use of water-soluble paints
Driving abroad Observations
To drive abroad, the following must be taken into consideration:
● For vehicles fitted with a catalytic converter ensure that unleaded petrol
is available for the journey. See the chapter “Refuelling”. Automobile organ-
isations will have information about service station networks selling unlea-
ded fuel.
● In some countries, it is possible that your vehicle model is not sold, and
therefore spare parts are not available or the Technical Services can only
carry out limited repairs.
Safety FirstOperating InstructionsPractical TipsTechnical Specifications
Page 189 of 280
187
Checking and refilling levels
Checking and refilling levels Refuelling
The tank flap is released manually. The tank holds approxi-
mately 45 litres.
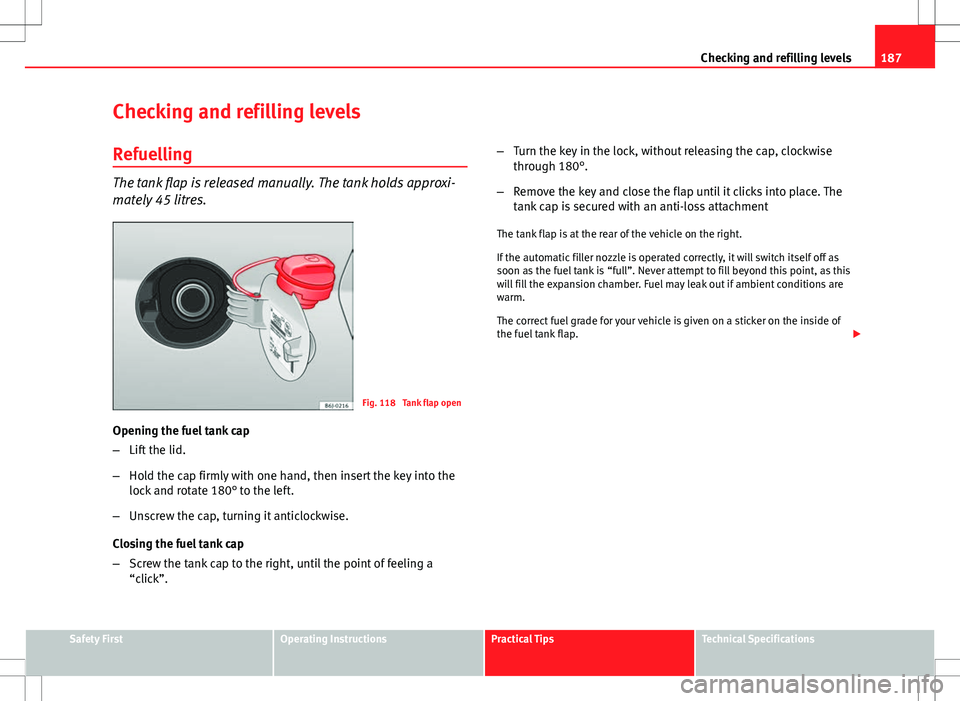
Fig. 118 Tank flap open
Opening the fuel tank cap
– Lift the lid.
– Hold the cap firmly with one hand, then insert the key into the
lock and rotate 180° to the left.
– Unscrew the cap, turning it anticlockwise.
Closing the fuel tank cap
– Screw the tank cap to the right, until the point of feeling a
“click”. –
Turn the key in the lock, without releasing the cap, clockwise
through 180°.
– Remove the key and close the flap until it clicks into place. The
tank cap is secured with an anti-loss attachment
The tank flap is at the rear of the vehicle on the right.
If the automatic filler nozzle is operated correctly, it will switch itself off as
soon as the fuel tank is “full”. Never attempt to fill beyond this point, as this
will fill the expansion chamber. Fuel may leak out if ambient conditions are
warm.
The correct fuel grade for your vehicle is given on a sticker on the inside of
the fuel tank flap.
Safety FirstOperating InstructionsPractical TipsTechnical Specifications
Page 191 of 280
189
Checking and refilling levels
LPG system*
Refuelling with LPG
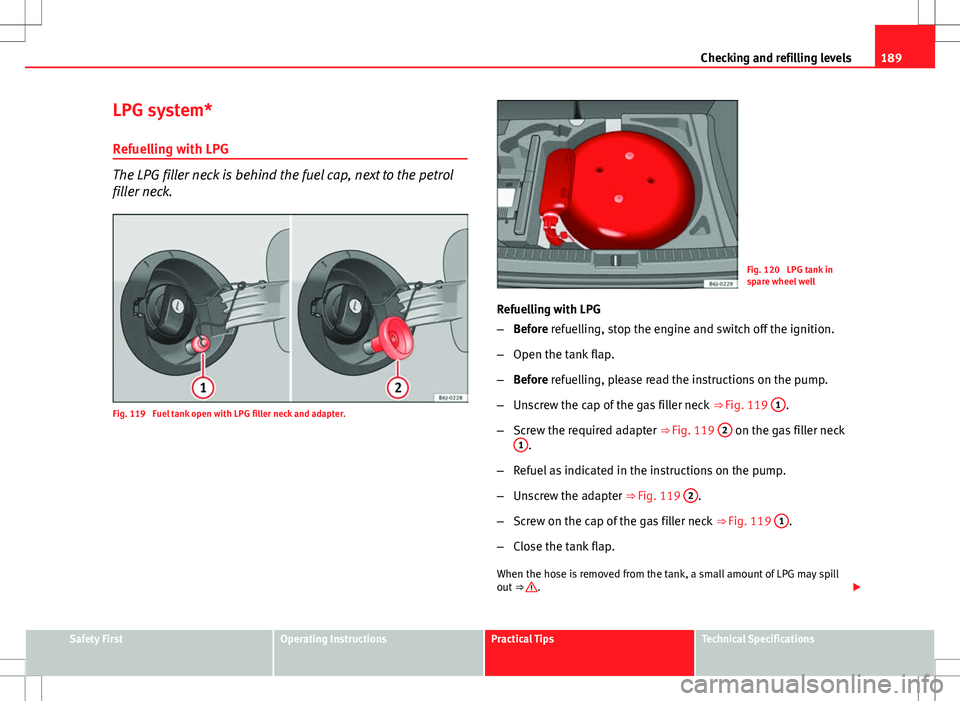
The LPG filler neck is behind the fuel cap, next to the petrol
filler neck.
Fig. 119 Fuel tank open with LPG filler neck and adapter.
Fig. 120 LPG tank in
spare wheel well
Refuelling with LPG
– Before refuelling, stop the engine and switch off the ignition.
– Open the tank flap.
– Before refuelling, please read the instructions on the pump.
– Unscrew the cap of the gas filler neck ⇒ Fig. 119 1
.
– Screw the required adapter ⇒ Fig. 119 2
on the gas filler neck
1.
– Refuel as indicated in the instructions on the pump.
– Unscrew the adapter ⇒ Fig. 119 2
.
– Screw on the cap of the gas filler neck ⇒ Fig. 119 1
.
– Close the tank flap.
When the hose is removed from the tank, a small amount of LPG may spill
out ⇒
.
Safety FirstOperating InstructionsPractical TipsTechnical Specifications
Page 192 of 280
190Checking and refilling levels
The LPG tank ⇒ Fig. 120 in the spare wheel well has a capacity of 52.8 li-
tres. If the outside temperatures are very low, it may not be possible to com-
pletely fill the LPG tank.
Pump attachments
There are a variety of types of LPG pump, and the methods of use may vary.
Therefore, let the pump operator fill the tank when refuelling for the first
time or fill from another pump.
Noises when refuelling with LPG
When refuelling with LPG, noises may be heard. These noises are insignifi-
cant.
WARNING
Failure to refuel or handle LPG in the correct way could result in a fire,
cause an explosion or lead to injuries.
● LPG is a highly explosive and inflammable substance. It may cause
severe burns and other injury.
● Switch off the engine before refuelling.
● Always switch off mobile phones and any other radiophony applian-
ces, as electromagnetic waves may produce sparks and cause a fire.
● Do not remain in the vehicle while refuelling. If it is absolutely neces-
sary to enter the vehicle, close the door and touch a metal surface before
touching the attachment again. This will prevent the generation of static
electricity and any possible fires while refuelling.
● Small quantities of LPG may leak out after refuelling. If LPG comes in-
to contact with skin, there is a risk of freezing.
● Do not smoke and always keep bare flames away from the tank during
refuelling. Failure to do so may lead to an explosion.
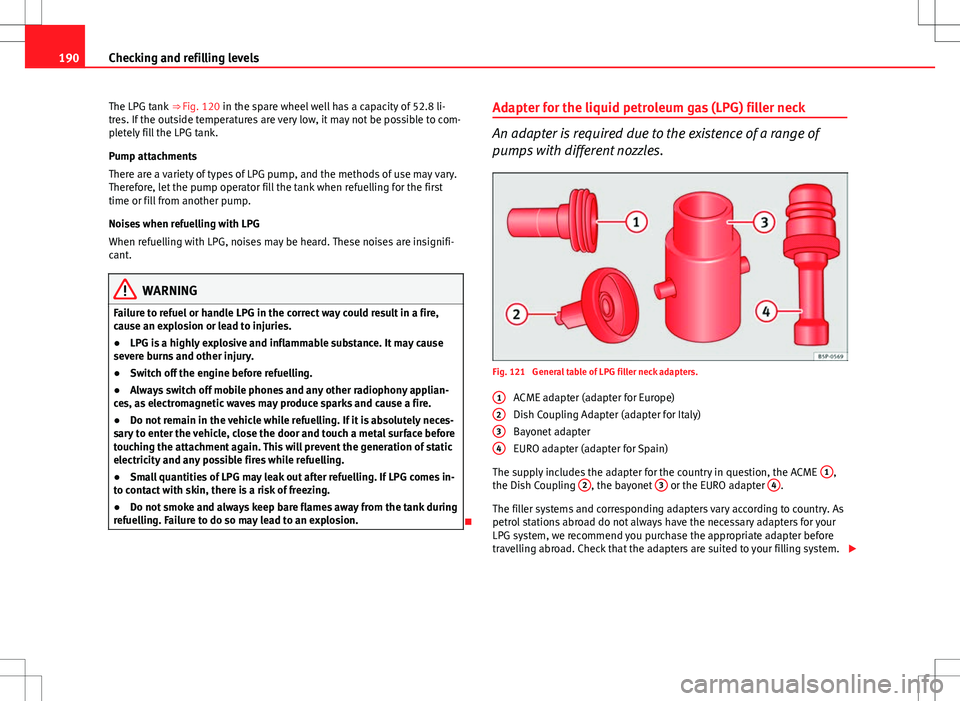
Adapter for the liquid petroleum gas (LPG) filler neck
An adapter is required due to the existence of a range of
pumps with different nozzles.
Fig. 121 General table of LPG filler neck adapters.
ACME adapter (adapter for Europe)
Dish Coupling Adapter (adapter for Italy)
Bayonet adapter
EURO adapter (adapter for Spain)
The supply includes the adapter for the country in question, the ACME 1
,
the Dish Coupling 2, the bayonet 3 or the EURO adapter 4.
The filler systems and corresponding adapters vary according to country. As
petrol stations abroad do not always have the necessary adapters for your
LPG system, we recommend you purchase the appropriate adapter before
travelling abroad. Check that the adapters are suited to your filling system.
1
234
Page 194 of 280
192Checking and refilling levels
Petrol
Petrol types
The correct petrol types are listed on a sticker inside the fuel
tank flap.Only unleaded petrol conforming to standard DIN EN 228 may be used for
vehicles with catalytic converters (EN = “European Standard”).
Fuel types are differentiated by the octane rating, e.g: 91, 95, 98 RON (RON
= “Research Octane Number”, unit for determining the knock resistance of
petrol). You may use petrol with a higher octane number than the one rec-
ommended for your engine. However, this has no advantage in terms of fuel
consumption and engine power.
CAUTION
● Even one tankful of leaded fuel would permanently impair the efficiency
of the catalytic converter.
● High engine speed and full throttle can damage the engine when using
petrol with an octane rating lower than the correct grade for the engine.
For the sake of the environment
Just one full tank of leaded fuel would seriously impair the efficiency of the
catalytic converter.
Petrol additives
Petrol additives improve the quality of the petrol.
The quality of the petrol influences the performance, power and life of the
engine. For this reason, you should use good quality petrol containing addi- tives. These additives will help to prevent corrosion, keep the fuel system
clean and prevent deposits from building up in the engine.
If good quality petrol with additives is not available or engine problems oc-
cur, the required additives must be added during refuelling.
Diesel Diesel*
Diesel fuel must conform to DIN EN 590 (EN = “European Standard”). It
must have a cetane number (CN) of at least 51. The cetane number indi-
cates the ignition quality of the diesel fuel.
Notes on refuelling ⇒ page 187.
Biodiesel*
CAUTION
● Your vehicle is not designed to use biodiesel fuel. Never, under any cir-
cumstances refuel with biodiesel. The use of biodiesel fuel could damage
the engine and the fuel system. The addition of biodiesel to diesel fuel by
the diesel manufacturer in accordance with standard EN 590 or DIN 51628
is authorised and will not cause damage to the engine or the fuel system.
● The diesel engine has been designed to be used exclusively with diesel
fuel conforming to standard EN 590. Never refuel or use petrol, kerosene,
fuel oil or any other type of fuel. If you accidentally fill up the vehicle with
the wrong type of fuel, do not start the engine. Seek assistance from speci-
alised personnel. The composition of these fuels may severely damage the
fuel system and the engine.
Page 275 of 280
Instrument panelService interval display . . . . . . . . . . . . . . . . 61
Instruments . . . . . . . . . . . . . . . . . . . . . . . . . . . . 55
Interior rear vision mirror . . . . . . . . . . . . . . . . . 109
Interval wipe, windscreen . . . . . . . . . . . . . . . . 106
ISOFIX system . . . . . . . . . . . . . . . . . . . . . . . . . . . 48
J
Jump-starting . . . . . . . . . . . . . . . . . . . . . . . . . . 241
Jump leads . . . . . . . . . . . . . . . . . . . . . . . . . . . . 241
K
Keys . . . . . . . . . . . . . . . . . . . . . . . . . . . . . . . . . . . 84
L Leather cleaning . . . . . . . . . . . . . . . . . . . . . . . . 181
Leaving Home function . . . . . . . . . . . . . . . . . . 101
Lights . . . . . . . . . . . . . . . . . . . . . . . . . . . . . . . . . 97
Load compartment in the luggage compart- ment
see Loading the luggage compartment . . . 16
Loading the luggage compartment . . . . . . . . . . 16
Locks . . . . . . . . . . . . . . . . . . . . . . . . . . . . . . . . . 178
LPG . . . . . . . . . . . . . . . . . . . . . . . . . . 56, 142, 189
LPG system Driving . . . . . . . . . . . . . . . . . . . . . . . . . . . . . 142
Filler neck adapter . . . . . . . . . . . . . . . . . . . 190
Level indicator . . . . . . . . . . . . . . . . . . . . . . . 56
Refuelling . . . . . . . . . . . . . . . . . . . . . . . . . . 189 Luggage compartment . . . . . . . . . . . . . . . . . . . 125
see also Loading the luggage compartment . .16
Luggage compartment light . . . . . . . . . . . . . . 241
Luggage compartment light* . . . . . . . . . . . . . 105
M
Main beam . . . . . . . . . . . . . . . . . . . . . . . . . 97, 103
Main beam headlights control lamp . . . . . . . . . . . . . . . . . . . . . . . . . 73
Maintenance Airbags . . . . . . . . . . . . . . . . . . . . . . . . . . . . . 31
Maintenance and cleaning . . . . . . . . . . . . . . . 174
Manual gearbox . . . . . . . . . . . . . . . . . . . . . . . . 146
Manual heating . . . . . . . . . . . . . . . . . . . . . . . . 128 controls . . . . . . . . . . . . . . . . . . . . . . . . . . . . 127
Manual heating system Defrosting the windscreen . . . . . . . . . . . . . 128
Demisting the windscreen and side win-dows . . . . . . . . . . . . . . . . . . . . . . . . . . . . . 128
MFI . . . . . . . . . . . . . . . . . . . . . . . . . . . . . . . . . . . . 59
Mirrors Exterior mirrors . . . . . . . . . . . . . . . . . . . . . . 110
Interior rear vision mirror . . . . . . . . . . . . . . 109
vanity mirror . . . . . . . . . . . . . . . . . . . . . . . . 106
Mobile phone . . . . . . . . . . . . . . . . . . . . . . . . . . 184
Multifunction display . . . . . . . . . . . . . . . . . . . . . 59
N
Number of seats . . . . . . . . . . . . . . . . . . . . . . . . . 18 O
Observations . . . . . . . . . . . . . . . . . . . . . . . . . . 171
Octane number . . . . . . . . . . . . . . . . . . . . . . . . . 192
Odometer . . . . . . . . . . . . . . . . . . . . . . . . . . . . . . 61
Oil . . . . . . . . . . . . . . . . . . . . . . . . . . . . . . . . . . . 196
Oil change . . . . . . . . . . . . . . . . . . . . . . . . . . . . . 199
Oil properties . . . . . . . . . . . . . . . . . . . . . . . . . . 197
One-touch opening and closing Electric windows . . . . . . . . . . . . . . . . . . . . . . 93
Opening and locking . . . . . . . . . . . . . . . . . . . . . 90
Operation when a fault occurs panoramic/tilting sunroof . . . . . . . . . . . . . . 96
Outside temperature indicator . . . . . . . . . . 58, 60
Overview Control lamps . . . . . . . . . . . . . . . . . . . . . 63, 66
Dash panel . . . . . . . . . . . . . . . . . . . . . . . . . . 53
Instruments . . . . . . . . . . . . . . . . . . . . . . . . . 55
Warning lamps . . . . . . . . . . . . . . . . . . . . 63, 66
P
Paintwork Polishing . . . . . . . . . . . . . . . . . . . . . . . . . . . 177
Panoramic sunroof . . . . . . . . . . . . . . . . . . . . . . . 94
Parking . . . . . . . . . . . . . . . . . . . . . . . . . . . . . . . 155
Parking lights . . . . . . . . . . . . . . . . . . . . . . . . . . 103
Passenger see Correct sitting position . . . . . . . 10, 11, 12
Pedals . . . . . . . . . . . . . . . . . . . . . . . . . . . . . . . . . 16
Petrol . . . . . . . . . . . . . . . . . . . . . . . . . . . . . . . . . 192 Driving abroad . . . . . . . . . . . . . . . . . . . . . . 171
273
Index