technical data Seat Ibiza SC 2015 Repair Manual
[x] Cancel search | Manufacturer: SEAT, Model Year: 2015, Model line: Ibiza SC, Model: Seat Ibiza SC 2015Pages: 248, PDF Size: 4.77 MB
Page 173 of 248
Driver assistance systems
It uses the ABS sensors to monitor the speed
of the driv
en wheel
s. In case of an EDL fault,
the warning light for ABS lights up
››› page 102.
At speeds of up to approximately 80 km/h
(50 mph), it is able to balance out differences
in the speed of the driven wheels of approxi-
mately 100 rpm/min caused by a partially
slippery road surface. It does this by braking
the wheel which has lost traction and distrib-
uting more driving force to the other driven
wheel via the differential.
To prevent the disc brake of the braking
wheel from overheating, the EDL cuts out au-
tomatically if subjected to excessive loads.
The vehicle will continue to function normally
without EDL. For this reason, the driver is not
informed that the EDL has been switched off.
The EDL will switch on again automatically
when the brake has cooled down. WARNING
● When acc el
erating on a slippery surface,
for example on ice and snow, press the accel-
erator carefully. Despite EDL, the driven
wheels may start to spin. This could impair
the vehicle's stability.
● Always adapt your driving style to suit road
conditions
and the traffic situation. Do not let
the extra safety afforded by EDL tempt you in-
to taking any risks when driving, this can
cause accidents. CAUTION
Modifications to the vehicle (e.g. to the en-
gine, the brak e sy
stem, running gear or any
components affecting the wheels and tyres)
could affect the efficiency of the EDL
››› page 190. Hydraulic Brake Assist (HBA)*
The function (Hydraulic Brake Assist HBA) is
only
inc
luded in vehicles with ESC.
In an emergency, most drivers brake in time,
but not with maximum force. This results in
unnecessarily long braking distances.
This is when the brake assist system comes
into action. When pressing the brake pedal
rapidly, the assistant interprets it as an emer-
gency. It very quickly builds up the full brake
pressure so that the ABS can be activated
more quickly and efficiently, thus reducing
braking distance.
Do not reduce the pressure on the brake ped-
al, since the brake assist system switches off
automatically as soon as you release the
brake.
Automatic hazard warning lights activation
The brake lights flash automatically to indi-
cate that the vehicle is braking suddenly or in
an emergency situation. If the emergency
braking continues until the vehicle comes to a standstill, the hazard warning lights will
then come on and the br
ak
e lights will re-
main on permanently from that moment. The
warning lights will automatically switch off
when the vehicle begins to move again or
when the "warning" light button is pressed. WARNING
● The risk of
accident is higher if you drive
too fast, if you do not keep your distance from
the vehicle in front, and when the road sur-
face is slippery or wet. The increased acci-
dent risk cannot be reduced by the brake as-
sist system.
● The brake assist system cannot defy the
law
s of physics. Slippery and wet roads are
dangerous even with the brake assist system!
Therefore, it is essential that you adjust your
speed to suit the road and traffic conditions.
Do not let the extra safety features tempt you
into taking any risks when driving. Anti-lock brake system (ABS)
The anti-lock brake (ABS) system prevents
the wheel
s
fr
om locking during braking and
is an important part of the vehicle's active
safety system.
How the ABS works
If one of the wheels turns too slowly in rela-
tion to the vehicle's speed, and is close to
locking, the system will reduce the braking »
171
Technical data
Advice
Operation
Emergencies
Safety
Page 175 of 248
Driver assistance systems
Electronic differential lock (XDS)* When taking a curve, the driveshaft differen-
tial
mec
hanism allows the outer wheel to turn
at a higher speed than the inner wheel. In
this way, the wheel that is turning faster (out-
er wheel) receives less drive torque than the
inner wheel. This may mean that in certain
situations the torque delivered to the inner
wheel is too high, causing the wheels to
spin. On the other hand, the outer wheel is
receiving a lower drive torque than it could
transmit. This causes an overall loss of lateral
grip on the front axle, resulting in understeer
or “lengthening” of the trajectory.
The XDS system can detect and correct this
effect via the sensors and signals of the ESC.
Via the ESC, the XDS will brake the inside
wheel and counter the excess driving torque
of that wheel. This means that the driver's
desired trajectory is much more precise.
The XDS system works in combination with
the ESC and is always active, even when ASR
traction control is disconnected or the ESC is
in Sport mode.
Brake servo The brake servo increases the pressure you
ap
p
ly
to the brake pedal. It works only when
the engine is running . If the brake servo is not functioning, e.g. due
to a malf
unction, or if the vehicle is being
towed, you will have to press the brake pedal
considerably harder to make up for the lack
of servo assistance. WARNING
The braking distance can also be affected by
ext ern
al factors.
● Never let the vehicle coast with the engine
switc
hed off. Failure to follow this instruction
could result in an accident. The braking dis-
tance is increased considerably when the
brake servo is not active.
● If the brake servo is not working, for exam-
ple when the
vehicle is being towed, you will
have to press the brake pedal considerably
harder than normal. Start-Stop System*
D e
s
cription and operation The Start-Stop function stops the engine
when the
v
ehic
le is stopped and starts it au-
tomatically when required.
Vehicles with a manual gearbox
– When the vehicle is stopped, put it into
neutral and r
elease the clutch pedal. The
engine will switch off. The warning lamp will appear on the instrument panel dis-
pla
y.
– When the clutch pedal is pressed the en-
gine wil
l start up again. The warning lamp
will switch off.
Vehicles with an automatic gearbox – Use the foot brake to bring the vehicle to a
stop and k
eep the brake pedal pressed
down with your foot. The engine will switch
off. The warning lamp will appear in the
display.
– When you take your foot off the brake pedal
the engine wi
ll start up again. The warning
lamp will switch off.
Start-Stop function conditions
● The driver seat belt must be buckled.
● The bonnet must be closed.
● The engine must be at operating tempera-
ture.
● The s
teering wheel must be straight.
● The vehicle must be on flat ground.
● The vehicle must not be in reverse.
● A trailer must not be connected.
● The temperature of the interior must be
within the comf
ort limits (A/C button should
be sel ect
ed).
● The w
indscreen de-mist function must be
off. »
173
Technical data
Advice
Operation
Emergencies
Safety
Page 177 of 248
Driver assistance systems
Manually deactivating the Start-Stop func-
tion
– Press the
› ››
Fig. 174
b utton located on
the centre console. When the Start-Stop
function is switched off, the warning lamp
comes on.
– If the Start-Stop function is operating then
the engine st
arts immediately.
Switching the Start-Stop function on manual-
ly – Press the
› ›
› Fig. 174
button located on
the centre console. The warning lamp will
switch off.
Tiredness detection (break rec-
ommendation)* Introduction
›› ›
table on page 2
The Tiredness detection informs the driver
when their driving behaviour shows signs of
fatigue. WARNING
Do not let the comfort afforded by the Tired-
nes s
detection system tempt you into taking
any risks when driving. Take regular breaks, sufficient in length when making long jour-
neys.
●
The driv er a
lways assumes the responsibil-
ity of driv
ing to their full capacity.
● Never drive if you are tired.
● The system does not detect the tiredness of
the driver in al
l circumstances. Consult the in-
formation in the section ››› page 176, System
limitations.
● In some situations, the system may incor-
rectly int
erpret an intended driving manoeu-
vre as driver tiredness.
● No warning is given in the event of the ef-
fect c
alled microsleep!
● Please observe the indications on the in-
strument p
anel and act as is necessary. Note
● Tiredne s
s detection has been developed for
driving on motorways and well paved roads
only.
● If there is a fault in the system, have it
check
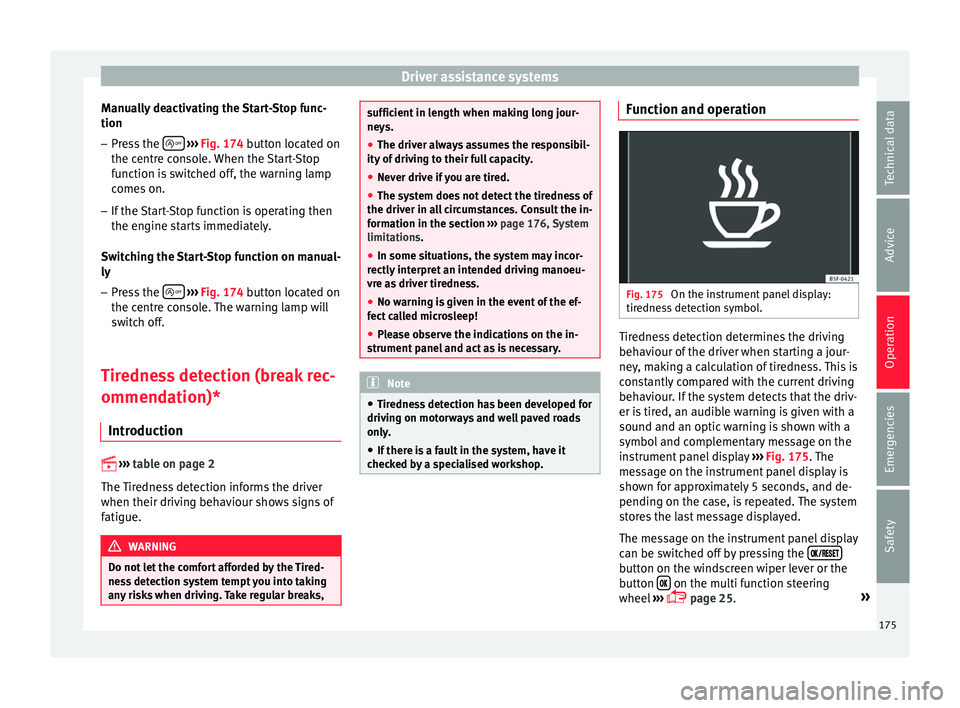
ed by a specialised workshop. Function and operation
Fig. 175
On the instrument panel display:
tir edne
s
s detection symbol. Tiredness detection determines the driving
beh
av
iour of
the driver when starting a jour-
ney, making a calculation of tiredness. This is
constantly compared with the current driving
behaviour. If the system detects that the driv-
er is tired, an audible warning is given with a
sound and an optic warning is shown with a
symbol and complementary message on the
instrument panel display ››› Fig. 175. The
message on the instrument panel display is
shown for approximately 5 seconds, and de-
pending on the case, is repeated. The system
stores the last message displayed.
The message on the instrument panel display
can be switched off by pressing the button on the windscreen wiper lever or the
b
utt
on on the multi function steering
wheel
›
›
› page 25. »
175
Technical data
Advice
Operation
Emergencies
Safety
Page 179 of 248
Driver assistance systems
–
Ob j
ects with certain surfaces or struc-
tures, such as wire mesh fences or pow-
der snow.
● Certain surfaces of objects and garments
do not refl
ect the ultrasound sensors' sig-
nals. The system cannot detect, at least cor-
rectly, these objects or people wearing such
clothes.
● Ultrasound sensor signals may be affected
by e
xternal sound sources. In certain circum-
stances this may prevent them from detect-
ing people or objects.
● Please note that low obstacles detected by
the syst
em may no longer be registered by
the sensors as the car moves closer, so the
system will not give any further warning. In
certain circumstances, objects such as high
kerbs that could damage the bottom of the
vehicle are not detected either.
● If the first warning from the Park Pilot is ig-
nored, the v
ehicle could suffer considerable
damage.
● The knocks or damage on the radiator
grill
e, bumper, wheel arch and vehicle under-
body can adjust the orientation of the sen-
sors. This can affect the parking aid function.
Have the function checked by a specialised
workshop. Note
● In cer t
ain situations, the system can give a
warning even though there is no obstacle in
the detected area, e.g: –
with r ough or c
obbled floors or ground
with long grass;
– with external ultrasound sources, such as
cleaning vehicles or other vehicles;
– In downpours, intense snow or dense ex-
haust gases;
– if the registration plate (front or rear) is
not properly affixed to the bumper sur-
face;
– or in locations such as the brow of a hill.
● In order to guarantee good system opera-
tion, keep the ultr
asound sensors clean, free
of snow or ice, and do not cover them with
adhesives or other objects.
● If you use high-pressure or vapour equip-
ment to c
lean the ultrasound sensors, apply
it directly only very briefly and always from a
distance of more than 10 cm.
● Retrofitting of accessories to the vehicle,
such a
s a bicycle carrier, may interfere with
the operation of the Parking Aid.
● In order to familiarise yourself with the sys-
tem, it i
s advised that you practice parking in
an area or car park that is free from traffic.
There must be good weather and light condi-
tions.
● The volume and tone of the warnings can
be modified, in addition t
o the indications
››› page 180.
● In vehicles without a driv
er information
system, these parameters can be modified in
a SEAT Official Service or in a specialised
workshop. ●
Ple a
se observe information on towing a
trailer ››› page 181.
● The display on the Easy Connect screen
shows
a slight time delay. Rear parking aid*
The rear Parking Aid assists the driver in
park
in
g by means of audible warning
sounds.
Description
There are sensors integrated in the rear
bumper. When the sensors detect an obsta-
cle, you are alerted by audible warnings.
Make particularly sure that the sensors are
not covered by adhesives, residues and the
like, as this could affect the system's opera-
tion. Cleaning instructions ››› page 194.
The approximate measurement range of the
rear sensors is:
side area0.60 m
central area1.60 m As you approach the obstacle, the time inter-
v
al
betw
een the audible warnings will be re-
duced. When you reach around 0.30 m the
warning will be constant: Do not continue to
move forward (or backward) ››› in General
»
177
Technical data
Advice
Operation
Emergencies
Safety
Page 181 of 248
Driver assistance systems
10 km/h (6 mph) ››
› page 179, Automatic ac-
tivation. The obstacle is detected as of a dis-
tance of approx. 95 cm if the automatic con-
nection is activated in the infotainment sys-
tem. A reduced display is shown.
Automatic disconnection of Parking Aid
● Move the selector lever to position P.
● OR: accelerate to more than approx.
10 km/h (6 mph) for
ward.
Temporary suppression of sound in Parking
Aid
● Press the function button found on the
s
teering wheel.
Change from reduced view to full view
● Engage reverse gear or turn the selector
lever t
o position R.
● OR: press the car icon in reduced view.
If nec
essary, switch to the rear-assist image
(Rear View Camera “RVC”)
● Engage reverse gear or turn the selector
lever t
o position R.
● OR: Press the RVC fu
nction button.
A short confirmation signal will be heard and
the button symbol will light up yellow when
the system is switched on. Automatic activation
Fig. 178
Miniature indication of automatic ac-
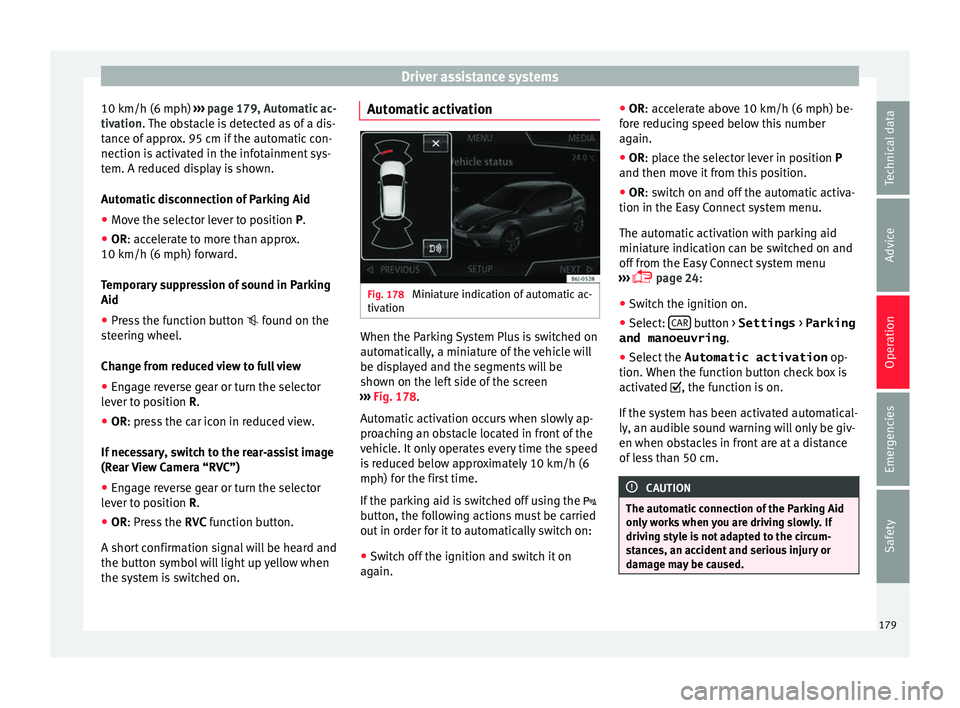
tiv ation When the Parking System Plus is switched on
aut
om
atic
ally, a miniature of the vehicle will
be displayed and the segments will be
shown on the left side of the screen
››› Fig. 178.
Automatic activation occurs when slowly ap-
proaching an obstacle located in front of the
vehicle. It only operates every time the speed
is reduced below approximately 10 km/h (6
mph) for the first time.
If the parking aid is switched off using the
button, the following actions must be carried
out in order for it to automatically switch on:
● Switch off the ignition and switch it on
again. ●
OR: ac
cel
erate above 10 km/h (6 mph) be-
fore reducing speed below this number
again.
● OR: place the selector lever in position P
and then mov
e it from this position.
● OR: switch on and off the automatic activa-
tion in the Ea
sy Connect system menu.
The automatic activation with parking aid
miniature indication can be switched on and
off from the Easy Connect system menu
››› page 24:
● Switch the ignition on.
● Select: CAR button > Settings
> Parking
and manoeuvring .
● Select the Automatic activation op-
tion. When the f
u
nction button check box is
activated , the function is on.
If the system has been activated automatical-
ly, an audible sound warning will only be giv-
en when obstacles in front are at a distance
of less than 50 cm. CAUTION
The automatic connection of the Parking Aid
only w
orks when you are driving slowly. If
driving style is not adapted to the circum-
stances, an accident and serious injury or
damage may be caused. 179
Technical data
Advice
Operation
Emergencies
Safety
Page 183 of 248
Driver assistance systems
Parking System Plus*
If ther
e i
s a fault in the parking aid system a
message will appear on the instrument panel
indicating the error. In addition the key
LED will blink.
If there is a fault in a sensor, the symbol is
displayed on the Easy Connect display in
front of/behind the vehicle. If a rear sensor is
faulty, only the obstacles in the areas A and
B are displayed
››
›
Fig. 176. If a front sensor
is faulty, only the obstacles in the areas Cand
D are displayed.
Hav e the f
au
lt corrected by a specialised
workshop without delay.
Towing bracket In vehicles equipped with a towing bracket
dev
ic
e fr
om the factory, when the trailer is
connected electrically, the Parking Aid rear
sensors will not be activated when reverse
gear is engaged, when the selector lever is
turned to position R or when the button is
pressed.
Parking System Plus
The distance to possible obstacles at the rear
of the vehicle will not be displayed on the
screen and nor will it be indicated by means
of audible sound signals. The Easy Connect system screen will only dis-
pla
y objects detected at the front, and the ve-
hicle's trajectory will be hidden.
Rear Assist “Rear View Cam-
era”*
Operatin
g and safety warnings WARNING
● The Re ar As
sist does not make it possible
to precisely calculate the distance from ob-
stacles (people, vehicles, etc.) and nor can it
overcome the system's own limits, hence us-
ing it may cause serious accidents and inju-
ries if used negligently or without due care.
The driver should be aware of his/her sur-
roundings at all times to ensure safe driving.
● The camera lens expands and distorts the
field of
vision and displays the objects on the
screen in a different, vague manner. The per-
ception of distances is also distorted by this
effect.
● Some objects may, due to the resolution of
the disp
lay screen - not be displayed in a sat-
isfactory manner or may not be displayed at
all. Take special care with thin posts, fences,
railings or trees that might not be displayed
on screen and could damage the vehicle.
● The rear assist has blind spots where it is
not pos
sible to represent people or objects
(small children, animals and certain objects cannot be detected in its field of vision). Mon-
itor the
v
ehicle's surrounding area at all
times.
● Keep the camera lens clean, free of ice and
snow
, and do not cover it.
● The system is not a replacement for driver
awar
eness. Supervise the parking operation
at all times, as well as the vehicle's surround-
ing area. Adapt your speed and driving style
at all times to suit visibility, weather, road
and traffic conditions.
● Do not be distracted from the traffic by
looking at
the screen.
● The images on the rear assist screen are
only tw
o-dimensional. Due to a lack of spatial
depth, protruding parts or holes in the road,
for example, are more difficult to detect or
may not be seen at all.
● Vehicle load modifies the representation of
the orientation lines
displayed. The width
represented by the lines diminishes with ve-
hicle load. Pay special attention to the vehi-
cle's surroundings when the inside of the ve-
hicle of the luggage compartment is carrying
a heavy load.
● In the following situations, the objects or
other vehic
les shown in the navigation sys-
tem display appear to be further away or
closer than they really are: Pay special atten-
tion:
– On moving from a horizontal plane to a
slope.
– On moving from a slope to a horizontal
plane. » 181
Technical data
Advice
Operation
Emergencies
Safety
Page 185 of 248
Driver assistance systems
● Use de-ic
in
g spray to remove any ice. CAUTION
● Never u se abr
asive cleaning products to
clean the camera lens.
● Do not use hot or warm water to remove ice
or snow fr
om the camera lens. Doing so could
damage the camera. Parking and manoeuvring with the
re
ar a
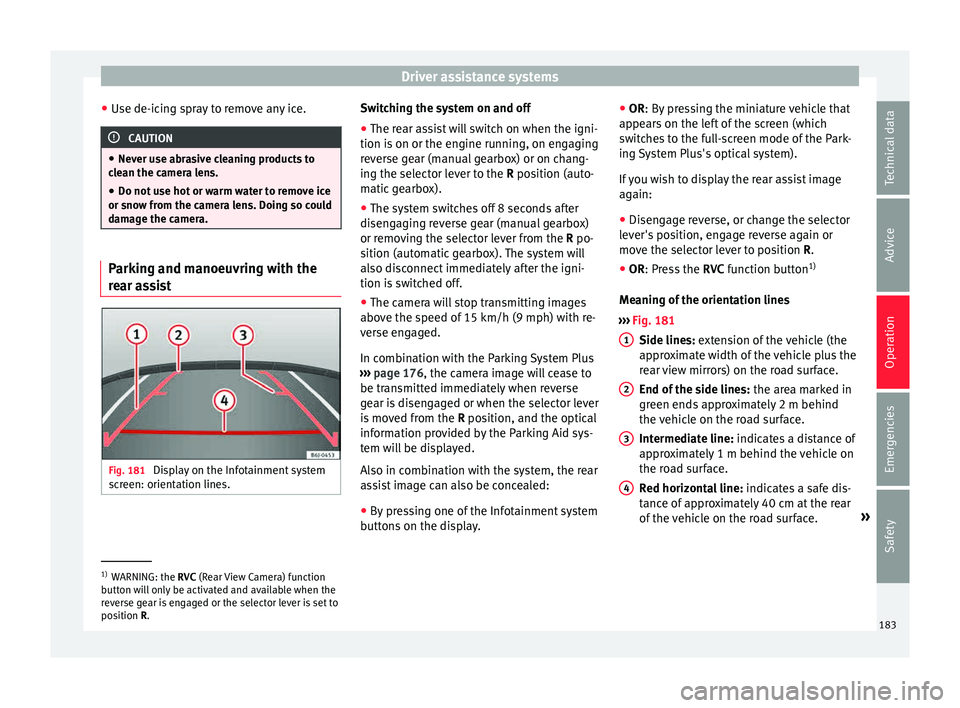
ssist Fig. 181
Display on the Infotainment system
s cr
een: orientation lines. Switching the system on and off
●
The rear assist will switch on when the igni-
tion i s
on or the en
gine running, on engaging
reverse gear (manual gearbox) or on chang-
ing the selector lever to the R position (auto-
matic gearbox).
● The system switches off 8 seconds after
diseng
aging reverse gear (manual gearbox)
or removing the selector lever from the R po-
sition (automatic gearbox). The system will
also disconnect immediately after the igni-
tion is switched off.
● The camera will stop transmitting images
above the s
peed of 15 km/h (9 mph) with re-
verse engaged.
In combination with the Parking System Plus
››› page 176, the camera image will cease to
be transmitted immediately when reverse
gear is disengaged or when the selector lever
is moved from the R position, and the optical
information provided by the Parking Aid sys-
tem will be displayed.
Also in combination with the system, the rear
assist image can also be concealed:
● By pressing one of the Infotainment system
button
s on the display. ●
OR: By pr
essing the miniature vehicle that
appears on the left of the screen (which
switches to the full-screen mode of the Park-
ing System Plus's optical system).
If you wish to display the rear assist image
again:
● Disengage reverse, or change the selector
lever's
position, engage reverse again or
move the selector lever to position R.
● OR: Press the RVC fu
nction button1)
Meaning of the orientation lines
››› Fig. 181
Side lines: extension of the vehicle (the
approximate width of the vehicle plus the
rear view mirrors) on the road surface.
End of the side lines: the area marked in
green ends approximately 2 m behind
the vehicle on the road surface.
Intermediate line: indicates a distance of
approximately 1 m behind the vehicle on
the road surface.
Red horizontal line: indicates a safe dis-
tance of approximately 40 cm at the rear
of the vehicle on the road surface. »
1 2
3
4
1)
WARNING: the RVC (Rear
View Camera) function
button will only be activated and available when the
reverse gear is engaged or the selector lever is set to
position R. 183
Technical data
Advice
Operation
Emergencies
Safety
Page 187 of 248
Driver assistance systems
long as you keep the rocker switch pressed.
When y
ou r
elease the switch, the new speed
is stored.
Setting a lower speed
● Press the lower part of the rocker switch
SET– ›››
Fig. 182 2 to reduce the speed. The
v ehic
l
e will automatically reduce its speed for
as long as you keep the switch pressed.
When you release the switch, the new speed
is stored.
When you increase speed with the accelera-
tor and then release the pedal, the system
will automatically restore the set speed. This
will not be the case, however, if the vehicle
speed exceeds the stored speed by more
than 10 km/h (6 mph) for longer than 5 mi-
nutes. The speed will have to be stored
again.
Cruise control is switched off if you reduce
speed by depressing the brake pedal. Reacti-
vate the control by pressing once on the up-
per part of the rocker switch RES+ ››› Fig. 182
2 .
Temporary deactivation of cruise con-
tr o
l* The cruise control system will be switched off
in the f
o
l
lowing situations:
● if the brake pedal is depressed, ●
if the clut
ch pedal is depressed,
● if the vehicle is accelerated to over
180 km/h (112 mph),
● when the lever 1 is moved in the direction
of
OFF w
ithout
being fully engaged.
To resume cruise control, release the brake or
clutch pedal or reduce the vehicle speed to
less than 180 km/h (112 mph) and press
once on the upper part of the rocker switch RES+ ››› Fig. 182 2 .
Complete system deactivation Vehicles with a manual gearbox
The sy
s
t
em is completely turned off by mov-
ing the control ››› Fig. 182 1 -- all the way to
the right h
and side (set into the OFF posi-
tion), or when the vehicle is stationary,
switching off the ignition.
Vehicles with an automatic gearbox
To completely disengage the system, the se-
lector lever must be placed in one of the fol-
lowing positions: P, N, R or 1 or with the vehi-
cle stopped and the ignition turned off. “SEAT Drive Profile” system
Function and oper
ation Fig. 183
In the centre console: button to ad-
ju s
t
the "SEAT Drive Profile" system The “SEAT Drive Profile” system modifies the
s
u
s
pension system's characteristics and
power steering behaviour.
you can choose between 2 different settings
with different characteristics.
CONVEN-
IENCEBalanced setting, suitable, e.g. for day-to-
day use.
SPORTThis gives the vehicle sporty characteristics
and is suitable for a sporty driving style. Settings can be changed when the vehicle is
s
t
ation
ary or in movement. When a “SEAT
Drive Profile” setting is changed it is activa-
ted immediately. »
185
Technical data
Advice
Operation
Emergencies
Safety
Page 189 of 248
Towing bracket device and trailer
Towing bracket device and
tr ai
l
er
Driving with a trailer What do you need to bear in mind
when towing a trailer? Your vehicle may be used to tow a trailer
when fitted w
ith the c
orrect equipment.
If the car is supplied with a factory-fitted tow-
ing bracket it will already have the necessary
technical modifications and meet the statuto-
ry requirements for towing a trailer. If you
wish to retrofit a towing bracket, consult
››› page 188.
Connectors
Your vehicle is fitted with a 12-pin connector
for the electrical connection between the
trailer and the vehicle.
If the trailer has a 7-pin plug you will need to
use an adapter cable. It is available at any
Technical Service.
Trailer weight/drawbar load
Never exceed the authorised trailer weight. If
you do not load the trailer up to the maxi-
mum permitted trailer weight, you can then
climb correspondingly steeper slopes. The maximum trailer weights listed are only
app
lic
able for altitudes up to 1000 m above
sea level. With increasing altitude the engine
power and therefore the vehicle climbing
ability are impaired because of the reduced
air density. The maximum trailer weight has
to be reduced accordingly. The weight of the
vehicle and trailer combination must be re-
duced by 10% for every further 1000 m (or
part thereof). The gross combination weight
is the actual weight of the laden vehicle plus
the actual weight of the laden trailer. When
possible, operate the trailer with the maxi-
mum permitted drawbar load on the ball joint
of the towing bracket, but do not exceed the
specified limit.
The figures for trailer weights and drawbar
loads that are given on the data plate of the
towing bracket are for certification purposes
only. The correct figures for your specific
model, which may be lower than these fig-
ures for the towing bracket, are given in the
vehicle documentation or in ››› chapter Tech-
nical Data .
Distributing the load
Distribute loads in the trailer so that heavy
objects are as near to the axle as possible.
Loads carried in the trailer must be secured
to prevent them moving. Tyre pressure
Set tyr
e pressure to the maximum permissi-
ble pressure shown on the sticker on the in-
side of the fuel tank flap. Set the tyre pres-
sure of the trailer tyres in accordance with the
trailer manufacturer's recommendations.
Exterior mirrors
Check whether you can see enough of the
road behind the trailer with the standard rear
vision mirrors. If this is not the case, you
should have additional exterior mirrors fitted.
Both exterior mirrors should be mounted on
hinged extension brackets. Adjust the mirrors
to give sufficient vision to the rear. WARNING
Never transport people in a trailer. This could
re s
ult in fatal accidents. Note
● To w
ing a trailer places additional demands
on the vehicle. We recommend additional
services between the normal inspection inter-
vals if the vehicle is used frequently for tow-
ing a trailer.
● Find out whether special regulations apply
to to
wing a trailer in your country. 187
Technical data
Advice
Operation
Emergencies
Safety
Page 191 of 248
Towing bracket device and trailer
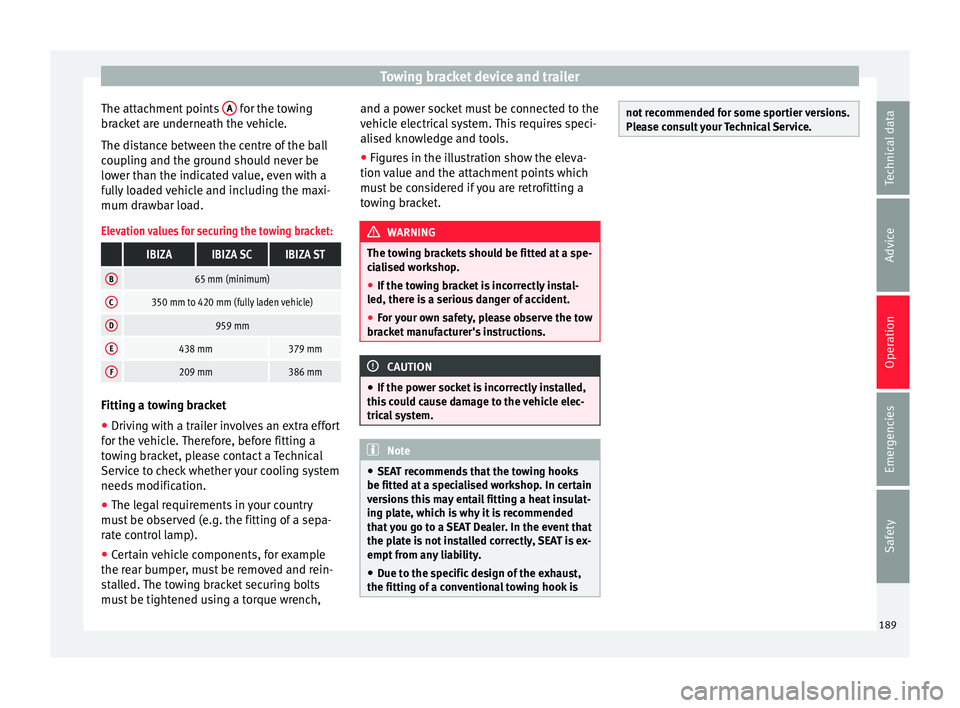
The attachment points A for the towing
br ac
k
et are underneath the vehicle.
The distance between the centre of the ball
coupling and the ground should never be
lower than the indicated value, even with a
fully loaded vehicle and including the maxi-
mum drawbar load.
Elevation values for securing the towing bracket:
IBIZAIBIZA SCIBIZA ST
B65 mm (minimum)
C350 mm to 420 mm (fully laden vehicle)
D959 mm
E438 mm379 mm
F209 mm386 mm Fitting a towing bracket
●
Driving with a trailer involves an extra effort
f or the
v
ehicle. Therefore, before fitting a
towing bracket, please contact a Technical
Service to check whether your cooling system
needs modification.
● The legal requirements in your country
must
be observed (e.g. the fitting of a sepa-
rate control lamp).
● Certain vehicle components, for example
the rear b
umper, must be removed and rein-
stalled. The towing bracket securing bolts
must be tightened using a torque wrench, and a power socket must be connected to the
vehicl
e electrical system. This requires speci-
alised knowledge and tools.
● Figures in the illustration show the eleva-
tion value and the att
achment points which
must be considered if you are retrofitting a
towing bracket. WARNING
The towing brackets should be fitted at a spe-
ci a
lised workshop.
● If the towing bracket is incorrectly instal-
led, there i
s a serious danger of accident.
● For your own safety, please observe the tow
brack
et manufacturer's instructions. CAUTION
● If the po w
er socket is incorrectly installed,
this could cause damage to the vehicle elec-
trical system. Note
● SEA T r
ecommends that the towing hooks
be fitted at a specialised workshop. In certain
versions this may entail fitting a heat insulat-
ing plate, which is why it is recommended
that you go to a SEAT Dealer. In the event that
the plate is not installed correctly, SEAT is ex-
empt from any liability.
● Due to the specific design of the exhaust,
the fitting of a c
onventional towing hook is not recommended for some sportier versions.
Ple
a
se consult your Technical Service. 189
Technical data
Advice
Operation
Emergencies
Safety