checking oil Seat Ibiza ST 2009 User Guide
[x] Cancel search | Manufacturer: SEAT, Model Year: 2009, Model line: Ibiza ST, Model: Seat Ibiza ST 2009Pages: 250, PDF Size: 6.4 MB
Page 191 of 250
Checking and refilling levels
190
Note•The wiper arms can be moved to the service position only when the
bonnet is properly closed.Changing the rear wiper blade
A good rear wiper blade is essential for clear rear vision.
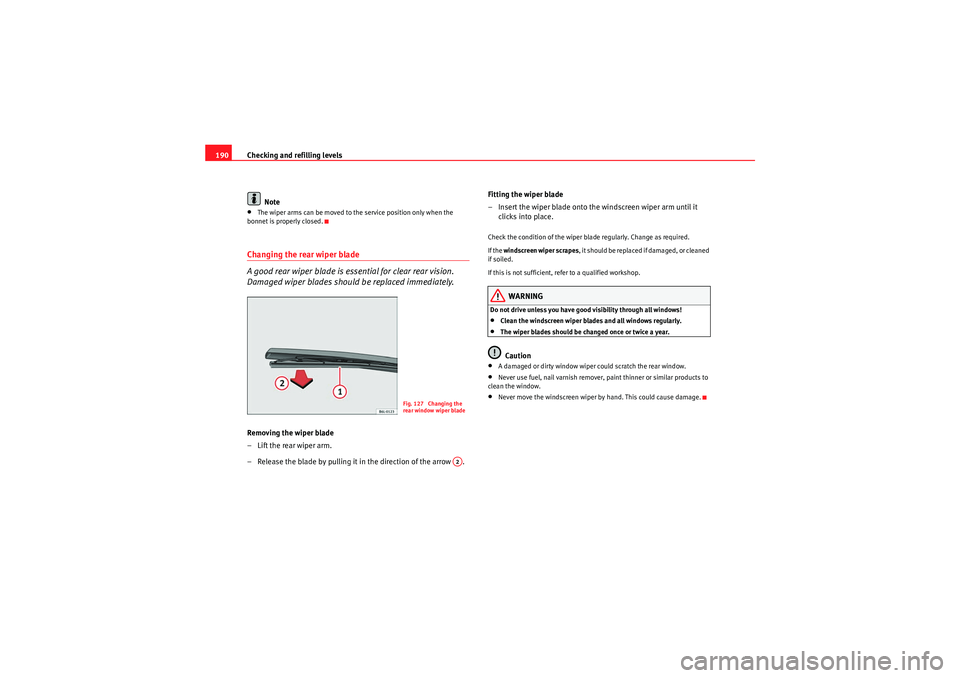
Damaged wiper blades should be replaced immediately.Removing the wiper blade
– Lift the rear wiper arm.
– Release the blade by pulling it in the direction of the arrow . Fitting the wiper blade
– Insert the wiper blade onto the windscreen wiper arm until it
clicks into place.
Check the condition of the wiper blade regularly. Change as required.
If the windscreen wiper scrapes , i t s h o u ld b e r e p la ce d i f d a m a ge d , o r c l ea n e d
if soiled.
If this is not sufficient, refer to a qualified workshop.
WARNING
Do not drive unless you have good visibility through all windows!•Clean the windscreen wiper blades and all windows regularly.•The wiper blades should be changed once or twice a year.Caution
•A damaged or dirty window wiper could scratch the rear window.•Never use fuel, nail varnish remover, paint thinner or similar products to
clean the window.•Never move the windscreen wiper by hand. This could cause damage.
Fig. 127 Changing the
rear window wiper blade
A2
Ibiza ST_EN.book Seite 190 Dienstag, 12. Januar 2010 4:03 16
Page 192 of 250
Checking and refilling levels191
Safety First
Operating instructions
Practical tips
Technical Data
Brake fluidChecking the brake fluid level
The brake fluid is checked at the intervals given in the service
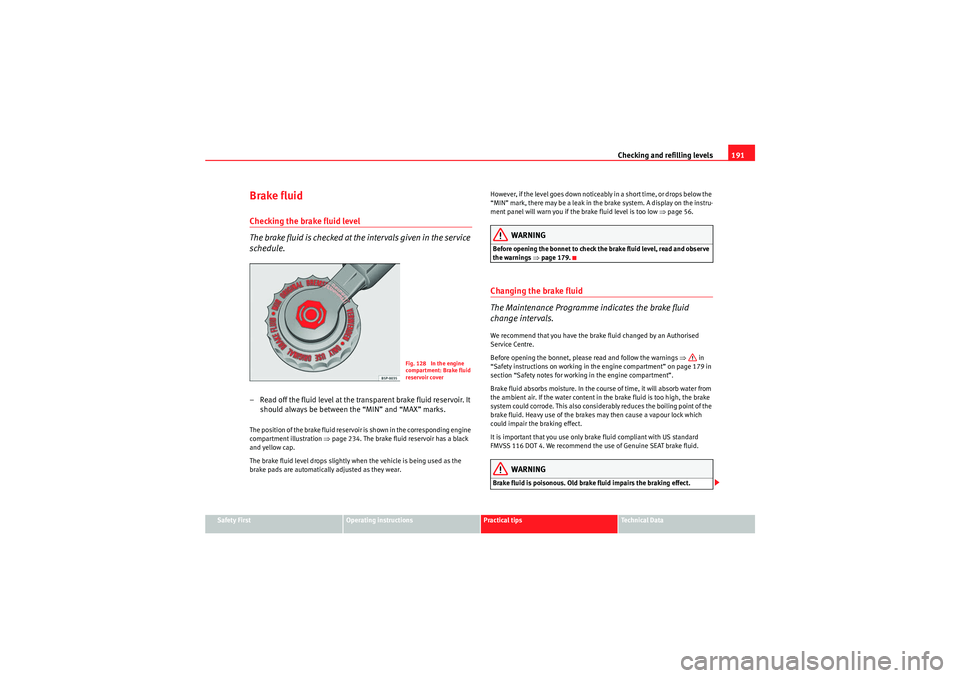
schedule.– Read off the fluid level at the transparent brake fluid reservoir. It
should always be between the “MIN” and “MAX” marks.The position of the brake fluid reservoir is shown in the corresponding engine
compartment illustration ⇒page 234. The brake fluid reservoir has a black
and yellow cap.
The brake fluid level drops slightly when the vehicle is being used as the
brake pads are automatically adjusted as they wear. However, if the level goes down noticeably in a short time, or drops below the
“MIN” mark, there may be a leak in the brake system. A display on the instru-
ment panel will warn you if the brake fluid level is too low
⇒page 56.
WARNING
Before opening the bonnet to check the brake fluid level, read and observe
the warnings ⇒page 179.Changing the brake fluid
The Maintenance Programme indicates the brake fluid
change intervals.We recommend that you have the brake fluid changed by an Authorised
Service Centre.
Before opening the bonnet, please read and follow the warnings ⇒ in
“Safety instructions on working in the engine compartment” on page 179 in
section “Safety notes for working in the engine compartment”.
Brake fluid absorbs moisture. In the course of time, it will absorb water from
the ambient air. If the water content in the brake fluid is too high, the brake
system could corrode. This also considerably reduces the boiling point of the
brake fluid. Heavy use of the brakes may then cause a vapour lock which
could impair the braking effect.
It is important that you use only brake fluid compliant with US standard
FMVSS 116 DOT 4. We recommend the use of Genuine SEAT brake fluid.
WARNING
Brake fluid is poisonous. Old brake fluid impairs the braking effect.
Fig. 128 In the engine
compartment: Brake fluid
reservoir cover
Ibiza ST_EN.book Seite 191 Dienstag, 12. Januar 2010 4:03 16
Page 195 of 250
Checking and refilling levels
194Charging and changing the vehicle battery
The battery is maintenance-free and is checked during the
inspection service. All work on the vehicle battery requires
specialist knowledge.If you often drive short distances or if the vehicle is not driven for long
periods, the battery should be checked by a qualified workshop between the
scheduled services.
If the battery has discharged and you have problems starting the vehicle, the
battery might be damaged. If this happens, we recommend you have the
vehicle battery checked by an Authorised Service Centre where it will be re-
charged or replaced.
Charging the battery
The vehicle battery should be charged by a qualified workshop only, as
batteries using special technology have been installed and they must be
charged in a controlled environment.
Replacing a vehicle battery
The battery has been developed to suit the conditions of its location and has
special safety features.
Genuine SEAT batteries fulfil the maintenance, performance and safety spec-
ifications of your vehicle.
WARNING
•We recommend you use only maintenance-free or cycle free leak-proof
batteries which comply with the standards T 825 06 and VW 7 50 73. This
standard applies as of 2001.•Before starting any work on the batteries, you must read and observe
the warnings ⇒ in “Warnings on handling the battery” on page 192.
For the sake of the environment
Batteries contain toxic substances such as sulphuric acid and lead. They
m ust b e d isp ose d of app ro pr iate ly a nd m ust no t b e disp ose d of wit h or di na r y
household waste.WheelsGeneral notesAvoiding damage
– If you have to drive over a kerb or similar obstacle, drive very
slowly and as near as possible at a right angle to the kerb.
– Keep grease, oil and fuel off the tyres.
– Inspect the tyres regularly for damage (cuts, cracks or blisters, etc.). Remove any foreign objects embedded in the treads.
Storing tyres
– Mark tyres when you remove them to indicate the direction of rotation. This ensures you will be able to install them correctly
when you replace them.
– When removed, the wheels and/or tyres should be stored in a cool, dry and preferably dark location.
– Store tyres in a vertical position if they are not fitted on wheel rims.
Ibiza ST_EN.book Seite 194 Dienstag, 12. Januar 2010 4:03 16
Page 198 of 250
Checking and refilling levels197
Safety First
Operating instructions
Practical tips
Technical Data
WARNING
There is a serious danger of accidents if a tyre bursts during driving!•The tyres must be replaced at the latest when the tread is worn down to
the tread wear indicators. Failure to do so could result in an accident. Worn
tyres do not grip well at high speeds on wet roads. There is also a greater
risk of “aquaplaning” •At continuously high speeds, a tyre with insufficient pressure flexes
more. This causes it to overheat. This can cause tread separation and tyre
blow-out. Risk of accident. Always observe the recommended tyre pres-
sures.•If tyres show excessive wear, you should have the running gear checked
by an Authorised Service Centre.•Keep chemicals such as oil, fuel and brake fluid away from tyres.•Damaged wheels and tyres must be replaced immediately!For the sake of the environment
Under-inflated tyres will increase fuel consumption.New tyres and wheels
New tyres and wheels have to be run-in.The tyres and wheel rims are an essential part of the vehicle's design. The
tyres and rims approved by SEAT are specially matched to the characteristics
of the vehicle and make a major contribution to good road holding and safe
handling ⇒.
Tyres should be replaced at least in pairs and not individually (i.e. both front
tyres or both rear tyres together). A knowledge of tyre designations makes it easier to choose the correct tyres. Radial tyres have the tyre designations
marked on the sidewall, for example:
195/65 R15 91T
This contains the following information:
195 Tyre width in mm
65 Height/width ratio in %
RTyre construction: Radial
15 Rim diameter in inches
91 Load rating code
TSpeed rating
The tyres could also have the following information:
•A direction of rotation symbol•“Reinforced” denotes heavy-duty tyres.
The manufacturing date is also indicated on the tyre sidewall (possibly only
on the inner side of the wheel).
“DOT ... 1103 ...” means, for example, that the tyre was produced in the 11th
week of 2003.
We recommend that work on tyres and wheels is carried out by an Authorised
Service Centre. They are familiar with the procedure and have the necessary
special tools and spare parts as well as the proper facilities for disposing of
the old tyres.
Any Authorised Service Centre has full information on the technical require-
ments when installing or changing tyres, wheels or wheel trims.WARNING
•We recommend that you use only wheels and tyres which have been
approved by SEAT for your model. Failure to do so could impair vehicle
handling. Risk of accident.
Ibiza ST_EN.book Seite 197 Dienstag, 12. Januar 2010 4:03 16
Page 199 of 250
Checking and refilling levels
198•Avoid running the vehicle on tyres that are more than six years old. If
you have no alternative, you should drive slowly and with extra care at all
times.•Never use old tyres or those with an unknown “history of use”.•If wheel trims are retrofitted, you must ensure that the flow of air to the
brakes is not restricted. This could cause them to overheat.•All four wheels must be fitted with radial tyres of the same type, size
(rolling circumference) and the same tread pattern.For the sake of the environment
Old tyres must be disposed of according to the laws in the country concerned.
Note
•For technical reasons, it is not generally possible to use the wheels from
other vehicles. This can also apply to wheels of the same model. The use of
wheels or tyres which have not been approved by SEAT for use with your
model may invalidate the vehicle's type approval for use on public roads.•If the spare tyre is not the same as the tyres that are mounted on the
vehicle - for example with winter tyres - you should only use the spare tyre for
a short period of time and drive with extra care. Refit the normal road wheel
as soon as possible.Wheel bolts
Wheel bolts must be tightened to the correct torque.The design of wheel bolts is matched to the rims. If different wheel rims are
fitted, the correct wheel bolts with the right length and correctly shaped bolt heads must be used. This ensures that wheels are fitted securely and that the
brake system functions correctly.
In certain circumstances, you may not use wheel bolts from a different car -
even if it is the same model
⇒page 172.
WARNING
If the wheel bolts are not tightened correctly, the wheel could become
loose while driving. Risk of accident.•The wheel bolts must be clean and turn easily. Never apply grease or oil
to them.•Use only wheel bolts which belong to the wheel.•If the prescribed torque of the wheel bolts is too low, they could loosen
whilst the vehicle is in motion. Risk of accident! If the tightening torque is
too high, the wheel bolts and threads can be damaged.Caution
The prescribed tightening torque for wheel bolts for steel and alloy wheels is
120 Nm.Winter tyres
Winter tyres will improve the vehicles handling on snow and
ice.In winter conditions winter tyres will considerably improve the vehicles
handling. The design of summer tyres (width, rubber compound, tread
pattern) gives less grip on ice and snow.
Winter tyres must be inflated to a pressure 0.2 bar higher than the pressures
specified for summer tyres (see sticker on tank flap).
WARNING (continued)
Ibiza ST_EN.book Seite 198 Dienstag, 12. Januar 2010 4:03 16
Page 235 of 250
Technical Data
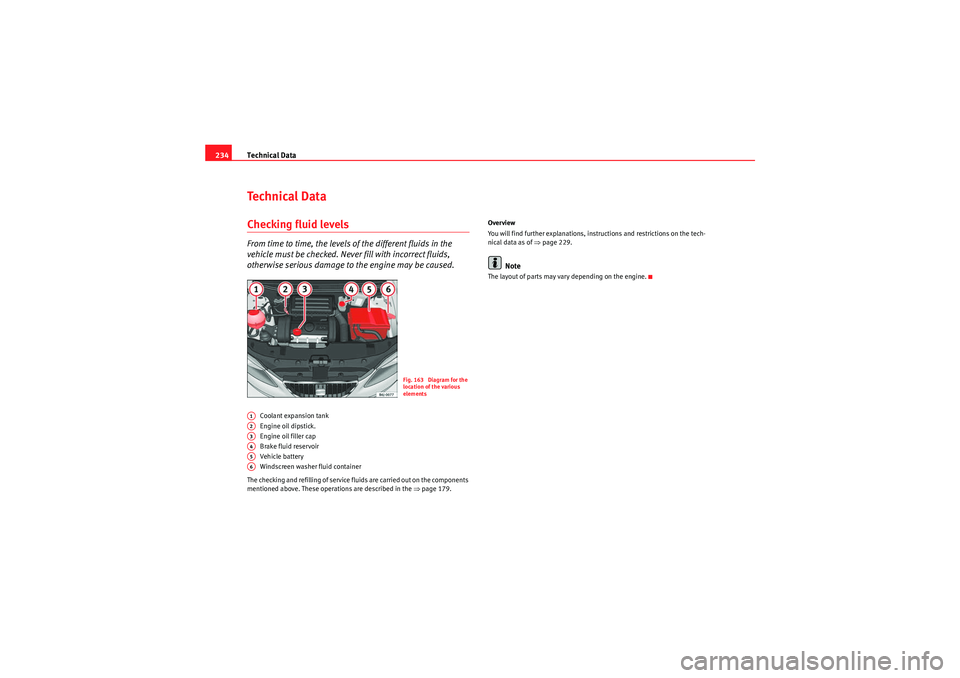
234Technical DataChecking fluid levelsFrom time to time, the levels of the different fluids in the
vehicle must be checked. Never fill with incorrect fluids,
otherwise serious damage to the engine may be caused.
Coolant expansion tank
Engine oil dipstick.
Engine oil filler cap
Brake fluid reservoir
Vehicle battery
Windscreen washer fluid container
The checking and refilling of service fluids are carried out on the components
mentioned above. These operations are described in the ⇒page 179. Overview
You will find further explanations, instructions and restrictions on the tech-
nical data as of
⇒page 229.
Note
The layout of parts may vary depending on the engine.
Fig. 163 Diagram for the
location of the various
elements
A1A2A3A4A5A6
Ibiza ST_EN.book Seite 234 Dienstag, 12. Januar 2010 4:03 16
Page 243 of 250
Index
242Car phone . . . . . . . . . . . . . . . . . . . . . . . . . . . . . 173
Catalytic converter . . . . . . . . . . . . . . . . . . . . . . 157
Central locking . . . . . . . . . . . . . . . . . . . . . . . . . . 70
Automatic speed dependent locking and un-locking system* . . . . . . . . . . . . . . . . . . . . . 72
Emergency unlocking system . . . . . . . . . . . . 72
Locking system for involuntary unlocking . . 72
Selective unlocking system* . . . . . . . . . . . . 71
Unlocking system* . . . . . . . . . . . . . . . . . . . . 72
Central locking button locking . . . . . . . . . . . . . . . . . . . . . . . . . . . . . . 73
unlocking . . . . . . . . . . . . . . . . . . . . . . . . . . . . 73
Cetane number . . . . . . . . . . . . . . . . . . . . . . . . . 178
Changing bulbs interior light and front reading lights . . . . 221
Changing double headlight bulbs . . . . . . . . . . 214 dipped beam . . . . . . . . . . . . . . . . . . . . . . . . 215
main beam and side lights . . . . . . . . . . . . . 214
turn signal . . . . . . . . . . . . . . . . . . . . . . . . . . 216
Changing gear See Manual gearbox . . . . . . . . . . . . . . . . . . 135
Changing gear in Tiptronic mode . . . . . . . . . . . 140
Changing rear lights on the rear lid . . . . . . . . . . . . . . . . . . . . . . . 219
on the wing . . . . . . . . . . . . . . . . . . . . . . . . . 218
Changing single headlight bulbs . . . . . . . . . . . 216 turn signal . . . . . . . . . . . . . . . . . . . . . . . . . . 218
Changing the bulbs Luggage compartment light . . . . . . . . . . . . 222
number plate light . . . . . . . . . . . . . . . . . . . 221
Side turn signal lights . . . . . . . . . . . . . . . . . 220 Changing the single headlight bulbs
dipped/main beam . . . . . . . . . . . . . . . . . . . 217
Side lights . . . . . . . . . . . . . . . . . . . . . . . . . . 217
Changing windscreen wiper blades . . . . . . . . . 189
Chassis number . . . . . . . . . . . . . . . . . . . . . . . . 230
Checking . . . . . . . . . . . . . . . . . . . . . . . . . . . . . . 193
Checking battery electrolyte level . . . . . . . . . . 193
Checking engine oil level . . . . . . . . . . . . . . . . . 183
Child safety . . . . . . . . . . . . . . . . . . . . . . . . . . . . . 38
Child seat . . . . . . . . . . . . . . . . . . . . . . . . . . . . . . . 40 Categorisation in groups . . . . . . . . . . . . . . . 40
Group 1 . . . . . . . . . . . . . . . . . . . . . . . . . . . . . 41
Group 2 . . . . . . . . . . . . . . . . . . . . . . . . . . . . . 41
Group 3 . . . . . . . . . . . . . . . . . . . . . . . . . . . . . 41
Groups 0 and 0+ . . . . . . . . . . . . . . . . . . . . . . 40
ISOFIX system . . . . . . . . . . . . . . . . . . . . . . . . 43
Securing . . . . . . . . . . . . . . . . . . . . . . . . . . . . . 43
Child seats on the front passenger seat . . . . . . . . . . . . . 27
safety notes . . . . . . . . . . . . . . . . . . . . . . . . . . 38
Cigarette lighter . . . . . . . . . . . . . . . . . . . . . . . . 111
Cleaning alloy wheel rims . . . . . . . . . . . . . . . . 168
Cleaning chrome . . . . . . . . . . . . . . . . . . . . . . . . 167
Cleaning engine compartment . . . . . . . . . . . . . 169
Cleaning steel wheel rims . . . . . . . . . . . . . . . . 168
Cleaning windows . . . . . . . . . . . . . . . . . . . . . . . 166
Climatronic automatic mode . . . . . . . . . . . . . . . . . . . . . 127
controls . . . . . . . . . . . . . . . . . . . . . . . . . . . . 126
General notes . . . . . . . . . . . . . . . . . . . . . . . 129
manual mode . . . . . . . . . . . . . . . . . . . . . . . 128 Clock . . . . . . . . . . . . . . . . . . . . . . . . . . . . . . . . . . 50
Cloth seat covers cleaning . . . . . . . . . . . . . . . . 170
Cockpit . . . . . . . . . . . . . . . . . . . . . . . . . . . . . . . . . 47
Coming home function . . . . . . . . . . . . . . . . . . . . 89
Control
exterior mirrors . . . . . . . . . . . . . . . . . . . . . . . 99
Control lamps . . . . . . . . . . . . . . . . . . . . . . . . . . . 56
Control lighting . . . . . . . . . . . . . . . . . . . . . . . . . . 47
Controls Electric windows . . . . . . . . . . . . . . . . . . . . . . 82
Light switches . . . . . . . . . . . . . . . . . . . . . . . . 87
Convenience closing Sliding/tilting sunroof . . . . . . . . . . . . . . . . . 86
Windows . . . . . . . . . . . . . . . . . . . . . . . . . . . . 84
Convenience opening Windows . . . . . . . . . . . . . . . . . . . . . . . . . . . . 84
Coolant . . . . . . . . . . . . . . . . . . . . . . . . . . . 186, 187
Coolant Level . . . . . . . . . . . . . . . . . . . . . . . . . . . 187
Coolant level warning lamp . . . . . . . . . . . . . . . . . . . . . . . . 63
Coolant Loss . . . . . . . . . . . . . . . . . . . . . . . . . . . 187
Coolant temperature Safety instructions . . . . . . . . . . . . . . . . . . . . 64
warning lamp . . . . . . . . . . . . . . . . . . . . . . . . 63
Correct adjustment of front head restraints . . . 12
Cruise control . . . . . . . . . . . . . . . . . . . . . . . . . . 147
Cruise control system warning lamp . . . . . . . . . . . . . . . . . . . . . . . . 61
Ibiza ST_EN.book Seite 242 Dienstag, 12. Januar 2010 4:03 16
Page 244 of 250
Index243
DDanger of fitting a child seat on the front passenger
seat . . . . . . . . . . . . . . . . . . . . . . . . . . . . . . . 27
Dash panel . . . . . . . . . . . . . . . . . . . . . . . . . . . . . . 47
Dash panel cleaning . . . . . . . . . . . . . . . . . . . . . 170
Daytime running lights . . . . . . . . . . . . . . . . . . . . 88
Diesel . . . . . . . . . . . . . . . . . . . . . . . . . . . . . . . . . 178
Diesel engine Winter driving . . . . . . . . . . . . . . . . . . . . . . . . 179
Diesel engine particulate filter . . . . . . . . . . . . . 158
Differential lock . . . . . . . . . . . . . . . . . . . . . . . . . 154
Differential lock fault (EDL) warning lamp . . . . . . . . . . . . . . . . . . . . . . . . . 60
Digital clock . . . . . . . . . . . . . . . . . . . . . . . . . . . . . 50
Dipped beam headlights . . . . . . . . . . . . . . . . . . 87
Disabling front passenger airbag Safety notes . . . . . . . . . . . . . . . . . . . . . . . . . . 37
Disabling the airbag Disabling front passenger airbag . . . . . . . . . 36
Displays in the Multi-function display Memory displays . . . . . . . . . . . . . . . . . . . . . . 52
Disposal Airbags . . . . . . . . . . . . . . . . . . . . . . . . . . . . . . 28
Door lock cylinders . . . . . . . . . . . . . . . . . . . . . . 167
Door release lever . . . . . . . . . . . . . . . . . . . . . . . . 47
Doors Childproof locks . . . . . . . . . . . . . . . . . . . . . . . 74
warning lamp . . . . . . . . . . . . . . . . . . . . . . . . . 62
Drive wheels traction control system . . . . . . . . 152 Driveshaft differential
XDS . . . . . . . . . . . . . . . . . . . . . . . . . . . . . . . . 153
Driving Driving abroad . . . . . . . . . . . . . . . . . . . . . . . 160
With a trailer . . . . . . . . . . . . . . . . . . . . . . . . . 161
with a trailer . . . . . . . . . . . . . . . . . . . . . . . . . 160
Driving abroad . . . . . . . . . . . . . . . . . . . . . . . . . . 160 Headlights . . . . . . . . . . . . . . . . . . . . . . . . . . 160
Driving safety . . . . . . . . . . . . . . . . . . . . . . . . . . . . . 8
Duplicate keys . . . . . . . . . . . . . . . . . . . . . . . . . . . 75
Dust filter . . . . . . . . . . . . . . . . . . . . . . . . . . . . . . 129
Dynamic headlight range control . . . . . . . . . . . . 88
EEconomical driving . . . . . . . . . . . . . . . . . . . . . . 158
EDL . . . . . . . . . . . . . . . . . . . . . . . . . . . . . . . . . . . 154 warning lamp . . . . . . . . . . . . . . . . . . . . . . . . . 59
Electro-hydraulic steering warning lamp . . . . . . . . . . . . . . . . . . . . . . . . . 63
Electronic differential lock . . . . . . . . . . . . . . . . 154 warning lamp . . . . . . . . . . . . . . . . . . . . . . . . . 59
Electronic immobiliser . . . . . . . . . . . . . . . . . . . . 132
Electronic Stability Programme . . . . . . . . . . . . 153 Description . . . . . . . . . . . . . . . . . . . . . . . . . . 131
warning lamp . . . . . . . . . . . . . . . . . . . . . . . . . 60
Warning light . . . . . . . . . . . . . . . . . . . . . . . . 131
Electronic Stability Programme (ESP) warning lamp . . . . . . . . . . . . . . . . . . . . . . . . . 60
Emission control system warning lamp . . . . . . . . . . . . . . . . . . . . . . . . . 63 Engine
Running in . . . . . . . . . . . . . . . . . . . . . . . . . . 156
Engine compartment Working in the engine compartment . . . . . 179
Engine coolant . . . . . . . . . . . . . . . . . . . . . . . . . . 186
Engine fault warning lamp . . . . . . . . . . . . . . . . . . . . . . . . . 58
Engine management warning lamp . . . . . . . . . . . . . . . . . . . . . . . . . 58
Engine oil . . . . . . . . . . . . . . . . . . . . . . . . . . . . . . 182 Changing . . . . . . . . . . . . . . . . . . . . . . . . . . . 185
Checking level . . . . . . . . . . . . . . . . . . . . . . . 183
Oil properties . . . . . . . . . . . . . . . . . . . . . . . . 183
Specifications . . . . . . . . . . . . . . . . . . . . . . . 182
Topping up . . . . . . . . . . . . . . . . . . . . . . . . . . 184
Engine oil dipstick . . . . . . . . . . . . . . . . . . . . . . . 183
Engine oil pressure Warning lamp . . . . . . . . . . . . . . . . . . . . . . . . 59
Environmental tip Avoiding pollution . . . . . . . . . . . . . . . . . . . . 177
Environmentally friendly driving . . . . . . . . . . . . 158
ESP . . . . . . . . . . . . . . . . . . . . . . . . . . . . . . . . . . . 153 warning lamp . . . . . . . . . . . . . . . . . . . . . . . . . 60
See also Electronic Stability Programme . . 131
Exhaust gas purification system . . . . . . . . . . . 157
Exterior mirrors . . . . . . . . . . . . . . . . . . . . . . . . . 166
External aerial . . . . . . . . . . . . . . . . . . . . . . . . . . 173
FFabric trim cleaning . . . . . . . . . . . . . . . . . . . . . . 170
Ibiza ST_EN.book Seite 243 Dienstag, 12. Januar 2010 4:03 16