airbag off Seat Ibiza ST 2012 User Guide
[x] Cancel search | Manufacturer: SEAT, Model Year: 2012, Model line: Ibiza ST, Model: Seat Ibiza ST 2012Pages: 282, PDF Size: 3.77 MB
Page 68 of 282
66Cockpit
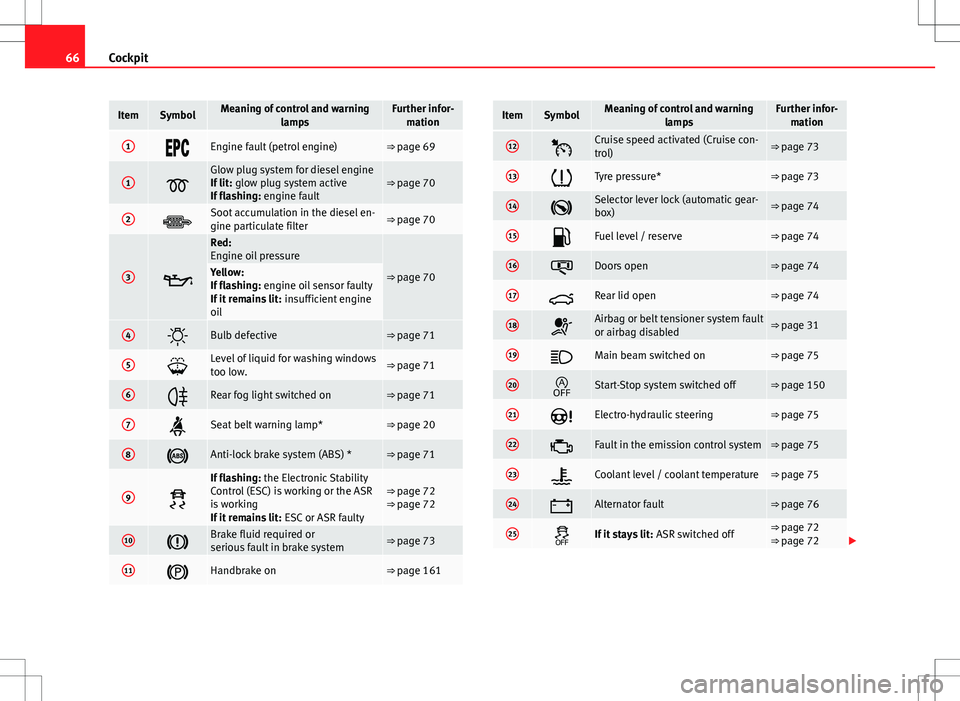
ItemSymbolMeaning of control and warning
lampsFurther infor-mation
1Engine fault (petrol engine)⇒ page 69
1
Glow plug system for diesel engine
If lit: glow plug system active
If flashing: engine fault⇒ page 70
2Soot accumulation in the diesel en-
gine particulate filter⇒ page 70
3
Red:
Engine oil pressure
⇒ page 70Yellow:
If flashing: engine oil sensor faulty
If it remains lit: insufficient engine
oil
4Bulb defective⇒ page 71
5Level of liquid for washing windows
too low.⇒ page 71
6Rear fog light switched on⇒ page 71
7Seat belt warning lamp*⇒ page 20
8Anti-lock brake system (ABS) *⇒ page 71
9
If flashing: the Electronic Stability
Control (ESC) is working or the ASR
is working
If it remains lit: ESC or ASR faulty⇒ page 72
⇒ page 72
10Brake fluid required or
serious fault in brake system⇒ page 73
11Handbrake on⇒ page 161
ItemSymbolMeaning of control and warning
lampsFurther infor-mation
12Cruise speed activated (Cruise con-
trol)⇒ page 73
13Tyre pressure*⇒ page 73
14Selector lever lock (automatic gear-
box)⇒ page 74
15Fuel level / reserve⇒ page 74
16Doors open⇒ page 74
17Rear lid open⇒ page 74
18Airbag or belt tensioner system fault
or airbag disabled⇒ page 31
19Main beam switched on⇒ page 75
20Start-Stop system switched off⇒ page 150
21Electro-hydraulic steering⇒ page 75
22Fault in the emission control system⇒ page 75
23Coolant level / coolant temperature⇒ page 75
24Alternator fault⇒ page 76
25If it stays lit: ASR switched off⇒ page 72
⇒ page 72
Page 86 of 282
84Opening and closing
Activating the selective unlocking system*
With the door open, insert a key into the start cylinder and start the ignition.
Insert the other key into the driver door lock and turn in the opening direc-
tion for at least 3 seconds. The turn signals will flash twice.
Deactivating the selective unlocking system*
With the door open, insert a key into the start cylinder and start the ignition.
Insert the other key into the driver door lock and turn in the locking direc-
tion for at least 3 seconds. The turn signals will flash once.
Involuntary unlocking
It is an anti-theft system and prevents the unintentional un-
locking of the vehicle. If the vehicle is unlocked and any of the doors (including the rear lid) are
opened within 30 seconds, it gets re-locked automatically.
Automatic speed dependent locking and unlocking system*
This is a safety system which prevent the access to the vehi-
cle from the outside when it is running (for example, when
stopped at a traffic light).
Locking
The doors lock automatically after exceeding 15 km/h (10 mph). The rear lid
locks automatically after exceeding 6 km/h (4 mph).
If the vehicle is stopped and any of its doors open, when starting again and
exceeding the mentioned speed, all doors will lock again. Unlocking
On withdrawing the ignition key, the vehicle will returns to its status prior to
self-locking.
Each door can be unlocked and opened independently from the inside (for
example, when a passenger gets out of it). To do it, simply operate the lever
inside the door.
Activating the system*
With the ignition on, press the locking key on the central locking system
within 3 to 10 seconds.
Deactivating the system*
With the ignition on, press the unlocking key on the central locking system
within 3 to 10 seconds.
In both cases, if the operation has been carried out correctly, the locking
lamp will flash
⇒
Fig. 43.
WARNING
The door handles must not be operated when the vehicle is running: the
door would open.
Note
If the airbags are triggered during an accident, the vehicle is unlocked, ex-
cept for the luggage compartment. It is possible to lock the vehicle from in-
side with the central locking, after turning the ignition off and back on
again.
Page 87 of 282
85
Opening and closing
Emergency unlocking system
If the airbags are triggered during an accident, the vehicle is unlocked, ex-
cept for the luggage compartment. It is possible to lock the vehicle from in-
side with the central locking, after turning the ignition off and back on
again.
Central lock button*
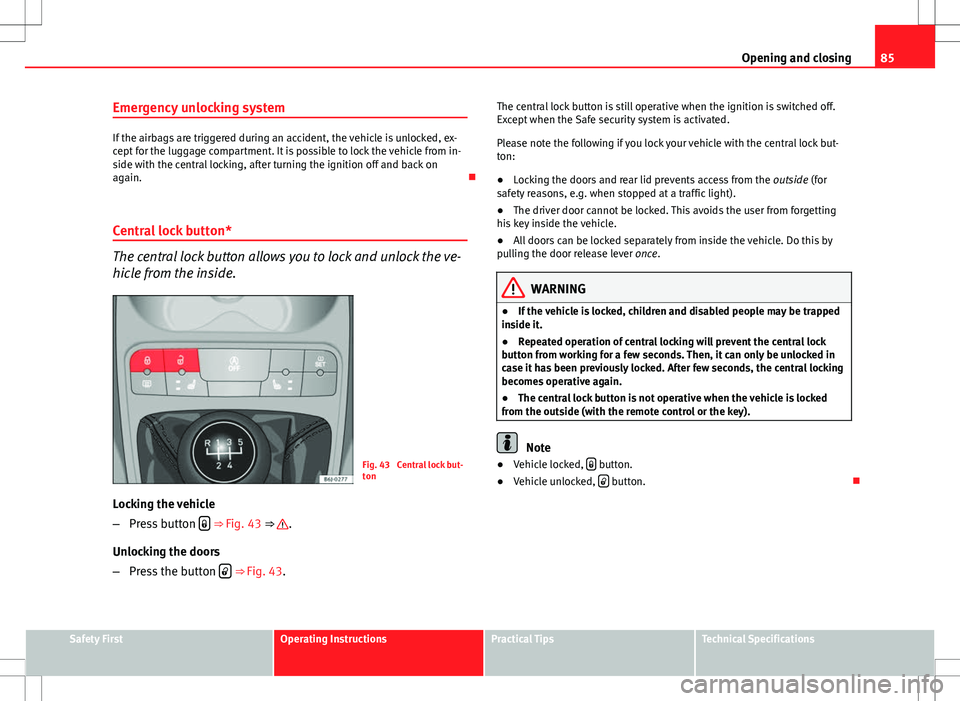
The central lock button allows you to lock and unlock the ve-
hicle from the inside.
Fig. 43 Central lock but-
ton
Locking the vehicle
– Press button
⇒ Fig. 43 ⇒ .
Unlocking the doors
– Press the button
⇒ Fig. 43. The central lock button is still operative when the ignition is switched off.
Except when the Safe security system is activated.
Please note the following if you lock your vehicle with the central lock but-
ton:
●
Locking the doors and rear lid prevents access from the outside (for
safety reasons, e.g. when stopped at a traffic light).
● The driver door cannot be locked. This avoids the user from forgetting
his key inside the vehicle.
● All doors can be locked separately from inside the vehicle. Do this by
pulling the door release lever once.
WARNING
● If the vehicle is locked, children and disabled people may be trapped
inside it.
● Repeated operation of central locking will prevent the central lock
button from working for a few seconds. Then, it can only be unlocked in
case it has been previously locked. After few seconds, the central locking
becomes operative again.
● The central lock button is not operative when the vehicle is locked
from the outside (with the remote control or the key).
Note
● Vehicle locked, button.
● Vehicle unlocked, button.
Safety FirstOperating InstructionsPractical TipsTechnical Specifications
Page 162 of 282
160Driving
WARNING
If the vehicle moves with no control, an accident and serious injury may
occur.
● As a driver, you should never leave your vehicle if the engine is run-
ning and a gear is engaged. If you have to leave your vehicle while the
engine is running, you must always apply the handbrake and engage the
parking lock position P.
● If the engine is running and if D or R are engaged, you will need to
hold the vehicle stopped by depressing footbrake down. The vehicle
would creep forward as the power transmission is not fully interrupted
even when the engine is idling.
● Never accelerate when moving the selector lever or you may cause an
accident.
● Never move the selector lever to “R” or “P” when driving. Risk of acci-
dent.
● Before driving down a very steep slope, reduce your speed and shift
to first gear.
● Always hold the vehicle on the foot brake if you stop on hills. Other-
wise, the vehicle could roll back.
● Never allow the brake to rub and do not use the brake pedal too often
or for long periods. Constant braking will cause the brakes to overheat
and will considerably reduce the brake effect. This increases the braking
distance and could cause the brake system to fail.
WARNING
Never switch the engine off until the vehicle is stationary. You could lose
control of your vehicle. This could cause an accident and serious injury.
● The airbags and belt tensioners do not work when the ignition is
switched off.
WARNING (Continued)
● The brake servo does not work with the engine off. You need more
force to stop the vehicle.
● Power steering does not work when the engine is not running. That is
why it is much more difficult to turn the steering wheel.
● Never remove the key from the ignition if the vehicle is in motion. The
steering lock could suddenly engage, and you would not be able to steer
the vehicle.
● Never allow the vehicle to roll downhill with the selector lever in “N”,
regardless of whether the engine is running or not.
CAUTION
If you allow the vehicle to move when the engine is switched off or with the
selector lever in position “N”, take your foot off the accelerator and wait un-
til the engine starts idling before returning to position “D”.
Kickdown feature
This feature allows maximum acceleration. If you press the accelerator down thoroughly, the gearbox automatically
changes down, depending on speed and engine speed, into a lower gear to
take full advantage of give the vehicle maximum acceleration.
The gearbox does not change gear until the engine reaches the maximum
determined engine speed for the gear.
Page 190 of 282
188Vehicle maintenance and cleaning
WARNING
Never clean the dash panel and the airbag module surface with cleaners
containing solvents. Solvents cause the surface to become porous. If the
airbag triggered, plastic parts could become detached and cause inju-
ries.
CAUTION
Cleaning products which contain solvents will damage the material.
Wooden trim cleaning*
– Clean the wooden trim with a water-moistened clean cloth.
– If this does not provide satisfactory results, use a gentle soap
solution.
CAUTION
Cleaning products which contain solvents will damage the material.
Cloth seat covers and fabric trim cleaning
Cloth seat covers and fabric trim on the doors, headlining etc. can be
cleaned with a special interior cleaner or with dry foam and a soft brush. Cleaning the radio and climate controls
To clean the radio and/or climate controls, use a soft damp cloth. For more
resistant dirt, a neutral soap solution may be used.
Leather cleaning*
Normal cleaning
– Moisten a cotton or woollen cloth with water and wipe over the
leather surfaces.
Cleaning stubborn stains
– More stubborn dirt can be removed using a mild soap solution
(pure liquid soap; two tablespoons diluted in one litre of water)
and a cloth.
– Do not let the water soak through the leather or soak into the
seams.
– Then wipe off with a soft, dry cloth.
Leather maintenance
– The leather should be treated twice a year with a special leath-
er-care product, available in your Technical Services.
– Apply these products very sparingly.
– Then wipe off with a soft, dry cloth.
SEAT does everything possible to preserve the genuine qualities of this nat-
ural product. Due to the natural properties of the specially selected hides
employed, the finished leather has a certain sensitivity to grease and dirt,
Page 192 of 282
190Accessories, replacement of parts and modifications
Accessories, replacement of parts and modifications
Accessories and spare parts
Always consult a SEAT dealership before purchasing acces-
sories and parts.
Your vehicle is designed to offer a high standard of active and passive safe-
ty.
Before purchasing accessories and parts, and before making technical
changes to your vehicle, we recommend you to consult your SEAT Technical
Service.
SEAT dealerships will be happy to provide you with the latest information
about the use, legal requirements and recommendations from the manufac-
turer regarding accessories and parts.
We recommend you use only SEAT Approved Accessories®
and SEAT Ap-
proved Spare Parts ®
. This way, SEAT can guarantee that the product in
question is suitable, reliable and safe. SEAT Technical Services have the
necessary experience and facilities to ensure that parts are correctly and
professionally installed.
Despite a continuous observation of the market, SEAT is not able to assess
the reliability, safety and suitability of those parts SEAT has not approved.
For this reason, SEAT cannot assume responsibility for any non-genuine
parts used, even if these parts have been approved by an official testing
agency or are covered by an official approval certificate.
Any equipment subsequently installed which has a direct effect on the driv-
er's control of the vehicle (e.g. cruise control system or electronically-con-
trolled suspension) must be approved by SEAT and bear the e mark (the Eu-
ropean Union's authorisation symbol). If any
additional electrical components are fitted which do not serve to con-
trol the vehicle itself (e.g. refrigerator box, laptop or ventilator fan), these
must bear the CE mark (European Union manufacturer conformity declara-
tion).
WARNING
Accessories, for example telephone holders or cup holders, should never
be fitted on the covers, or within the working range, of the airbags. Oth-
erwise, there is a danger of injury if the airbag is triggered in an accident.
Technical modifications
Modifications must always be carried out according to our
specifications.
Unauthorised modifications to the electronic components or software in the
vehicle may cause malfunctions. Due to the way the electronic components
are linked together in networks, other indirect systems may be affected by
the faults. This can seriously impair safety, lead to excessive wear of compo-
nents, and also invalidate your vehicle registration documents.
The SEAT Technical Service cannot be held liable for any damage caused by
modifications and/or work incorrectly performed.
For this reason, we recommend having all work performed by a SEAT Techni-
cal Service using SEAT Original Spare Parts ®
.
Page 273 of 282
Index
A
ABS . . . . . . . . . . . . . . . . . . . . . . . . . . . . . . . . . . 169control lamp . . . . . . . . . . . . . . . . . . . . . . . . . 71
Accessories . . . . . . . . . . . . . . . . . . . . . . . . . . . . 190
Acoustic warning . . . . . . . . . . . . . . . . . . . . . . . 145
Adaptive headlights . . . . . . . . . . . . . . . . . . . . . 103
AFS headlight bulbs . . . . . . . . . . . . . . . . . . . . . 242
Airbag covers . . . . . . . . . . . . . . . . . . . . . . . . . . . 36
Airbag system . . . . . . . . . . . . . . . . . . . . . . . . . . . 30 control lamp . . . . . . . . . . . . . . . . . . . . . . . . . 31
Front airbags . . . . . . . . . . . . . . . . . . . . . . . . 34
side airbags . . . . . . . . . . . . . . . . . . . . . . . . . 38
Air conditioner Climatronic . . . . . . . . . . . . . . . . . . . . . . . . . 140
General notes . . . . . . . . . . . . . . . . . . . . . . . 142
Air conditioning* . . . . . . . . . . . . . . . . . . . . . . . 137
Air outlets . . . . . . . . . . . . . . . . . . . . . . . . . . . . . 136
Air recirculation Semi-automatic air conditioning . . . . . . . . 139
Air recirculation mode Climatronic . . . . . . . . . . . . . . . . . . . . . . . . . 142
Alarm system Switching off . . . . . . . . . . . . . . . . . . . . . . . . . 90
Alternator Warning lamp . . . . . . . . . . . . . . . . . . . . . . . . 76
Anti-lock brake system . . . . . . . . . . . . . . . . . . . 169 control lamp . . . . . . . . . . . . . . . . . . . . . . . . . 71 Anti-theft alarm system . . . . . . . . . . . . . . . . . . . 90
Switching off . . . . . . . . . . . . . . . . . . . . . . . . . 90
Anti-theft wheel bolts . . . . . . . . . . . . . . . . . . . 226
Antifreeze . . . . . . . . . . . . . . . . . . . . . . . . . . . . . 207
Aquaplaning . . . . . . . . . . . . . . . . . . . . . . . . . . . 219
Ashtray . . . . . . . . . . . . . . . . . . . . . . . . . . . . . . . 125
Aspects to note before setting off . . . . . . . . . . . . 8
ASR . . . . . . . . . . . . . . . . . . . . . . . . . . . . . . . . . . 169
ASR (Traction control system) Control lamp . . . . . . . . . . . . . . . . . . . . . . . . . 72
Audible warning . . . . . . . . . . . . . . . . . . . . . . . . . 20
Automatic anti-dazzle interior mirror Deactivating the anti-dazzle function . . . . 112
Automatic anti-dazzle interior mirror* Activating the anti-dazzle function . . . . . . 112
Automatic car washing tunnel . . . . . . . . . . . . . 182
Automatic gearbox . . . . . . . . . . . . . . . . . . . . . . 154 Kick-down feature . . . . . . . . . . . . . . . . . . . . 160
Selector lever positions . . . . . . . . . . . . . . . 158
Automatic lighting . . . . . . . . . . . . . . . . . . . . . . 101
Automatic windscreen wiper/washer . . . . . . . 109
AUX/USB input connection . . . . . . . . . . . . . . . 127
Auxiliary audio input connection (AUX) . . . . . 127
B
Ball coupling . . . . . . . . . . . . . . . . . . . . . . . . . . . 179 Battery
Changing . . . . . . . . . . . . . . . . . . . . . . . . . . 216
Charging . . . . . . . . . . . . . . . . . . . . . . . . . . . 216
Winter conditions . . . . . . . . . . . . . . . . . . . . 214
Before setting off . . . . . . . . . . . . . . . . . . . . . . . . . 8
Belt tensioners . . . . . . . . . . . . . . . . . . . . . . . . . . 28
Biodiesel . . . . . . . . . . . . . . . . . . . . . . . . . . . . . . 199
Biodiesel fuel . . . . . . . . . . . . . . . . . . . . . . . . . . 199
Bonnet . . . . . . . . . . . . . . . . . . . . . . . . . . . . . . . 202
Brake fluid . . . . . . . . . . . . . . . . . . . . . . . . . . . . 213 Changing . . . . . . . . . . . . . . . . . . . . . . . . . . 213
Brake pads . . . . . . . . . . . . . . . . . . . . . . . . . . . . 173
Brakes . . . . . . . . . . . . . . . . . . . . . . . . . . . . . . . . 173
Brake servo . . . . . . . . . . . . . . . . . . . . . . . . 168, 173
Brake system . . . . . . . . . . . . . . . . . . . . . . . . . . 213 warning lamp . . . . . . . . . . . . . . . . . . . . . . . . 73
Braking distance . . . . . . . . . . . . . . . . . . . . . . . 173
Bulb change double headlight . . . . . . . . . . . . . . . . . . . . 238
Single headlight bulb . . . . . . . . . . . . . . . . 236
Bulb changes General notes . . . . . . . . . . . . . . . . . . . . . . . 234
Bulb defect Control lamp . . . . . . . . . . . . . . . . . . . . . . . . . 71
Buzzer . . . . . . . . . . . . . . . . . . . . . . . . . . . . 107, 145
271
Index
Page 279 of 282
Seat belt tensionercontrol lamp . . . . . . . . . . . . . . . . . . . . . . . . . 31
Seat heating . . . . . . . . . . . . . . . . . . . . . . . . . . . 119
Selective opening* . . . . . . . . . . . . . . . . . . . . . . . 83
Semiautomatic air conditioning controls . . . . . . . . . . . . . . . . . . . . . . . . . . . . 137
Service interval display . . . . . . . . . . . . . . . . . . . 63
Side airbags . . . . . . . . . . . . . . . . . . . . . . . . . . . . 38 Description . . . . . . . . . . . . . . . . . . . . . . . . . . 38
Operation . . . . . . . . . . . . . . . . . . . . . . . . . . . 39
Safety notes . . . . . . . . . . . . . . . . . . . . . . . . . 39
Side lights . . . . . . . . . . . . . . . . . . . . . . . . . . . . . 100
Single headlight bulb . . . . . . . . . . . . . . . . . . . 236
Sitting position driver . . . . . . . . . . . . . . . . . . . . . . . . . . . . . . . 10
Sitting position, occupants . . . . . . . . . . . . . . . . 10
Snow chains . . . . . . . . . . . . . . . . . . . . . . . 221, 258
Soot accumulation in the diesel engine particu- late filter
control lamp . . . . . . . . . . . . . . . . . . . . . . . . . 70
Spanner symbol . . . . . . . . . . . . . . . . . . . . . . . . . 64
Spare parts . . . . . . . . . . . . . . . . . . . . . . . . . . . . 190
Spare wheel . . . . . . . . . . . . . . . . . . . . . . . . . . . 223
Speedometer . . . . . . . . . . . . . . . . . . . . . . . . . . . 58
Speed selector lever lock control lamp . . . . . . . . . . . . . . . . . . . . . . . . . 74
Start-Stop Activating and deactivating . . . . . . . . . . . . 152
Function . . . . . . . . . . . . . . . . . . . . . . . . . . . 150
Starting petrol engines . . . . . . . . . . . . . . 147, 148
Starting the engine . . . . . . . . . . . . . . . . . 147, 148 After the fuel tank has been run dry . . . . . 148 Steam jets . . . . . . . . . . . . . . . . . . . . . . . . . . . . . 183
Steering . . . . . . . . . . . . . . . . . . . . . . . . . . . . . . 144
Steering lock . . . . . . . . . . . . . . . . . . . . . . . . 145
Steering column controls Audio Control . . . . . . . . . . . . . . . . . . . . . . . . 78
Steering wheel height adjustment . . . . . . . . . 144
Storage compartment . . . . . . . . . . . . . . . . . . . 132 Front passenger side . . . . . . . . . . . . . . . . . 122
front seat . . . . . . . . . . . . . . . . . . . . . . . . . . . 123
Sun visor Sliding/tilting sunroof . . . . . . . . . . . . . . . . . 98
Sun visors . . . . . . . . . . . . . . . . . . . . . . . . . . . . . 108
Switch Hazard warning lights . . . . . . . . . . . . . . . . 105
Heated rear window . . . . . . . . . . . . . . . . . . 104
Light switch . . . . . . . . . . . . . . . . . . . . . . . . 100
Switches Electric windows . . . . . . . . . . . . . . . . . . . . . . 95
panoramic/tilting sunroof . . . . . . . . . . . . . . 98
Switching off the engine . . . . . . . . . . . . . . . . . 148
T Tank Fuel level . . . . . . . . . . . . . . . . . . . . . . . . . . . . 59
Reserve indicator . . . . . . . . . . . . . . . . . . . . . 59
Tank capacity . . . . . . . . . . . . . . . . . . . . . . . . 59
Technical modifications . . . . . . . . . . . . . . . . . . 190
The danger of not using the seat belt . . . . . . . . 22
Tightening torque of wheel bolts . . . . . . . . . . 258
Tilting sunroof . . . . . . . . . . . . . . . . . . . . . . . . . . 98
Tools . . . . . . . . . . . . . . . . . . . . . . . . . . . . . . . . . 223 Top Tether system . . . . . . . . . . . . . . . . . . . . . . . 50
Tow-starting . . . . . . . . . . . . . . . . . . . . . . . . . . . 252
Towing . . . . . . . . . . . . . . . . . . . . . . . . . . . . . . . . 252
Towing a trailer . . . . . . . . . . . . . . . . . . . . . 178, 257
Towing bracket . . . . . . . . . . . . . . . . . . . . . . . . . 179
Towing bracket, fitting . . . . . . . . . . . . . . . . . . . 192
Towline anchorage . . . . . . . . . . . . . . . . . . . . . . 252
Towline anchorages . . . . . . . . . . . . . . . . . . . . . 253
Tow starting
Comments . . . . . . . . . . . . . . . . . . . . . . . . . . 252
Traction control system control lamp . . . . . . . . . . . . . . . . . . . . . . . . . 72
Trailer turn signals control lamp . . . . . . . . . . . . . . . . . . . . . . . . 107
Trailer weights . . . . . . . . . . . . . . . . . . . . . . . . . 257
Turn signals . . . . . . . . . . . . . . . . . . . . . . . . . . . 106 control lamp . . . . . . . . . . . . . . . . . . . . . 76, 107
Two-way radio . . . . . . . . . . . . . . . . . . . . . . . . . . 191
Tyre-Mobility-System (Tyre repair kit) . . . . . . . 229
Tyre Mobility-System (Tyre repair kit) . . . . . . . 224
Tyre pressure . . . . . . . . . . . . . . . . . . . . . . . . . . 217 Control lamp . . . . . . . . . . . . . . . . . . . . . . . . . 73
Tyre pressures . . . . . . . . . . . . . . . . . . . . . . . . . . 258
Tyre repair kit . . . . . . . . . . . . . . . . . . . . . . 224, 229
Tyres and wheels Dimensions . . . . . . . . . . . . . . . . . . . . . . . . . 219
Tyres tread depth . . . . . . . . . . . . . . . . . . . . . . . 218
Tyres useful life . . . . . . . . . . . . . . . . . . . . . . . . . 218
Tyres with directional tread pattern . . . . . . . . 217
277
Index